12 | SOFT ROBOTICS
This class will focus in the study of a specific field in robotics, the soft robotics. Unlike rigid robots we are mostly used to, soft bodied robots have similarities and performance characteristics similar to living organisms or the human body. Soft-robotics are based in Bio-inspired design or biomimicry and have applications in wearables, rehabilitation prosthetics, surgical robots, rescuing and others. We will focus on the fabrication of soft actuators, sensors and grippers using novel materials, artificial muscles and performative locomotion design. FABRICADEMY
RESEARCH | INFLATABLES
I must admit that when I arrived at Fabricademy I had never heard of soft robotics, despite having studied textiles for the past 4 years. I had heard and worked with smart textiles, but never this. Therefore my base knowledge of this tiopic is based on what has been presented and found during this week. The first source I was intriduced to was the inflatable research by a Harvard based design and sience team. The research is based in creating foldable three-dimensional structures that through air filled picets can fold and unfols on its own. This is inspired by an origami technique caleld snapology, and uses actuators to remove any other external input. This project is extremely interestig as it uses inflasiona and actuators to make the material and the object have an agency withiut the need of interaction.
A more basic example on how to make inflatable objects move via air is this very comprehensible work on a soft robotic gripper by INSTRUCTABLES. I can recomend looking at their work to understand the basics of inflatables and how to make it step by step.
A documentation that is a must see in terms of research in inflatables and movement patterns is Saskia Helsinka's final project at Fabricademy. It is an amazing research into how patterns affect the movement of the inflated material.
RESEARCH | INFLATABLES AND ART
Inflatables, i.e. an object that becomes three-dimensional by pumping air into it, are also used in art. A fact I have never stopped to think about. In 2015 I saw the Kusama exhibition in Louisiana, Denmark. In this exhibition there is a red room filled with white polka dots, this room is inhabitated by big inflatable round shapes with polka dots. The adding of these massive inflated objects gives the impression of entering a completely different universe. The interesting aspect of inflatables in an artistic and spatial perspective, is that it can create massive volume while not being heavy, giving the impression that the objects can move around, as if they are somehow alive.
RESEARCH | INFLATABLES AND BIO MATERIAL
My interest during this week has been to research if seaweed material can be turned into inflatable objects. Thus I have been researching people working with bio-materials and soft robotics. In order to understand the processes I have focussed on looking at open source projects mainly from previous Fabricademy sources, as they provide a basis research on which I can continue the research and apply it to my seaweed research. The first source I looked at was Gabriella Lotaif who provides a very thorough research and documentation of inflatables with alginate and with gelatine.
Another interesting project is BioFLexo who made inflatable hexagons of alage based bio-material which is attached to an alage based garment to simulate breathing both the human breating but also to highlight the fact that alage is supplying our ecosystem with oxygen.
- 01| A 3D MATERIAL THAT FOLDS ON ITS OWN HARWARD
- 02| INSTRUCTABLES
- 03| POLKA DOTS YAOI KUSAMA
- 04| BIOFLASKIN GABRIELLA LOTAIF
- 05| GELATIN INFLATABLES GABRIELA LOTAIF
- 06| BIOFLEXO
FABRICADEMY SOURCES
- Beatriz Sandini TextileLab Amsterdam 2019-20_
- Vicky Luan
RESEARCH | SEAWEED
Some macro algae are in them self inflatables, kelp like Fucus Vesiculosus has bladders that allows it to float better. Therefore my idea was to research movement patterns and shapes in the seaweed that could be converted into inflatable shapes or movement patterns. Other inspiration sources could be the movement of the sea as a whole, as this very much affects the seaweeds's, movements such as the tide, the waves, the streams and the ripples.
INFALTABLES IN SEAWEED:
The inflatable seaweed | Fucus Vesiculosus. 1 Bladder wrack has round air bladders which allow the seaweed to float upright underwater, this helps them exhange gases and absorb nutrients when submerged. The bladders are ovals that sit side by side, and greates a bery beautiful pattern.
Anoter seaplant having inflatable properties is the Ulva intestinalis also called Gutweed. Gutweed is a mass of bright green, inflated tubes, often with pinched-in 'waists' along its length. Fonds are typically unbranched. This plant was the initial inspiration source for the pattern I have been using in several of the previous weeks. I developed it during my stay in Helsinki in 2020 where I took this video, where you can see the trapped air very clearly 2.
- 01 | FUCUS VESICULOSOS
- 02 BLADDER WRACK
- 03 | GUTWEED, PHOTO ALBERTE BOJESEN, 2020
- 04 | GUTWEED
TOOLS
- SCALES
- POTS
- JARS
- SPOON
- TONG
- MEASURING
- MOLDS
- TEXTILES
- EMBROIDERY HOOPS
- LEFTOVER PLASTICS
- PLY-WOOD FOR LASERCUT MOLDS
- DRYING CABINET
- GELATIN
- SEAWEED
- AIR PUMPS
- TUBES
- SILICON
- VINYL
TURORIALS
PROCESS | WORKFLOW
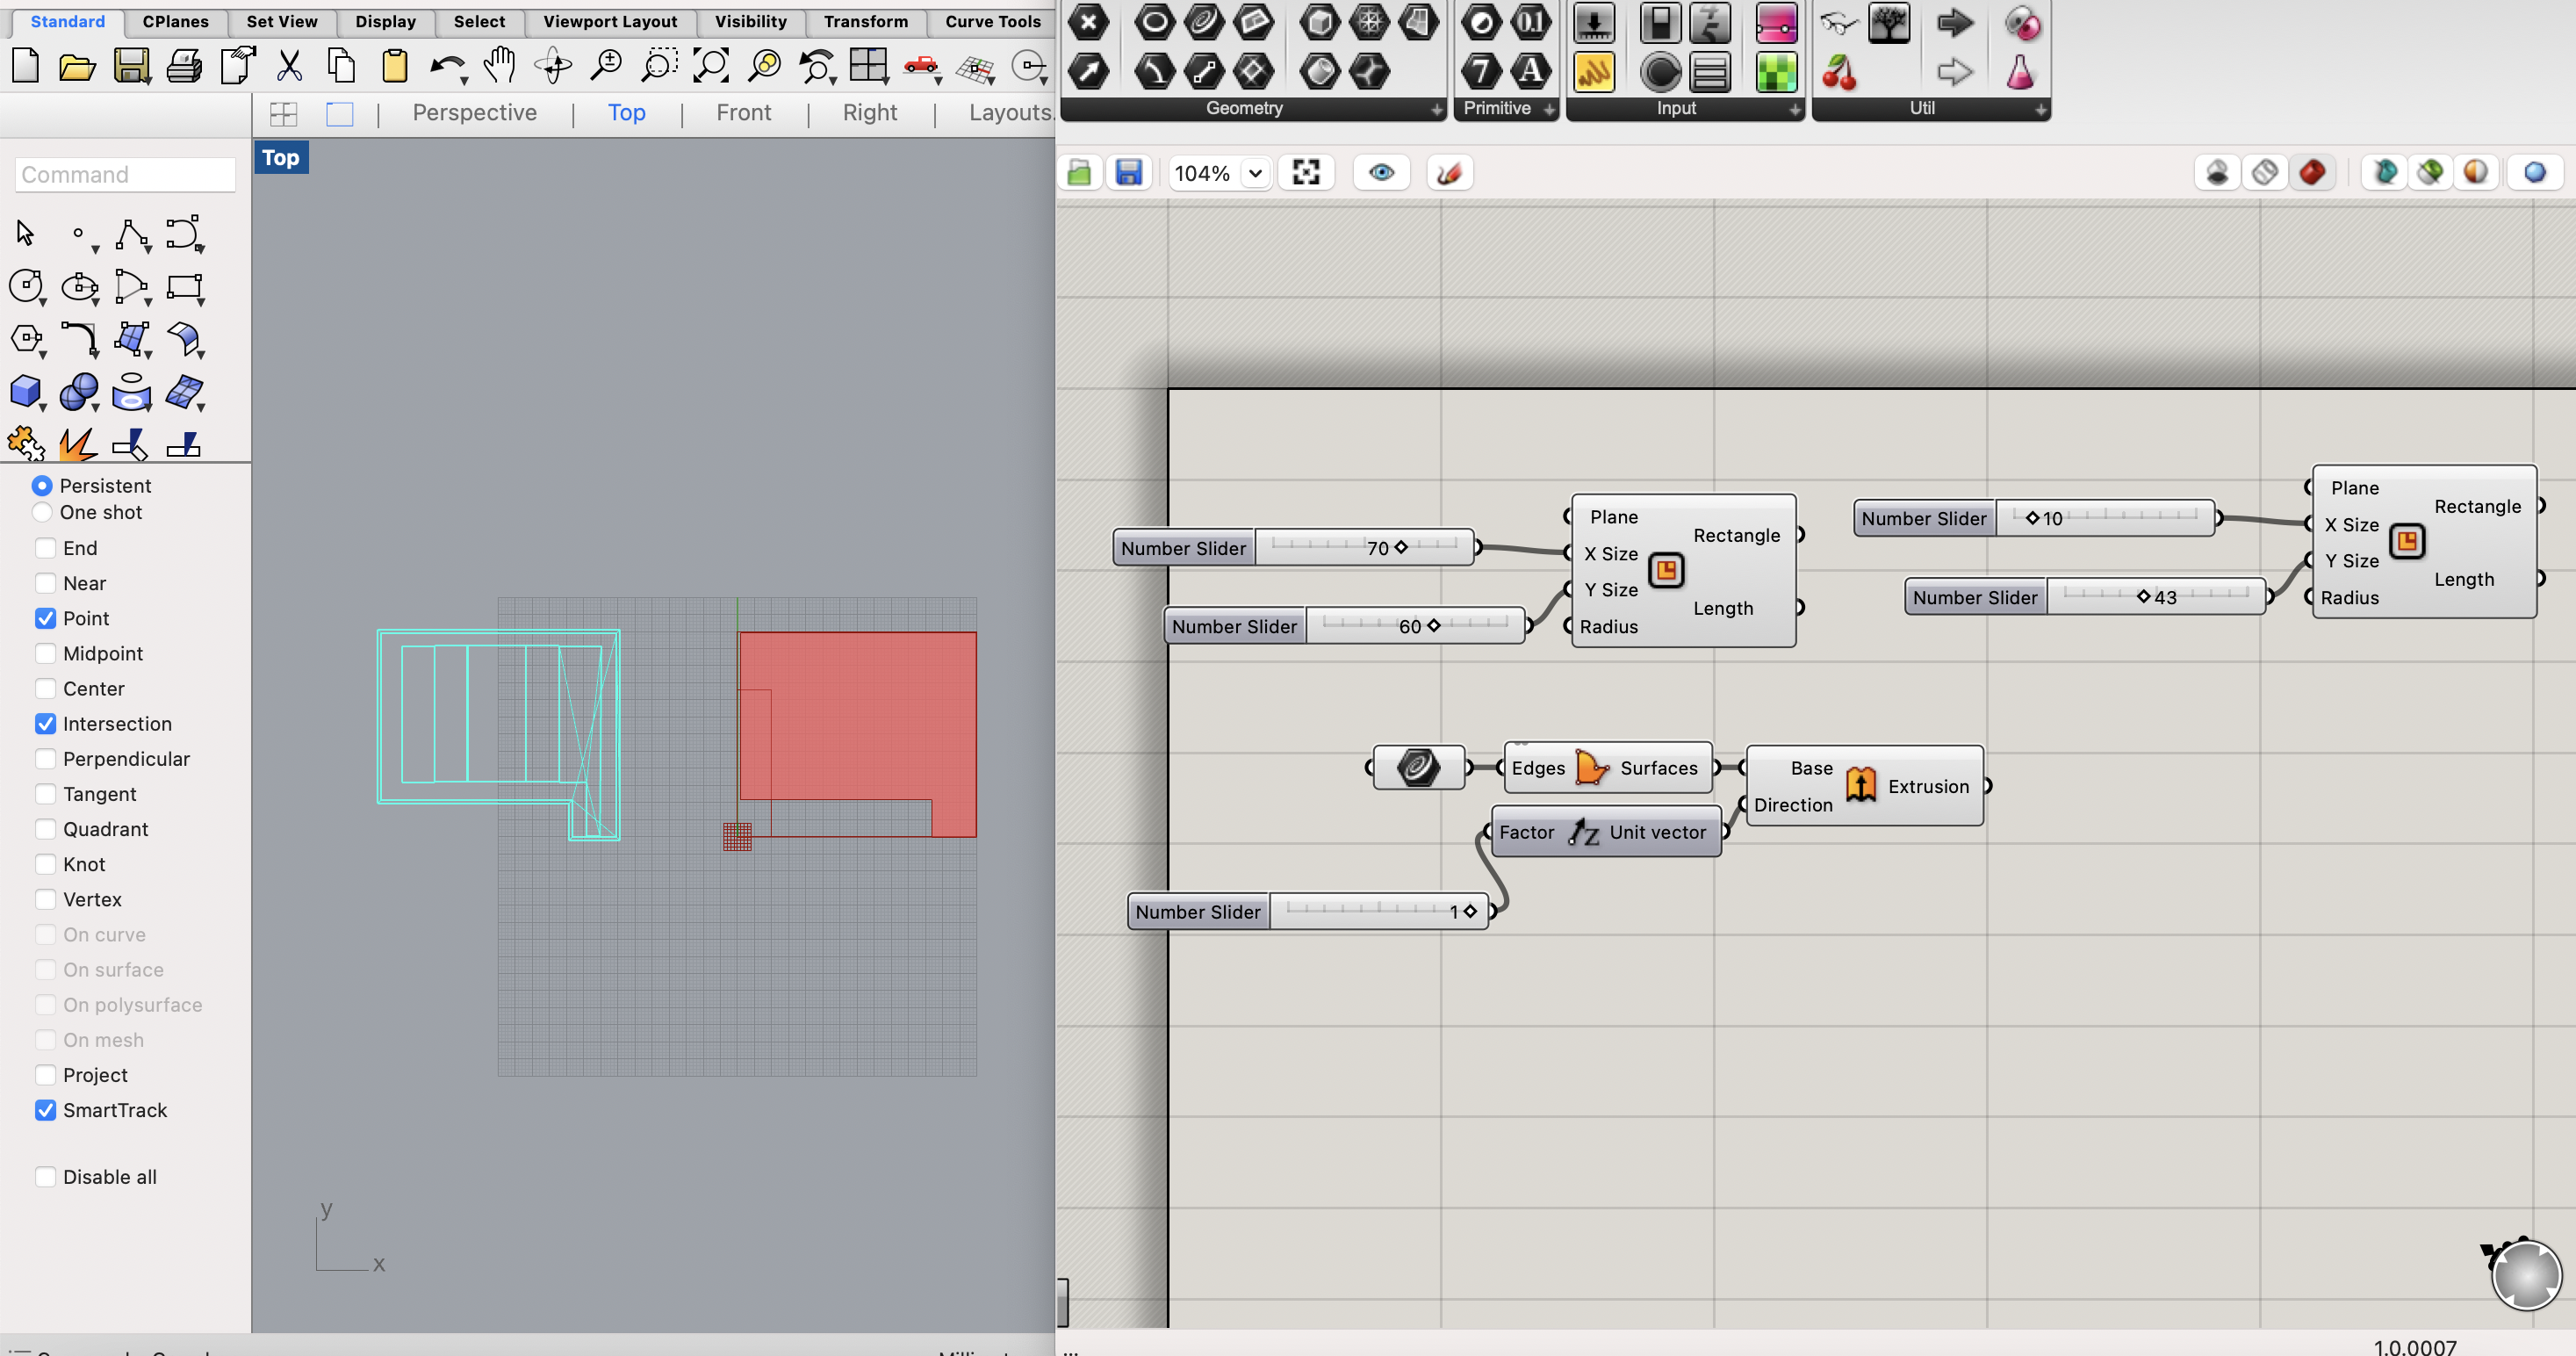
This week evolved a lot around making inflatables using the vinyl, silicon casing and researching bio-material compositions that are good for inflatables. However, I also used a good portion of my time to learning to use Grashopper to make moulds.
GOOD TO KNOW | RHINO, GRASHOPPER, ILLUSTRATOR
Are the three programs I have worked interchangeably with during the week. I found that it is easier to draw the outline shapes in Illustrator, it is easier to manipulate the shapes, using the pathfinaer tool (here is a great turorial for those who like me always forget the tools they doo not use.)
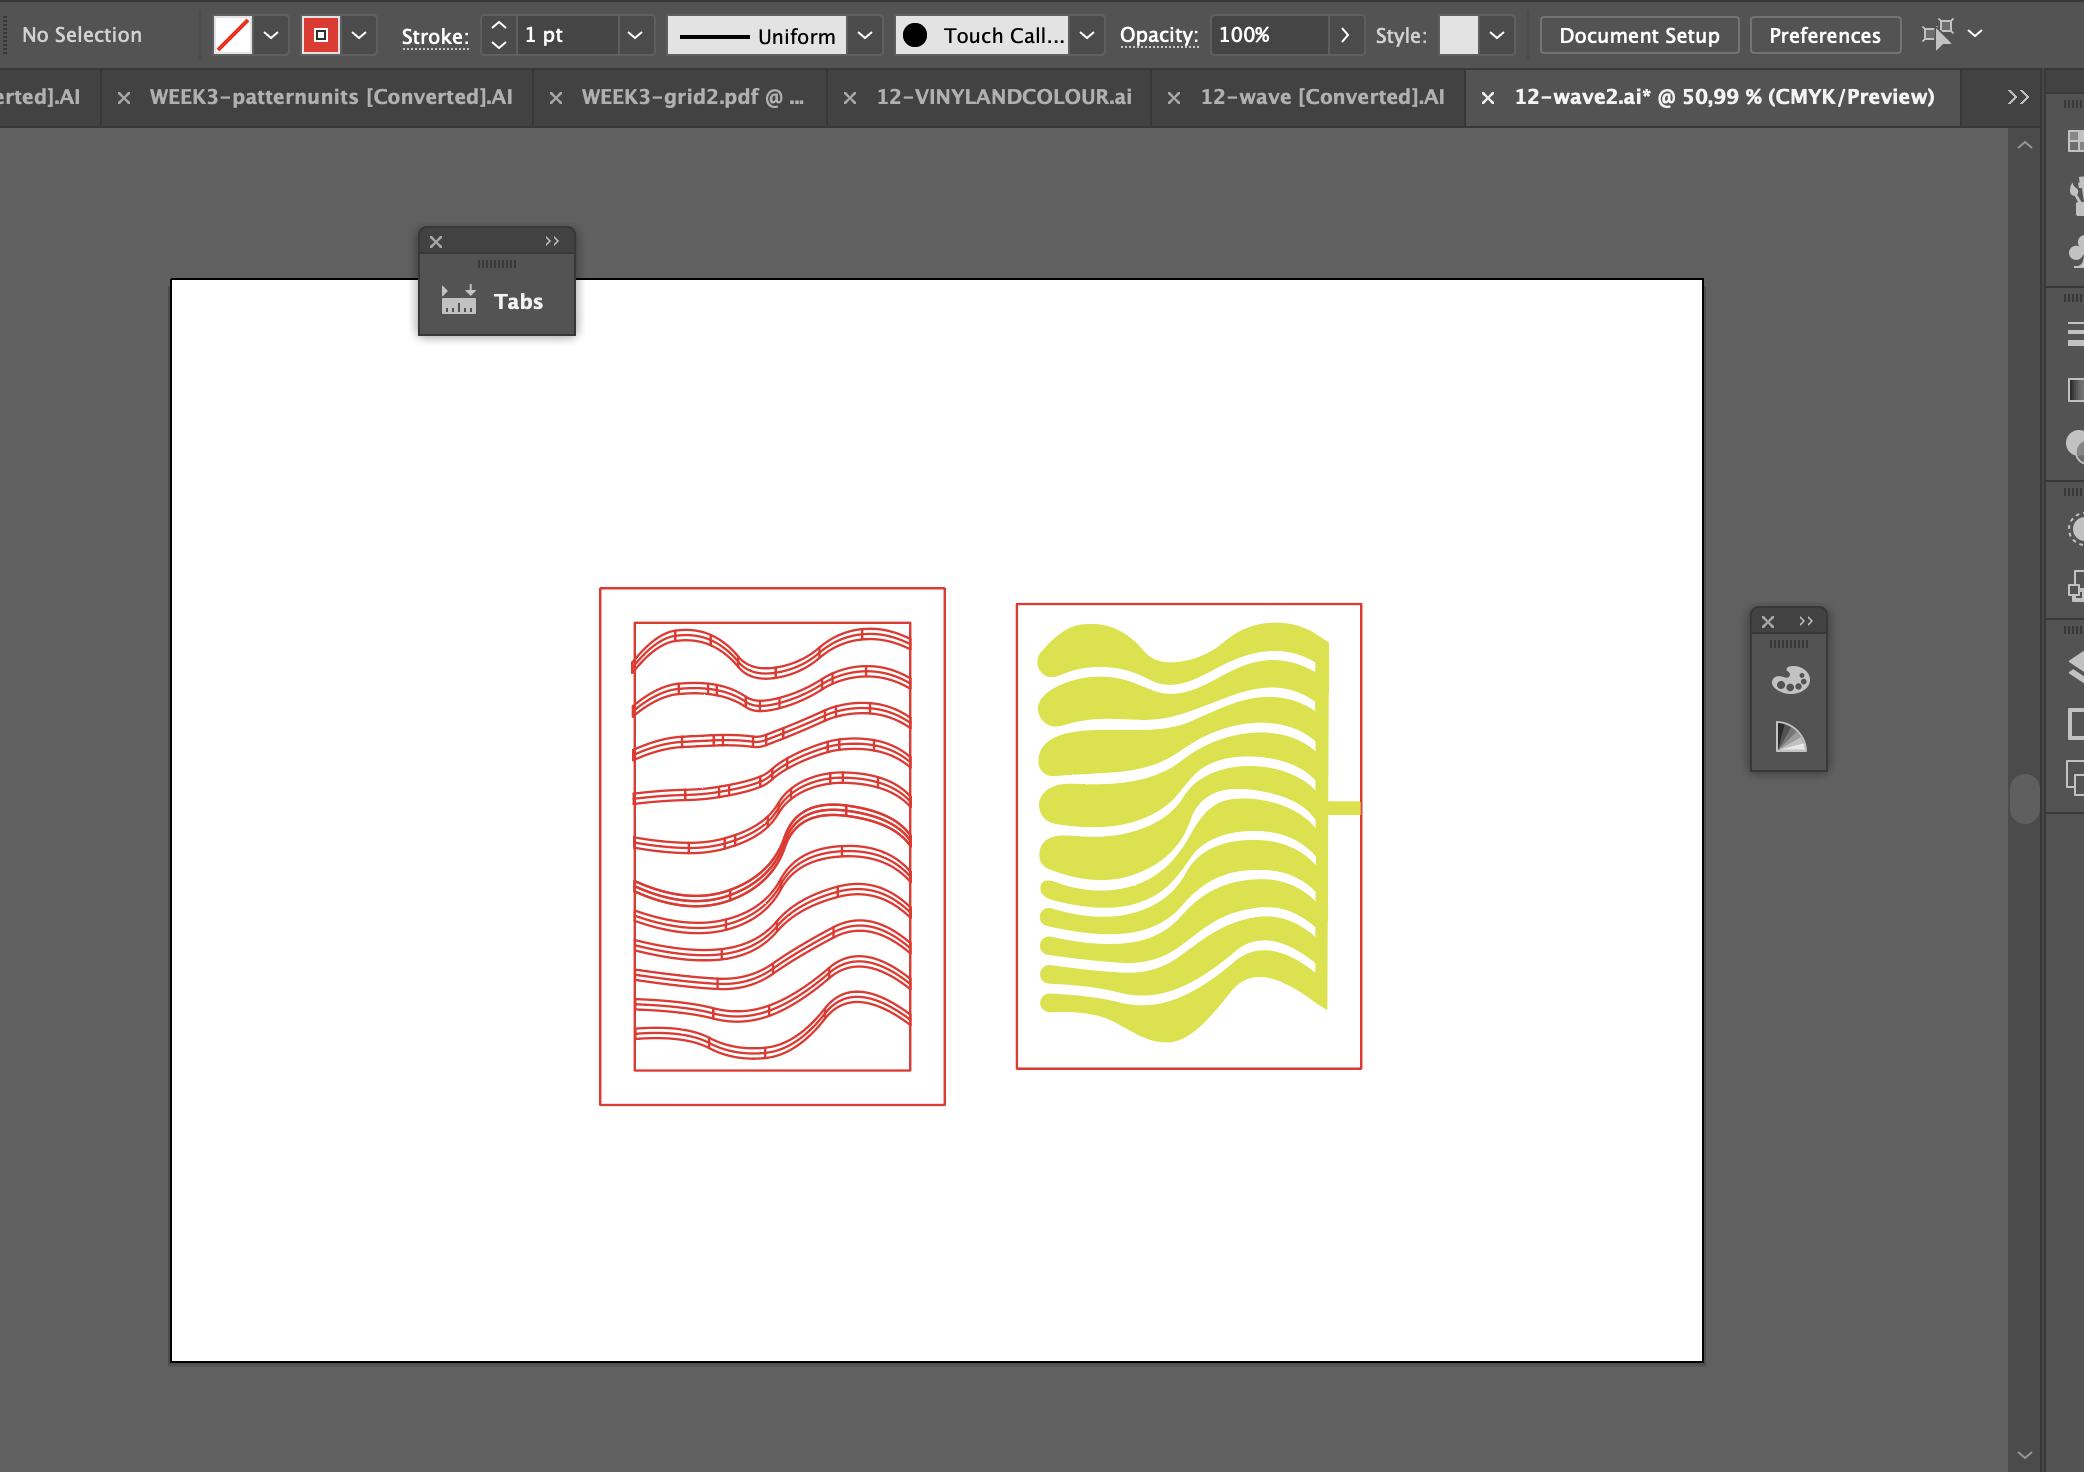
My initial idea was to momic the flow of the sea and the seaweed into wavy pocket that would move differently depending on their shape, this should then be 3D printed to become a mould for the silicon casting. However, after I first made the waves in Rhino, tween curved them in Grashopper and manipulated their shape in Illustrator, it was unsure if the distance between the waves would be big enough in the mould. Therefore I decided to try out the shape in the vinyl cutter first 3. An important aspect to remember for the vinyl cutter is to mirror the shapes that are to be the encapsulating material, as they have one more adhesive side. Also the cutting line has to be 0.02.
01 | Make three curves in RH
02 | Connect curves too curves components in GH
03 | Tween curves, one time between each of the curves, i.e. 2 times.
04 | Offset curves 3mm.
05 | Make a vertical line and offset, and a small line perpendicular to this line to crate the funel for the air tube.
06 | Bake and expoort to illustrator.
07 | Connect the edges of the curves and round them off. I connected the spaces inbetween the cuves instead of the curve with its offset.
08 | Export back to Rhino ( I could probably have done all oof this in RH.)
09 | In RH offset ariunf the whole shape to create the outline, 10mm.
10 | In GH Extrude the lines in the z plane.
11 | Create a loft between the curves. If loft does not work use the solid difference components.
12 | Merge
13 | Berep to mesh
14 | Bake
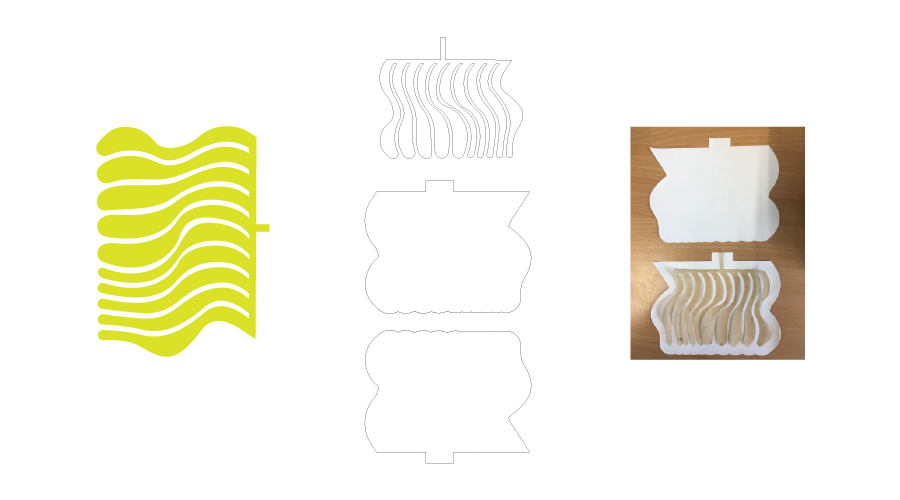
After this model I decided to make a new mould that also had a shape. I took the cellular shapes of my Guttweed pattern and enlarged them. My initial idea was to create them as pockets, and I also made a ready lasercur file for that so you could lasercut and assemble the mould in plexi.6 While doing this I started to experiment with the height of the chaimbers based on the wave pattern research of the first model.
STEPS OF THE BLOBS PATTERN: 67

01 | Make the blob shapes in Illustrator (remember to do the tap for insering the funel)
02 | Import in RH.
03 | Connect curves too curves components in GH.
04 | Offset curves 3mm outwards.
05 | Make the curves into boundary surfaces.
06 | Used solid difference to connect the curve and offset curve.
07 | Extrude in z plane.
08 | To make the inner pannels I divided the curve of the shape in RH using "cut" and cutting with a poly line.
09 | Offsetting the two curves inwards.
10 | Then I used rotate geoometry, rotating the half curve into the xz plane.
11 | The rotation was defined by setting the angle nuumber, using set number at x*pi.
12 | Then I projected geometry
13 | Then lofting the projected curve and the ofset curve.
14 | Finally extruding it in z.
15 | Repeat for each chamber you want to have.
16 | Merge
17 | Berep to mesh
18 | Bake
19 | Remember to save the GH file first, and name it the same name as the RH, then save the RH file.
As the above file got quite complex I decided to make a test of changing the height of the chaimebers.
STEPS OF THE WAVE PATTERN: 8
01 | Make the a square shape in Illustrator (remember to do the tap for insering the funel)
02 | Import in RH.
03 | Make rectangles of the different chaimbers, connect to two different curves in GH, and a third curve for the base rectangle.
04 | Offset rectangle curve 10mm outwards.
05 | Make the curves into boundary surfaces.
06 | Extrude the base in z plane 1mm.
07 | Used solid difference to connect the base curve and offset curve.
08 | Extrude 8mm in Z.
09 | Extrude group 1 rectangles 6mm.
10 | Extrude group 1 rectangles 4mm.
11 | Then lofting the projected curve and the ofset curve.
12 | Finally extruding it in z.
13 | Merge
14 | Berep to mesh
15 | Bake
16 | Remember to save the GH file first, and name it the same name as the RH, then save the RH file.
Rhino and GH defenition for 3D printing:
01 | Import stl file in Cura.
02 | set settings accordign to PLA and speed and save as Gcode.
03 | Heat Pruser 3D printer.
04 | Load G code.
05 | Print.
CURA ULIMAKER SETTINGS
| MATERIAL | HEAT | LAYER THICKNESS | WALL THICKNESS | TOP | BOTTOM | INFILL DENCITY | INFILL PATTERN |
|---|---|---|---|---|---|---|---|
| PLA | 60 | 0.3 | 0.8 | 3 | 3 | 10% | TRIANGLES |
The first 2 days of this week was only trying to work with grashopper, I find it hard but I am getting there where I can understand the different components and commands. So this has been really valuable. I have also realised that eventhough it is an extra step it is valuable to be able to draw the original shapes in Illustrator. I also realised that when you are making a mould, it is smart to think about all the components before starting the GH work and maybe sketch the final product on paper first.
GOOD TO KNOW | VINYL INFLATABLES
After my GH-escapades I ventured into the vinyl cutter. The first thing was tp try the wave pattern I made above. A feature whihc turned out to be a lot more complicated than first expected. We are using a Versa Studio Sign Maker BN-20, and after multiple trials we foound that it does not want to print unless the file is opened and saved from incscape here are some specific steps that needs to be done otherwise it will not print.
01 | Export Illustratoor file in pdf.
02 | Open in incscape.
03 | Get width from printer and set the height of your document
04 | Set the cuttin line to 0.020
05 | Set the colour of the cutting line to 1,1,1,100 for the CMYK.
06 | Print
07 | Put baking paper in for the pockets, this can be laser cut.
08 | Heat seal using heat press.
I had not mirrored my files and the first test sealed of despite not being the stiky to sticky side, but when i tried it for the wavy shape, it inflated completely.
| TRIAL | LAYERS | HEAT TEMP | TIME | RESULT |
|---|---|---|---|---|
| 1 | sticky to non sticky side, vinyl as inner pocket | 110 | 10 sek x2 | Did not stick |
| 2 | sticky to sticky side, vinyl as inner pocket | 110 | 10 sek x2 | Did not stick |
| 3 | sticky to sticky side, vinyl as inner pocket | 150 | 10 sek | Everything stuck |
| 4 | sticky to sticky side, Baking paper as inner pocket | 140 | 10 sek | A good pocet was created |
| 5 | My waves: sticky to non sticky side, Baking paper as inner pocket | 140 | 10 sek x 2 | Nothing stuck |
| 6 | My waves: sticky to sticky side, Baking paper as inner pocket | 150 | 10 sek x 2 | A good pocet was created |
GOOD TO KNOW | VINYL PATTERNS AND COLOURS
After having looked at how air can change the movement of a material, I wanted to see how this can change shapes, patterns and colours, inspired by the works of Yaoi Kusama.
01 | Export Illustratoor file in pdf.
02 | Open in incscape.
03 | Get width from printer and set the height of your document.
04 | Set the drying time for 5 min before cutting.
05 | Set the cuttin line to 0.020, make sure that the coloured pattern does not have a cutting line.
06 | Set the colour of the cutting line to 1,1,1,100 for the CMYK.
07 | Print
08 | Put baking paper in for the pockets, this can be laser cut.
09 | Heat seal using heat press.
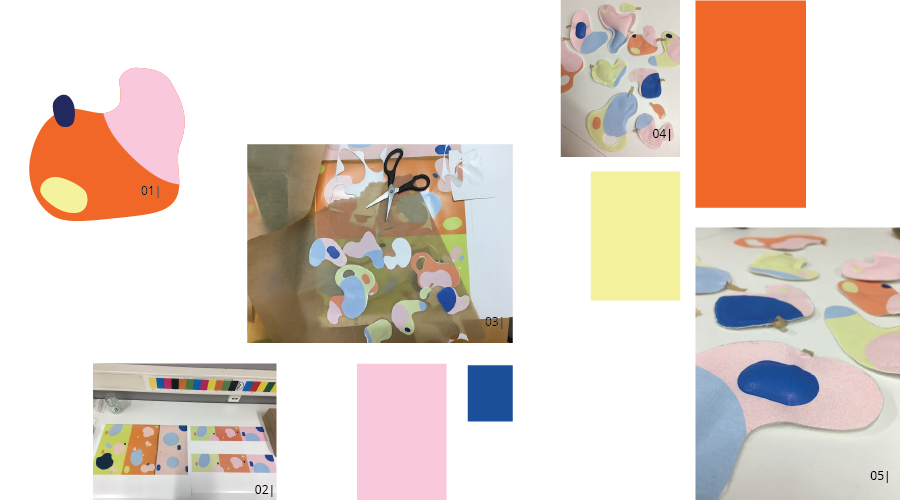
- 01 | COLOUR SKETCH IN AI, PHOTO ALBERTE BOJESEN, 2020
- 02 | PRINTED COLOUR TRIALS ON VINYL, TESTING CMYK AND RGB, PHOTO ALBERTE BOJESEN, 2020
- 03 | CUT SHAPES FROM THE VINYL, PHOTO ALBERTE BOJESEN, 2020
- 04 | INFLATED VINYL SAMPLES, PHOTO ALBERTE BOJESEN, 2020
- 05 | INFLATED VINYL SAMPLES, PHOTO ALBERTE BOJESEN, 2020
- 06 | INFLATEING THE VINYL SAMPLES, PHOTO ALBERTE BOJESEN, 2020
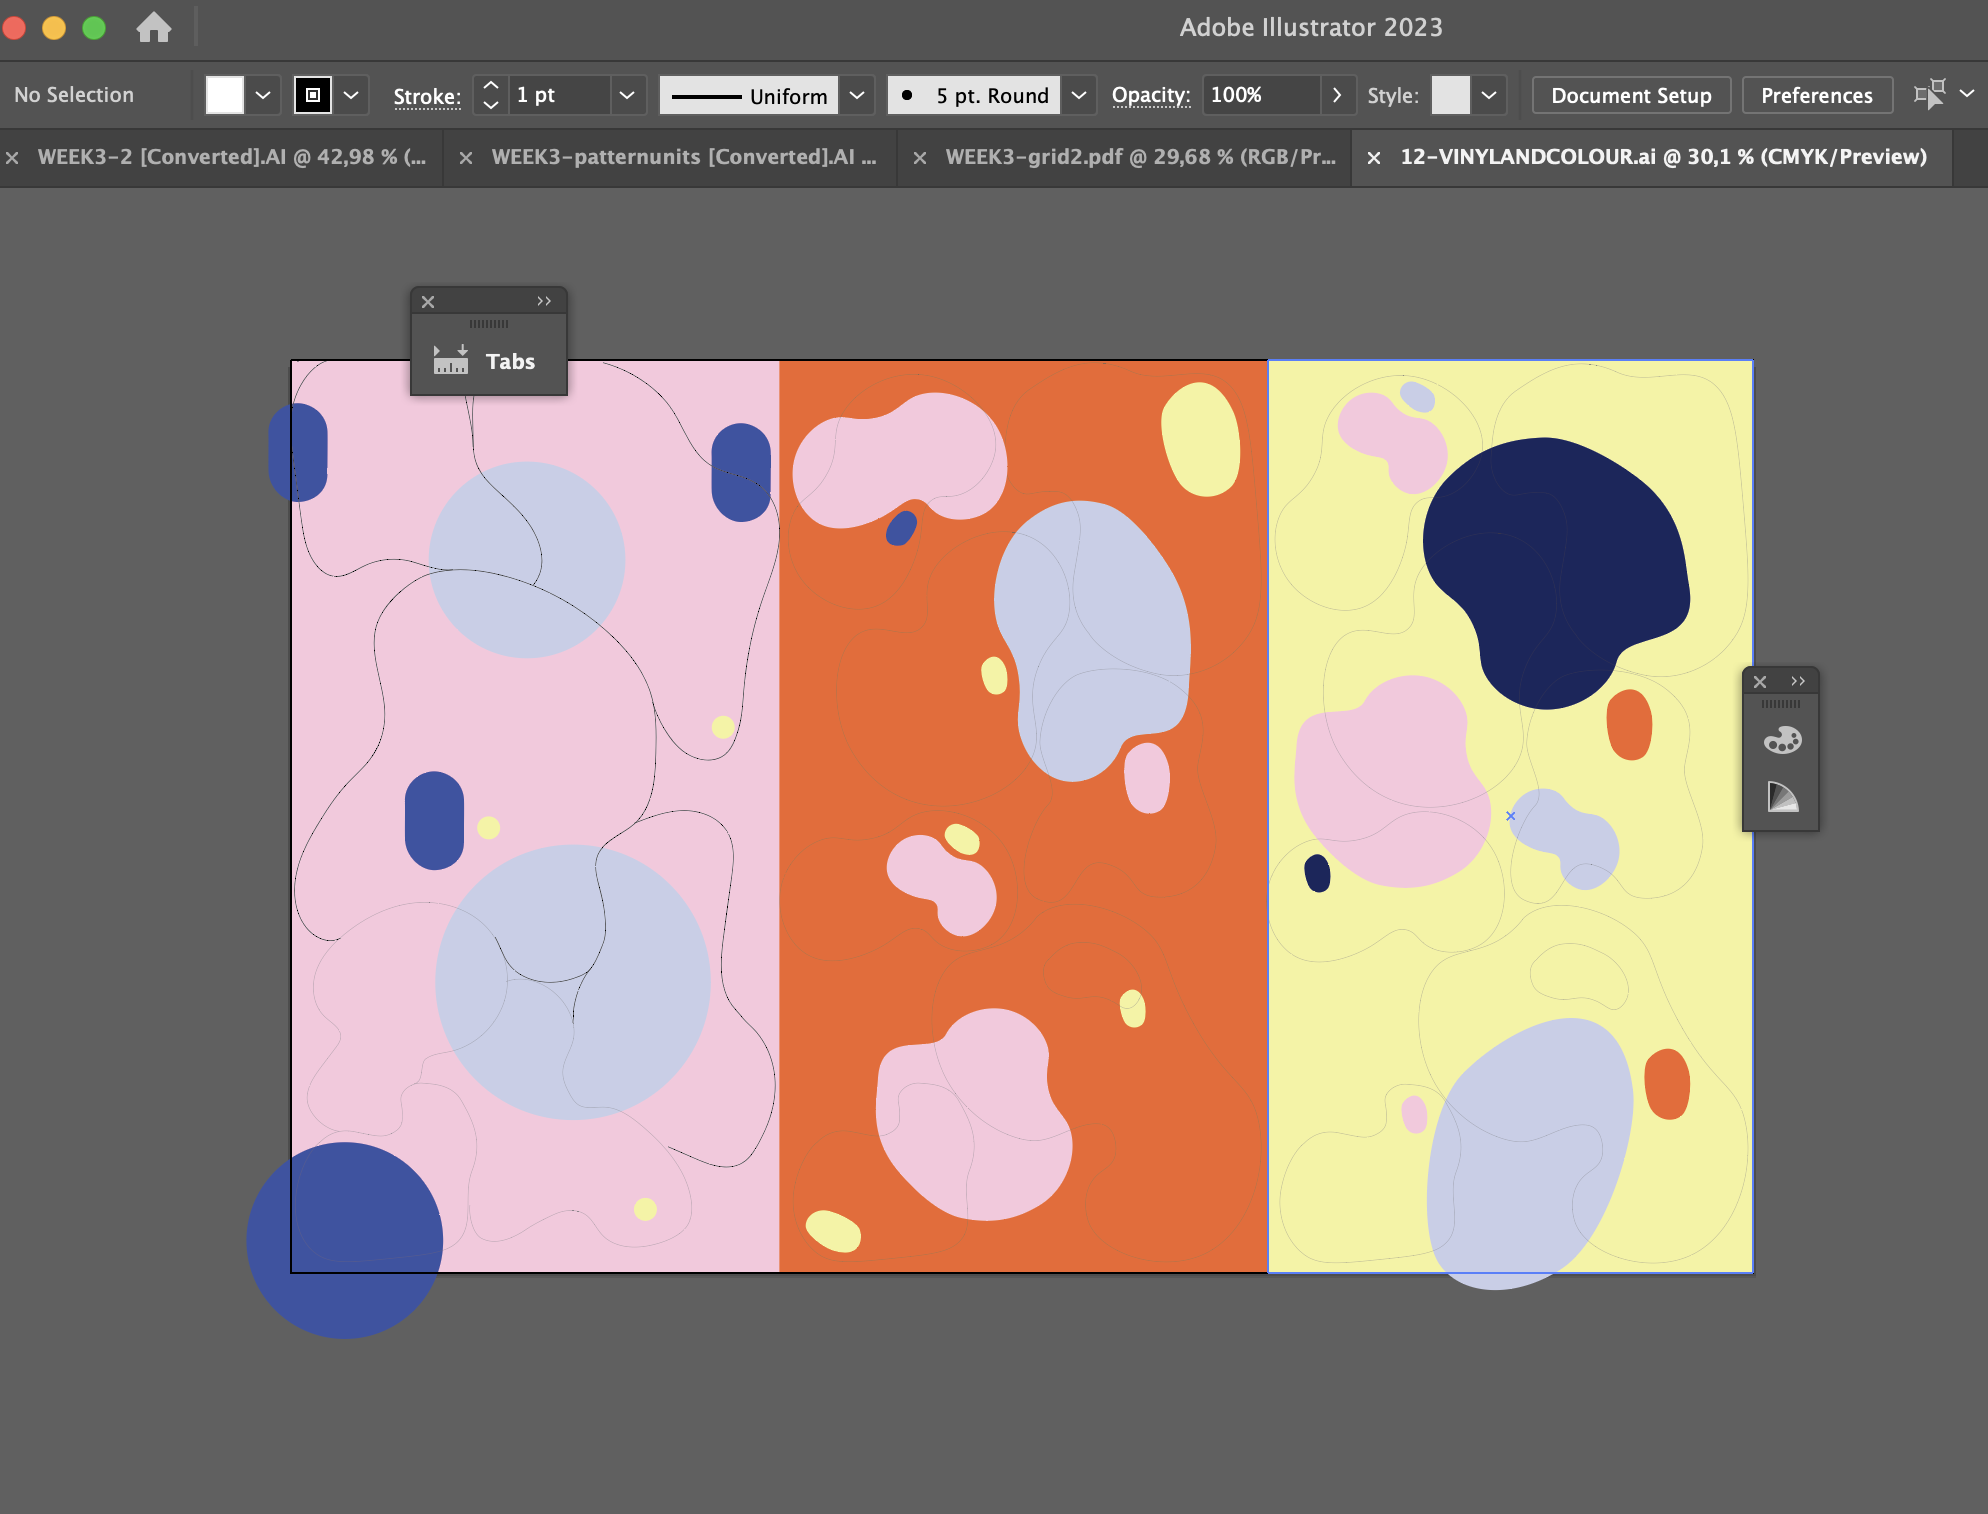
It was really fun working with colours, however the shapes were too small to be able to trap the air in. I will try trapping it by using clamps and super glue.
GOOD TO KNOW | SILICON INFLATABLES
Having printed my 3D mould I was ready to make the silicon moulds,using OOMOO 30-1A:1B silicon . I started by cutting some thin mesh for the bottom layer and to put in my 4mm chaimbers to emphasise the change in inflation. I also made different fabric samples, cut in the shapes made for the vinyl tets to see how different base fabrics would chance. My ide was to put in a baking paper pocket inbetween pouring two layers of silicon. This did not work very well, as the layers where not thick enough and the baking paper got stuck. So I poured another sheet to put on top when they had dried. This did not work well either as the silicon I put in between the layers were not closing enough. But I got some fun trials out of it. I also tried mixing the silicon with 10% seaweed powder, this did not cure porperly, however the videos turned out amazing!
SLICON RECIPE
| MATERIAL | RATIO |
|---|---|
| SOLUTION A | 1 |
| SOLUTION B | 1 |
| SEAWEED POWDER | 1:10 |
STEP BY STEP
01 | Pour in solution B in a while sirring very slowly, add Seaweed.
02 | Stirr for a while.
03 | Pour in the mould slowly.
04 | For the petri dish moulds put in the pocket shape and pour the second layer.
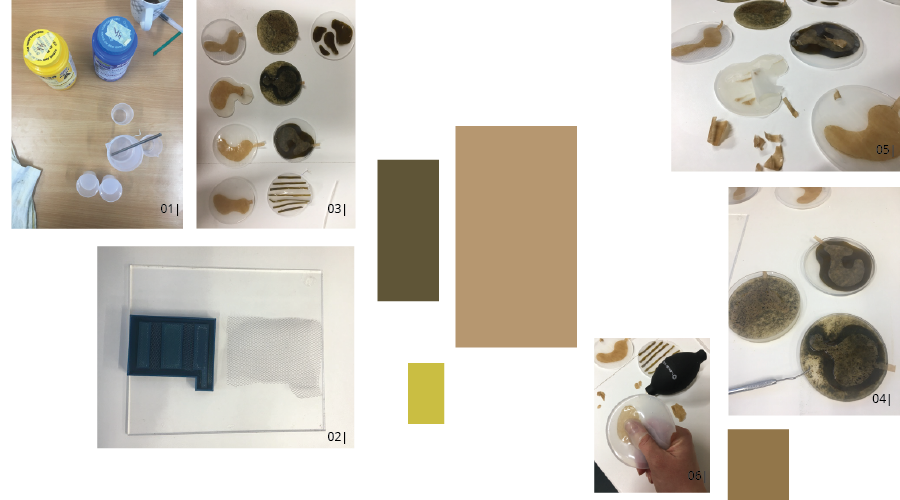
- 01 | POURING THE SILICON INTO THE 3D PRINTED MOULD, PHOTO ALBERTE BOJESEN, 2020
- 02 | POURING THE SILICON INTO THE PETRI DISH,SAMPLE 03, PHOTO ALBERTE BOJESEN, 2020
- 03 | POURING THE SEAWEED SILICON INTO THE PETRI DISH, SAMPLE 07, PHOTO ALBERTE BOJESEN, 2020
- 01 | THE SILOCON COMPONENTS, PHOTO ALBERTE BOJESEN, 2020
- 02 | THE 3D PRINTED MOULD, PHOTO ALBERTE BOJESEN, 2020
- 03 | THE SILICON SAMPLES WITH DIFFERENT FILLING, PHOTO ALBERTE BOJESEN, 2020
- 04 | THE SILICON SAMPLES WITH SEAWEEDS, PHOTO ALBERTE BOJESEN, 2020
- 05 | THE SILICON SAMPLES WITH DIFFERENT FILLING, REMOVING THE POCKETS, PHOTO ALBERTE BOJESEN, 2020
- 06 | REMOVING THE BACKING PAPER, FAILING ABISMALY, PHOTO ALBERTE BOJESEN, 2020
- 07 | INFLATING THE 3D-PRINTED SILICON MOULD, SAMPLE 01, PHOTO ALBERTE BOJESEN, 2020
- 08 | INFLATING THE SEAWEED SILICON MOULD, SAMPLE 11, PHOTO ALBERTE BOJESEN, 2020C
- 09 | INFLATING ONE OF THE SILICON MOULD, SAMPLE 06, PHOTO ALBERTE BOJESEN, 2020
SAMPLE EVALUATION
| SAMPLE | MOULD | MATERIAL FOR BACK | MATERIAL FOR POCKET | RESULT |
|---|---|---|---|---|
| 1 | 3D PRINTED MOULD WITH FABRIC IN SPECIFIC PLACES | MESH | MOULDED | VERY WELL |
| 2 | PETRI DISH | MESH | BAKING PAPER | NOT |
| 3 | PETRI DISH | COTTON DUCK | BAKING PAPER | NOT |
| 4 | PETRI DISH | POLYESTER VOLIE | BAKING PAPER | NOT |
| 5 | PETRI DISH | POLYESTER CREPE | BAKING PAPER | NOT |
| 6 | PETRI DISH | SEAWEED PIECE | BAKING PAPER | NOT |
| 7 | PETRI DISH | GROUND SEAWEED FILLING | BAKING PAPER | NOT |
| 8 | PETRI DISH | GROUND SEAWEED FILLING AND SEAWEED | BAKING PAPER | NOT |
| 9 | PETRI DISH | SEAWEED STRIPS | BAKING PAPER | NOT |
| 10 | PETRI DISH | SMALL SEAWEED BLOBS | BAKING PAPER | NOT |
| 11 | FLAT | GROUND SEAWEED | PLASTIC | THE INFLATABLE PART WORKED, BUT THE SEAWEED MADE THE SILICON NOT CURE. |
GOOD TO KNOW | SEAWEED INFLATABLES
Finaly we got to the bio-materials research. I started this by using a gelatin base as it has worked well in the past. I continued using the petri dishes as moulds with cut shapes as pockets. I tried two different soft plastics, found in the trash as material, as I found the baking paper to be too unreliable.
GELATIN RECIPE
| MATERIAL | SAMPLE 1 AMOUNT | SAMPLE 2 AMOUNT | SAMPLE 3 AMOUNT |
|---|---|---|---|
| WATER | 20 g | 20 g | 20 g |
| GLYCERINE | 20 g | 30 g | 30 g |
| GELATINE | 20 g | 20 g | 20 g |
| DRY SEAWEED POWDER | 3g (10%) | ||
| SEAWEED PASTE 1 | 20 g | ||
| SEAWEED PASTE 2 | 20 g |
STEP BY STEP
01 | Grind the dry seaweed in the coffee grinder.
02 | Let it soak in a glycerol solution 24 h.
03 | Weigh off the water, glycerol, gelatin and seaweed paste.
04 | Heat up the gelatin, water and glycerol slowly.
05 | Stirr until everything is dissolved under lowest heat to avoid bubbles.
06 | Add seaweed.
07 | Put vaseline the mould and the pocket.
08 | Pour in mould.
09 | Let it set for a minute, not too long otherwise the layers will not stick.
10 | Put in the pocket.
11 | Pour the second layer.
12 | Let it sit for a while in the fridge.
13 | Remove the plastic using a knitting neele.

- 01 | PREPARING THE POCKETS IN THE DIFFERENT PLASTICS, PHOTO ALBERTE BOJESEN, 2020
- 02 | THE SEAWEED STATES, DRY, POWDERED, GLYCERIN SOAKED, , PHOTO ALBERTE BOJESEN, 2020
- 03 | MAKING THE GELATINE SOLUTION, PHOTO ALBERTE BOJESEN, 2020
- 04 | GELATNE INFLATABLES, PHOTO ALBERTE BOJESEN, 2020
- 05 | REMOVING THE PLASTIC, SAMPLE 03, PHOTO ALBERTE BOJESEN, 2020
- 06 | INFLATING THE SEAWEED INFLATABLE, SAMPLE 02, PHOTO ALBERTE BOJESEN, 2020
- 07 | INFLATING THE SEAWEED INFLATABLE, SAMPLE 04, PHOTO ALBERTE BOJESEN, 2020
SAMPLE EVALUATION
| SAMPLE | DRY SEAWEED | SEAWEED PASTE 1 | SEAWEED PASTE 2 | RESULT |
|---|---|---|---|---|
| 1 | X | TOO THICK, HARD POURING. | ||
| 2 | X | (PLASTIC 1) | WORKED VERY WELL, THOUGH SOME HOLES OCCURED, PLASTIC COULD BE REMOVED | |
| 3 | X (PLASTIC 2) | WORKED VERY WELL, THOUGH SOME HOLES OCCURED, PLASTIC COULD BE REMOVED | ||
| 4 | X (PLASTIC 1) | WORKED VERY WELL, THOUGH SOME HOLES OCCURED, PLASTIC COULD BE REMOVED | ||
| 5 | X (PLASTIC 2) | WORKED VERY WELL, THOUGH SOME HOLES OCCURED, PLASTIC COULD BE REMOVED |
RESULT The amount of glycerol is very important as can be seen from the first sample with 1:1:1 glycerol and gelatin and water, by adding more glycerol the paste became much esier to pour and much more flexible. The hand of the samples with seaweed paste 1 and 2 were very similar and worked very well, pobably also because they also added glycerol and water from their solution. All of the inflatable samples had holes, which I tried to glue with super glue, but was less sucessful. The material was still flexible after 3 weeks, and I think with adding a bit higer quantity of glycerol will make it even more elastic.
GOOD TO KNOW | SEAWEED INFLATABLES NEXT STEP
For extra exploration I also tried making inflatables in alginate, this did not work however.
ALGINATE RECIPE
| MATERIAL | SAMPLE 1 AMOUNT | SAMPLE 2 AMOUNT | SAMPLE 3 AMOUNT |
|---|---|---|---|
| WATER | 450 ml | 450 ml + 225 ml | 450 ml + 225 ml |
| GLYCERINE | 60 g | 60 g | 60 g |
| ALGINATE | 15 g | 15 g | 15 g |
| DRY SEAWEED POWDER | 10g | ||
| SEAWEED PASTE 1 | 30 g | ||
| SEAWEED PASTE 2 | 30 g |
STEP BY STEP
01 | Pour the alginate into the glycerol water.
02 | Mix with a mixer.
03 | Mix in the seaweed.
04 | Drop in two drops of essential oils.
05 | Spray with alcohol.
06 | Let it set in the fridge for. (After this I added an extra 225 ml water to the sample 2 and 3 as they had absrbed all the water.)
07 | Spray petri dish with calcium cholride.
08 | Pour in first layer of alginate.
09 | Spray the fabric pocket.
10 | Pour the second layer.
11 | Spray the top.
12 | Remove from petri dish.

- 01 | PREPARING THE POCKETS IN THE DIFFERENT ALGINATE , PHOTO ALBERTE BOJESEN, 2020
- 02 | SEAWEED PAPER, , PHOTO ALBERTE BOJESEN, 2020
- 03 | THE DRYED ALGINATE SAMPLES, PHOTO ALBERTE BOJESEN, 2020
Sample evaluation
They all dried up completely, the shrunk more than 50%. They are not flexible at all and completley hard. Complete fail. It might be solved by using more glycerol, as I got some nice samples in Week 06 where I used a lot of glycerol, but the material become very rippable and wet. Thus the gelatine based sample is much better. I have also bought some carrageenan iota which is an algae based jellifying material that is very elastic, this might be better to use for inflatables?
GOOD TO KNOW | BOM
| Qty | Description | Price | Link | Notes |
|---|---|---|---|---|
| 1 | Silicon OOMOO 30-1A:1B | 45 € | https://www.amazon.com/Smooth-Silicone-Making-OOMOO-30/dp/B004BNF3TK?th=1 | two part |
| 8 g | PLA | 25 € | https://www.prusa3d.com/category/prusament/?gad=1&gclid=CjwKCAjwge2iBhBBEiwAfXDBR3-gCwuQ0CpPjp6jn7MsDJ7koUtC5ZXG_6etJ9LxwvuiI1G6i2qtmhoC1FkQAvD_BwE | PLA filament roll |
| 1 | Vinyl doublesided | 17 € | Textil lab | per meter |
| 500 ml | Glycerine | 10 € | Local store, Blue relief | per liter |
| 500 g | seaweed | 00 | Locally sourced | On the beach |
Fabrication files
-
File: FUCUS VESICULOSOS ↩
-
File: GUTTWEED PATTERN ↩
-
File: WAVE PATTERN FOR VINYL ↩
-
File: WAVE PATTERN RHINO ↩
-
File: WAVE PATTERN GH ↩
-
File: LASERCUTTING BLOB FILES ↩↩
-
File: BLOB FILES, RH, GH ↩
-
File: TEST MOULD STL,RH, GH ↩