Computational Couture
Reference & Ideation
Creative individuals have indeed brought a lot of new possibilities and innovations into the field of fashion design by incorporating digital fabrication. Through digital fabrication and parametric design, fashion designers can realize more flexible and creative ideas, breaking the limitations of traditional garment and fashion design. These technologies enable designers to create unique, futuristic clothing, while also enhancing production efficiency and sustainability.
In the future, we can expect more fashion designers and manufacturers to further explore digital fabrication and apply them to more innovative and sustainable fashion design. This may include personalized custom clothing, fashion products made from biodegradable and recycled materials, and faster prototyping processes. This will not only change the face of fashion design but also contribute to reducing resource waste and promoting the development of eco-friendly fashion.
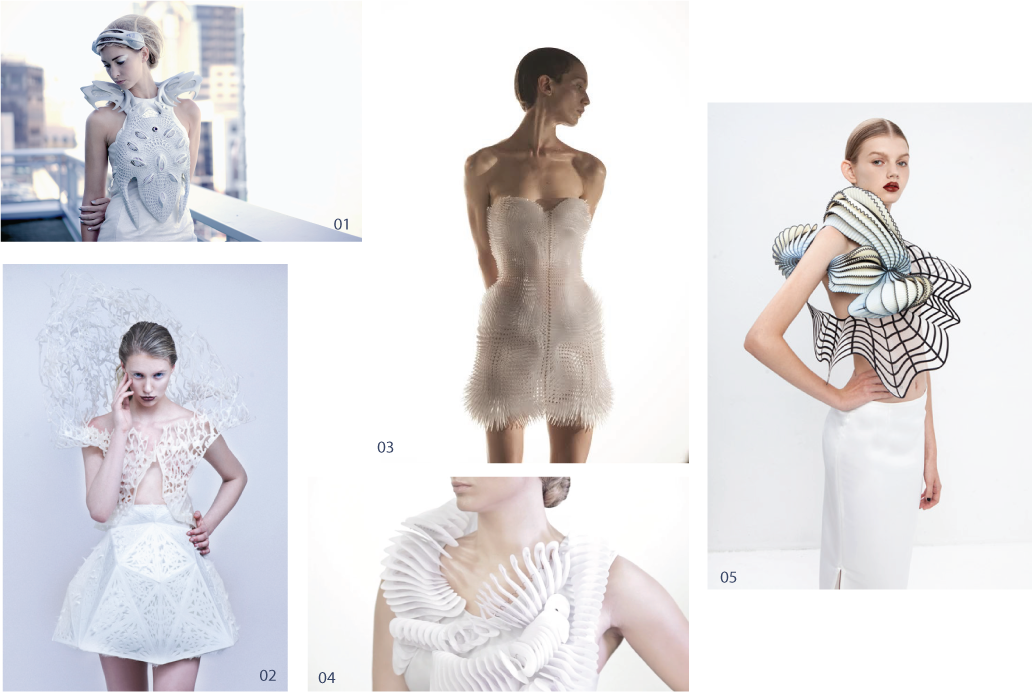
05 Noa Raviv
Transforming digital models into physical objects.
3D printing
3D printing, also known as additive manufacturing, is a technology that involves creating three-dimensional objects by layering material on top of itself. It works by taking a digital 3D model and slicing it into thin horizontal cross-sections. These cross-sections are then printed layer by layer, fusing together to form a physical object.
3D printers can use various materials, including plastics, metals, ceramics, and even biological materials like cells. The process is highly versatile and can be used in a wide range of applications, from rapid prototyping and custom manufacturing to creating intricate art and medical implants. 3D printing has revolutionized many industries by making it easier and more cost-effective to produce complex, customized, or one-of-a-kind objects.
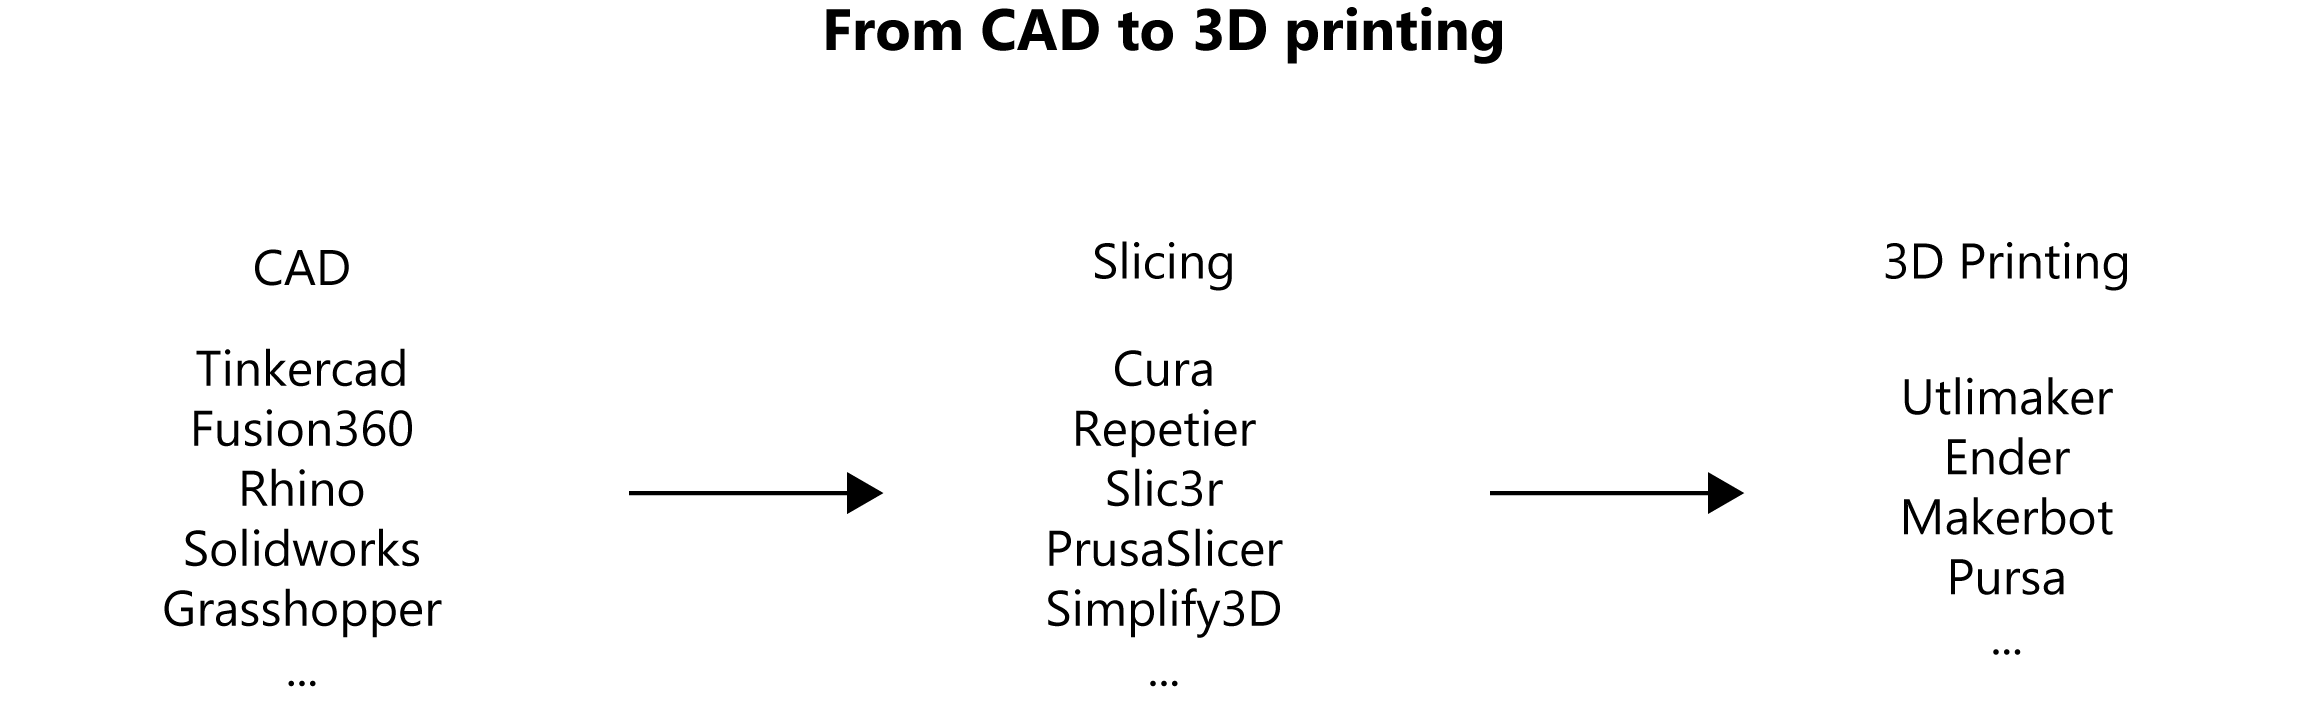
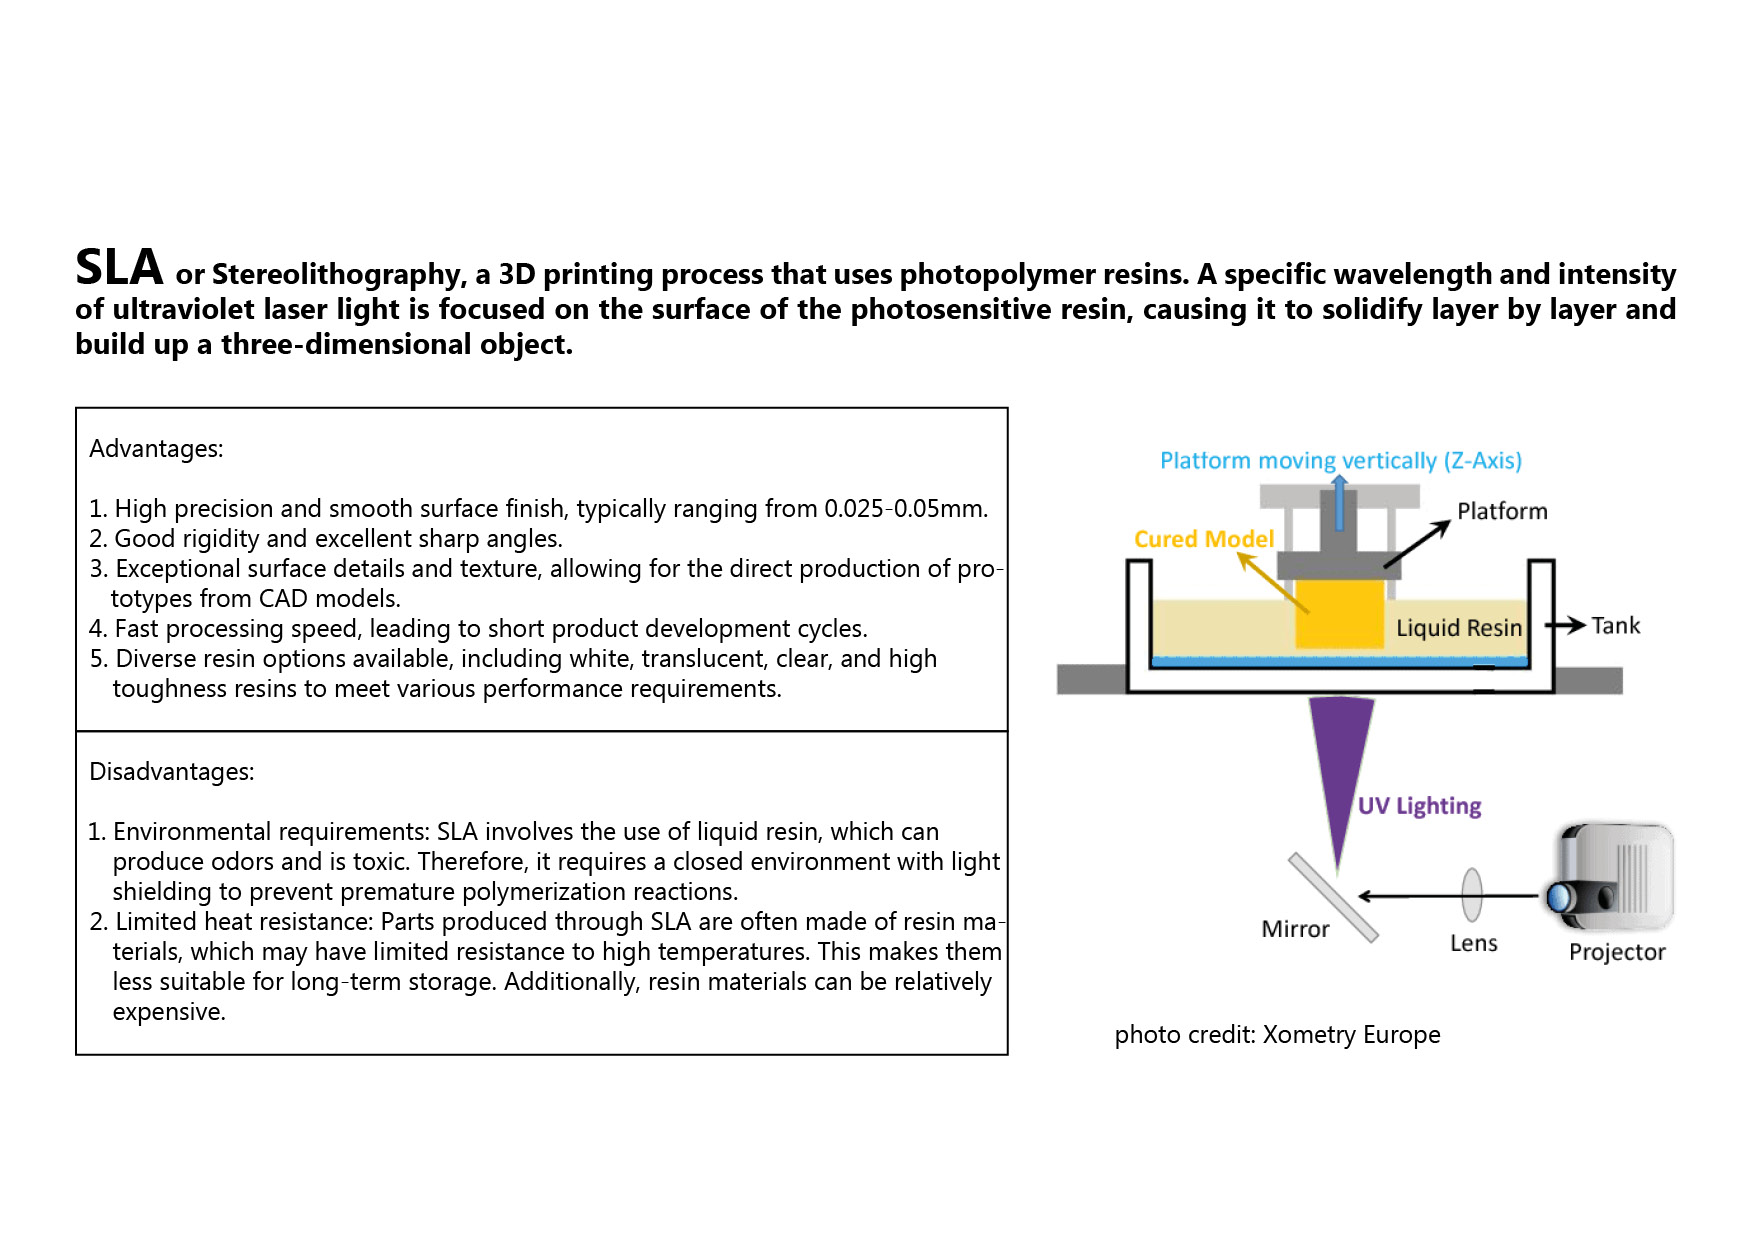
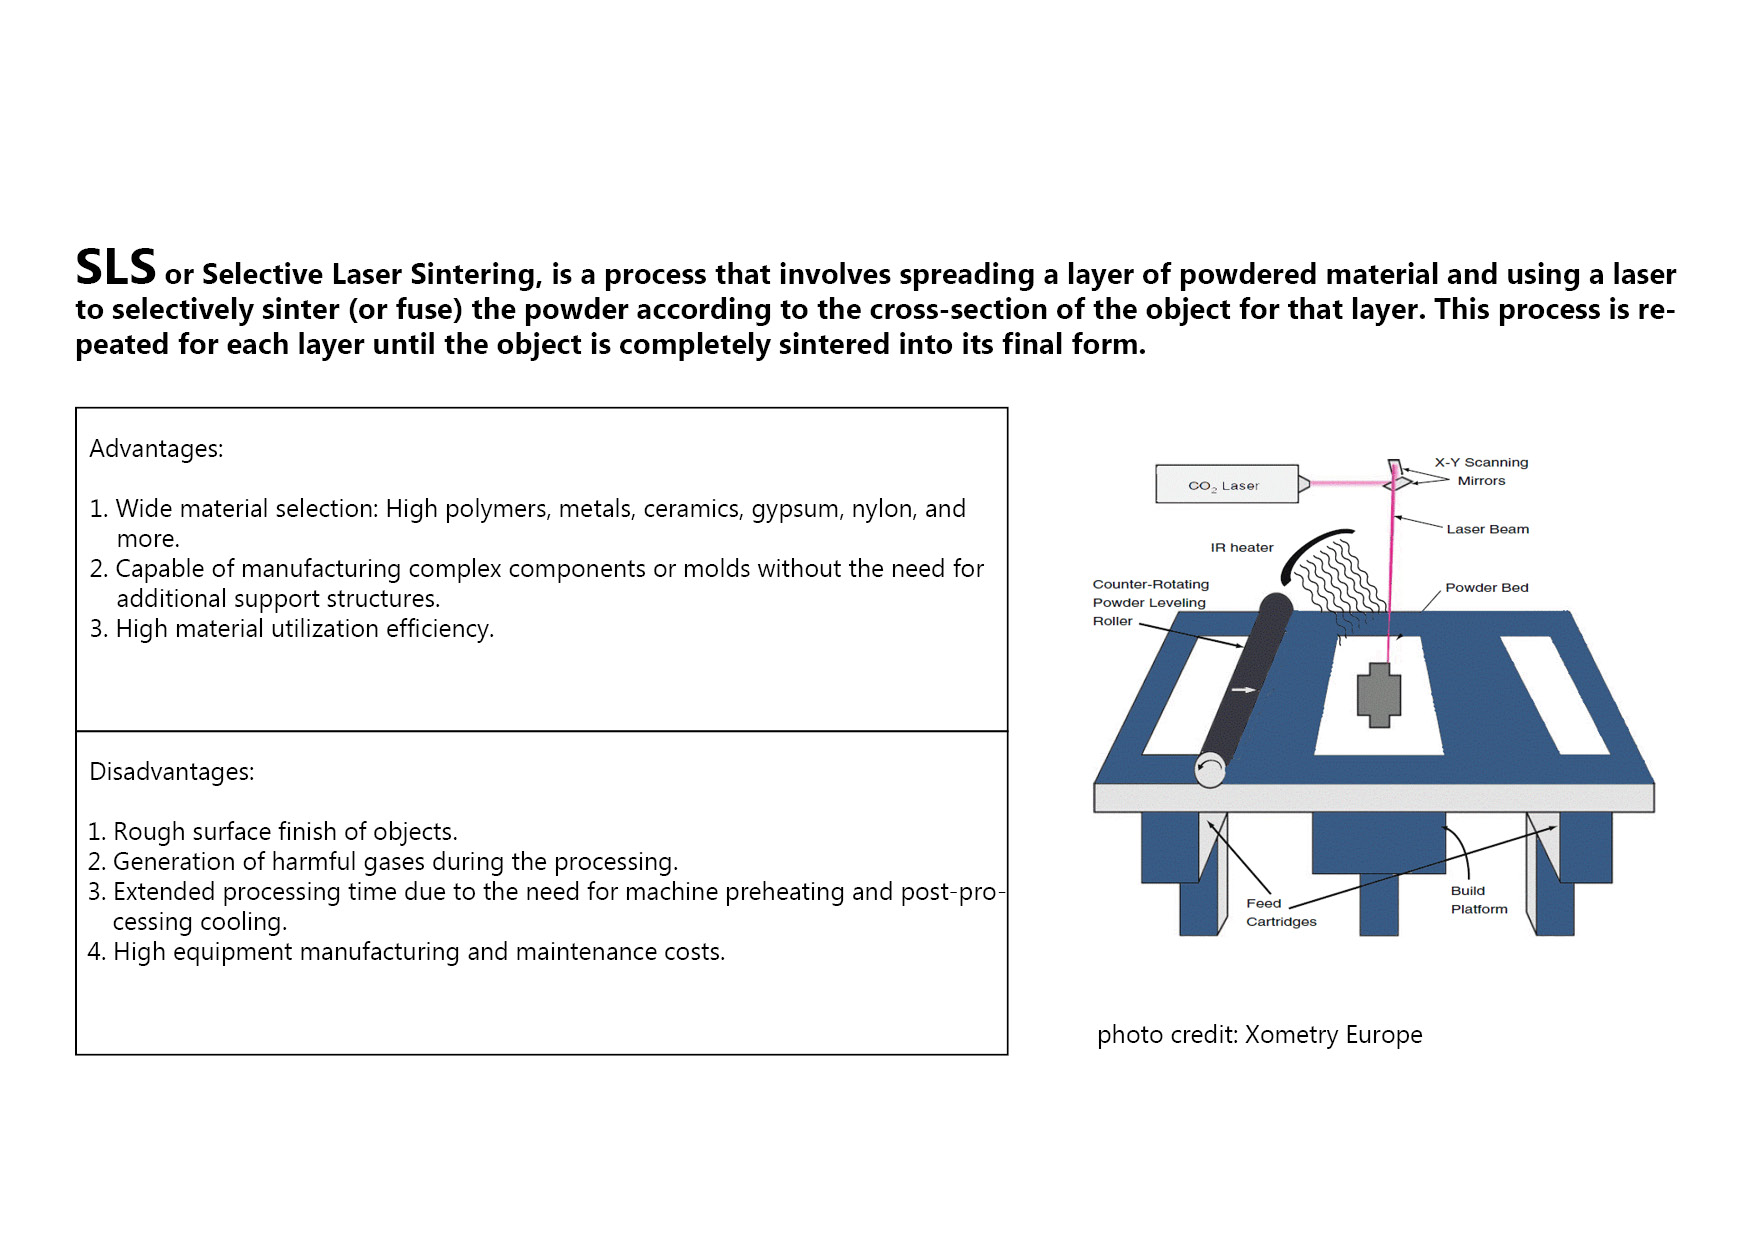
Here are some of the most common 3D printing technologies:

For this assignment, we mainly use FDM 3d printer, which is relatively fast and convenient. It allows for the experiment of 3D printing on fabrics, offering a high degree of expansiveness in combining different materials with 3D printing.
Common FDM 3d printing materials
The most common FDM 3D printing materials are ABS, PLA, and their various blends. More advanced FDM printers can also print with other specialized materials that offer properties like higher heat resistance, impact resistance, chemical resistance, and rigidity.
-
PLA (Polylactic Acid): PLA is one of the most widely used 3D printing materials. It is easy to print with, has low warping, and is biodegradable. PLA is commonly used for prototyping, educational projects, and decorative prints.
-
ABS (Acrylonitrile Butadiene Styrene): ABS is known for its strength, durability, and heat resistance. It is often used for functional prototypes and parts. However, it can be prone to warping and emits fumes during printing, so good ventilation is necessary.
-
PETG (Polyethylene Terephthalate Glycol): PETG combines some of the best properties of PLA and ABS. It's easy to print, durable, and has good layer adhesion. PETG is often used for mechanical parts and enclosures.
-
TPU (Thermoplastic Polyurethane): TPU is a flexible filament, making it suitable for printing objects that need to be bendable or have rubber-like qualities. It's commonly used for phone cases, gaskets, and other flexible components.
-
Nylon: Nylon filaments are known for their strength and durability. They have good layer adhesion and are used for applications that require toughness and resistance to wear, such as gears and functional parts.
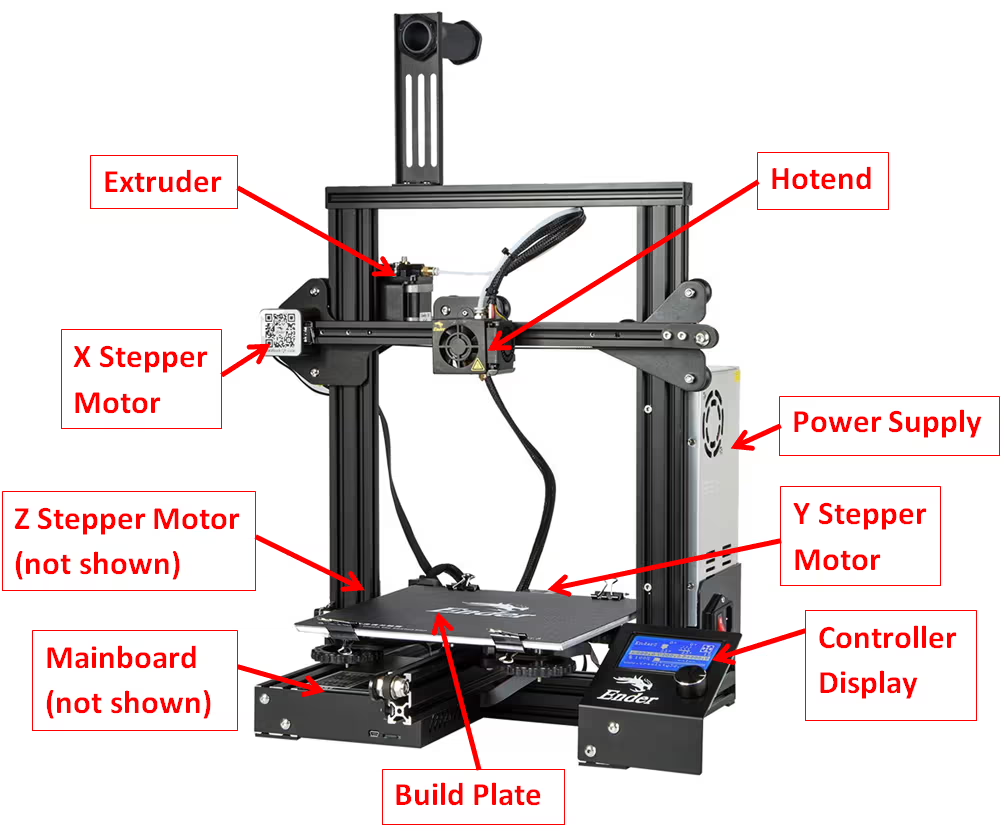
3D Printing Anatomy (source: How 3D Printing Works)
Steps of model to 3d printing
-
Exporting Digital Model (must be closed mesh or surface) as .STL file or .obj file...etc.from Rhinoceros(or any other 3d software):
-
Slicing the Model in CURA (Slicing Software): After obtaining the model, import it into CURA, a slicing software commonly used for 3D printing. In CURA, slicing involves breaking down the 3D model into layers and generating the necessary instructions for the 3D printer to produce the object layer by layer.
-
Setting Printer Parameters: Configure the following printer settings within CURA to ensure accurate and optimal 3D printing:
-
Layer Height: Determine the thickness of each printed layer, balancing precision and printing speed.
- Infill Density: Specify the amount of material used to fill the interior of the model, influencing its structural integrity and weight.
- Print Speed: Adjust the speed at which the 3D printer's nozzle moves, impacting the overall printing time and surface finish.
- Supports: Enable supports if the design has overhangs or structures that require additional support during printing.
- Build Plate Adhesion: Choose the appropriate adhesion method (e.g., brim, raft) to secure the model to the build plate and prevent warping.
- Print Temperature: Set the optimal temperature for the 3D printer's extruder and build plate based on the filament material being used.
- Filament Type: Specify the type of filament material (e.g., PLA, ABS) to match the 3D printer's capabilities.
- Print Cooling: Adjust cooling settings to enhance print quality and prevent overheating.
Ensure these printer settings align with the specifications of your 3D printer and the characteristics of the chosen filament material. This comprehensive configuration guarantees a successful 3D printing process and the production of a high-quality physical model from the digital design.
Useful references for 3d printing:
Digital modelling:Rhinoceros and Grasshopper
Rhino and Grasshopper are among the most powerful digital modeling tools today, the two complement each other. This week we mainly focus on Grasshopper, Grasshopper offering rapid and intuitive adjustability, generating models through numbers and logic. This reshapes our imagination of digital modeling, presenting a captivating new approach to digital design.
Rhinoceros (Rhino):
Purpose: Rhino is a widely utilized 3D modeling software known for its applications in industrial design, architecture, and various other fields.
Features: Providing a flexible and versatile environment, Rhino facilitates the creation, editing, analysis, and rendering of intricate 3D models. It supports diverse geometry types, encompassing curves, surfaces, and solids.
Interface: With its user-friendly interface, Rhino is accessible to both novices and professionals in the realms of design and engineering.
Grasshopper(GH):
Purpose: Grasshopper serves as a visual programming language and graphical algorithm editor seamlessly integrated with Rhino.
Features: Empowering designers and architects, Grasshopper enables the development of intricate parametric designs by visually linking various components (nodes) to articulate relationships and algorithms.
Visual Programming: Grasshopper's visual programming approach involves the creation of algorithms through the manipulation of graphical elements. This facilitates efficient exploration of diverse design iterations.
Parametric Design: Through Grasshopper, users can effortlessly adjust parameters and observe real-time transformations in the overall design. This establishes Grasshopper as a robust tool for parametric design, where shape and form are guided by parameters and rules.
Workflow:
Designers initiate the process by creating a foundational geometry in Rhino. Grasshopper is subsequently employed to parametrically manipulate and control the geometry, defining relationships and rules. The dynamic link between Rhino and Grasshopper allows designers to instantly modify design parameters and witness real-time updates in Rhino. Collectively, Rhino and Grasshopper form a potent alliance, empowering designers and architects to craft sophisticated and innovative 3D models with a remarkable degree of flexibility and efficiency.
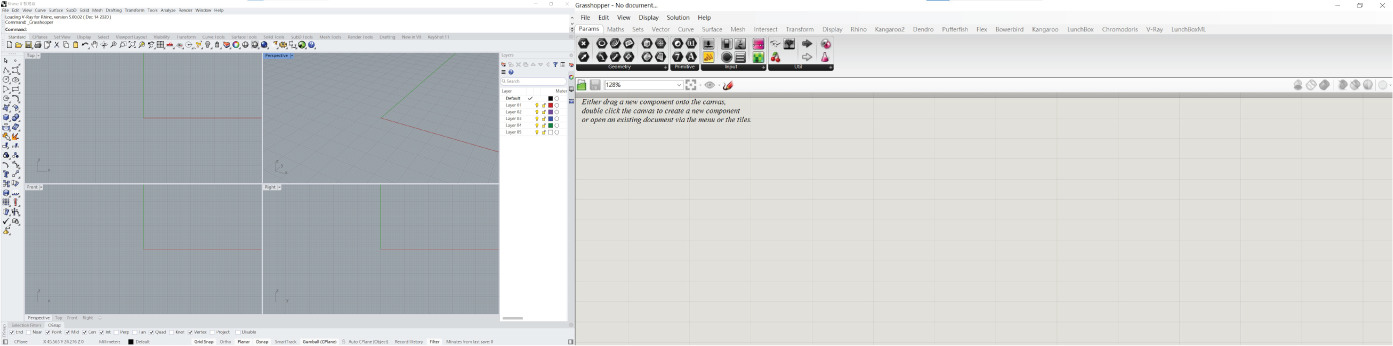
Interface of Rhino and GH
A Basic Tutorial for dive into Grasshopper
-
Installation: Ensure both Rhinoceros (Rhino) and Grasshopper are installed on your computer. Grasshopper is usually included with Rhino.
-
Opening Grasshopper: Open Rhino, and in the command bar, type "Grasshopper." Press Enter to launch Grasshopper.
-
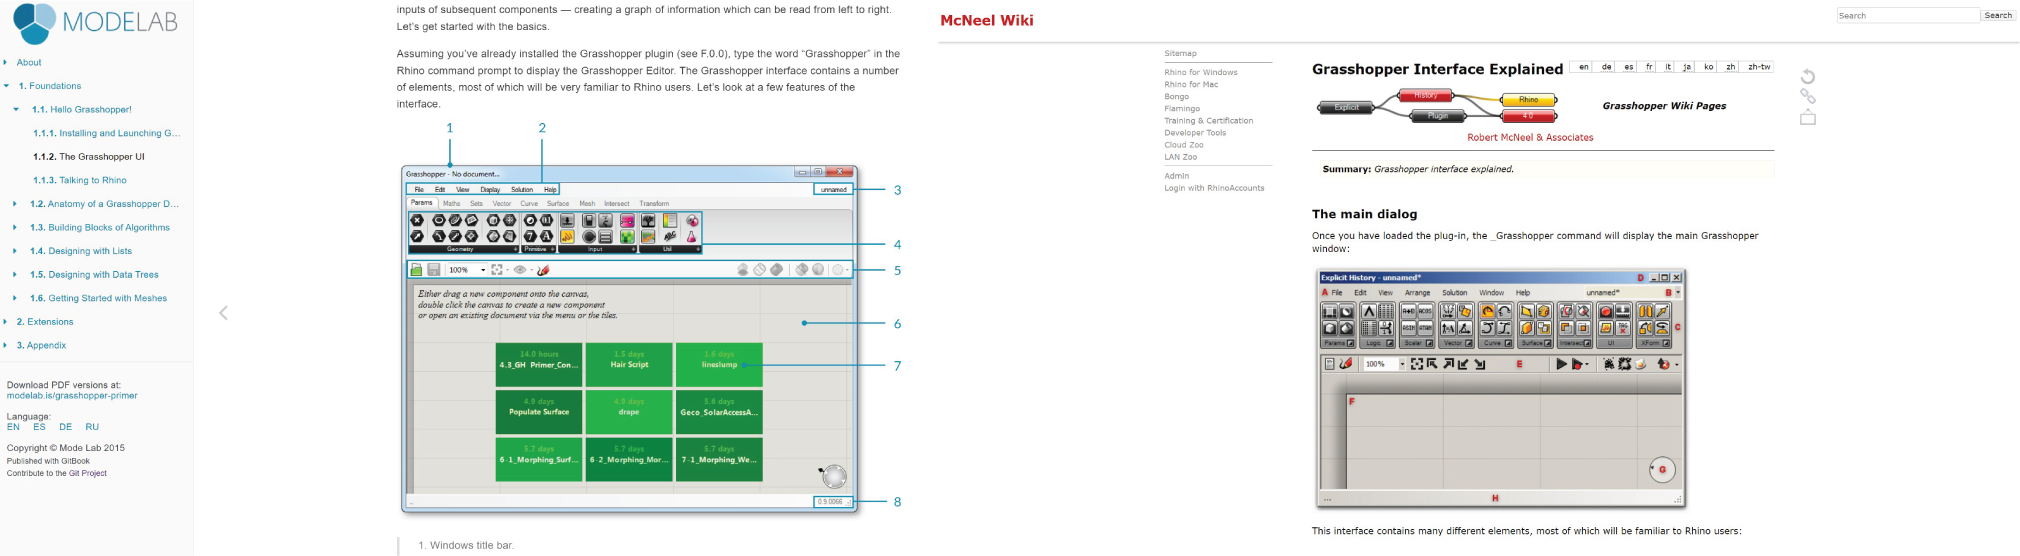
Grasshopper Interface: Familiarize yourself with the Grasshopper interface, which includes the canvas for visual programming, a toolbar with components, and a panel for displaying outputs.
-
Creating Basic Geometry: Start by crafting simple geometry in Rhino, such as a box or a sphere.
-
Connecting Geometry to Grasshopper: In Grasshopper, right-click on the canvas, navigate to the "Params" tab, and select "Geometry." Choose the desired type of geometry (e.g., Point, Curve, Surface).
-
Parametric Operations: Explore the "Math" and "Sets" tabs in the toolbar for parametric operations. For instance, use the "Move" component to translate geometry or the "Scale" component to resize it.
-
Components and Wires: Components serve as the foundational elements in Grasshopper. Drag components from the toolbar to the canvas, and use wires to establish the flow of data.
-
Parameters and Sliders: Introduce parameters via the "Params" tab. Sliders are useful for controlling numerical values. Connect sliders to components to dynamically adjust parameters.
-
Preview and Visualization: Utilize the "Preview" component to visualize your geometry on the Rhino canvas. Connect the design's output to the Preview component to observe real-time changes.
-
Experiment and Iterate: Grasshopper encourages experimentation. Modify sliders, rearrange components, and observe how your design evolves. This iterative process allows exploration of diverse design possibilities.
-
Save and Reuse: Save your Grasshopper script for future reference. Consider creating user-defined components for frequently used design operations.
Useful references for Grasshopper:
In addition to basic, there are many plugins for Grasshopper developed by experts online, catering to specific features and styles, such as Kangaroo, Physics, Lunchbox, Ladybug, Pufferfish...etc, these plugins come in various types, and you can find them on the food4Rhino.
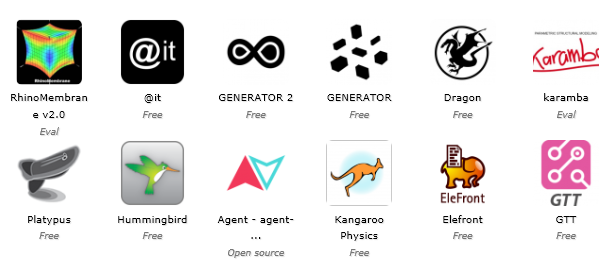
source: https://blog.rhino3d.com/2015/03/new-apps-on-food4rhino.html?m=1
Process and workflow
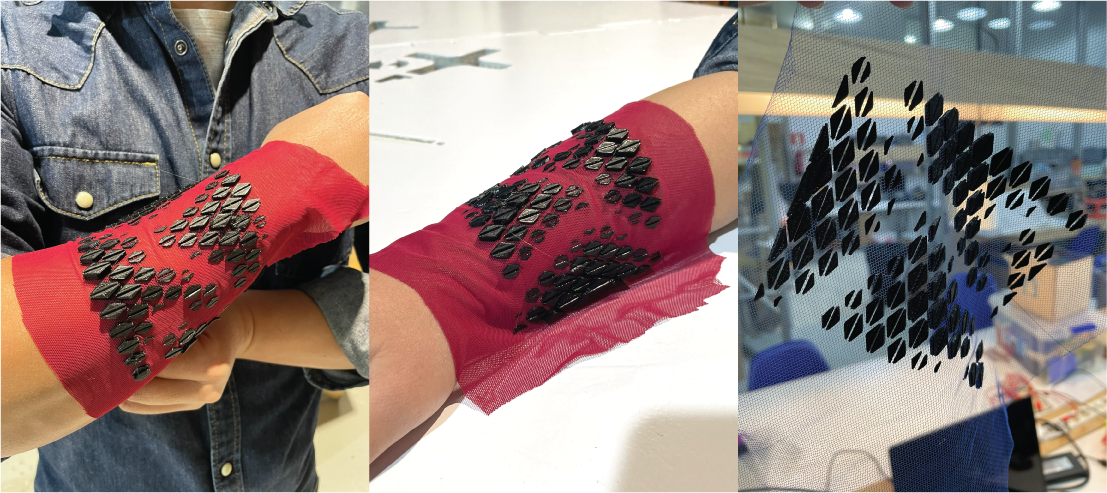
Curve attractor: simulating a city(3d printing onto fabric)
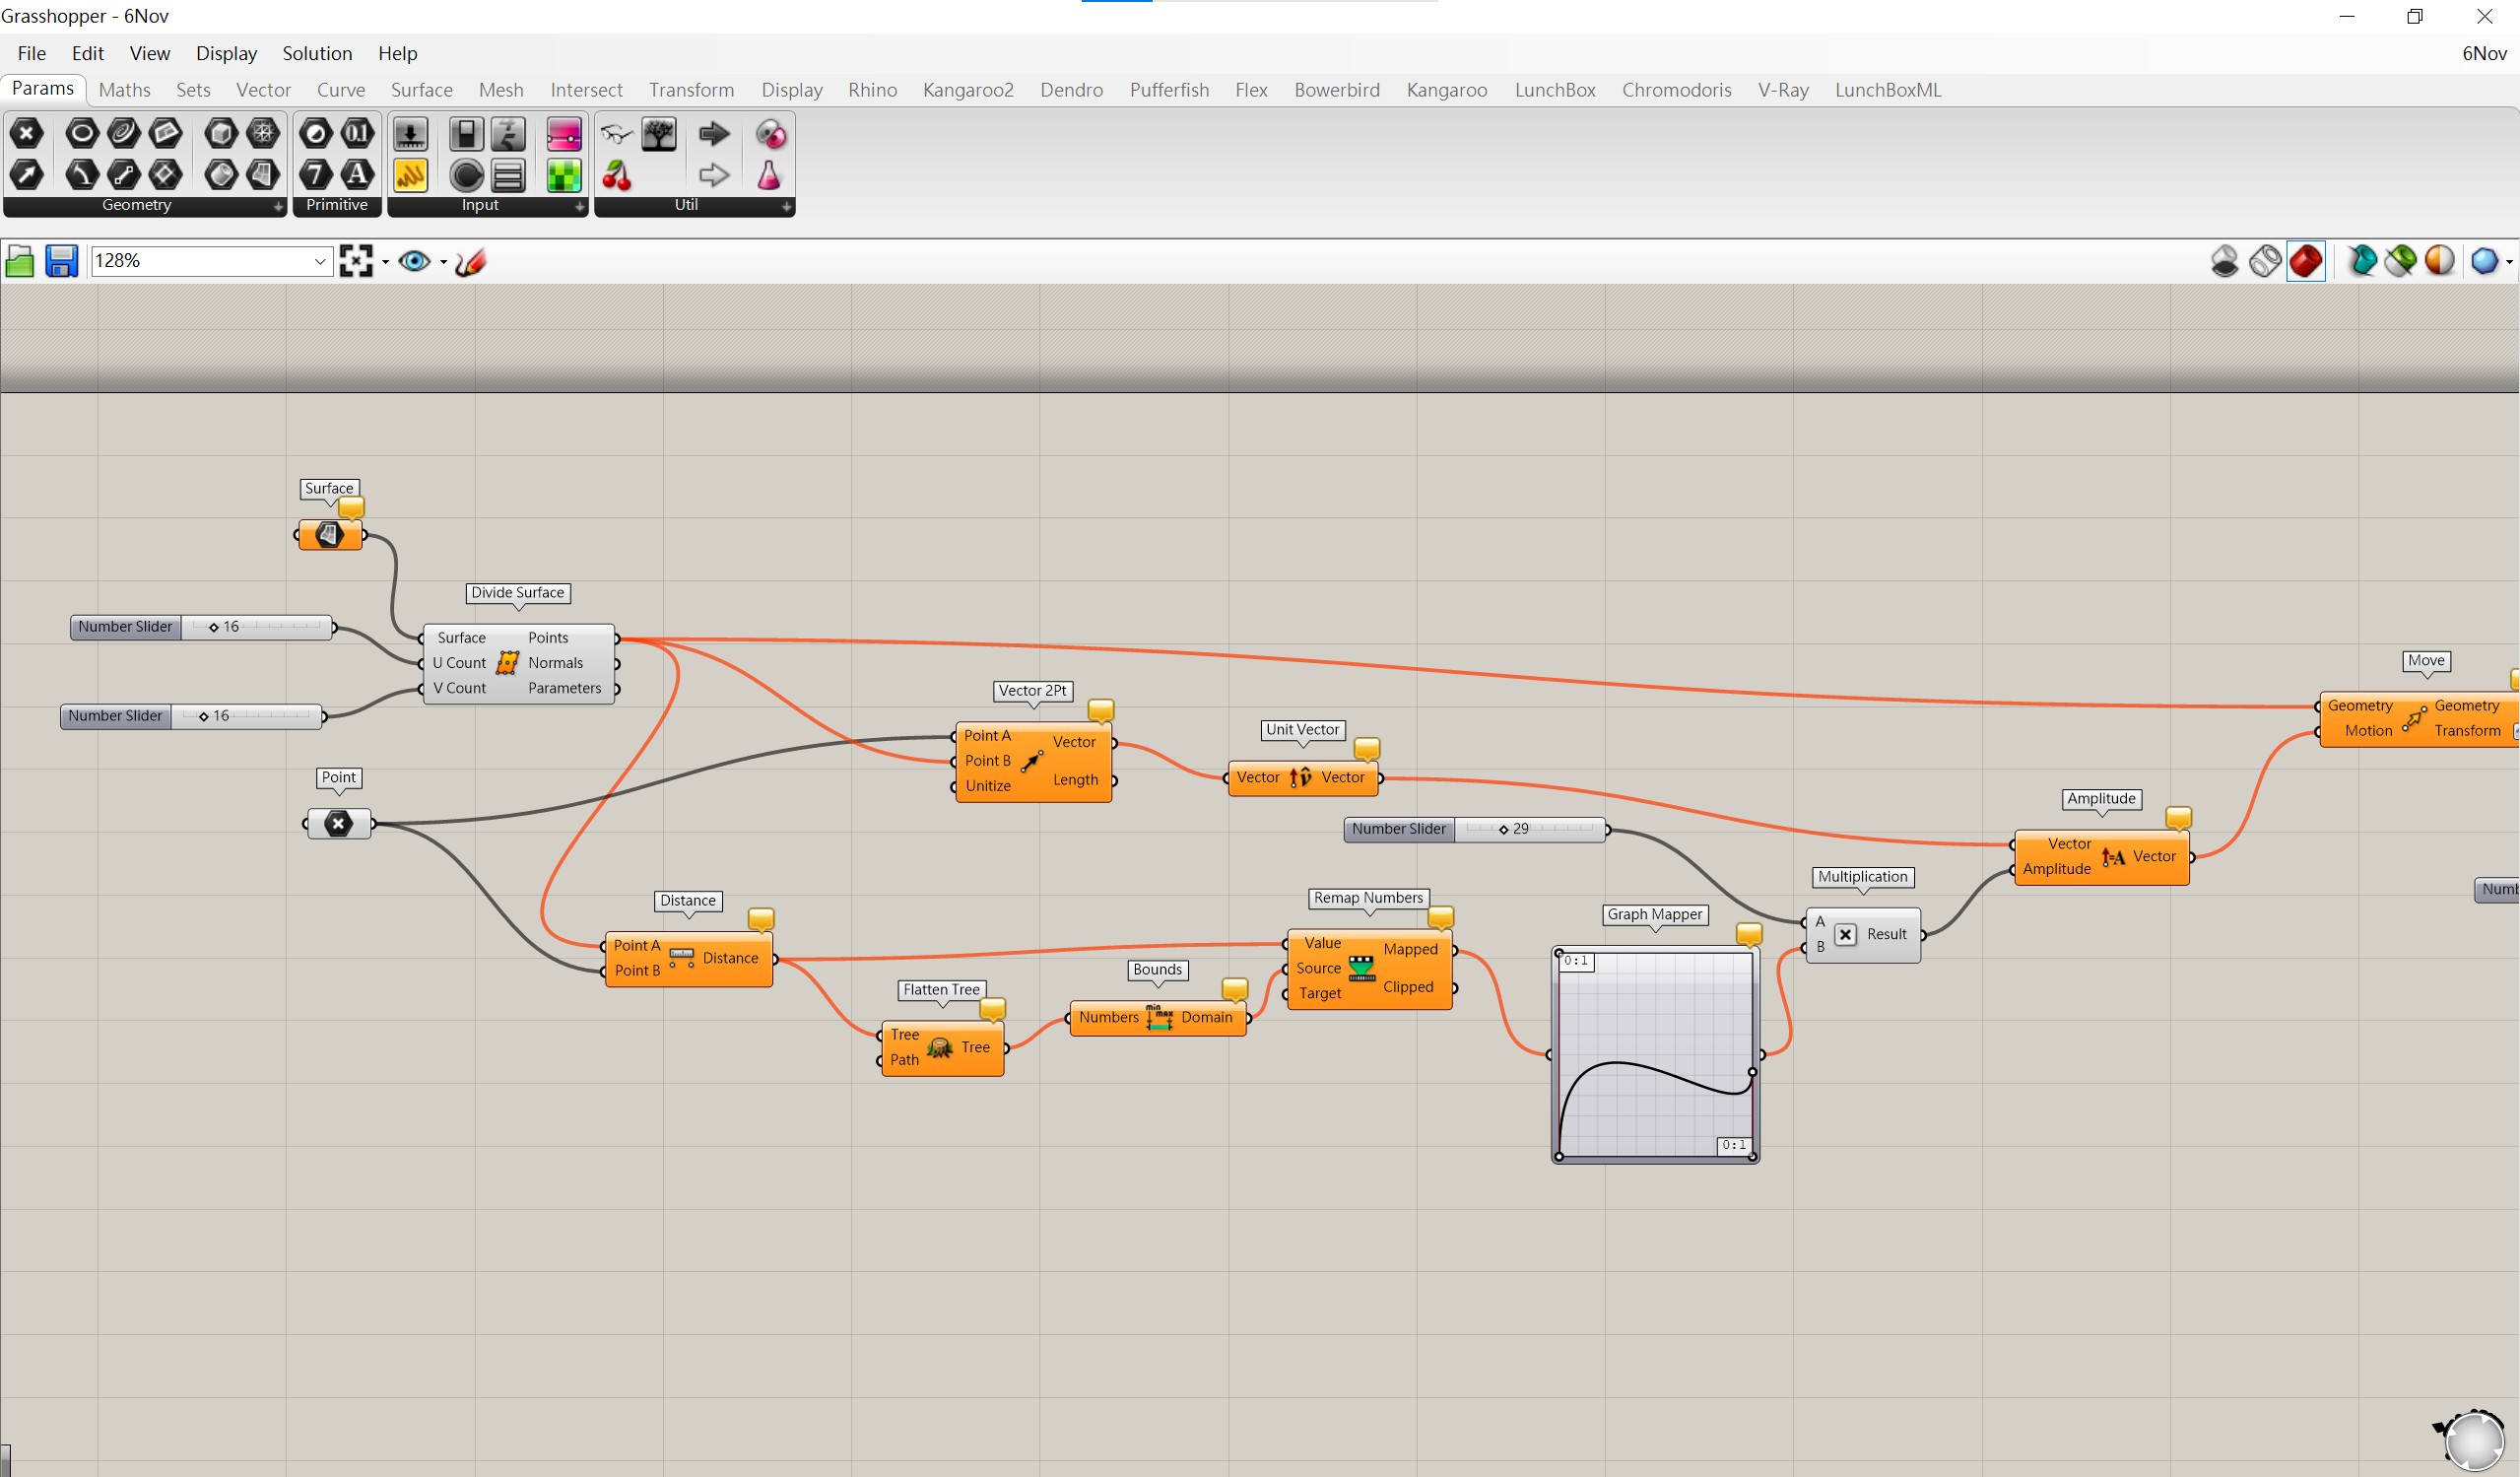
I envision each triangle as a building in the city, and the curves I define are like streets. Conceptually, I define them so that triangles (buildings) closer to the curve (street) are lower and smaller, while units farther from the curve are taller and larger. Here is my script:
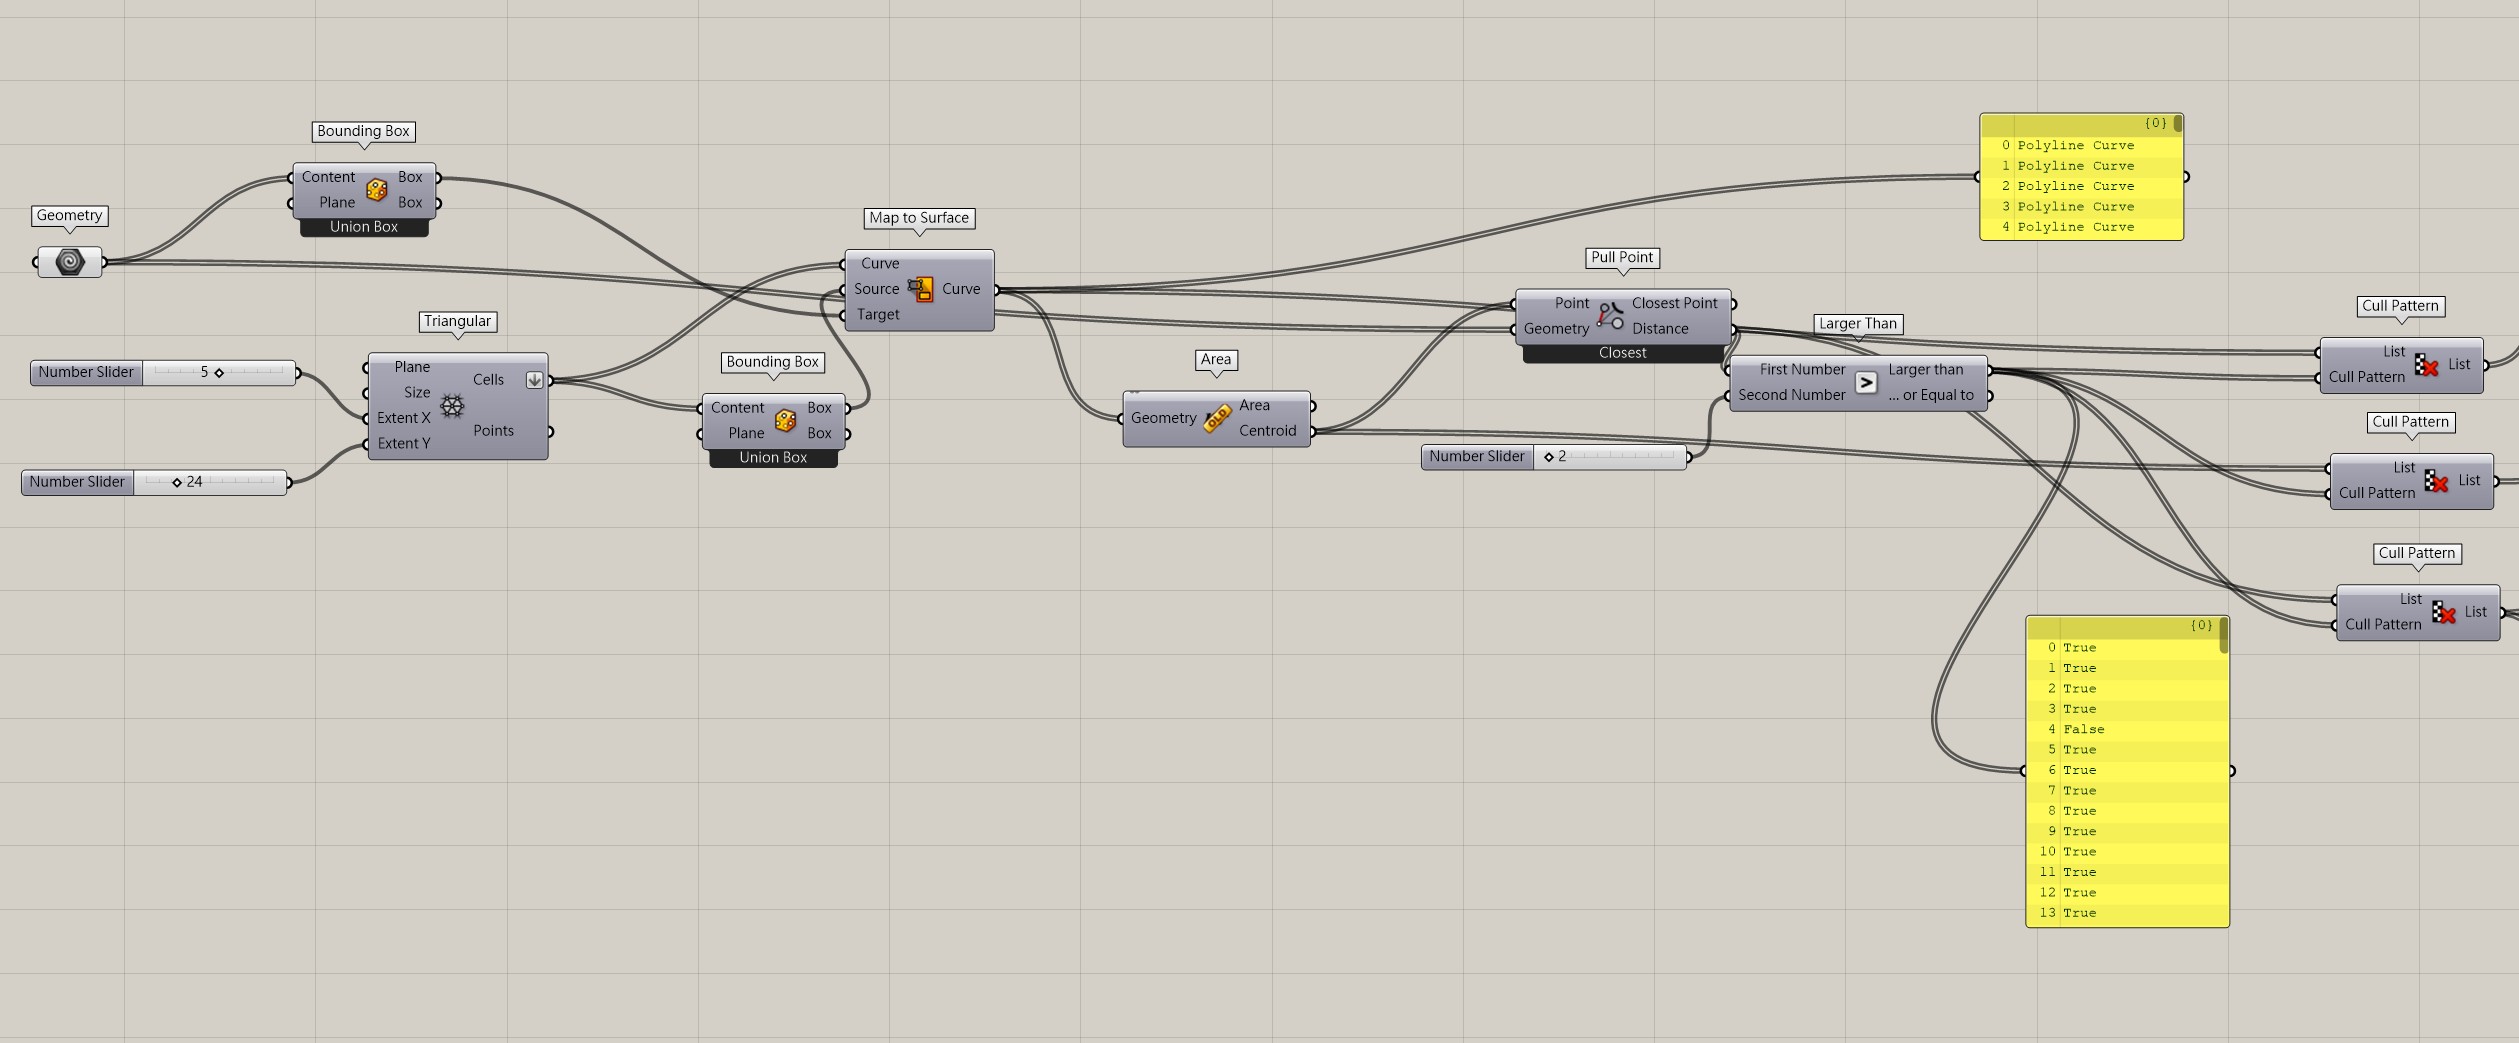
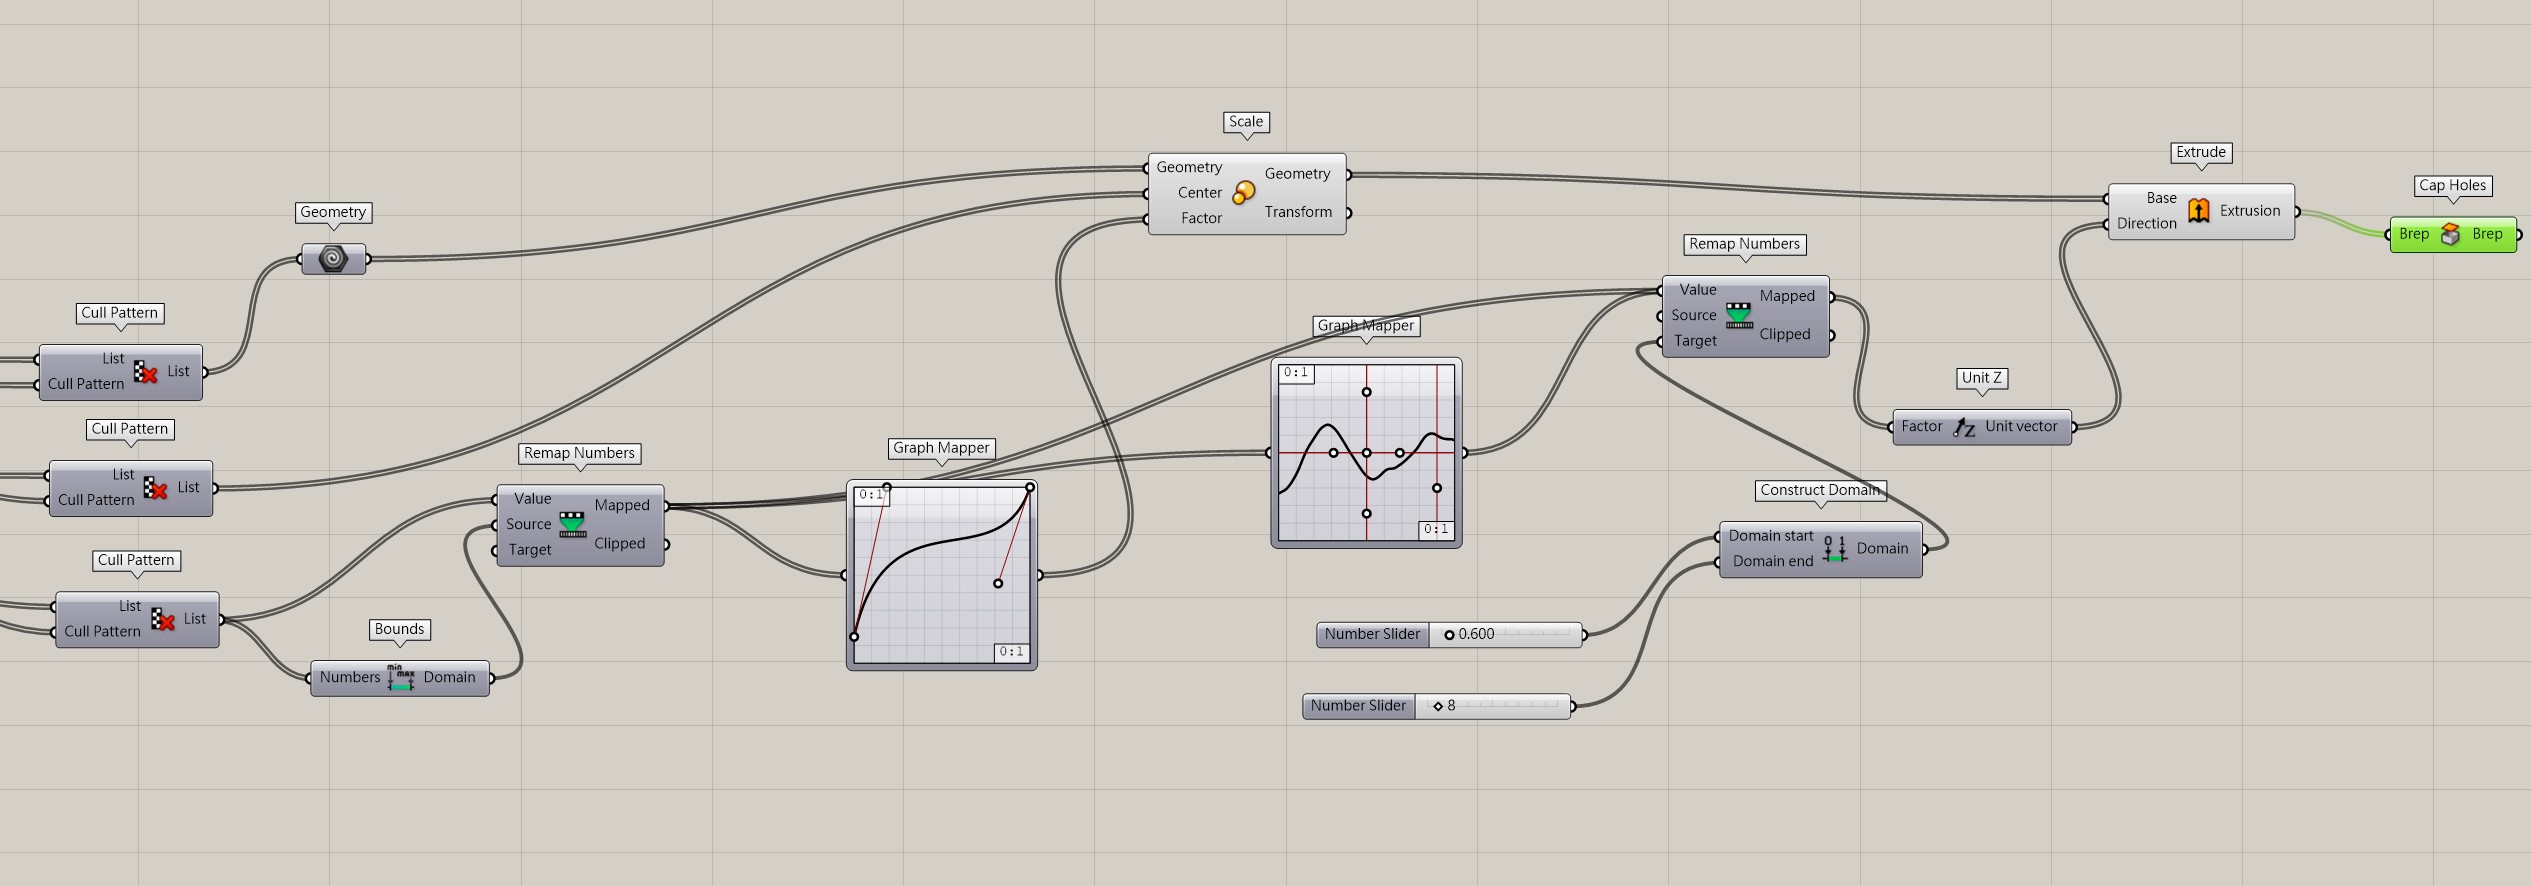
You can set the curves which you prefer, you can also adjust the density of triangles and the height of deformation within the script.
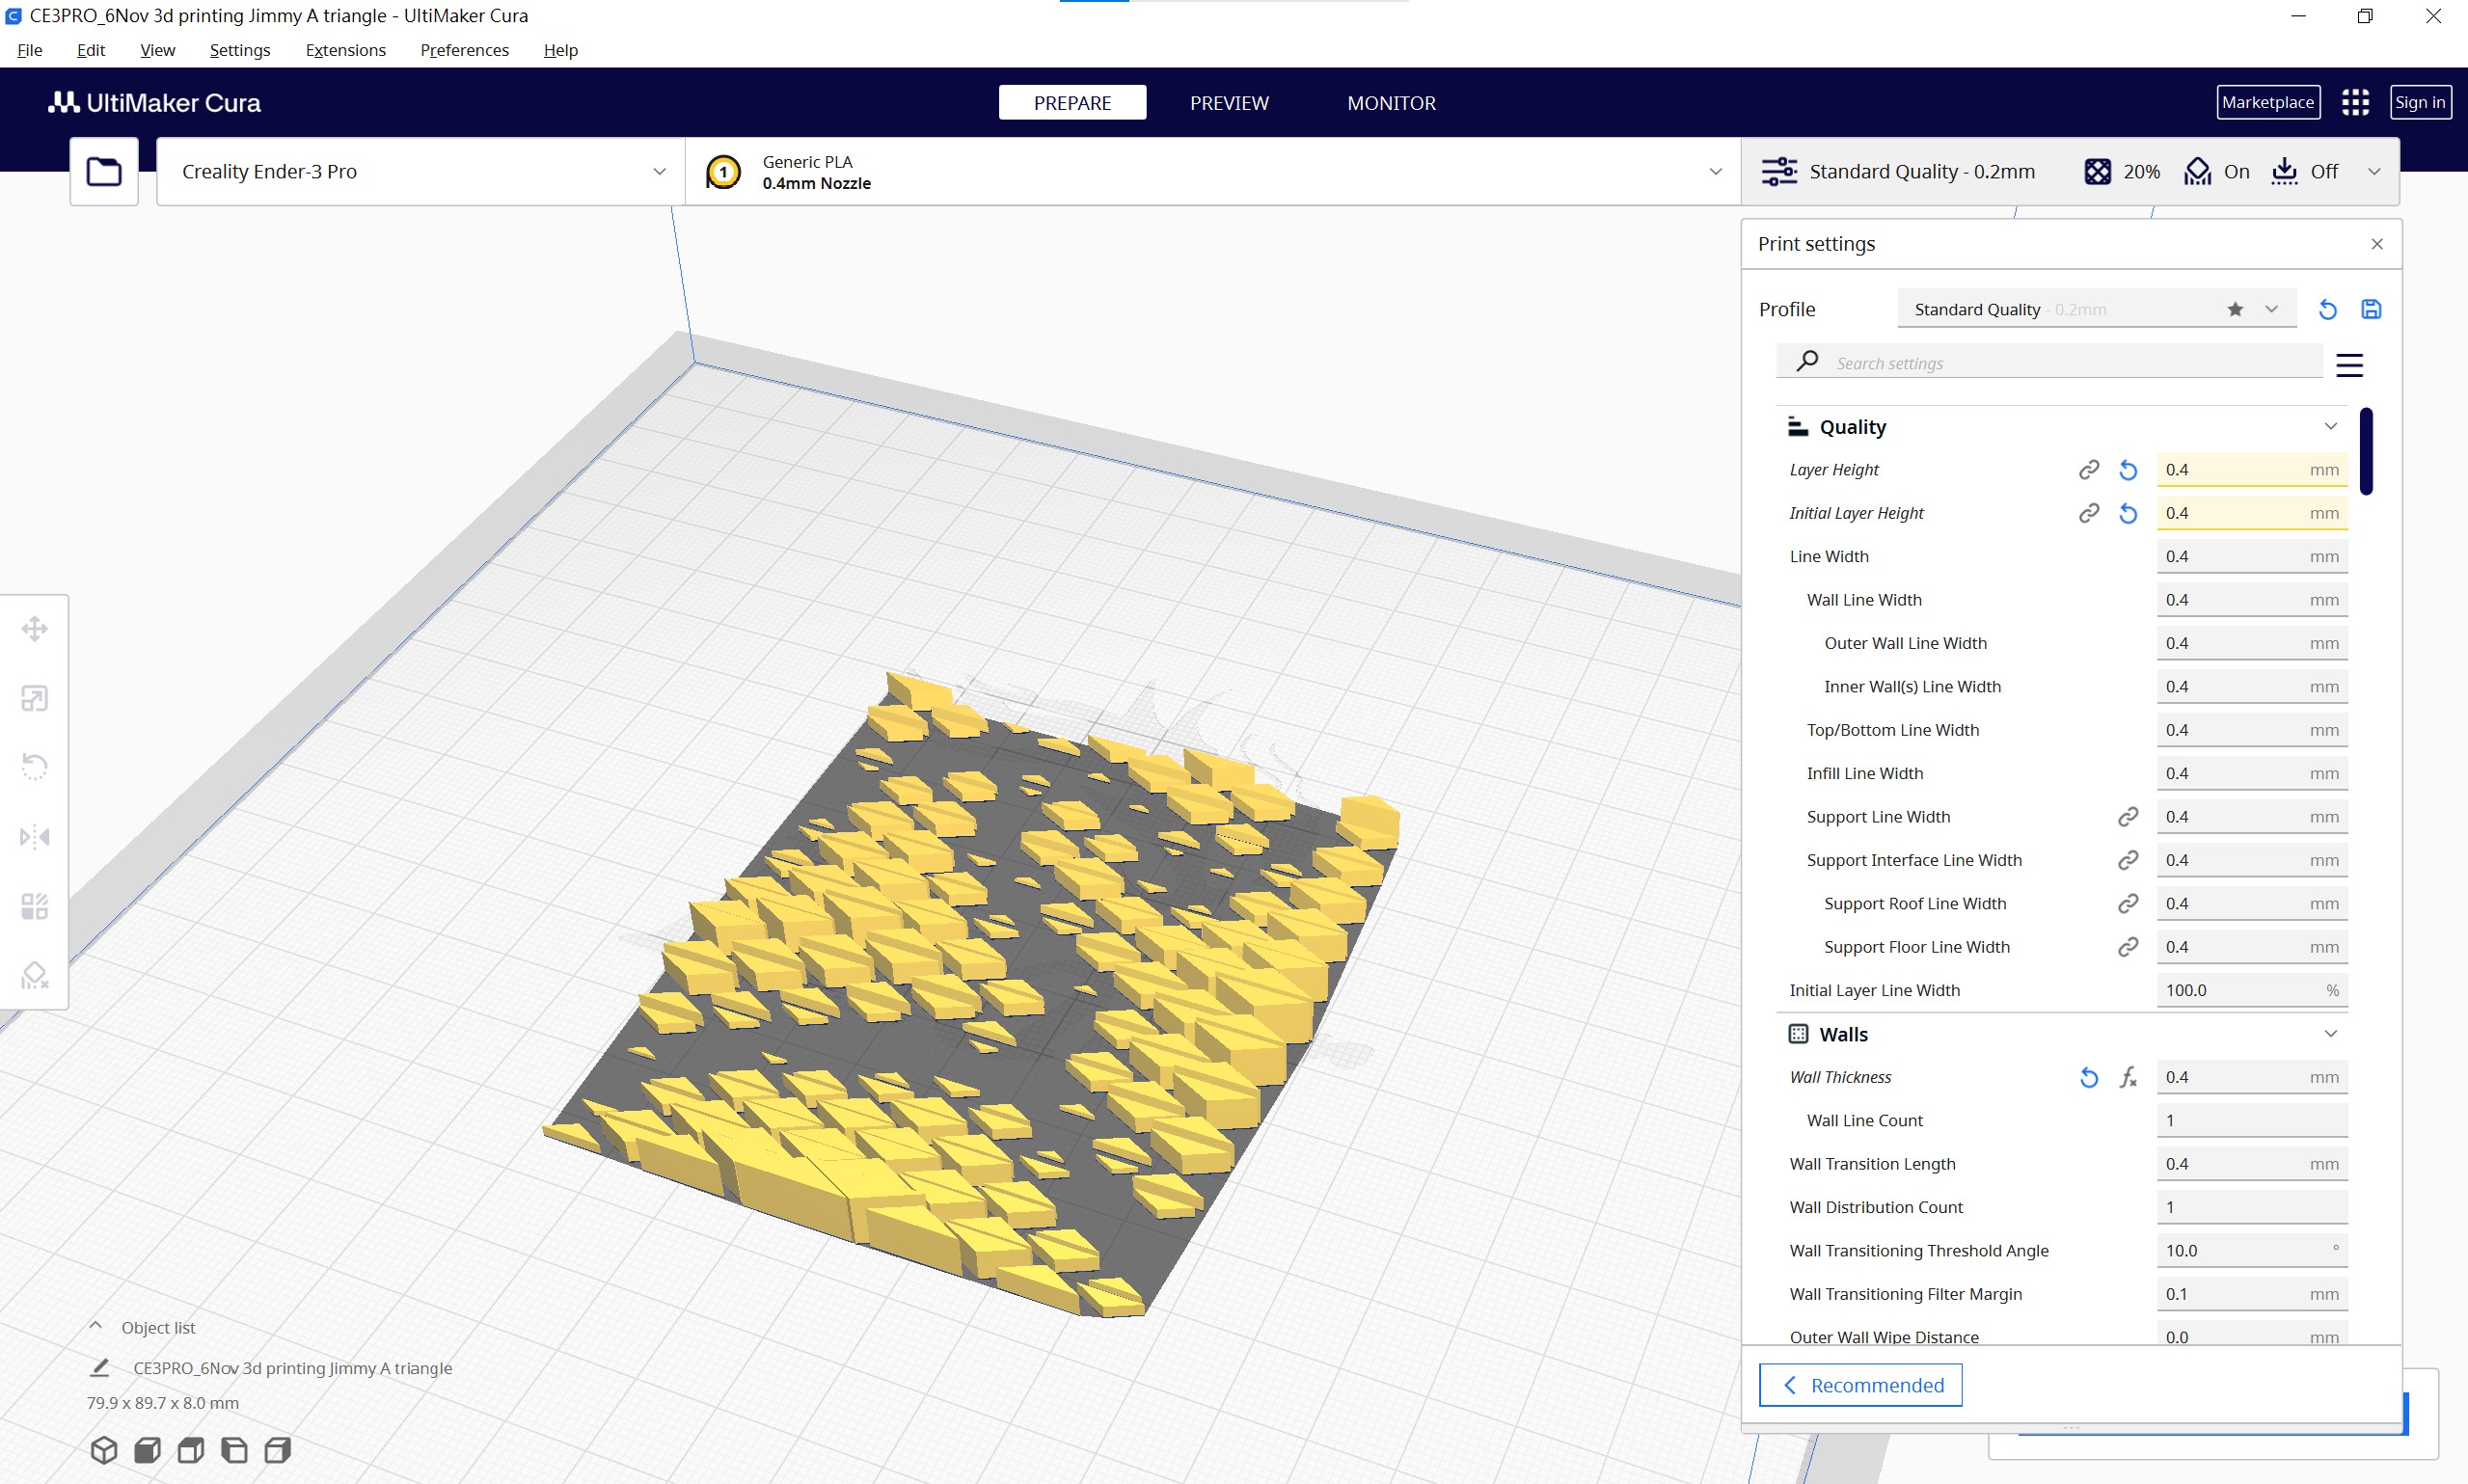
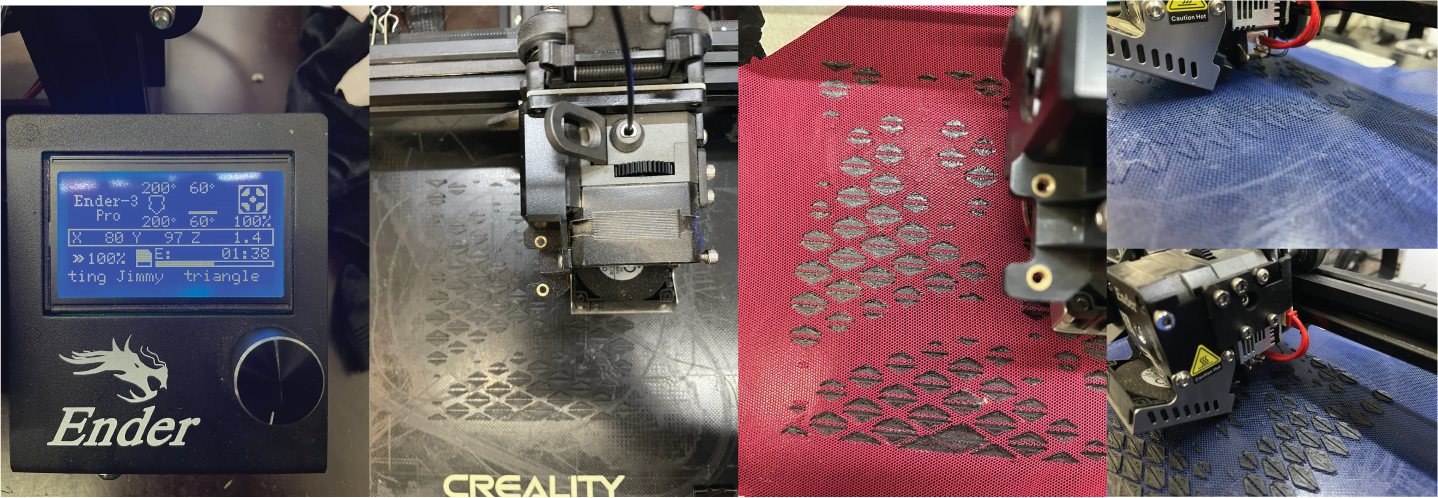
After "bake" the model in Rhino, you can either export in OBJ or STL then next step is to import it into Cura for slicing to generate G-code, here are the parameters I was using:
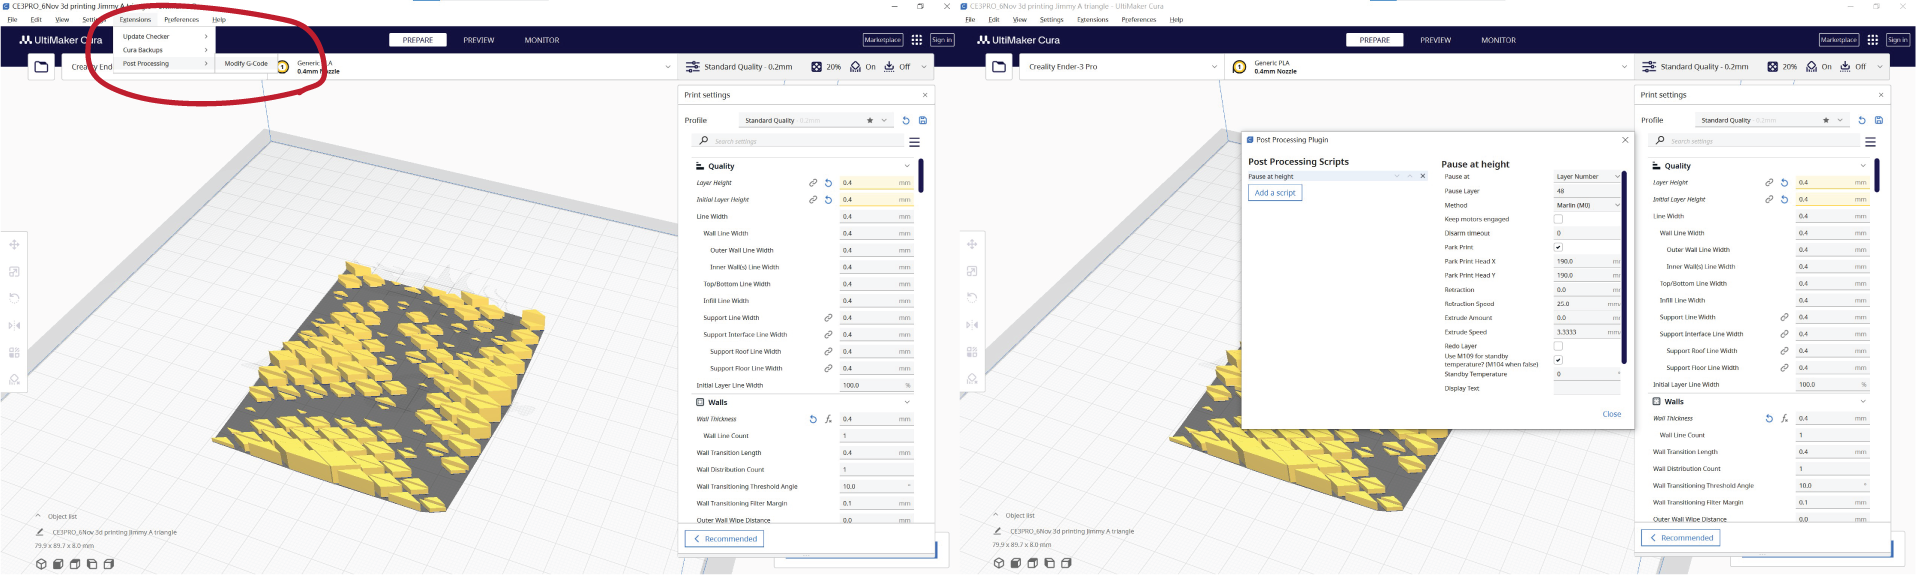
but there's one special idea that have to take care: for printing on fabric, it's best to 3D print in a "sandwich" way. This means printing several layers first, then placing the fabric on top, and continuing to print the remaining sections. In this way, the fabric becomes sandwiched between the layers of 3D printing material. Aluma Emma Picanyol have nice steps of it. Here's the steps I did for stop at certain layer in Cura:
- Open the “Extensions” menu.
- Select “Post Processing”, then click on “Modify G-Code”.
- In the new window, click on “Add a script”.
- Select “Pause at height” from the various options in the menu.
3D printing machine set up and print.
Yo! Here we Go!
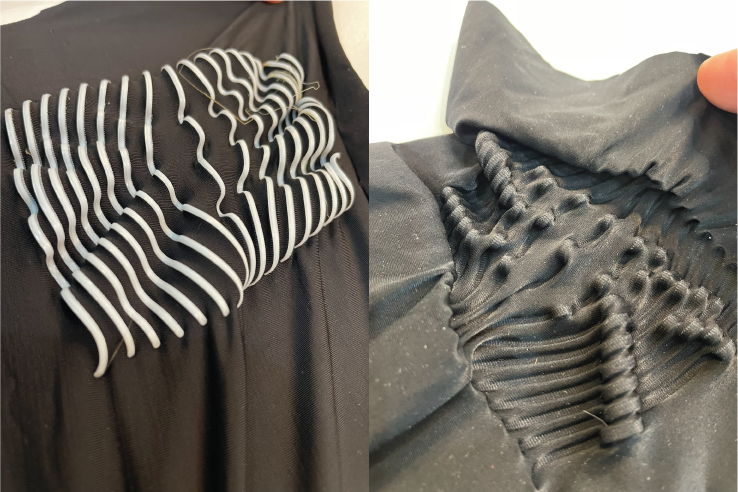
Repelling curves(tension of fabric)
Next, I am going to experiment with the shrinkage tension generated between 3D printing and fabric, TPU's flexibility can help us to achieve this effect. For the 3d model, I was using the method of pushing out parallel curves with control points to generate curves then extrude them. Here is script:
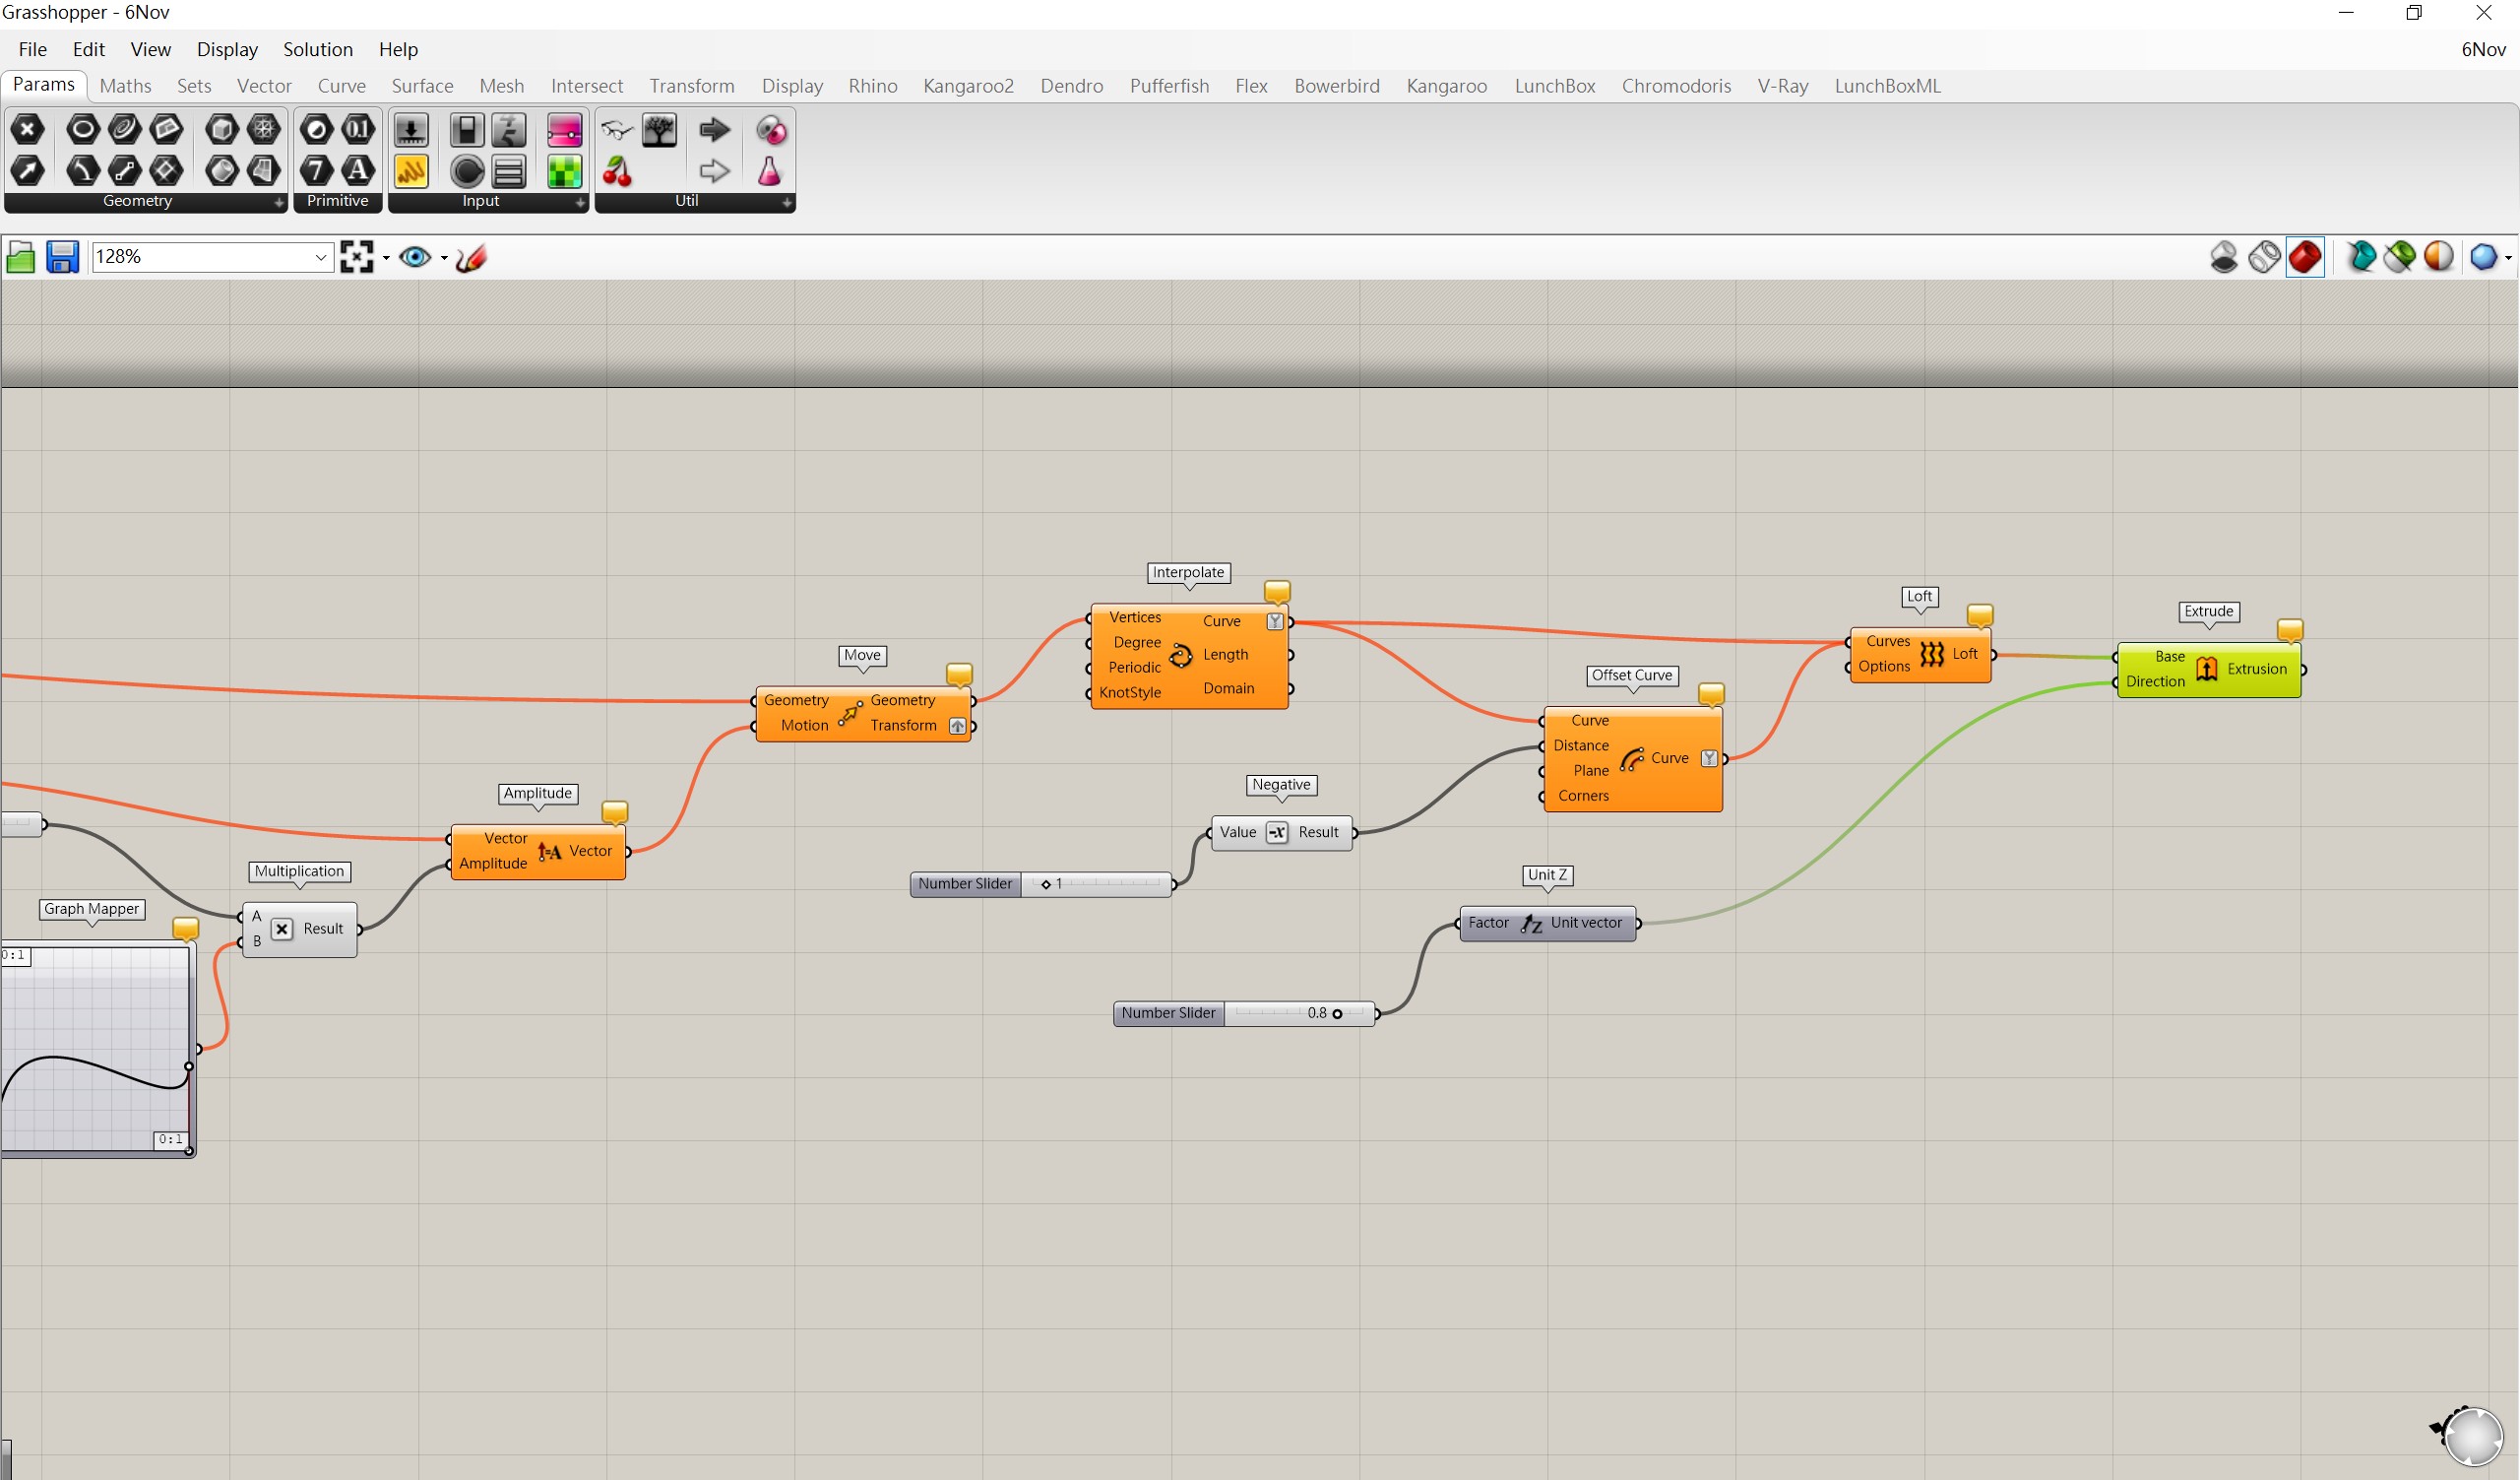
There is one crucial point to note here. Before starting 3d printing, make sure to stretch the target fabric as much as you can. This will make the shrinkage effect more pronounced. Also check out nice design from Emma Picanyol
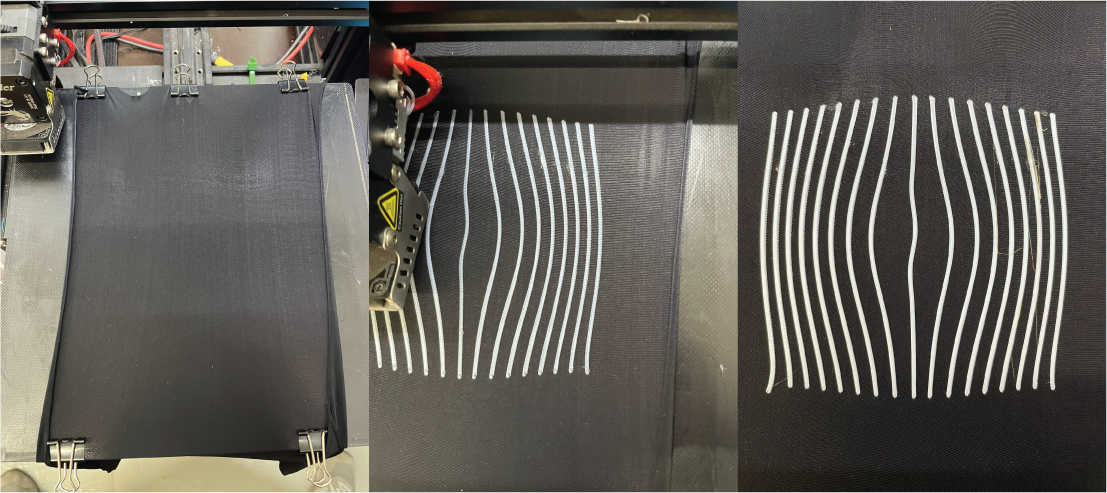
It shrinks with just a snap! This shows that the tension is very strong!
-