7. Computational Couture
This week we start the Computational and Parametric design. A design method that combine algorithms and parameters to solve and create new shapes translated into a coded computer language.
To me, it's a new language, some new methods to be capable to create interesting and uncountable designs. Interesting world ready to explore!
Inspiration
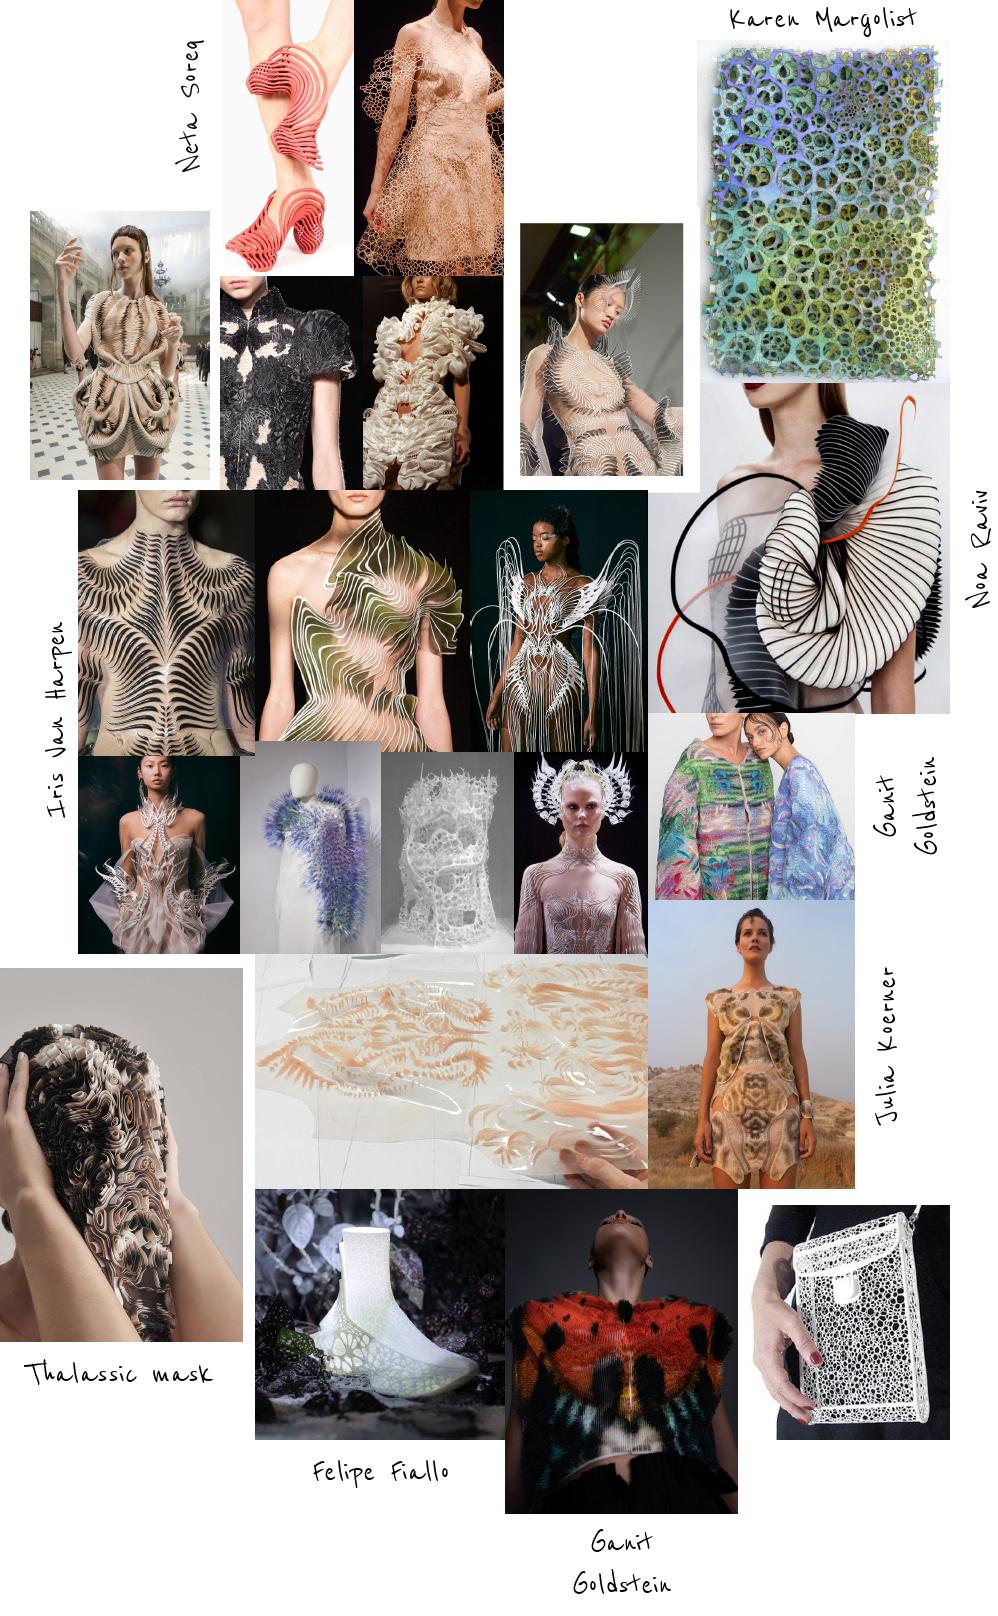
Noumena visit
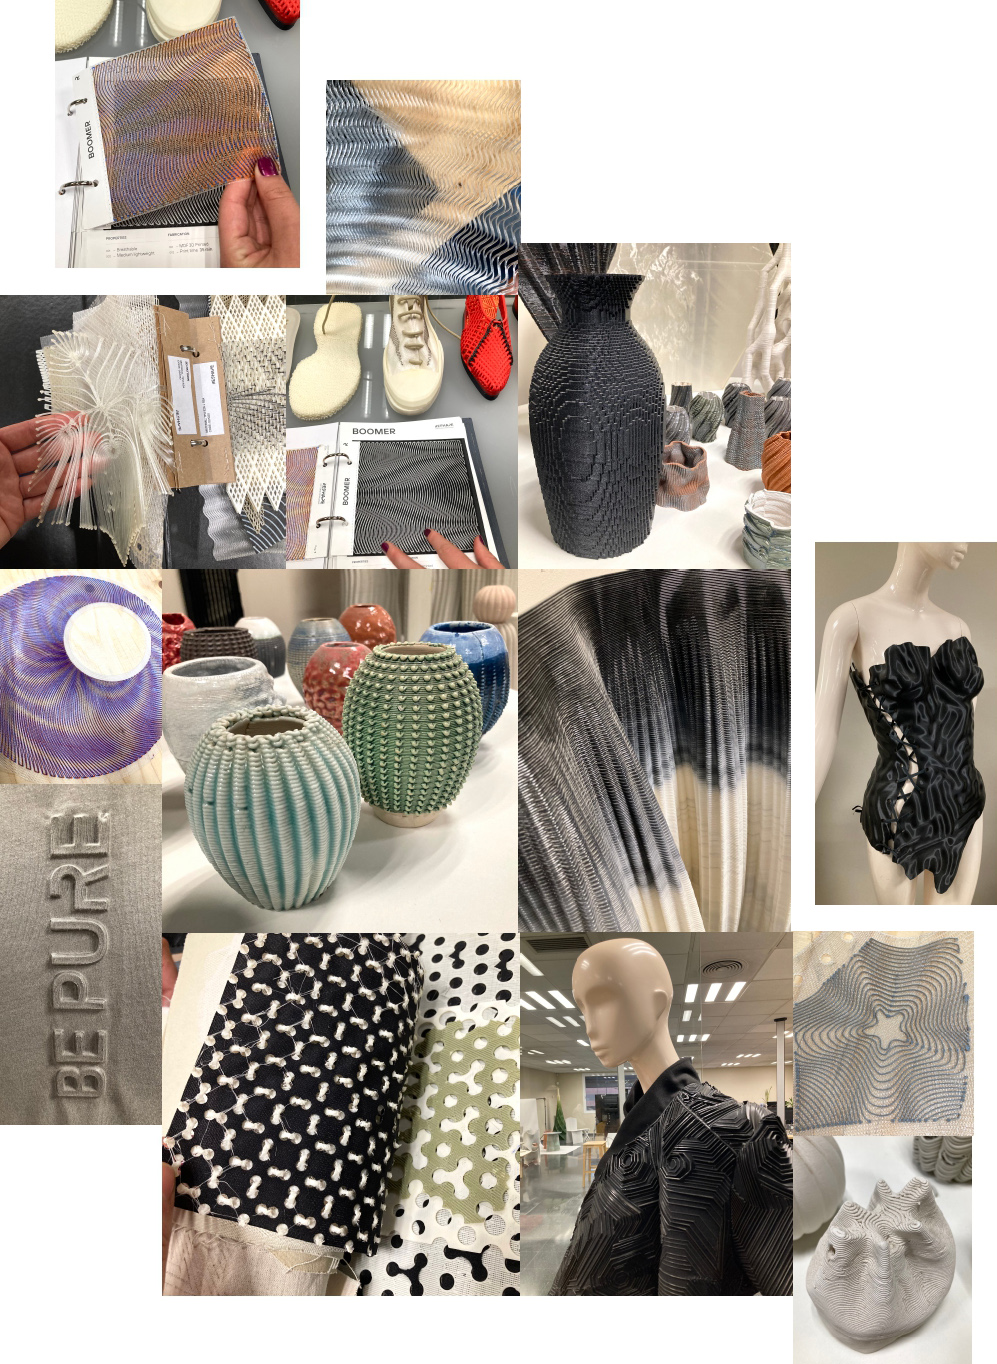
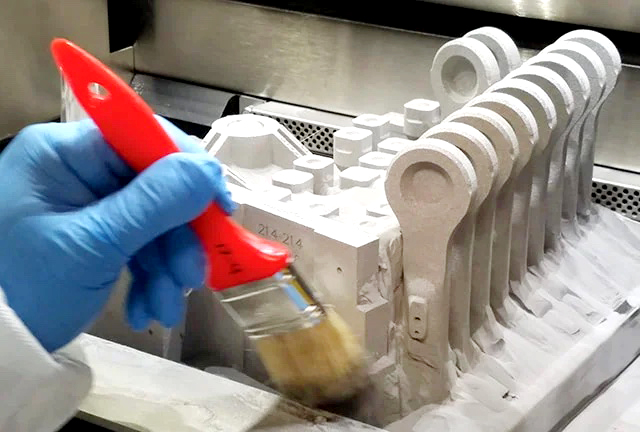
This week we started visiting Noumena, Reshape and La Maquina an studio in Barcelona where the innovations are they daily routine, specialists in 3D printings. There we could see how they work and the newest samples and prototypes that they are working on.
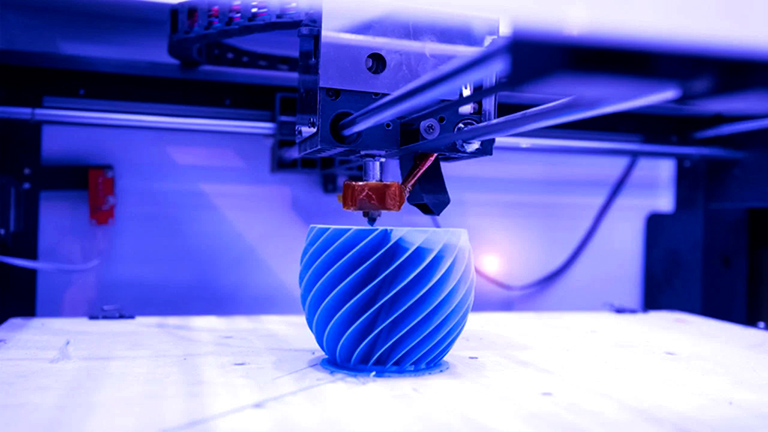
3D Print
Why 3D printer?
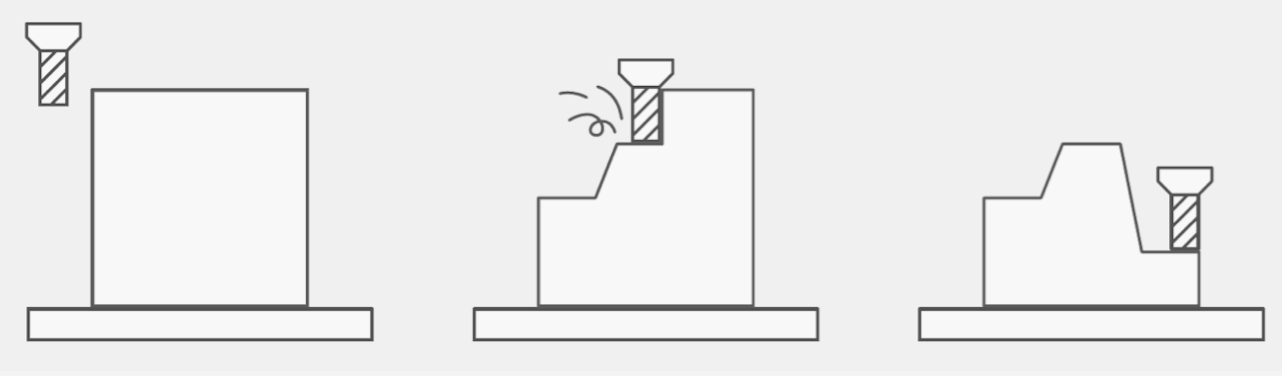
Subtractive manufacturing:
- Excess waste material.
- Generally more expensive.
- Waste of time.
- Better surface quality.
- More precise tolerances.
- Best for long-term use, high stress.
- Suitable for mass production.
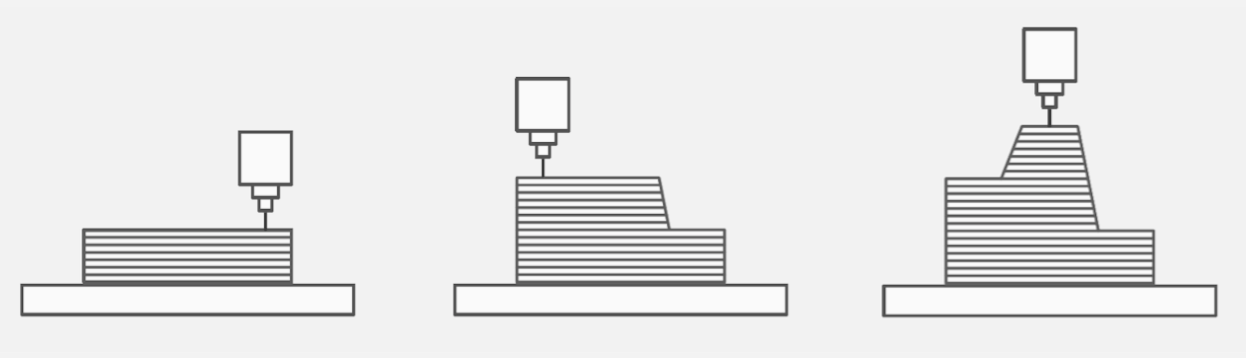
In the other hand,
Additive manufacturing:
- Minimal waste or zero.
- Economic costs of material and operation.
- Fast and easy to use.
- Poor surface definition and tolerances.
- Complexity and freedom of design.
Types of 3D Printing
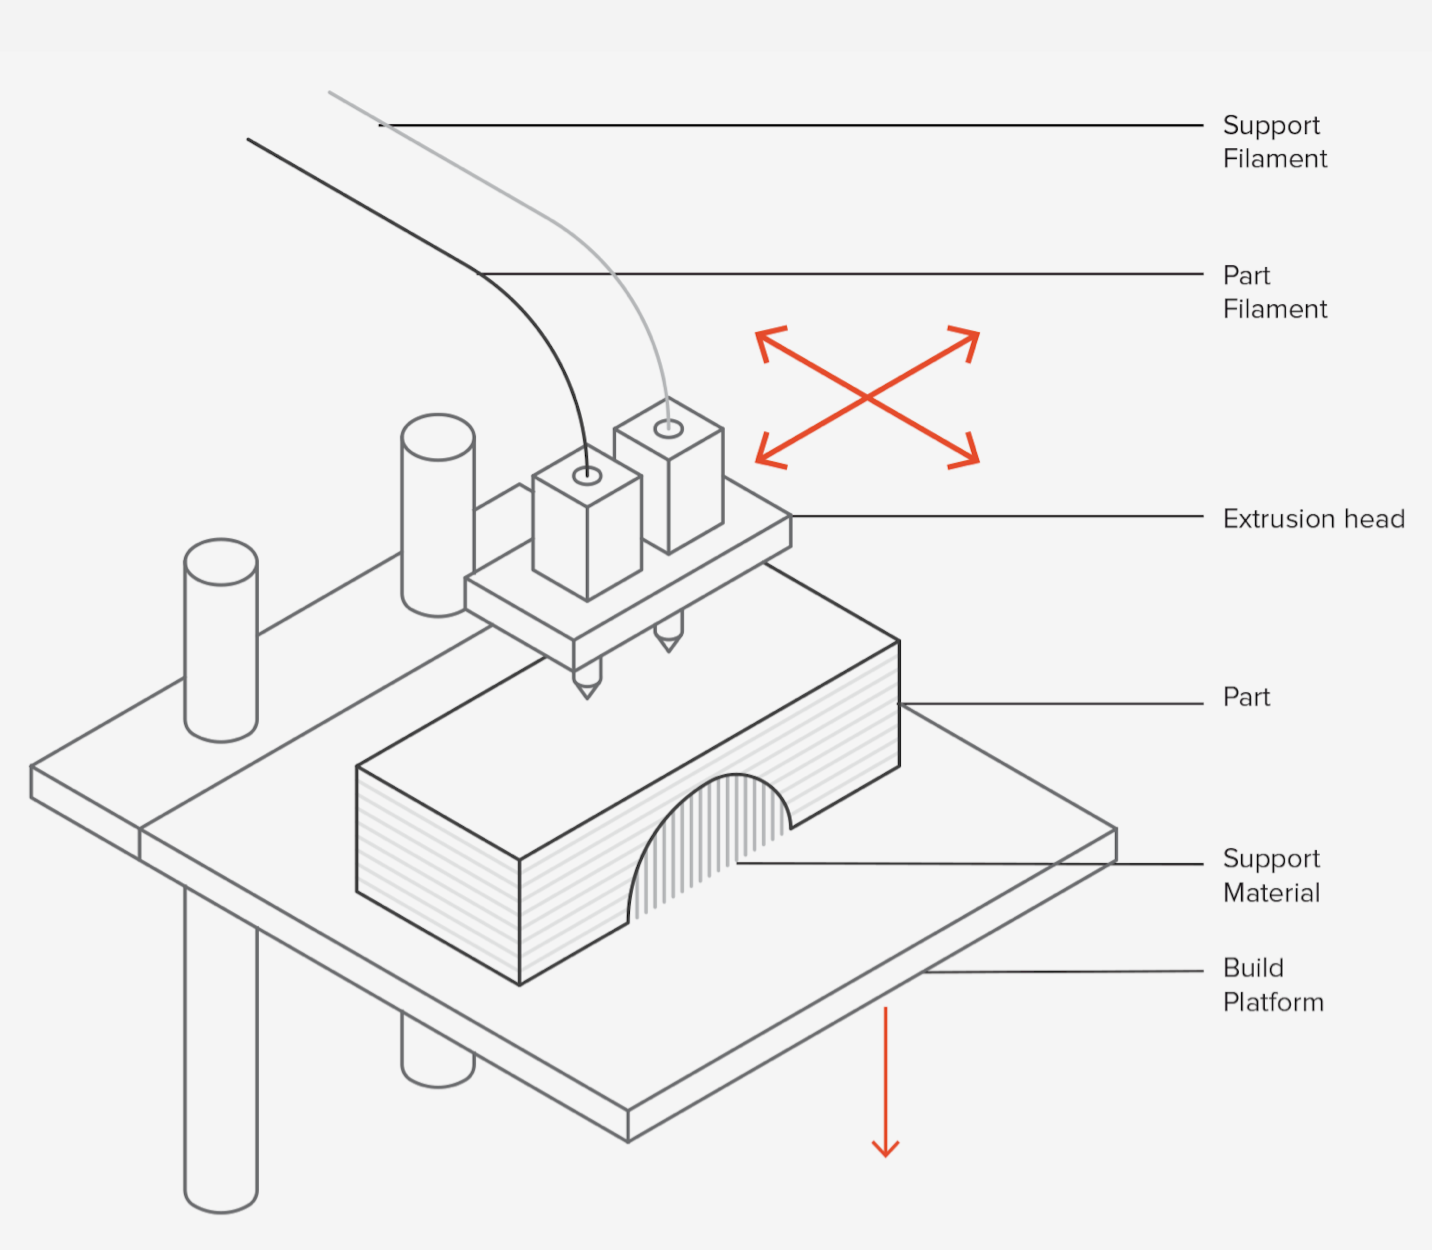
- Extrusion (FDM)
The most used technology. It builds parts by extruding lines from solid thermoplastic materials, which come in the form of a filament. The nozzles follow a predetermined path that deposits molten material at precise locations. Useful for big objects. Direct extrusion is the best option for print on fabrics.
There are 2 TYPES of extrusion:
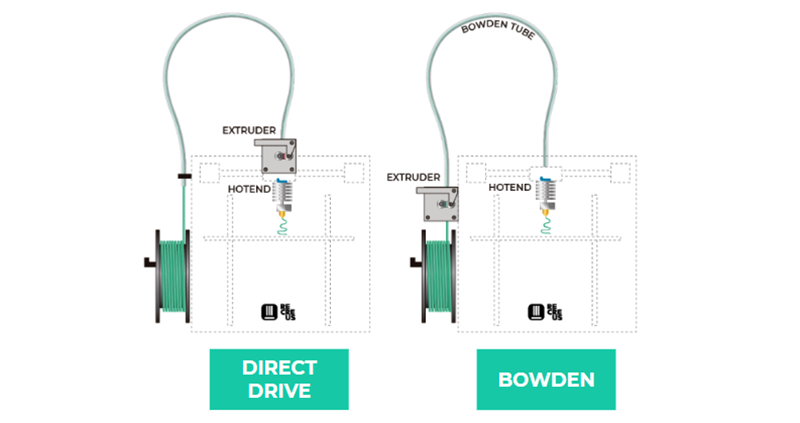
The direct extrusion:
-
Reliable extrusion
-
Better retraction
-
Less-powerful motor
-
Better for flexible and abrasive materials.
The bowden extrusion:
-
Cleaner movements
-
Larger build volume
-
Required more powerful motor
Nozzel: The piece where the filament gets out. There are different sizes.
- Light Polymerized (SLA)
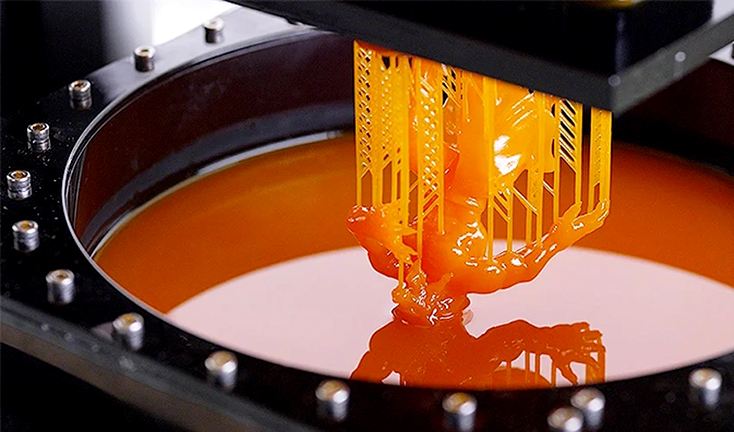
Uses a platform submerged in a tank filled with liquid photopolymer resin. once submerged, a laser maps a cross-sectional area (layer) of a pattern across the bottom of the tank solidifying the material. Laser for little objects. The base is on top.
- Powder Bed (3DP)
Uses a laser to sinter thin layers of powdered material, one layer at a time. The build platform descends one layer at a time as each cross-section of the part is scanned and sintered by the laser, solidifying it.
3D Printing materials
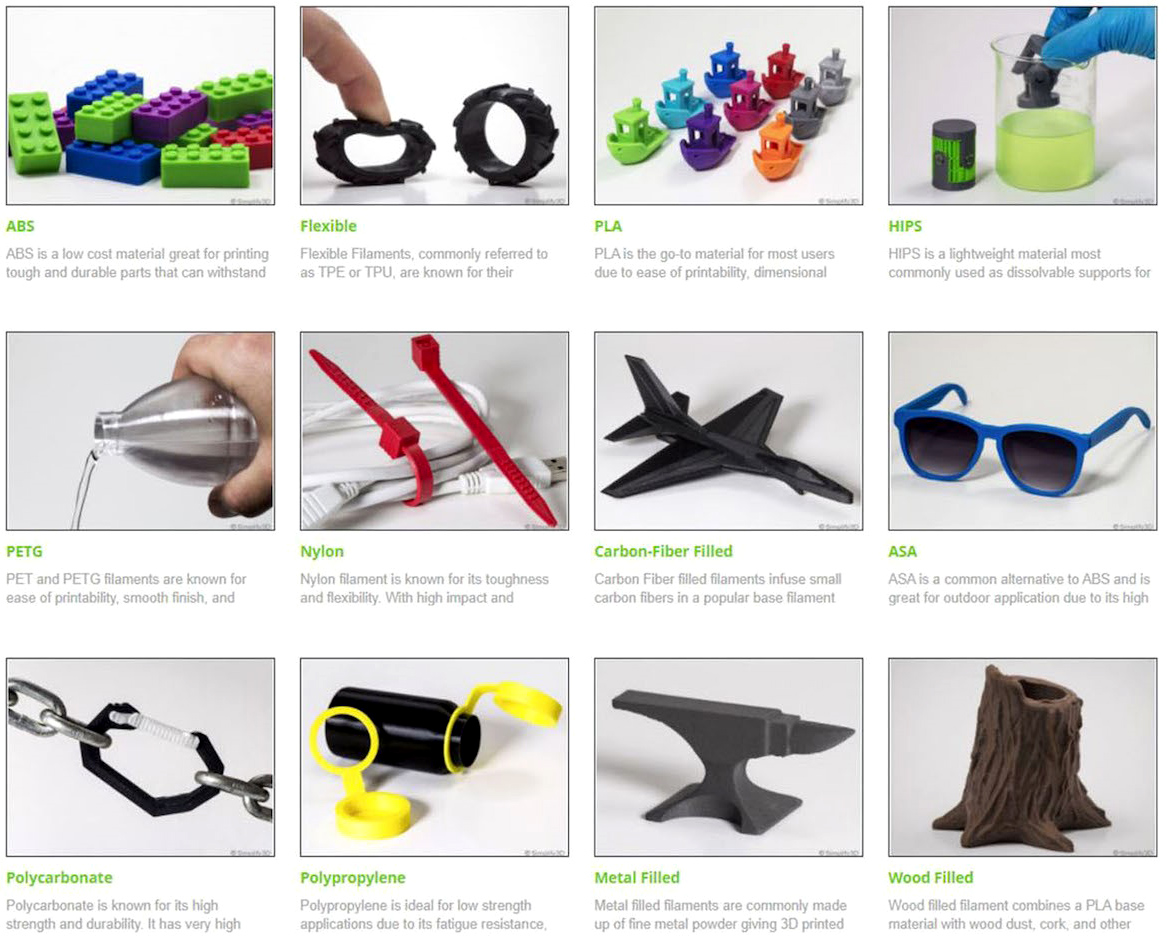
PLA (polylactic acid)
- Most common
- Excellent visual quality
- Easy to print
- Biodegradable (made from corn)
- Low impact strength. Rigid
- Unsuited for higher temperatures
ABS (Acrylonitrile butadiene styrene)
- Good mechanical properties
- Good temperature resistance
- More susceptible to warping
- High fume emissions
PETG (Thermoplastic)
- Food safe
- Good strength
- Easy to print with
- Limited dimensional accuracy
TPU- Filaflex (thermoplastic elastomer)
- Very flexible.
- Excellent mechanical properties.
- Difficult to print.
- Requires a 0.6mm nozzle.
The supports for flexible materials do not work! The design for the flexible filaments must be continuous. Direct- drive: The motor is located on the top of the nozzle, it works slower for the weight but it’s the best way to print flexible materials.
Nylon (Polyamide, PA)
- High strength.
- Excellent wear and chemical resistance.
- Low humidity resistance.
HIPS (High impact polystyrene)
- Excellent strength to weight.
- Dissolvable in limonene solution.
- Easy to paint and machine.
- Food safe, non-toxic, recyclable, won’t degrade in humid environments.
- High fume emissions while printing.
- Lack of force on the Z axis.
- Suitable for prototypes, short-term applications, and mass customization.
Keep in mind
Some aspects that you must considerate during using the 3D printing technique:
-
Layer height: This resolution setting can only be adjusted in FDM and SLA process. The thickness of the layer height determines the resolution of the surface. Examples of thickness: 0.05, 0.2, 0.3 (plus fast, less resolution) according to the resolution/ time. To print on fabrics the object height must be a multiple of 0.2mm. (0.2/0.4/0.6)
-
Shell: Number of layers on the outside of the print. More thickness of the carcass more resistance and more time to print. The Thickness of the casting must be a multiple of the diameter of the nozzle to prevent gaps from forming.
-
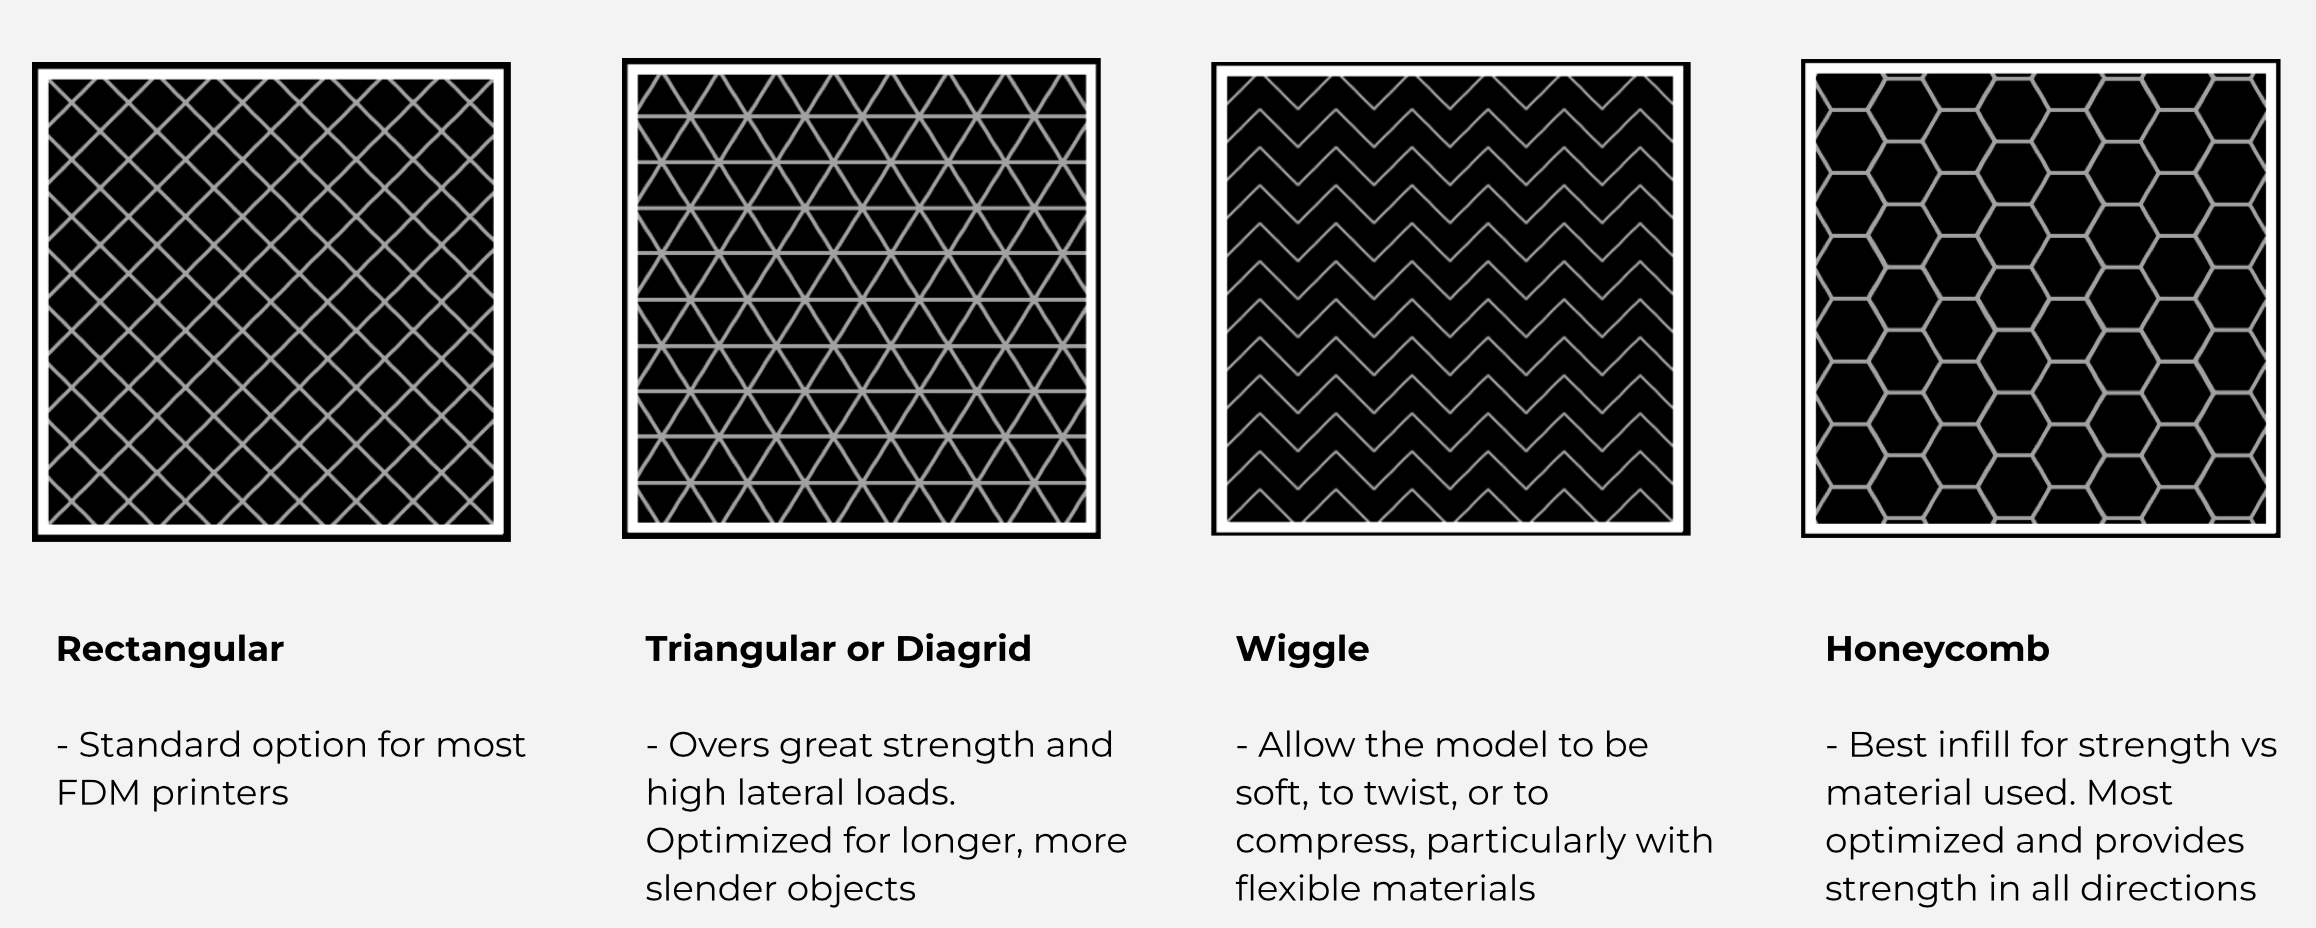
Infill: The design strength is related to fill density. Infill between 0%- 50%. If the shell thickness is high and the infill density is low= Good anchoring for screws and optimized print time.
If the shell thickness is low and the infill density is high = Good anchoring for screws. If the shell thickness is low and the infill density is low = Poor anchoring for screws.
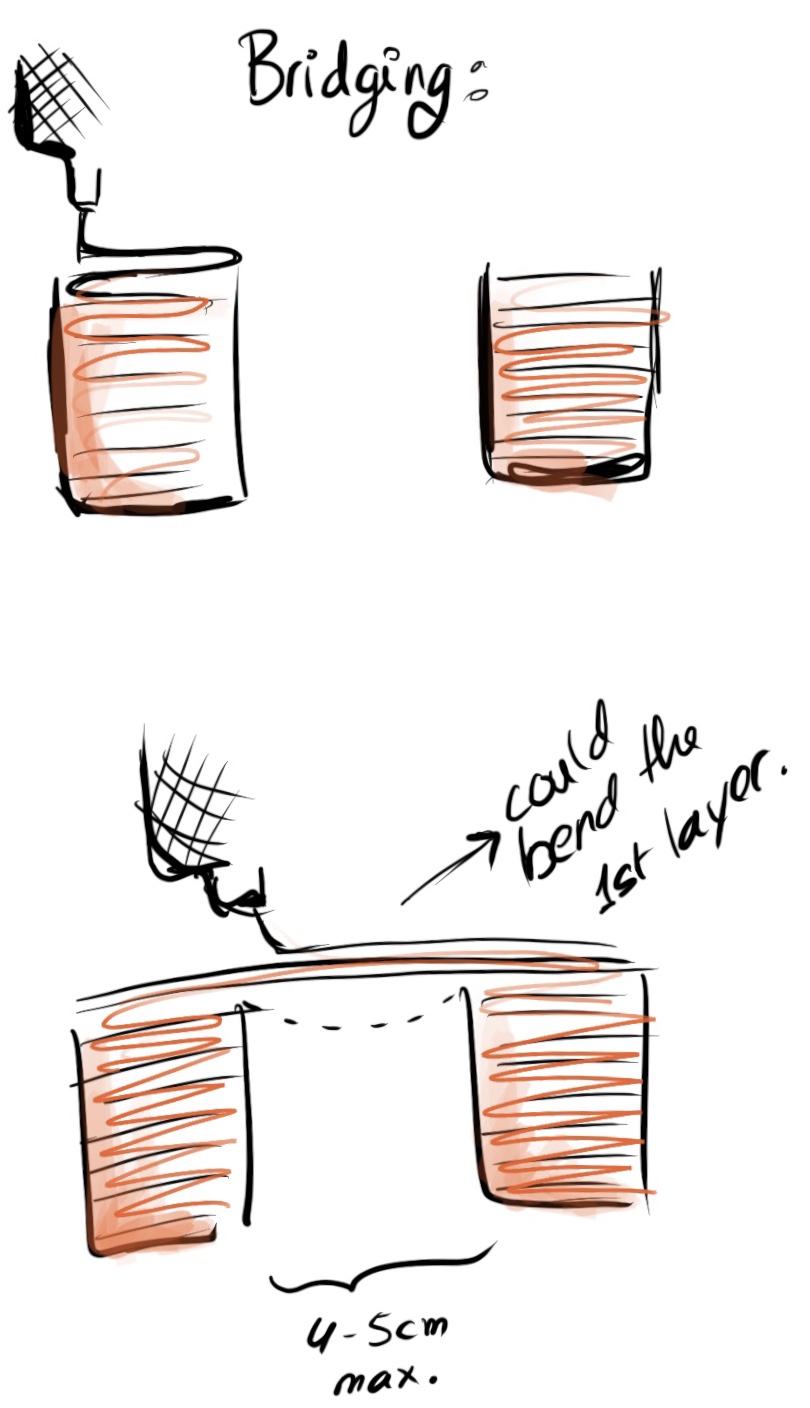
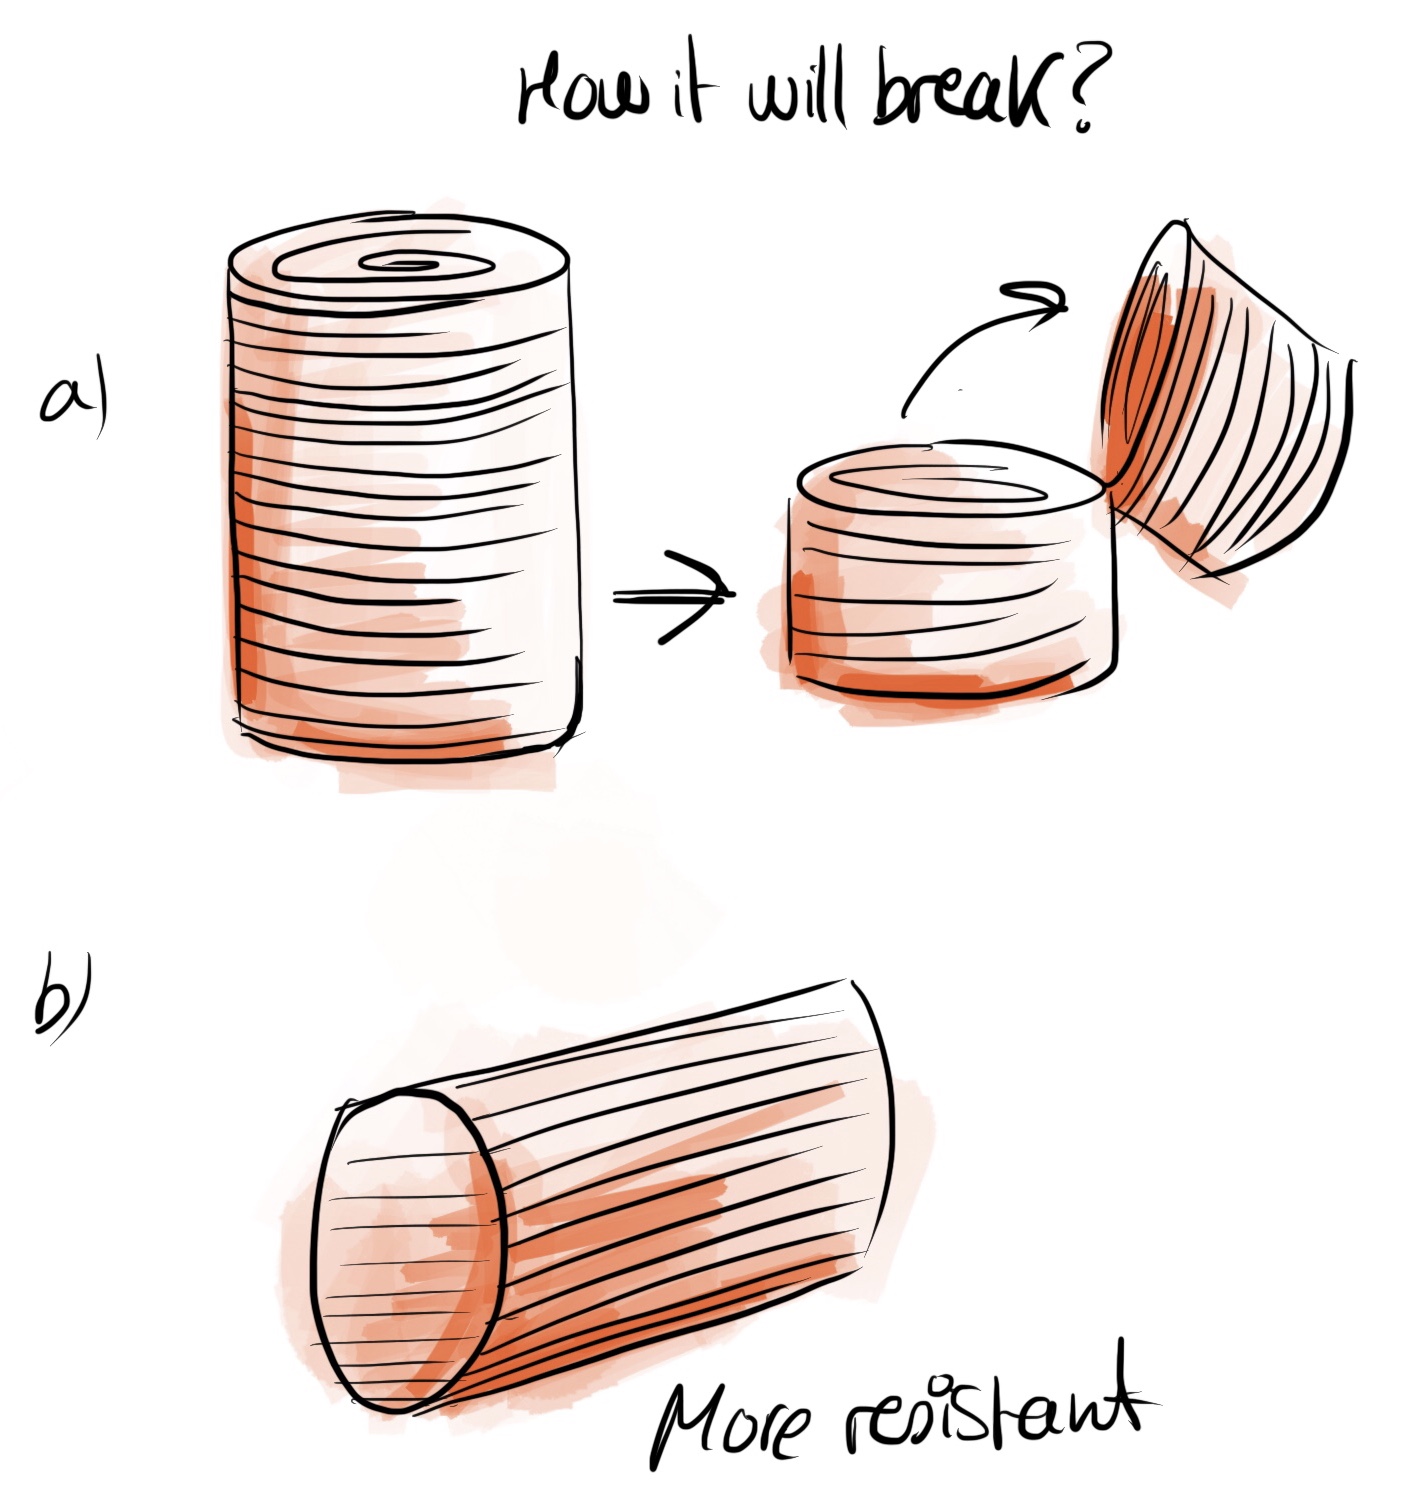
Bridging is when the distance between two points it's not so long (max. 4-5cm) and it did not require support for the 3D printer. In case the distance is too long the layers will bend, especially the first one.
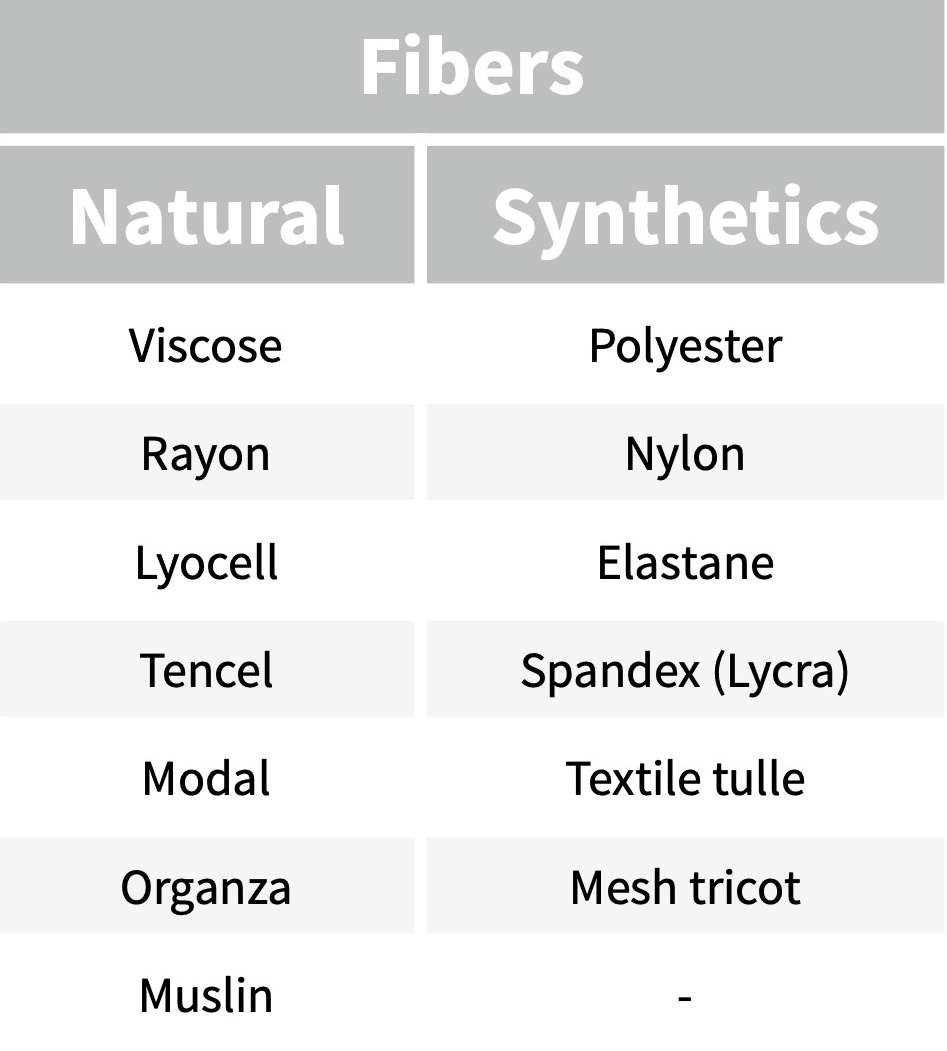
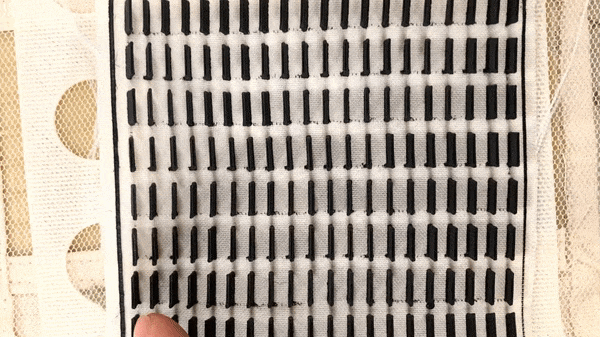
Fabrics to print on
The following graphic shows the various fabrics you could use for the 3D printer. We must take into consideration that the filament during the printing it's hot, so most of the Biomaterials for example it does not work for high temperatures.
Create textures
Depending on you design you will get different shapes:
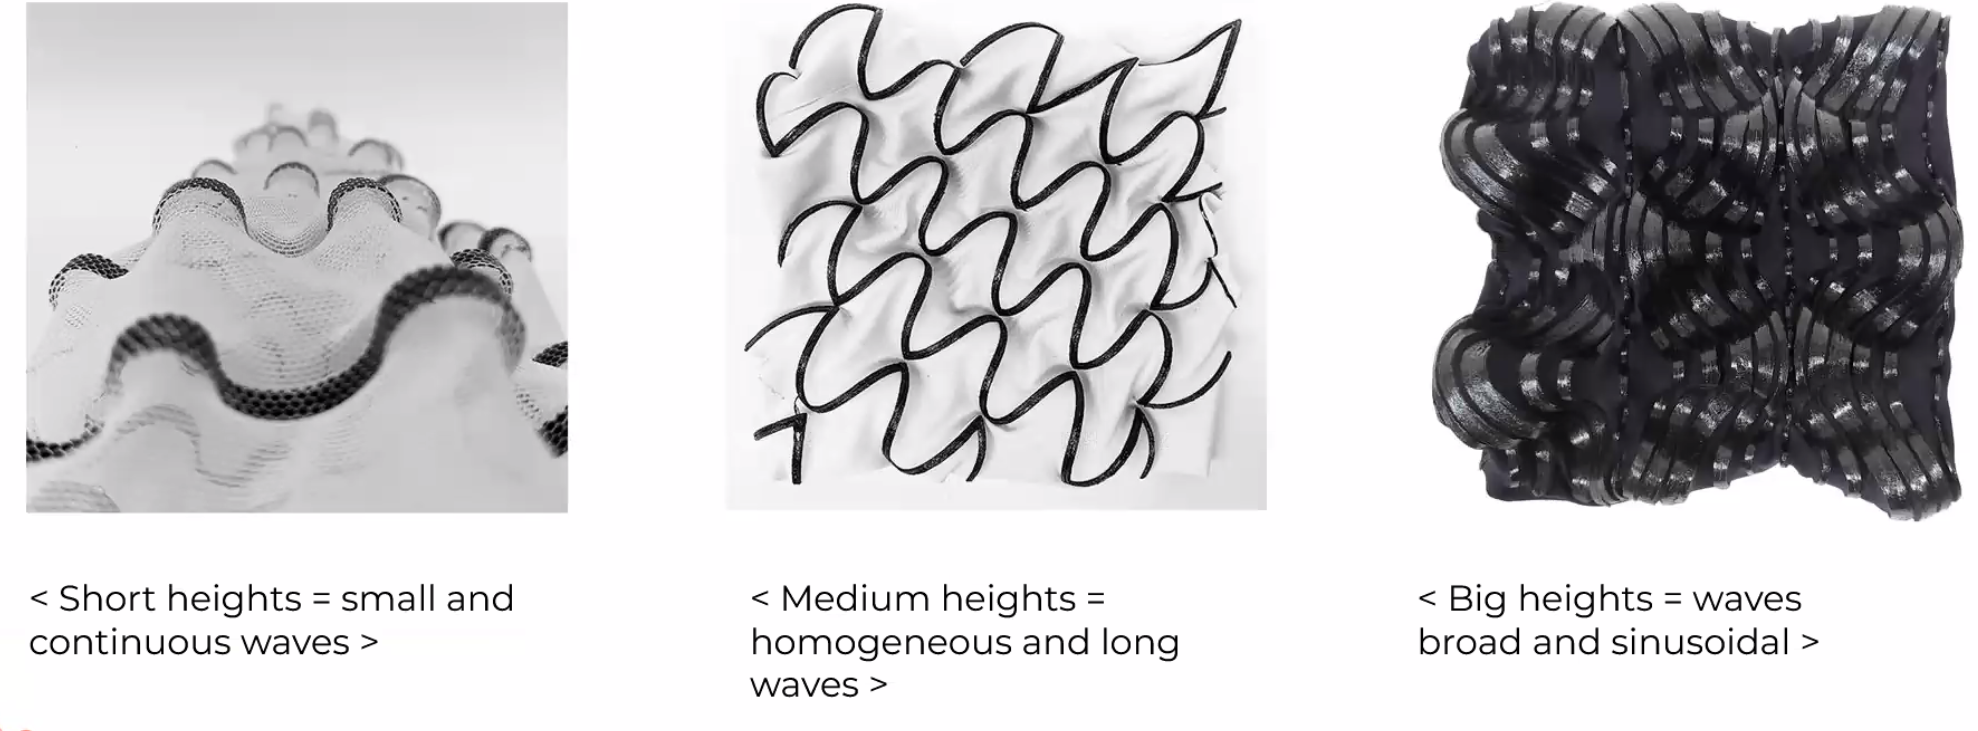
To create textures with the 3D printing machine you could stretch the fabric on the bed before printing with some clips and when it finishes the fabric will return to the initial position creating some relief.
Let's see various forms depending on the design and the fabric:
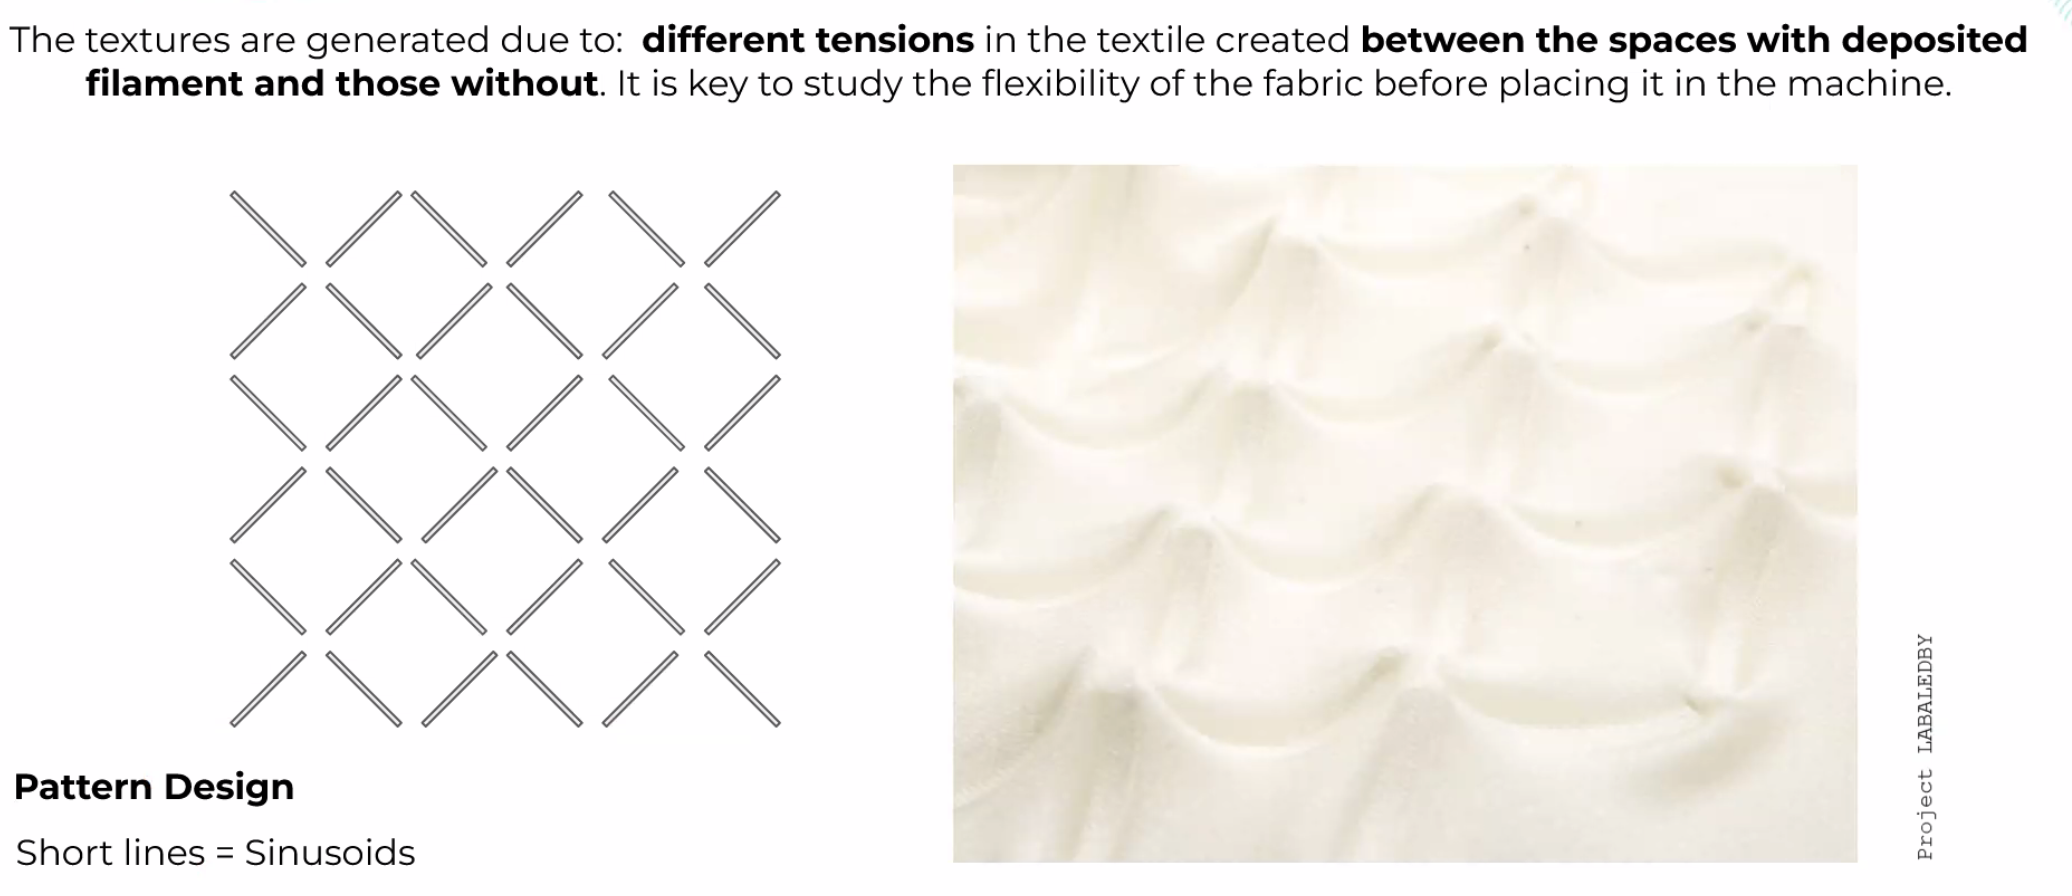
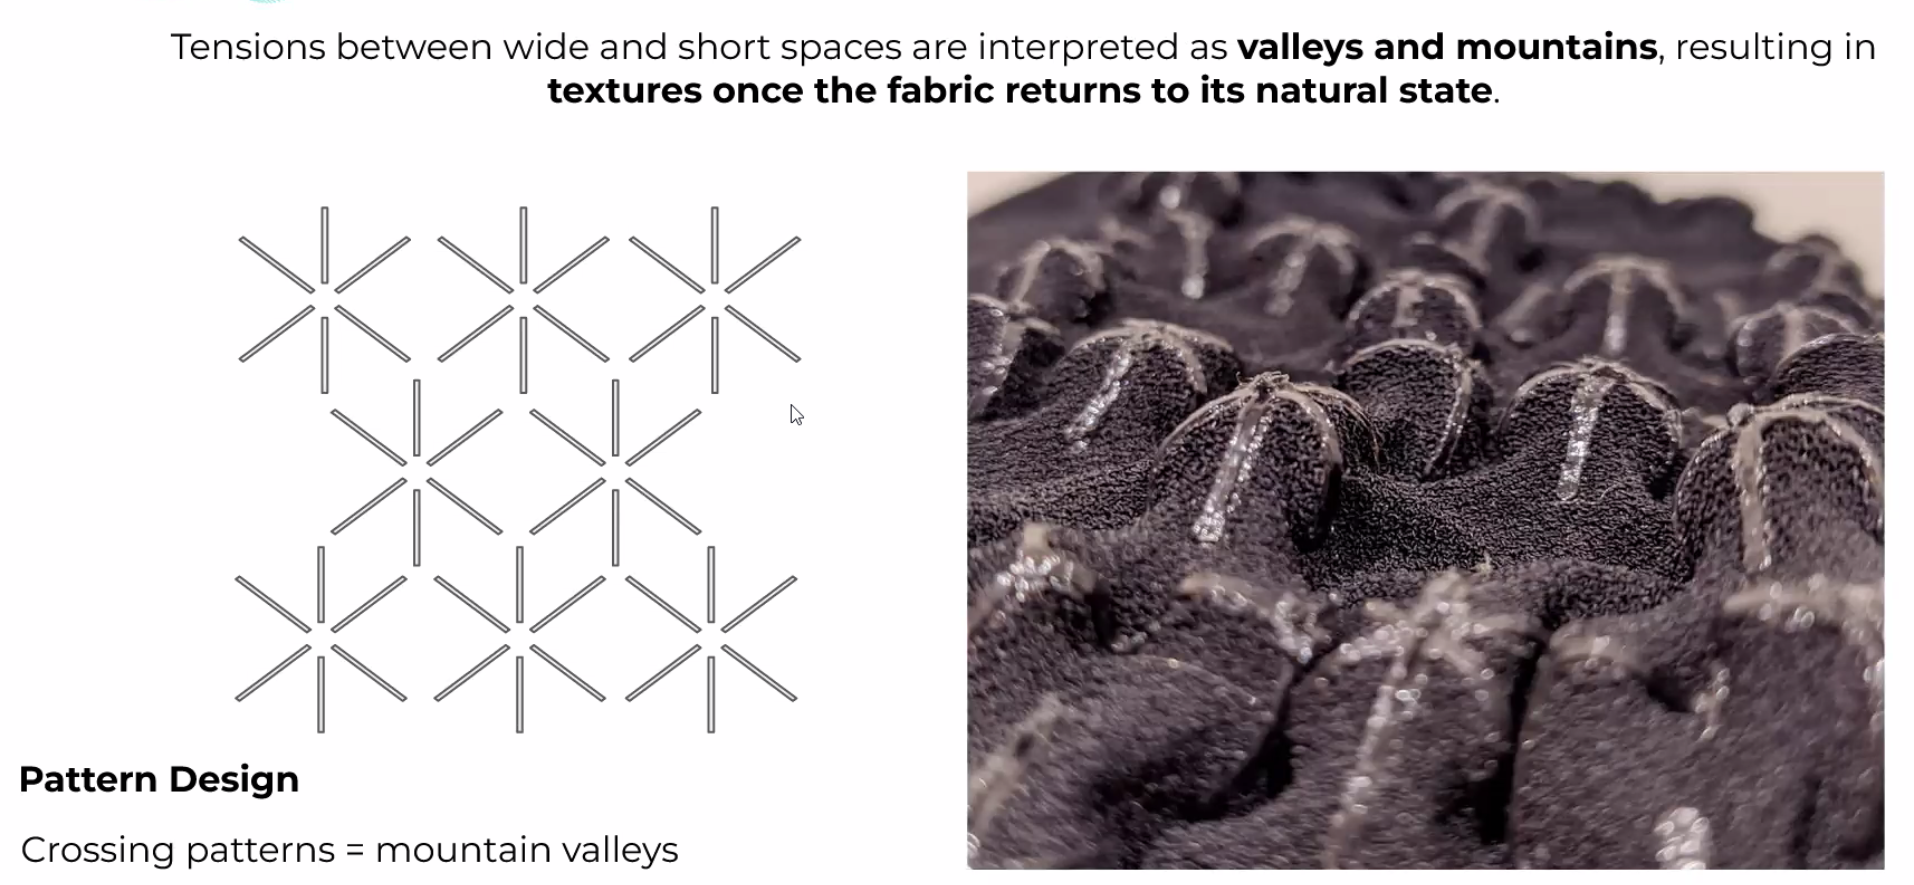
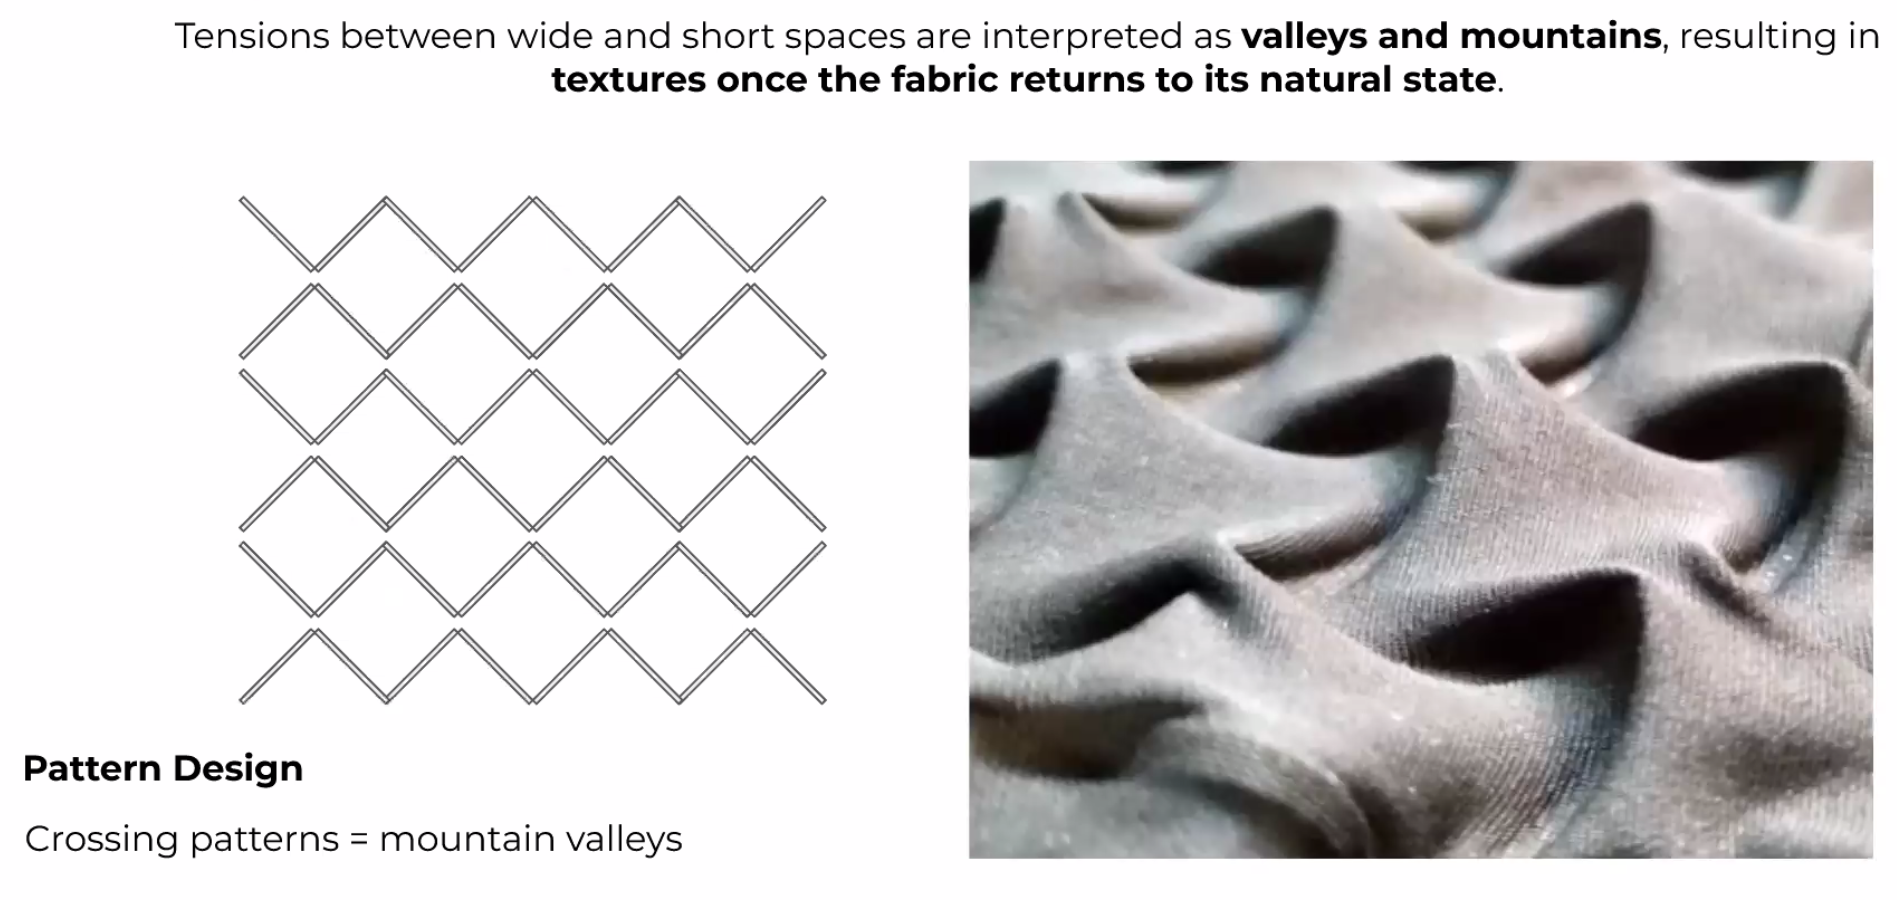
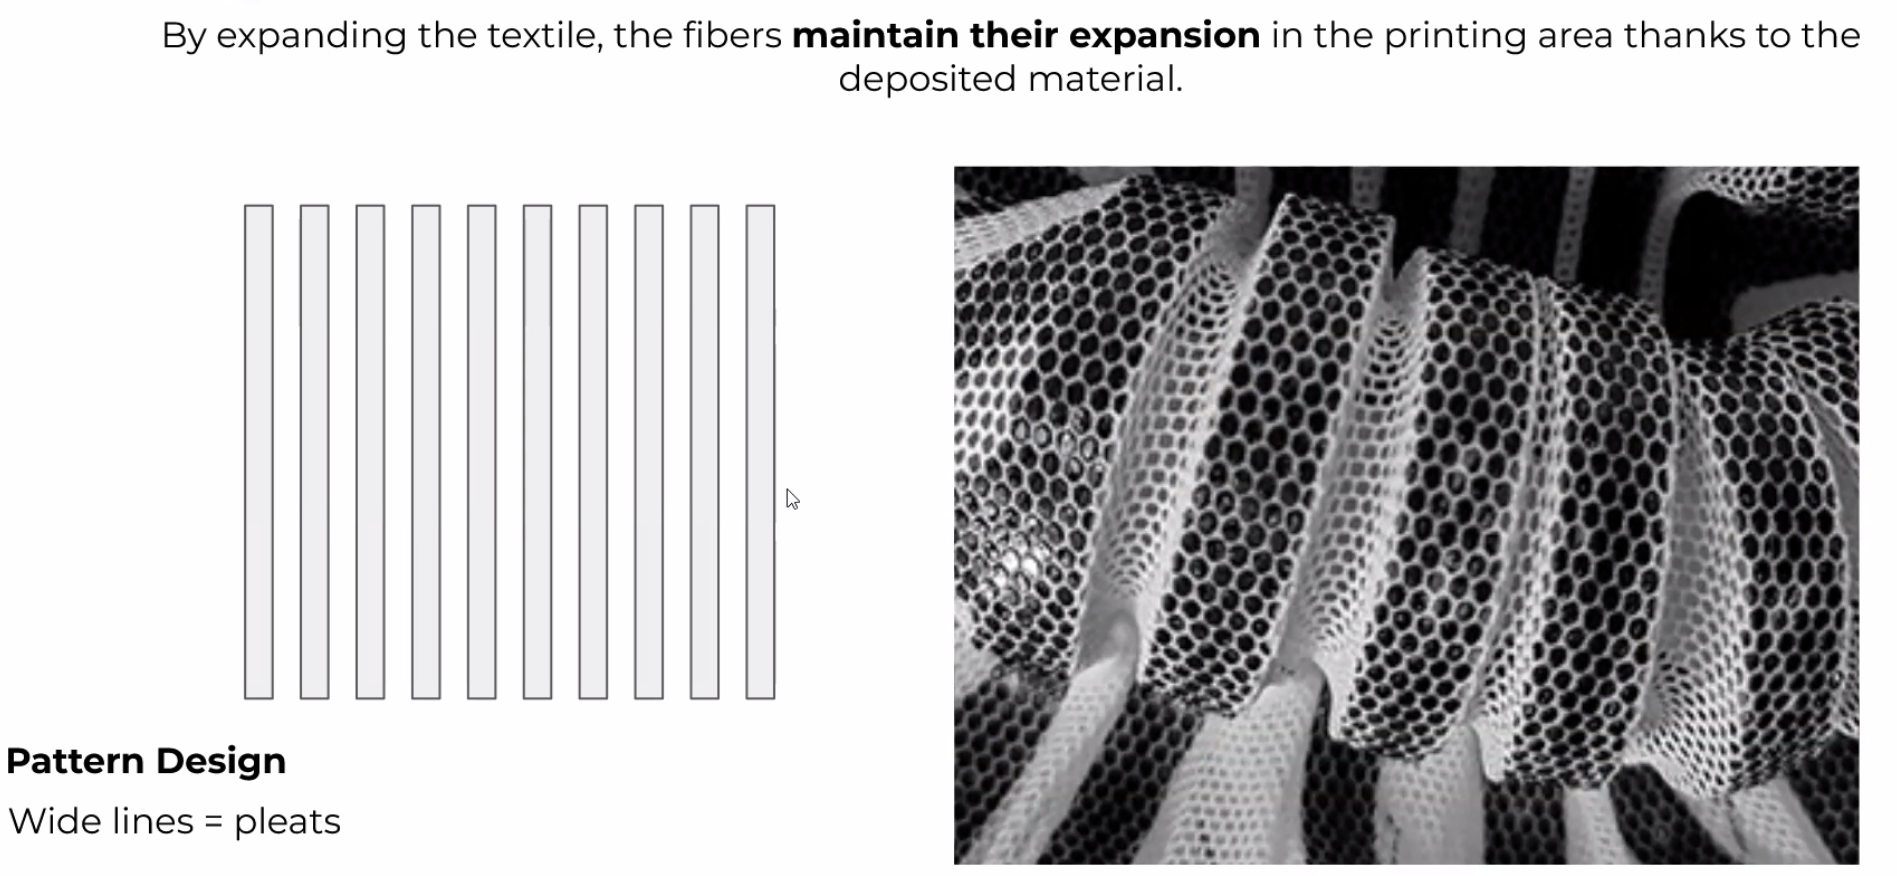
Remember: Must build a frame to keep the form in the fabric.
Techniques
- Sandwich technique: Useful to create volume on the fabric with a good unifying cause the fabric is between the object. In this case, you do not need to worry about losing pieces during the usage.
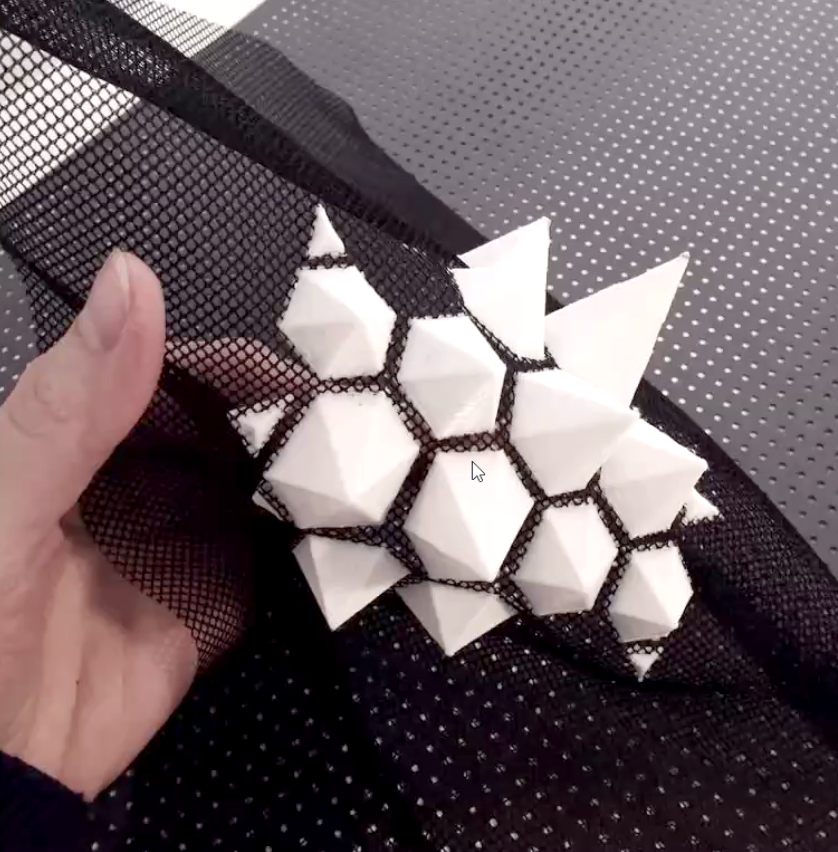
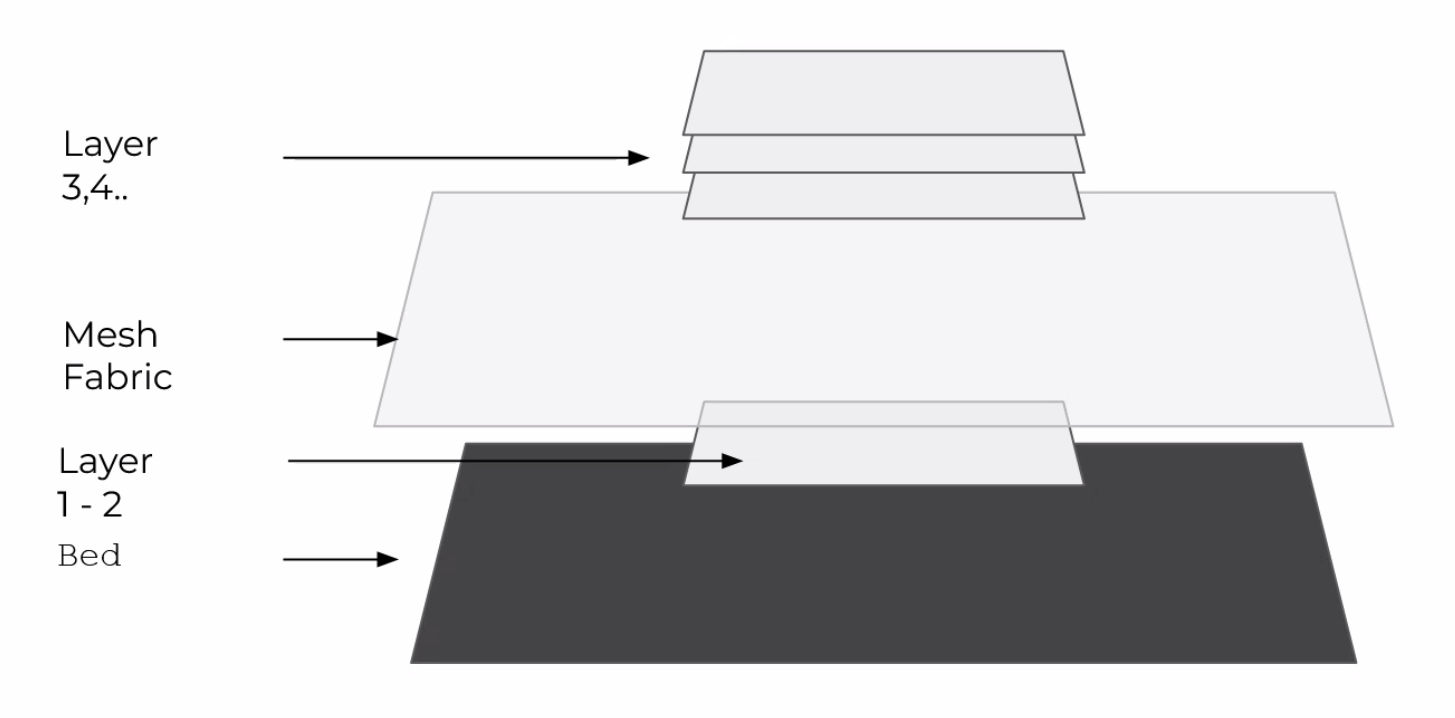
The process for this technique required to start printing 2 layers minimum without the fabric and then placing the fabric on the top and continuing printing.
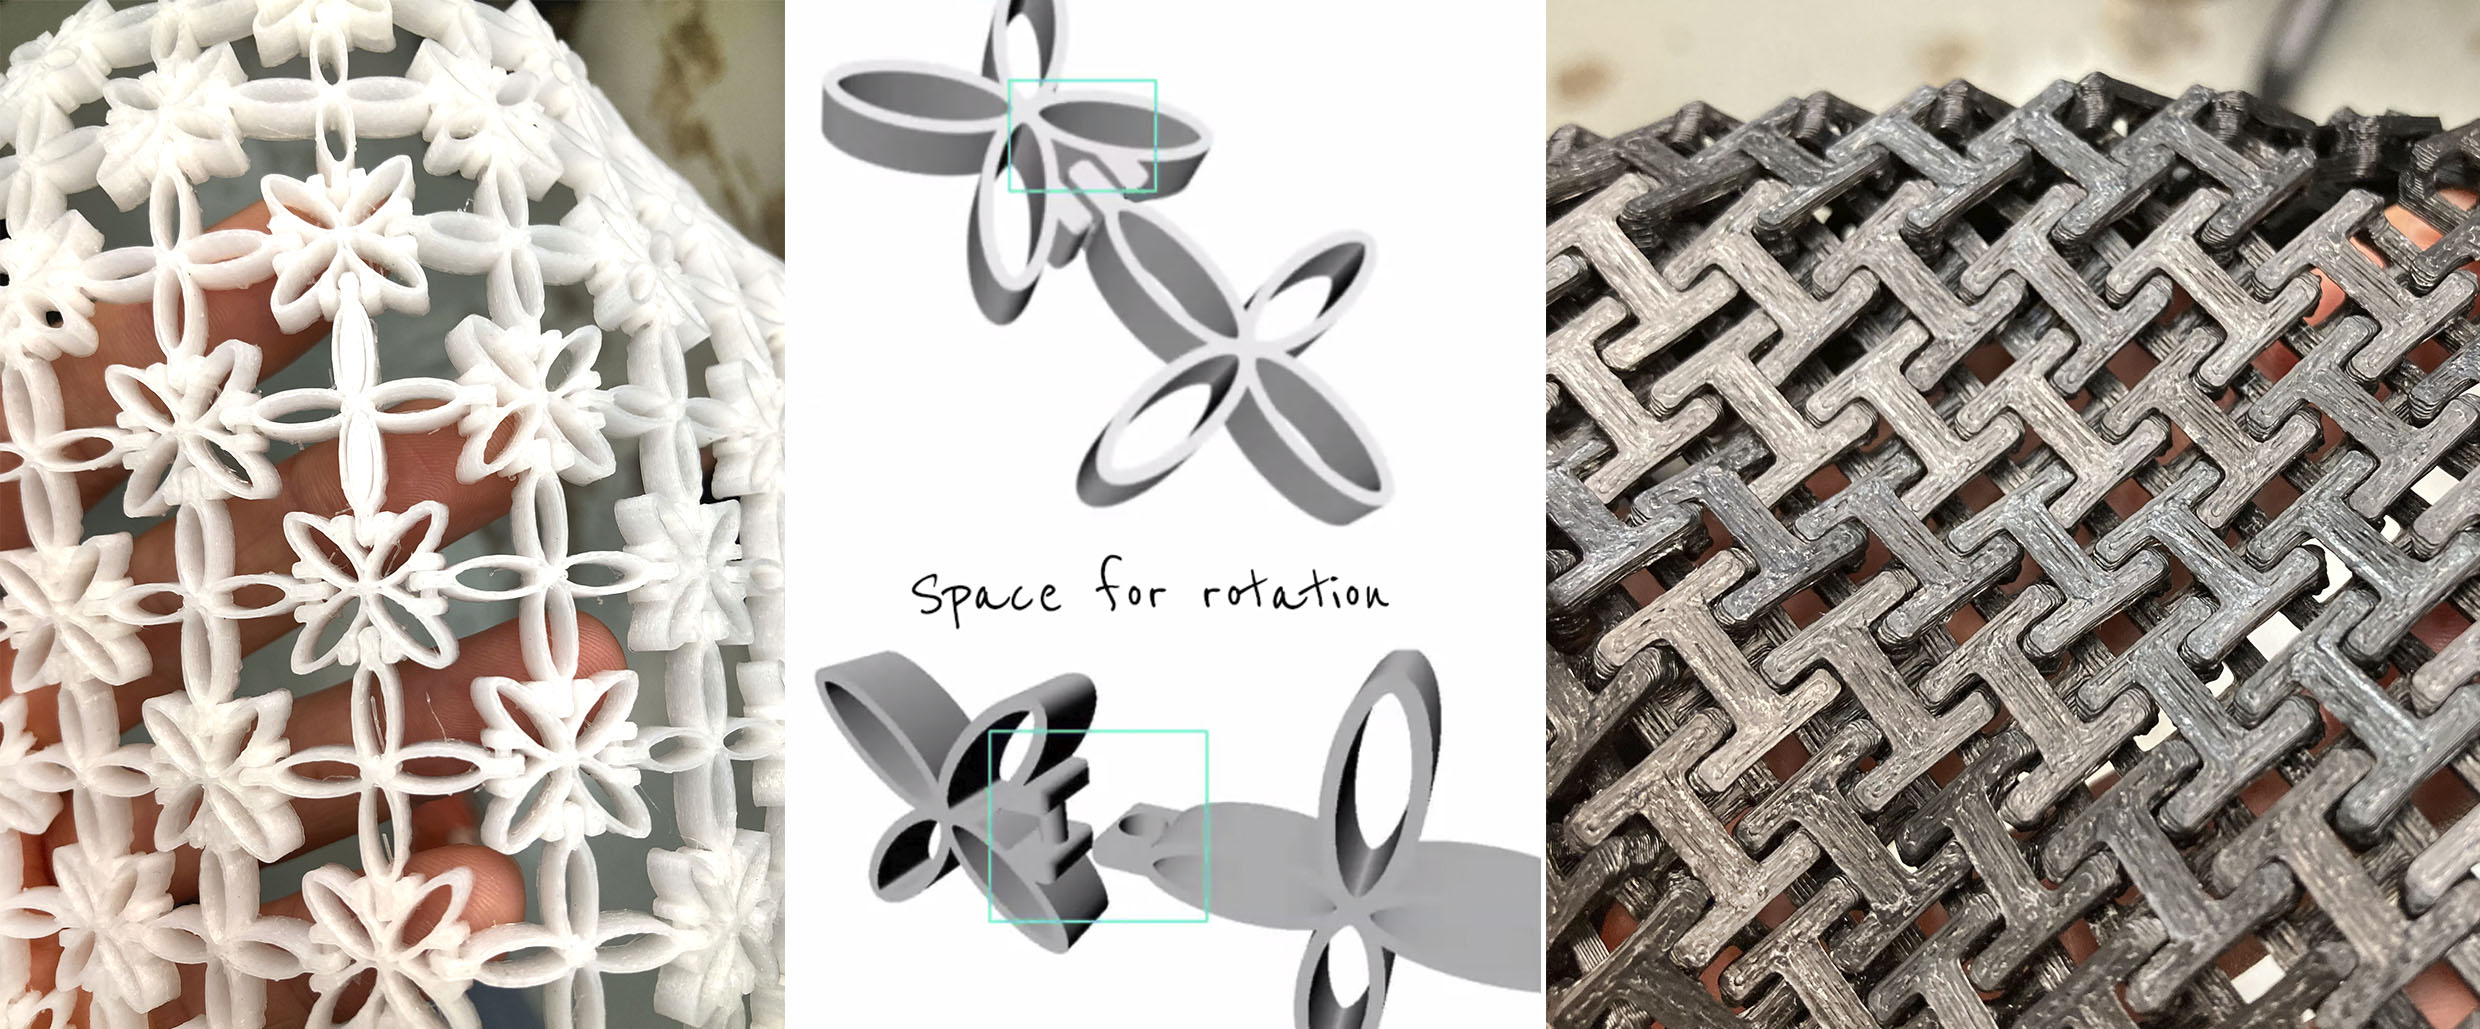
- Interlock pattern: Create fabrics or meshes with solid modules connected to one another with a fit. You must be considered the thinness and the separation between them, if not, the sample will be rigid instead of a flexible mesh.
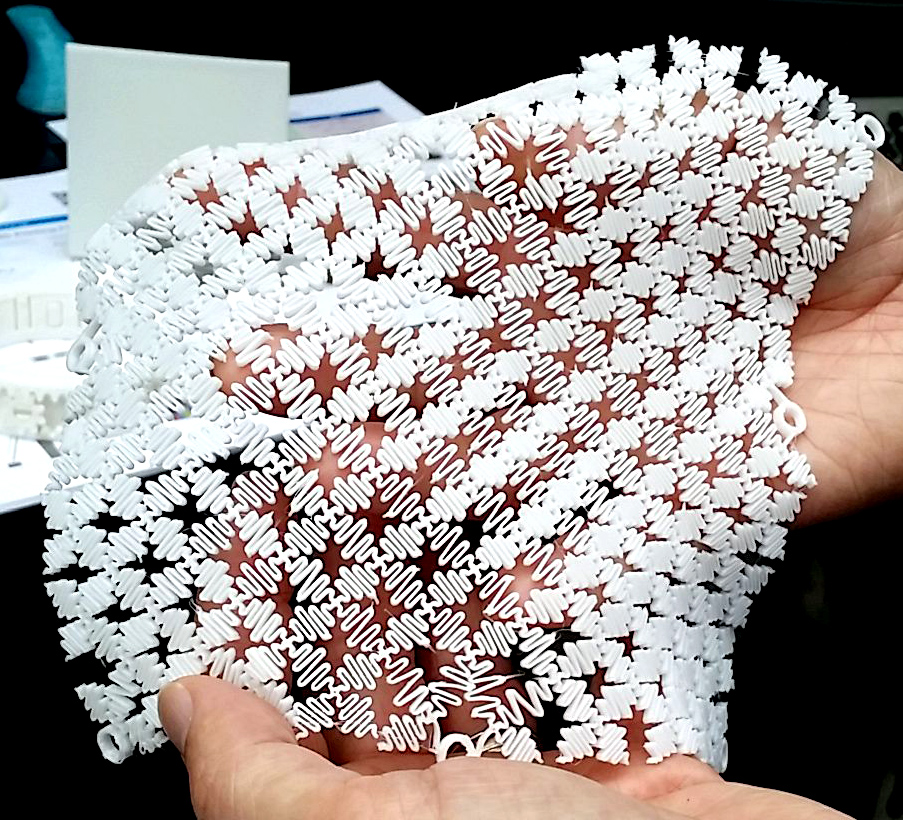
- Textures: Create a 3D pattern to have different optical rapports and volume textures.
- 3D printed textiles: Create meshes with flexible filaments with a solid pattern.
More about 3D Print:
Free objects library to print:
Grasshopper

Grasshopper is a Rhino Plug-in, famous 3D modeling software used in Design and Architecture. It is a powerful tool for algorithmic modeling and it is used to generate complex shapes through parameters.
The main advantages of Grasshopper modeling are:
- Shapes generated from data
- Parametric patterns
- Variable series
The benefit of this process is the possibility to change almost endlessly the geometry, simply changing parameters values. In fact, parameters are associated with different model sizes, and varying them you can obtain real-time geometry changes. This function is especially useful when you work with complex shapes, because it permits you to make changes without canceling and restarting your design.
Remember: Rhino gives the scale, and Grasshopper works in units.
Useful definitions:
- Bake: Comeback the object/points to Grasshopper to Rhino to be able to modify.
- Shatter: Trim in grasshopper.
- Lock solver: Freeze GRasshopper to copy some parts and work with this part of the file, it is less heavy.
- Flaten: Make one list of data.
- Voronoi: To create cells.
- Kangaroo: Plugin to work with mesh.
- Load: Gravity in Kangaroo.
- BB Offset: To pass a Polyline to a line with thickness, an offset.
- Boundary Surface: To closed polygons, such as a closed polyline or a parcel, or from surfaces.
- Extrude: To project your surface in an axis X, Y or Z.
- Mesh Brep: Bodies are made up of triangular polygons, called facets. The facets of a mesh BREP body can be collected into faces.
Some information about the state of each object based on their color:

- Parameter with no warnings or errors
- Parameter with warnings
- Component with warnings
- Component with no warnings or errors
- Component with a preview disabled
- Component that has been disabled
- Selected component
- Component with an error
In Grasshopper, you could organize your data in a list (all the data in one folder) or a tree (More folders, more organized, the line is discontinuous).
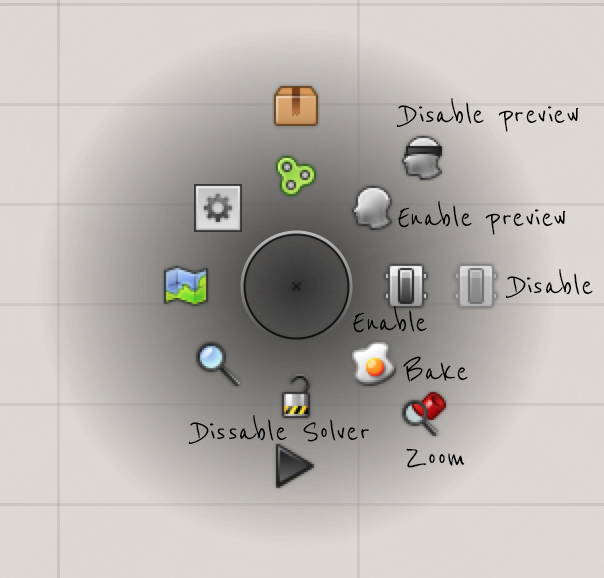
- To disconnect: cmd + click the connection will appear an arrow with a minus.
- To add more than one connection in an input: click SHIFT
- To Bake: by right-clicking a component and selecting Bake. A dialog will appear that allows you to select onto which Rhino layer the geometry will bake. Grouping your baked geometry is a convenient way to manage the instantiated Rhino geometry, particularly if you are creating many objects with Grasshopper.
Be must save the file .STL for the 3D Printer.
More about Grasshopper:
- Grashopper Guide PDF
- Alogarithmic Sketchbook
- Parametric house
- Flower file
- Voronai diagram
- Differential Growth Shoe
- Growing ring
Plugins
The plugin, also called add-on or extension, is computer software that adds new functions to a host program without altering the host program itself.
During this week we work with:
Workflow
PROCESS:
STL/OBJ - Slicer (layers) CURA software - 3d printer
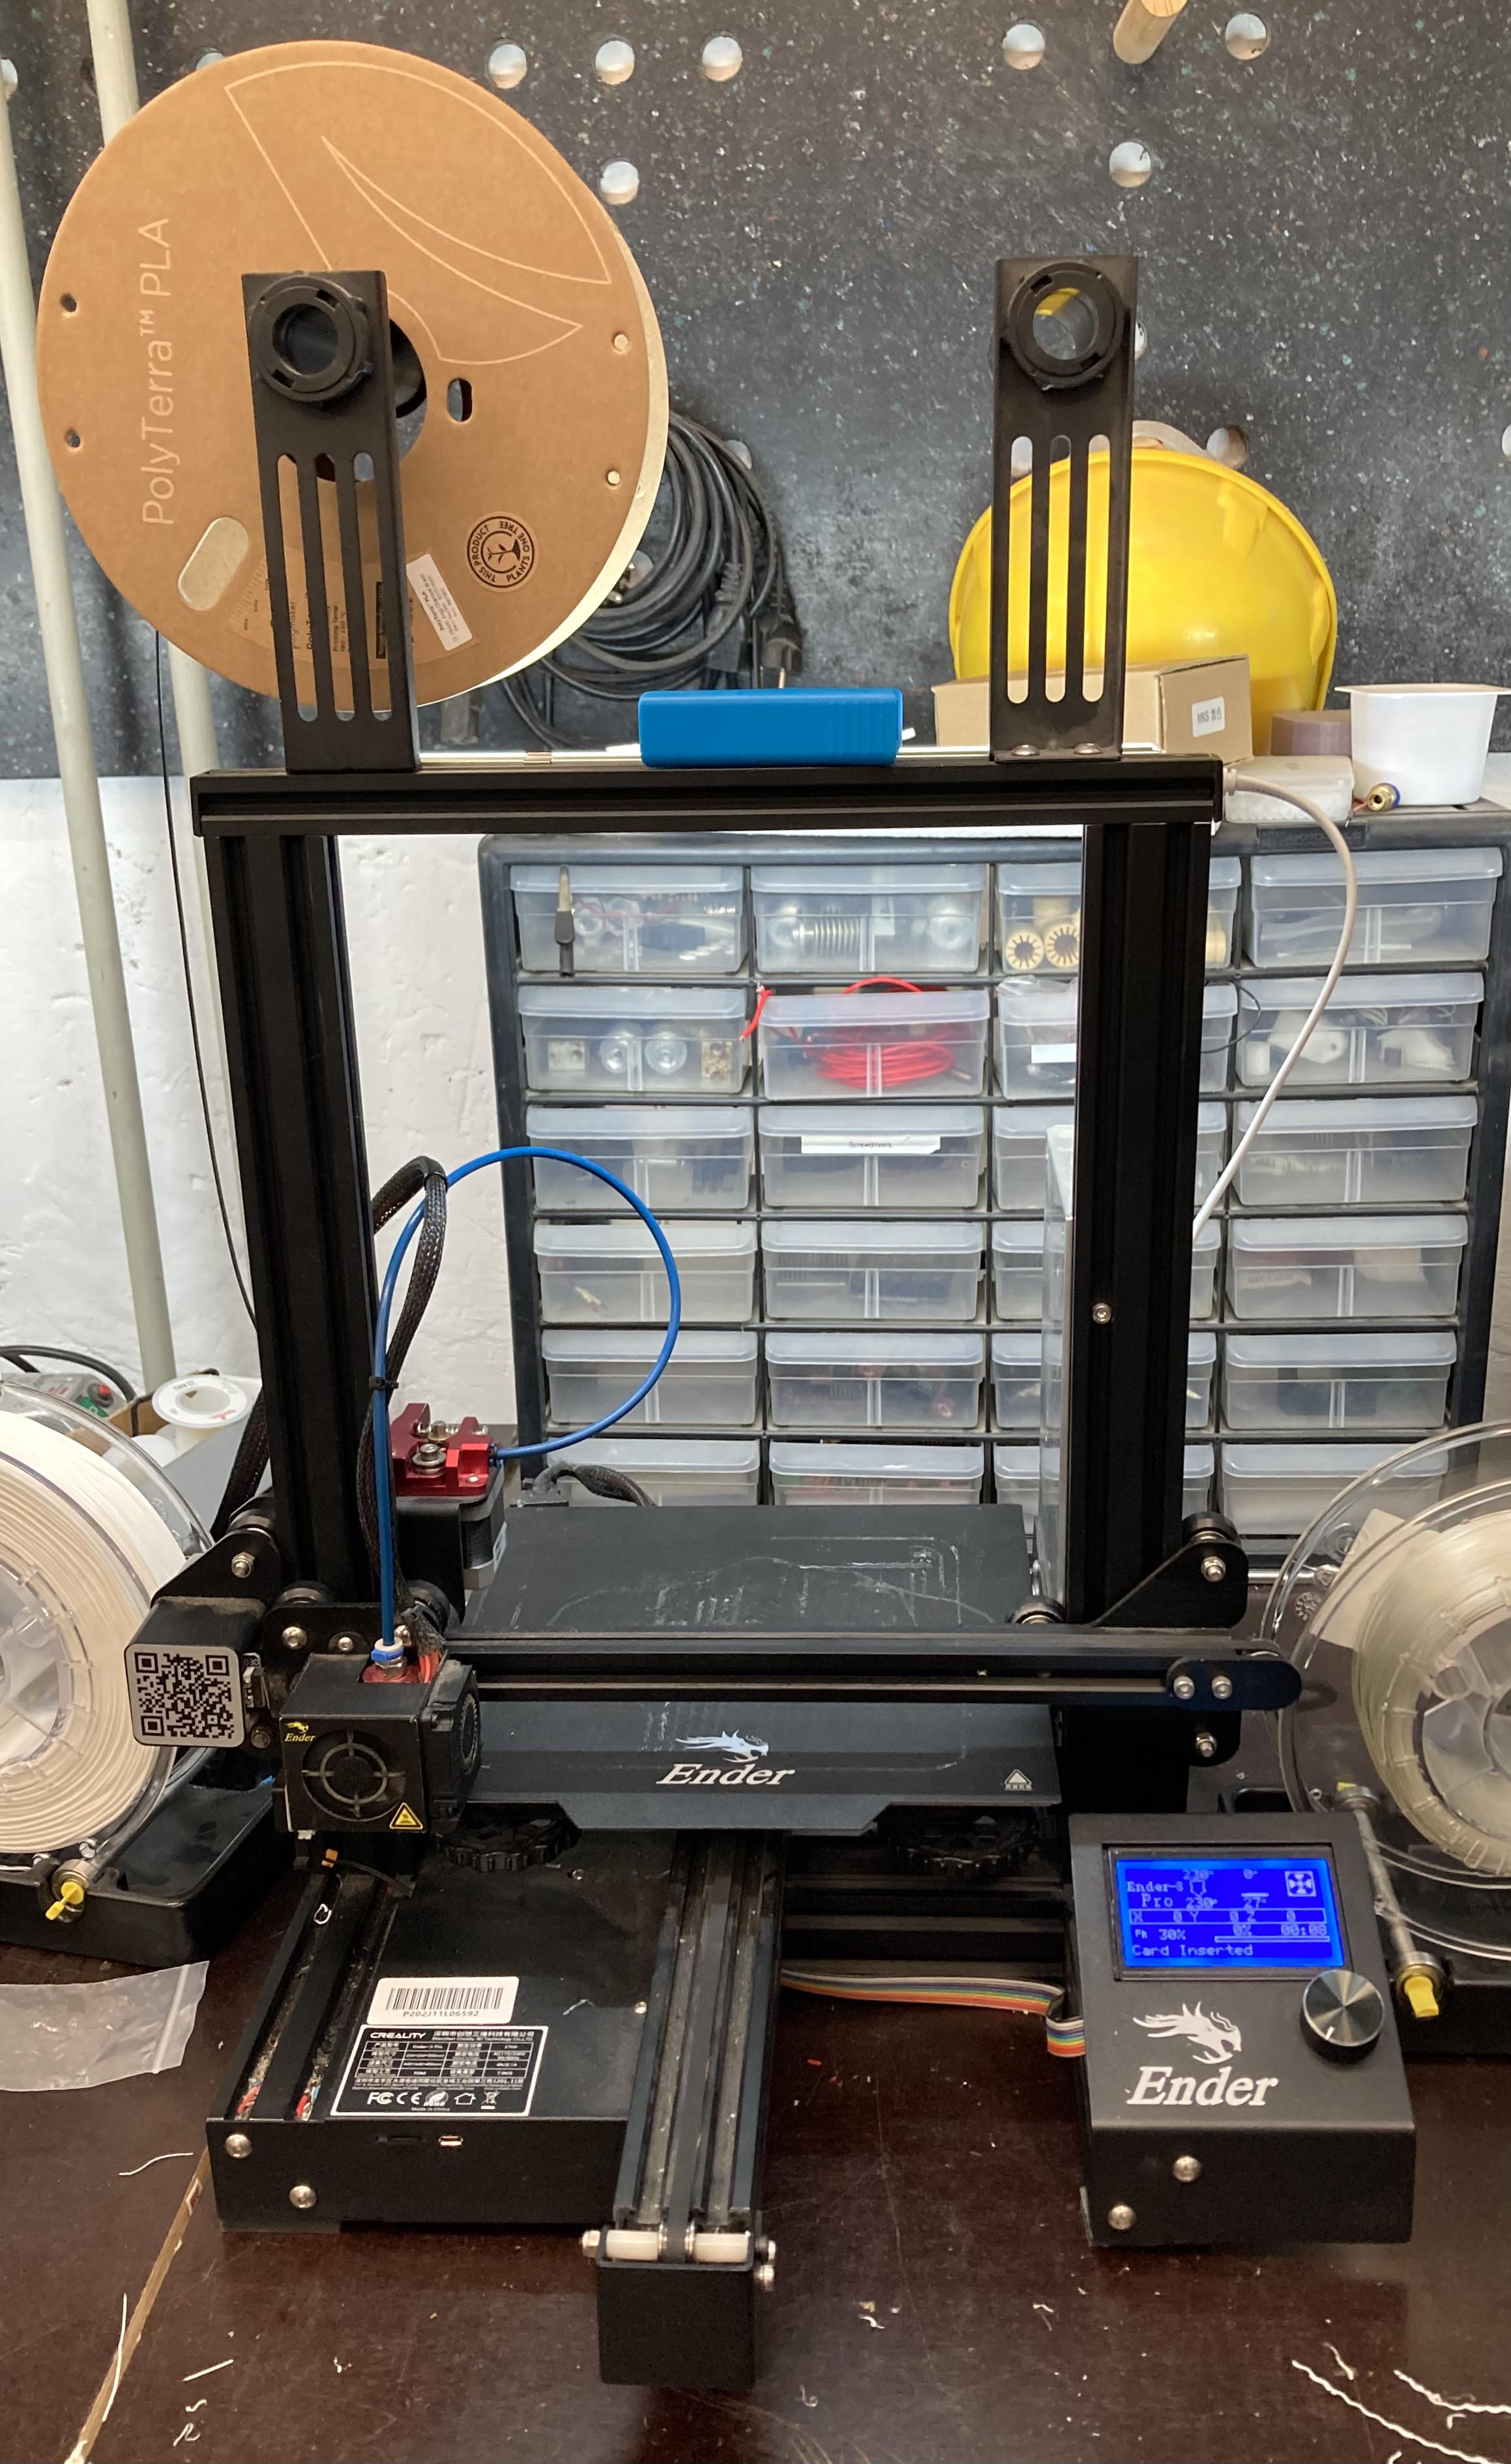
In the FABLAB we have the PLA (PolyTerra) and the FLEX (SmartFil) options to print, both of them 1.75mm nozzle size.
Set the machine:
1) Home.
2) Place the fabric over the bed using clippers. It’s easy to start clipping in the middle of the bed. It Depends on the design stretch or not the fabric.
3) Calibrate the bed. The nozzle must not drag the fabric and must briefly touch the textile.
4) Take the nozzle in the origin.
5) Cut the filament diagonal.
6) Push the filament (must go out a little to clean the previous material).
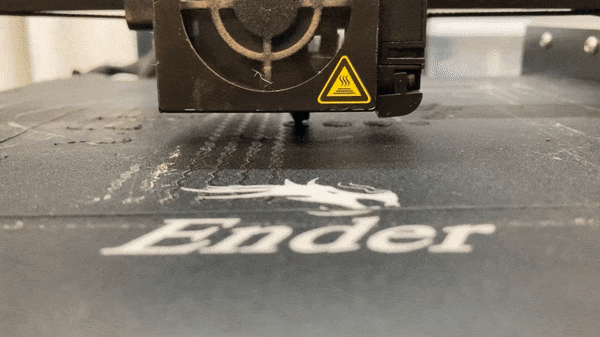
7) Turn on the temperature in the bed and nozzle to start warming up. Wait until the heat starts printing.
8) Add Laca (hair product) to the bed and the fabric to be easier to adhere to the print on the fabric.
9) Connect the SD Card or online (depending on the printer machine).
Prepare the file:
1) Transform your design into a closed mesh in Rhino.
2) Export to a . STL file.
3) Open it in CURA (Slicer software)
4) Set the following printer settings:
- Layer height: 0.2
- Line with:1 (Same as the nozzle of the machine)
- Infill: Lines
- Flow: 100%
- Enable retraction: OFF
- Print speed: 25mm s
- Material T: 215 ºC
- Support: OFF
5) Save the file (Gcode is the file that you send to the printer with all the instructions and coordinates of your design) on the SD card or upload (Depending on the software machine).
6) Print
My investigation
In the following part, there are the 3 different samples I was working on during the week:
Sandwich technique. Sample 1
For this sample I start working with Grasshopper with the hexagonal cell generation modifying the area depending on two curves.
Here you could see the investigation:
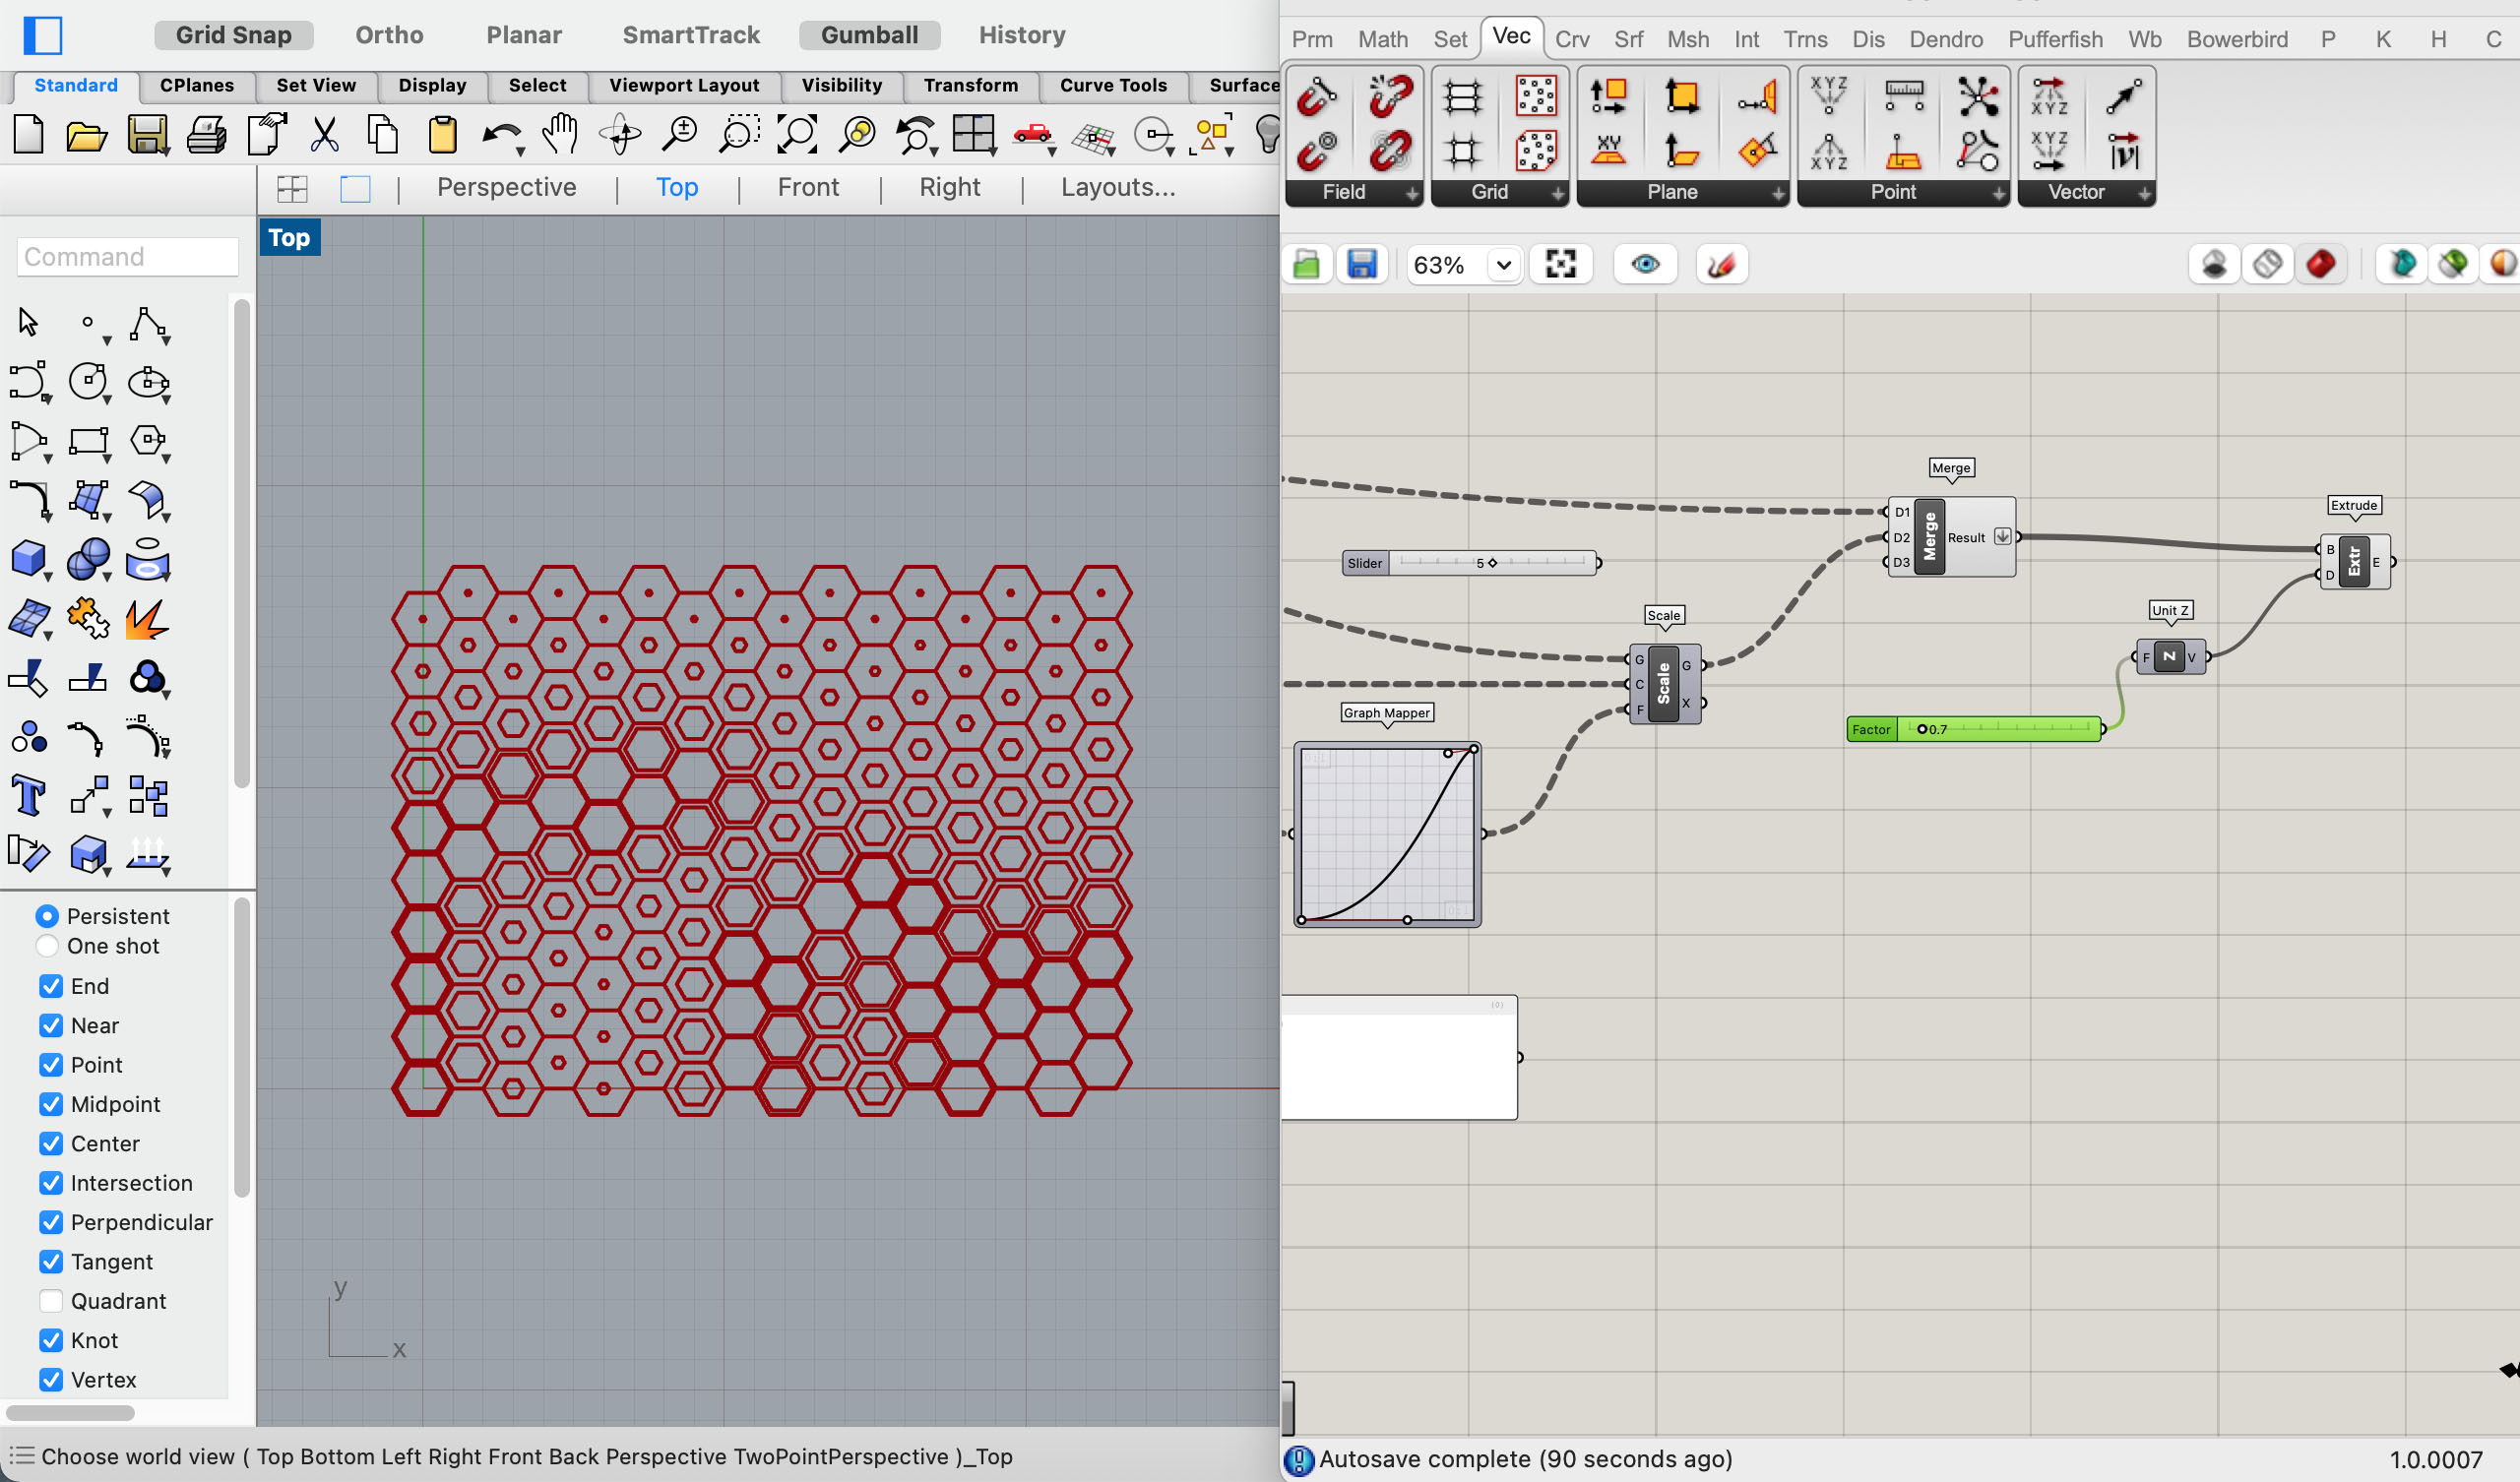
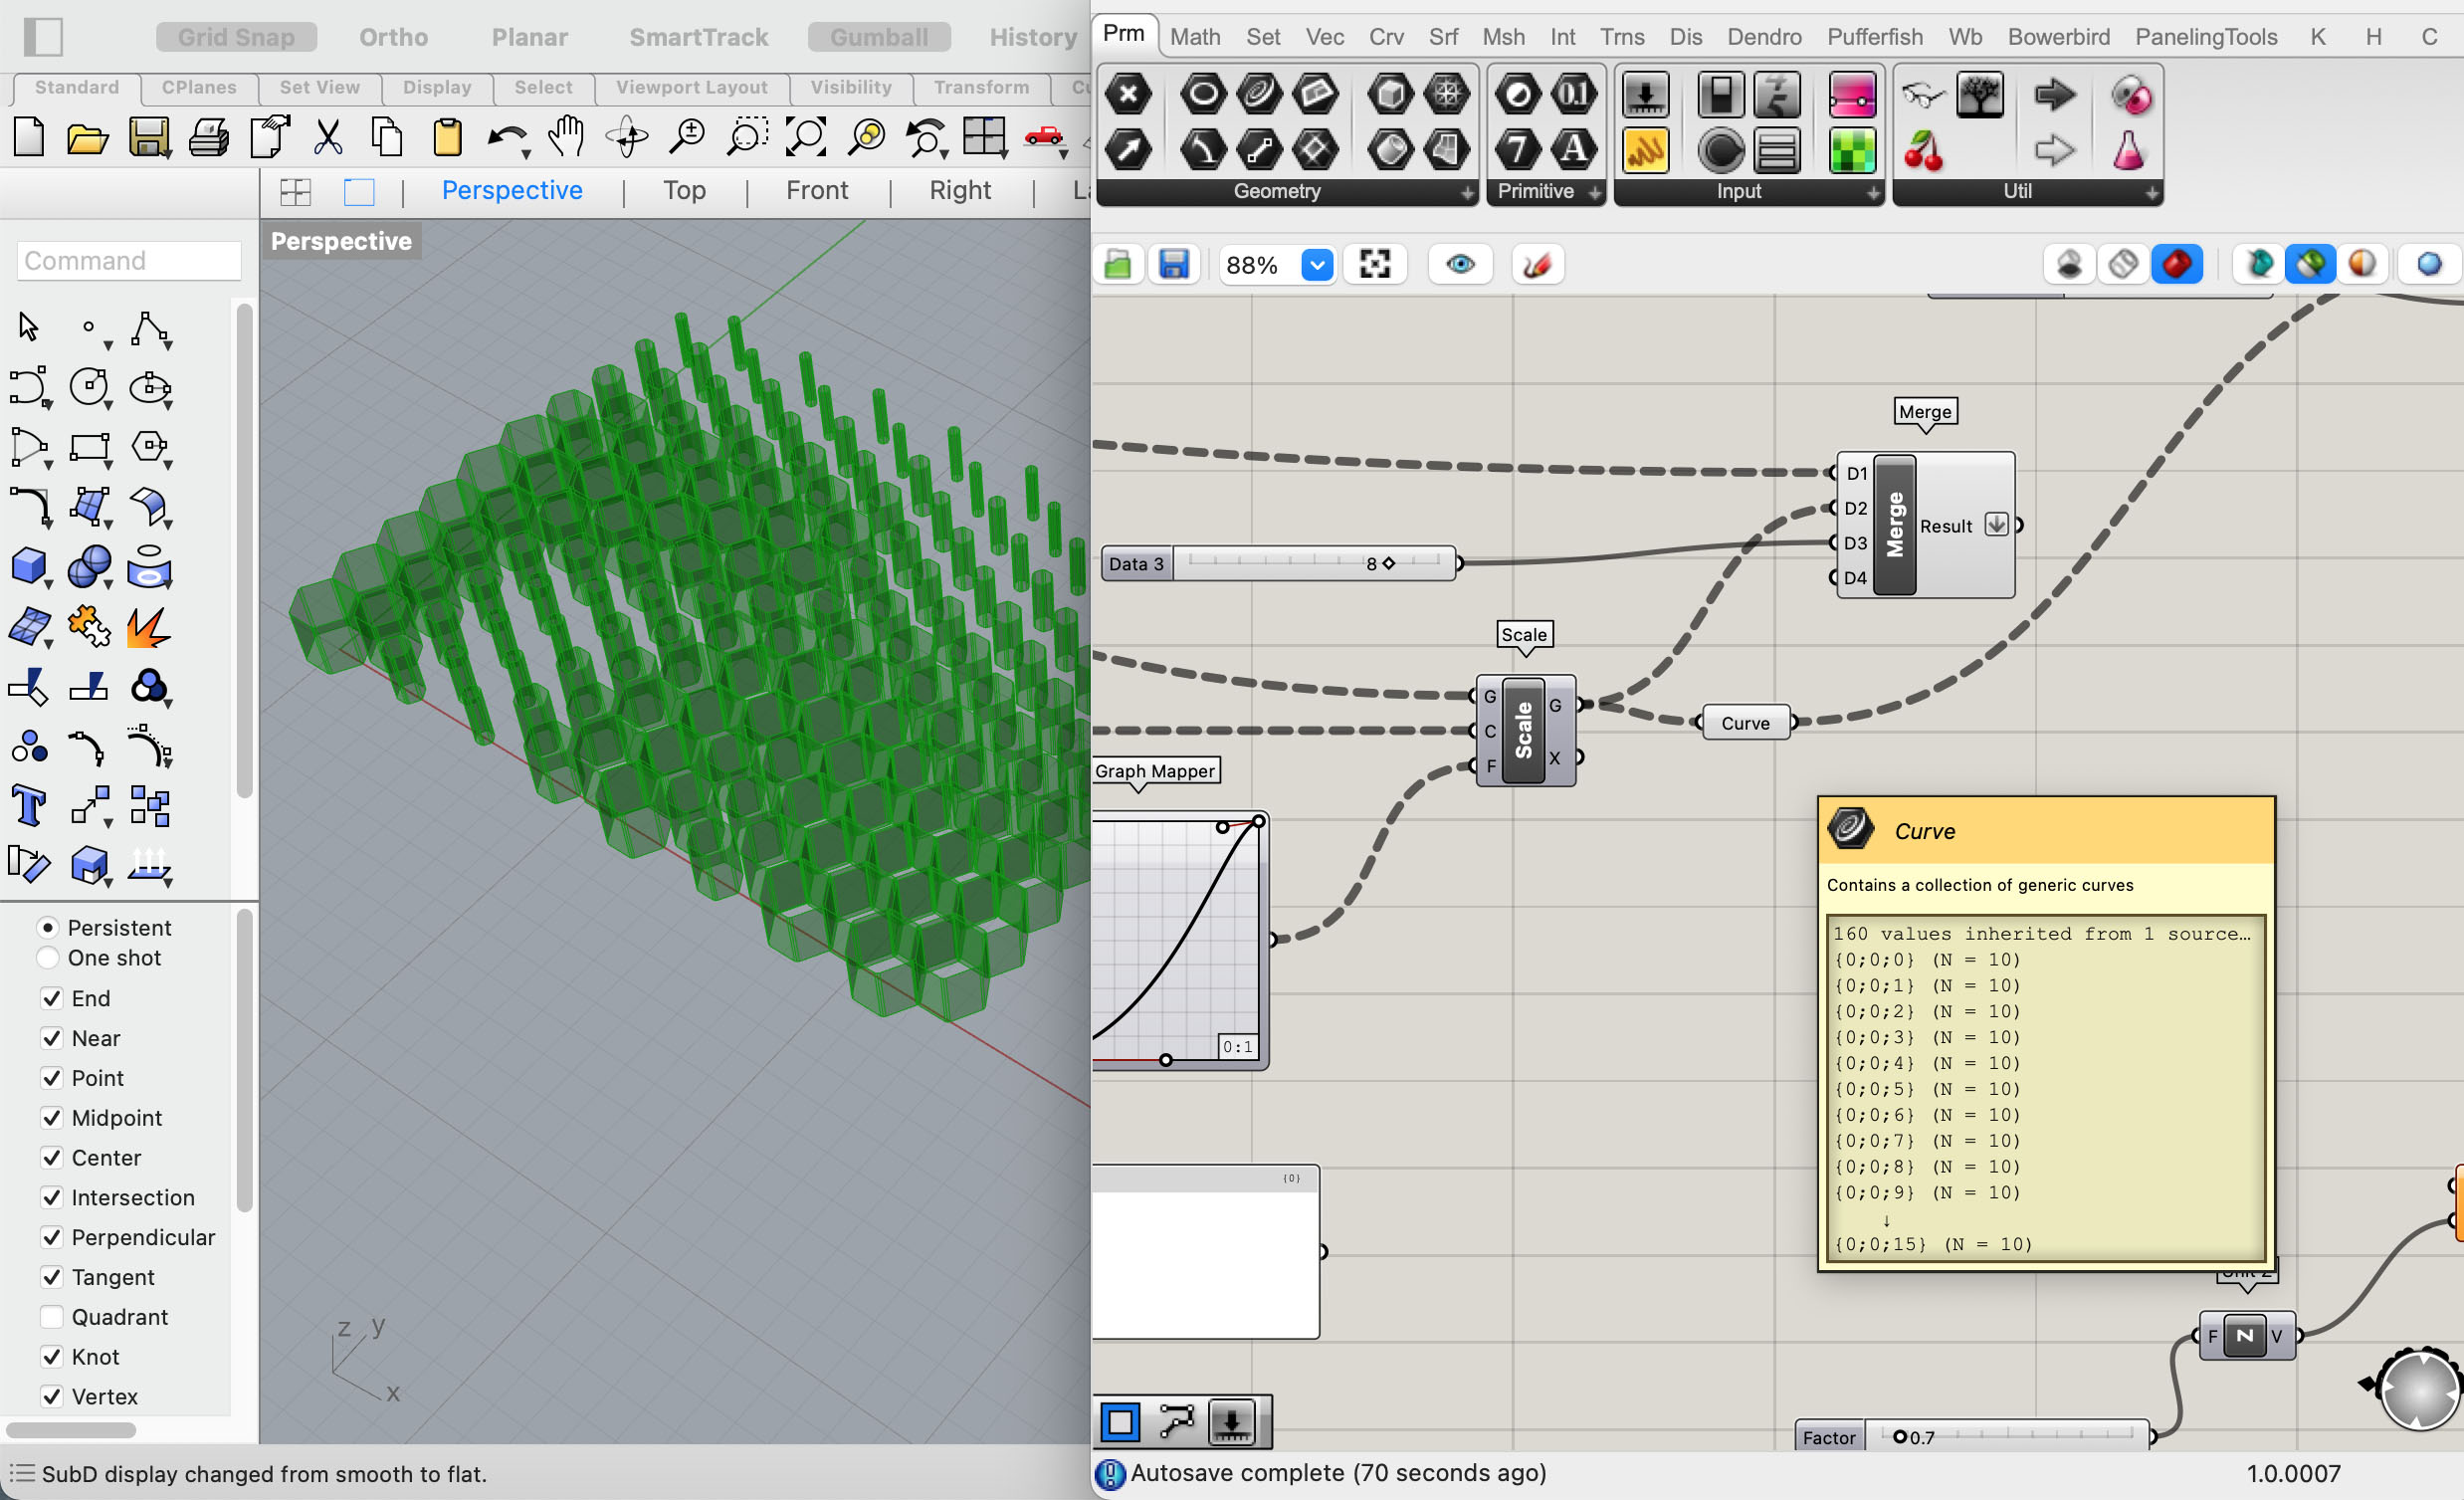
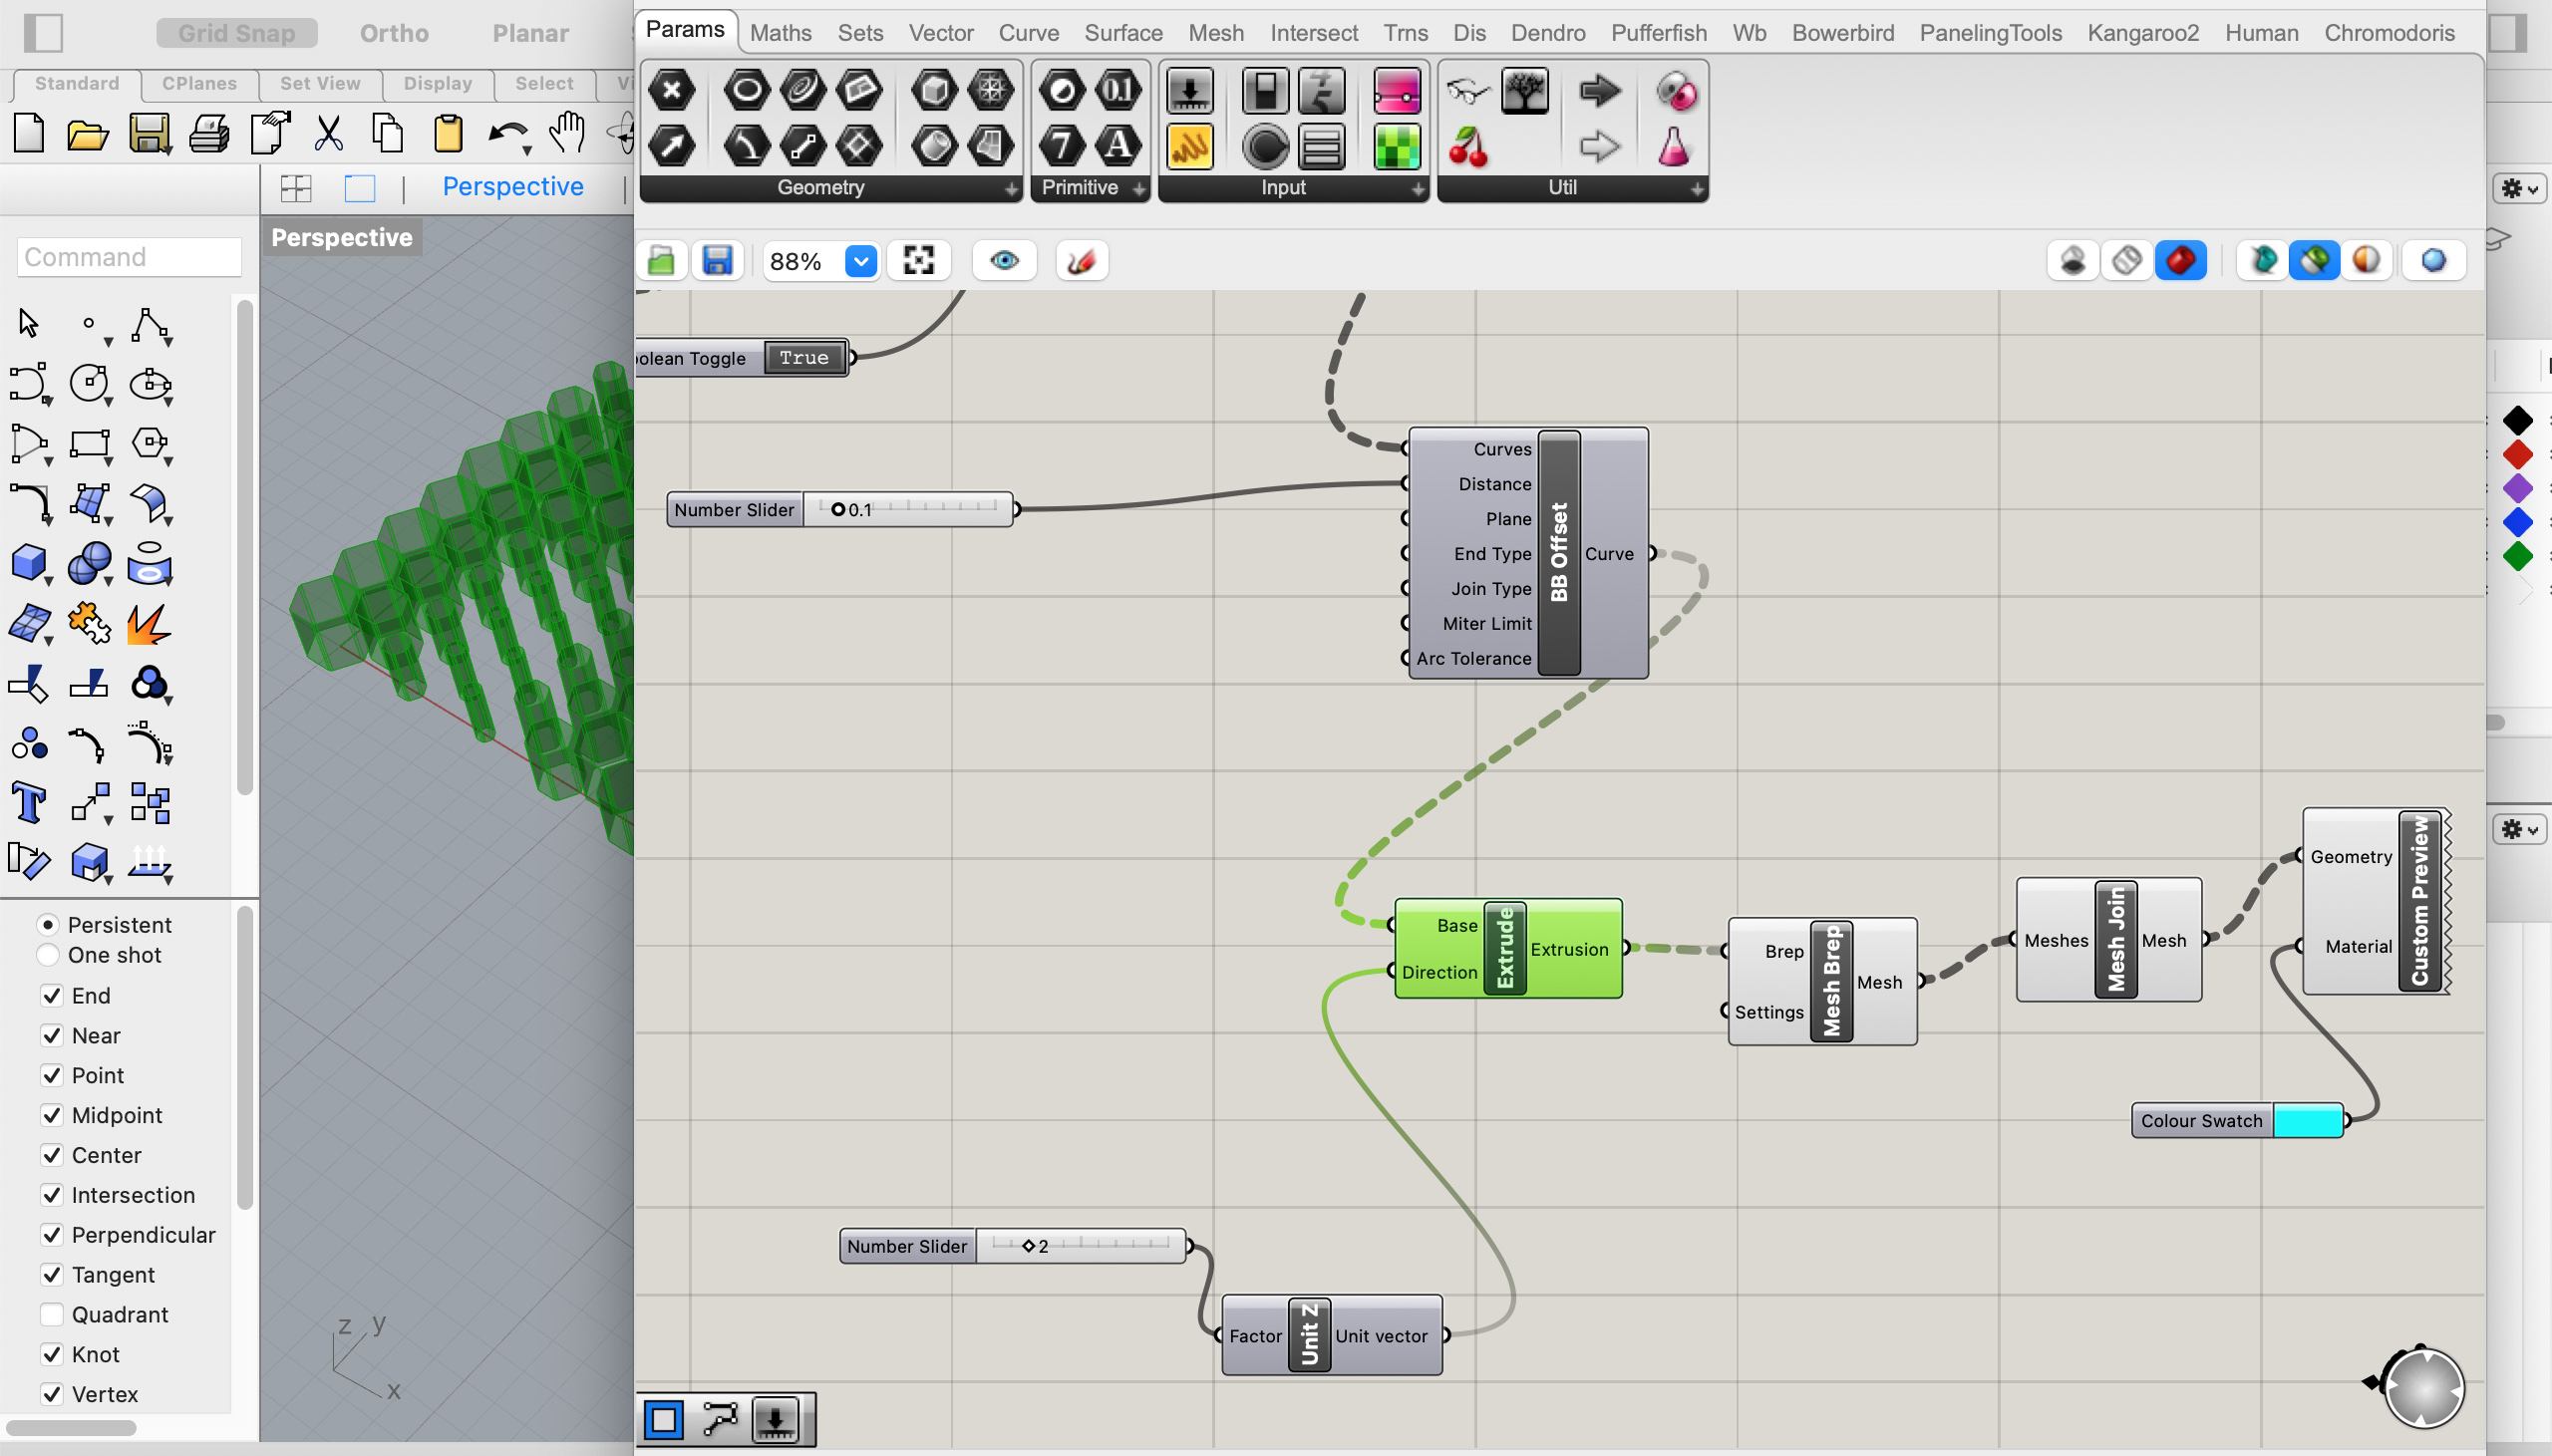
In the begging I was super confused with the diagram, I played with the differences shapes and the Graph Mapper to figure out my pattern, but when I was trying to create a BB Offset and extrude the geometry it didn't work... I pass some hours trying to find the trouble between the connections... Fortunately, Ana helps me and I could understand that in this sample I was working with an area instead of a polyline! So that was the error...
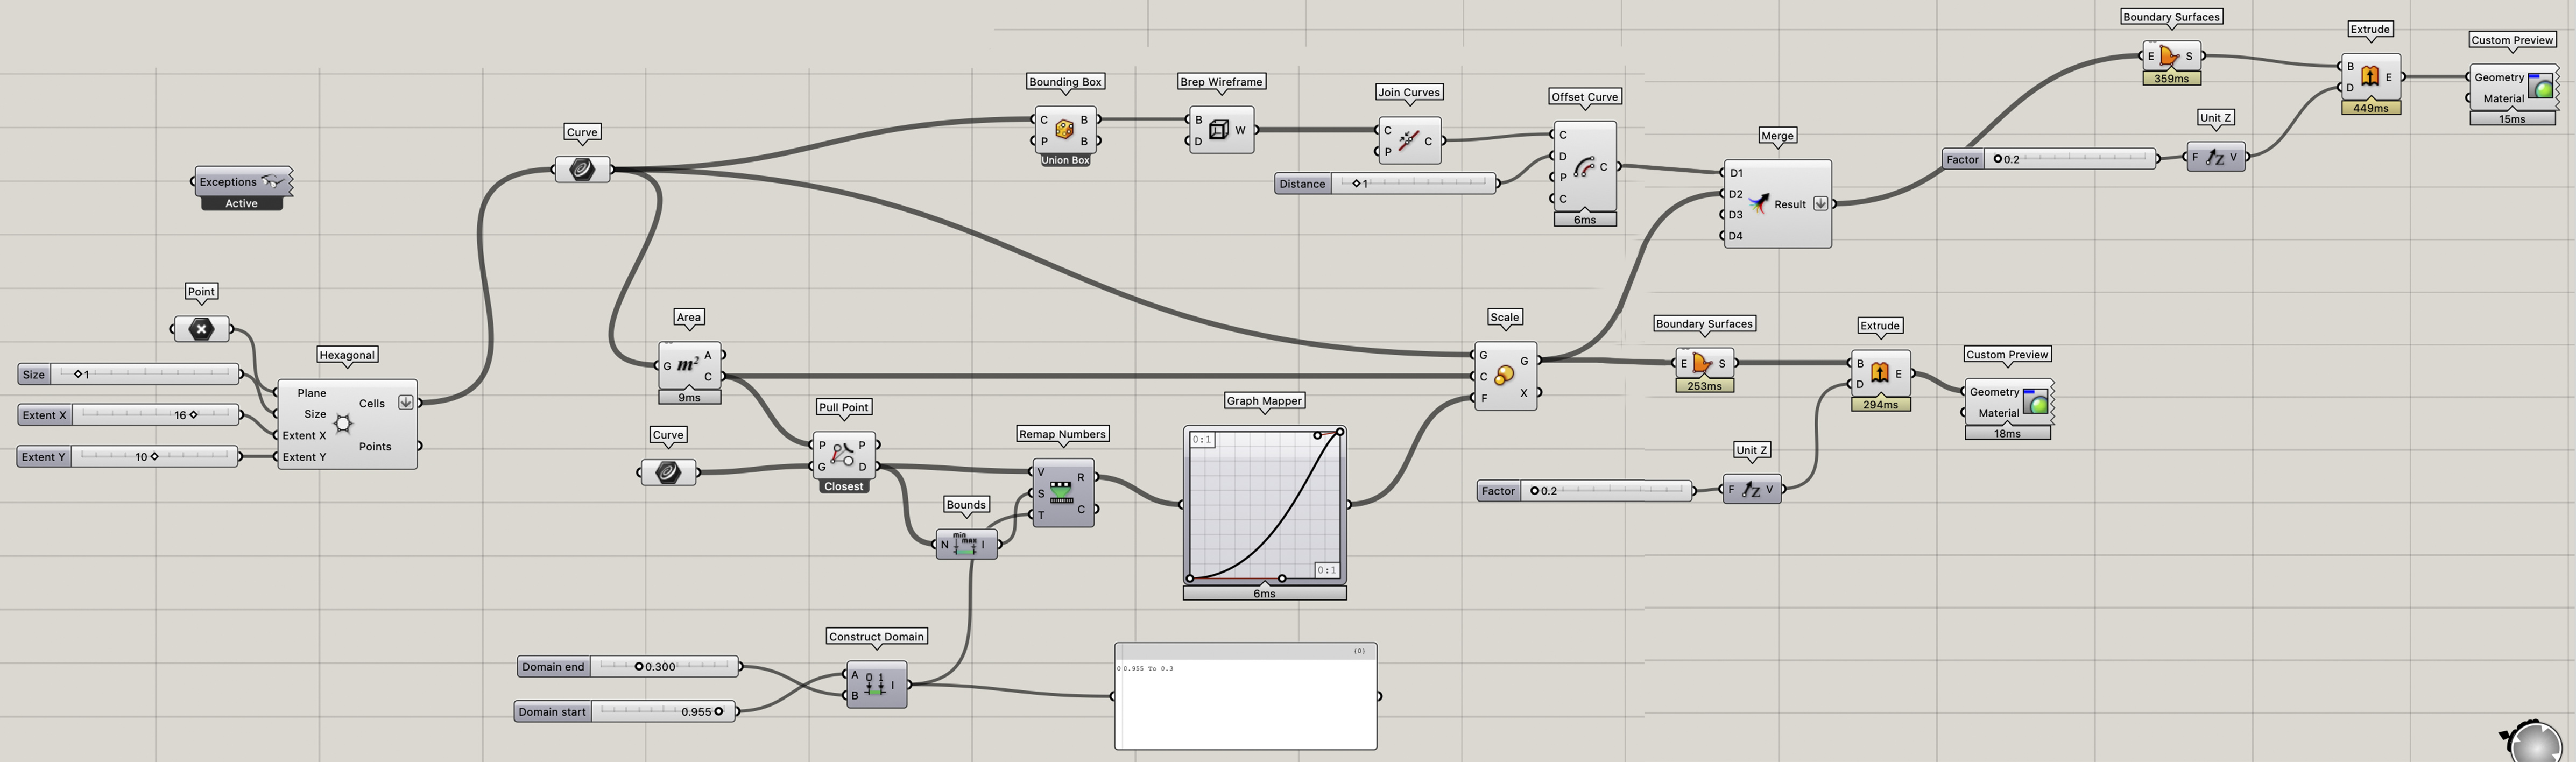
Finally, we revert the pattern to get the hexagonal instead of the mesh.
The result saved in .STL format.
Here you could download the cell generation file Rhino and Grasshopper.
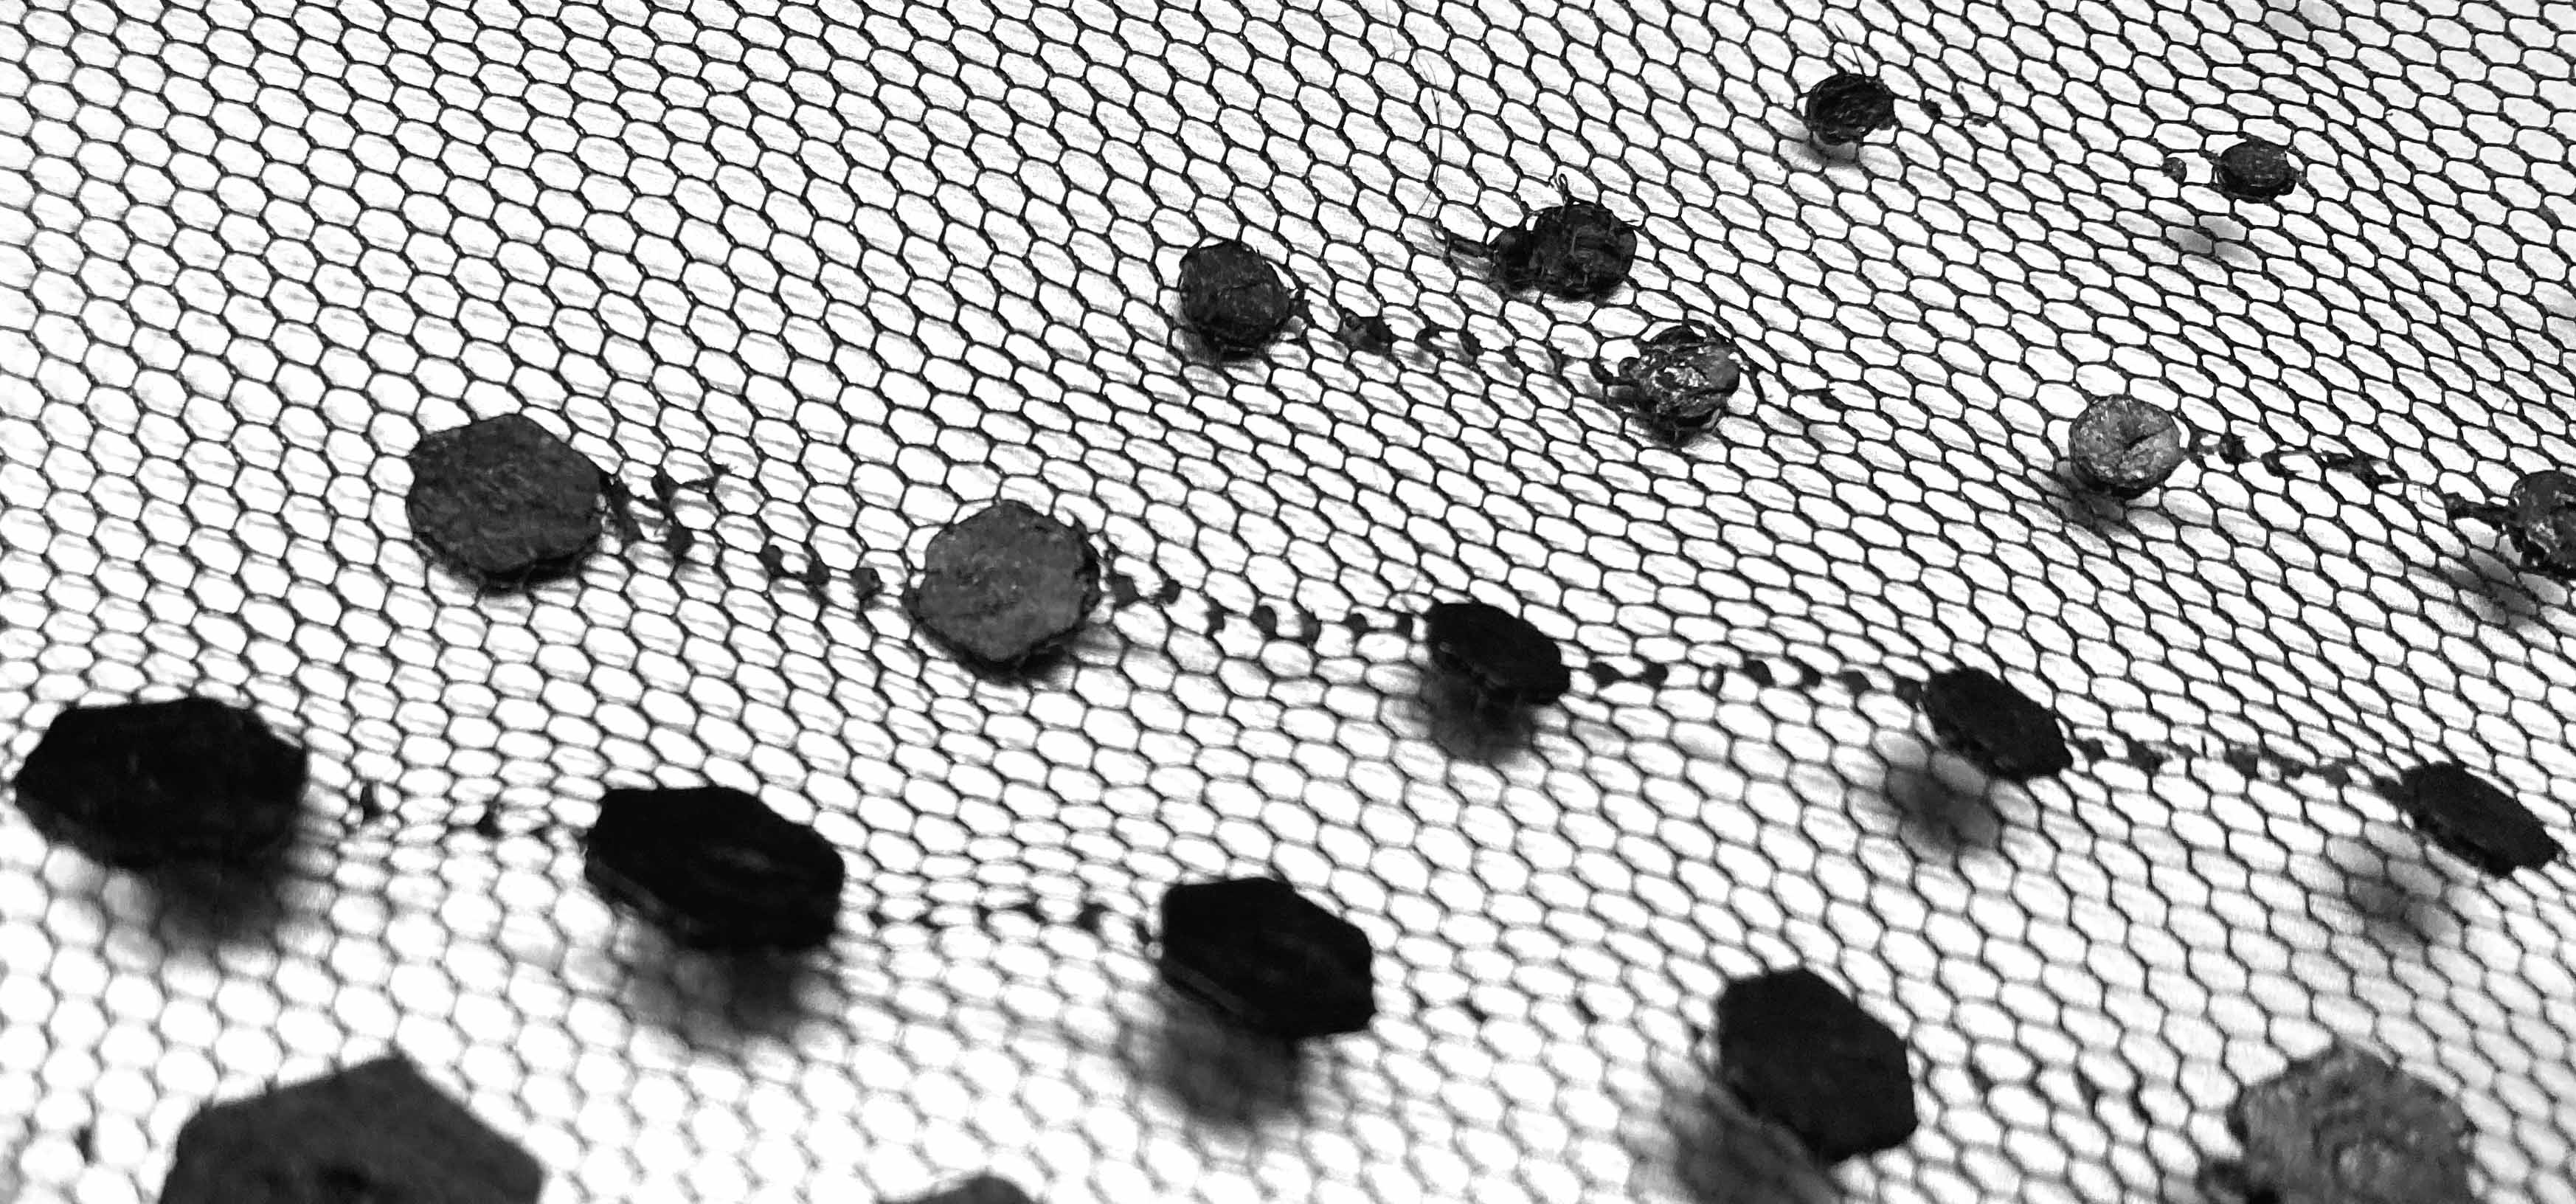
As I have mentioned before, one of the techniques for 3D printing is the sandwich. A technique that the fabric goes between the geometry, so I decided to use it for this sample.
In the next video you could see the script for pausing the printer and adding the fabric in Cura.
CURA Process de Emma
The process in the 3D printer:
Sandwich technique de Emma
For this sample, we print in Ana's studio because the printer on Friday in our Fablab didn't work properly. So we print 2 layers, add the fabric in the bed with some clips, and we continue printing 2 more layers on top, to get the sandwich technique.
Gcode Cell generator file.
Parameters:
- Nozzle size: 1 mm
- Material: Black PLA
- Fabric: Black mesh tulle
- Layer Height: 0.2mm
- Temperature: Nozzle= 200ºC Bed= 60ºC
- Retraction: 3mm
- Print Speed: 50 mm/s
- Time: 1:03h
- Material need: 2,02m
Finally, the sample created with Grasshopper!
So many ideas come up!
The texture of the fabric:
Còpia de Sandwich technique de Emma
In conclusion, for this sample I will add more layers cause, in that case, I just have 2 layers on each side of the fabric so the shell it's wasn't thicker enough and you see the infill.
At that time, we didn't add more layers to the prototype because of the time printing, but for a real sample, I would print 6 layers on each side.
Voronoi. Sample 2
Start playing in Grasshopper with Populate 2D with several points and then I created a Voronoi pattern. In this sample I explored a lot with the various designs you could get depending on the parameters and adding a circle inside the Voronoi.
Here you could see the investigation:


After playing around and being helped by Dinesh to create the BBOffset and extrude the design I decided to print this pattern so I saved it in .STL format to get ready to print it.
Here you could download the Voronoi file Rhino and Grasshopper.
Parameters:
- Nozzle size: 0.4 mm
- Material: White TPU
- Fabric: -
- Layer Height: 0.2mm
- Temperature: Nozzle= 230° Bed= 60°
- Retraction: 0.2mm
- Print Speed: 50 mm/s
- Time: 0:25h
- Material need: 0.74m
After changing the parameters of the printer and copying the file to the SD card we are ready to warm up the bed and the nozzle.
Gcode Voronoi file.
Process Voronoi de Emma
This sample was printed without any fabric, which creates a stretched white mesh to form shapes and light structures ready for prototyping large designs, as clothes or objects for example.
Optical illusion. Sample 3
For the last sample I search some examples in the parametric house and get some ideas and patterns to play with. So I downlod a optical illusion file to develop.
First of all, I identify how this script works, then I adjust the flower moving the lines in Rhino and the different parameters in Grasshopper. When I get the design in 2D (Polyline) I need to create the BB Offset, the Boundary Surfaces and then extrude in the Z axis. Subsequently, I add the Mesh Brap and the Mesh Join to join all.
At that time the Grasshopper was "theoretically working", but I could not see the cap of the design in the Rhino software. So I thought that I need to fix it. That was my nightmare during the weekend... After all, it was that I haven't activated the preview, Grasshopper: 1 Emma: 0.
At least, I bake the figure and I need to Rebuild the mesh in Rhino because when I exported it to the Cura it was not reading properly the mesh. I have some open edges in my bad mesh...
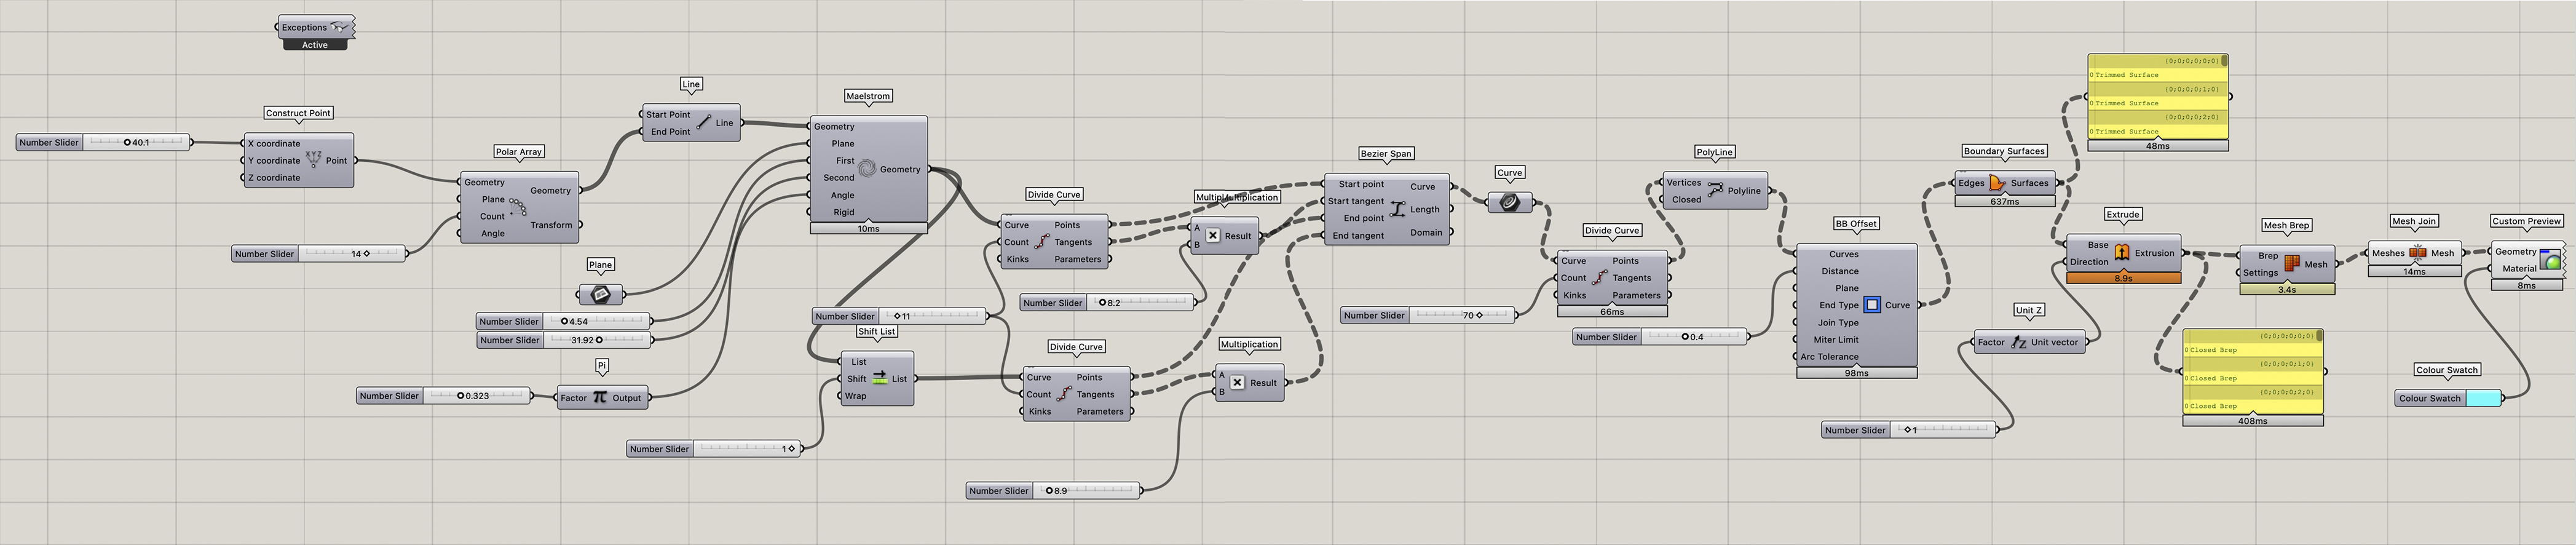
The result saved in .STL format.
Here you could download the Optical illusion file Rhino and Grasshopper.
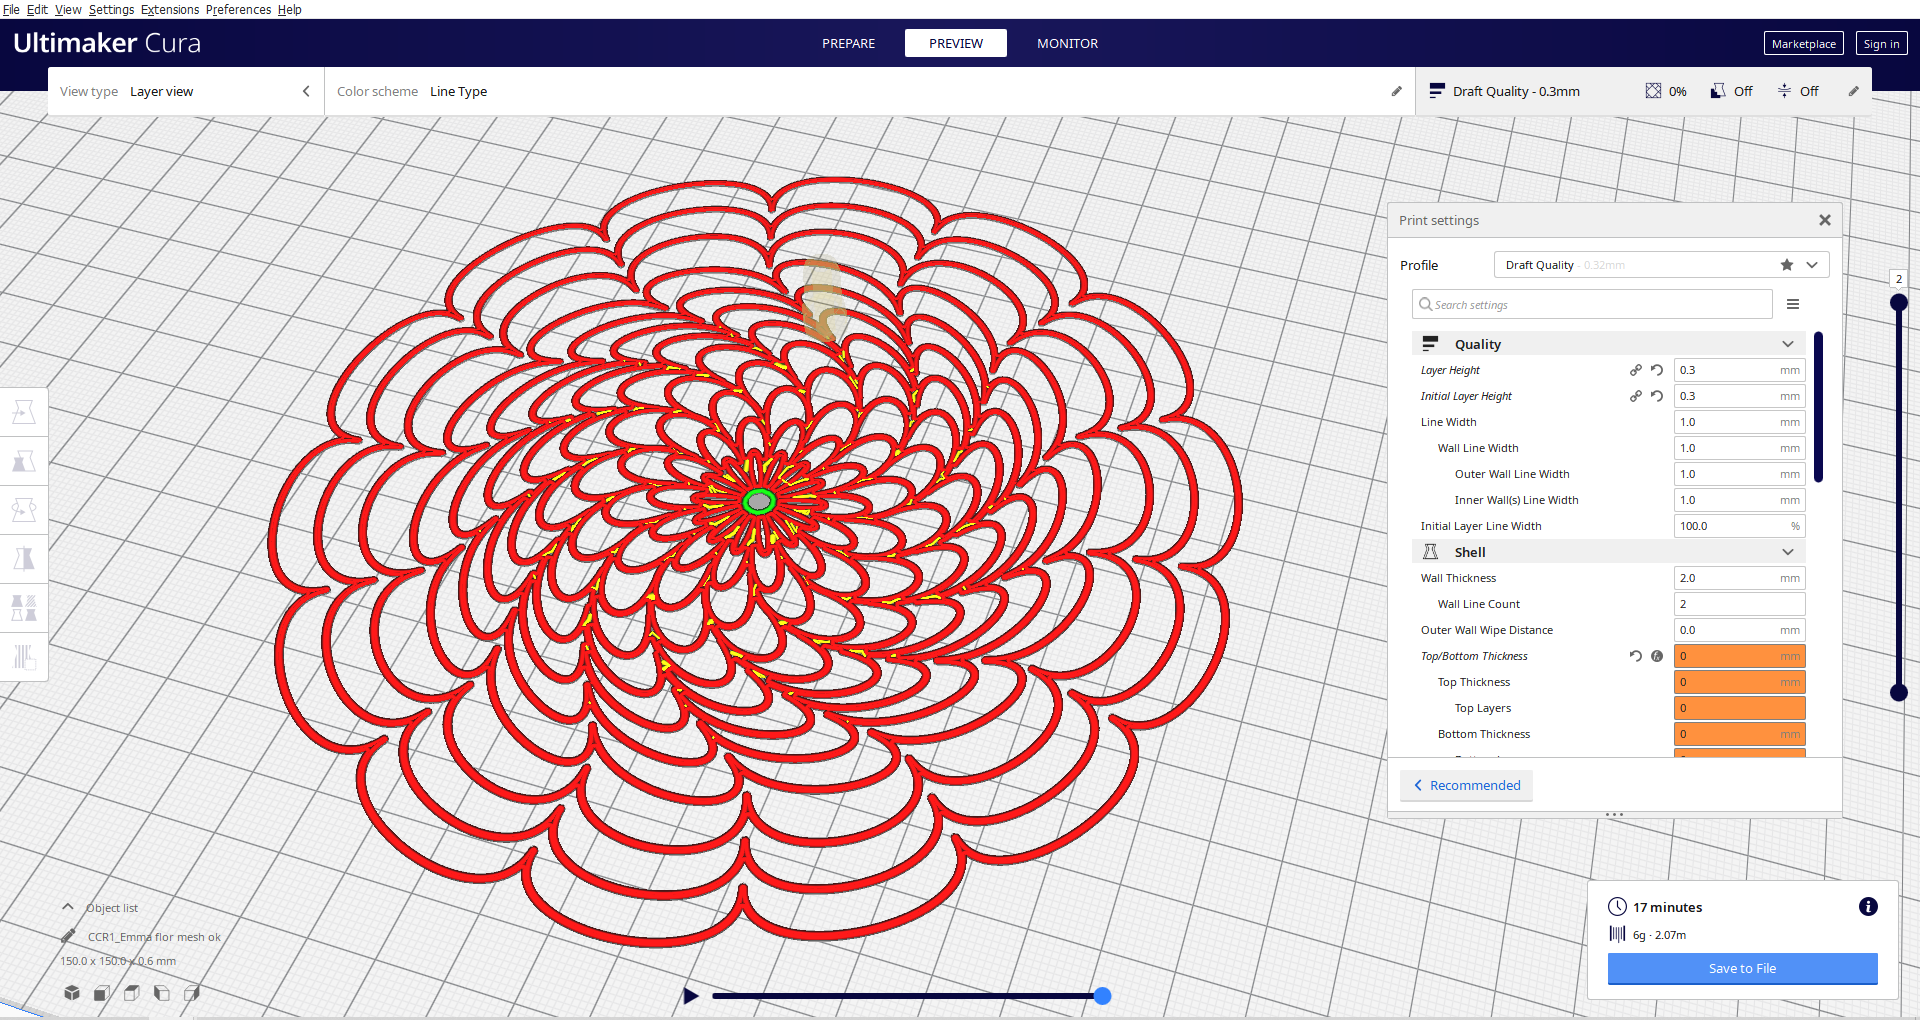
After opening the file in Cura we adjust the parameters and move the pattern on the digital bed to waste less fabric.
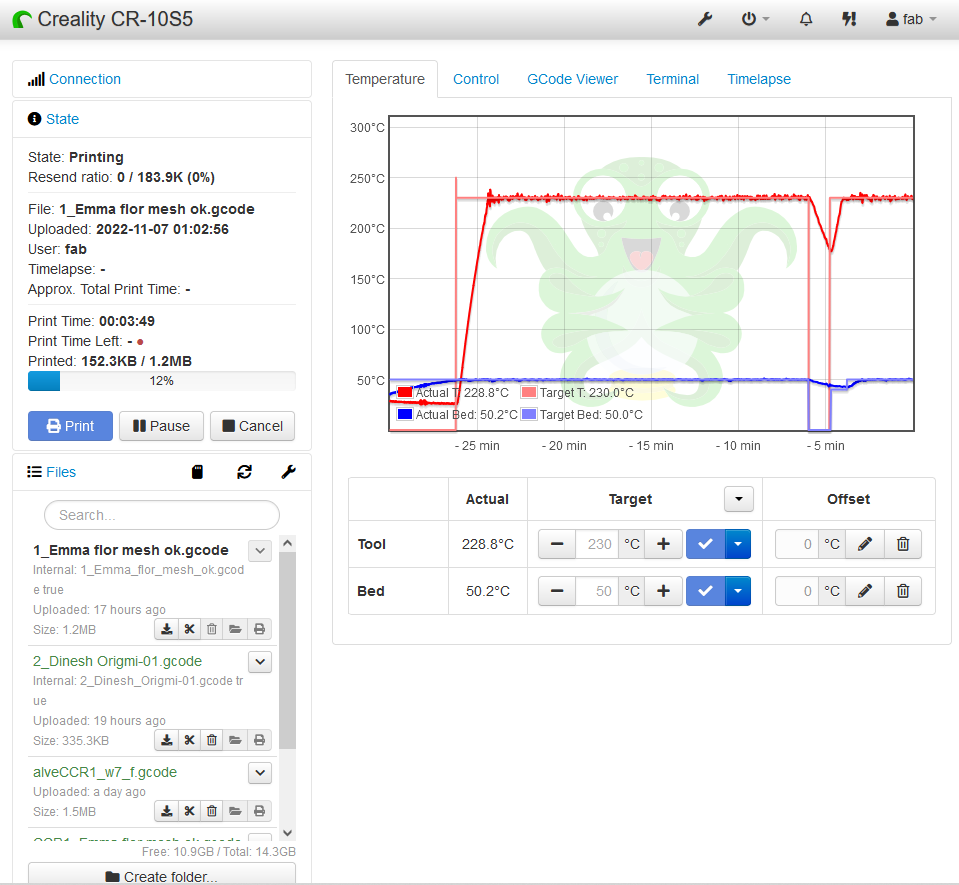
For the Creality CR-10S5 printer, the file is exported to the online surface, so you control the printer in the computer instead of the machine controller.
Parameters:
- Nozzle Size: 1.0 mm
- Material: Black TPU
- Fabric: Tulle red mesh
- Layer Height: 0.3mm
- Temperature: Nozzle= 230°C Bed= 50°C
- Retraction: Not used. If we use it, the extrusion does not work properly and creates some gaps when it continues printing.
- Print Speed: 50 mm/s
- Time: 00:17h
- Material need: 2.07m
Gcode Optical ilusion file.
Printing time:
Process Optical Illusion de Emma
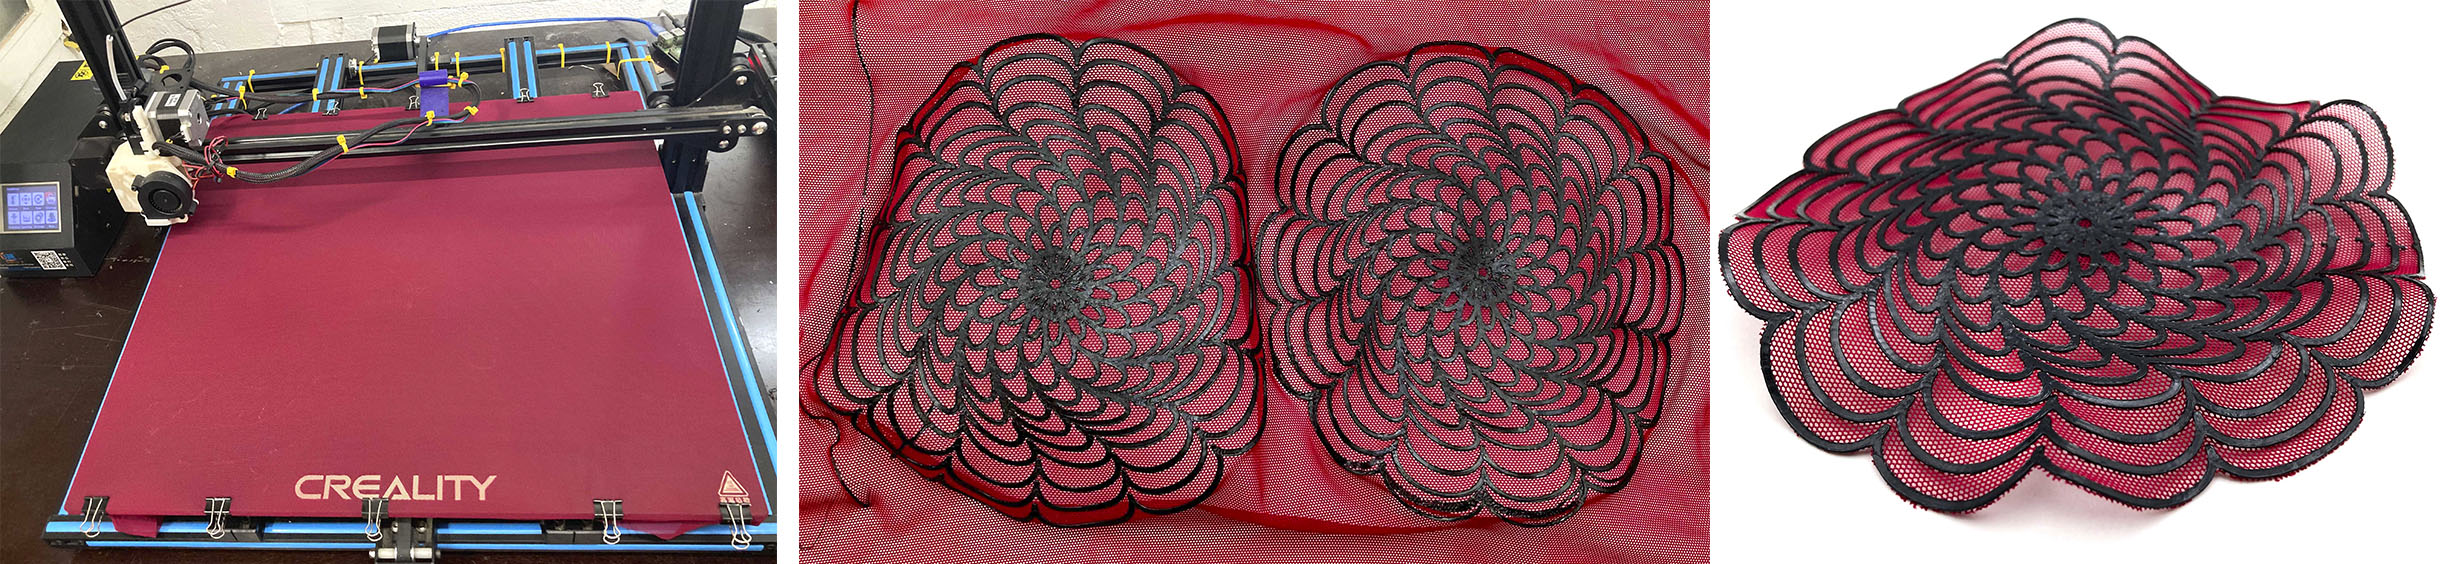
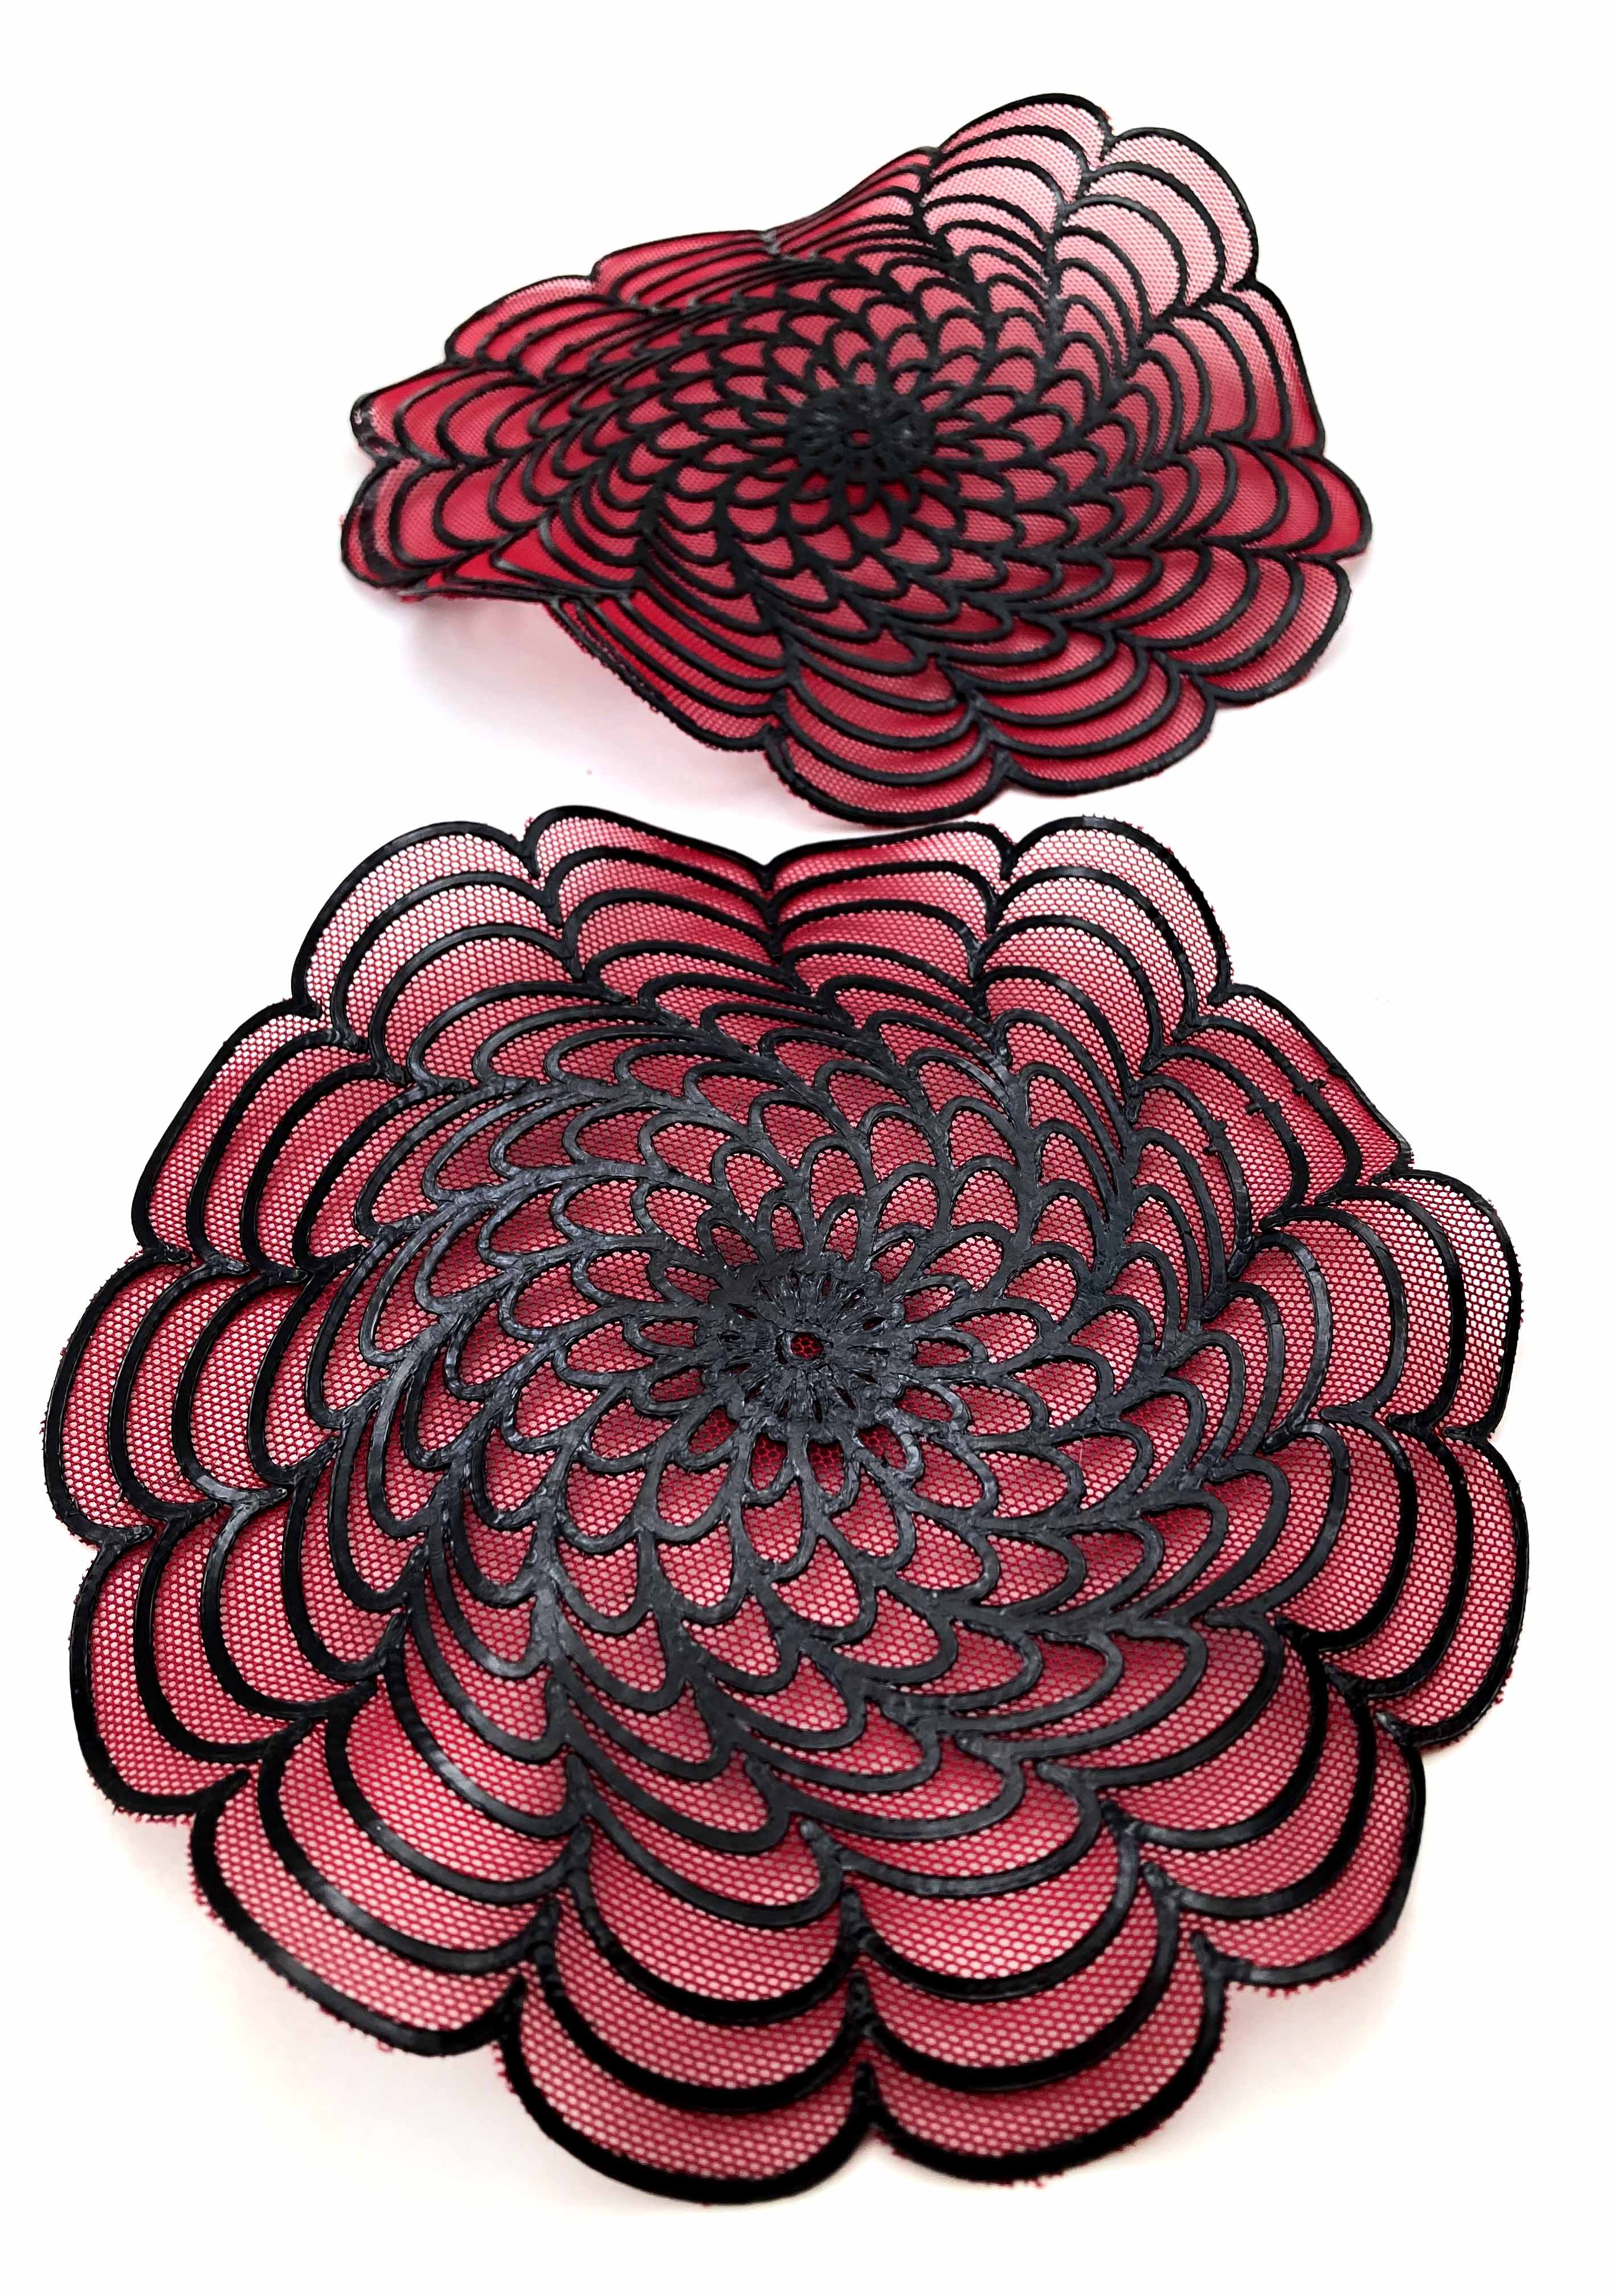
To sum up, I will improve this sample by adding more stretch to the fabric mesh and making the flower much bigger or with bigger gaps to create more tension and get more waves.
More about:
- Rhino,Grasshopper and 3D Printing Tutorials
In conclusion: I NEED MORE TIME TO EXPLORE!!!
This week has opened a new way to work and create, a different way to think about how to design. To be honest, my brain is still progressing with all the information and the new vocabulary.
Awesome!
💻📈 See you the following week! 📉🔓