Process 1
Ideation & sketches
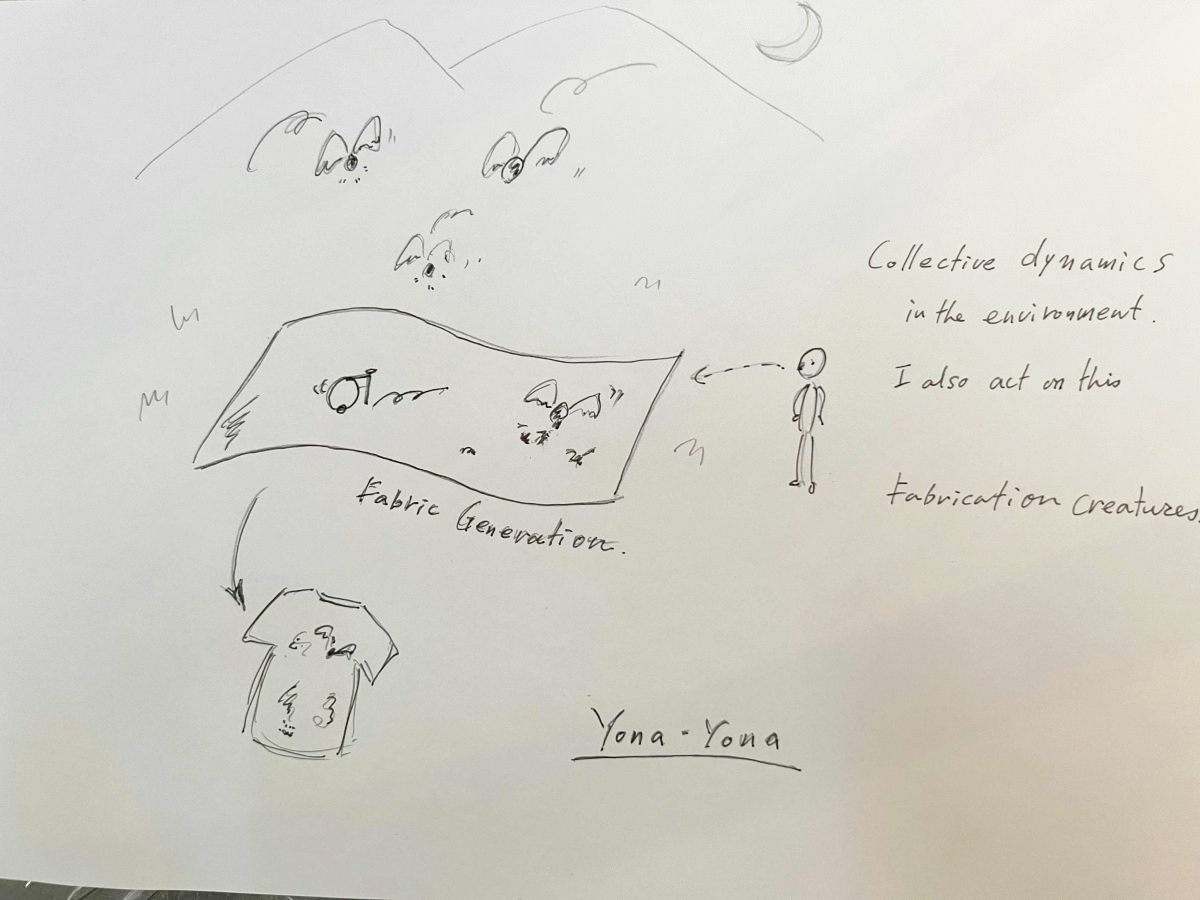
This is the first sketch I drew.
Dyeing and crafts are nurtured over time in nature.
Naturally, nature such as plants and insects will be involved, and micro robots will also be mixed in to create accidental organic art.
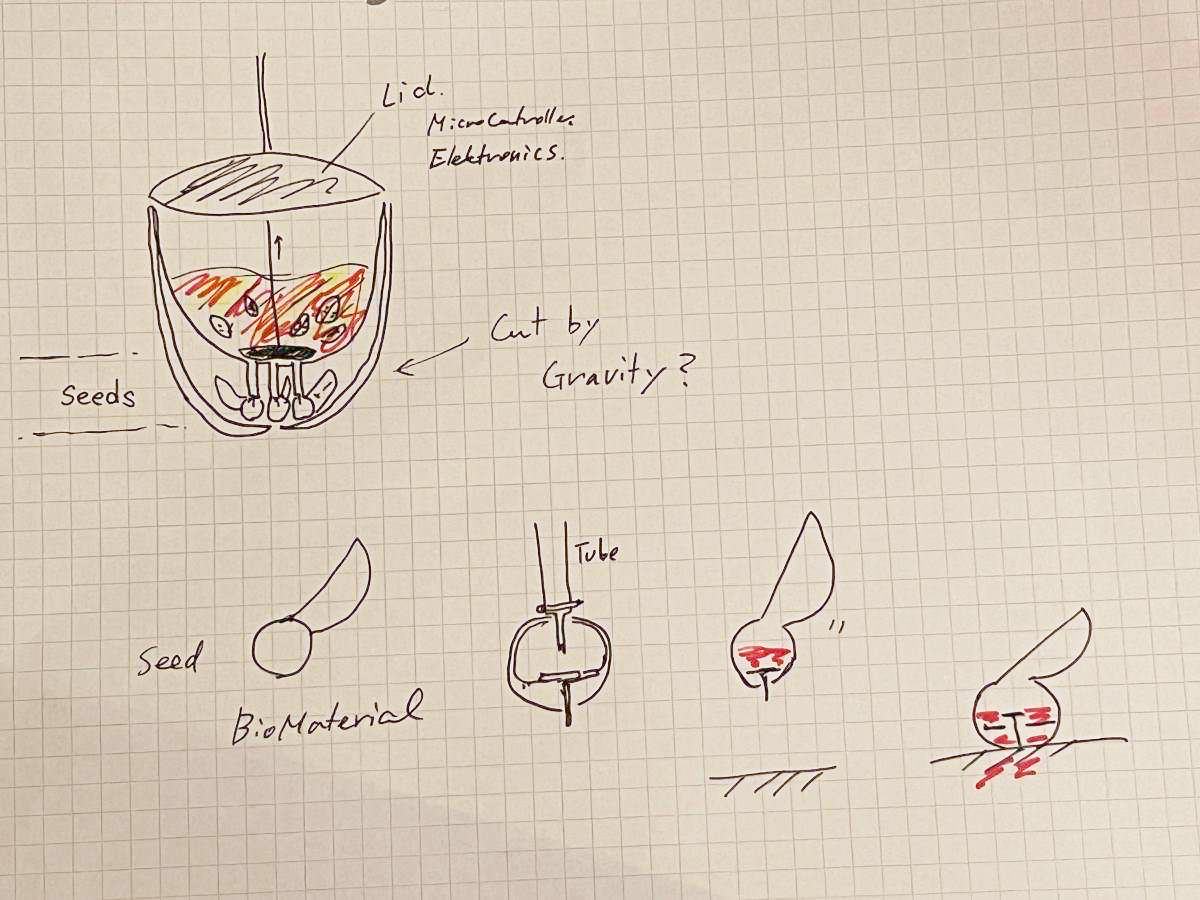
Initial study of a REED unit that will be hung on a tree.
The upper part is the bath where the dye liquid is fermented, and the lower part is the part where the fermented dye liquid flows and the seeds fly.
Process
I planned the process and workflow using Notion's GANTT chart. The first prototype will be created in the first half, and the final work will be done after MidTerm Review. Each item is further divided into works. GANTT and task are listed at my Deliverables page

Dyeing & Fermentation
Reference
-
Indigo dyeing Japanese book
- Method
- Sukumo Ai, which is made by fermenting the entire leaf
- Precipitated Indigo, which is made by soaking fresh leaves in water to extract the indigo component and oxidize it.
- Method
-
Ice Dyeing
Sayaka Asai is Ice Dye Artist, fascinated by the "accidental beauty that comes naturally", the beauty of things that cannot be completely controlled.
Dyeing experiment1 @Dec.26-
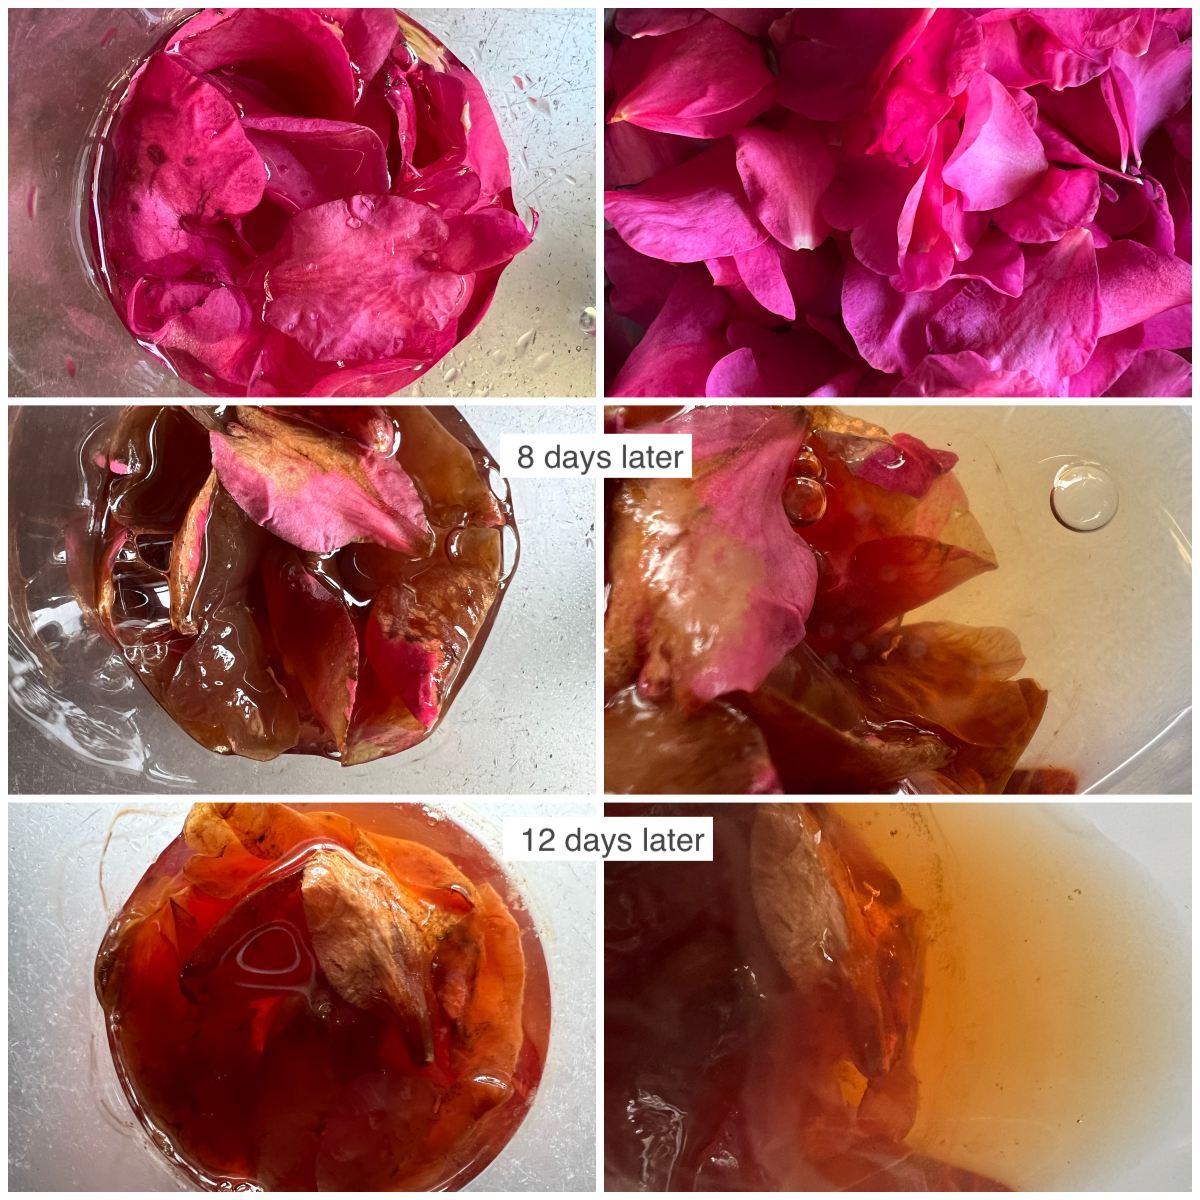
It's just camellia season in Japan. I've tried experiment with camellia which contains anthocyanin.
* Camellia petal(Raw)  10g
* Water 100cc
* Glass cup
* scale / measuring cup
* Coffee Filter (cover), rubber band
* Weigh the petals and water, put them in a glass, and mix them gently with a stick.
* Cover with a coffee filter and secure with a rubber band.
* Place it in a sunny place, such as a garden or near a window, where it will not be exposed to rain.
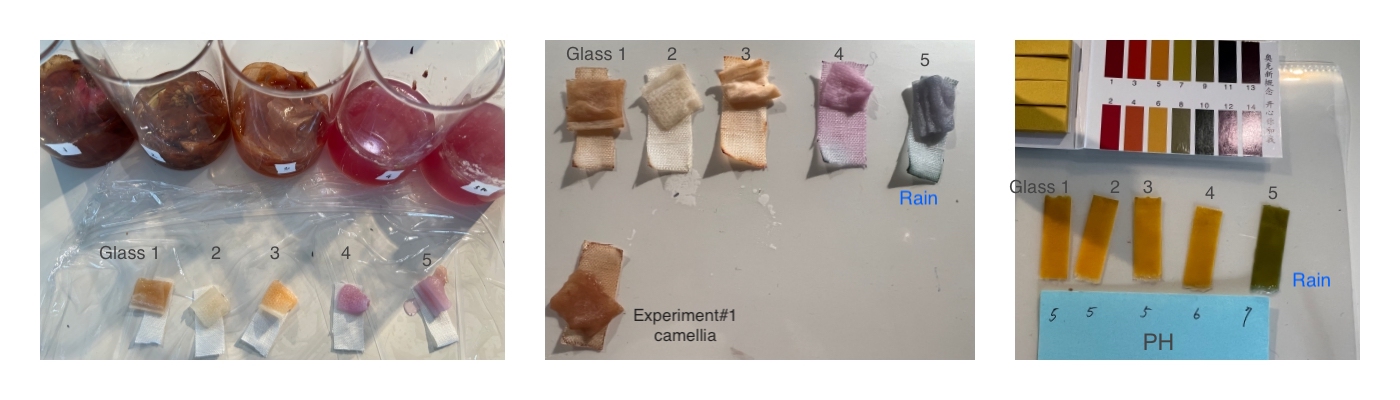
Changes were observed as follows. It was confirmed that the dye solution could be extracted using just water and sunlight.
- PH measurement (14 days later)
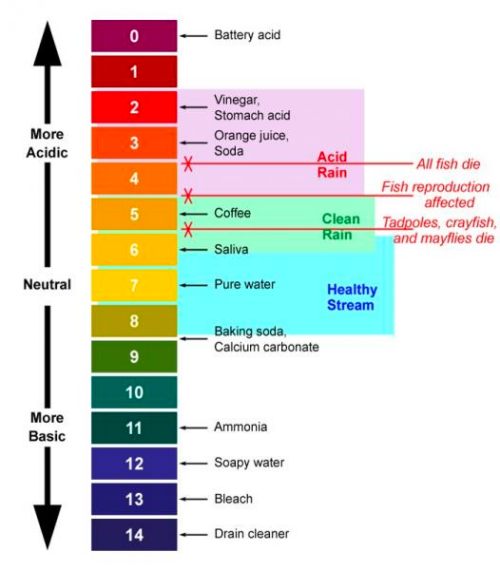
Measurements were made using PH test paper. Compared to tap water (PH7), Camellia liquid was found to be more acidic, with a pH of 5.

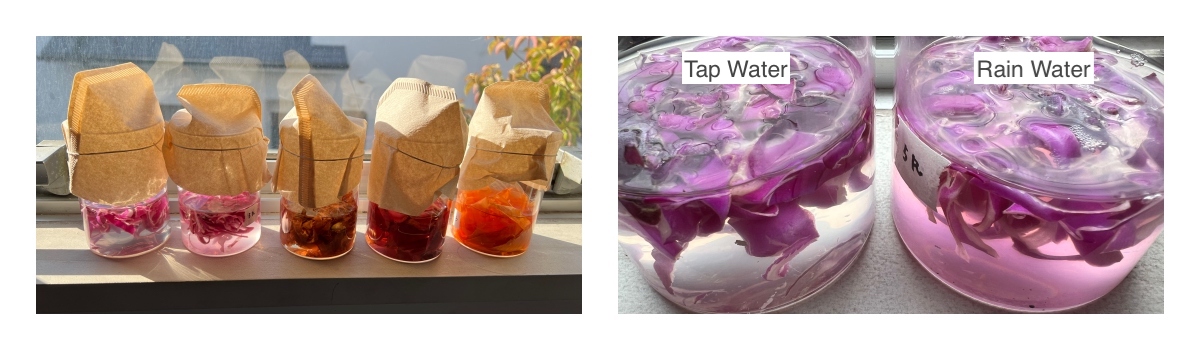
Dyeing experiment2 @Jan.20-
Experiment 2 was conducted using the following ingredients. The reason why I tried using rain instead of tap water is that in Japan, tap water has a pH of around 6, and rain has a pH of around 5 (acid rain has a pH of around 4), so rain is more acidic, so I thought it would be better for staining. This is because I thought there might be.
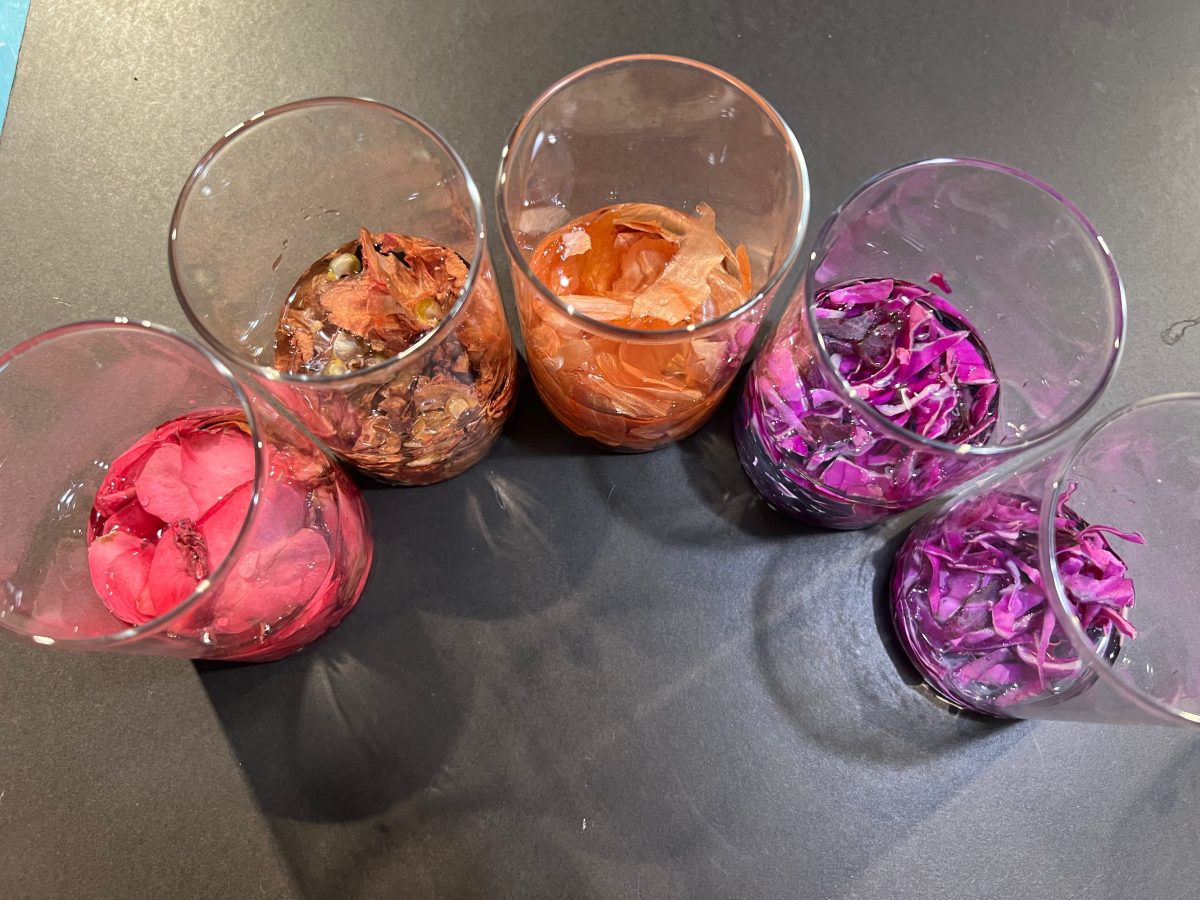
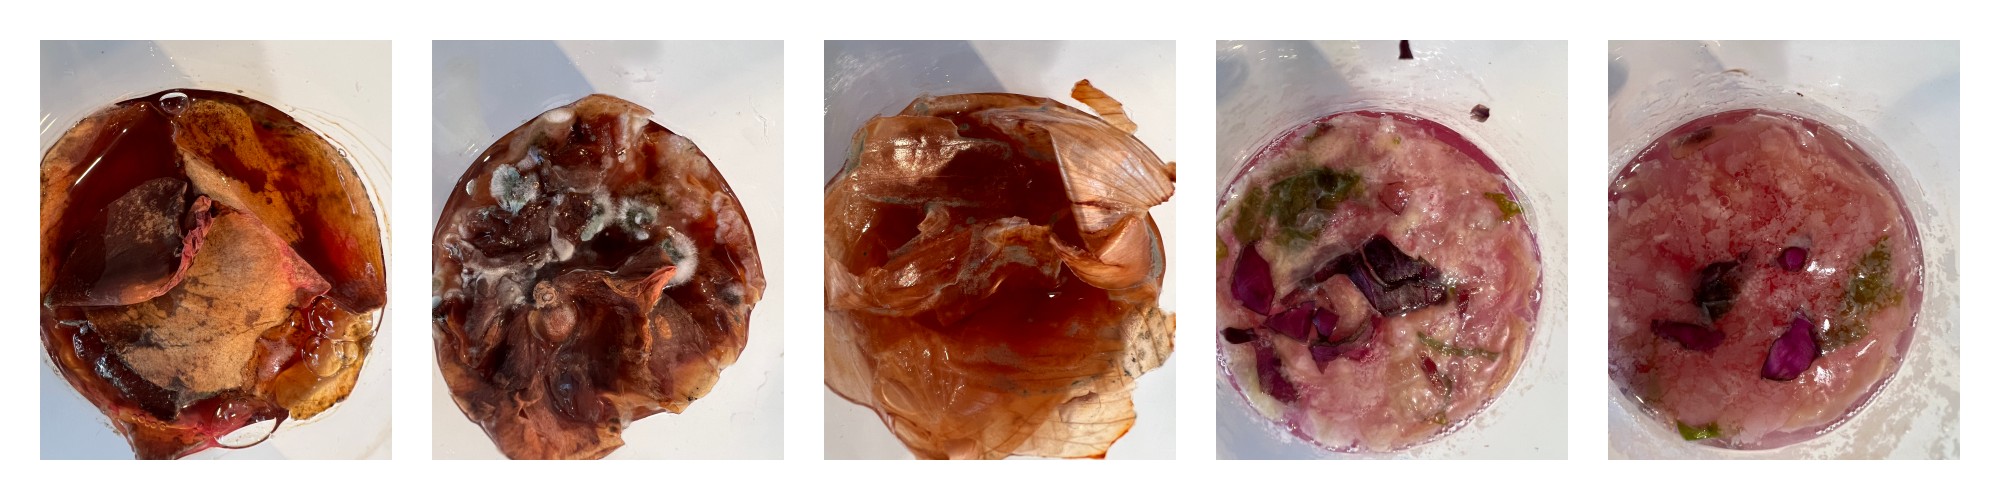
1 Recipe
* Glass#1:  Camellia petal(Raw)     10g / tap water 100cc
* Glass#2:  Camellia petal (dried) 2.5g / tap water 100cc
* Glass#3:  Onion skin (Dried)     2.5g / tap water 100cc
* Glass#4:  Red cabbage(Raw)        10g / tap water 100cc
* Glass#5:  Red cabbage(Raw)        10g / rain water 100cc
* Glass cup
* scale / measuring cup
* Coffee Filter (cover), rubber band
* Weigh the petals and water, put them in a glass, and mix them gently with a stick.
* Cover with a coffee filter and secure with a rubber band.
* Place it in a sunny place, such as a garden or near a window, where it will not be exposed to rain.
Fermentation sensing
To sense the progress of fermentation, time, temperature, color, odor, etc. can be used. It is assumed that temperature and color are affected by the weather and are difficult to judge. Elapsed time is the most reliable method, but this time I tried out a gas sensor out of curiosity.
Gas Sensor TGS8100 is highly sensitive to things like cigarette smoke and cooking odors. If there is a detectable gas in the air around the sensor, the resistance value will change.
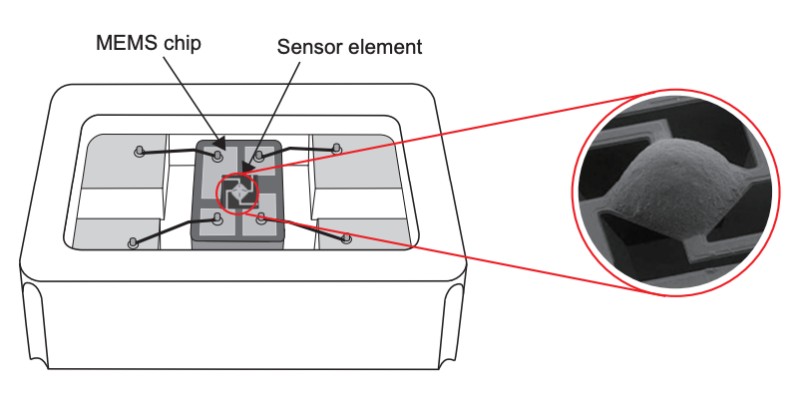
- Technical information for TGS8100
For reference, I tried wine and Kombucha using Arduino. When the liquid was brought closer to the sensor, the value dropped clearly as follows.

Sensing result @ Jan.20

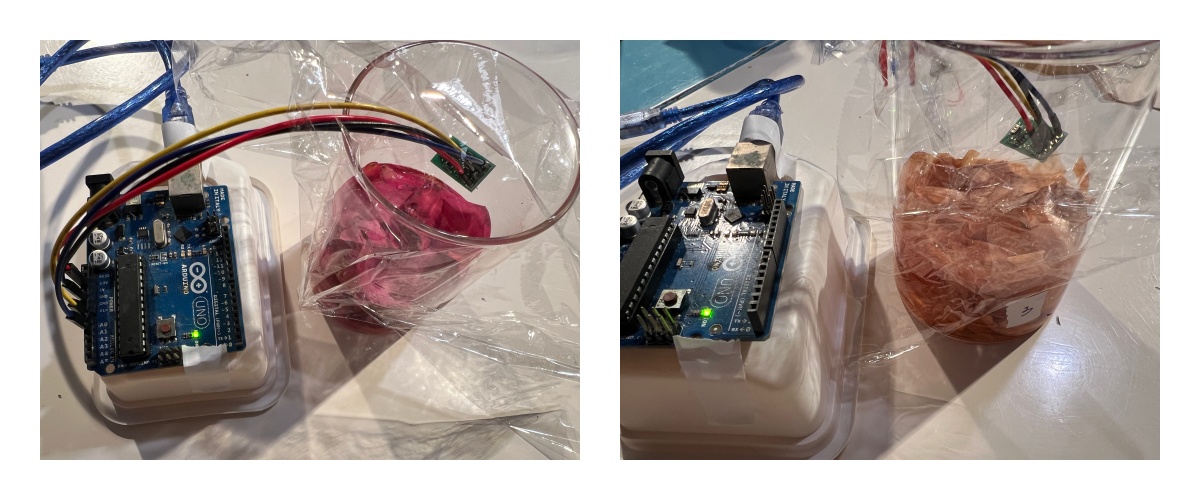
Sensing result @ Jan.27
The sensor value appear to be clearly declining over the course of a week. So, the gas sensors has a potential to monitor the progress of fermentation. Although it is necessary to consider correction methods for accurate measurements as it is also influenced by the environment.

Program
This is the basic measuring circuit in the technical information.
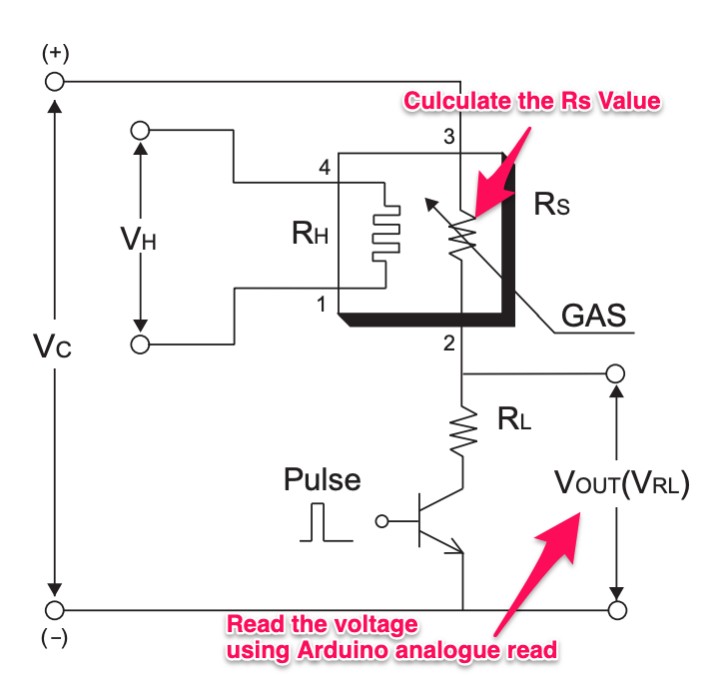
The controlling microcontroller outputs pulses with a 1s period and a 2ms width, and reads the Vout voltage during the pulse. Then the sensor resistance (Rs) is calculated with a measured value of VOUT(VRL) by using the following formula:
RS = (VC/VRL - 1) x RL

I referred the Arduino code in the doc.
2 code:
/****************************************
*   TGS8100 sensor    Arduino Uno
*****************************************/

int adval = 0; //ADC data
float sensor_r;

void setup() {
 Serial.begin(115200);
 pinMode(A0, OUTPUT); //PULSE pin
}

void loop() {
 digitalWrite(A0, HIGH); //PULSE pin HIGH
 delay(1); //Wait until OUT stabilizes
 adval = analogRead(A1); //ADC
 delay(1); //
 digitalWrite(A0, LOW); //PULSE pin HIGH
 if (adval != 0) {
 //((3.0 / (adval * 5.0 / 1024.0)) - 1)*10k ohm
 sensor_r = 6144.0 / adval - 10;
 Serial.println(sensor_r, 1);
 }
 else Serial.println("div 0 ");
 delay(998); //
}
An interesting phenomenon is that rainwater turns color faster than tap water.
 The ingredients that are not soaked at the top are prone to mold.
 As a result of PH measurement, Rain Water is more acidic than tap water.
Play with snow
Usually, it snows in Tokyo once or twice a year. The snow that fell on February 6th of this year has accumulated a little.
I remembered Ice Dye and did a small trial.
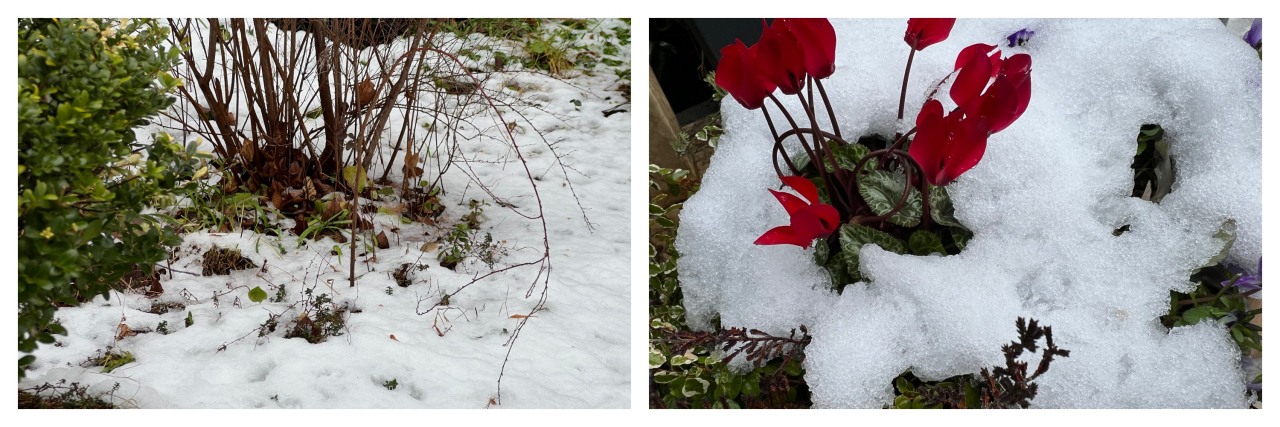
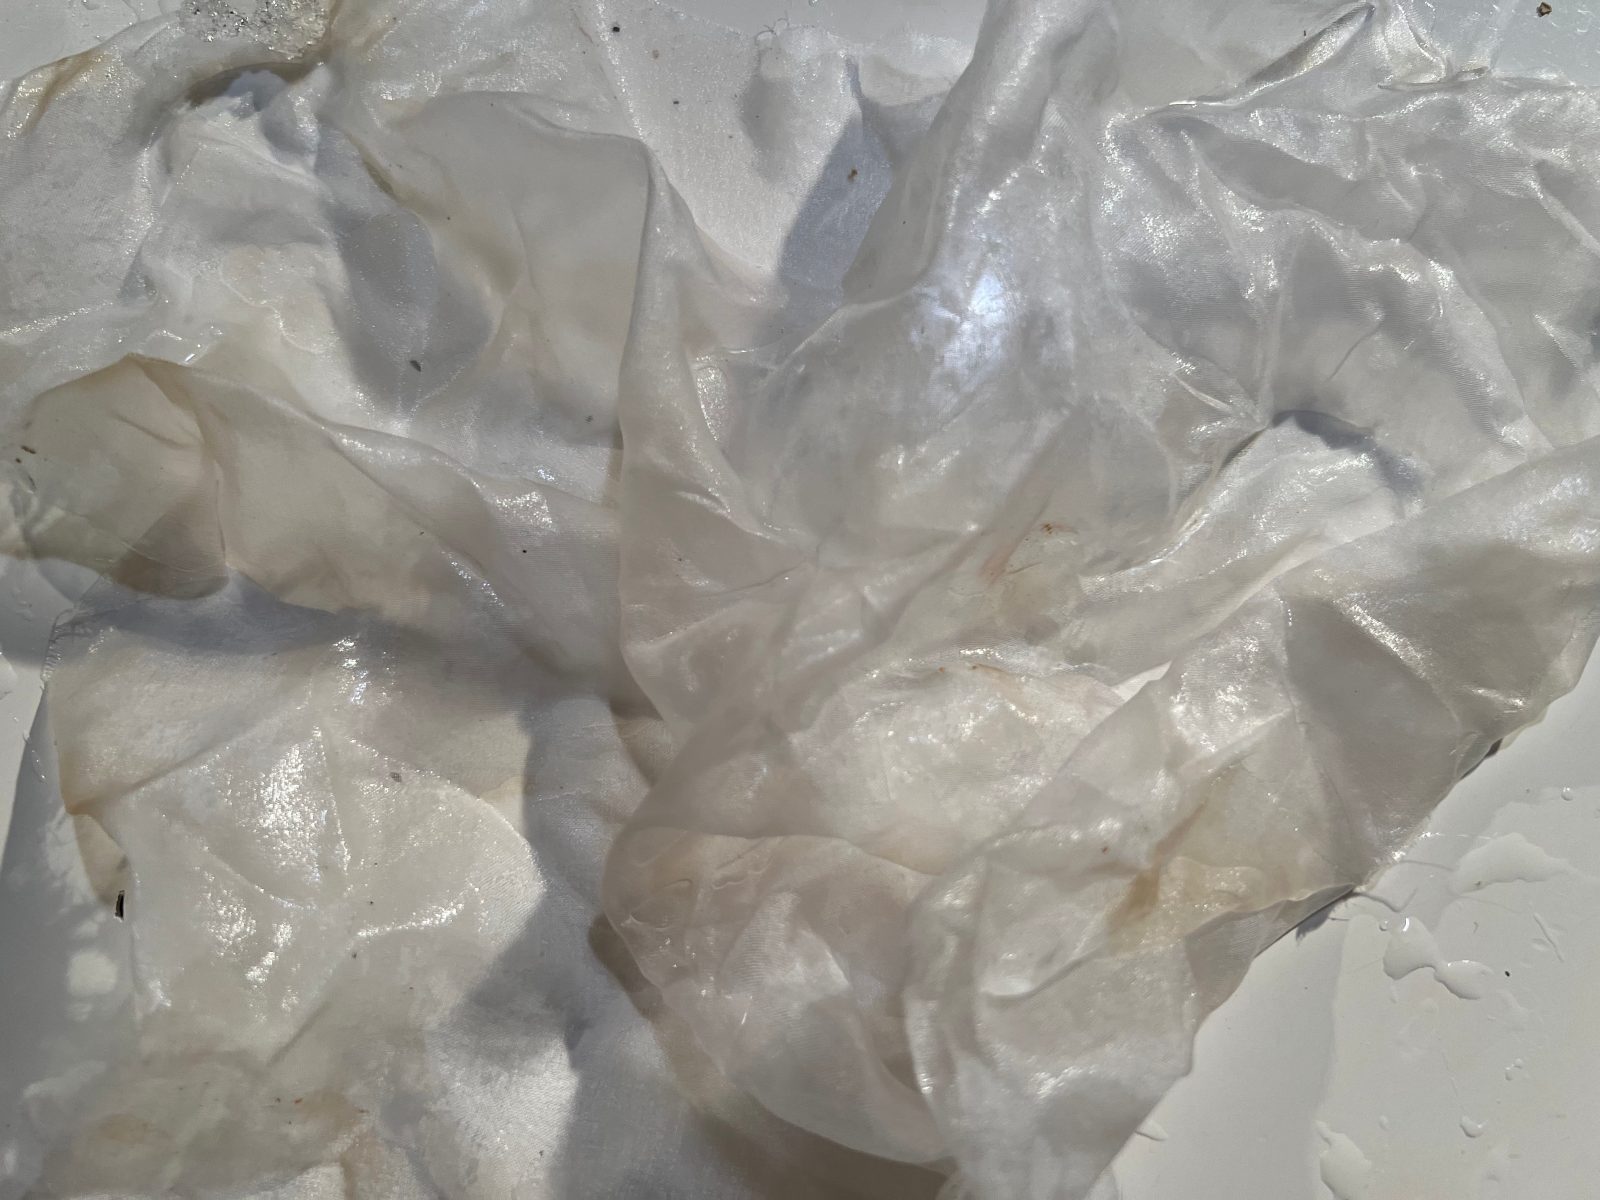
Snow is placed on a silk cloth, covered with dye extracted from onions, and left outside.
 The result was a very pale, smudged, and delicate dye.
The results will vary depending on the balance of amounts and time adjustment.
The result was a very pale, smudged, and delicate dye.
The results will vary depending on the balance of amounts and time adjustment.
Main unit
Tool
- Grasshopper: 3D pattern design
-
PrusaSlicer: Slicer
-
Prusa: 3D printer
-
Filament: PLA, PET
-
Fusion360: Mesh repair
3D Print filament
- PLA
The combination of having low-temperature resistance and low UV-resistance means that it’s not ideal for outdoor use. - PETG
High UV-resistance
Rapid Prototype #1
Material selection
At first, I printed it with PLA, which I usually use. However, I found that PLA is sensitive to UV rays. So I also tried printing with PET, which is resistant to UV rays. However, from an environmental perspective, PLA is probably better.
-
- PLA is not a perfect material and, just like every other plastic, has some disadvantages. The low melting temperature also means low-temperature resistance. Parts start to lose mechanical strength at temperatures over 60 °C. The combination of having low-temperature resistance and low UV-resistance means that it’s not ideal for outdoor use.
-
- PETG is a very tough material with good thermal resistance. Its use is universal but especially suitable for mechanical parts and both indoor and outdoor use. PETG has almost no warping, so printing large objects isn’t a problem. We use PETG to print parts for our printers!
My thinking changed after receiving feedback from my instructor Rico and my mentors.
For this project, a fragile unit that will break down over time is better than a solid unit. Just like natural flora and fauna.
Since I have been developing products for long-term use, I found this idea of "fragile items" very interesting.
I found an article about the successful use of ultraviolet light to improve the decomposition of plastic.
3D print
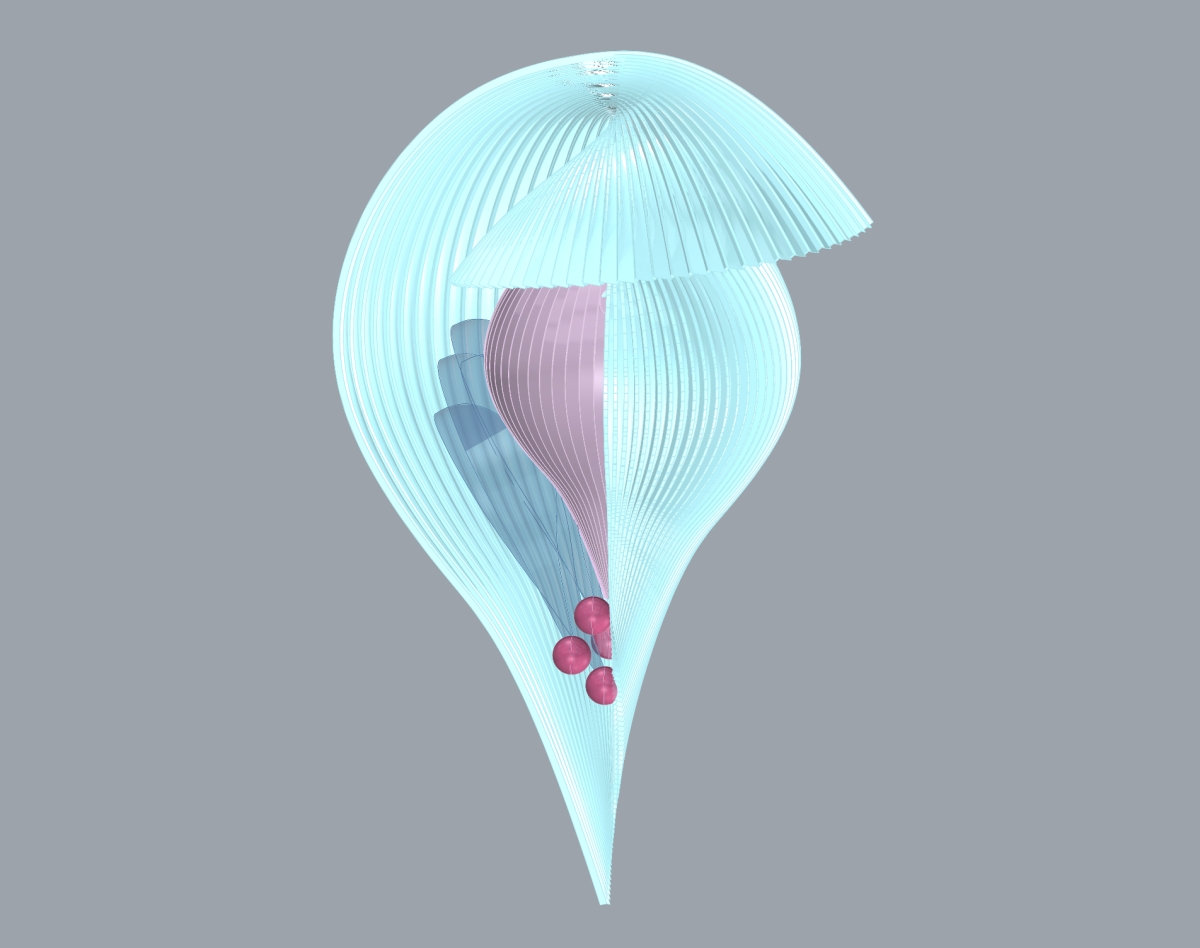
Initial trial of Dye Unit. without leaking dye liquid It requires a mechanism to store it and to drain it once fermentation is complete. I made a lid at the bottom and considered a rubber stopper.
Rapid Prototype #2
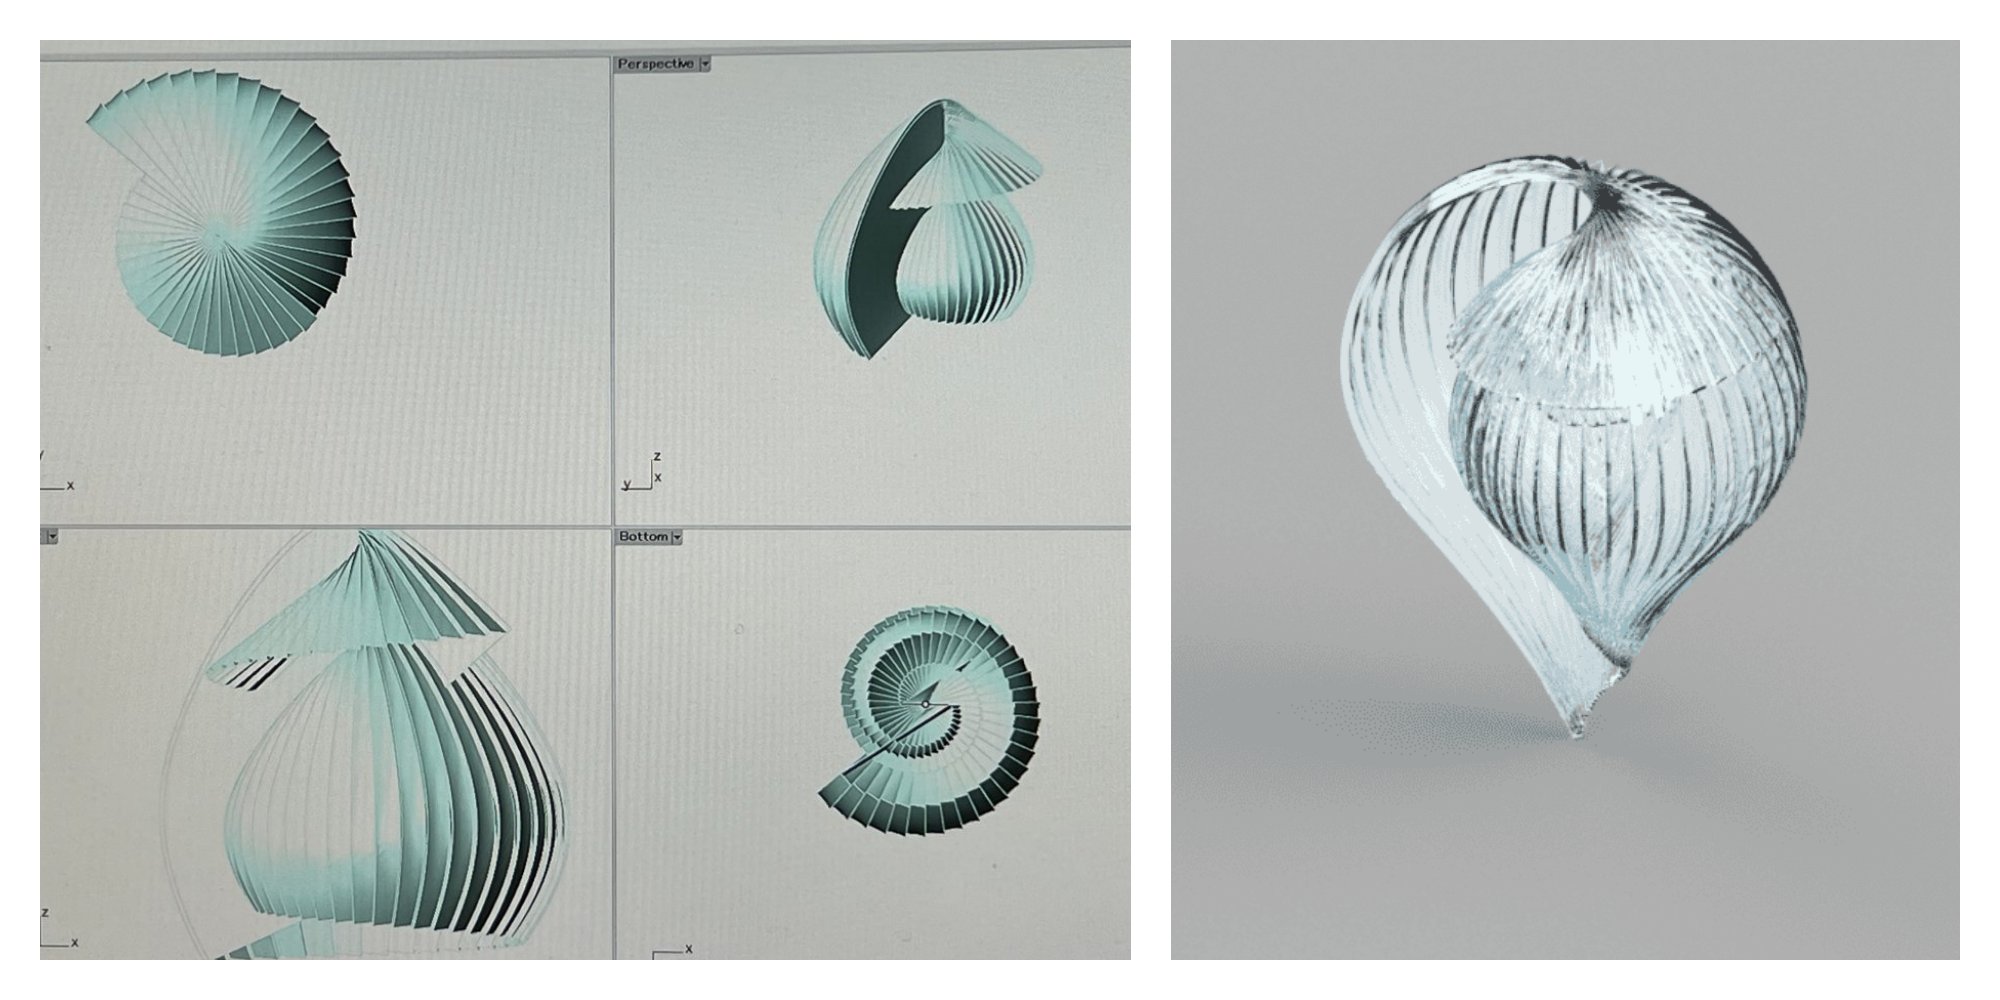
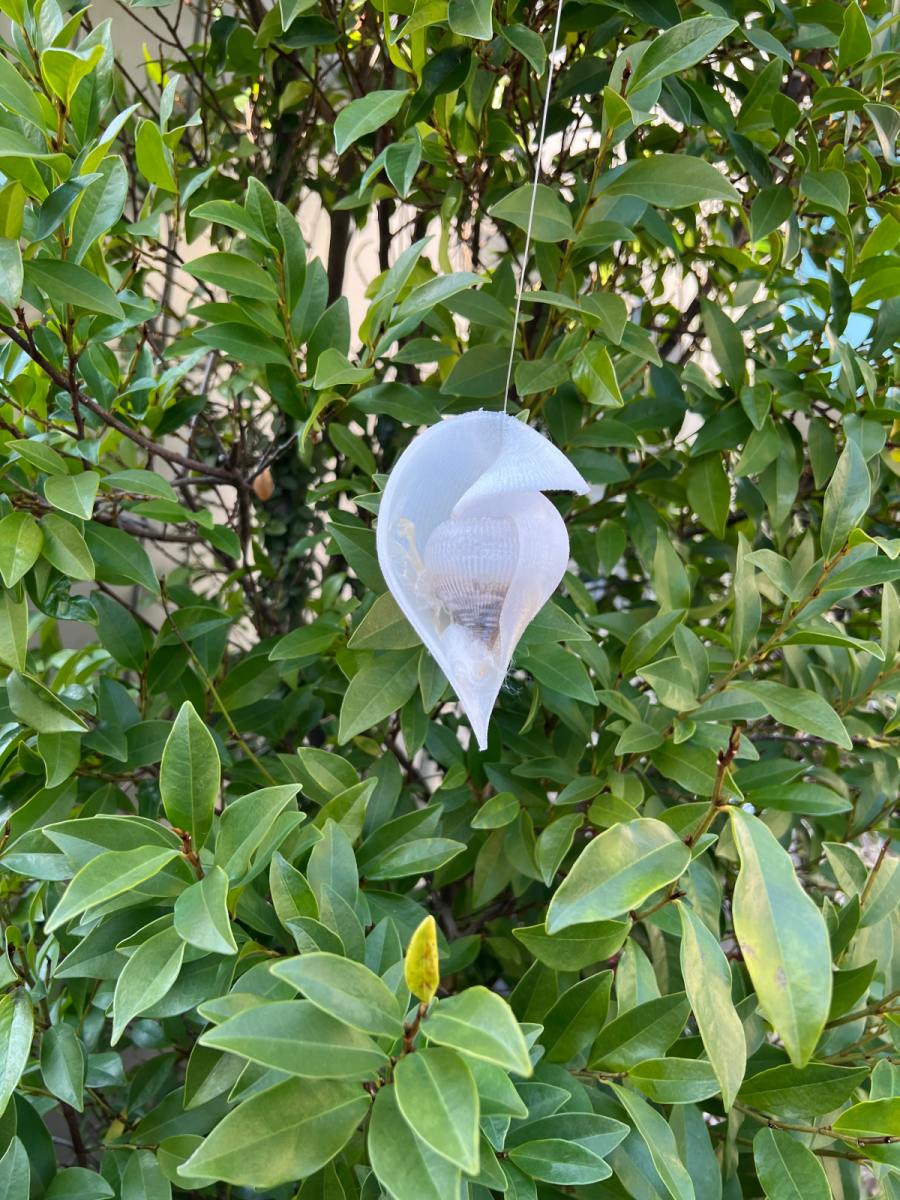
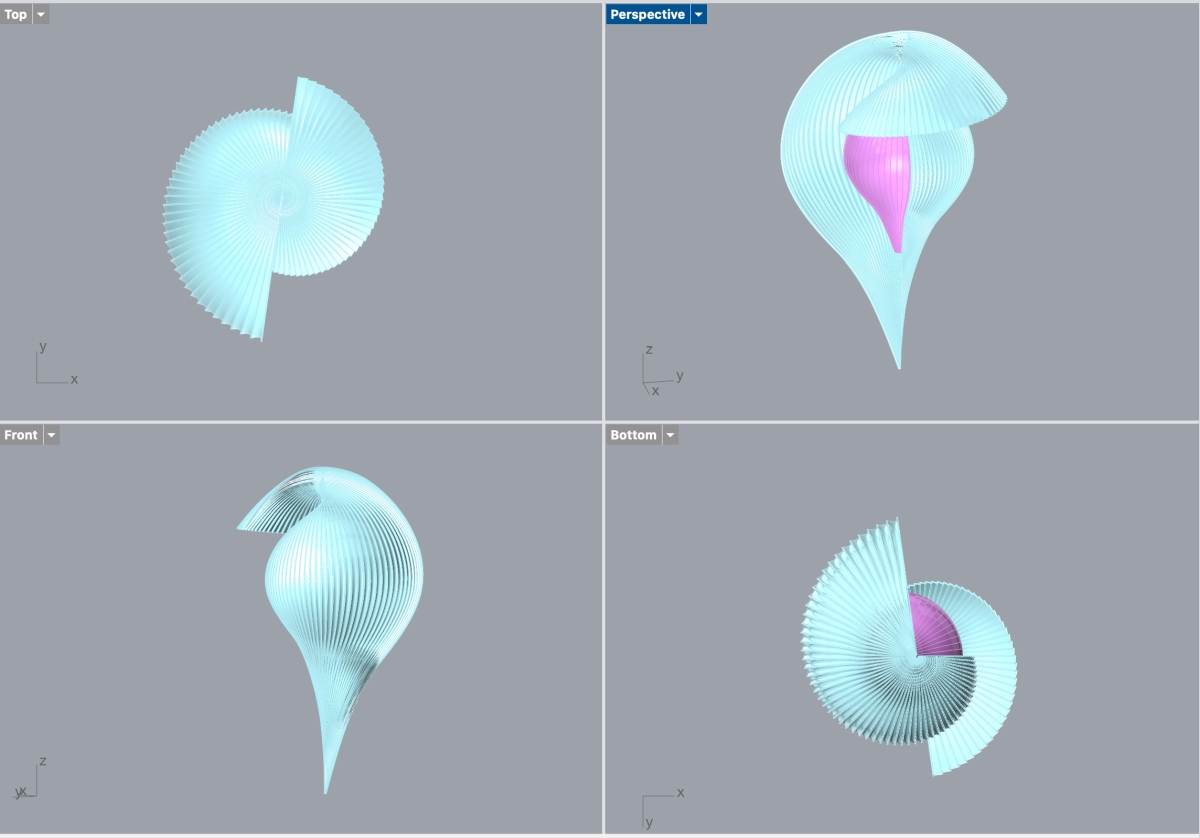
I want the unit to have an organic design, soI made a shell-like design using Grasshopper. I considered Reeed's main unit based on this Ark Pavilionarchitecture.
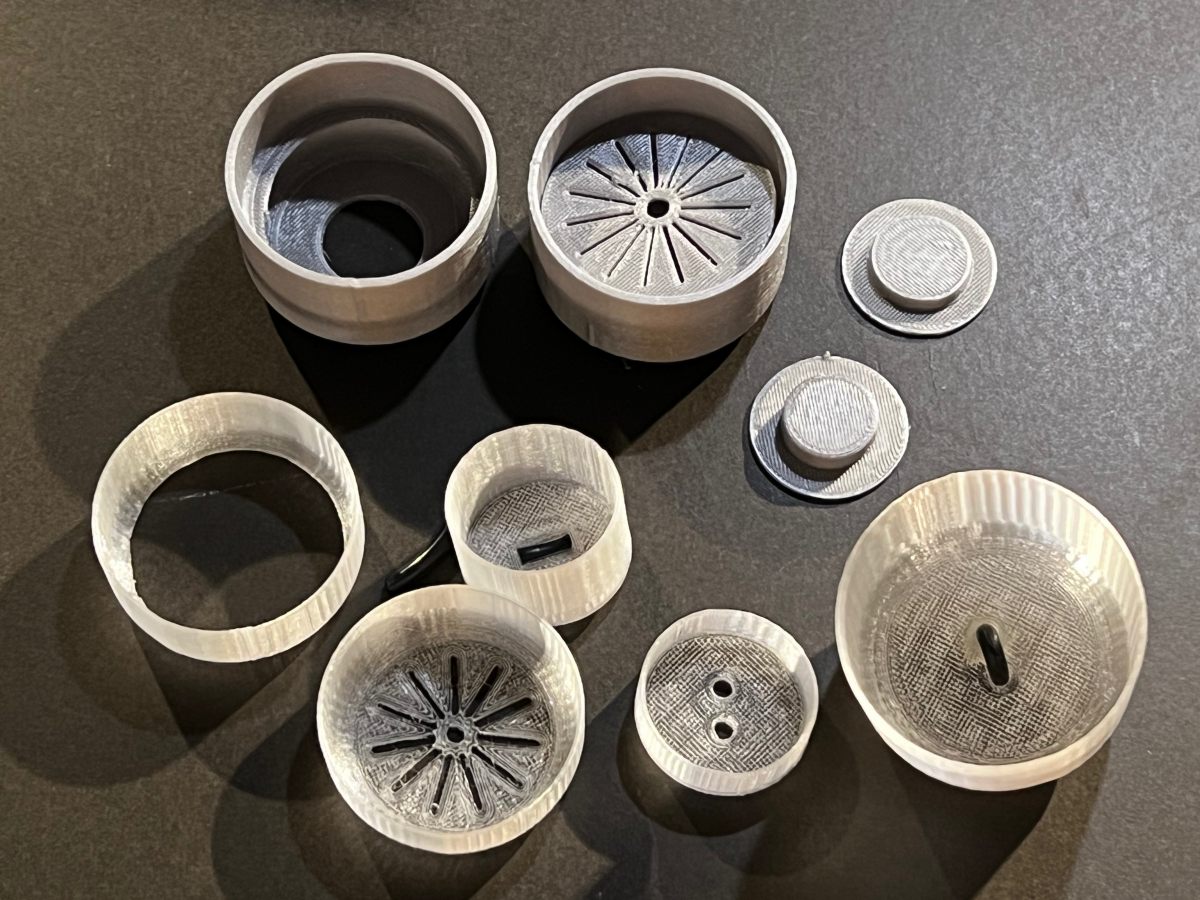
Test print1 (PET)
In order to confirm if I could print out such an organic shape with my FDM type 3D printer (Prusa), I first tried printing it at a small size. It seems to work if I adjust printing parameters.
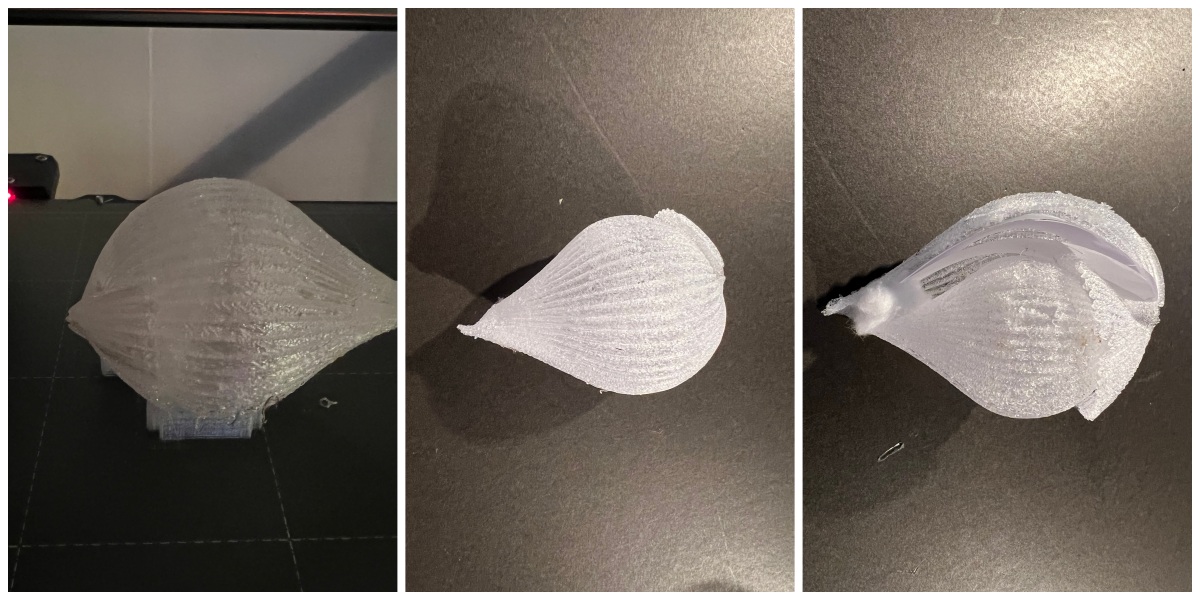
Test print2 (PLA) : with inner dye unit
I changed the material from PET to PLA. The result was better than 1st printing. The jagged texture like a shellfish has been reproduced.
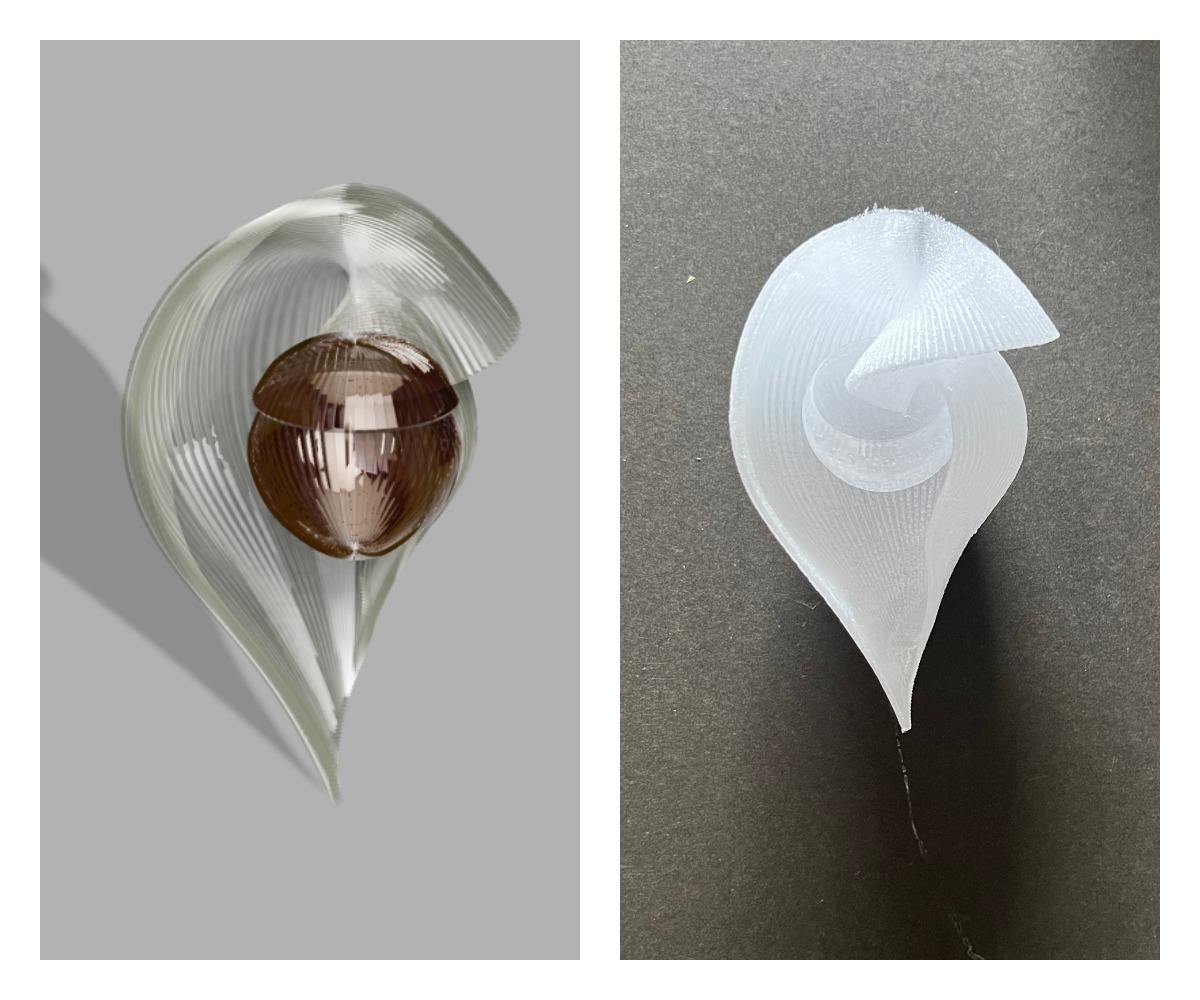
Test print3 (PLA) :
- Improved point
- Create an internal dye unit using (scale) a part of the external form. Last time it was just a round shape, but now it has a more natural design.
3Grasshopper design

Main Unit:
- Draw the base line on Rhinoceros.
-
Define the step and rotation angle range with GH, and scale while rotating the 1 line.
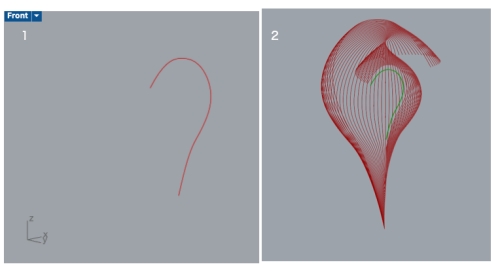
-
Offset the lines outward to create a surface in the normal direction.
-
Also create a surface with the offset line and the adjacent line
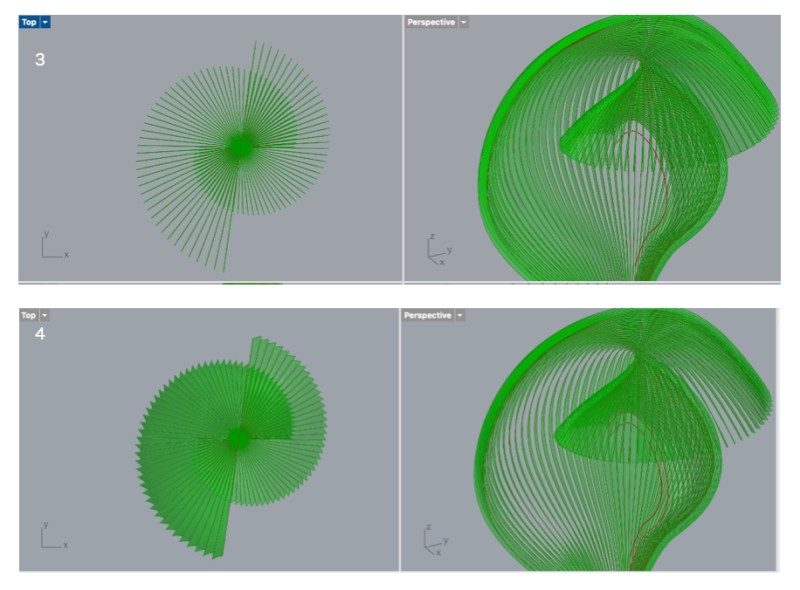
-
Integrate 3 and 4
-
Extrude in normal direction

-
Convert to Mesh, then Bake to Rhinoceros layer.
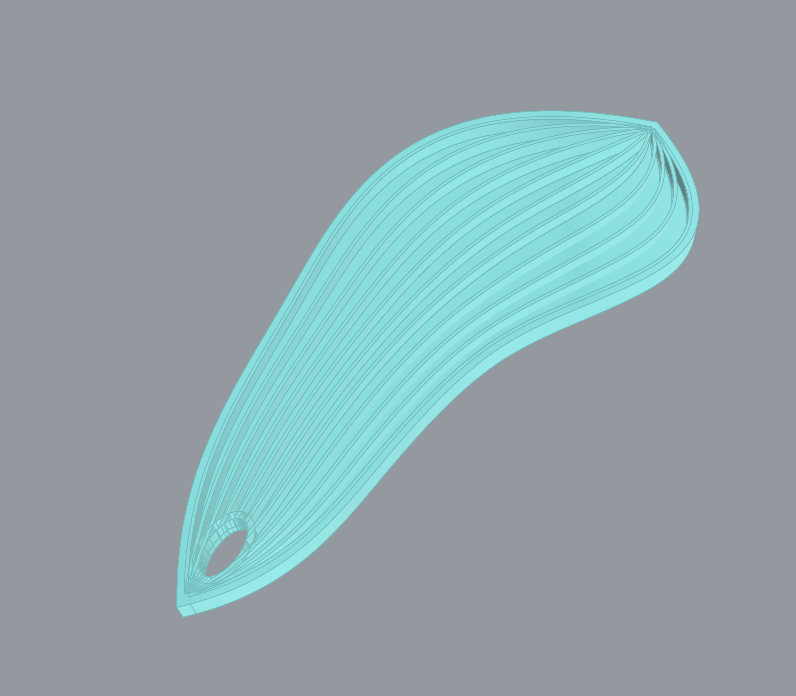
Dye Unit
-
Divide line 1 of the main unit, take out a part and rotate it to create a dye liquid unit. In other words, it has an opening at the top to put the ingredients in, and a hole at the bottom for the dye to flow through.

-
Extrude in the normal direction to create thickness and create a mesh.
Seed wing
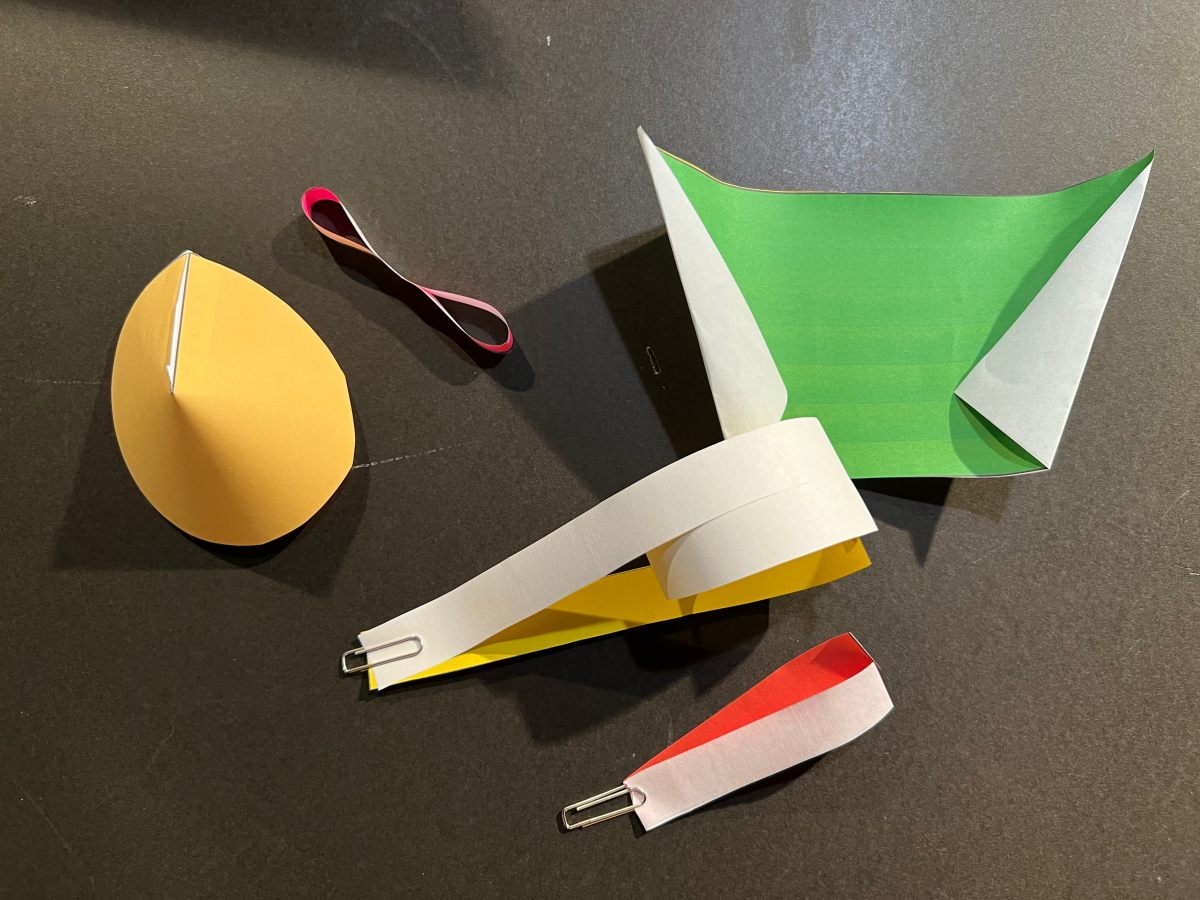
Paper Prototype
Some plants release seeds to expand their range. I created a paper prototype using a template for an experiment in which I made a paper model of the seed and observed how it flew. The V-shaped "Futabagaki" and the flying style of a maple tree with a single feather seem to be good for this project.
Bio Plastic wing
According to the article, there is a diversity in flying seeds as shown in the following picture. Some fly with light thread-like wings like dandelions, some fall while spinning like maples, and some fly like gliders like Javanese cucumbers. Since the way an airplane flies changes depending on its mass, wing balance, position, etc., there is a lot of research on aerodynamics.
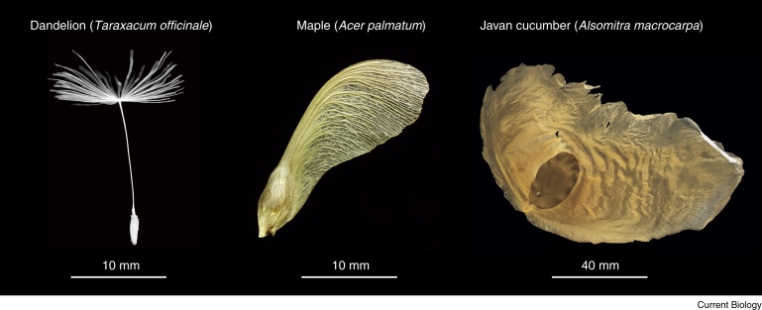
Unlike dandelions, the purpose of this project is not to make it fly as far as possible. It dyes the cloth under the hanging tree, so if it falls in different places within a 1 meter square, You will be able to create dyed items with naturally occurring designs. This time, I decided to create a design with a maple-shaped seed motif.
First, I tried bio plastic with 3d printed mold as follows.

-
Mold
-
Bio Plastic recipe
* Agar 1g
* 50ml water
* Glycerin 1g
* cup
* scale
* spoon
* mold
* Measure agar and put into a cup
* Pour water into the cup and stir it with a spoon.
* Boil for 2 minutes. I used the microwave. Stir occasionally. A large cup is better to avoid spills.
* If there is evaporation, add water to make 50ml.
* Measure Glycerine, then pour into each cup. Stir it.
* Pour into some molds
* Leave it around one day ( room temperature )
The result was as follows. It was difficult to remove from the mold and the shape was distorted.

It became fragile when it dried. The fact that it breaks easily over time is good for this project, but it looks like it will break when it is set in the main unit.
PLA wing (single wing)
I designed a model to be printed in PLA based on the first Grasshopper program. [4] Grasshopper

- Point the red dots in Rhinoceros and connect them with Nurbs Curves in Grasshopper to create the base wing shape.
-
Create an internal line by taking the lower left origin and two points on the outline curve.
-
The lines are offset to give them a little width.

The Grasshopper program shown above is designed to output designs for multiple purposes from a single base feather design.
- Outline model: Used to create molds by laser engraving
- Single wing with seed hole
- Single wing without seed hole: used for main unit
- Double wing with seed hole
- Outline model: Used to create wing by laser vector cut
- Pattern: Used to create boards hanging under a tree

The 2nd "Single wing with seed hole" was printed as follows. On the right below, the wings were stacked

To print thin, delicate wings, I adjusted the Config on the Prusa Slicer, setting the infill to zero and printing with only two layers.

PLA wing (double wing)

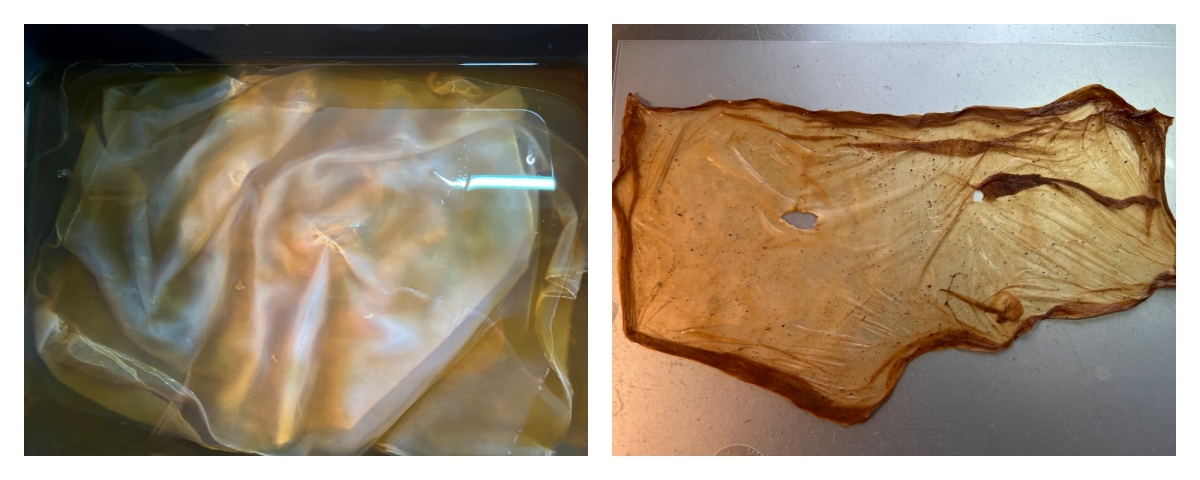
Biomaterial : Kombucha
Currently, the wings are made of PLA, a biodegradable material. However, it requires conditions such as high temperatures and microorganisms. So there are problems with leaving the seed wing in nature to decompose.
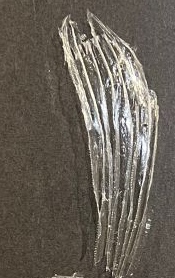
Instead of PLA, I tried Kombucha scobies @ Week6 for the wing part. I removed one thin layer of Scobie skin, placed it on a clear file, and left it to dry indoors for 3 hours.
I used a laser cutter to engrave the feather lines and cut out the outline.
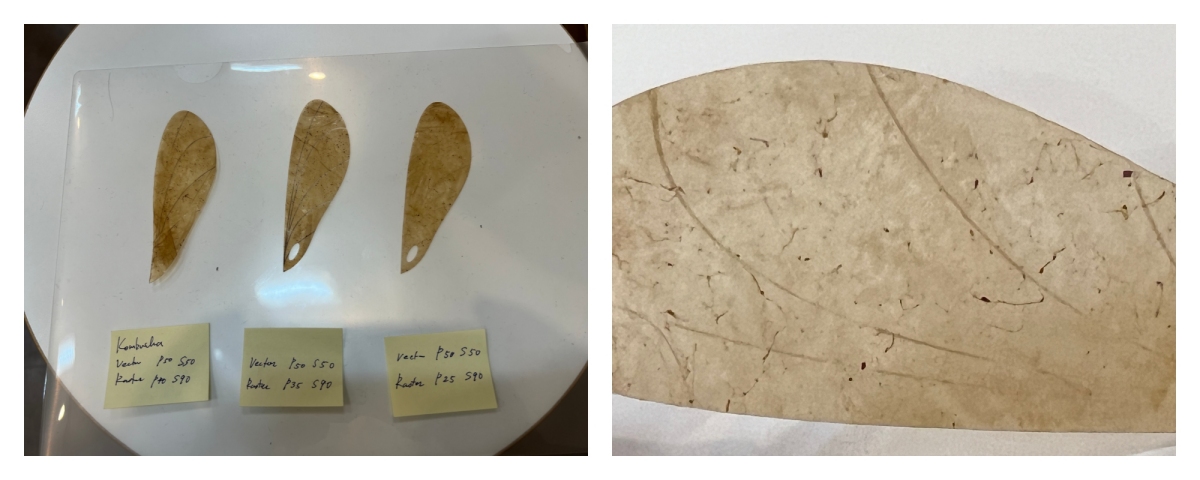 The result was beautiful feathers that flew down beautifully when dropped from above.
However, if seeds (cotton) containing dye are applied, the feathers lose their balance and cannot maintain their wing shape, causing them to fall straight down. Even if it is thin, it must have a solid structure.
The result was beautiful feathers that flew down beautifully when dropped from above.
However, if seeds (cotton) containing dye are applied, the feathers lose their balance and cannot maintain their wing shape, causing them to fall straight down. Even if it is thin, it must have a solid structure.
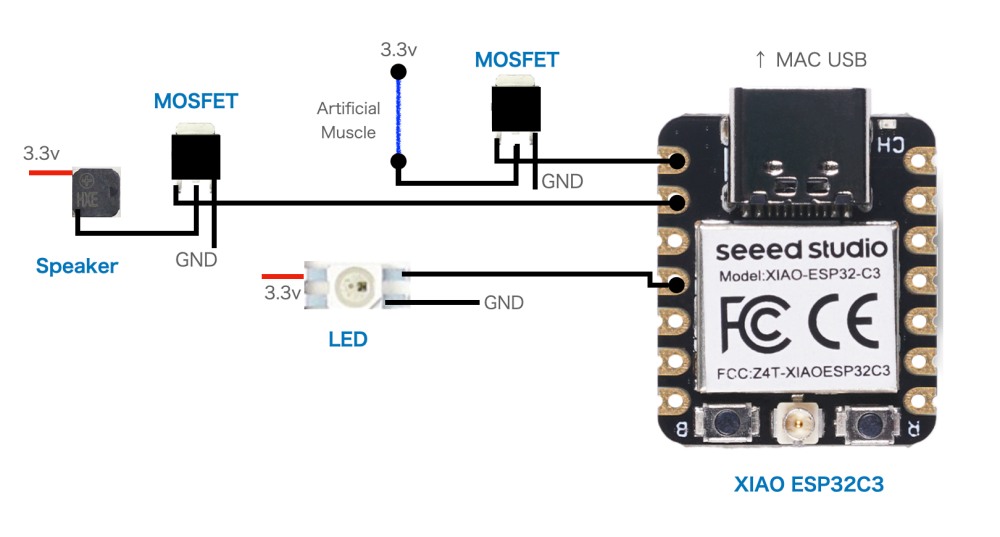
Electronics
For the mid-term review, tried LED, Speaker and Artificial muscle as follows.
Parts :
-
Micro controller board
- Small, low power consumption
- XIAO ESP32C3
-
LED
- NeoPixel : I used at E-textile week & Skin electronics week
-
Speaker
- Speaker: I used at Skin electronics week
-
Artificial muscle
- BioMetal: I used at Soft robotics week
code1 5
    /************************************************************
    *   Fabricademy FP  rapid proto#1   LED & Tone
    ************************************************************/
    // NeoPixel
    #include <Adafruit_NeoPixel.h>
    #define PIN  D3// Neopixel pin
    #define NUMPIXELS 1 // Number of NeoPixels
    Adafruit_NeoPixel pixels(NUMPIXELS, PIN, NEO_GRB + NEO_KHZ800);

    //Speaker
    #define spPin D1//
    //int mScale[]={131,165,196,262,330,392,523,659,784,1047}; //C#3, E#3, G#3,  ---
    //int mScale[]={277,311,329,391,440}; //C#4, D#4, E#4, G#4, A#4)
    int mScale[]={1046,1174,1318,1567,1760}; //C#6, D#6, E#6, G#6, A#6)

    int mode=0;
    unsigned long timCnt=0;
    bool  isLED = true;
    int ledBr = 100;
    //int colR=255, colG=105, colB=180;
    int br=2;

    void setup() {
    //NeoPixel setup
    pixels.begin(); // INITIALIZE NeoPixel strip object (REQUIRED)
    pixels.clear(); // Set all pixel colors to 'off'
    Serial.begin(9600);
    }


    void loop() {

    switch(mode){
        case 0:
        chkFerment();
        break;
        case 1:
        break;
        case 2:
        break;
    }
    delay(5);
    }


    void chkFerment(){
    dspLed();
    randomTone();  //
    }


    void dspLed(){

    if(isLED){
        for (int i = 0; i < NUMPIXELS; i++) { // For each pixel...
        // pixels.Color() takes RGB values, from 0,0,0 up to 255,255,255
        pixels.setPixelColor(i, pixels.Color(255, 105, ledBr));
        //pixels.setPixelColor(i, pixels.Color(255, 185, 50));
        pixels.setBrightness(ledBr);
        pixels.show();   // Send the updated pixel colors to the hardware.
        }
        ledBr += br;

        if(ledBr<5){ br=4;}
        else if(ledBr >250){ br=-4;}
        Serial.println(ledBr);

    }else{
        pixels.clear(); // Set all pixel colors to 'off'
        pixels.show();
    }
    }


    void randomTone(){
    tone(spPin, mScale[random(sizeof(mScale)-1)], random(100,150));  //
    Serial.println("spout");
    }
code2 6
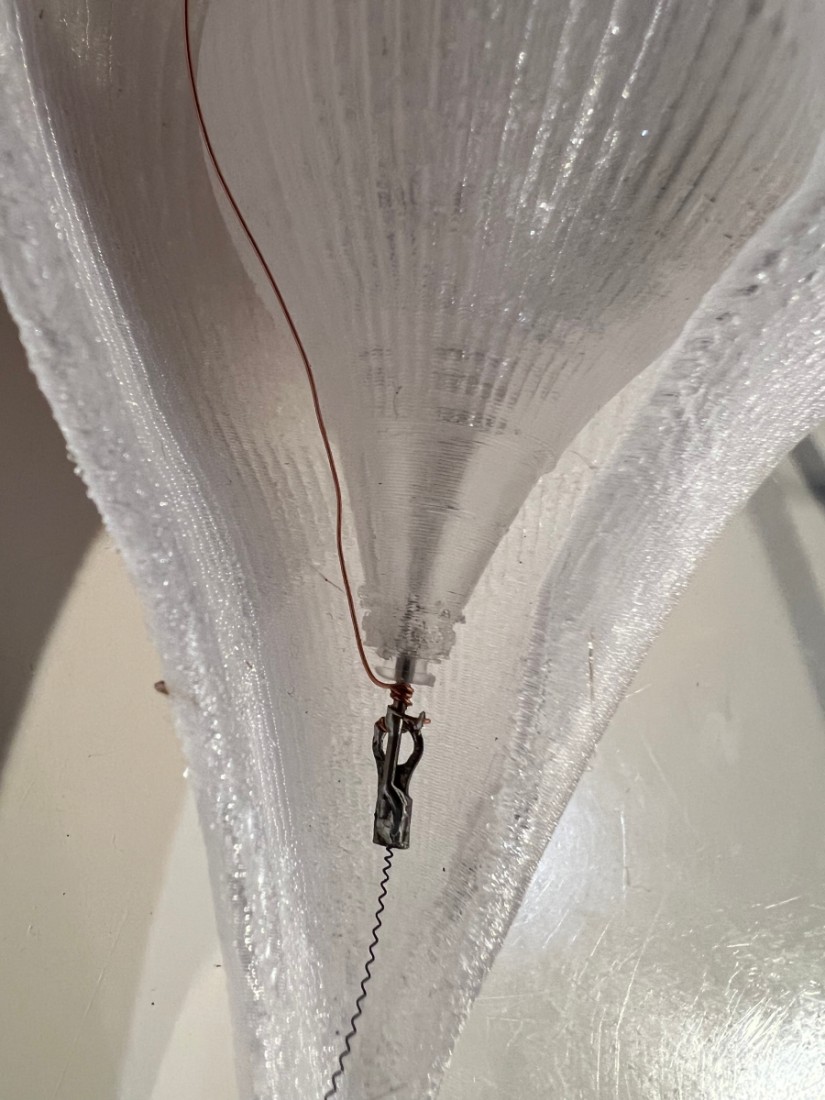
Using the LED and Tone programs, I confirmed the operation of the artificial muscle. At the current stage, it is turned on and off periodically (5ms, etc.) to repeat contractions.
```
/************************************************************
*   Fabricademy FP  rapid proto#1   artificial muscle
************************************************************/
// NeoPixel
#include <Adafruit_NeoPixel.h>
#define PIN  D3// Neopixel pin
#define NUMPIXELS 1 // Number of NeoPixels
Adafruit_NeoPixel pixels(NUMPIXELS, PIN, NEO_GRB + NEO_KHZ800);

//Speaker
#define spPin D1//
//int mScale[]={131,165,196,262,330,392,523,659,784,1047}; //C#3, E#3, G#3,  ---
//int mScale[]={277,311,329,391,440}; //C#4, D#4, E#4, G#4, A#4)
int mScale[]={1046,1174,1318,1567,1760}; //C#6, D#6, E#6, G#6, A#6)


//BioMetal
#define amPin2 D0//
bool isAmOn=false;

int mode=0;
unsigned long timCnt=0;
bool  isLED = true;
int ledBr = 100;
int br=2;

void setup() {
//NeoPixel setup
pixels.begin(); // INITIALIZE NeoPixel strip object (REQUIRED)
pixels.clear(); // Set all pixel colors to 'off'

Serial.begin(9600);
}


void loop() {

switch(mode){
    case 0:
    chkFerment();
    break;
    case 1:
    break;
    case 2:
    break;
}

if(isAmOn){
    analogWrite(amPin2, random(240,255));
    Serial.println("High");
}else{
        analogWrite(amPin2, 0);

        Serial.println("Low");
}

//delay(5);
delay(5000);
isAmOn = !isAmOn;
}


void chkFerment(){
    dspLed();
    // randomTone();  //
}


void dspLed(){

if(isLED){
    for (int i = 0; i < NUMPIXELS; i++) { // For each pixel...
    pixels.setPixelColor(i, pixels.Color(255, 105, ledBr));
    pixels.setBrightness(ledBr);
    pixels.show();   // Send the updated pixel colors to the hardware.
    }
    ledBr += br;

    if(ledBr<5){ br=4;}
    else if(ledBr >250){ br=-4;}
    Serial.println(ledBr);
}else{
    pixels.clear(); // Set all pixel colors to 'off'
    pixels.show();
}
}


void randomTone(){
tone(spPin, mScale[random(sizeof(mScale)-1)], random(100,150));  //

Serial.println("spout");

}
```
Mid Term Review
Mentoring notes
Jan.30
- Create the story board
-
In addition to the flying seeds style, there are other designs as well.
- Cut and harvest like fruit
- You can also enjoy the movement of the hanging Reed
- Sprinkle on your clothes.
- Design for each season
-
it could be also an accessory as a wearable tool for clothes dyeing
- you could also use biodegradable filament so it will dissolve after some time
-
the biodegradable filament is a very good idea - printed thickness will allow you to time it differently
-
https://sites.courtauld.ac.uk/documentingfashion/2020/12/11/martin-margielas-melting-ice/
Feb.13
-
Will the unit be reused?
-
If you are pursuing biodegradability, it is a good idea to research the biodegradability of electronics.
-
beautiful and clear slides!
-
Your project is advanced technically, on all fronts, your research is detailed and goes in depth, from sensing your dyes progression to precise electronics controls - congratulations, this is really impressive! The process is core - and we see with the videos it really comes to life - for your final project it would be great to film this with the same poetic way (keep some time for the video recording in march)
-
I am curious to see how people will interact with the object, will they need some information? will they intuitively know what to do? is a sort of ritual happening every so often?
-
poetry...sublime...elegant. I highly anticipate your final project...as I expect it will take my breath away! Some refinement of your message...to make it even more concise and powerful would be the only minor comment I would offer.
-
you are a true storyteller and im looking forward to a beautiful experience and installation. The research is great, lovely experiments. The use of electronics is fundamental also to the maintenance of the device. Is the music a requirement tho? Could the flying seeds be made of a biomaterial rather than PLA? The shapes hanged reminds me of the oscillating pendulum for dripping art
-
Very unique and original project! I like the shape you gave the object. I had the same question as Ricardo, would there be a way to reuse it several times? I cannot wait to see how it develops :)