6. BioFabricating Materials
References
Dutch Design Week 2022
Last year, I visited a small but incredible exhibition on biomaterials at Dutch Design Week 2022. Here are pictures that I took back then.


Lucile Haute
Lucile Olympe Haute is a friend that I met through graphic design practices. In parrallel, she's been exploring Kombucha as a cosmic talisman through artistic performances. She has led a stunning workshop on Kombucha as a biomaterial. She is now in a 10 months residency at Cité Internationale des Arts (Paris) to explore Kombucha furthermore.
Instagram post embedding not available.Watch it on Instagram


Precious Peels
Precious peels is a project by Loumi Le Floch' where she explores eggplant skins as biomaterials. I really like the different colors she obtains by adding lemon to modify the colors.
Instagram post embedding not available.Watch it on Instagram
Instagram post embedding not available.Watch it on Instagram
Instagram post embedding not available.Watch it on Instagram
Materiom
Materiom is a contributive database of biomaterials recipes. You can create an account and add your recipes, fork/modify existing recipes, comment, etc.

Hacking Silk
Marie Vihmar (Hacking Silk) is producing new materials out of silk.
Instagram post embedding not available.Watch it on Instagram
Instagram post embedding not available.Watch it on Instagram
Instagram post embedding not available.Watch it on Instagram
Kelp shoes by Jing-cai Liu
https://www.futurematerialsbank.com/material/kelp/

Lichens growing on knits
Mirte Musje made her final project at Swedish School of Textile on lichens growing on knits.
Instagram post embedding not available.Watch it on Instagram
Instagram post embedding not available.Watch it on Instagram
Lichen bioplastic


I love the warning when you arrive on the website:
Lichen bioplastic was just a one-shot research.
It’s not sustainable to use it since the growth of the specie takes long and in very specific places. I used the leftovers of products that were already on the market so I would not interfere with the environment :)
Nevertheless, if you have this under control then, I encourage you to do more research.
Paper yarn / Kami-ito
Paper has been used traditionnally in Japan to make clothes that are washable. It was a less expensive alternative to cotton. They generally use mulberry paper.
Sabrina Sachino Niebler describes wonderfully her process. She makes beautiful shifu (cloth made of kami ito) that she sometimes dye with natural ingredients.
Instagram post embedding not available.Watch it on Instagram
Instagram post embedding not available.Watch it on Instagram
Since I discovered this practice, I wanted to try it out myself in order to recycle paper waste, mostly tissue paper or patternmaking paper. I made myself some tests in the past couple of years with only tissue paper for now. The first post are samples made with a spindle in 2020, the other one was made with an e-spinner in 2022. Both of those samples were intact after washing (of course, I did just a gentle wash for now).
Instagram post embedding not available.Watch it on Instagram
Instagram post embedding not available.Watch it on Instagram
Tests made with the Studio Hilo spinning machine:


Wild textiles
I am deeply interested in using resources that we can find anywhere which are often underestimated. I bought Alice Fox's Wild Textiles book last year to have inspirations on many natural resources.

Last year, I tried making yarn out of nettle.
PICTURE
This summer, I found some Creeping Thistle (cirsium arvense, chardons des champs) at a pollination state on my way to the lab. I thought their little hairs were actually quite long compared to dandelions for example and that they were worth trying to spin. It was quite hell to spin so I only managed to spin that much, but it gives a very soft fabric!

Manioc bioplastic
This was made before Fabricademy but thought it was interesting to share.
I've been curious to experiment with biomaterials for quite a while now. My only experiment till now was at the beginning of the year when my partner wanted to do tapioca flour from scratch out of manioc. There were a lot of manioc fibres left out of the process (the tapioca flour was great!) and I thought to give it a random try. I cooked them in a pan with vinegar and with/without glycerol. The ones without glycerol were super hard and broke too easily when dried. The ones with the glycerol are still today quite supple (check video). Lasercut worked quite nicely on this material.

For preparing I Love Science festival (see below), I wanted to try bioplastics from tapioca flour directly. The two attempts I made ended up in super sticky mixtures which were too difficult to spread and never dried. FAIL.
Gelatin bioplastic
Two weeks ago, I gave 30 minutes workshops during three days at the I Love Science Festival (this is why I am late for documenting week 4 Biochromes!). To prepare this, I've been testing some recipes every now and then for a month. I used Anastasia Pistofidou's tricks of using embroidery hoops as molds to have nicely shaped samples.


I tested recipes from Le Textile Lab in Lyon:
- agar-agar
- silicone gelatin
- resin gelatin
- composite gelatin
Agar-agar bioplastic sheets
This recipe gives a rather soft and elastic sheet. It is still quite sticky. When you make a composite by adding a filler, it looks quite fragile.
Ingredients
- 250mL water
- 5g agar-agar
- 15g glycerol
Recipe
- weigh all ingredients in a pot.
- simmer it on low heat until it thickens.
- pour it in mold.


!!! Tips/Remarks
- Cook the mixture well so that it thickens in the pot before pouring it, otherwise it will never dry!
- If you pour onto a fabric, put a plastic underneath.
- It shrinks quite a lot and does not stay in the embroidery hoop. I suggest to make a big surface and then cut off the outline.
Gelatin bioplastic sheets
Ingredients
- 240mL water
- 48g gelatin
- (gelatin ratio) glycerol
According to the amount of glycerol, you obtain a plastic which is super soft and sticky (more glycerol) or a plastic which is hard and slick (less glycerol). They all have different usage, you need to find one ratio that suits your needs.
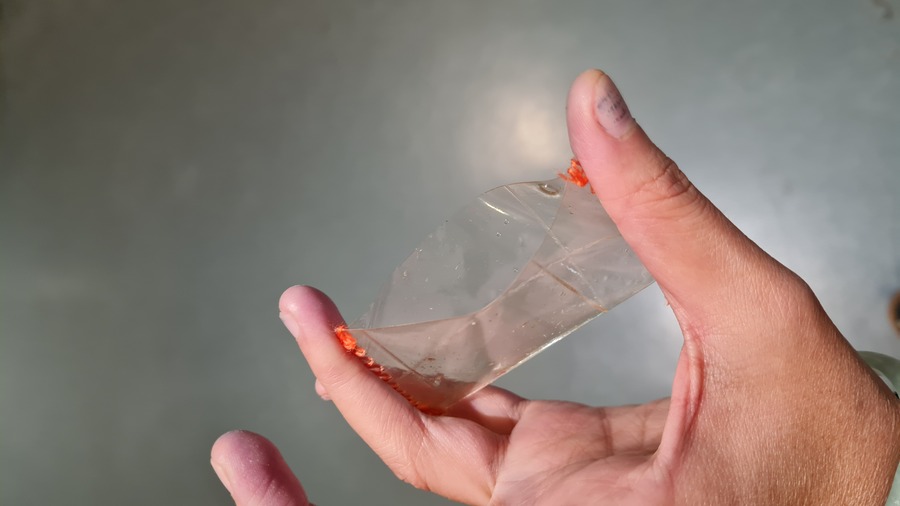
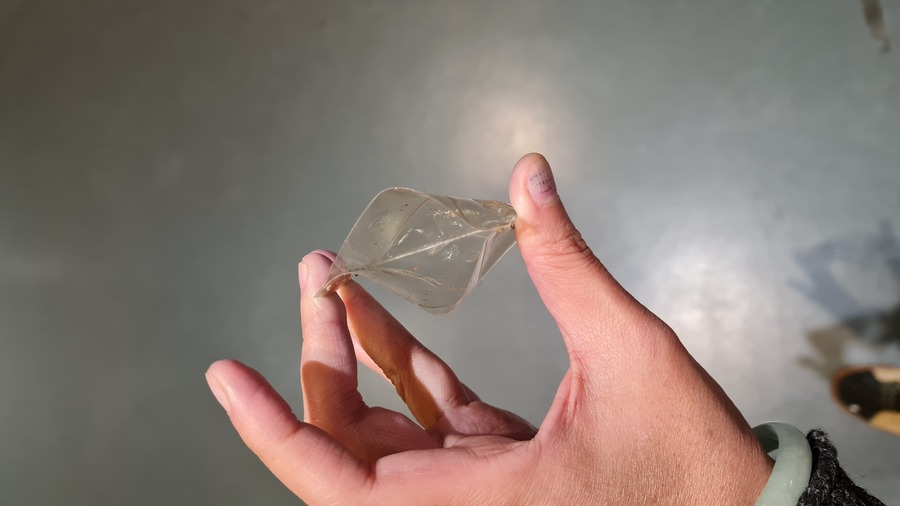
Gelatin silicone
Gelatin/Glycerol ratio: 1:1
As its name suggests, this recipe mimicks silicone matter. It is very soft, squishy, elastic and sticky. It could be used to replace rubber usage. It is still sticky even when fully dried. This stickyness can be seen as a feature and can be used to replace rubber/silicone usage. I used them as spacers in week 2 Digital Bodies. After a lot of manipulation, it can lose its stickiness and translucency, you can clean it with a damp towel and it will be good as new.


Bioplastic poured on a "sandwich" bubble wrap: a bubble wrap having a flat layer on each side. It makes nice facettes.
Bioplastic poured on machine knit sample.
Gelatin resin
Gelatin/Glycerol ratio: 6:1

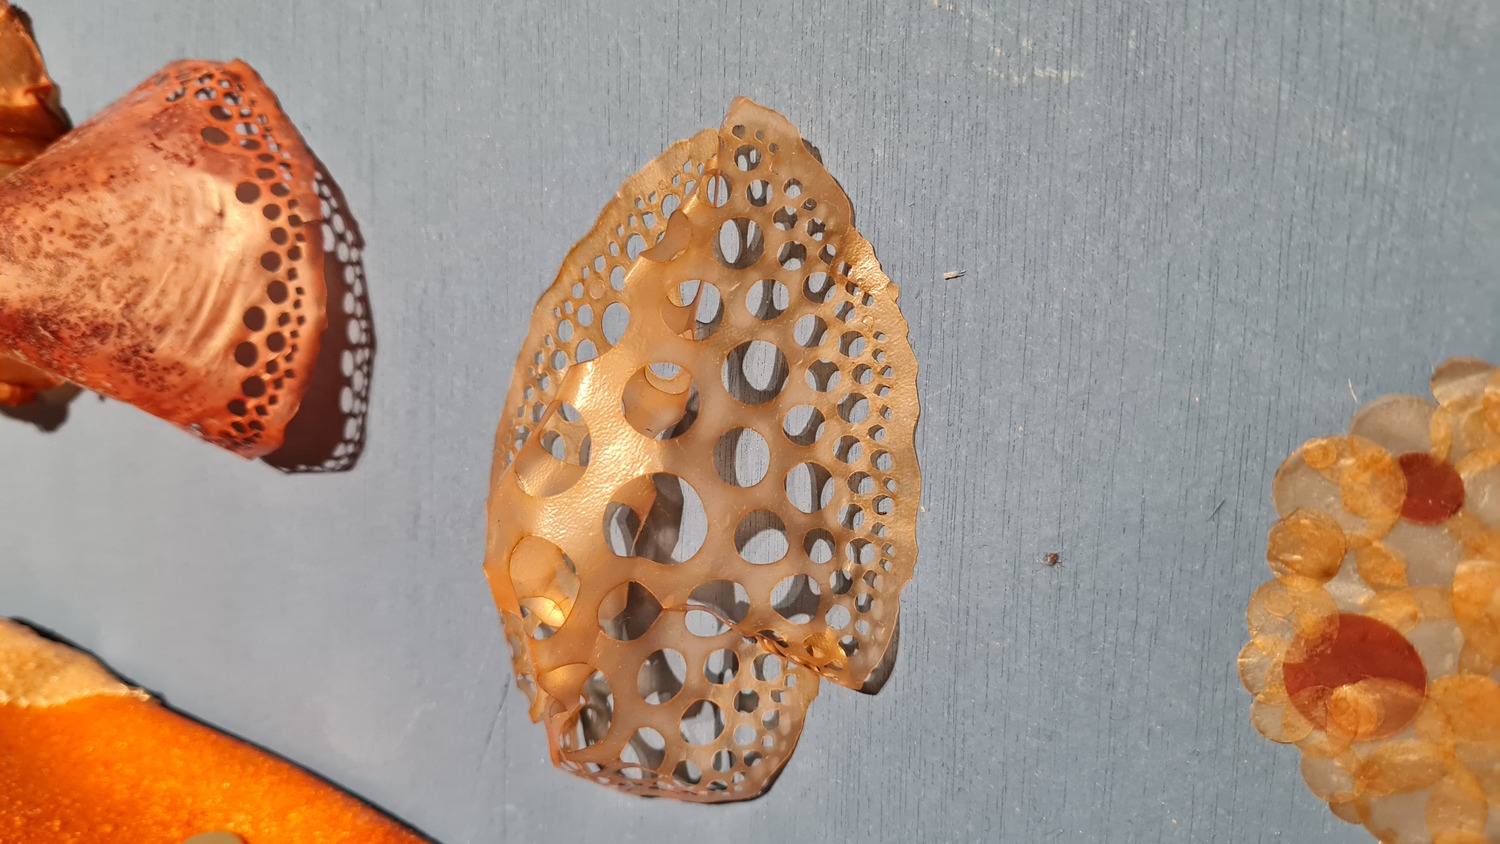
Gelatin composite
Gelatin/Glycerol ratio: 3:1

Festival I Love Science
For the festival, I decided to use the Gelatin resin recipe as it gave a non-sticky result. Also because if kids would put too much glycerol, it would still give a nice result.


Instagram post embedding not available.Watch it on Instagram
This week's experiments
Lasercut
Beware of the smell of burnt gelatin, it is horrible…


Engraving works super nicely and it doesn't even smell that horrible.
New fillers
I took a bit of time to test fillers I didn't have time to test before. This time I wanted something more suple than the gelatin resin recipe upper in the page.
Gelatin/Glycerin ratio 2:1


Glitter
Who doesn't love glitter? I know they're not sustainable at all, but I did buy those golden and pink glitter at the store where we bought all Fabricademy products. I just couldn't resist… I do plan to use them only for unwashed objects though.


Mica
As an alternative to plastic glitter, I wanted to try natural glitter: mica.
Here is a natural mica that I found this summer during my vacation in Auvergne mountains. It was actually quite difficult to turn it into a powder, the mica sheets are really like natural plastic! The mortar/pestle would not do much to it. I broke them with my fingers is small pieces. I think a blender would have worked better, but I just wanted to test a tiny amount for now and it was not sufficient for a blender.


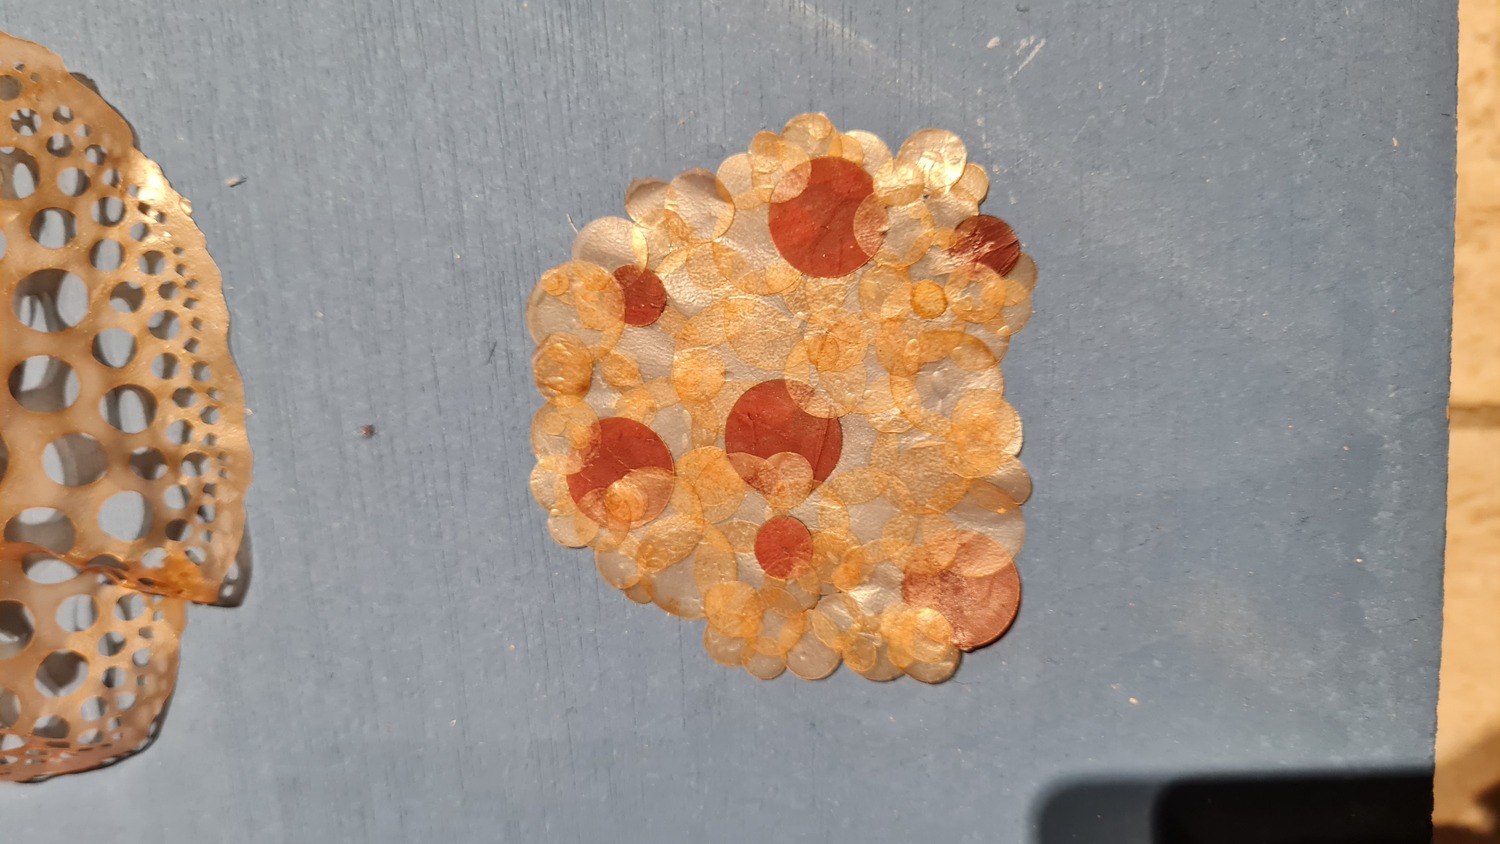
Fish scales
Sea bream scales.
Natural indigo waste
The natural dyer of Green Fabric, Amandine Brun-Sauvant often removes the top layer of her indigo vat. She kept it to see if it would make an interesting bioplastic. I made it into a powder again with a mortar/pestle but it did not dissolve very well in the bioplastic. Amandine suggests for next time to rehydrate it just like when you launch a vat, and use this coloured paste/water to make the bioplastic.


Repair bioplastic
I was wondering if you could repair bioplastics. I took a failed one which was too thin and broke when it dried. I added a few drops of sirupy bioplastic on the whole. The edges melted a bit when I did that. Maybe it's good to wait a little bit that the mixture gets colder to avoid that. But in the end, when dried, the repair is quite ok!

Foam gelatin
I made several attempts at making foam bioplastics but it always dephases. The foam is always on top, leaving a big chunk of translucent bioplastic underneath which gets moldy after a few days. I don't understand what's wrong with those…


Scale it up
I wanted to make big sheets of bioplastic to be able to make small objects.


Some tests into making objects by sewing.


A test by melting the bioplastic with a hot needle. This technique would be nice to make temporary sealings, for packaging for example. You can open it up again quite easily.

Origami
Dewi Brunet, a friend artist specialized in origami, has been exploring biomaterials as well under the name Flowd.lab. We met on Monday to show ourselves with Charlotte and Eileen our respective experiments. I had a thin sheet of gelatin bioplastic which was holding the fold quite well and asked Dewi to fold it. He tried the bioplastic on the open source pleating loom that he developed.


Sodium Alginate
I am obsessed with yarns so I wanted to make sodium alginate yarn when I saw Loes Bogers super strong yarn.
Ingredients
- 6g sodium alginate
- 10g glycerol
- 200mL water
- 5g olive oil
- 20g calcium chloride
- 200mL water
Recipe
- Mix all ingredients with a handheld mixer otherwise there are big lumps.
- Let it sit overnight (in the fridge?).
- Prepare your calcium chloride solution by dissolving it into water (10% concentration).
- Put the sodium alginate mix into a syringe.
- Extrude in the calcium chloride solution.
My first attempt was a fail as I had too much of the gelatin recipe in mind, and I was convinced that there would be more sodium alginate than glycerol, but it is the other way around… I also forgot the oil. I ended up with very chunky fatty strings. I figured that after half an hour, my mixture left inattended completely solidified.
Second try, I did the proportions good, but I ended up with quite fragile strings and pearls. Maybe my hole in my plastic bag (DIY syringe) was too small… I then noticed that you should normally let sit the mixture overnight for the bubbles to go away…
Third try: good proportions, left it overnight on the table. When I came back in the morning, I found a cheese/tofu sort of thingie… I got discouraged by the sodium alginate so I abandoned this path for now. I did use the little bubbles as pearls. The "cheese" is still like a flan after 6 days, let's see how it evolves. I saw on another recipe that they let it sit overnight in the fridge. Does this make a difference?…


Algae
Alert: this is a totally unscientific and completely arbitrary process and experimentations… It went a bit all over the place, but it was fun!
Links
I ate some oysters this week so I kept the algaes which were with it. I let them sit in water for a day to remove the salt, then a second bath of a couple of hours. I simmered them a few hours.
Drying
I wanted to use the algaes as materials itself. I wondered if I could find a way to make them more supple. I tried putting it in sodium carbonate, in vinegar, in both.


- In vinegar
- Still hard.
- Gets a green blueish color.
- In sodium carbonate
- After a while, the algae becomes soft and disintegrates when you press it between your fingers
- In Sodium Carbonate then vinegar
- It fuzzes for a while (acid + alkalin makes this fuzzy reaction and delivers CO2).
- After 5 days, the algae is not soft at all
Precipitate
I tried to spray calcium chloride onto my different juices to see if I got a reaction. It did make some kind of whitish precipitation right away, without really solidifying ever. There was absolutely no reaction from the vinegary juices, so there is definitely a reaction with sodium carbonate going on. As it is not solidifying, I tried to filter those precipitates to see if I could exploit them afterwards. To be continued…


Extracting colors
The green given by the vinegar is quite intense and I thought it would be nice to exploit it. I made a test of putting algaes in ethanol 96% to extract colors.

Fish leather
My mom wanted to eat some sushi this week-end and bought an enormous piece of salmon. I asked the fishmonger to remove the skin but to keep it. I removed the scales with a handmade tool that I bought a few years ago in Thailand or Laos. I then removed the few left scales and flesh with a chef knife. I didn't have ethanol at 96% at home, so I froze the skin to wait till Monday to do it at the lab.
I tested the so-called "lazy" recipe (this is just perfect for me!) that Cecilia Raspantes gave during the course: one part glycerine, one part ethanol. Shake 5-20 times a day during 3 days.

Grown materials
Flowers
This is not really a grown material, but I wanted to check if my gelatin resin with flower seeds would actually make flowers. So I put one of my samples in water, to see how much time it would take to dissolve and germ.
After a day, the plastic was soft but still present!


Kombucha
We were given a Kombucha mother on Monday by Dewi Brunet who has been exploring with Kombucha leather for 4-5 years. We tested 2 recipes, one with failed homemade beer (white beer but with a brown color) from Fabricademy fellow Charlotte and one with jasmine tea.
We made the new baths on Tuesday 31st October, let's this how this goes…

Sponge blob
A blob is a mysterious unicellular thingie that one can find in the forest. It has no nervous systems but it can resolve networking problems nonetheless. I knew that our friend Dewi Brunet had blobs. I asked him to give us one piece to see if it would make an interesting material…
Dewi says it likes oats from Quaker brand the most. So I bought its fav food and we gave him its first oat flakes on Tuesday 31st October. Let's see what happens…
