7. Computational Couture
TOOLS
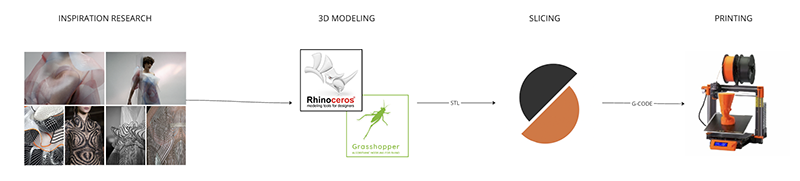
During the computational couture week I am exploring 3D modeling with Rhino/grasshopper and 3D printing onto textiles.
PROCESS AND WORKFLOW
VORONOI
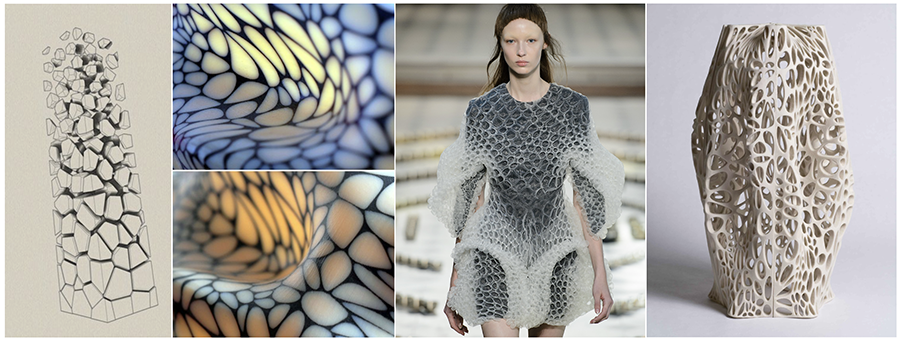
I started out by researching the internet looking for inspiring projects. I wanted to start with a voronoi pattern variation since it is a beginner friendly pattern. I already have experience with Rhino/grasshopper but i am not very confident with my skills, so i thought it best to start easy. Here are some beautiful examples where the voronoi pattern is applied.
3D modeling with Rhino/Grasshopper
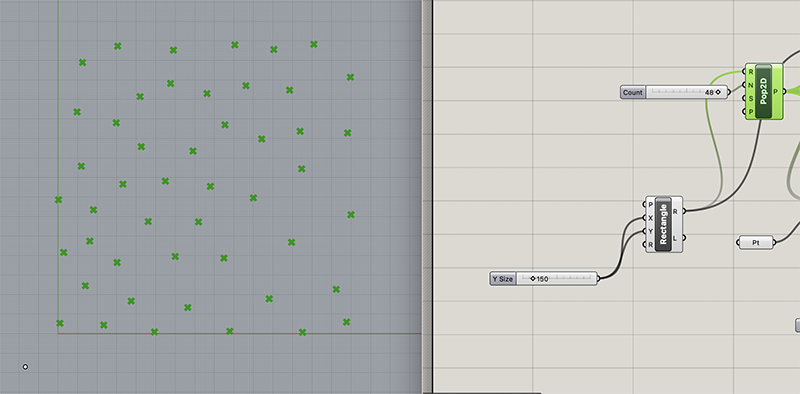
Using Rhino and grasshopper, I started out by creating a simple square curve with the Rectangle tool.
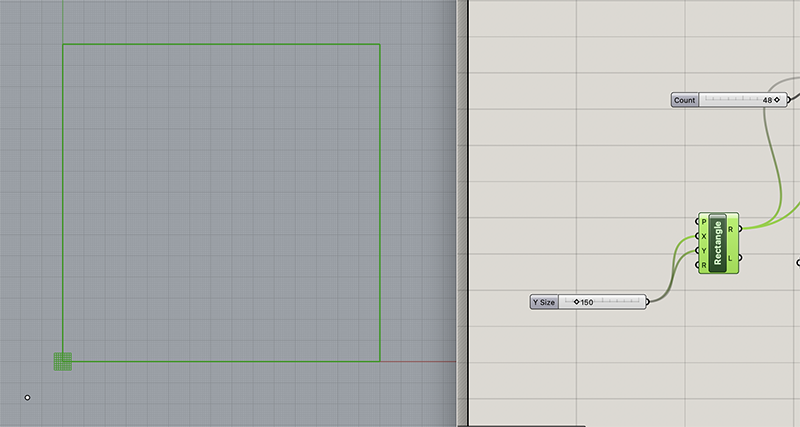 Next, I used the command Populate 2D, which populates the square i created with points in a random arrangement. I can decide how man points are generated, as well as the seed.
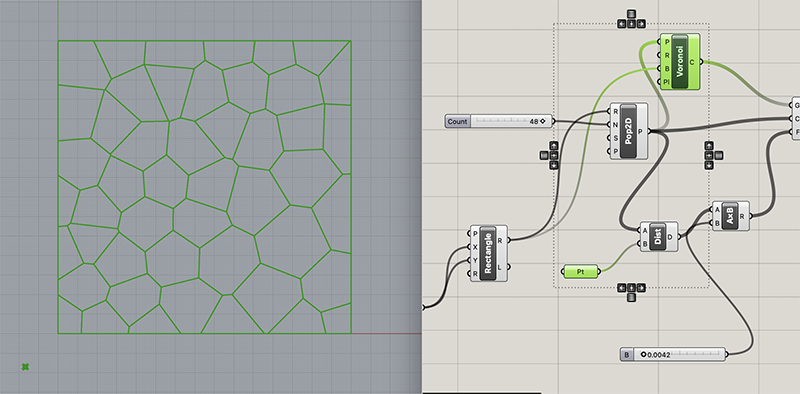
 Next, I use the voronoi generation tool, which creates a voronoi pattern from a list of points.
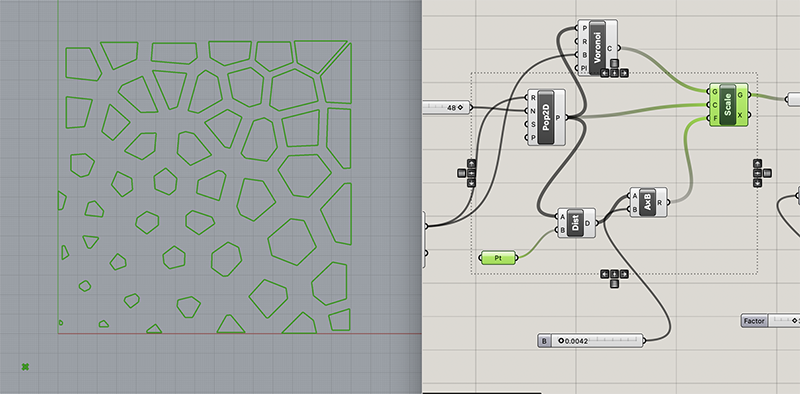
 To add another layer of interest, I decided to scale the voronoi cells according to the distance between a point and the center of the cells.
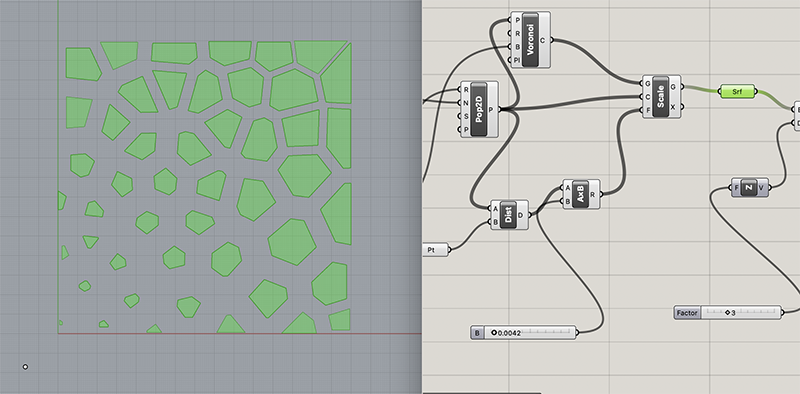
 In order to create a 3d shape, i need to change my curves to a surface, using the surface tool.
 From there i can extrude the height i want my print to be. I extruded 3mm.
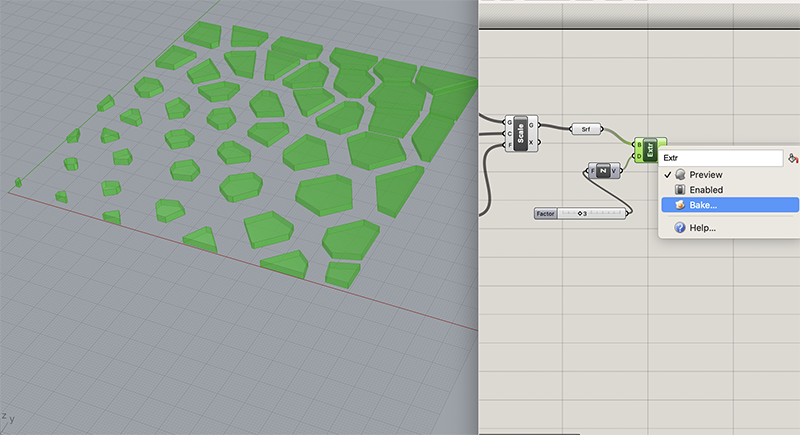
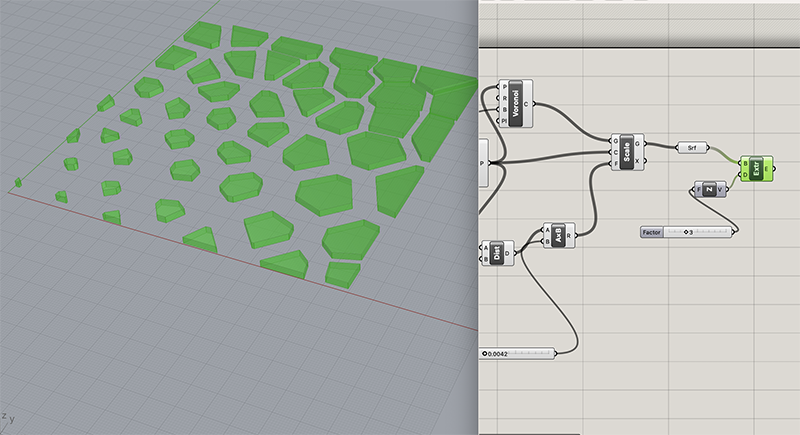 Once my surface is extruded, I baked it by right clicking the extrusion box. This step is necessary if you want to work with the geometry you've created, and export it.
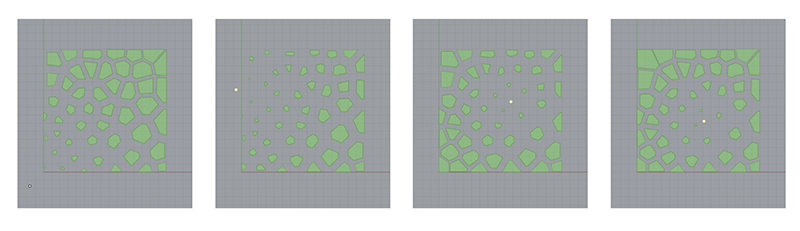
 Here are some examples of variations created with this script. I am playing with the location of the point in these variations, but you can play with other variable too.
Here are the Rhino/Grasshopper files 1
Slicing 3D model
After exporting my Rhino file as an STL, I imported it into the Prusa slicing software. With this software you can choose all your print settings, I chose the default that was recommended for the filament i was using. I was using a PLA filament.
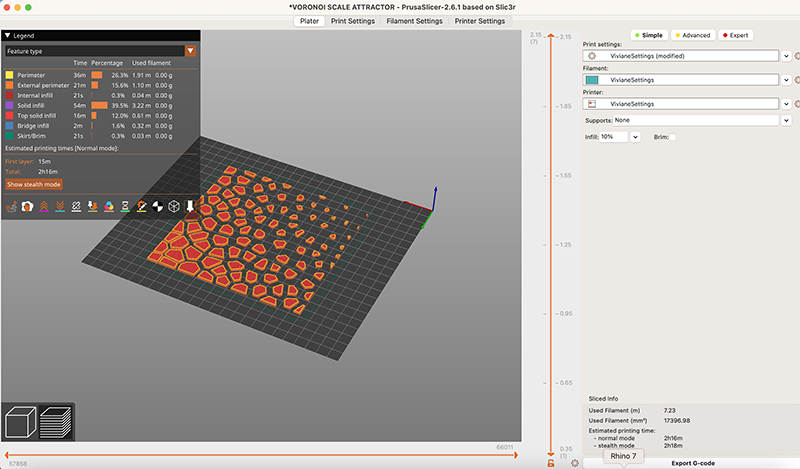
Once you have figured out all your settings, you can click on export G-code in the lower right corner and save this on an SD card.
Printing with 3D printer
Now I've exported my G-code onto my SD card, i can simply load the card onto the printer, and select my print file and press start.
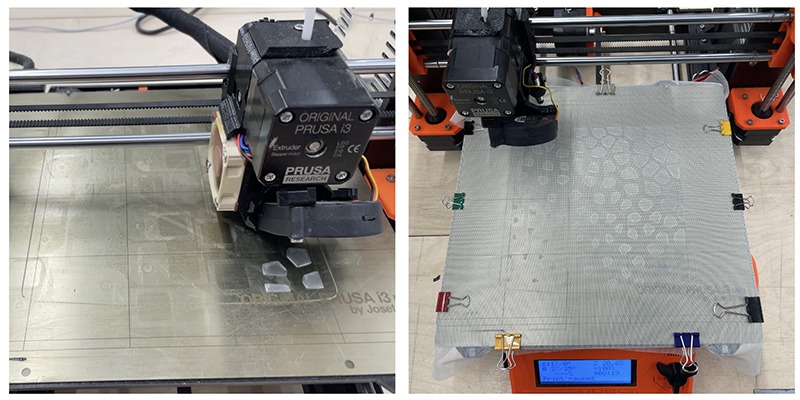
OOPS! make sure the bull clips don't get in the way of the 3D printer's mechanism. Here you can see that i forgot to completely fold down the bull clips and they got caught when the printer bed started moving and it scrapped the print.

So, I had to start my print over. and second time i didn't forget the bull clips and everything went smoothly.
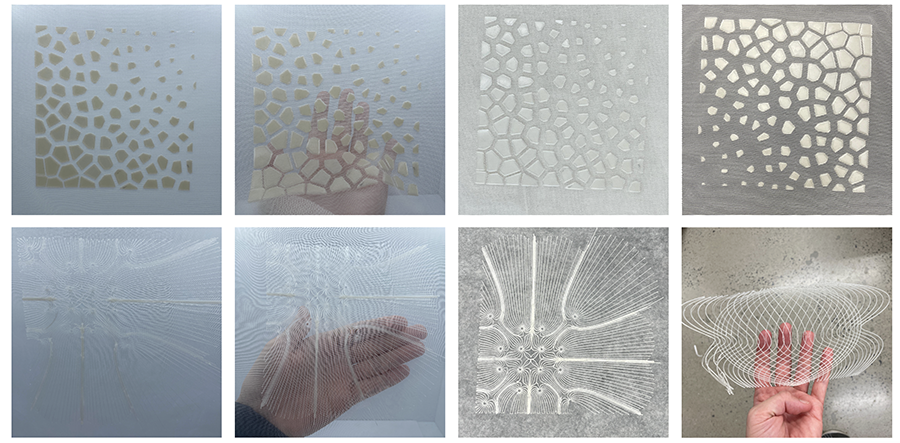
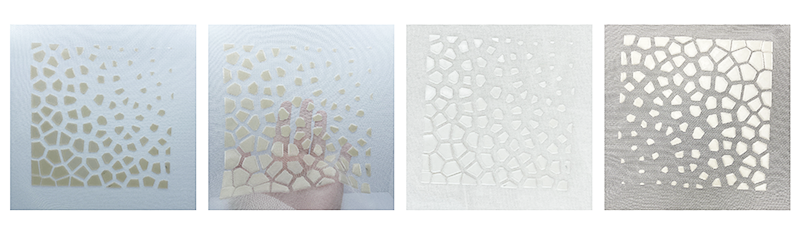
Result
Here's the result for my first print. These are all the same swatch, but they are photographed with different colored backgrounds to showcase different options of contrast.
3D model
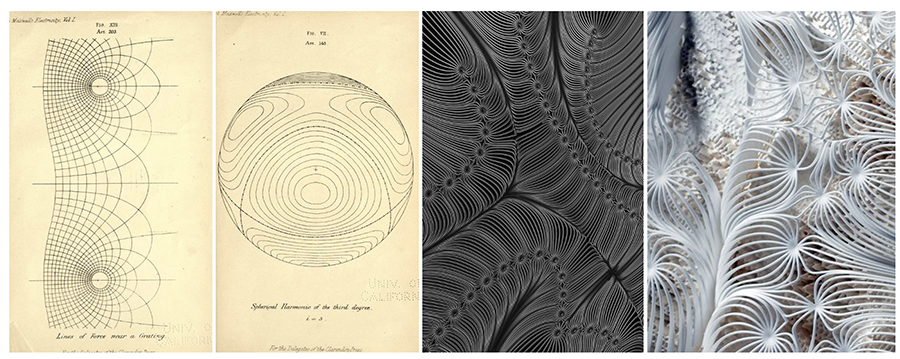
MAGNETIC
During my internet research, i found some interesting visuals representing magnetic field lines. I have been fascinated with this kind of gaphic for a long time so I decided to attempt to recreate something similar.
3D modeling with Rhino/Grasshopper
I based myself on this tutorial but made some variations of my own. The tutorial uses populate 2D to generate a list of random points but I wanted to have points that are organized in a specific way, a little bit more regular, not so random.
I started out by creating an arrangement of points. I created them in Rhino without grasshopper so that i could manipulate with my cursor.
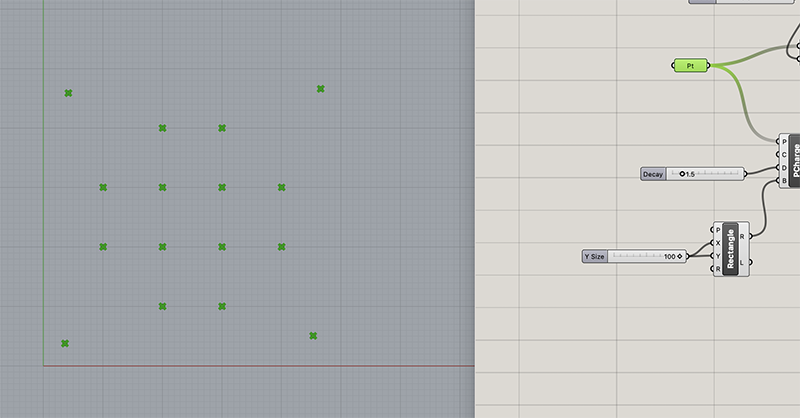 From there, i used the Point Charge command which gives my points a positive and negative charge.
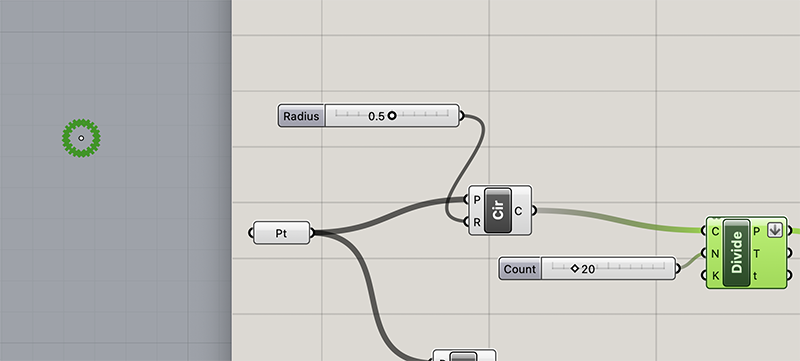
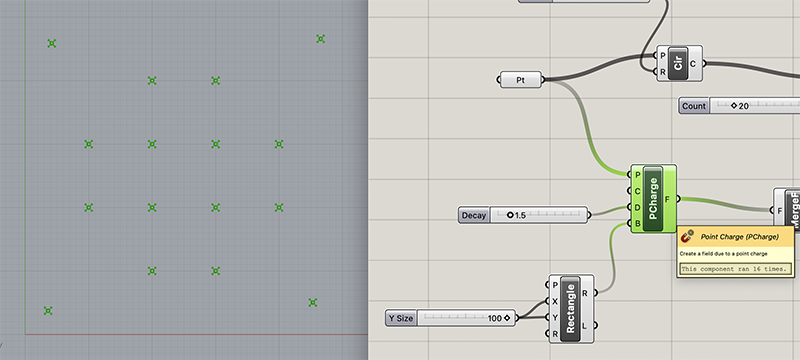 After that I need to create circles around my points with the Circle command
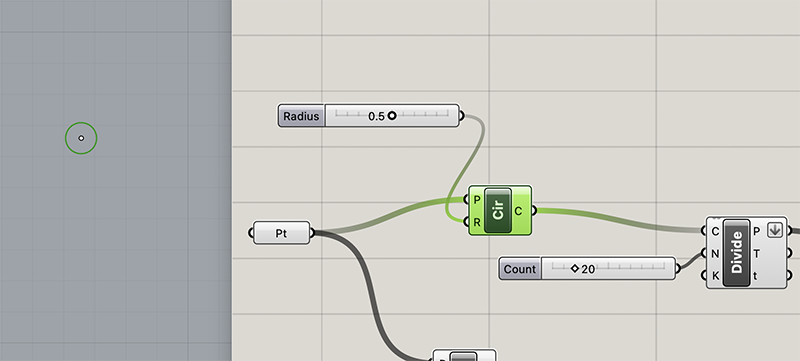 The cirles then need to be divided into smaller parts using the Divide Curve command. The number of parts will dictate how many magnetic lines are created.
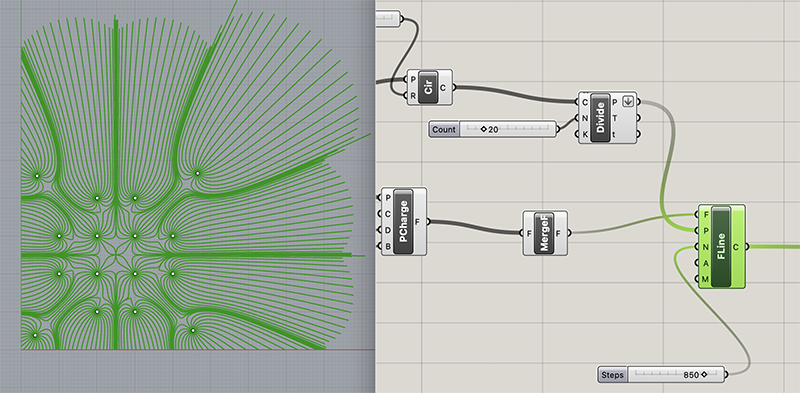
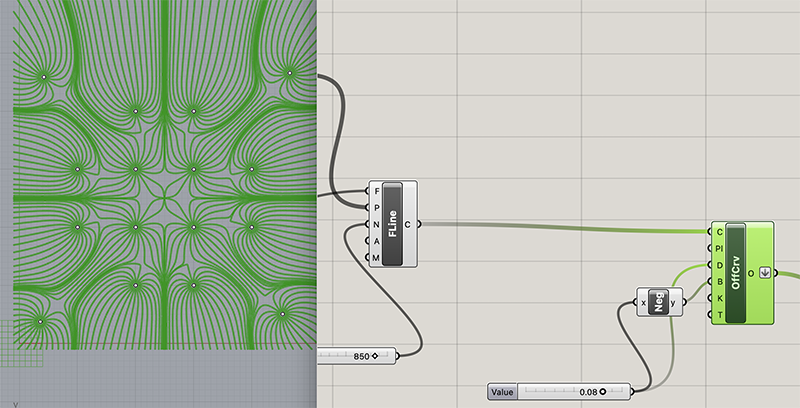
 The Field Line tool creates the magnetic field lines out of the circle segments and the charged points.
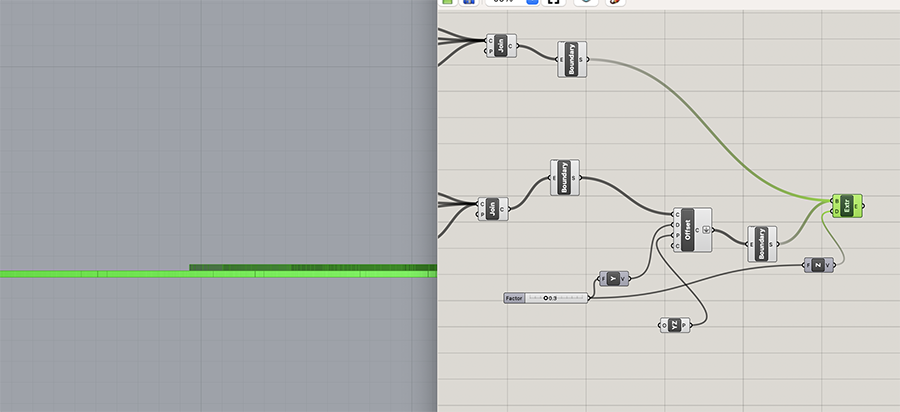
 Now I like the geometry I've created so I want to build it in 3D. I need to offset the lines in order to create a closed shape. I used the Pufferfish Offset Curve command.
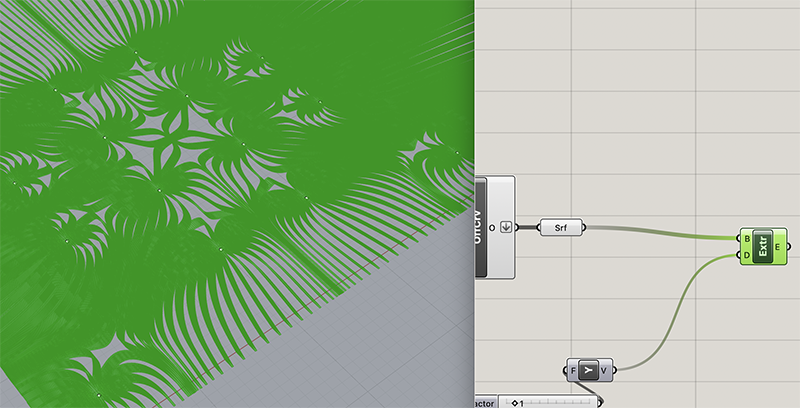
 After that, I transform my curve into a surface with the Surface command. And then I extrude my surface to the desired height of the print.
There are a few things I didn't quite understand from this script. And it ended up being very heavy and crashed a couple of times, so I didn't play around with it as nmuch as i wanted to.
Here are the Rhino/Grasshopper files 2
Slicing 3D model
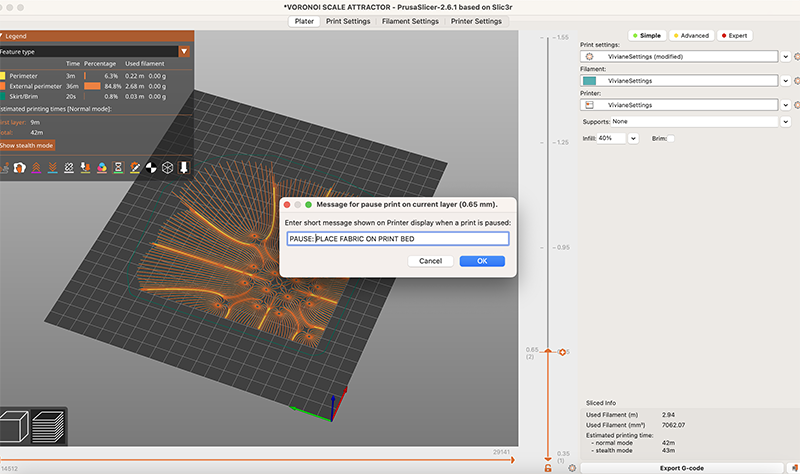
I kept the slicing parameters pretty much the same as the first print, since it went so well, but this time I added a pause after the first layer gets built. This way I don't have to manually pause it, it will automatically pause by itself.
Printing with 3D printer
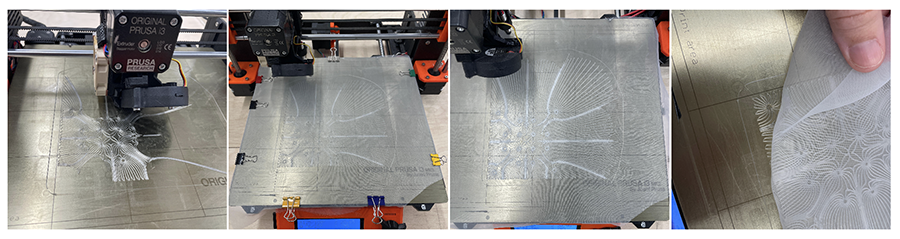
Here's the printing process for this file. The first layer of the print went well, and the printer paused by itswelf, letting me know i need to layout my material. I decided to dry a different fabric for this print, I tried a woven taffeta, but the PLA didn't bond well to it. I think it's because the fabric has less holes, so the print can't bond to the other layer of print. The first print layer stayed on the bed when i removed the textile.
Result
The result is still interesting, althought not as durable as the voronoi sample, since it is peeling off.
Here are photos of the same sample but with different backgrounds.
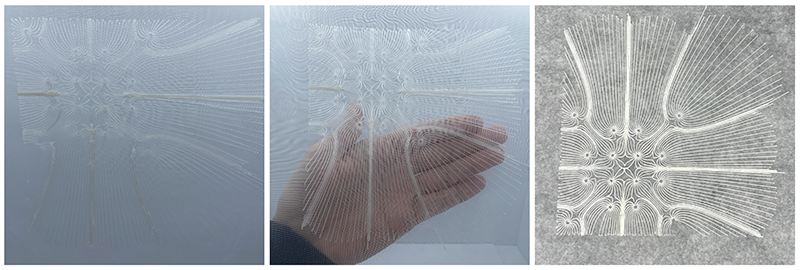
3D model
TWEEN CURVES
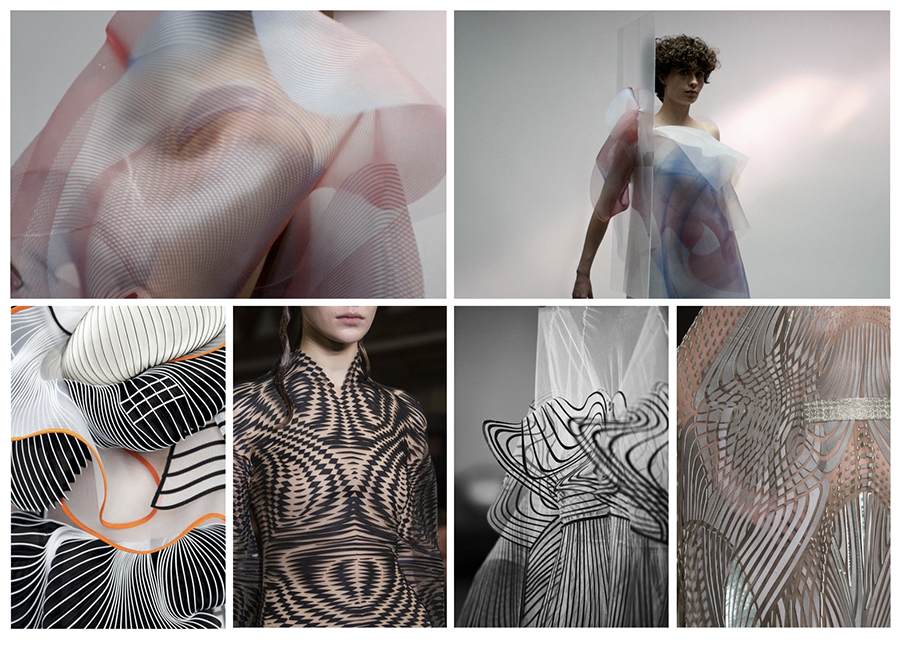
Another type of pattern that caught my eye is one that is generated with the Tween Curves command. I especially like the effect created by Iris Van Herpen where it looks like a moiré pattern. I would like to try that out myself.
3D modeling with Rhino/Grasshopper
I didn't follow any tutorial for this script, I just tried to build it myself from scratch. I started off by drawing 2 curves in rhino and set them as curves in grasshopper.
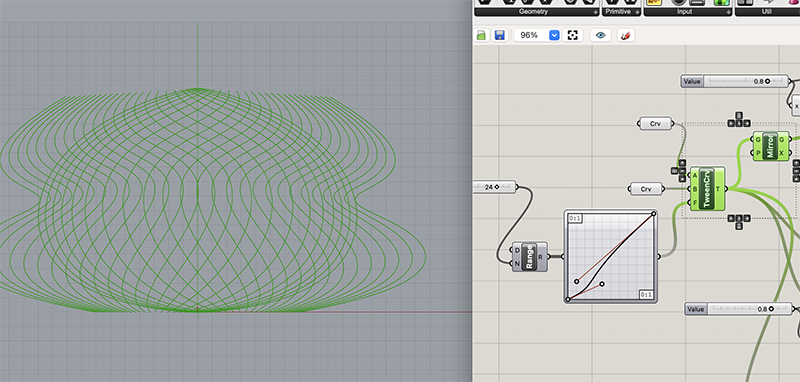
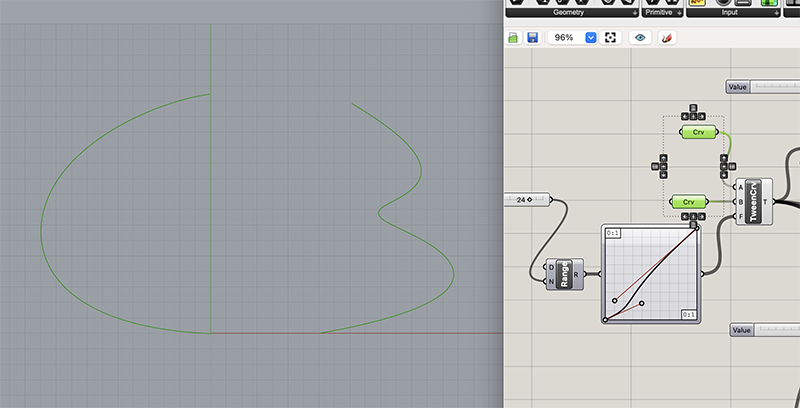 Then I used the Tween curve command, which lets you input 2 different curves and it creates a "blend" of both curves. By default it only generates one blended curve. If you want to add mnultiple steps, you need to create a range using the Range command. There you can specifiy exactly how many steps you want, example, below i have 24. Now, you have the option of creating different spacing between the steps by using the graph mapper. If you right click on the graph mapper tool, ou have different graph options that produce different outcomes.
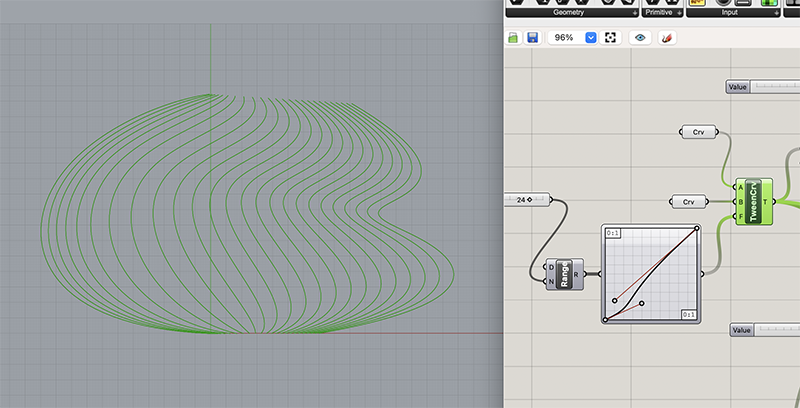 Then I mirrored the tween curves with the Mirror command.
 Since I was going to try printing this artwork with the Prusa 3D printer, I had to create closed shapes and surfaces. Here, I show another way to offset the curves and create a closed shape. This is what pufferfish usually does. But, I had just updated my Rhino to the version 8, and pufferfish is not yet available, so I had to figure out how to do it another way.
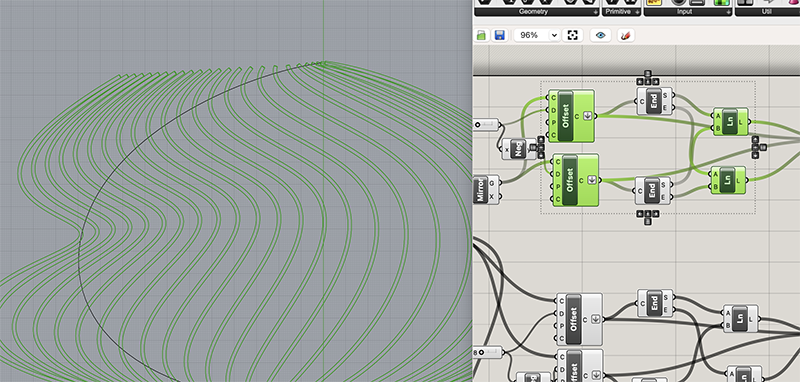
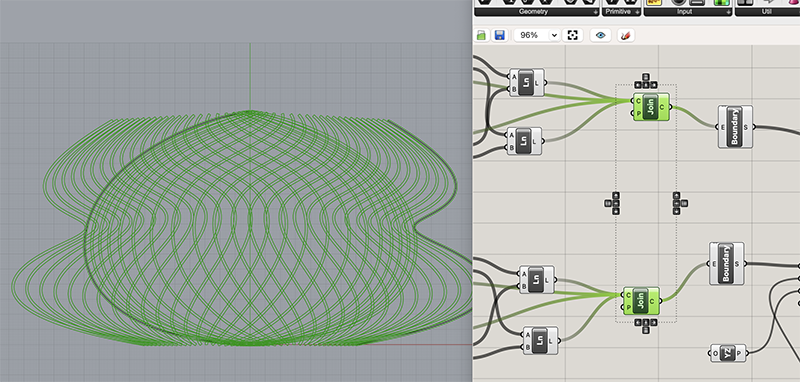 With Surface Boundary command, I created a surface from my curves.
 Extruding to give my print some height.
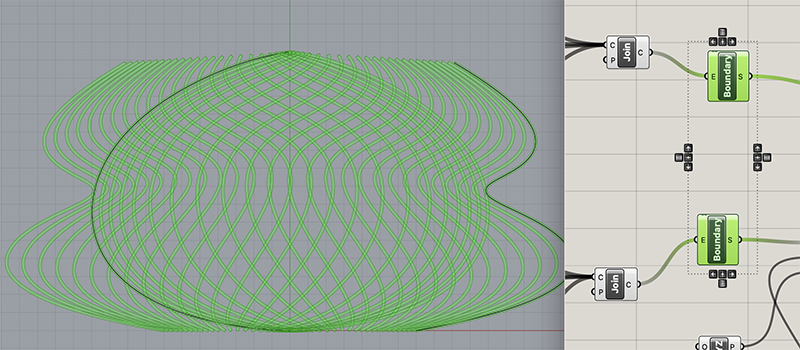
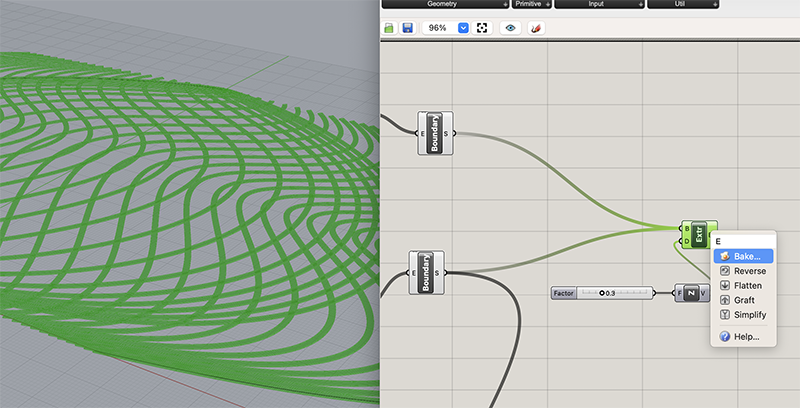
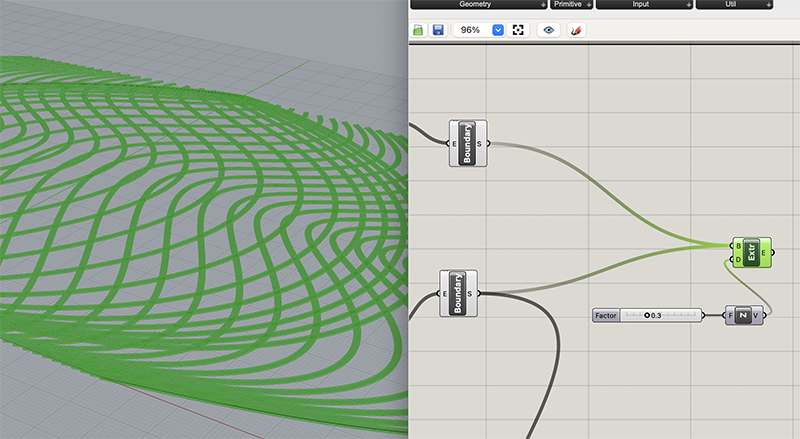 Baking in order to export.
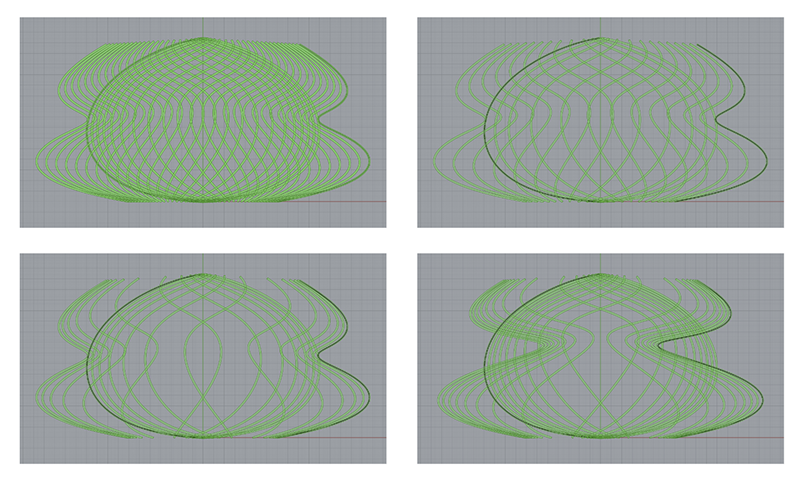
 Example of variations that can be done just by tweaking the parameters. In the second and third, I changed graph mapper which changes the spacing between the curves. And in the last photo, I tweaked the curve manually in Rhino.
Here are the Rhino/Grasshopper files 3
Slicing 3D model
I sliced the model the same way I did for my other explorations and it ended up not being the best way. Keep reading.
Printing with 3D printer
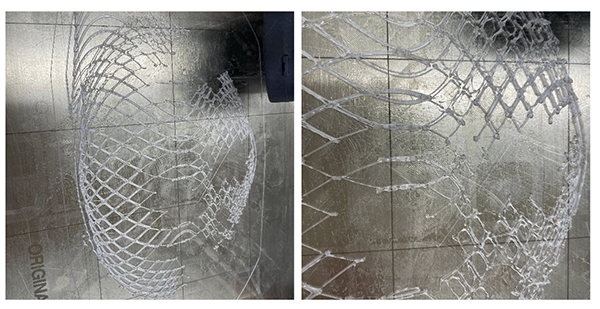
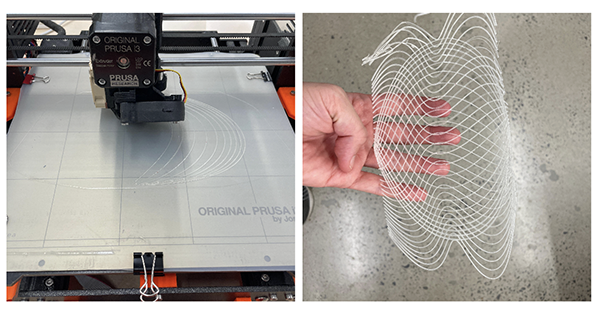
Here we can see the printer is printing the 3d model all as one chunk, and therefore the printer head lifts up at every intersection, creating a messy print.
 Instead of having so many interuptions, I want the path to be continuous, i don't want it to interrupt every intersection. How can I do this?
I asked Annie, my lab instructor and she suggested i silghtly offset the mirrored set of curves in the z axis.
So I went back to grasshopper and did just that. I determined the ammounts of Z height offset by looking at the layer thickness in the Prusa slicing software. It was set at 0.2mm layer thickness. So I offset my mirrored curves to be offset by 0.3mm in Z height. (I tried 0.2mm, but prusa slicer sent me an error message saying my layer thickness was too thin) 0.3mm worked.
Instead of having so many interuptions, I want the path to be continuous, i don't want it to interrupt every intersection. How can I do this?
I asked Annie, my lab instructor and she suggested i silghtly offset the mirrored set of curves in the z axis.
So I went back to grasshopper and did just that. I determined the ammounts of Z height offset by looking at the layer thickness in the Prusa slicing software. It was set at 0.2mm layer thickness. So I offset my mirrored curves to be offset by 0.3mm in Z height. (I tried 0.2mm, but prusa slicer sent me an error message saying my layer thickness was too thin) 0.3mm worked.
Now I can print without interruptions at every intersection. The printer prints out the first set of tween curves, and then prints out the mirrored tween curves on top of it and the result is much better. The print is still not perfect, needs some imporvements but it's good for now.
 Note: I used a silicone pad in order to avoid having the filament stick to the printer bed, it worked pretty well.
3D model
Fabrication files
Thoughts
As I mentioned, I have used grasshopper before so it was not totally foreign to me. But, I still don't feel very confident using the software, i think the learning curve is really steep and it takes so much time to assimilate. I find it especially frustrating to use when I have a tight deadline I am trying to reach. I always end up getting stuck at some point, and then I end up switching to illustrator because i am more comfortable with that software and i can figure out what i need to get done in time. Of course, I want to get out of this habit and eventually be working fully in grasshopper.
I intend on using grasshopper for my final project and my goal will be to stick with it. I am excited to explore the digital workflow and to design a full garment on a 3d mannequin and see how i can translate grasshopper scripts into couture fabrication. I want to explore the idea of generating custom patterns for a specific person that i will be scanning.
I found some interesting tutorials to get me inspired and start getting into it. I can imagine integrating something similar to this into my final project. The only thing they don't cover in this tutorial is how to translate these forms into 2d shapes for fabrication. How do you generate the patterns from this 3d modeled dress? I don't know yet but i will have fun figuring it out.