7. Computational Couture
Global Class with Aldo Sollazo from Iaac Barcelona, Noumena
Assignment
Document the concept, sketches, also references to artistic and scientific publications.
Design a parametric model using Grasshopper3D and upload the rhino file + grasshopper files.
Learn how to use 3D printing techniques to print the 3D model in/on the chosen materials.
Document the workflow for exporting your File and preparing the machine and gcode to be 3D printed.
Upload your STL file with pictures at https://oscircularfashion.com
Submit some of your swatches to the analogue material library of your lab. (20cm *20cm approx)
Inspirations
Youtube
FabricateTM 3D Tech-StyleTM Printing for Cube
Rhino6 and Grasshopper
Grasshopper is an add-on or plugin for Rhino. It is part of the default Rhino. Offers tutorials, forums and other links. If you are using a Rhino version lower than 6, then you can download Grasshopper from this site as well.
In my experience, Grasshopper is not for dummies. It takes patience enough to achieve stunning results.
I watched some beginners tutorials like DigitalToolBox - grasshopper basic and TUDelft - Getting started with Grasshopper, still did not feel that I learned enough to go to a new project alone.
Another fast and easy I watched is Tutorial Easy - Grasshopper from CREArT.studio.
Basic notes
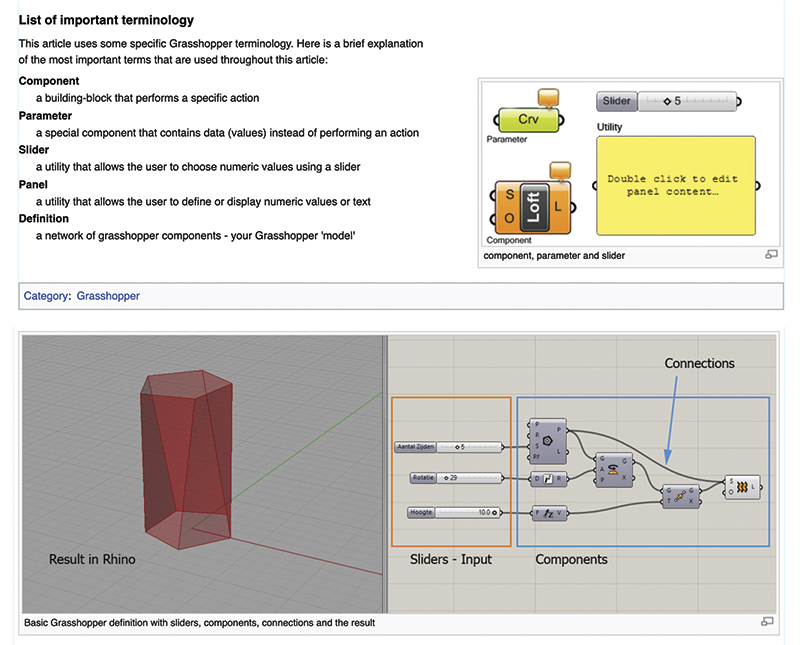 Grasshopper Basics, TUDelft
Starting Grasshopper can be done by typing 'grasshopper' in the Rhino command line
- File > Special Folder > Component Folder
- Grasshopper to Rhino > Bake the to put what you create on GH to Rhino > Can be done only at the end of the project
- I worked on Mac OS Catalina, and I have the full version of Rhino6. Not all the plugins are ready for Mac and some that work are still not safe for Mac (follow the txt recommendations when you download the plugin)
These are some necessary information about its contents: http://wiki.bk.tudelft.nl/toi-pedia/Getting_Started_with_Grasshopper
Is strongly recommend to use layers and preview options from the beginning, to organise your project. Due to the previews of many components and parameters, it can be a big mess of lines and xx that don't allow us to understand what we are building or changing completely.
I followed this tutorial, a Triangular Parametric Grid, so I could practice and maybe learn in the process. From Parametric House I chosed Rhino Grasshopper Parametric Pattern.
 Test1 on GH - folowing ParametricHouse tutorial, Carolina Delgado
3D Printer
The basics 3D Printers work with solids filaments that are melted, extruded and dry again:
- Motherboard - the brain
- Nozzle - Fills a Filament from the hothead, it melts and extrudes in
- Thermostat - put the ideal ºC
- Filament -- most usual is PLA from starch (supposedly bio-plastic biodegradable), PETG (recyclable)
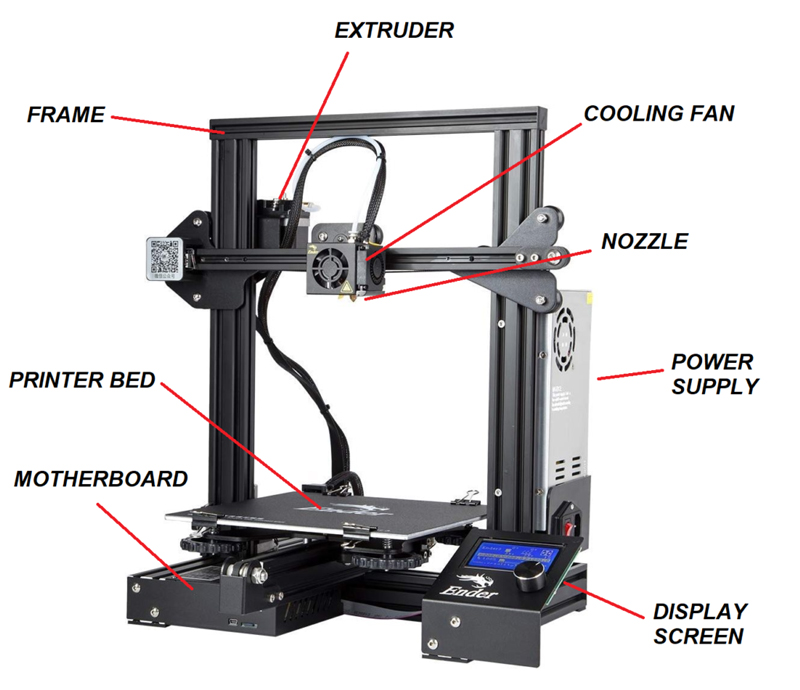 Machine parts of a 3D printer, example from Flarelab]
Software to 3D printing
We have to now 2 printers on the FabLab:
- Ultimate Cura - Software to 3D printing. Instal the software but no need to make an account to use it
- Prusa - Printers, software and research by Josef Prusa
Ultimate Cura
Menus
- Position
- Scale
- Rotate - if we need to put a different position so that the flatter or more significant surface support to lay down on the printer bed
- Mirror
- Mesh
- Eraser
- Lateral bar slider - to see each layer that is going to print
-
Support - a weaker piece that is used just for print and will be removed aft. Simple wall and less filament used. The simple way is to use as recommended on the software.
-
Menu Prepare - if you rotate the view, you can see it in red if areas need support.
- Add Printer > add a non network printer > Prusa i3 Mk3/ Mk3s. And repeat and also add Ultimaker2+.
Prusa
Menus
- Setting - Set the filament to print > Generic TPU 95A (flex fill)
- Fine - Default is 0.15 mm/ the higher the number the thickness of the layer and less resolution of the print.
- Infill - thickness inside, changes density of the inFill - the heavier, the less the fast and lighter. To test in the lines, it will be empty. Basic 2D on a fabric.
Chose on the simple object to play and learn the software - Import file. play with menus
- Zoom - scroll with the mouse
- Rotate view - right button
- Slice - Select the object and slice to make a file set to print and preview the layers. Also slides to save the File to print.
- Preview - See number and layers sliding on the right
- Save to File - the imported one is stl, and *gcode is the File you save.
Preparing file to 3D Printer
- Import the STL file to Ultimaker Cura
- Preview the plate and slices
- Change the settings of the material - PLA 0.4
- Preview - Set Fine 0.1 and Infiller 0

Preparing file with Ultimaker Cura, Carolina Delgado
Meet the Ultimaker 2+
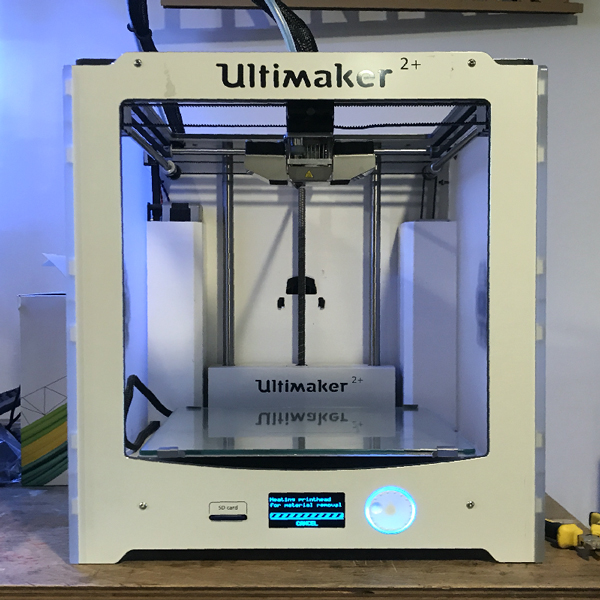
Meet the Ultimaker 2+, Carolina Delgado
- Always clean the bedplate before you start
- Change > Remove the filament > insert new material
- Put the Insert in the hole up till it gets stick on the upper tube.
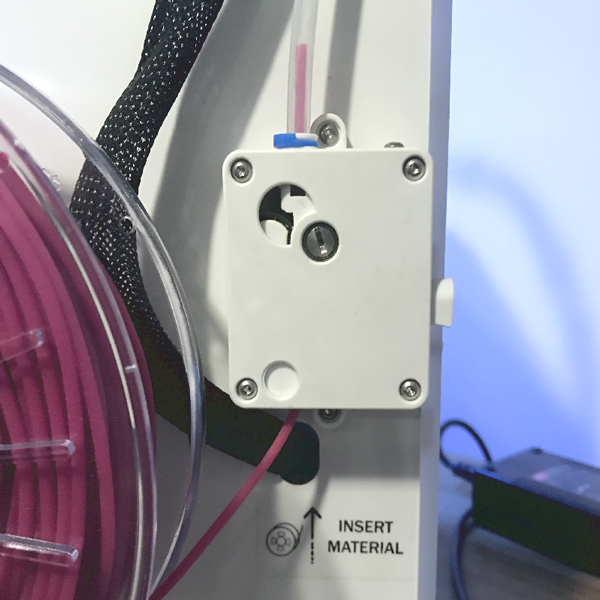
Insert material, Carolina Delgado
- Wait till the material comes out of the Nozzle.
- Pull the remaining off old material that comes out, like all the other colour. It starts to change the colour to yours.
- Then chose the material you will print
- PLA - press this as the similar, and it sets the temperature
- Move the bottom - rotating and click to select
- Menu SD card > prepare > heating up
- Calibrating the Nozzle:
Maintenance (in the initial menu)> Build plate > I will guide you > ok > rotate to place the material (sample paper with similar thickness) > turn to be closer like 1 mm.
Note: the bed in this machine moves up to the Nozzle. Others work moving the Nozzle down.
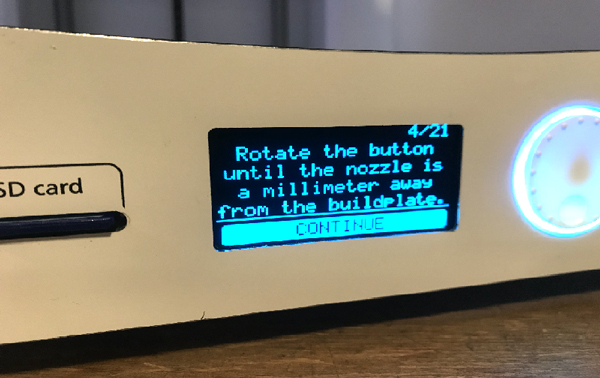
Calibrate Nozzle distance, Carolina Delgado
- Test the Nozzle with paper some while resistance screeching
- Repeat to other corners as asked by the machine
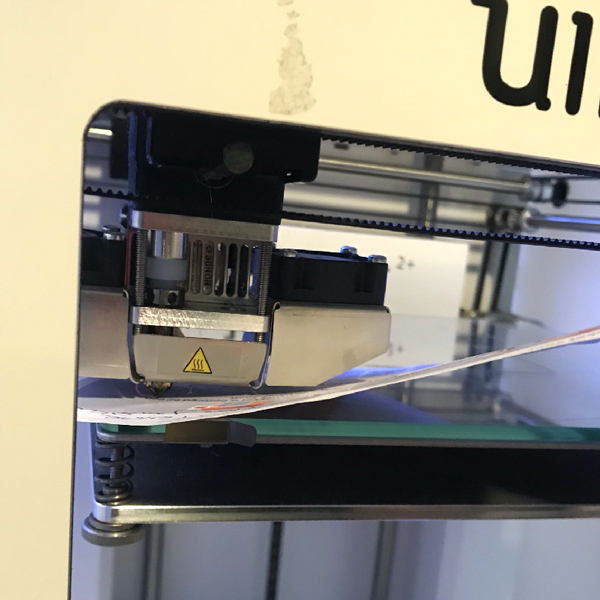
Test Nozzle position with a card, Carolina Delgado
- Remove and Clean the glass plate
- Put again on the place
- Select your File from the SDcard menu
- Remove the beginning extrusion with a tweezer
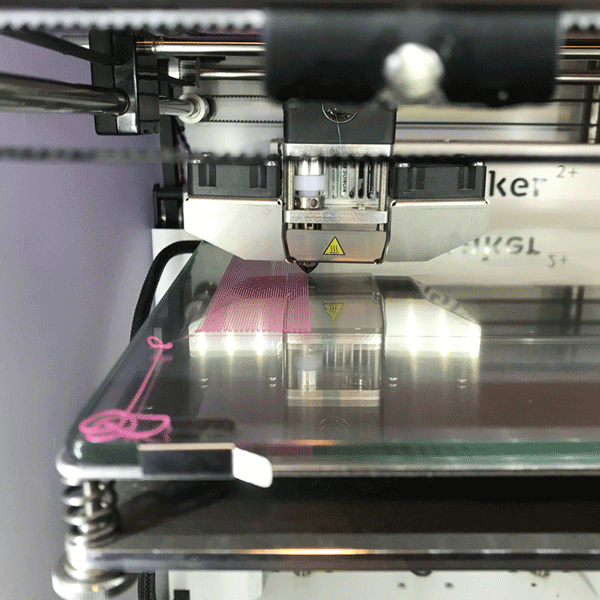
Sara's test without fabric, Carolina Delgado
Test on Lycra
- Clean the glass plate
- Stretch the lycra on the plate using a paper tape to keep it in place
- Test with your nails if the fabric does not move. If it grabs, is to lose and the Nozzle will burn the textile or just damage the printing
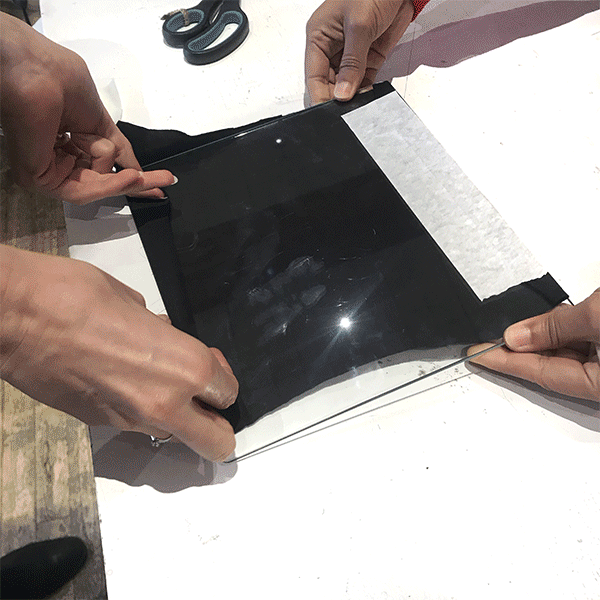
Preparing BedPlate with Lycra, Carolina Delgado
- Menu > Tune > adjust settings continuing print
First result burned the textile so we had to adjust reducting the speead for this: - PLA Material (similar to flexible filament)70% speed
- 240°C Nozzle temperature
- 60°C Bedplate temperature
- Finished your 3D printing? Clean and Close
- Remove the materials! > following the Menu to remove the filament. And Switch off the machine (button on the back).
Note for 3D printing Curves
Straight lines are easy to print. So if you print curves, I strongly recommend to slow down the speed (for example 60%).
Results
3D SpiderWeb on Lycra
I've made some attends to create a 3D pattern to print. Understanding the menus and actions of Grasshopper, took me at least five tests. However, considering the limitation of time and the need to prepare a 3D ready to print File, I decided to go back to basic.
Therefore, I've chosen a radial grid to bake a Spider Web.
In Rhino
- On Rhino > Edit > Settingns > adjust units to milimiters
- Create Square with 180x180mm to a new layer - you can name it BedPlate
In GrassHopper
- Type Grasshopper on the Comand and start working on GH window
- Menu Vector > Radial Grid
- Double click and ad a number > slider to Extent R (Radial)
- Double click and ad a number > slider to Extent P (Perimenter?)
- Adjust the slides as wish (considering the size of the 3D priter BedPlate, in this case was recomended less than 180x180mm)
- Size > Flaten (with right button) and repeat the same with the Cells
- Curve > Offset Curve > add number slider to distance and corners
- Distance > Right click > Expression > -X ( this means that the offset will be inside the limits)
- Curve Utilitys or double click and write to select > Explode
- Conect to Curve
- Save file same folder and with same name of Rhino file
- Select Explode > Bake and save to a new layer (for example Layer 3 in blue and call it Spider Web)
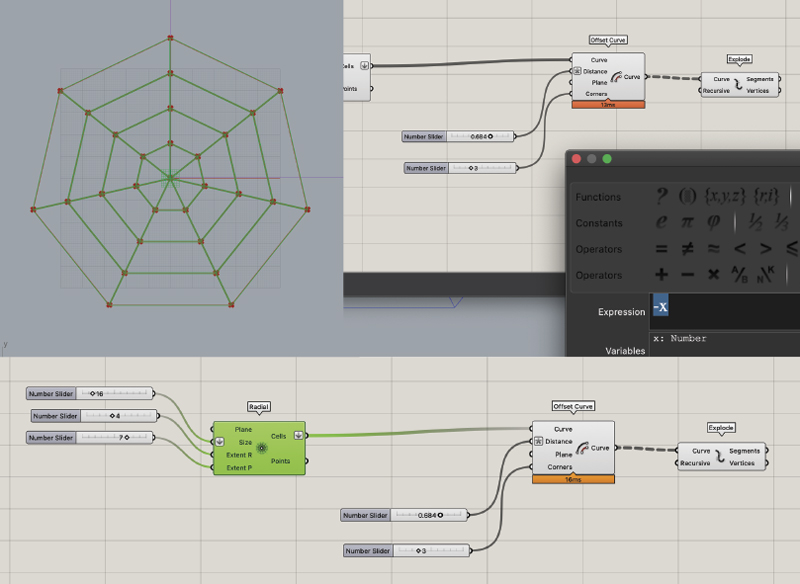 Parametric Radial Grid in Grasshopper, Carolina Delgado
Again in Rhino
- With the radial grid Bake from GH visible
- Extrude > 1 (mm) > Z direction (high)
- Save and export as STL
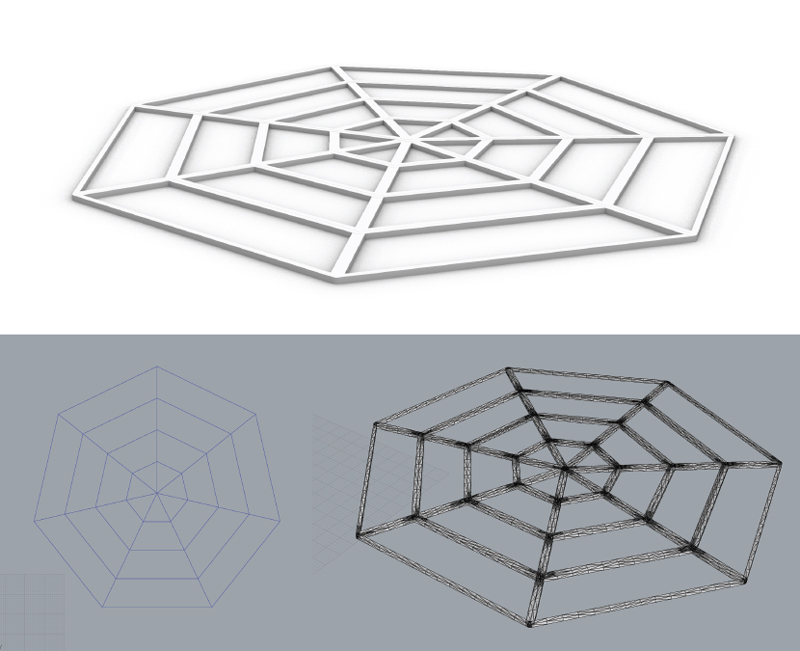
SpiderWeb Extruded in Rhino, Carolina Delgado
On Ultimaker Printing the Spider Web
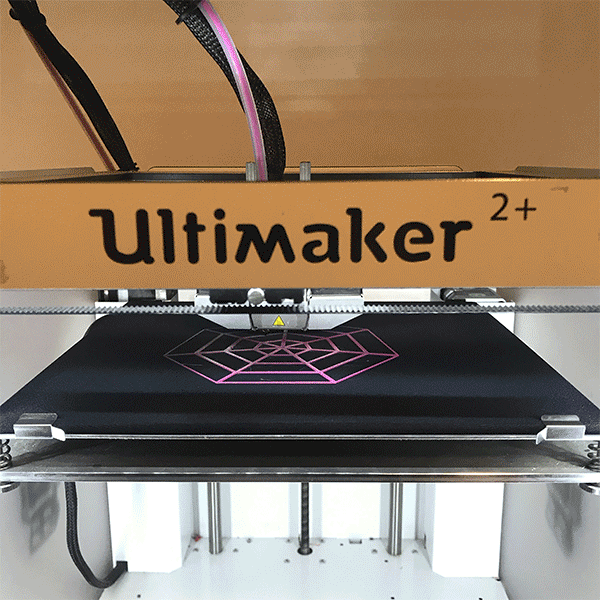
SpiderWeb Printing, Carolina Delgado
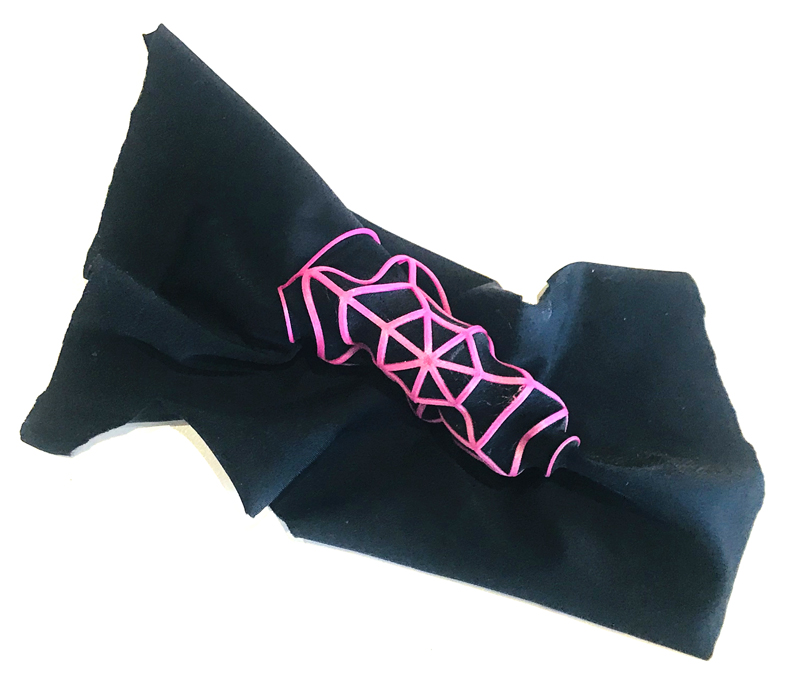
SpiderWeb shaping the fabric, Carolina Delgado
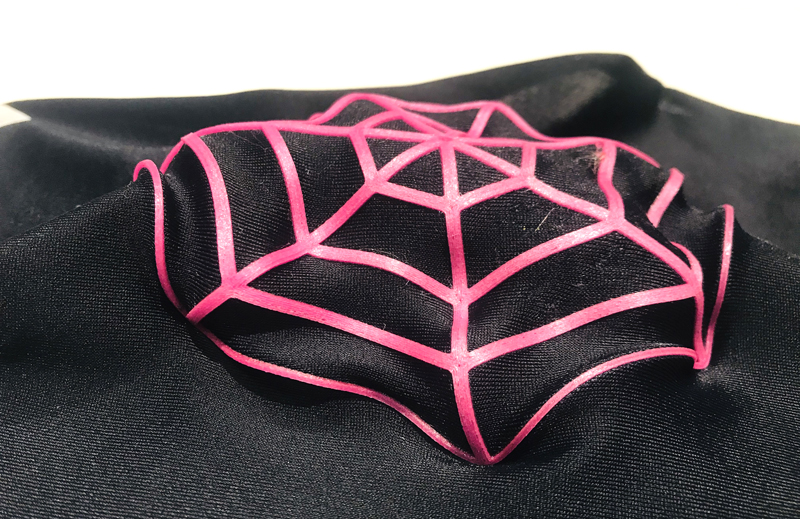
SpiderWeb detail, Carolina Delgado
Youtube
Testing behaviour of Spider Web on Lycra, Carolina Delgado
Future notes
Print the first slice on fabric with slower speed. This can help the Flex PLA to grib better on the Lycra.
References
- Resources for Computational Couture week by Bea Sandini
- Thingiverse.com
Youtube
5 Ways to 3D Print Fabric | Experimenting with 3D Printed Textiles, by Sew Printed