9. Textile as Scaffold
Global lecture with Anastasia Pistofidou from Fab Lab Barcelona / Institute for Advanced Architecture of Catalonia, FabTextiles.
Assignment
- Document the concept, 3D model of the piece and document the design process.
- Make two samples with 2 out of the 5 techniques to make a prototype of a textile form: fabric formwork with casting crystallization; wood-textile; resin-textile; leather moulding or other.
- Document the process from CAD to CAMM, document how to use the CNC mill and prototype your textile composite.
- Upload your 3D model and CAMM file.
- Document the 2 processes you have followed step by side from design to machine and hands-on making, materials you used, your mistakes, failures and achievements.
- Use 3D modelling software to simulate your fabric deformation.
- Build up your tools (container for moulding, vacuum bag set up, frames, matrix, recipients) and process for your workflow.
Intro
Technical Textiles
There 10 fields for textile use, fashion is only one-off them: Agrothec | Buildtech | Clothtech | Geotech | Hometech | Indutech | Meditech | Mobiltech | Oektech | Packtech | Protech | ...
Biocomposites uses fibres to reinforce the materials. Continues fibres, discontinuous fibres, particles and Fabric and hoven fabrics.
Bio-based material is a material intentionally made from substances derived from living (or once-living) organisms.
Fibres
* There are 4 main types of natural fibres - collagen | Cellulose | Chitin | Silks.
* And other are Natural bio-based - Polylactic acid (PLA) | Polycarprolasctone (PCL - synthetic but biodegradable) | animal glue or bee wax.
Composites
* Epoxy Bio (50); Bio-based polyester.
* Starch; Gelatine.
* Mycelium; Kombucha.
We change the mechanical properties of the material by adding the fibres. - compression, tension, etc.
(e.g. Sandwich biocomposite type - Cork, Balsa, Hexagonal cardboard)
Techniques
Technical Textile applications
- Composites
- Biocomposites
- Crystallization
- Fabric formwork & Concrete or Plaster Casting
- Wood + Textile Composite
Materials
- Bio Resin and Resin
- Borax, Rochelle salt, Potassium sodium, Epsom Salt, Sugar,
- Concrete and Plaster
- Veneer Wood
- Fabric
- White Glue
- Vacuum bags or vacuum machine
- natural fibres + resin - Yarn and resin
- Lycra + white glue
- Carbon Fibres - better behaviour then fibreglass because resist more to high temperature
- Burlap Hemp fabric + resin - many layers
CNC to create a mould
- Design 3D Mould
- Mill the 3D in foam, wood or other composite of fibres
- Combine the Mould with film and material Layers
- Compress
- Let dry and form
- Take it out

Hemp ethanol and Hemp Plastic, Ford 1941
Henry Ford’s Suppressed Hemp Car
Leather moulding
- Leather leftovers composite
- Compoleather - Julie van den Born
- Linen + Resin - layers of fabric and create a board to mill it (use shinner fabrics)
- Weaving threads and solidified with gelatine
- Woven fibres with robotic
Create a module for CNC machine by glue wood or fabric layers
Create negative and positive and create holes for the liquids and air to flow and push down the material.
Measure the tools exactly
Use a 3D like Rhinoceros remember you can't have undercuts, and this cannot be cut in the CNC
Draw closed polyline region and contour different layers
Generical rule: excavate very quickly with a larger tool and next with a detail tool, take out the rest and refine - fine tool for finishing. Put the object elevates for better scalp the material. You can make extensions to w+your material. If using leather massage with cold water.
Without a vacuum machine, you can use a double moulder (negative+positive) and let it rest more time.
Textile Composite
You need to make your textile composite with the binder of your choice and document all the materials needed, recipe, step by step process. Either flat or formed on a 3D dimensional surface. 3D model and CNC mill your mould and create your final textile composite
Fabric Formwork
Maximum size 40x40x40cm Create a pattern to sew and use as fabric formwork for casting. Materials: lycra, leggings, geotextile, any fabric plaster, micro concrete, fibreglass fibers, natural cotton fibres, hydraulic concrete, liquid marble pt
Wood+Textile Composite
Prepare your wood and textile composite and laser cut or CNC mill your design Materials: - Veneer wood, flexible wood - White glue - Fabric
Crystallization
Choose one of the recipes or a new one to add in the handbook and create your structure from threads or textile to grow your crystals. Materials: Borax, Rochelle salt, Potassium sodium, Epsom Salt, Sugar,
Wastes of cork and bio-resin Seaweed bio-composite
Lecture CNC with Henk
This machine is very strong and dangerous so we need to follow security rules.
Security First:
- Don’t leave wood or other materials close to the CNC because when the bridge moves can be stuck in then and detached off from the table.
- There is a big vacuum cleaner on the armoire.
- Don’t work in a worry, late. You will be tired and distracted, it’s not safe.
- Big mistake not to do: if you need to clamp the wood to fix it in the table, don’t let the mill bits the iron/ nails, because it will sparks and start a fire!
- When you use foam you just need to tape it with double face.
- Make breaks with woodblocks.
- Tye your long hair or use a cap. No scarfs or necklaces!
- Don’t stay over the machine, the bridge can move and get you.
- See where is the fire extinctor
- Learn where is the emergency stop button.
- In an emergency, you can also pause in the computer so you don’t lose all settings. Immediately it will ask you
- Bottom down to turn the control of dust collector.
- For security reasons, the key to the machine is attached to the wrench that adjusts the drills.
Preparing the file:
- Pen in USB and import to a created a Folder in Library > Document >your Name
- Open VCarve> new file> type the dimensions of the foam.
- Set up the zero on top (of material). The arrow of the table board allows you to move X and Y.
- Mesures in Milímeters
- Apearence - not important (Canadian Maple)
- Import > Components > 3D Model.
- Initial orientation > bottom. (Use the zero in fist point of the foam. note: if you have positive and negative mould you should make different files and mill in 2 times.
- Select option working from top face (instead of 2 sides(top and bottom) or 4 sides)
- Put Z=0 on Top (so it will drill down) Note: we change the software to PartWorks 3D we couldn’t find the features we wanted.
1- ruff in two 1st faster and ruffer. Speed 1800 rpm Feet rate 120 mm/sec Pluge rate 60 mm/sec 20 min work 2 - softener Finishing tool 10% depth 0.5 path depth 0.5 Step over + 20 min work = save the tool path and the finishing pathway same file because is the same tool.
ShopBot software of the machine
Z page up and page down keys X <>keys Y up and down arrow ⬇️
- Place the material on the table.
- Tape double side overall surface
- Clean up the table with vacuum as most as possible
- Drill the wood stopping blocks to the table (nail it)
- Choose a 5 mm milling big, nut and collet.
- Connect first the nut with the collet and click and then put the bit inside and attach to the machine.
- Measure the size height of the drill.
- Zero the machine home. It will alarm with sound and move.
- Job zero - the start of the material (use the arrows. Done by eye measurements.
- Job Home - Picture the notes XYZ so if you stop or exit (electric fail example) you now were to restart.
- Menu- zero > XY axis Now tell the machine we’re the zero Z is using the metal piece (from the machine). If there was dust on the table sensor wouldn’t work properly. Start edit Z zero A message will appear “the contact is not clear for some reason. > but is Ok to go on.
Press K and then Page up. the Z is not zero, is 3,07 because of the thickness of the metal. If it’s starting melting
RESEARCH
Installation of Japanese Bamboo Art: Tanabe Chikuunsai IV: Connection
Inspiration
On the tests made in Bioplastics I used leaves, starch and cotton mesh to change the material. I choose to continue with the natural bio-based materials, therefore, involuted from what was already on the path. From the beginning of this assignment, I wanted to try different fibres. Because my staying here in Amsterdam was short (I only come for some classes) I wasn't able to do many tests with the same mould. Therefore I decided to find a pattern of moulds that would allow me to cast more than one recipient/ plate or packaging at the same time. Because of my PhD research, the obvious option was to apply Natural-Based Design Principles. I’ve chosen Biomimicry - How nature pack different units at the same time? Fruits have lots of good examples but I selected garlic bulb as inspiration because of the different shape of cloves that create the pattern instead of, for example, orange (when in the Netherlands...). After a quick research online for images of garlic bolbs, cloves and slices I imported some to AI (Adobe Illustrator) to work some regular shapes.
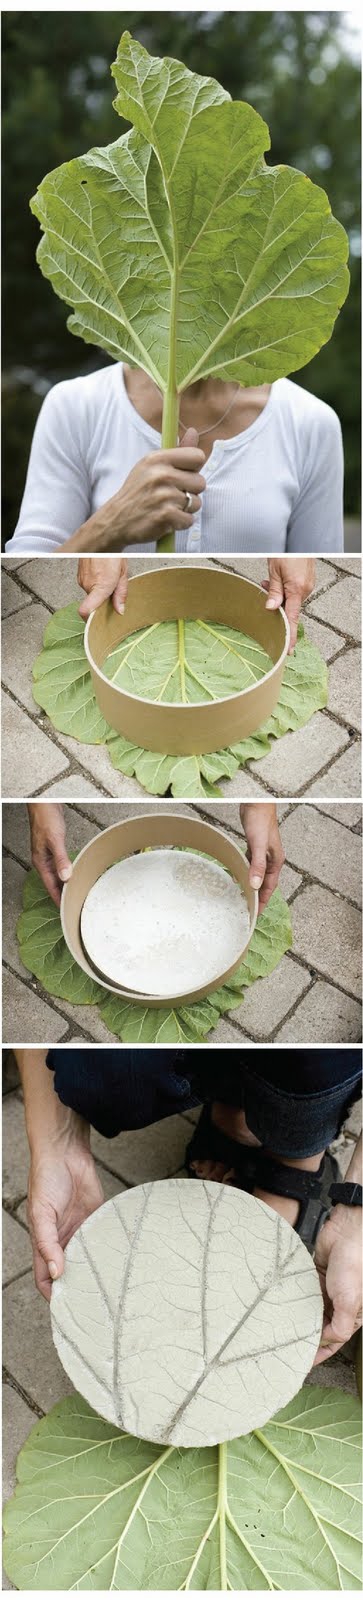
Exemple of technic for concrete impression
PROCESS
Create a mould
After a quick research online for images of garlic bolbs, cloves and slices I imported some to AI (Adobe Illustrator) to work some regular shapes. And the results were simplifying to 3 slices and repeat them. Garlic cloves sliced Bowls
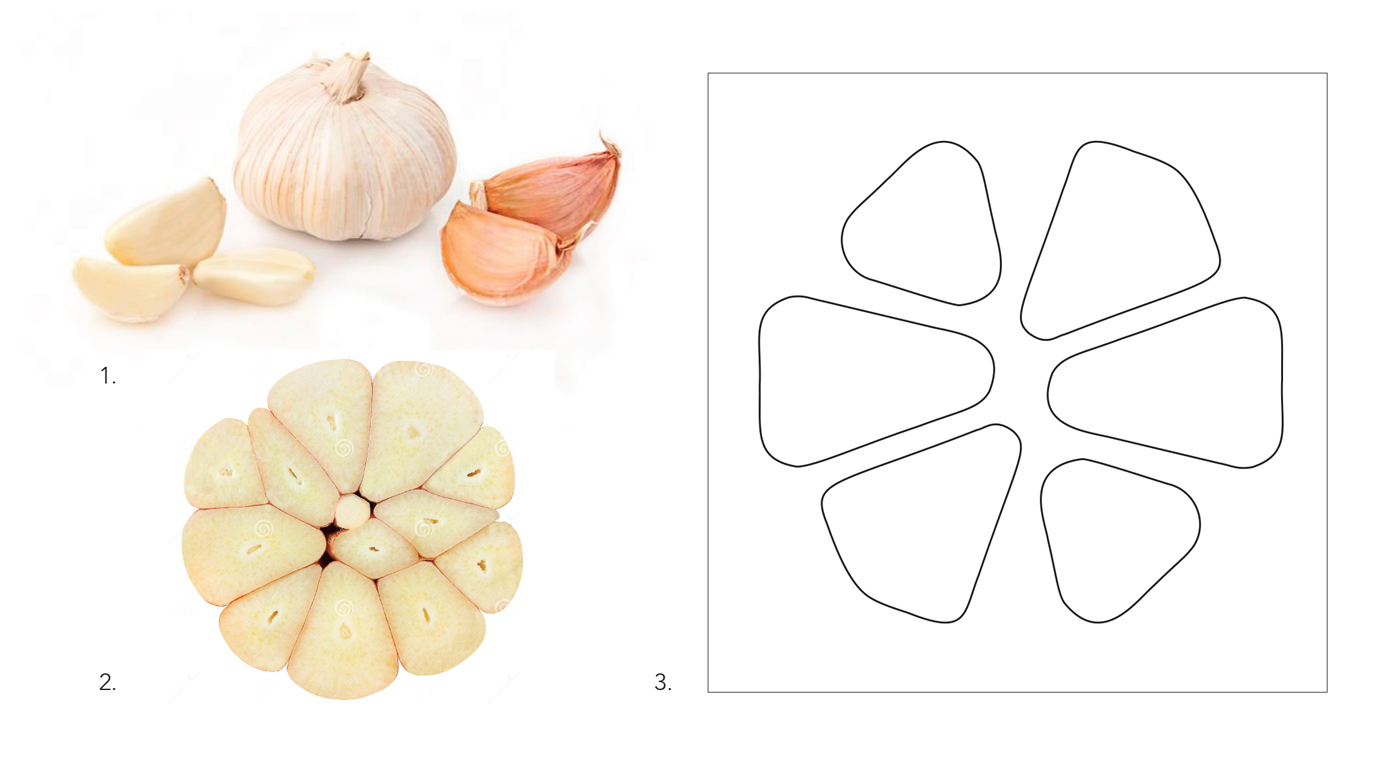 Creating garlic slices for mould in AI
1. Garlic and cleaves, reluctantgourmet.com; ! 2. Garlic sliced, Elenvd, Dreamtimes.com; 3. Draft Illustrator, Carolina Delgado
Creating garlic slices for mould in AI
1. Garlic and cleaves, reluctantgourmet.com; ! 2. Garlic sliced, Elenvd, Dreamtimes.com; 3. Draft Illustrator, Carolina Delgado
Youtube
Making Garlic cloves slices in AI, Carolina Delgado
In illustrator Import the images inspirations.
Whit polygonal tool design organic and geometrical shapes similar to the base image, to create a pattern to render.
At first, I develop the 3D objects in Photoshop 3D mode by importing the garlic slices.
This is one of the Phoshop 3D tutorials, I followed.
Youtube
Basic Photoshop 3D Tutorial, O'Reilly - Video Training
However, the Rhino didn't accept changes to the objects because it assumed as blocks so, I had to study some Rhino and learn how to do it from scratch.
Rhino steps
- Create a solid > Trunk Pyramid > give the number of sides 3 (or other) > give measures (15cm to 5 cm hight - but I scale in the end to fit in a smaller foam and for faster milling).
- Menu Solid > Fillet > Fillet Edge - select the edges to change (base and sides lines) and give radius number (e.g. 2)
- Make different Trunk Pyramid to make different shapes plates
- Move them - Arrange the solids to create a pattern. It's easier if you use the Top View.
- Save in one layer and duplicate layers and objects than hide the original layer and lock so you don't lose any.
- Make a group and duplicate the layer to another - Positive and Negative.
- In the Positive add a based block solid > 50 cm x 50 cm x 1cm and align them to top of the base. Duplicate layer and group. Create a Positive Mould. Menu Solid > select base and plate (union them) and union all.
- Negative layer - using the rotation tool invert all group 180º.
- Create a base to cut. Solid > 50 cm x 50 cm x 4cm and the Align Objects to top. (duplicate layer and save another name)
- Select the Menu Solid > offset the plates 2mm for the material you are working (or less if you don need so much - mine is Bio-gelatine and it will shrink a lot).
- Union all the Negative Mould.
- Export for different STL or union in the same layer to create an Up and Down Mould to mill at once.
Notes: I had to delete my other lock layers because it was exporting all.
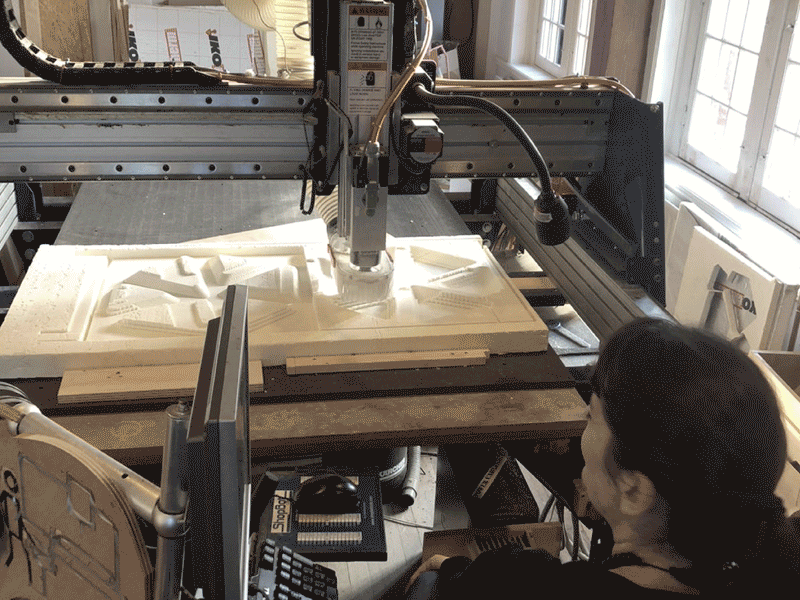
CNC Milling
Prepare your work
I spent many hours with the CNC. In Friday I prepared the 3D path file and attached the foam to the “operation table” with double tape and woodblocks. * In Monday early morning, Henk noted that the foam was detached, because of the time, weather and because I didn’t straighten enough the foam between the woodblock Note: ask always someone to help you in this. Unless you are q Superman you can’t do it alone. We were 3 doing this again because the foam was big and it was already lifted. * I open the file saved on Friday and confirmed some settings that were missing. * Saved the tools path (ruff and finishing) in one file and close the PW 3D.
Security Check List
- Hair tied up, no scarfs, no stuff near the machine.
- Vacuum the table to clean extra dust so that the sensor or the bot don’t miss the material.
- Turn the dust collector On. Is the light on?
- Turn the machine on (just the big switch not the key for the drill).
- Open SoftBot software and give the zero of the machine.
- Disconnect all mill with the right tools that are connected with the key. It was already made from Friday but you have to do it always because you never know if/ who use the machine after. move the arm of the material. Use the butterfly to move down the skirt (cleaner). Disable the nut clot and mill and check the measurements. I needed a 5mm flute and more than 3 cm high (Ps. My first mistake - my depth was 3 cm but the material specifications were 4cm, only after I realised that the borders of my design weren’t the boarded of the foam, so or I needed a +4 cm High or to set 3cm on the 3D tools path settings.
- Move the skirt up again, the higher you can so it doesn’t damage your foam. Move the arm of the bridge over the foam. Use the metal plate attached to the machine and test sensor. Set Z home. It will give you 3mm high because of the metal plate you used to test the sensor.
- Now, set Z zero job - Z and Y. Use the K to enter the command menu and arrow to Z and Y. Page up and Page down to move Z-axis. Take a picture of the Zero point of the Job and then Ok zero. It will assume 0 on the XY axis but you saved in the pictures the real location so you have to resettle, pause or emergency stop you ca start again the same path job.
- Turn on the mill drill rotating the switch key.
- Turn on the cleaner on the button and rotate for stronger power.
- Only now you import the toolpath file to SoftBot. Check all list if it’s ok and start. The bot will make an alert noise and start moving.
- Pause in the space bottom if you suspect anything unnormal.
- In case of emergency use the stop bottom - you will lose all the job settings because the machine will be turned off. we discover that the mill was biting the foam (that lap between + 3cm to 4cm job So we stopped and try to fix it. We open the 3D path file again and change the depth of the design job. We imported again to Soft bot, assuming that Job Z zero was the same. Unfortunately, my second mistakes, the path file made on Friday was different from Monday morning (and I didn’t save assuming again it was ok). On the morning I had put wrong measurements for the foam- 600mm x 1020mm instead of 600mm x 1200mm!! OMG! Huge marks on the foam told us it was something wrong. Gratefully Maud help me contour the machine problem by changing the position of the design on the material (not central or zero) and correctly send the finishing job to mill again! After more than 8h on the machine, one salad is eaten, 3 takeovers to go to the toilet, the job finally stopped!
Hand finishings
 Finishing foam moulds, Carolina Delgado
- Now the easiest part. Undo all again. Switch the key and the cleaner. Move the bridge of the material. Rotate the cleaner button to turn off the vacuum and light. Rotate the machine Bottom also.
- Uninstall the woodblocks and the slowly detach the Foam or it will break.
- Kept the metal foil with tape to use to cut the board into moulds (positive and negative) by fixing it with to grips into a working table.
- Detach the foam an remove the metal back foils gently (it can take a while, again you don’t want to damage the big work).
- Cut the undead edges of the mould.
- With sandpaper and a sharp x-act knife cut the bigger parts. With a smaller sand make it smoother to finishing. Et voilá! You have done your moulds.
Sandwich Assembling
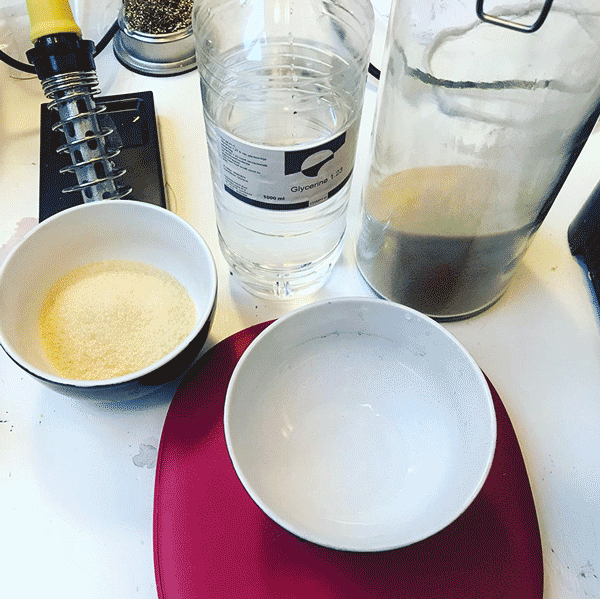
First test was made with Bio-Silicon the base recipe:
96 gr Gelatine | 96 gr Glycerin| 480 ml Water | tbd Pigment
First - Assembling the moulds, Carolina Delgado
Result with Bio-Silicon, Carolina Delgado
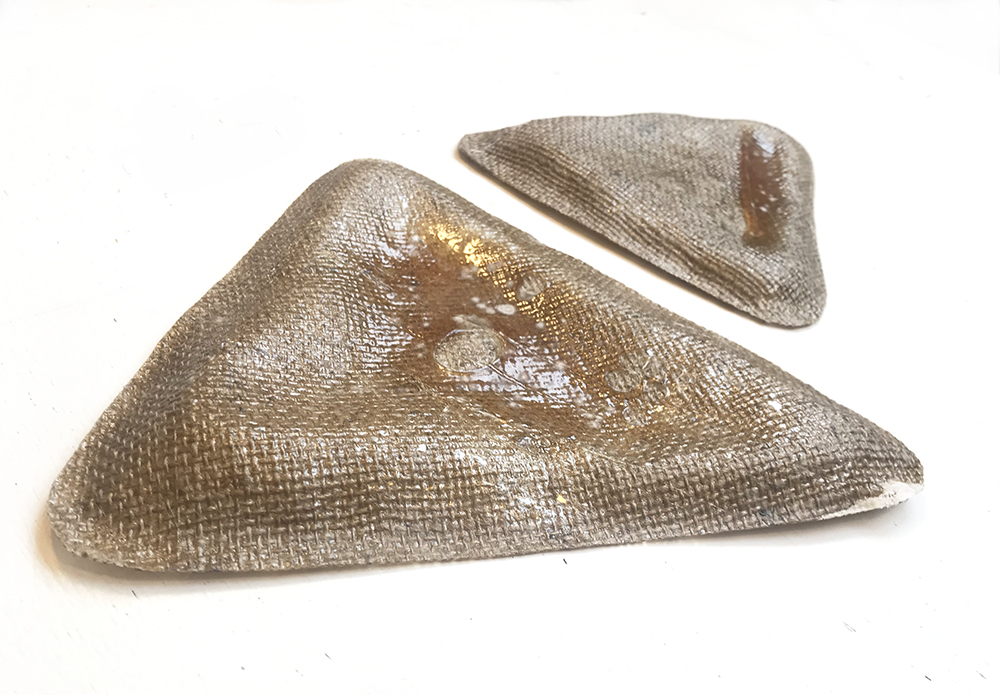
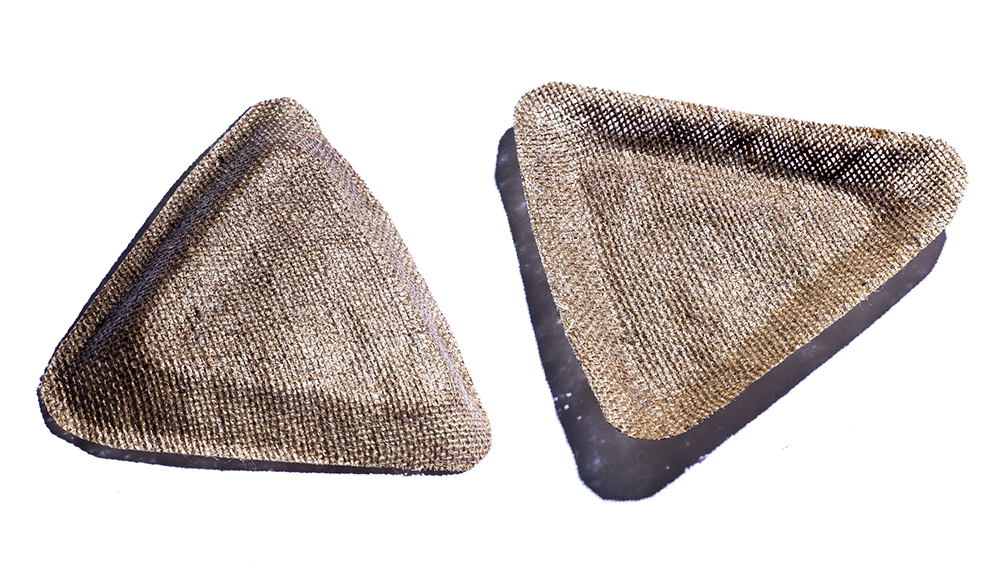
So I repeated the test, this time using Bio-resign and putting male mould down, so that the excess of bio-resign could come out.
BioResin the base recipe:
96 gr Gelatine | 16 gr Glycerin | 480 ml Water | no pigment
Repeating with Bio-Resin, Carolina Delgado

Sandwish layers with Bio-Resin, Carolina Delgado
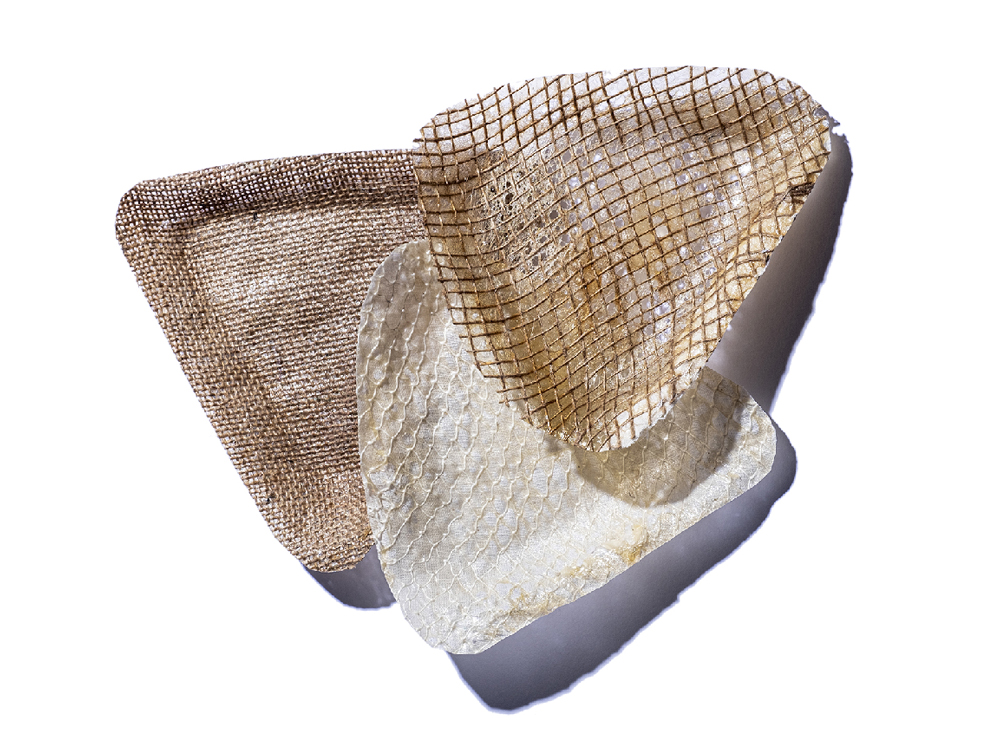
These ones resulted better. Bio-resine makes the textile stipher and the assembling male/down and female/up allows bleading the excess of material and resulted without lakes.
Second test with Bio-Resin, Carolina Delgado, photo by Luís Silva Campos
The entire Plates collection
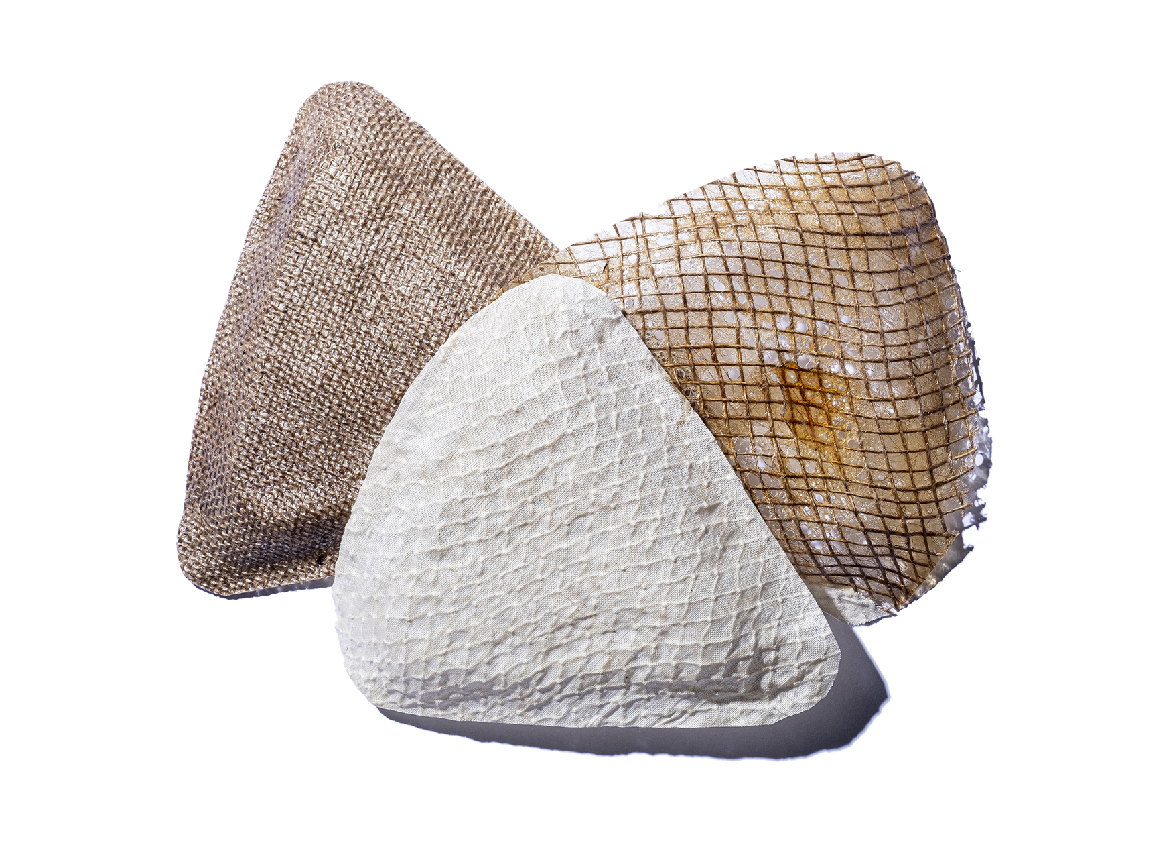
Trio up-side down, Carolina Delgado, photo by Luís Silva Campos
Trio up, Carolina Delgado, photo by Luís Silva Campos
Final Plates collection
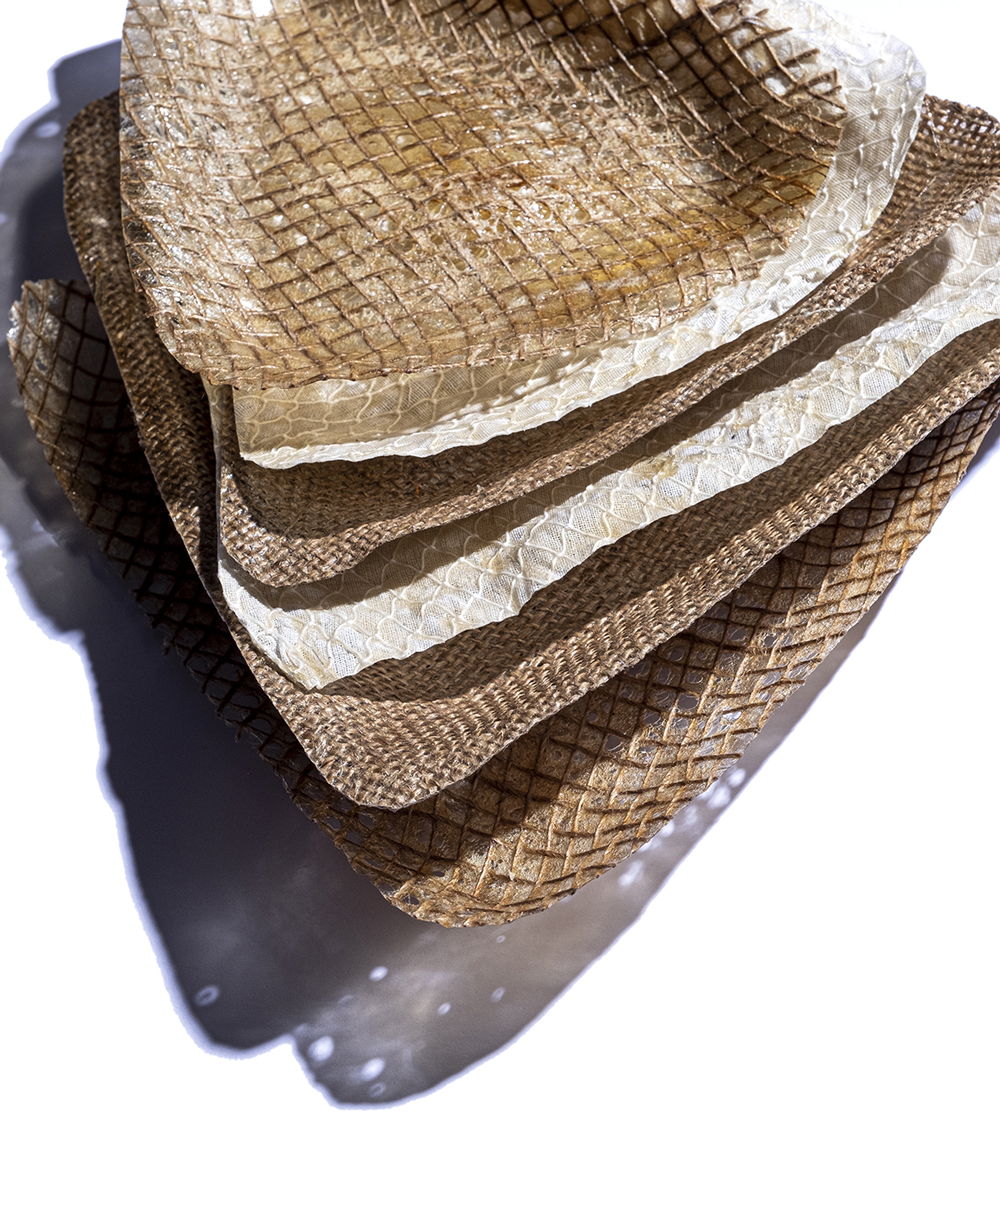
Textile Plates collection, Carolina Delgado, photo by Luís Silva Campos
Crystallization
Growing Chrystal in fabrics can be easier than you think. Preparation it's fast and the rest job is made by the chemical composts. I wanted to create a textile scaffold, but Instead, I have chosen to focus on faster results, so I could apply more time on the 3D and milling machine for the moulds. I collected 2 recipes with Beatriz, add some colours and prepared two different fabrics as structure: Burel felt and Cotton Mesh.
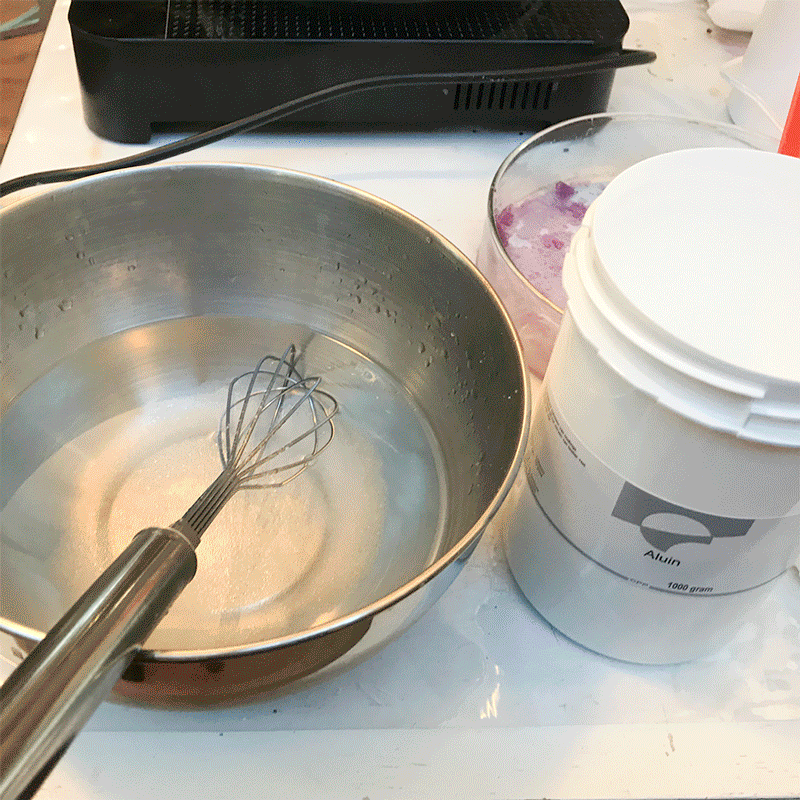
Alum Crystallisation
Preparing Alum solution, Carolina Delgado
Alum Crystallisation in Borel Felt with Red Cabbage ink, Carolina Delgado
Borax Crystallisation
 Borax Crystallisation in Cotton Mesh with Blue Food Colour, Carolina Delgado
Conclusions
My alum Crystal didn't grow so much as I wanted, so I repeated the experience. This time I reuse the wastes from the other week works. Girls had recovered the alum solutions in Alum jars. Aldo, instead of salt form, they were very crystallised in the bottom, we can boil the leftovers in a pot always mixing with a whisk. We didn't know the colours used, but as I realise, they seem very light and didn't fix in the crystals.
 Alum Crystallisation using solution wastes, Carolina Delgado
I've made to jars with different fibres - Borel wool feel and Cotton mesh (it is not so recommended because its very open and lose).
In the next day, I made a new Alum solution and add Raw cotton fabric.
Note: the secret is a higher recipient and a fabric that is right hang so that doesn't touch the walls. The alum deposits on the bottom of the fabric, so higher jar and concentrated solution, bigger are the results.
Results
 Alum Crystals in raw cotton, Carolina Delgado
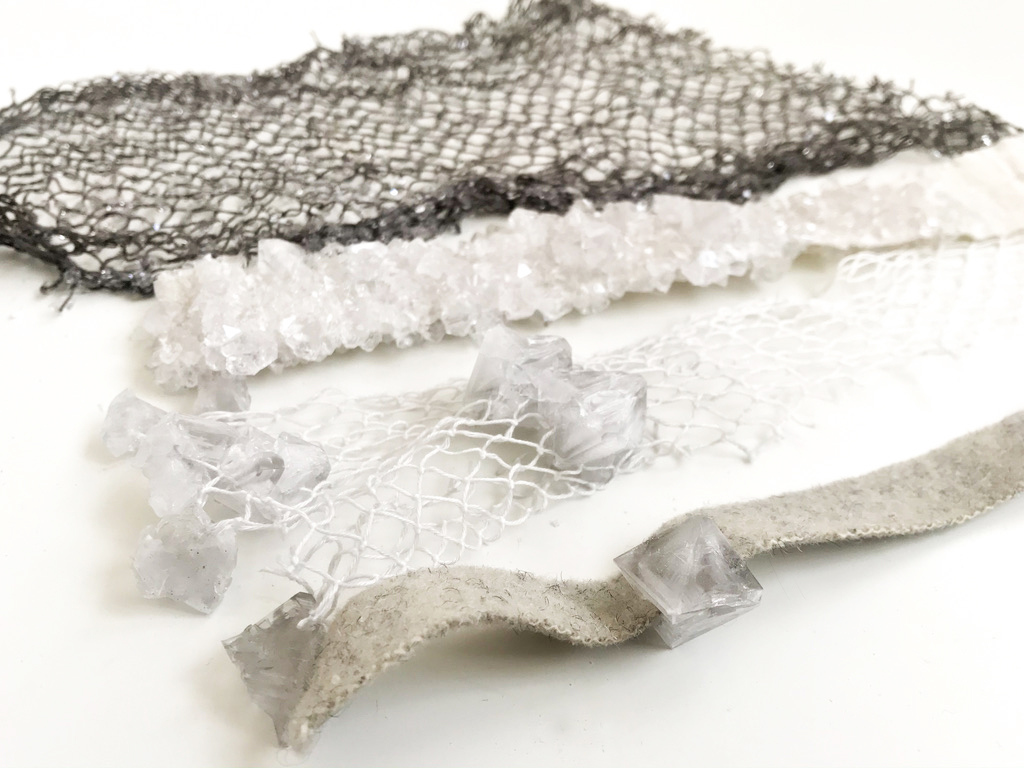
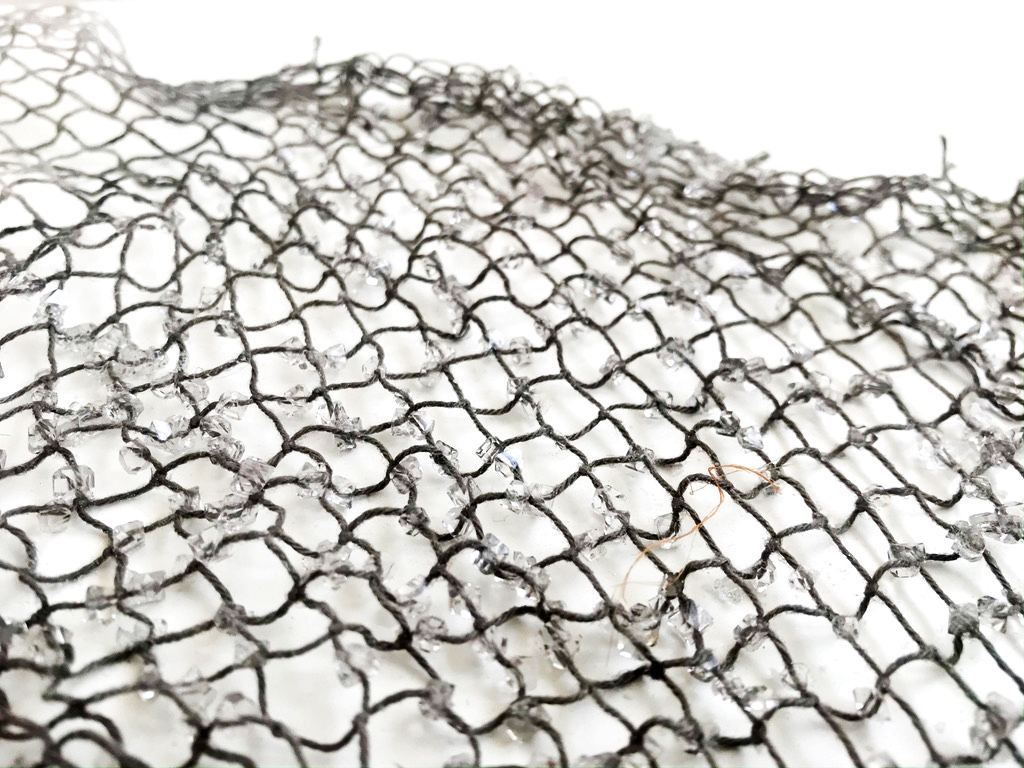
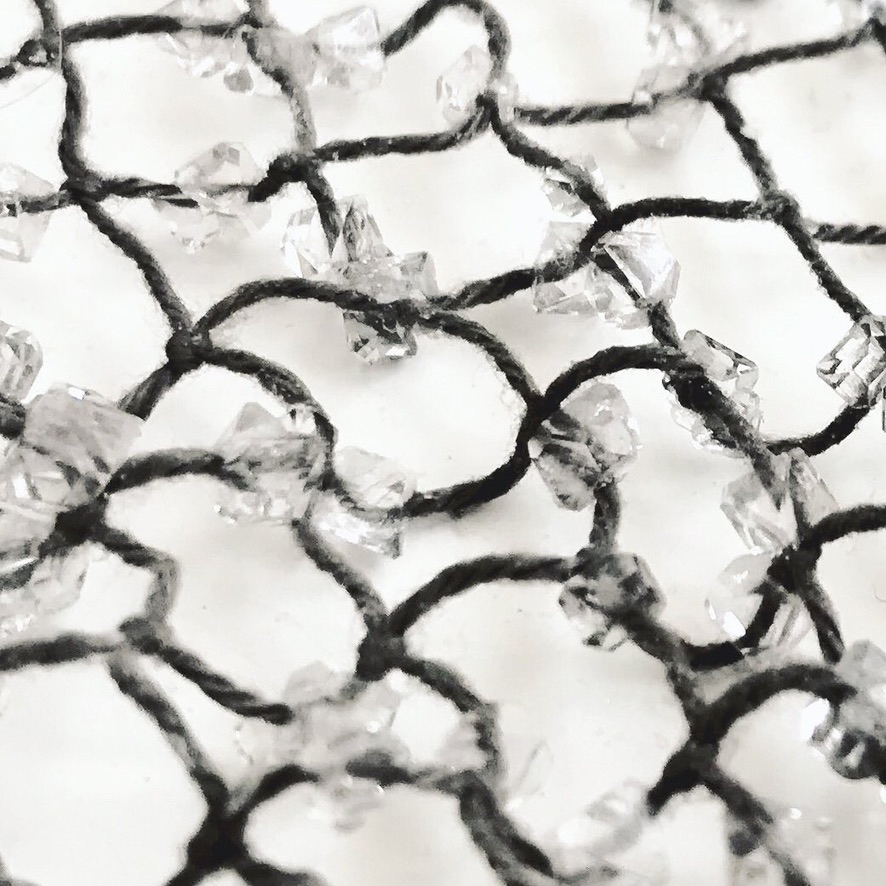
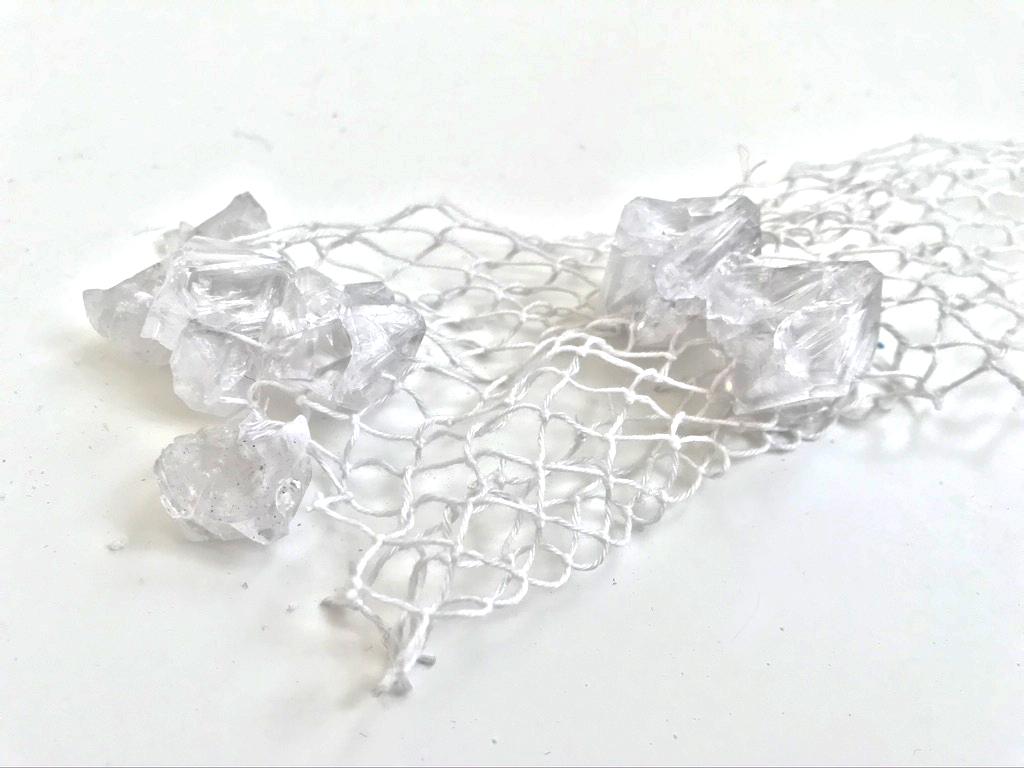 Alum Crystals in cotton fish net, Carolina Delgado
 Alum Crystals with Chinese Ink in cotton fish net, Carolina Delgado
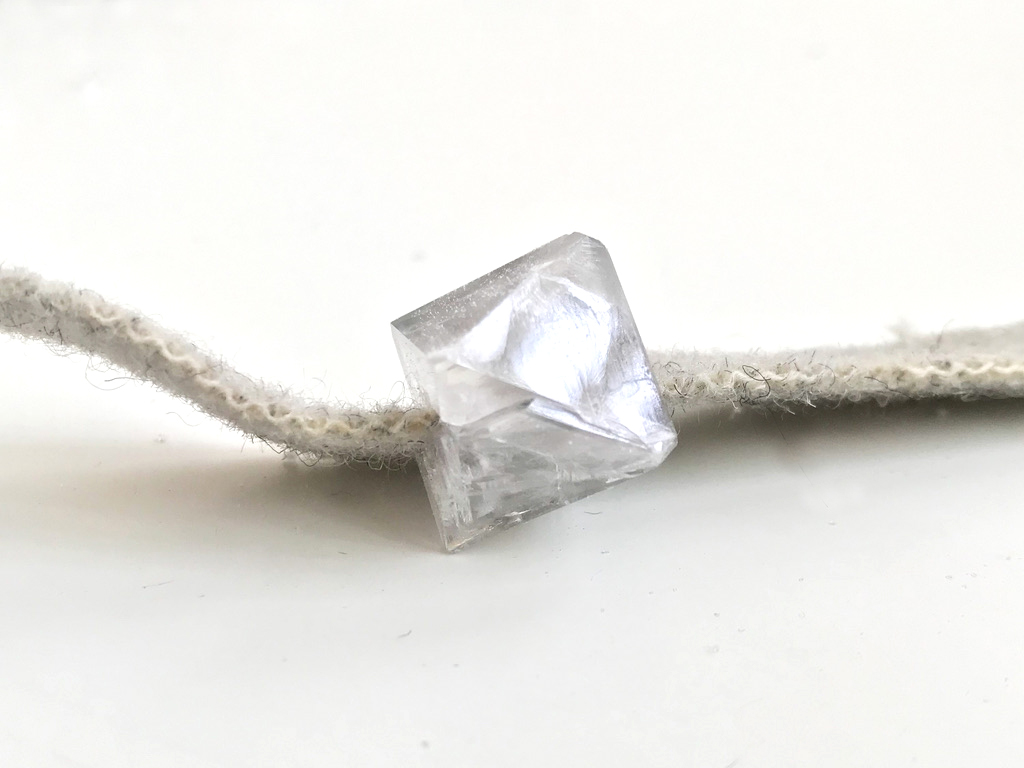 Geometric Diamond, surprising Alum Crystal result in Borel, Carolina Delgado
Recommendations
Roland Snooks - Fibrous Assemblage and Behaviour Composites Molding Fabruccs - FabTextiles