10. Wearables
Global class by Liza Stark from The New Parsons Faculty
Local classes by Emma Pareschi from TextileLab Amsterdam at Waag.
Assignment
This week assgment is to create two actuator swatches - Termochromic, LED, Fabric speaker, Sound, Motion. 1. Test them with the Arduino (or other board), using hard-soft connection solutions and battery 2. Create a swatch using an Attiny with one input and one output of your choice.
Heating Circuits for Thermochromic Inks
Liza Stark's tutorial for Heating Circuits for Thermochromic Inks
Heating takes a LOT of power – current to be specific. We want about 800mA to 1.3 Amps for this circuit. Arduino pins cannot provide the power we need to warm a heating element. Remember: you can’t draw more than 40mA from a pin. This means we need a separate power source for the heating element using a high load circuit.
Liza Stark notes
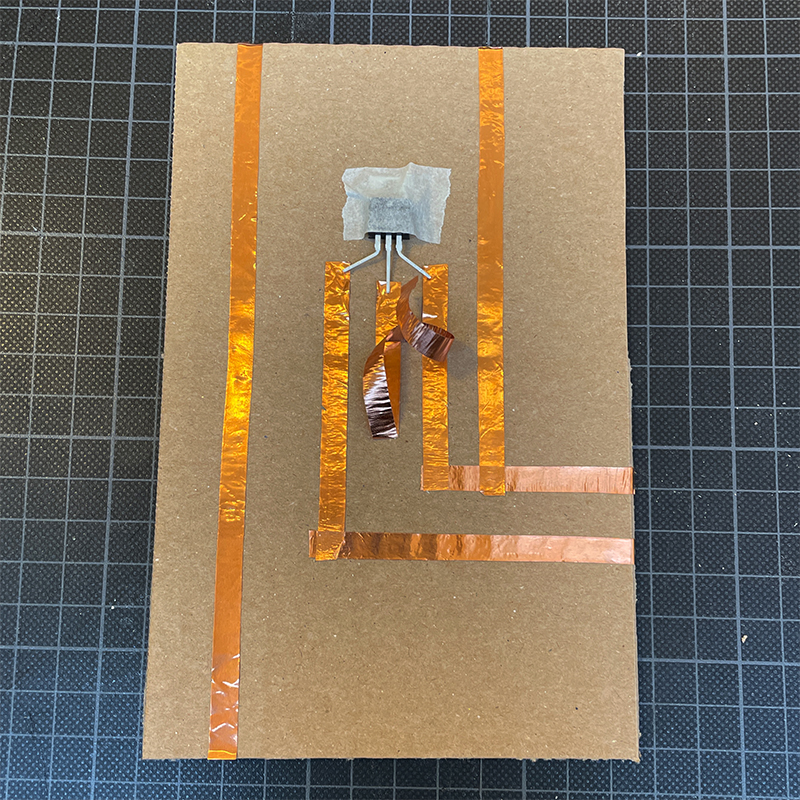
Mosfet transistor circuit
- Cut a 110x170mm cardboad.
- Make a copper line for power (on the left).
- Open the legs of the mosfet (flat as possible), to tape the mosfet to cardboard so it stays in position to connect three differen copper lines: Grain (G), Drain (D) and Source (S).
- Than tape a line for each leg of the MOSFET.
Cardboad transistor, following Loes Bogers Mosfat Transistor model model, Carolina Delgado
- Paper tape the connection to D.
- Name all connections (follow Loes sample)
- I used the back of the scissors to secure the Cooper tapes better.
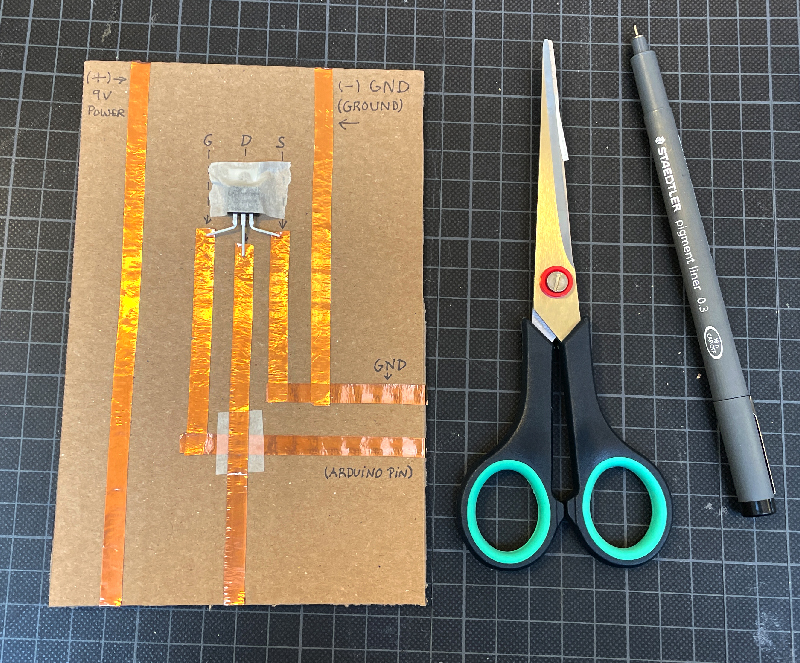
Name the connections, Carolina Delgado
- Solding the legs of Mosfet to the copper tape:

Solder materials - (clockwise) Hot iron, Cleaner and super solder wire, Carolina Delgado
- Warm up the solder iron.
- Cut a little bit of solder wire and melt it over the legs.
- I taped to a cutting mat, to make it easier.
- Clean the iron after each use and be carefull not to burn your fingers.
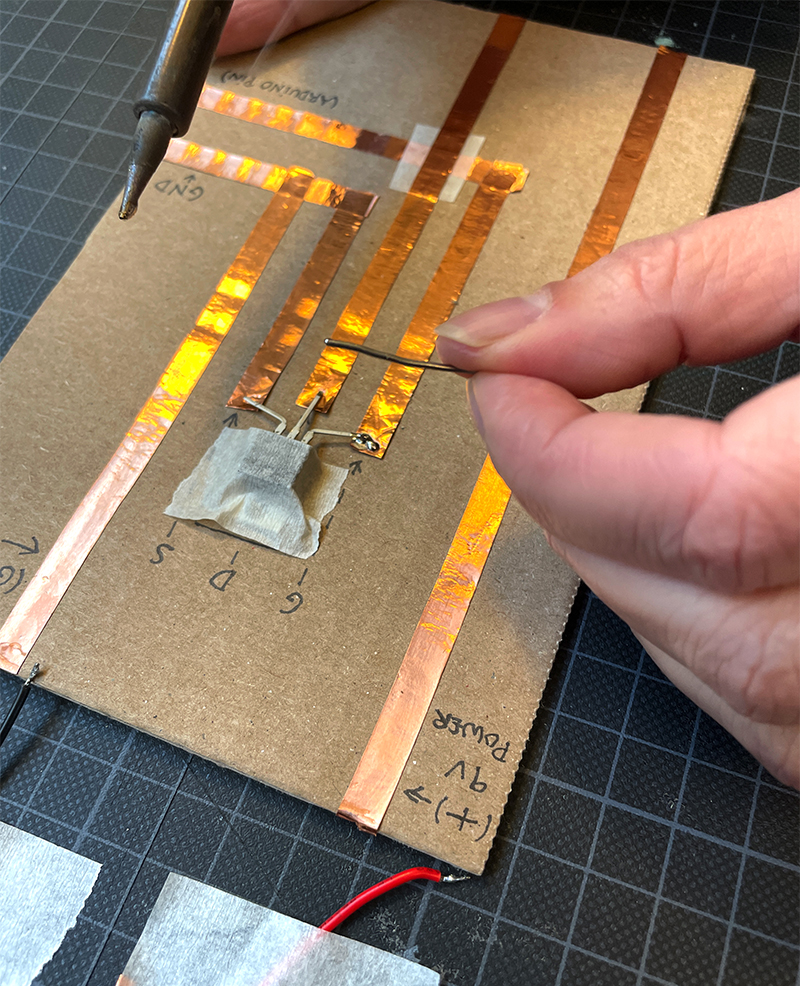
Solding the Mosfet legs, Carolina Delgado
- Test all the connections with the multimeter.
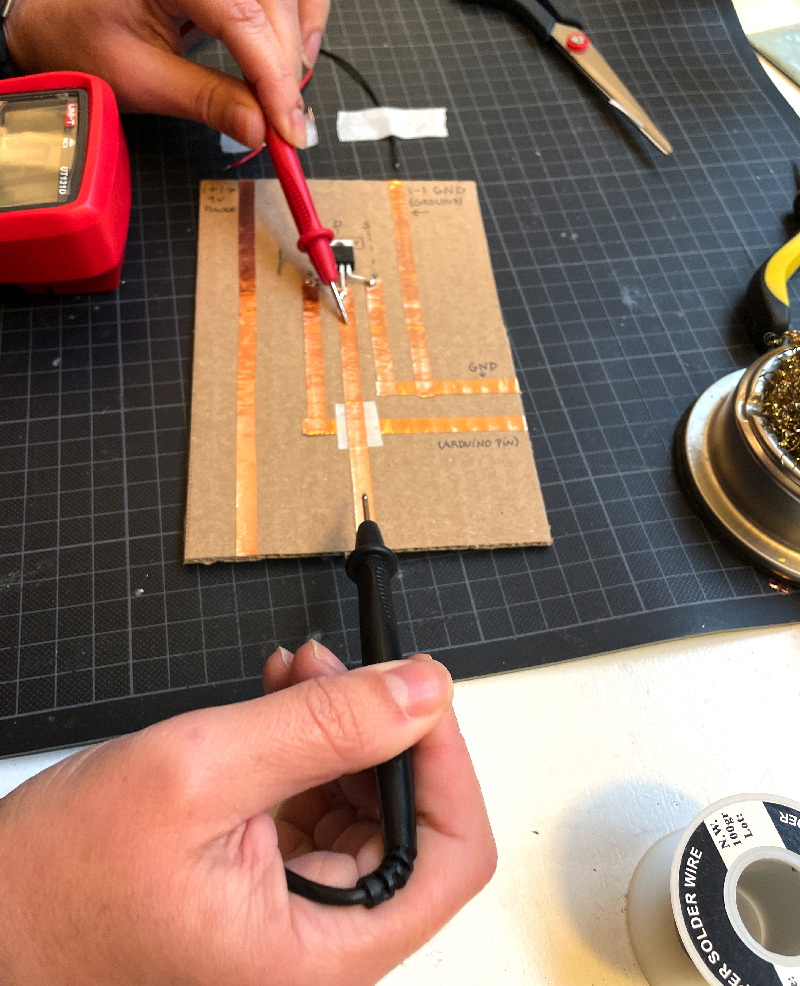
Test all the connections, Carolina Delgado
- Repeat the process to solder the batery wires.
Final Result:
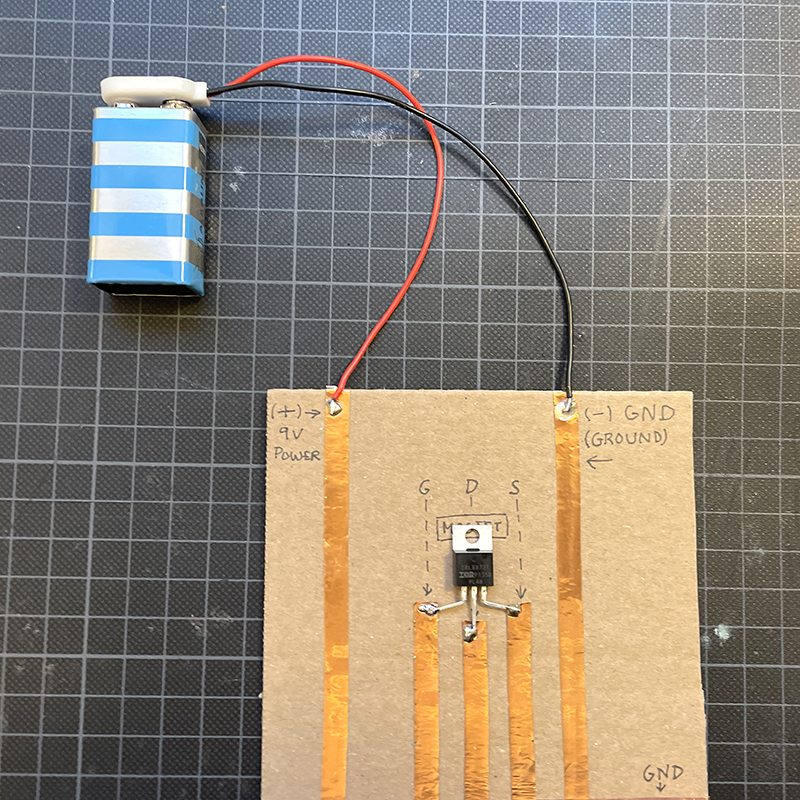
Mosfet trasistor with 9v batery, Carolina Delgado
Conductive embrodery for hot heating pad
To test a thermochromic ink, I've made a conductive circuit to heat up. I draft one eye on raw cotton fabric and use a conductive thread. I leaft two edges, to make connect the power and ground. Then I used metal paper clips (not coated).
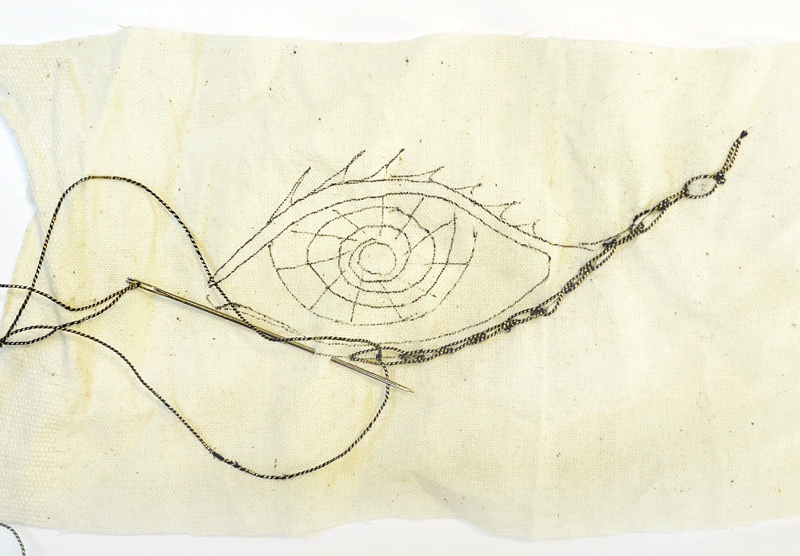
Embroding the conductive thread, Carolina Delgado
Thermochromic pigment
To understant how to used the Thermochromic pigment I read DIY Thermochromic ink, by Kobakant.
Thermochromic inks are pigments that change color to colorless at certain temperature.
- I recoverd part of Green Hackerestore Thermocolor from petry dish, that had already been used. I mixed it with a litle more pigment and white glue. Because it was very dried I added a thwo table spoons of water.
- Then painted on raw cotton fabric and let it dry hangued for three hours.
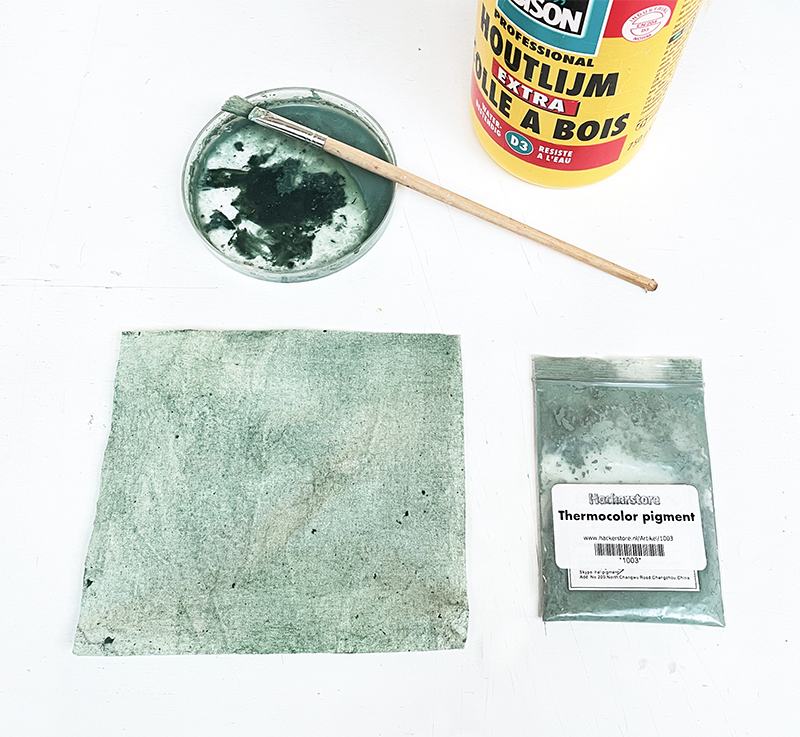
Thermochromic painting, Carolina Delgado
Testing the pigment reaction
Thermochromic finger press reaction, Carolina Delgado
Arduino programing
Aduino can ber: powered by Computer via USB or by powered source.
* Use the mutimeter to test the resistance - Ohm.
* Use Ohm’s Law to figure it out what voltage is appropriate: V = I x R. We can determine the resistance of our heating element using a multimeter (we want something in between 800 milliamps and 1.3 amps
* Determine the resistance of our heating element using a multimeter and we know we want to have anywhere between 800 milliamps and 1.3 amps.
* Solve for the voltage. Check worksheet below.
I measured different times, because the thread that I'm using is not stable (high conductive + non conductive thread). When using it changes the Ohm's.
1.
9v = I x R (20)
9 ÷ 20 = (I x 20)÷ 20
I = 9 ÷ 20 = 0,45 Amps = 450 mA
2.
9v = I x R (7)
9 ÷ 7 = I
I = 1,28 Amps = 1280 mA
- Therefore, in this is case I assumed that the resistor was in between 800 milliamps and 1.3 amps.
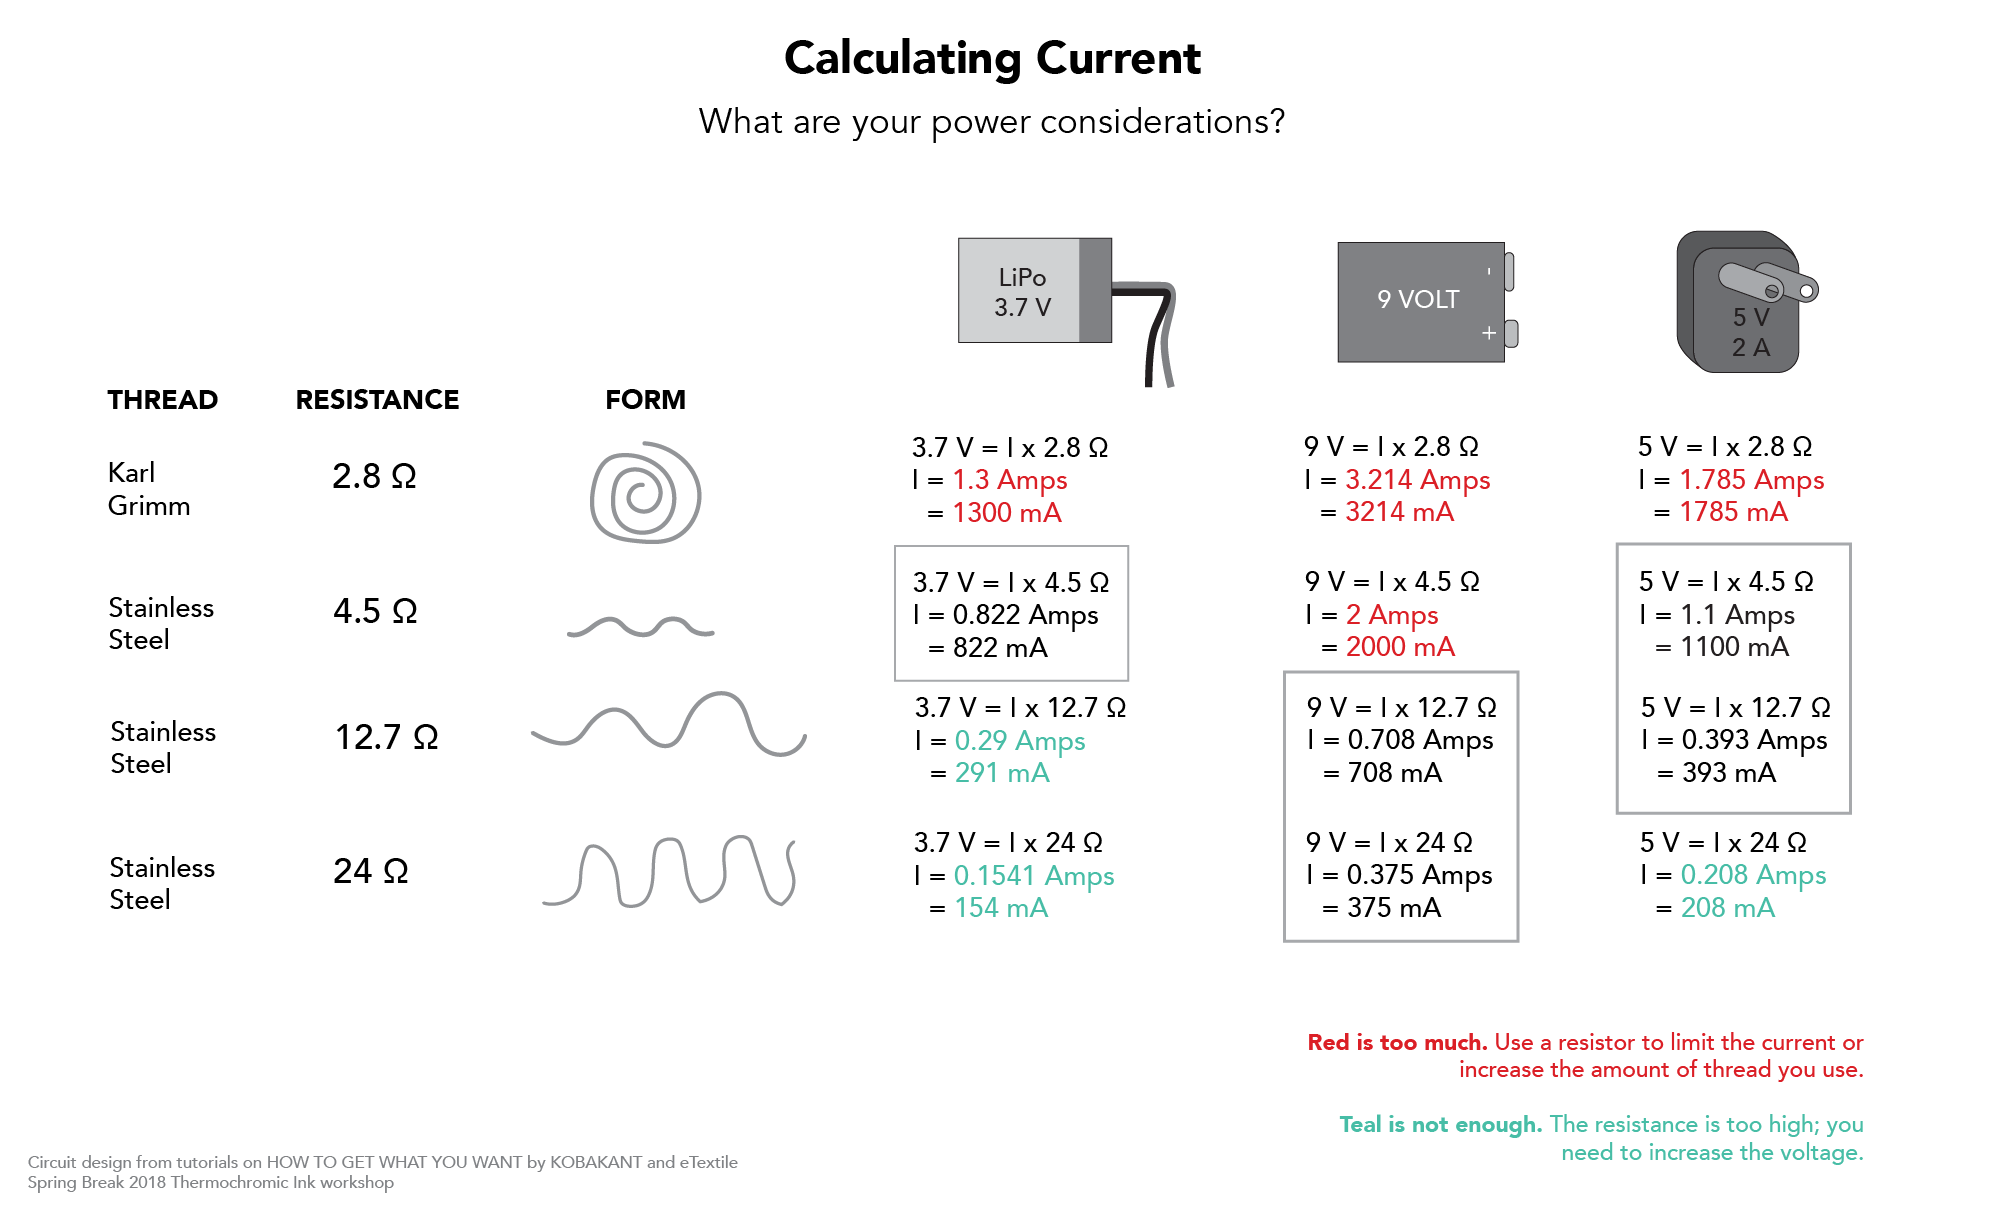
Calculate for power source, by Liza Stark
I sarted with the basics board connections and downloading the file for one led on the arduino uno.
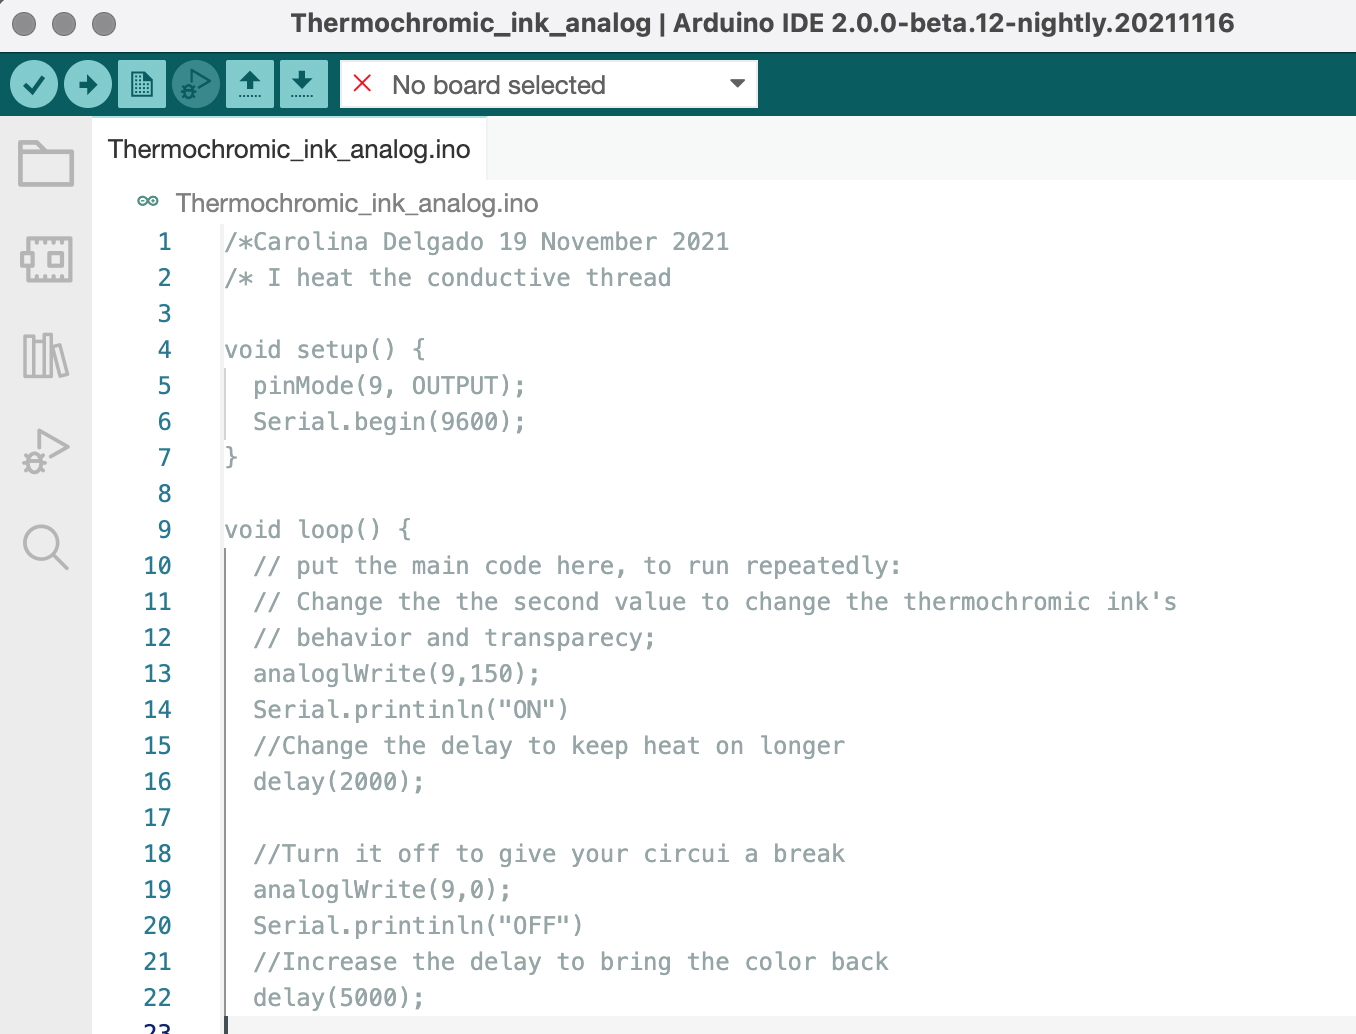
Arduino code for thermochromic circuit, by Carolina Delgado
Results
Interative Monster with Nuria Robles
Color composition + textiles + electronics
Making the electrical circuit
Materials
- LED RGB (common cathode,10 mm)
- 3V BATTERY 2032
- CONDUCTIVE TAPE
- GOMA EVA(50x80mm)
- VELOSTAT
- PIECES OF FELT(cutting file)
Process
I first prepared the monster circuit following Nuria Robles tutorial.
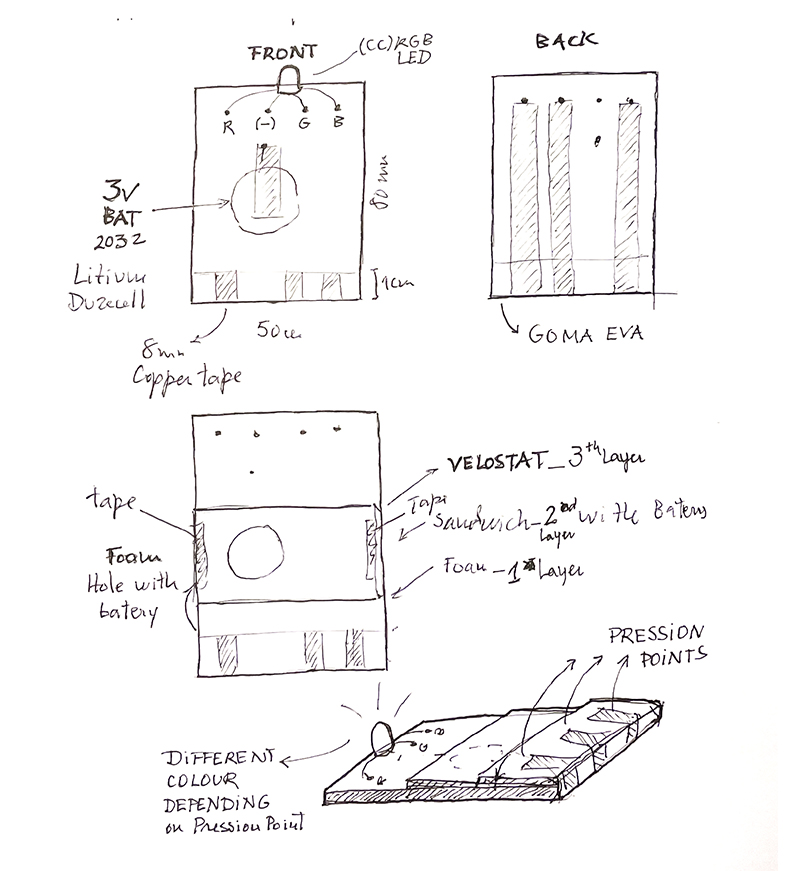
Electrical circuit scheme, Carolina Delgado
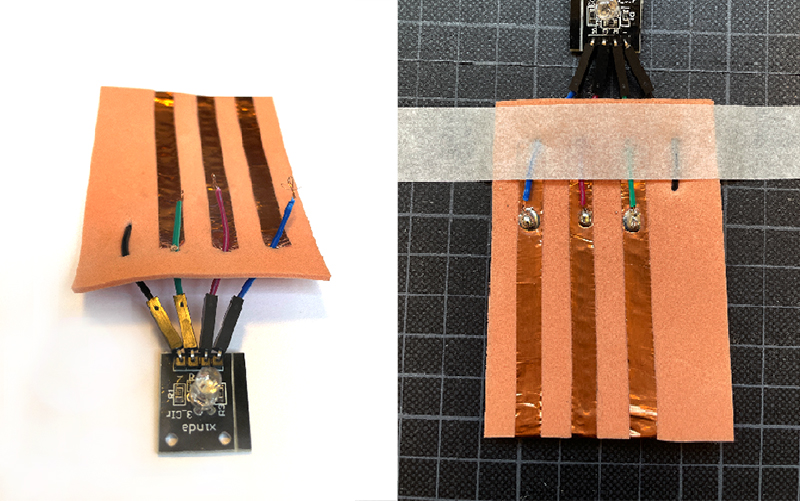
However, I couldn’t found the RGB Led with long legs so I connected wires to the legs.
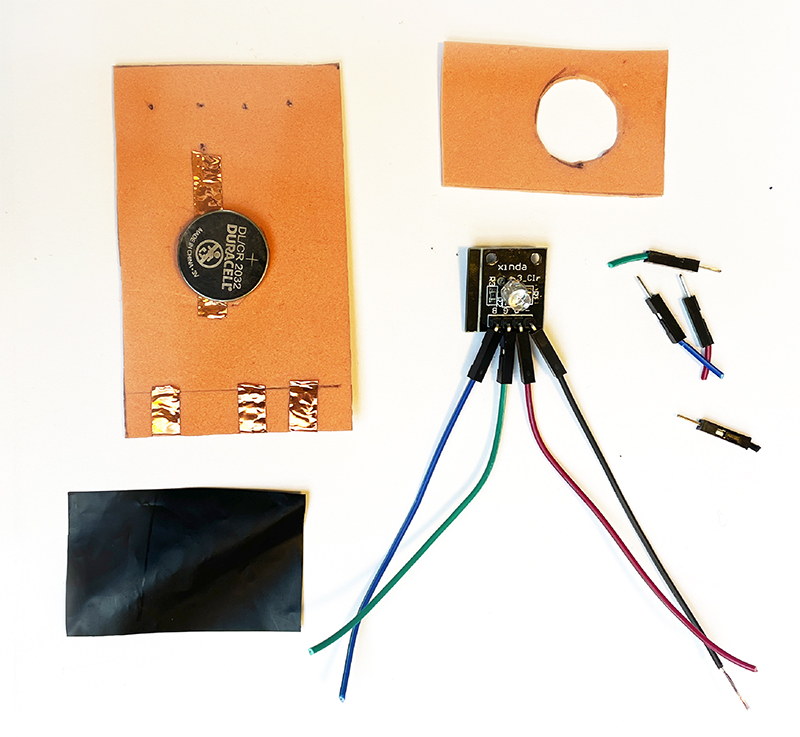
MonsterCircuit - test 1, Carolina Delgado
Because the (-) leg of my RGB LED was is on 4th hole, I need to draw in a new foam, and I reused the copper tape.
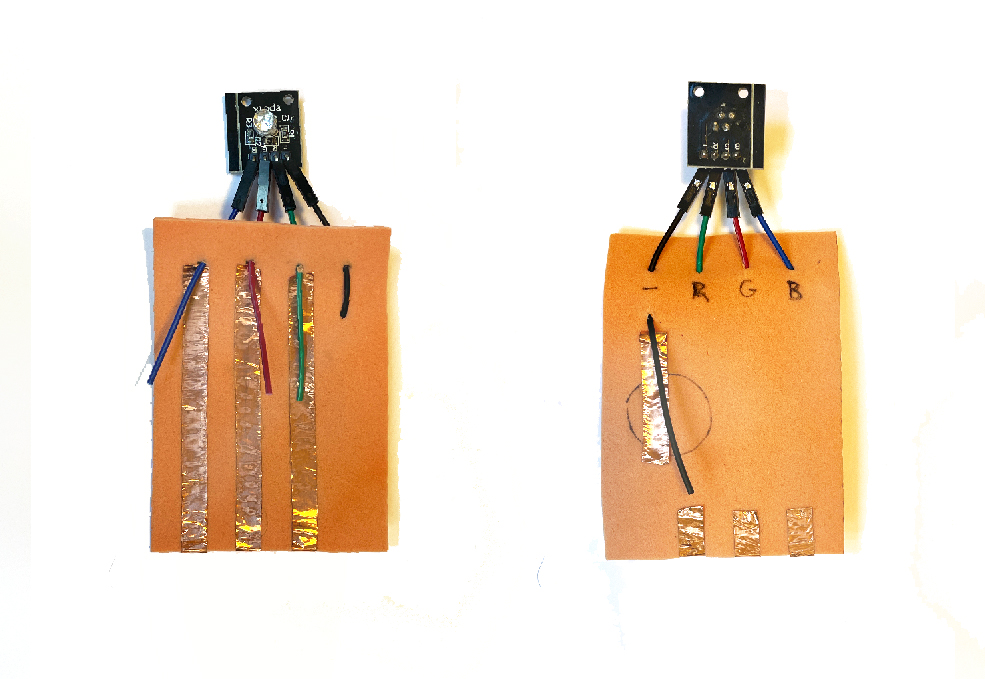
MonsterCircuit - test 2, Carolina Delgado
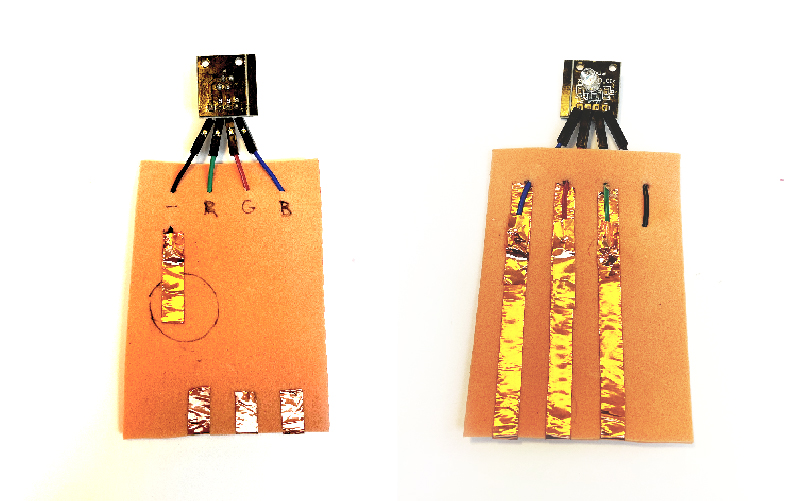
Then I cuted the plastic edges and solder to the cooper tape.
Solding the wires - back, Carolina Delgado
Repeat in the front solding the (-) wire and then I used copper tape again to secure, just for safe, although in this case the connections were already working.
Securing the wires - front and back, Carolina Delgado
Cut a foam bed for the batery and tape to the cirtuit. Layer on top the velostat and tape it also.
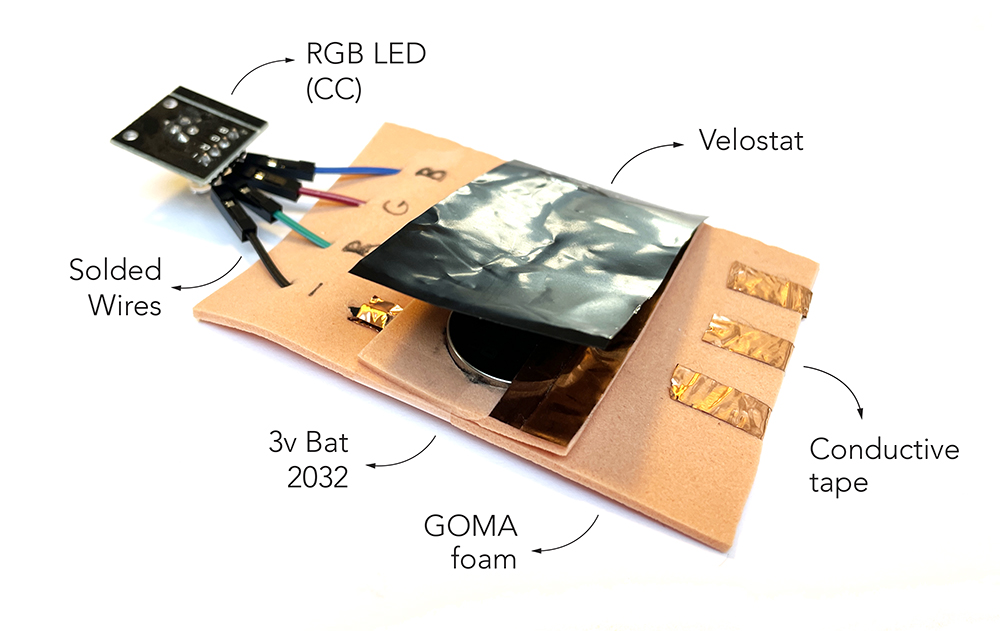
Circuit - final scheme, Carolina Delgado
Result
The RGB LED had a board so I had to put it, upside down. After testing the circuit it al worked, although the colours did not correcpond from the LED bord names. We can only assume that the circuit was defective, because all the lights and batery worked fine.
Youtube
Playing with the Monster RGB Leds, Carolina Delgado
Making the Character
Materials
- Pieces of colored felt
- Felt character (download the amongUs)
- Needle and thread
- Scissors
- The circuit made
Process
Results
Research
Lectures and Tutorials
Wearables Class with Liza Stark
Tutorial Arduino and Power Loads by Emma Pareschi
Tutorial for Tutorial Basic Electronics by Emma Pareschi
Materials to prepare for Emma workshops
Tutorial to create interative Monters with Nuria Robles | Fab Lab León