Work Plan
ABSTRACT
This final project is called Nature-Based System for Food Packaging. It is a Material Driven Study on Seaweed Bioplastics to develop a packaging system to buy food in bulk, for a long life use and reusable waterproof film and net bag that are homecompostable. Aware of the plastic pollution problems and textile waste concerns was chosen to use Alginate from the brown algae regarding invasive alien species (invasive macroalgae) ensuring sustainable exploitation of resources for food reusable packaging. For this work were used Alginate Biofilms and BioPlastic sheets and manual extrusion with a syringe (BioYarn), threads of fibres coated with Alginate. It was made a small study on Blueberry Ink for colouring the Alginate. There were developed open-source manual devices, one called the Alginator to coat yarns, and a plywood Laser 3D loom to create a Spider Web inspired groceries bag.
THEORETICAL FRAMEWORK
Spiders skills
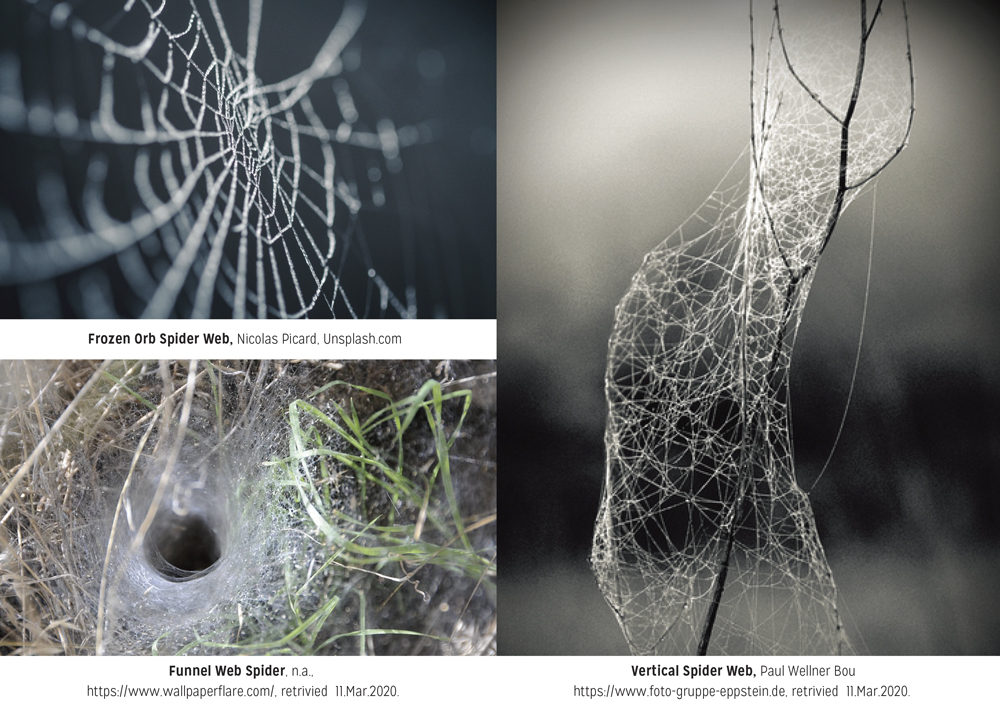
Spiders were here thousand of years before humans. They spread even before the dinosaurs. Their ancestors move from the water to conquer the land living under the soil, protecting them from the hot sun and maintaining their humidity. With evolved spinneret, they create many types of silks that allowed them to move long distances in the air, by rappel or ballooning, build webs on trees, and adapt to different weathers from hot to dry, from desert to the top of mountains. Spiders evolved by developing different types of silks. When building orb webs, they use at least four types of silk with different form and function. They provide strength, flexibility, and scaffold during the construction.
'“Silk has made the spider’s adaptation to these different environments possible. As spiders have evolved, they have developed many ways of using silk: to protect themselves and their eggs, to detect and catch prey, to travel to new habitats. They use some silk as glues, some watertight packaging, some as rappelling rope, some as super-flexible impact-absorbing snare netting. (p.xii)”'
Spider Silk, Lesli and Catherine L. Craig, Yale, 2010
 Spider Webs, Carolina Delgado
Humans had already invented similar solutions like Kelvar and BioSteel. But producing Kevlar requires raw material derived from coal and petroleum and the use of either highly toxic solvents or very high temperatures. Also, BioSteel is still at the beginning of upscale and uses high tech labs and materials, resulting in a prime and expensive material.
Algie Fibres
'The fashion industry is facing many challenges as the textile consumption is expected to increase three times by 2050. In addition, there is almost no circularity in the industry as 95% of textiles after its’ product lifetime is burnt.(...) Organic organisms of algae are spread globally in the oceans and lakes and are the crucial element in the carbon flux as it converts large volumes of CO2 to oxygen. This makes a positive impact in dealing with the global warming.(...) In places with an excessive growth, algae unwanted and cause problems like worsening water quality and negative effects on local communities. From some lakes, it is already being removed but usually just left to decompose or burnt without any actual use. (...) This makes a great potential to upgrade algae value and apply it in the textile industry. By applying design thinking and experimenting in our studio lab we develop ways on how to achieve this..'
Seaweeds in Portugal and Netherlands
Seaweed species like Sargassum muticum and Colpomenia peregrine, among others, were native to the Eastern Pacific Ocean but has been introduced to other areas.
Reference
Seaweed Invasions: A Synthesis of Ecological, Economic and Legal Imperatives edited by Craig Johnson.
Portugal
Project on invasing species. Amalia Project from Politécnico de Leiria, and others.
"While generating value and contributing for the economy, the extraction of these seaweed may contribute to marine ecosystem equilibrium or even site restoration." Algae to Market Ideas - Adding value to invasing seaweds of Iberian of the Northwest. CCMAR-Centro de Ciência e do Mar, Universidade do Algarve
As Algas Marinhas e Respectivas Utilidades, Leonel Pereira, Universide de Coimbra http://www.cienciaviva.pt/rede/oceanos/1desafio/algas-marinhas-utilidades.pdf
The 3B’s Research Group (Biomaterials, Biodegradables and Biomimetics) was established in 1998 at the University of Minho https://3bs.uminho.pt/research/marine-biomaterials
Netherlands
SeaMe project, Nienke Hoogvliet
Seaweed Centre, NIOZ Royal Netherlands Institute for Sea Research
FIBRES
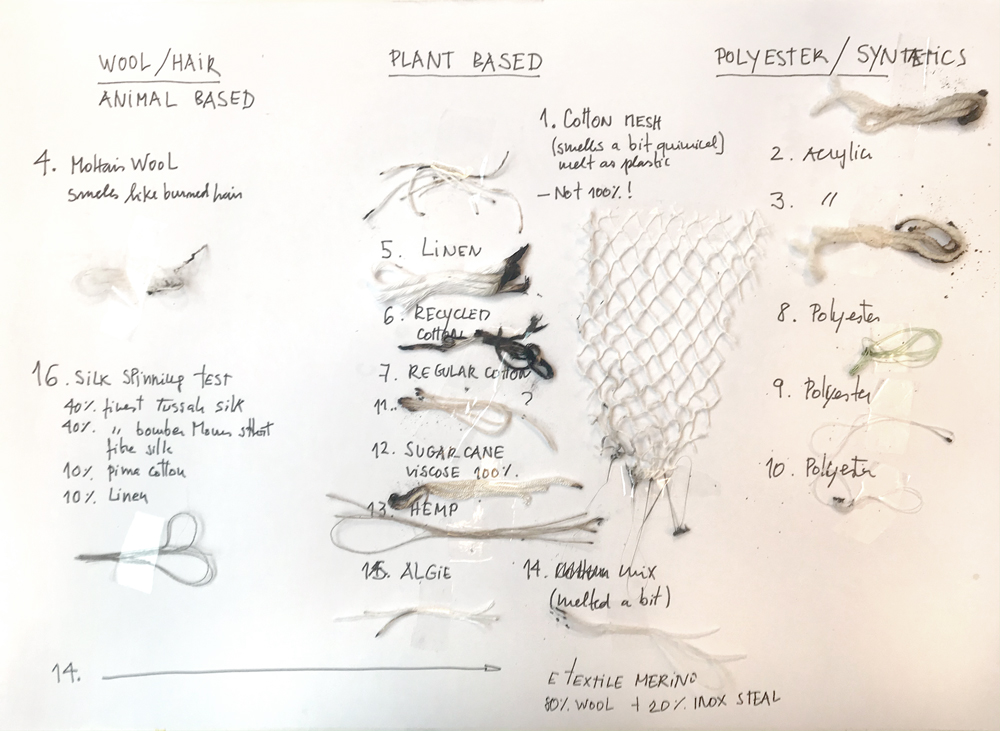
To start testing the behaviour of Bioplastic in yarn for Sustainable studies I decided to use only nature-based fibres. We had much variety of fibres already at TextileLab Amsterdam. However, we have to know them and make sure of first choices. It was relevant for this project to start with raw or not coloured fibres so that we could understand the results better. After a quick view and a first selection, we prepared a collection of 14 yarns. But without the certainty of some fibres, we start by testing them.
The Burn Test
How to know Animal, Vegetal or Acrylic Fibres?
- Cotton - Catches fires quite fast; the smell is very different from the wool, smelling like burned paper; the flame turns yellow.
- Wool - Strong smell of burned hair; when take off the flame stops burning; the flame slowly dies.
- Bamboo - Imflamable; flame deep yellow almost orange; smell similar to cotton; the strays will fall apart.
- Acrylic - Catch fire fast; strong light and burns longer than bamboo; the smell is chemical and the ashes are like bead crispy plastic.
Resume
The Burn test was made on 15 yarns and one cotton mesh, only one reveals wool.
Some had identification others did not.
Yarn Types:
1. Cotton mesh
2. Acrylic knitting yarn
3. Acrylic knitting yarn
4. Mohair Wool
5. Linen yarn
6. Recycled Cotton
7. Regular Cotton
8. Polyester green thread
9. Polyester white thread I
10. Polyester white thread II
11. Not identifyed yarn (?)
12. Sugar cane yarn (100% viscose)
13. Hemp yarn
14. E-Textile Merino (80% wool, 20% Inox steal)
15. Algie yarn
16. Silk Spinning Test (40% Tussah silk, 40% Bombyx morus silk, 10% Pima Cotton, 10% Linen)
Results
image
Testing the fibres, Carolina Delgado
Conclusions
The Burn test was made on 15 yarns and one cotton mesh, only the yarn 4 reveals wool.
Most of the simple yarns to sew were synthetic.
The supposedly 100% cotton mesh reveals chemicals, suggesting that is made from recycled cotton with parts of polyester or other synthetic.
We did not have enough Algie yarn desired for the final project, but we opt for using plant-based yarns to test the first steps. That way we could not only compare them but also start working before our order of 2 different Algie yarns arrive.
Un-twining a yarn
Comparing the Sugar cane yarn with the desired Algie yarn, it appeared very thick. The yarn was made by the torsion of 6 thread so the solution was to make 2 options: one maintaining the original yarn and other with only one thread.
How to untwine the yarn without a machine, Carolina Delgado
This was the faster solution I imagine. It can consume lots of time and patience but I just wanted some meters for the first tests.
Note: I've learn that it is possible to make a yarn with different threads by attaching 2 or more on one side (e.g. on the doorknob), and in a cardboard with a hole attached to a drill!
BIOPLASTICS
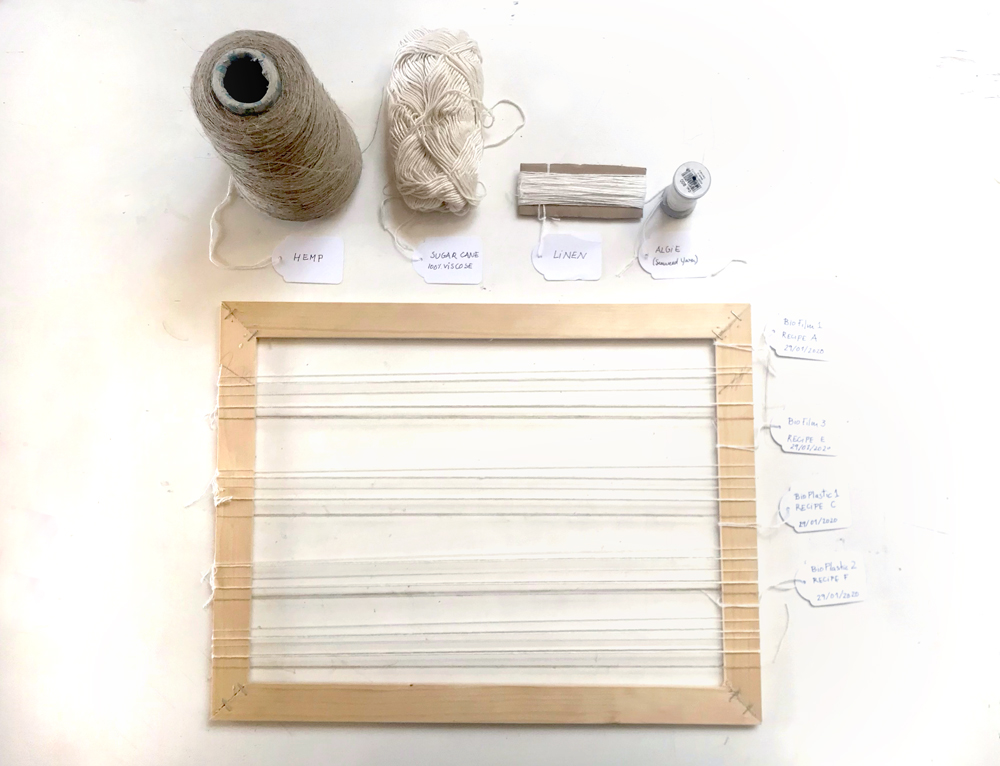
To achieve a waterproof material was chosen the Alginate base instead of Agar and gelatine. In collaboration with Lorena Trebbi, a PhD student from Rome, were made 6 recipes of Alginate at the WetLab.
 Alginate Recipes, Carolina Delgado
Bio-Films
Recipe A
16 gr Alginate | 30gr Glycerol | 400 ml Water
Recipe B
16 gr Alginate | 30gr Glycerol | 200 ml Water
Recipe E
16 gr Alginate | 30gr Glycerol | 800 ml Water
Bio-Plastics
Recipe C
24 gr Alginate | 40gr Glycerol | 600 ml Water | 20 gr Sunflower oil
Recipe D
24 gr Alginate | 40gr Glycerol | 200 ml Water | 20 gr Sunflower oil
Recipe F
24 gr Alginate | 40gr Glycerol | 800 ml Water | 20 gr Sunflower oil
How to
Put all the ingredients in the blender machine and mix it and leave it overnight, so the bubbles come out. In the next day, you'll be able to use it spray sodium chloride hydrate before you put the material. Remember to apply after if you want to dry it faster and become waterproof.
From the six recipes, the ones with less water results in very thick material, difficult to apply with brush, syringe or even dip in the fibres. Therefore, they were discarded, and we tested the remain 4 (A, C, D and F).
Calcium Chloride Hydrate
Was made on a sprayer bottle with: 10 gr Calcium Chloride | 100 ml Water
For the bath to curate the BioYarn, I chose to use more water so that it gives more time to manage the syringe.
 Alginate Biofilms, Carolina Delgado
Test 1 - Brush
Yarns on frame, Carolina Delgado
For the first test were used 5 samples from 4 fibres. They were stretched in a frame and brushed with different Alginate bioplastics recipes. The fibres after brushed automatically became loose so some of them had to be tied again. For the same reason, it as put a stick of wood so that the yarns were more stretched.
Then they were sprayed with calcium chloride solution.
After dry, they were removed. Some small pieces of plastic are attached to the fibres and the parts that were touching the frame didn't receive bioplastic.
Results
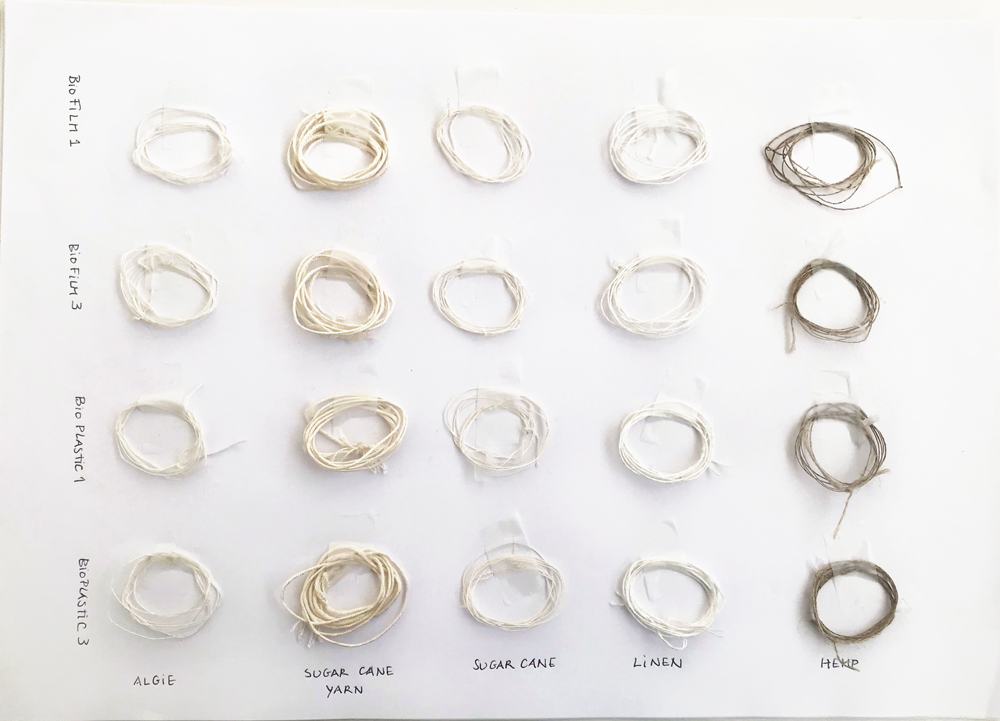
Yarns brushed with Alginate, Carolina Delgado
Conclusions
The yarn that behaves more similar to Algie yarn was linen (note: it was yarn and not a thread). Good for use in knots tests.
The fibres appear not to absorb enough bioplastic to became covered and waterproof.
Test 2 - Dip in
There still was enough Algie thread to this test so it was only used this one. Were cut thread of 2 mt, dipped in the recipes of Alginate with food colours (to easy identification). Then passed by a calcium chloride hydrate bath and then in another water bath. They stay over a plastic fabric for drying on air.
Results
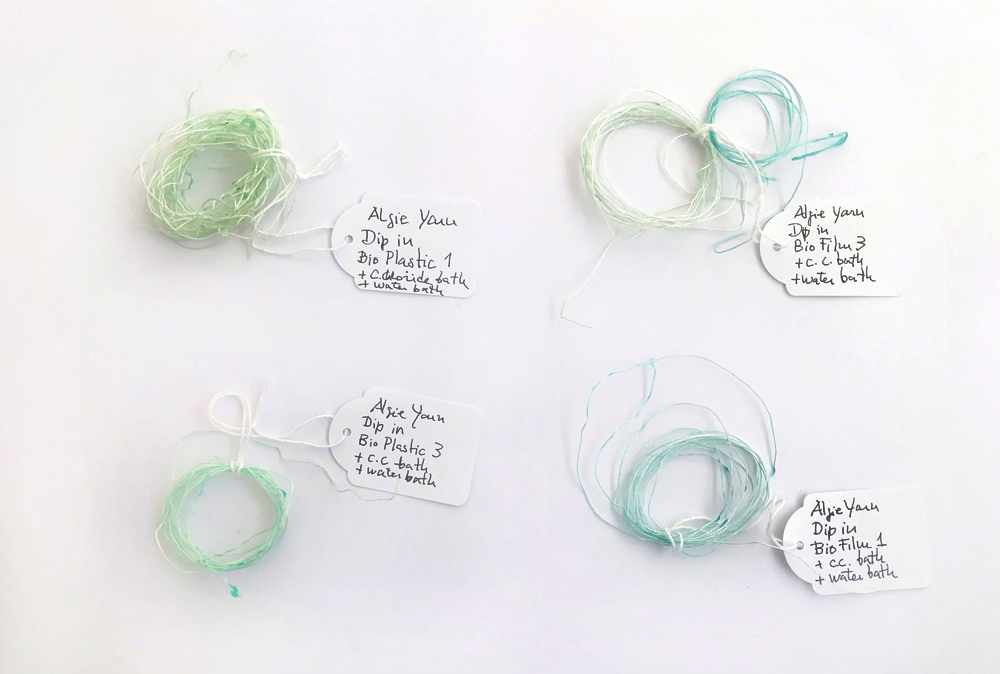
Algie Yarn diped in Alginate, Carolina Delgado
Conclusions
All the yarns became more rigid. They absorb more Alginate material so they became more thief and I supose waterproof (to test).
Recipe of bioFilm 3 was the easier to work with. It is hard to dip in the yarn, so the better way is to put it all in and remove separate (the stretch as possible) and slowly dip in the calcium chloride bath. Then it was washed to be sure that the calcium chloride excesses were removed and stop curing.
BioPlastic 1 result was very curly hard to work after dried.
Note: need a dip in machine to make the coating the threats.
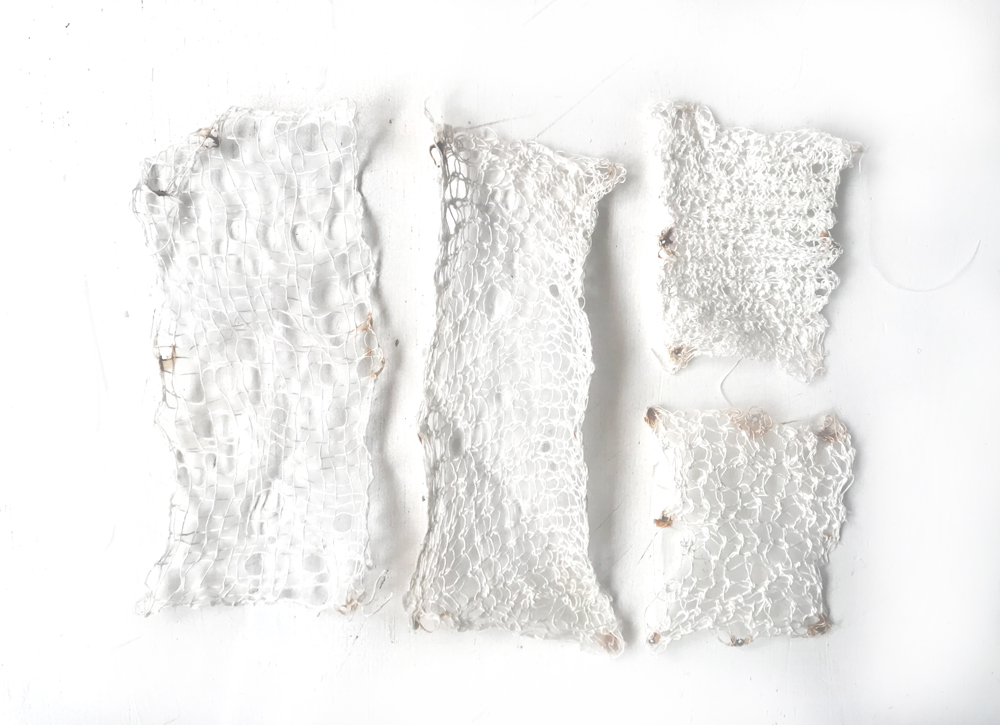
Netting
Weaving Net (NL)
My first trial was with a Sugar Cane threat (the one collected from the yarn). This one was chosen for its similarity to the Algie yarn, as the Linen, but also, because (Surprise!) it is from a Portuguese company with I recognise for it quality wools and yarns.
A net was made over a 29,5cm round knitting loom. The horizontal and vertical threats were intersected alternated. I did not use knots as a usual net because I wanted to test the glue effect of the Alginate as a result.
 Linen and Alginate - Weaving, kniting and crochet, Carolina Delgado
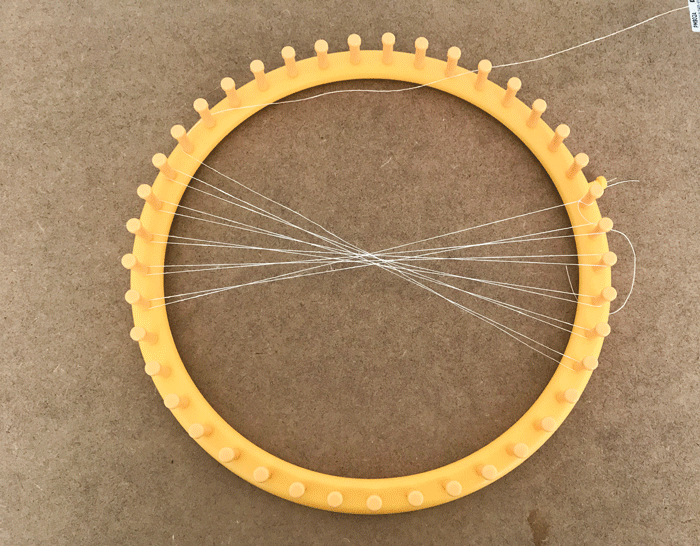
Linen Orb with Alginate (PT)
The orb was made with a round knitting loom to create concentrical lines of the orb and then intertwined a circular orb beginning from the centre. Using a brush, was applied the Alginate bioplastic (?) on both sides and sprayed with the 10% Calcium Chloride Hydrate. Was less to dry on room for the weekend.
Linen Orb with Alginate, Carolina Delgado
Spider Web Concept
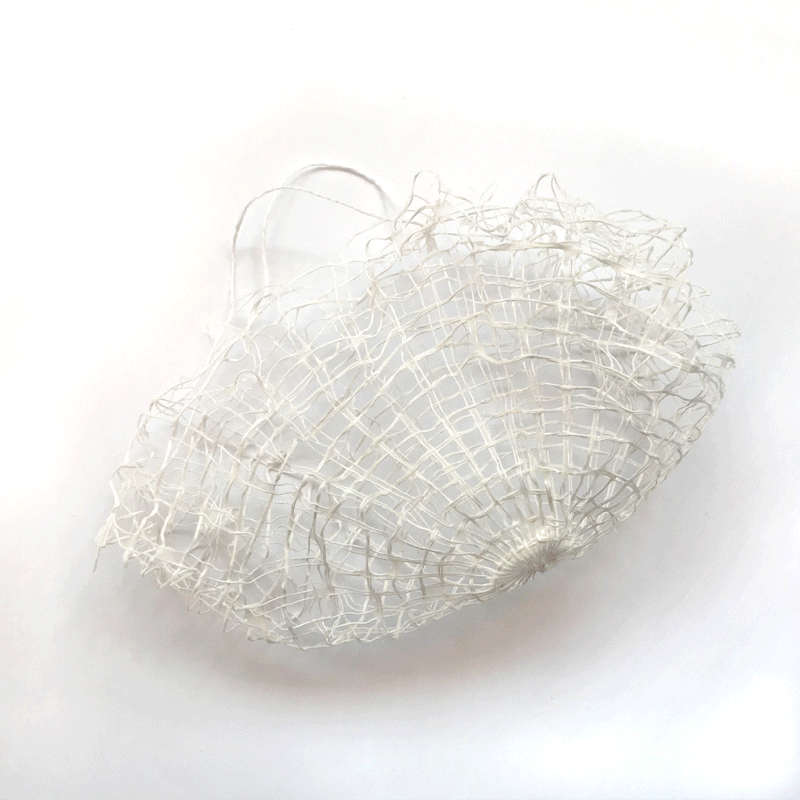 Spider Web groceries bag, Carolina Delgado
BIOYARNS
Extruding Alginate BioYarn with a syringe.
Fabricademy Bootcamp 2019, with Anastasia Pistofidou. ICELAND, Tækniskólinn Technical College, Reykjavìk.
Extruding Alginate BioYarn with a syringe, Carolina Delgado
I tested here in the TextileLab Amsterdam with the syringe (without the fine point) and the conclusion was that the calcium clroride hydrate must be half of the concentration to give time for the manual pumping the syringe.
- A syringe with Alginate BioFilm or BioPlastic
- Pot with calcium chloride hydrate (only 5%)
- Tap water to wash the calcium chloride.
Samples of Bioyarns (NL)
I made different tests on bioyarns using a syringe and a calcium chloride bath (with less %) so I could have time to press the bioplastic out of the syringe (hard work!). All the Alginate materials were coloured using food colours so that it was easier to identify each one of them. Also made a collection of samples of each one to compare the difference in yarns and in Petri dishes and Lego silicon moulds.
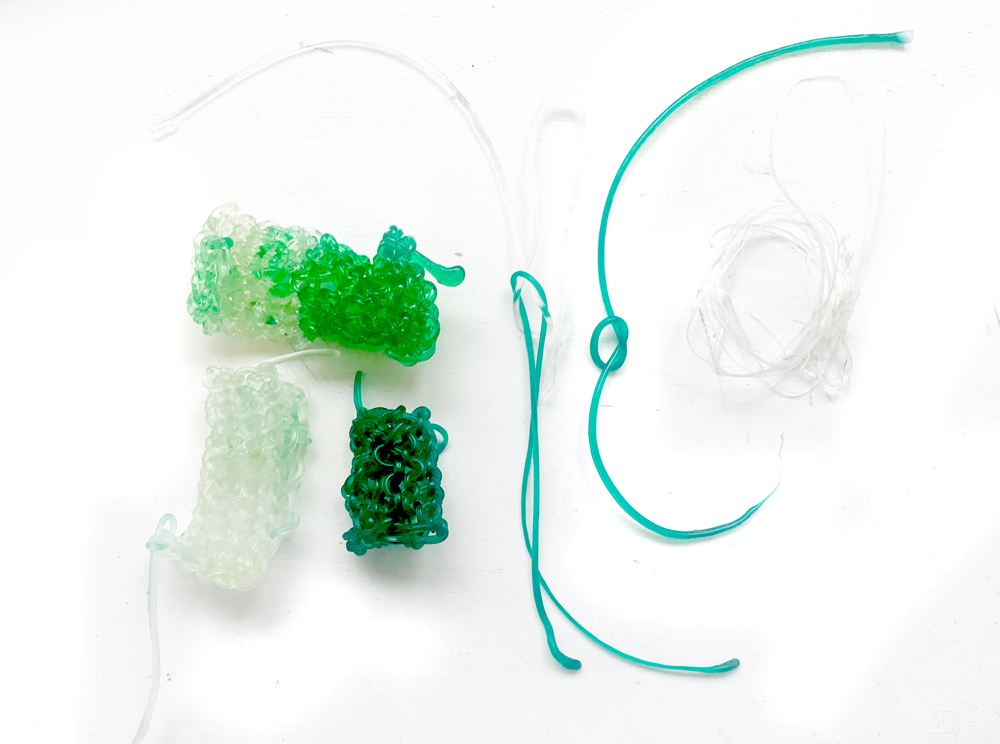 Alginate BioYarns and Knitting, Carolina Delgado
BIOCHROMES
The intention was to create a colour to the alginate that could change the apearence of the white seaweed yarn when apllying the Alginate bioplastic. I looked for some natural inks that assembled the sea colours using from a specie from a vegan source. It took some tests to achieve the ideal one.
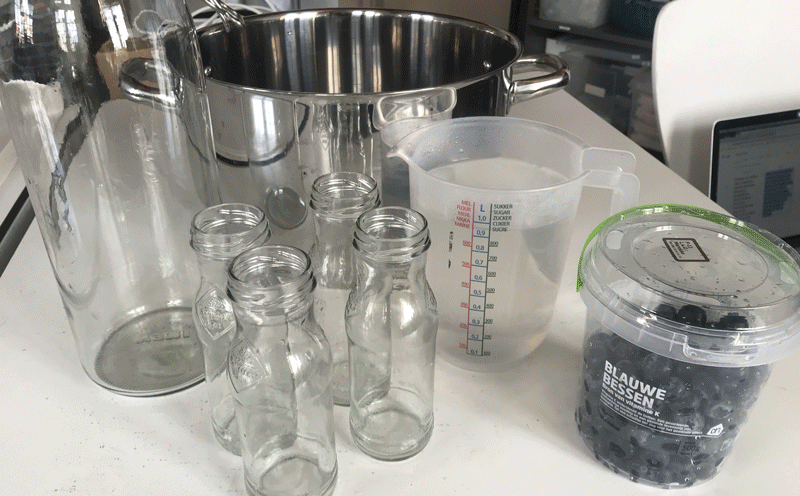
Blueberry Inks
Materials
500 gr of Blueberries | 1000 Lt boiled water | Vinegar | Baking soda | Coffee filters | Big pot | Scale | Jars and pipets | Stove | Mixer | Ph paper marks
Process
Place the blueberries with the water in the pan until boiling and lower the temperature - Cook for an hour. I use the electric mixer and use the pulp, making a Syrup for a profound result. Coil with a coffee or tea filter into a well-washed bottle (if sterilised it will last longer).
 Making Blueberries Ink, Carolina Delgado
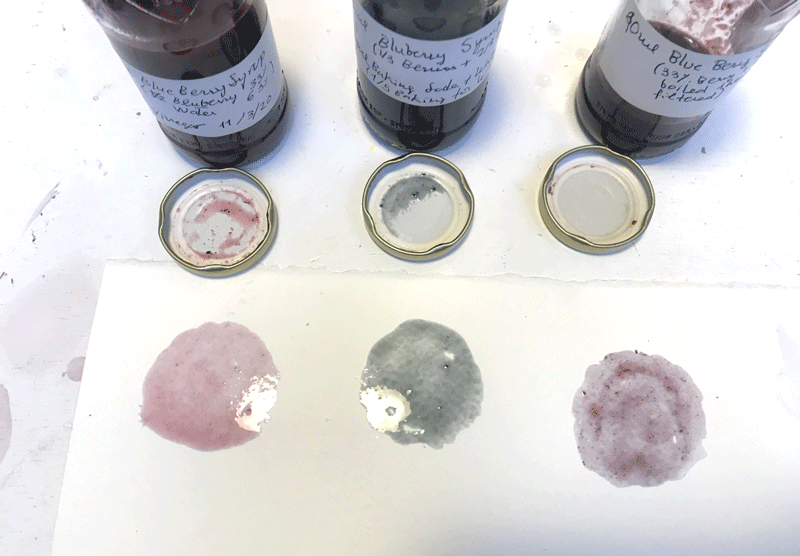 Testing Blueberries Ink Test on paper, Carolina Delgado
TECHNICAL
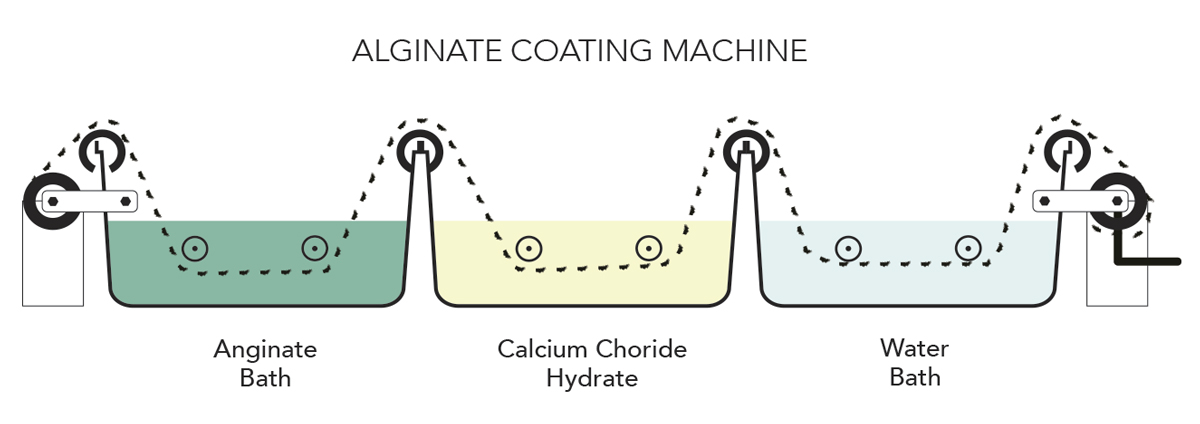
The Alginator
To make lots of meters of alginate coated algie yarn it was needed to create a faster dip-in machine with the needed 3 different baths.
I started with a first draw of the parts that I needed, and then I collected simple materials anyone could use to create in a simple and fast process.
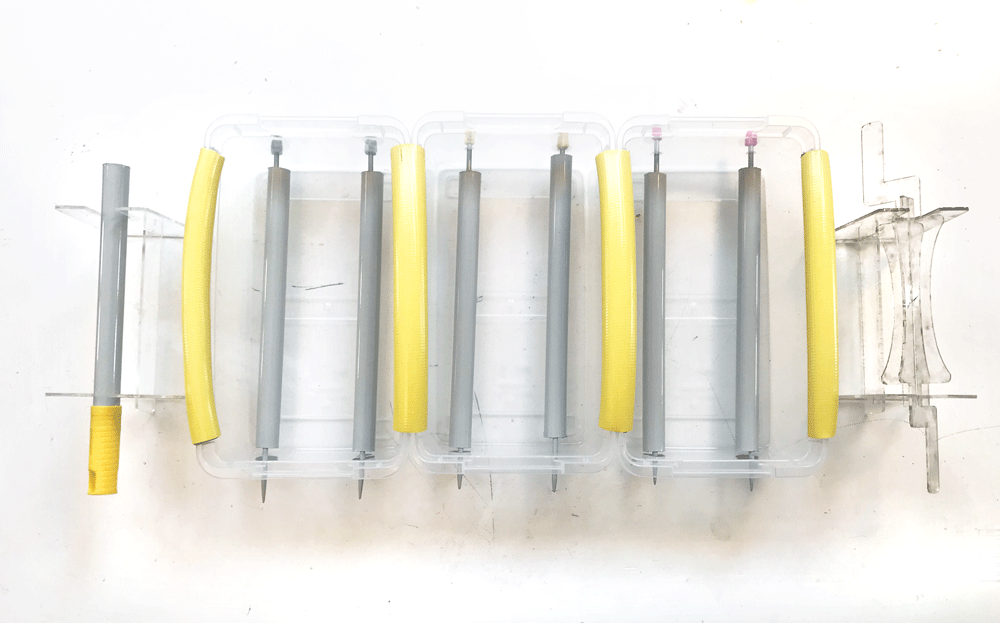
Mainly there are 3 techs: 1. Bath boxes assembling | 2. Roller tubes in knitting needles | 3. Yarn reels with a crank.
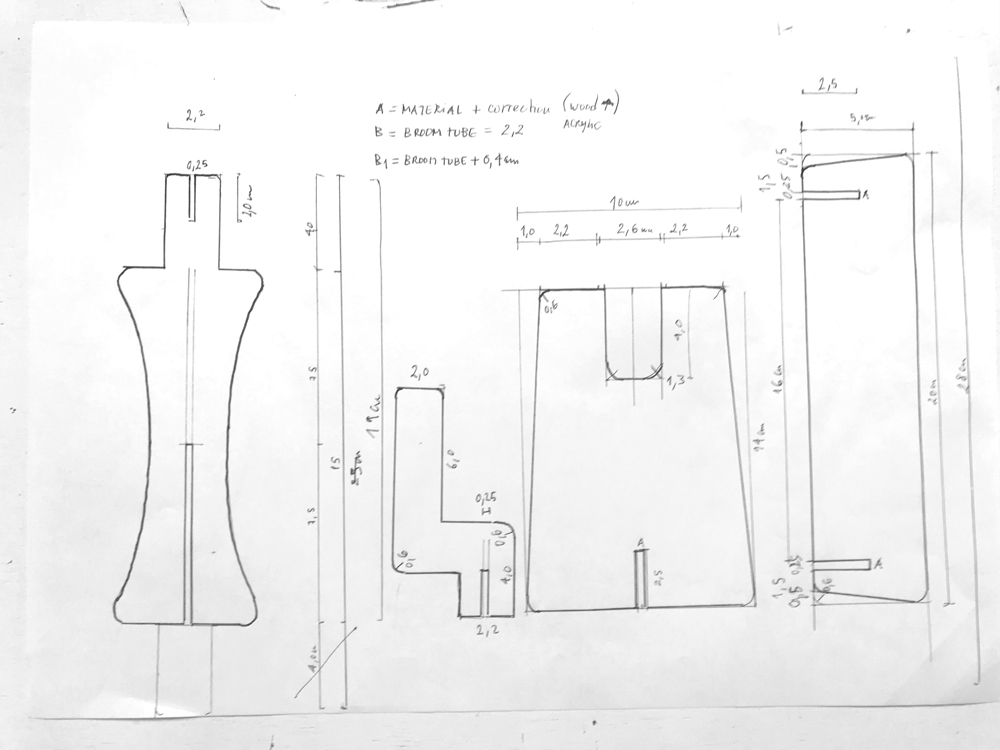
First I made drafts of what I needed. Then I made pen drawings in a paper, in real size, to better understand the final sizes.
As a proportion, I used the size of the broom tube (2,2 cm and 2,0 cm hole) and the short sizes of the plastic boxes (18 cm approx.). After selecting the wastes of acrylic to use in the lab, I downsized so I could make all the pieces in the same thickness (3mm).
After the first sketch of the Alginator, I decided that the crank should not be attached to the tanks allowing to use different sizes of plastic box tanks, and also for the free handling of the crank.
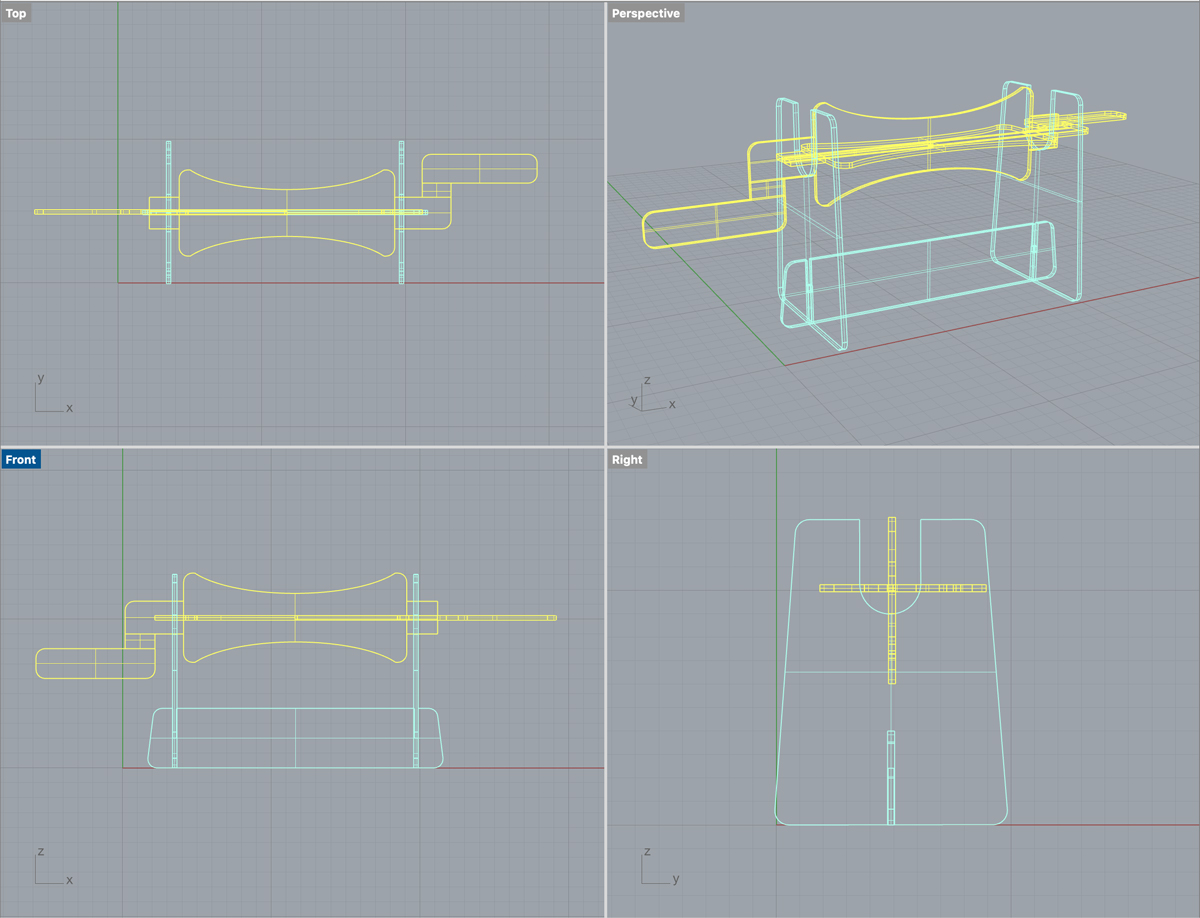
Finally, the technical drawings were made in 3D Rhino and exported to dxf.
 First draft for the Alginator, Carolina Delgado
Process
Materials
3 plastic boxes | 6 Kniting needles of 5 mm | 3 steel broom tubes | 1,5m of Ruber huse (2mm) | 3mm Acrylic board 50cm x 30cm | Silicon Pistol| Soldering iron | LaserCut machine
1. Bath boxes assembling
- With scissors or a knife cut 4 tubes of hoose with 26 cm.
- Then cut the in the longitudinal middle.
2. Roller tubes in knitting needles
- Cut the broom tubes with 27 cm. We need 6.
- Make a card mark with the size of the shorter side of the boxes. Mark the dots for the holes to put the knitting needles (4 cm from the bottom and 3 cm from the edges. Put the card inside the box and with a marker point the holes.
- Make 5mm holes using a soldering iron.
Alginator tanks assemble, Carolina Delgado
3. Laser Acrylic Yarn bases and a crank
- Cut a tube with 30cm to make a base for your yarn cone. Cut 2 pieces of 6cm of huse for the hadles of the crank.
- Create the files using Rhino and Illustrator and export as dxf.
- Laser cut them.
- Assemble all the pieces together.
- Finish the crank handles with 2 pieces of ruber huse with 8cm.

Alginator Crank 1, Carolina Delgado
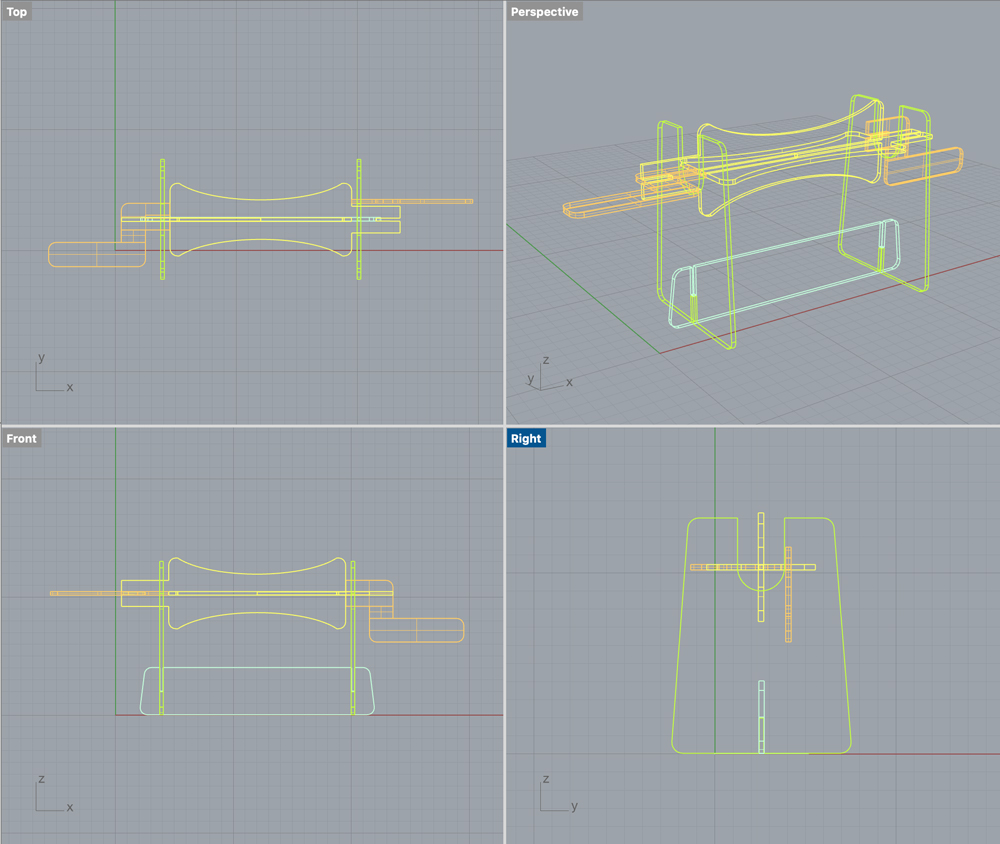
Rhino
General parts were made using Rectangle, then fillet (0.6 or 1.3). Extrude all the pieces 3mm (or the size of your material). BooleanDifference - selcect the polysurface to substract from, enter,(check delete input: on ) select polysurface to substract with, enter. (It's not cutting? Make shore that they are extrusions and not curves, and that they are on the same layers and level.) Export as dxf. I open after in Adobe Illustrator because the file was on 3D and I had to make it in 2D (clean the surface lines).
Alginator Crank views, Carolina Delgado
Alginator Crank 3D, Carolina Delgado
Laser Cut Acrylic
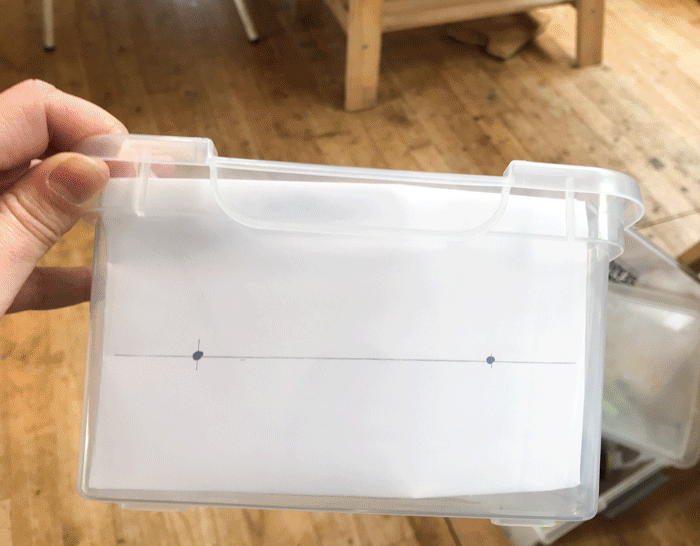
To make the crank and the yarn bases was chosen to use Acrylic instead of wood (cheap but not waterproof). First was made a test for the contractions of the material on the joints. The acrylic board had 3mm and I made a scale of 3.4/3.2/ 3.0/ 2.8/2.6.
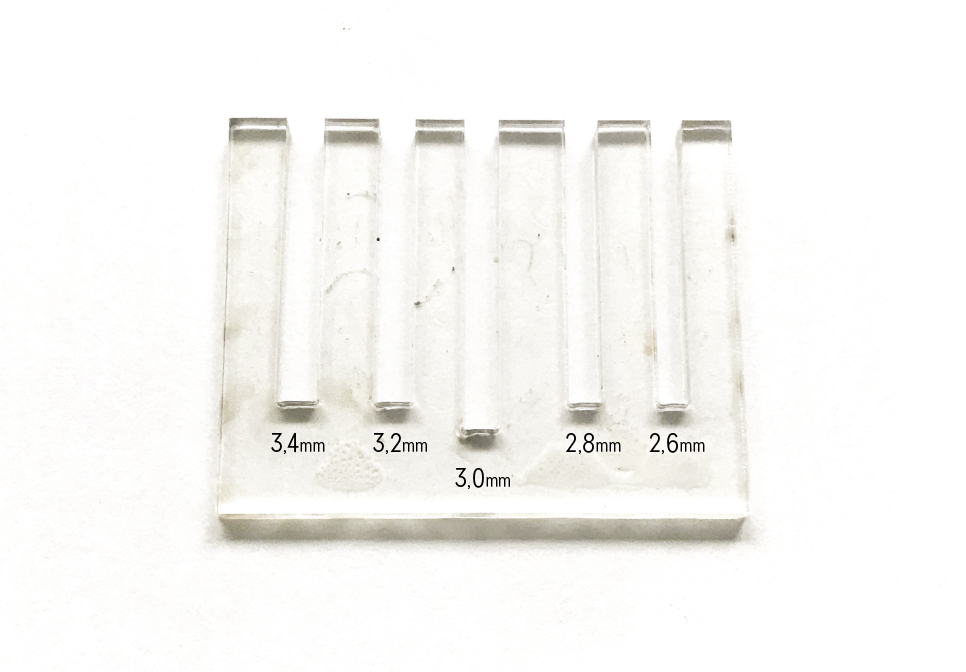
Joints thickness test, Carolina Delgado
- Speed 100
- Power 25
- Corner 20
- Mode: cut
1. Put the Acrylic on the machine.
2. Turn on the machine on the Key. Then Power On (button green).
3. Turn the ventilator on (green button on the black block). Warning! Never leave the machine unwatched!
4. Using the arrows of the machine Anchor the laser head on the corner of the Acrylic [to reset press ESC].
5. Use heavy woods or metals to fix the material (I did not need this).
6. Put the laser head manually on the spot.
7. Press Test.
8. Don't forget to download /upload your file to the Laser machine after deleting the previous work done by the same.
9. Close the tamp with both hands.
10. Switch on air bomb to filter the air.
11. Laser Schitch on!
12. Press Start.
13. Is the job done? Wait a minute to turn off the ventilator.<br
14. Turn of the Laser and switch off the power.
15. Open the door using both hands, remove pieces and let it clean.
Testing the acrylic joints resulted better on the 0,26 mm but still had some space. Therefore, I finished the 3D pieces with 0,25 mm joints.
The boards were leftovers from other works, so I had to plan different files and cut them apart.
Note: there was a problem with the file. I open the dxf in the Illustrator and simplified the lines (in Rhino they were surfaces and we need only curves). The test I made for cut and measure of the joints worked, but for some reason, the lased cut burned a lot of the pieces.
Therefore, I guess, the other problem with the file was the stroke measure? Or I need to change the power?
I made a final file in Ai with the cutting plan on a 50cm x 30cm board. This one includes: * a Crank with a yarn base for the coated yarn * an uncoated yarn base (21 cm) * extra feet for the uncoated yarn base for bigger cones (28 cm)

Alginator Crank and Yarn bases Cutting plan, Carolina Delgado
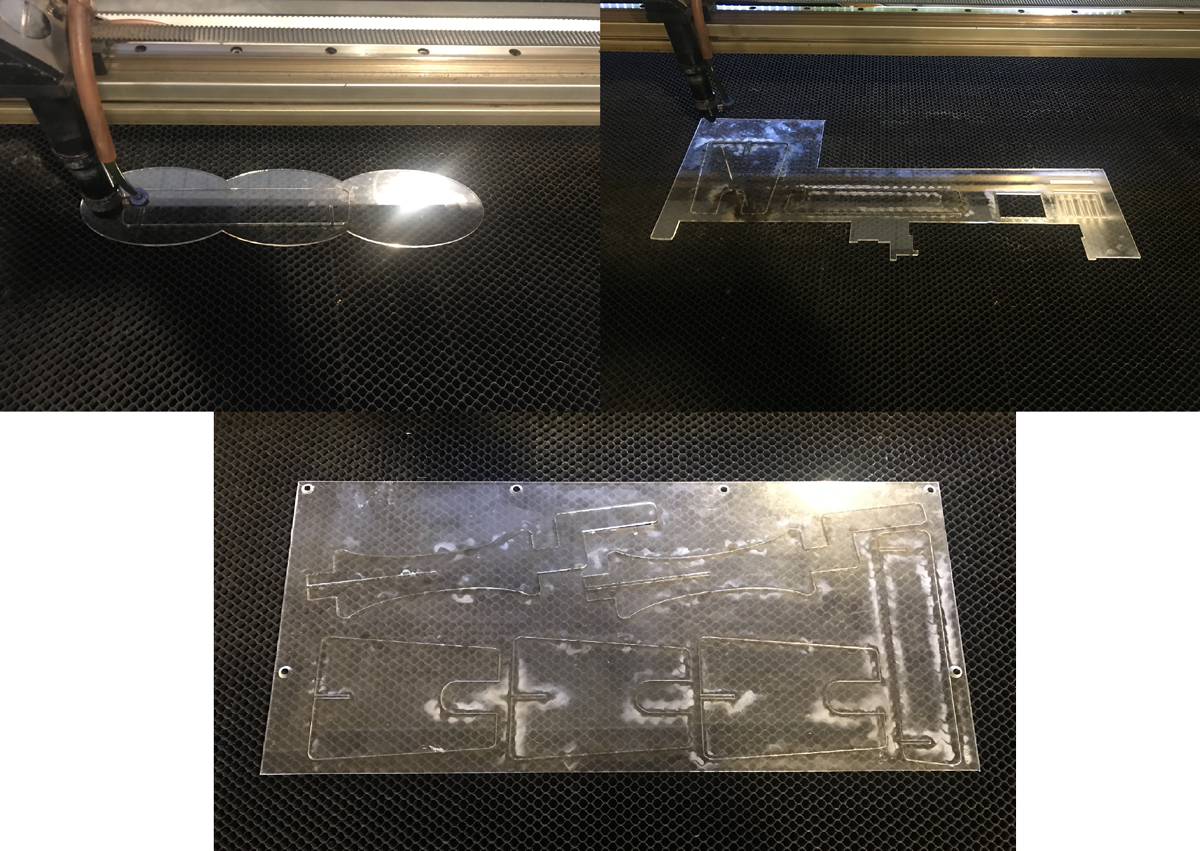 LaserCut Acryclic leftover boards, Carolina Delgado
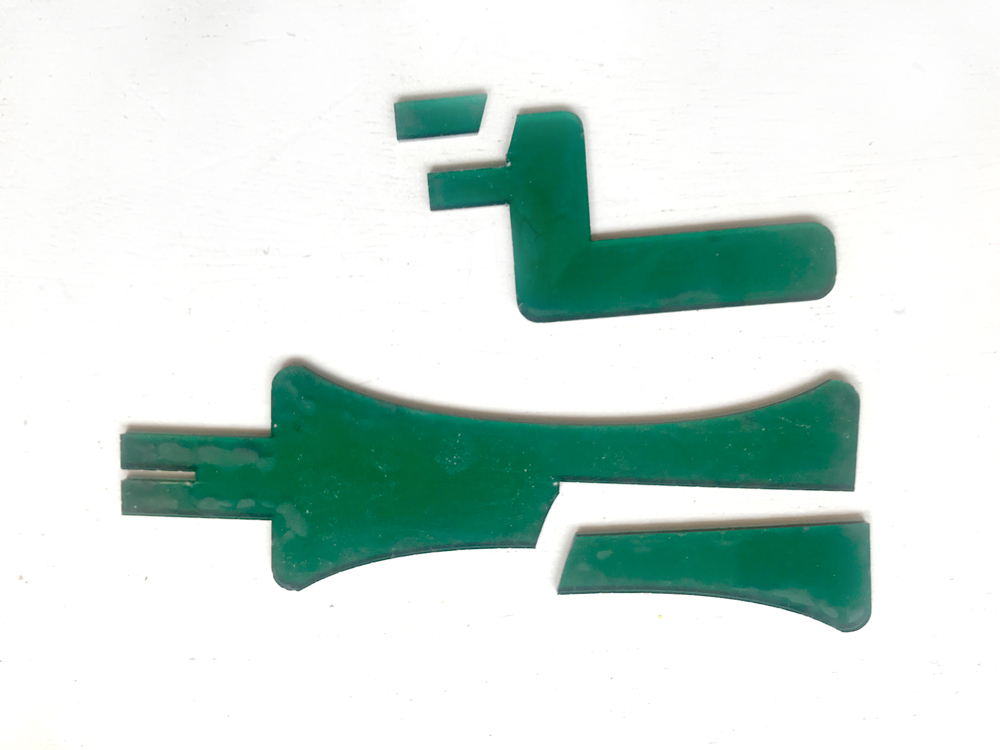
First Results
 The Alginator - first test, Carolina Delgado
The acrylic was cut without the plastic protection and the lines were perhaps very complex for the cut.
So I needed to make a new cuting plan in illustrator and cut it again. Also, Marguerite sugested that I cut the crank removable from the bioyarn bobine.
Next step is to recreate the new crank and Laser cut again.
 Alginator Crank 2, Carolina Delgado
Rhino
To create lines of all the pieces instead of surfaces, I used the Split and the Join menus:
- Command Split, then select the object to cut, press enter. Then select the object to cut with, press enter.
- Select the intersected lines and delete them.
- Command Join (puzzle icon), select all the lines and enter. This way you will have a close line instead of a group of open lines.
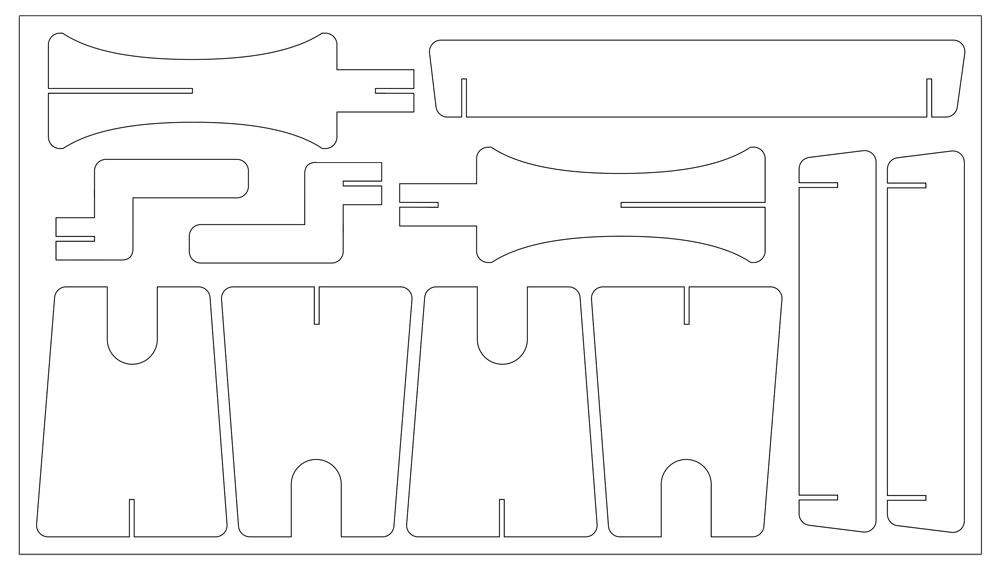
Alginator Cutting plan 50x28cm, Carolina Delgado
Alginator new Crank views, Carolina Delgado
Alginator cutting test 2, Carolina Delgado
This second laser cut test when assembled broked a lot (it was bigger then my sample test and burned less, so the joints were smaller) so I had to make a new plan with larger joints (3 mm). Also, I keeped the plastic protection and reduce the power to 80 so it did not burn so mutch. But it breaked some pieces on assembling, therefone it was needed a new test.
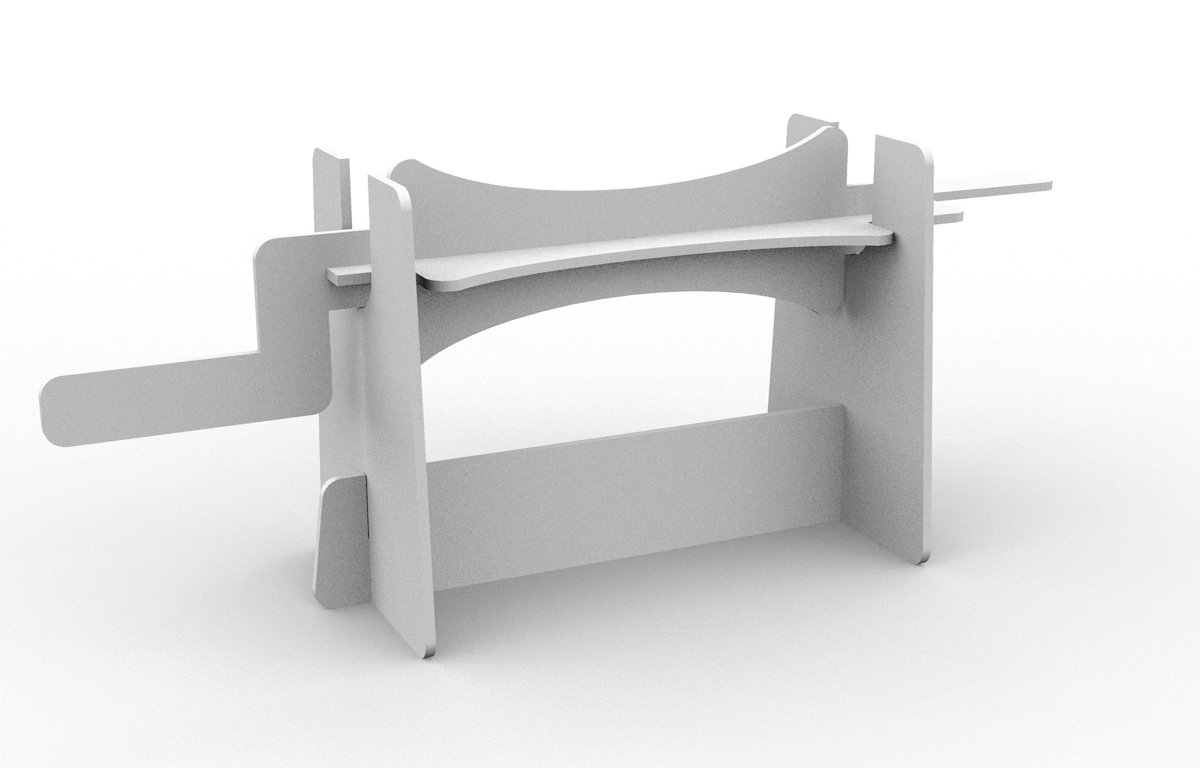
Final work with 3mm on the joints
I repeated the design with larger joints so it did not crack so much. I also bought a new type of acrylic helder at Dokter Plexiglass and asked and the shop how to LaserCut better. He told me that Power 65 was enough for this thickness, and also this sheet is double side protected.

Alginator final version, Carolina Delgado
3D Loom
Process
Materials
Plywood board with 50cm x 28cm | 200x inox nails or screws with 20mm x 2mm | LaserCut machine | hammer or screwer
Rhino
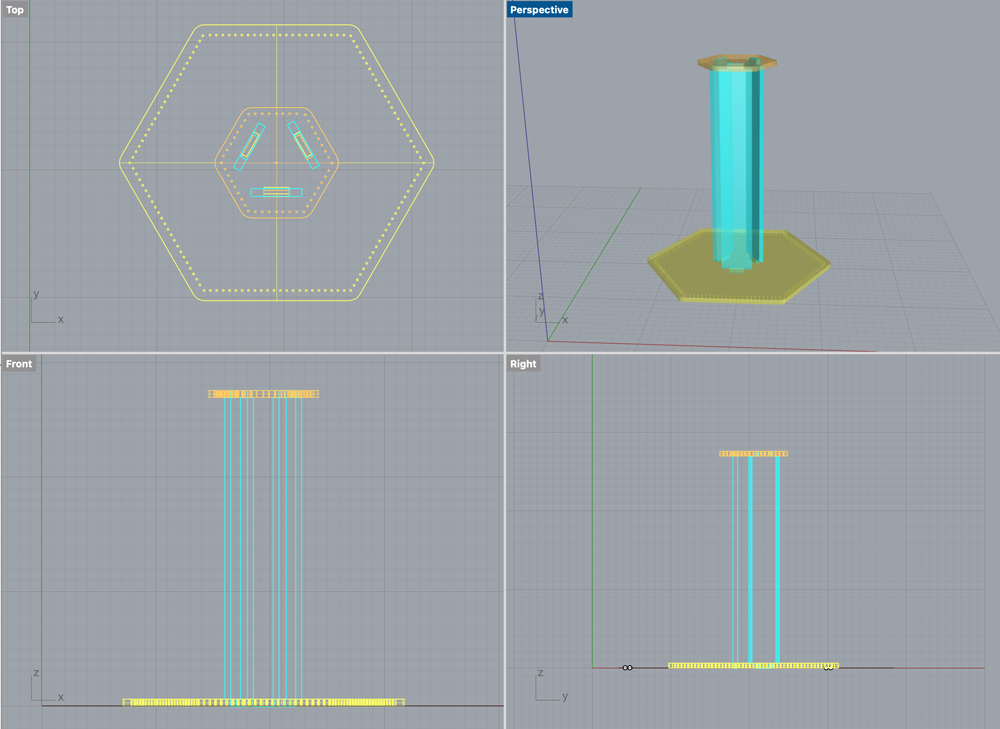
3D Loom views, Carolina Delgado
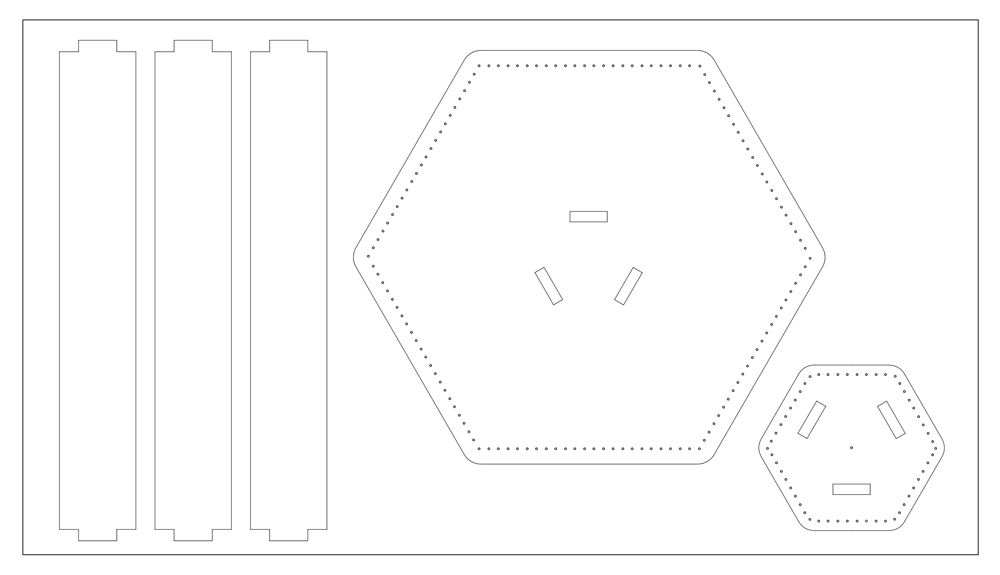
3D Loom cutting plan 50x28cm, Carolina Delgado
Laser Cut Plywood
- Speed 60
- Power 25
- Corner 20
- Mode: cut
1. Put the Plywood on the machine.
2. Turn on the machine on the Key. Then Power On (button green).
3. Turn the ventilator on (green button on the black block). Warning! Never leave the machine unwatched!
4. Using the arrows of the machine Anchor the laser head on the corner of the Acrylic [to reset press ESC].
5. Use heavy woods or metals to fix the material (I did not need this).
6. Put the laser head manually on the spot (use the wood foot).
7. Press Test.
8. Don't forget to download /upload your file to the Laser machine after deleting the previous work done by the same.
9. Close the tamp with both hands.
10. Switch on air bomb to filter the air.
11. Laser Schitch on!
12. Press Start.
13. Is the job done? Wait a minute to turn off the ventilator.<br
14. Turn of the Laser and switch off the power.
15. Open the door using both hands, remove pieces and let it clean.
Fabrication Files
Download 3D-Loom Laser-cut
Download Crank Laser-cut
References
Beautiful Spider Web Build Time-lapse | BBC Earth
Spider spreading silk outstreams a 25mt bridging line along the air, across the river. The stuffer natural fibre on the planet, stuffer than steel.
Spiral Spider Web Keeting from the center
How was it made? Golden spider silk
BURN TEST for Wool, Cotton, Bamboo and Acrylic Yarn, 10 Rows a day
PROJECT TIMELINE
This project had to include the limitation of time in the Lab (NL), because of the frequent flights to Lisbon (PT).
The plan was divided into 10 weeks and tasks were grouped in sequential order.

Project Timeline, Carolina Delgado