3. Circular fashion
This week was about creating 2D shapes that are interlocking to make a modular fabric or garment that also could become a 3D structure. The assignment was about circular fashion systems aswell, on how to not cause material waste as a part of the design process. I have to admit that my design was not really sustainble thinking but following more my intution with my framework.
Can´t touch this Bra
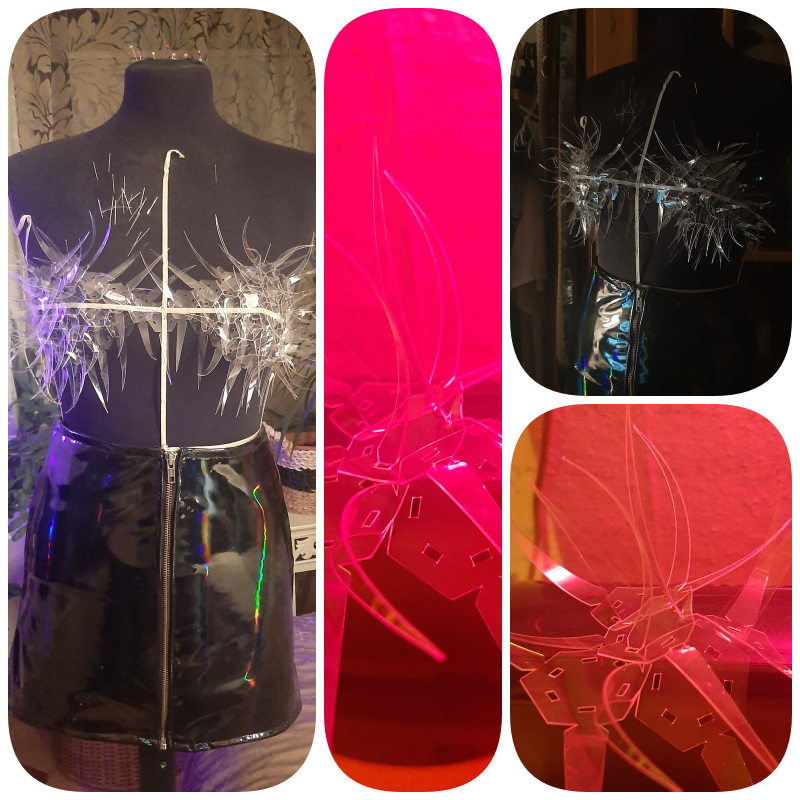
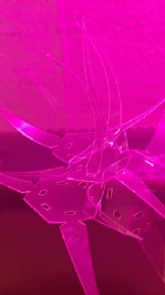
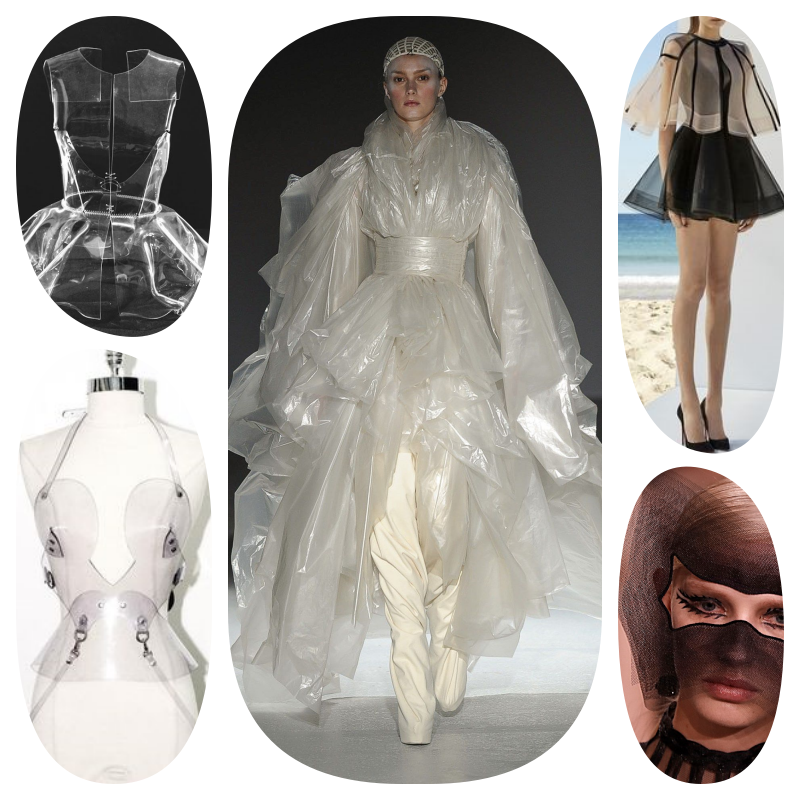
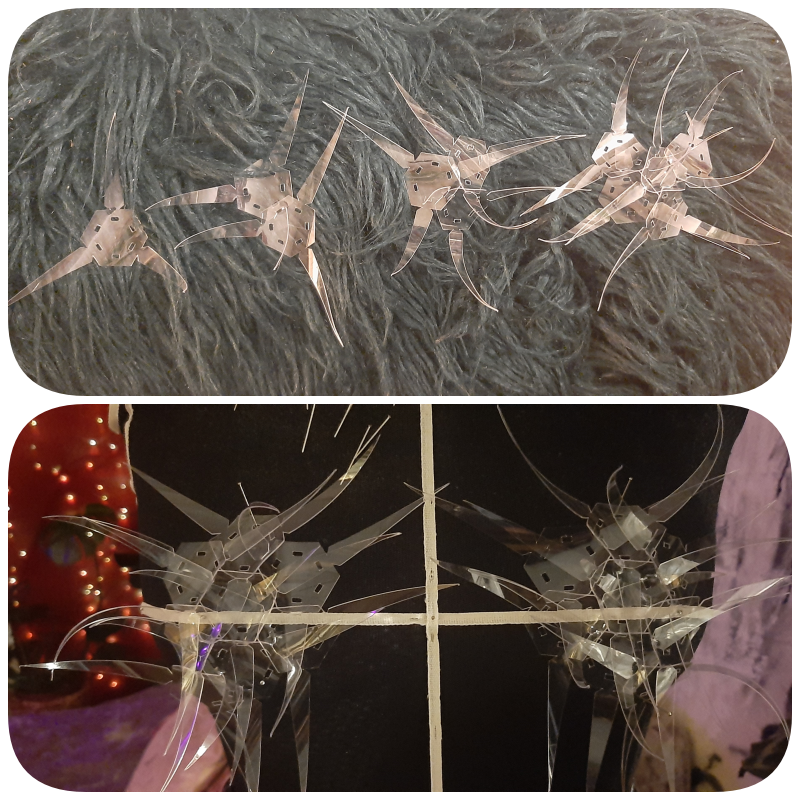
I had a role of PVC lying around and I thought the stiffness could make great 3D structures that are spiky. So I designed some moduls which would create that look and I chose a bra for a proto to start. The straps can also be designed to be interlocking with the moduls and I´d like to add some light to it. Probably this would make a great piece to go to the club. I already started to create a skirt to complement the Look. To get that effect, it is important to use the PVC of 0.3mm. I was going to various hardware stores to get more. I only got 0.2mm PVC which lies flat and I tried to make a different shape using a heat fan melting the ends.
Research
Getting a Vinyl Cutter
As I have to work from home the this weeks and I am also planning to build up a textile lab, I decided to get a vinyl cutter. I already was familiar with the cameo 3 and giving Shirt Design Workshops to kids. Anastasia from fabricademy recommended the Cricut. So we compared the models that cut fabric and other thick materials. I decided to check out the cricut maker and the cameo 4, what was my first research.
It took me a long time to decicide, cause it is also an investment for future designs. I really like the cricut cause it is better fabricated and comes wih a lot of tools, like a Scoring Wheel Engraving Tip and Debossing Tip. The software is easier to use but not as complex as the silhouette software. A Plus on on the cameo is the possibility to add a role and cut 3 meters. As I saw that there is a Plus version of the cameo that can cut to 38 cm wide I was totaly into it cause I could cut pants, slim sleeves, basic shirts etc. Then I also was thinking that I might manipulate some tools from for example the cameo curio with adapters so I also could engrave and so on.
So I ordered it!!! There is also a pro model coming out that can cut 50 cm wide, but it is not on the market yet. The difference to a lasercutter is that you can not use fabric that frays. In a lasercutter the fun thing is that the edges of chemical synthetics are melting and getting sealed. The good thing in a vinyl cutter is that you are able to cut the "bad materials", that you are not allowed to use in the lasercutter. The choice of PVC was only possible to be cutted with a vinyl cutter, cause of the toxic fumes it causes in the lasercutter.
My first Unboxing Video for the Cameo 4 Plus
Fashion Inspiration
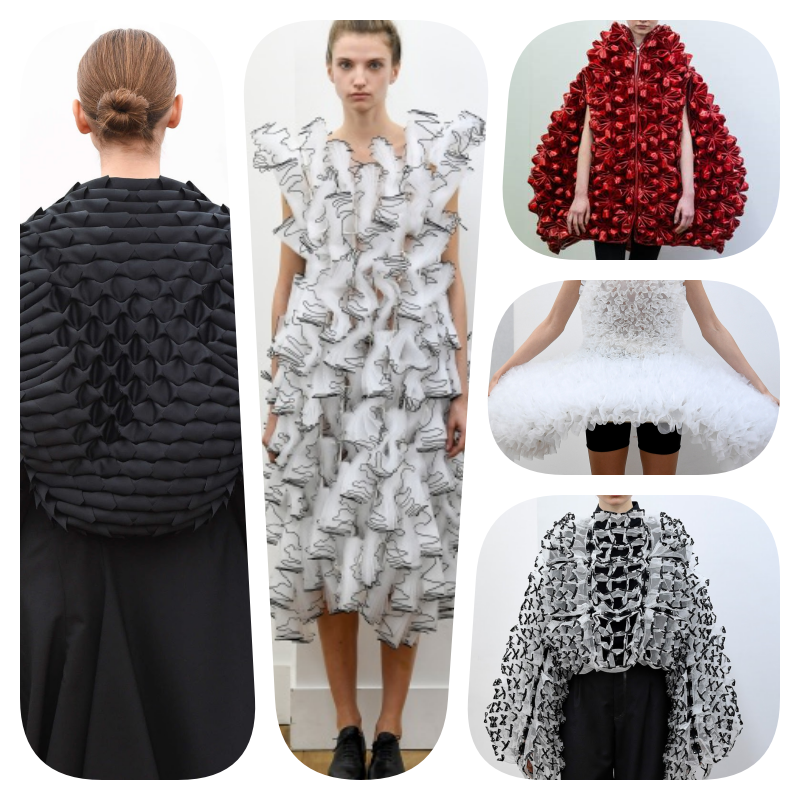
Noir Kei Ninomiya
I put a lot of the work from Noir Kei Ninomiya cause it has such a great palette of various designs with small shapes or even textile moduls creating volume and 3D structures. Also with simple stripes the designer created modular garments. Those techniques represented the topic of the week to me and could be a great inspiration for textile structures to digitaly design modular dresses with 2D shapes.

Substraction Pattern Cutting
I came across the work of Julian Roberts. As we also had a Seamly2D tutorial - digital pattern making open source software -. I want to investigate more and apply my pattern making technique -CONTEC- into that programme, making digital patterns that I could use for 2D designs in a laser- or vinyl cutter for example. This is quiet challenging when you never learned the principles of pattern making. The way Julian Roberts creates pattern is a playful technique to make creative dresses without any knowledge and is easy for everyone to start studying the behaviour of materials and shapes.
Julian Roberts creating a substraction dress pattern. Kobakant created Basic patterns you can download and may use for the substraction patterncutting or digital designs: Pattern Blocks free download from Kobakant
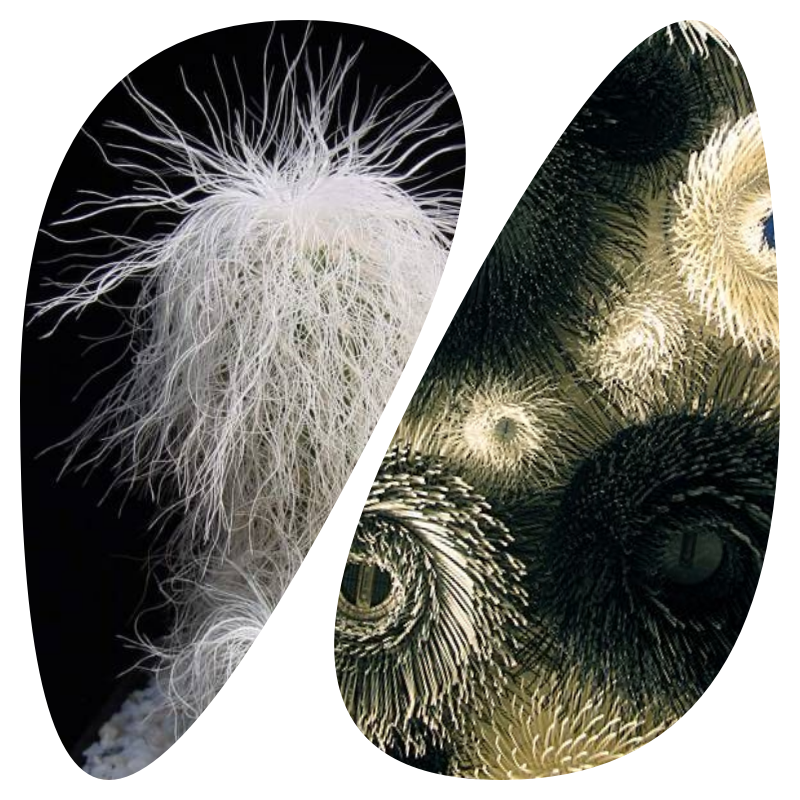
Moodboard
To define my vision I looked up hairy and spiky structures, looks and accessories with that kind of esthetics. Formerly I wanted to make a whole dress and combine the milky organza with the transparent PVC. This can be a project for later on.
Hairy Spiky Structures
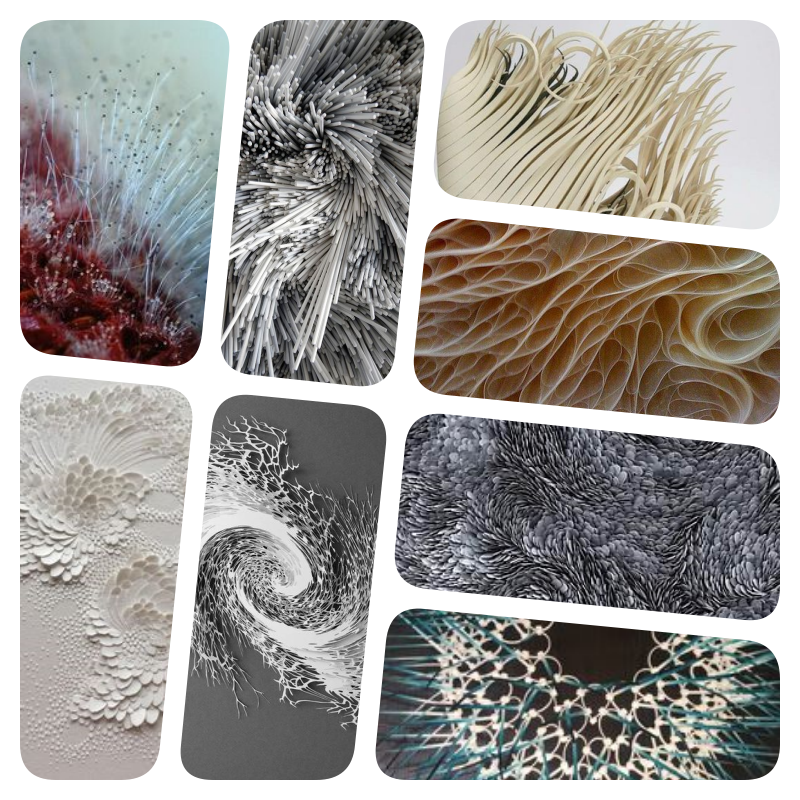
Hairy Spiky Fashion
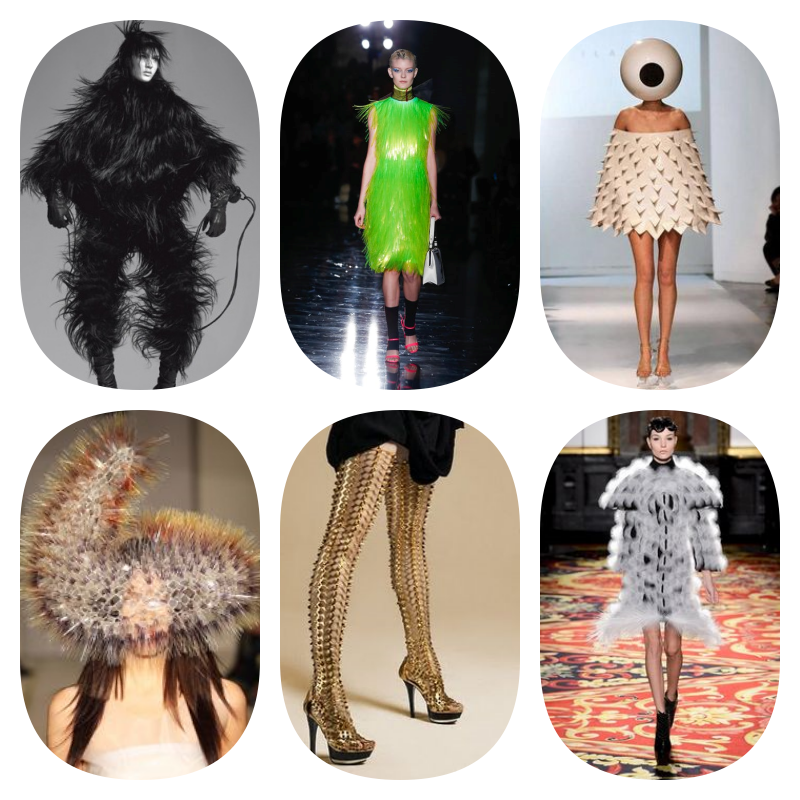
the Look
PVC and Organza
Design Process
As I was quiet clear about my idea, I just made a sketch of the modul to imagine the size and the assembling method.
Constructing the Modul in Rhino
I wanted to start getting familiar with Rhino as we also had the 2nd basic tutorial about it. I also thought it is more intuitiv and handy than Adobe Illustrator cause it is layed out more technical to contruct with exact measurements and arraying objects on objects. So Rhino is also great for designing in 2D.
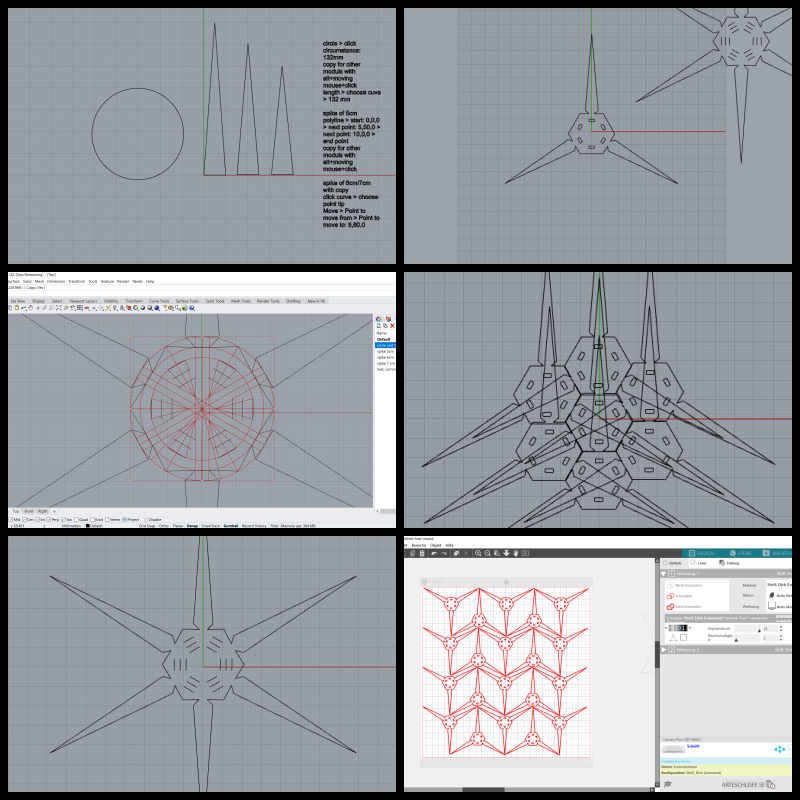
The first design process was a bit too complicated, as you can follow in the end of the section in the rhino commands. It is sufficient to use less commands and helping lines like for the second design with less spikes. The final design looks nicer when being assembled and also having bigger holes that makes it easier to assemble. The rhino file has to be exported as a .dfx file to be imported to the silhouette cameo software. In the software you can arrange the moduls on the digital cutting mat. The spikes made it hard to reduce waste. On one sheet could go 20 moduls.
Cutting the PVC with the Cameo 4
First of all I had to deflower my new cameo. I was excited to use the craft knifes I ordered extra, which are able to cut through 3mm ply wood even or a fabric roller blade, cause it just comes with an automatic knife originally. It was pretty frustrating and long time troubleshooting when I realised those craft knifes are just able to make straight cuts and are not really good for small and curvy shapes. The conclusion was therefore the knifes don´t move inside like the automatic knife, they just cut an arc into the material to change the direction, so it was only possible to cut the moduls with a automatic knife.
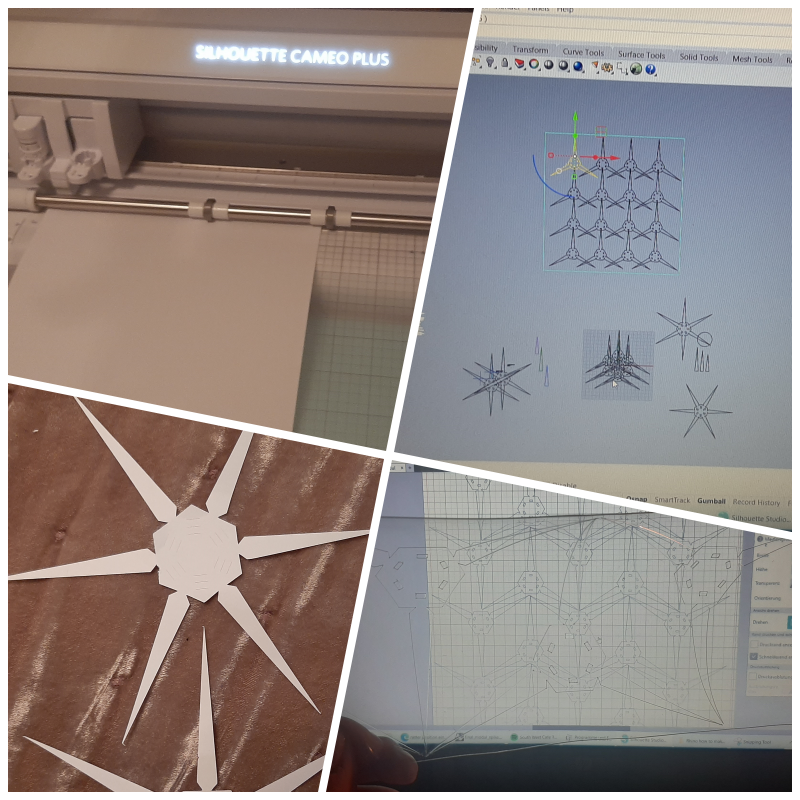

To cut through the pvc I made around 7 tests that I also documented for myself. The final setting needs around 5 passages, the highest pressure and very low speed -2- to get through the 0.3mm PVC. If you take 4 Passages, 33 pressure and 1 speed it takes 37 secs to cut the same circle. The whole sheet with 20 moduls took around 1 hour to finish cutting.
Non Sustainable Scraps
So one sheet with 20 Moduls caused that much waist. Any idea how to recycle PVC and make something new out of it?
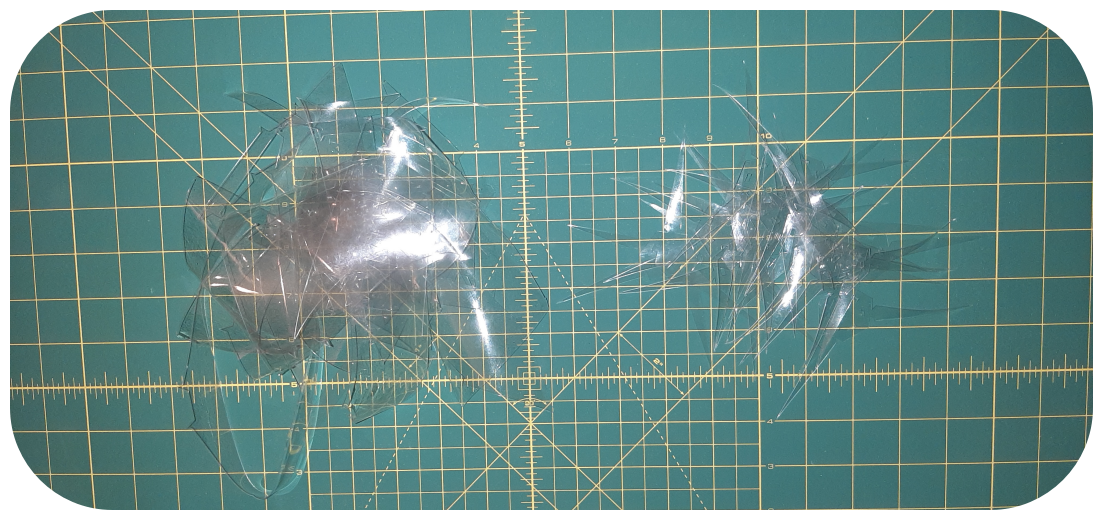
In a further assignment of textile as scaffold Anastasia was talking about a collaboration where the designer and her tested to use old PVC materials to melt and scaffold. It is actually too bad for the environment and health causing toxic fumes. This requires a professional industrial solution that can´t be fulfilled in a Lab.
Assembling the Moduls
Commands for Rhino
Rhino creating a modular piece

comands:

circle > click circumstance: 132mm
copy for other moduls with alt+moving mouse+click
length > choose cuve > 132 mm

spike of 5cm
polyline > start: 0,0,0 > next point: 5,50,0 > next point: 10,0,0 > end point
copy for other moduls with alt+moving mouse+click

spike of 6cm/7cm with copy
click curve > choose point tip
Move > Point to move from > Point to move to: 5,60,0

Join and explode !!
group is not join !!
points on fn F10
for exampel selall > zoom selected: ZS
hide and show sel obj
insert points
extend and trim
rebuild
rotate: select angle or refrence point on obj to turn in circle
hatched areas can be engraved cause it is like an image to rhino
rotate 3d in axes
select color layers
scale f.e. select a point and you want half type 0,5. or choose other side ob obj end type in size
distance
scale 1D in one diretion inbetween 2 referent points or type size
trim select the object inbetween you wanne trim

put middle points on spikes
Command: InsertEditPoint
Point on curve to add edit point. Press Enter when done

Command: ArrayPolar
Center of polar array ( Axis )center of circle

Number of items <2>: 2
Angle to fill or first reference point <-180.288> ( Preview=Yes  StepAngle  Rotate=Yes  ZOffset=0 ): 180
Press Enter to accept. FillAngle = 180 ( Items=2  FillAngle  Rotate=Yes  ZOffset=0 )

Command: ArrayPolar
Center of polar array ( Axis ) centre of circle
Number of items <6>: 6
Angle to fill or first reference point <180> ( Preview=Yes  StepAngle  Rotate=Yes  ZOffset=0 ): 360
Press Enter to accept. FillAngle = 360 ( Items=6  FillAngle  Rotate=Yes  ZOffset=0 )


Command: Rotate helping lines
Center of rotation ( Copy=Yes  UseLastCenter )
Angle or first reference point <45> ( Copy=Yes ): 45
Angle or first reference point ( Copy=Yes ): 60
Angle or first reference point ( Copy=Yes ): 105
Angle or first reference point ( Copy=Yes ): 120
Angle or first reference point ( Copy=Yes ): 180
Angle or first reference point ( Copy=Yes ): 240
Angle or first reference point ( Copy=Yes ): 300

Command: Offset line under spikes to both direction
Side to offset ( Distance=3  Loose=No  Corner=Sharp  ThroughPoint  Tolerance=0.001  BothSides  InCPlane=No  Cap=None ): 2
Side to offset ( Distance=2  Loose=No  Corner=Sharp  ThroughPoint  Tolerance=0.001  BothSides  InCPlane=No  Cap=None )

Command: Rotate offset lines from centre to middlepoints of spikes
Center of rotation ( Copy=Yes  UseLastCenter )

Command: _Line from spike sides to cross points of offset circle and helping lines
Start of line ( BothSides  Normal  Angled  Vertical  FourPoint  Bisector  Perpendicular  Tangent  Extension )
End of line ( BothSides )

Command: Rotate both lines to other spikes
Center of rotation ( Copy=Yes  UseLastCenter ) from circle center to circle edge

Command: Offset inner circle
Side to offset ( Distance=3  Loose=No  Corner=Sharp  ThroughPoint  Tolerance=0.001  BothSides  InCPlane=No  Cap=None ): 2
Side to offset ( Distance=2  Loose=No  Corner=Sharp  ThroughPoint  Tolerance=0.001  BothSides  InCPlane=No  Cap=None )

Start of polyline ( PersistentClose=Yes ) from inbetween spikes line circle make a triangle connecting to grid
start with 3 mm on both sides to get 6 mm line
Next point of polyline ( PersistentClose=Yes  Mode=Line  Helpers=No  Undo )

make a line from new crossing points and also on middle offset circle for slimmer interlocking part of spike
and make lines from ther to outer circle middle point between spikes

rotate all from center and copy like before

group interlocking holes and offset to get more variety for interlocking

explode spikes and change triangle base to layer helinglines red

join all open curves by cliking the otside boarders
Fabricademy Lectures: Circular Fashion
Fabricademy 20-21 WEEK 3 OS CIRCULAR FASHION from Fabricademy, Textile Academy on Vimeo.