10. Wearables
TO BE EDITED...
This week I was experimenting with soft circuits to make wearables.
E.T. to call home Synth
Oscillator with Piezo Output + soft Capacitor/Potentiometer Sensor Input
This is my raw circuit which will be integrated into a swatch to use as a wearable noise synth
I was using a Flora Microcontroller and added two Inputs for Metal tools one on the Piezo Pin and one on the 3.3V Pin to use it as an oscillator and produce more varieties of sounds. My experimentation on this and the process of the soft synth will be uploaded soon.
Inspiration and Experiments
Circuit
Circuit Drawing

Circuit Sketch on Swatch

Capacitive Piezo Sound
This is a code mixed with the capacitive sensor and potentiometer including arduino tones.
#include <CapacitiveSensor.h>

#include "pitches.h"
// notes to play, corresponding to the 3 sensors:
// 21 pitches
CapacitiveSensor   cs_4_8 = CapacitiveSensor(10,9); // 1M resistor between pins 4 & 8, pin 8 is sensor pin, add a wire and or foil

int notes[] = {
NOTE_B0,NOTE_C1,NOTE_D1,NOTE_E1,NOTE_F1,NOTE_G1,NOTE_A1,
NOTE_B1,NOTE_C2,NOTE_D2,NOTE_E2,NOTE_F2,NOTE_G2,NOTE_A2,
NOTE_B2,NOTE_C3,NOTE_D3,NOTE_E3,NOTE_F3,NOTE_G3,NOTE_A3};

int Tone = 0;
int speakerPin = 2;

void setup() {
// do nothing

cs_4_8.set_CS_AutocaL_Millis(0xFFFFFFFF);// turn off autocalibrate on channel 1 - just as an example
   Serial.begin(9600);
   pinMode(2,OUTPUT);
Serial.begin(9600);
}

void loop() {

// get potentiometer input
long sensor1 =  cs_4_8.capacitiveSensor(50); // 0 – 1023

// calculate corresponding, divide by 49 as we have 21 pitches. 1023/13 ~ 21
//int pitch = sensorValue/49;

Serial.println(sensor1);
  // map the sensor reading to a range for the
  // speaker
  tone(2, 440 * pow(2.0, (constrain(int(map(sensor1, 0, 1023, 36, 84)), 35, 127) - 57) / 12.0), 1000);
  delay(10); // Delay a little bit to improve simulation performance

}
Thanks to Adriana Cabrera helping me to create the code I wanted for my wearable project
Experiments
Research
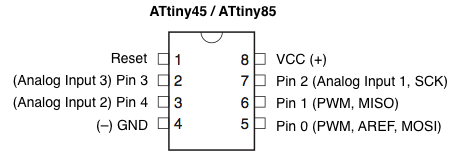
ATTINY
Arduino
Notes from the tutorial
Using enamelled copperwire it requires to be prepared for connection. To get rid of the isolation it is possible to use Acetone, rubbing it off with sandpaper or using heat to burn it off(for example with a simple lighter).
By checking the Datasheet of the Transistor (I used the MOSFET IRF530N) if it is compatible with the Powersupply and Voltage of the Arduino. See the Specification for Gate-Source Threshold - Voltage VGS(th) VDS = VGS, ID = 250 μA 2.0 - 4.0 V (If the Powersupply has 5V a rate inbetween here is fine, everything above won´t let the current flow)
Useful links
- Tinkercad Circuit Simulator
- Actuate fabric into smocking pattern
- Connecting fibre optics to garment
- Fibreoptic Poetry Project
- 10 Embroidery Stitches Tutorial
- Chain stitch tutorial
Sewing and Embroidery
- Kobakant Basic Patterns dxf files for download
- Hand stitiching techniques
- 10 Embroidery Stitches Tutorial
- Chain stitch tutorial
Links from the Tutorials
- Flip Dot Dress by Pauline van Dongen
- Flip Dot Dress making proces
- Pauline van Dongen
- Fabric Speaker Swatches
- Woven Speaker
- Fabric Speakers 2
Supply
Datasheets of my Hardware
Gallery

Thanks to Adriana Cabrera helping me to create the code I wanted for my wearable project
Experiments
Research
Notes from the tutorial
Useful links
- Tinkercad Circuit Simulator
- Actuate fabric into smocking pattern
- Connecting fibre optics to garment
- Fibreoptic Poetry Project
- 10 Embroidery Stitches Tutorial
- Chain stitch tutorial