6. BioFabricating Materials
This week I was super excited to work with mycomaterials, food waste and Kombucha! We gathered a lot of orange peels, banana peeels, coffee grounds, eggshells and other biowaste and we made sure we used the dehydrator to remove all the water from in there in advance and then grinded them in order to prepare for this weeks Biofabrication classes! We did the same with the Kombucha scoby as we started preparing it a couple of weeks ago.
This week's assignment:
-Produce at least two grown and/or two crafted materials:

-Grown materials - Grow a material, experimenting with at least 2 different recipes and variations thereof. Document the process, ingredients, changes, describe and compare the materials.

-Craft materials - Craft a material, experimenting with at least 2 different recipes and variations thereof. Document the process, ingredients, changes, describe and compare the materials.

-Document your recipes, the ingredients and process and if there have been changes, document your unexpected discoveries.

-Name your materials, classify them by typology and display them in a systematic order of samples.

-EXTRA POINT Submit some of your swatches to the analog material library of your lab. (20cm *20cm aprox)
Research- Alternative photographic processes, biocircuits, DIY intimate health(care) and more
Printing with Kombucha
Through my own bioart and biohacking research I came across the work of Michaela Davidova who uses Kombucha Scoby as a bio-photographic material. She has also been experimenting in order to find botanical or ecofriendly alternatives for replacing the cyanotype chemicals, Ferric Ammonium Citrate and Potassium Ferricyanide since she is interested in an environmentally friendly approach to developing and printing.
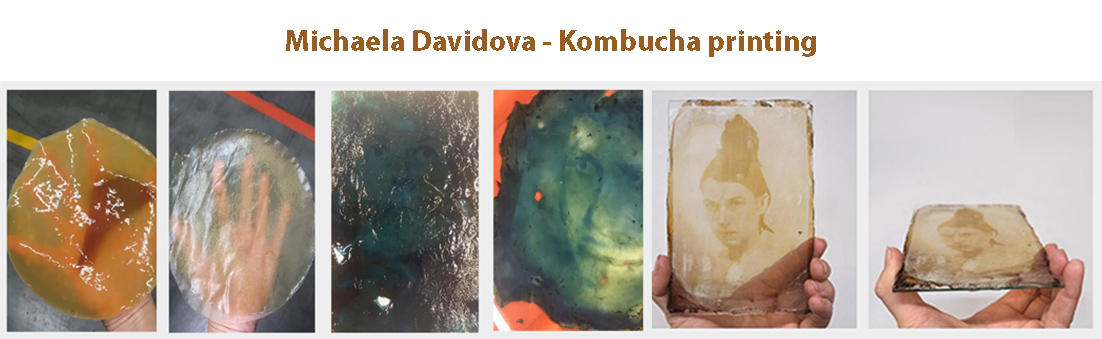
Photos of work and interview of Michaela here
Cyanotypes on bioplastics- Martha Gray
In Martha Gray's bioplastic cyanotypes she uses an agar based bioplastic recipes from Anastasia Pistofidou's Bioplastic cook book. She combines cyanotype chemicals such as Ferric Ammonium Citrate and Potassium Ferricyanide to expose her negative acetate sheets or other found objects on the biomaterial sheet.
Martha Gray is a London based artist and curator, who has worked with alternative processes for the past seven years. Gray’s practice explores personal relationships to the ‘natural’ through experimental photographic processes, with ongoing research into the use of cyanotype as a contemporary method.
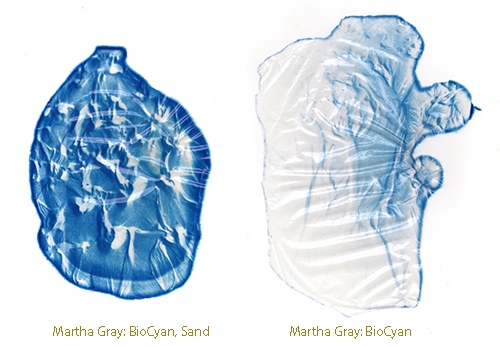
Images from Interaliamag
After having a discussion with Cecilia Raspanti she mentioned that I can use fugitive dyes such as cabbage and Hibiscus instead of the cyanotype chemicals and create solar prints on my bioplastics! I have some Hibiscus dye left from the Biochromes week so I can start experimenting with that soon. This is definitely an area that I want to explore in the future.
Future Flora- Giulia Tomasello
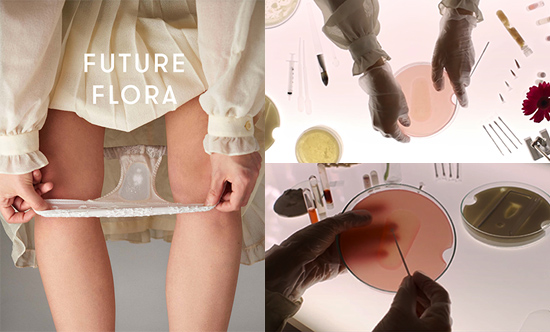
Open source intimate health, gelatin pads with probiotics to combat intimate infections by Giulia Tomasello
Elisabeth Lorenzi biosensors and fabtextiles conductive biomaterials
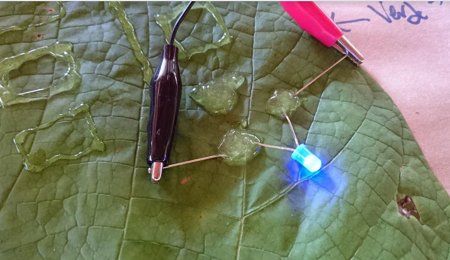
REPENSANDO LOS MATERIALES DESDE LOS E-TEXTILES. BIOMATERIALES, INNOVACIÓN y SOSTENIBILIDAD por Elisabeth Lorenzi
From "Work and Progress within the Seminar Skin2" at FABTEXTILES
Kombucha healing 2nd skin from Lorena Trebbis Kombucha lecture
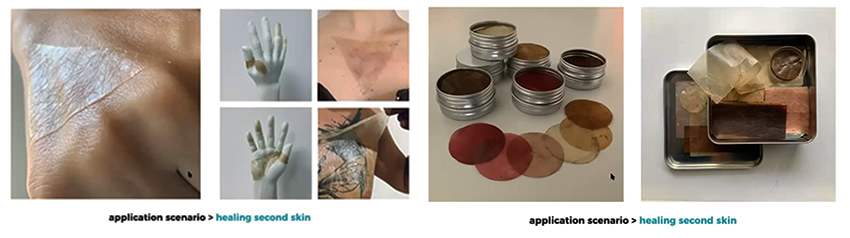
I have been super intrigued by the idea of researching biomaterials, crafted or grown, and their applications in medicine, healthcare or selfcare in general. In this instance, when Lorena mentioned how one of the possible application scenarios of bacterial cellulose is that of healing the skin.
The characteristics of the material that allow it to become a healing second skin are: -It is 100% biocompatible (used in medical field for living implants and it is suitable to have contact with living tissues inside and outside the body) -It is hydrophilic (it is) -Curative properties (wounds) -Tattoo aftercare
Grown material explorations
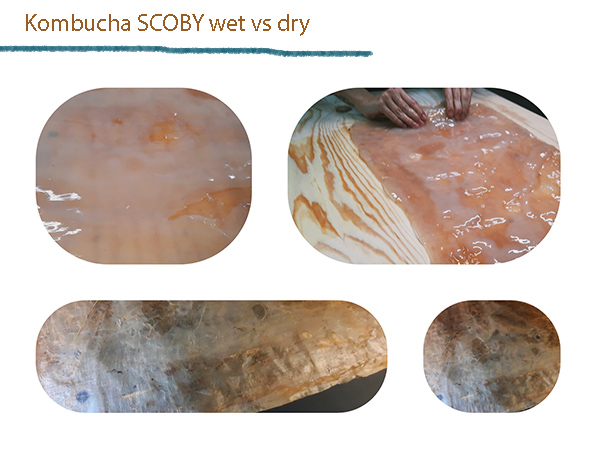
I have some experience with growing bacterial leather or cellulose but I never attempted to go to the next step and try and manipulate, or hack as i say,the colour, texture, shape or combine digital fabrication with this material unfortunately. Not yet! At first, I think its important to get to know and care for the material because after all you are growing a living organism. Getting to know the material through sensory and empirical experience and spend some time analysing its properties is also key and I would say that this week I got a little closer to fullfilling my sensory experience with this material.
Fermina, our bacterial girl!
Fermina was one of our bacterial leather cellulose babies from the fermentation cupboard! We also have the mother of Fermina and from a new scoby we also started Shiro, another bacterial leather baby).
Saying goodye to Fermina gif video- taking Fermina outside her tub, washing her and preparing her to dry
We saved up all the liquid and remnants of our dear Fermina for future cultivations and I was very curious to save up a sample from the liquid and other bits for my microscope experiments. There is a lot of research going around the human microbiome but also on the microbiome of Kombucha SCOBY as a probiotic. It is very interesting to see how scientific, multidisciplinary and citizen science discoveries and projects are reshaping our bodily and more than human perceptions and relationships.
Here is the recipe for bacterial cellulose or bacterial leather or as otherwise known as SCOBY (Symbiotic Culture of Bacteria and Yeast), the "waste" byproduct of Kombucha brewing that we are transforming into a waste resource.
Kombucha recipe
-1 ltr of black or green tea
-120gr white sugar (Fermina looooves white sugar!)
-1 Kombucha SCOBY
-1 clean container (plastic or glass! Fermina hates metal and it affects her growth)
-You can also use natural dyes or food dyes to modify or hack the colour of your growing baby!
Method
-Brew 1 ltr of black or green tea
-Add at least 120gr of white sugar and stir until the sugar is fully dissolved then place in a sterile container and let it cool down!
-Measure the temperature! Ideal temperature: 30 degrees celcius
-Add Kombucha Scoby and its liquid
-Cover your container with a fabric or lid but do not seal it as we need some airflow
Other Kombucha Scoby tips from the Kombucha Lecture by Lorena Trebbi
Modifying the colour of your bacterial cellulose
-Beer: 500 ml beer, 500 ml water, vinegar (for pH adjustments), 100gr sugar (10%) and scoby

-Red wine: 0,75l wine, 100 gr sugar, vinegar (for pH adjustments) and scoby

-Red wine recipe 2: 0,75 wine, 100 gr sugar and 0.75l scoby starter
Modifying the shape and form of your bacterial cellulose
-You can mold it using a CNC mold after it is harvested
-You can lasercut it
-You can modify the texture by using different surfaces for the scoby to dry on!
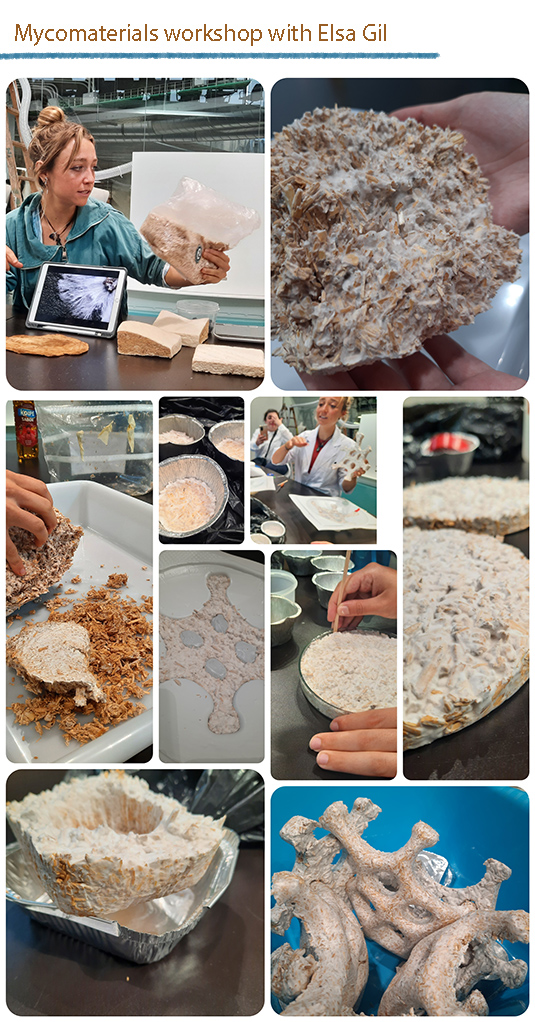
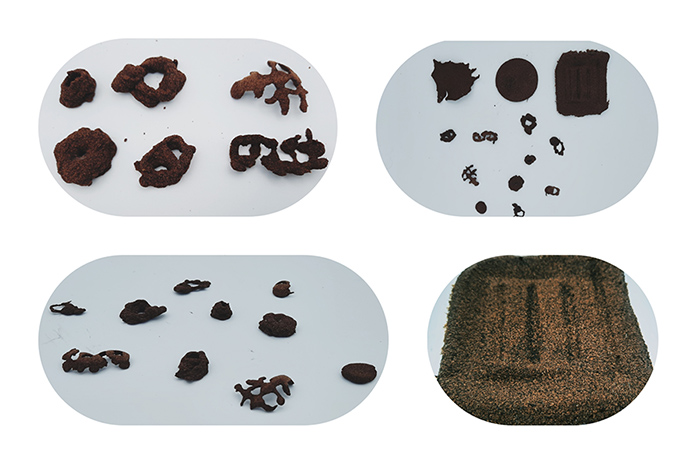
Mycomaterials workshop with Elsa Gil
On Wednesday we had the pleasure to participate in a Mycomaterials workshop by Elsa Gil. Elsa demonstrated how to use mycelium in combination with different molds and how to modify the appearance of the texture and colour of the mycomaterial.
Myco process, by Elsa Gil
-Sanitize your molds and surfaces with ethanol and clean your hands
-Break the mycelium to its minimum
-Add flour (this is food for our mycelium, 30gr per kg of mycelium)
-Incubation: Cover with a sanitized plastic bag for 2-3 days with 18-25 degrees celsius and 80% humidity and leave a small hole in the opening so the babies can breathe
-OUT-IN PROCESS: Remove the babies from the molds and leave the mycelium for 1-2 days if you want to grow skin or leather or you can leave it in for a week to get a more brown colour (same conditions, in a bag, same temperature and humidity as above)
-Drying process: 150 degrees celcius in the oven for 40 mins or exposure to the sun (during this time we will observe a shrinkage up to 70%)
Crafted Biomaterial exploration- The micro/macro/micro version
I have been for a few years now a microscopy enthusiast and a lover of the micro world! During this week I have been using microscopy as a tool to explore the morphology and properties of raw materials such as salt, coffee grounds, eggshels, eggshel skin and orange peels. Later on I decided to try and put these micro images of the raw materials aside the micro images of the final crafted biomaterial or biocomposite itself and observe and document any structural and morphological changes!
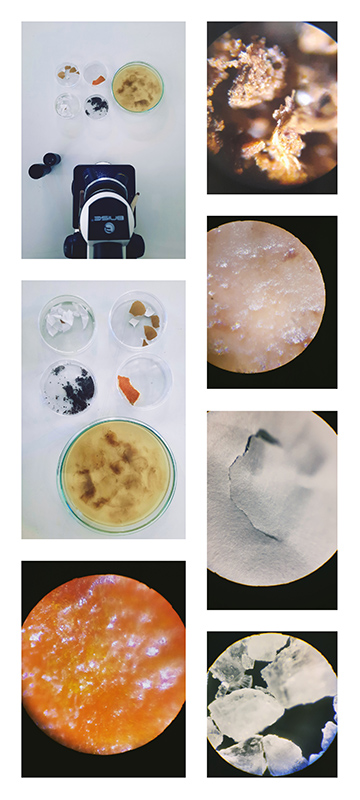
The micro version- Our raw materials under the microscope, from left to right- orange peels, coffee grounds, eggshell, eggshell skin and salt
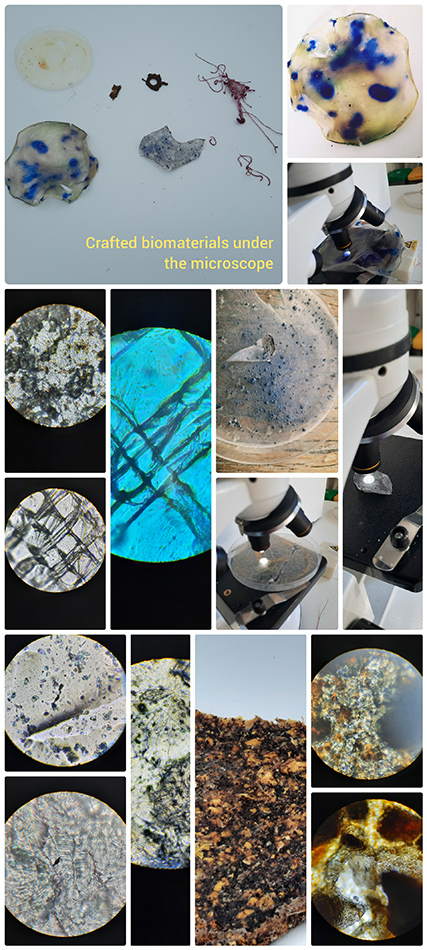
The macro/micro version- Crafted biomaterials under the microscope
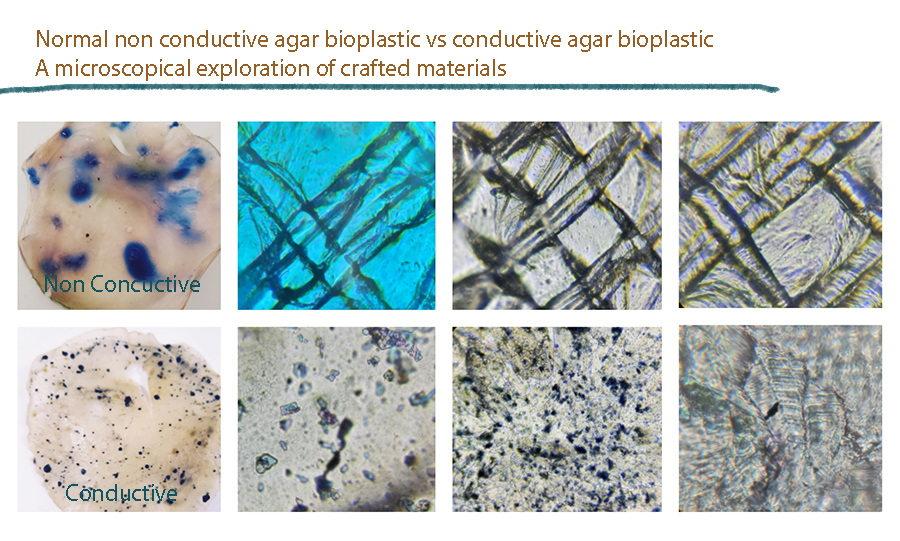
We analysed and used the crafted biomaterial (macro) under the microscope (micro) again! Here on the top we are comparing the crafted conductive and non conductive agar bioplastic
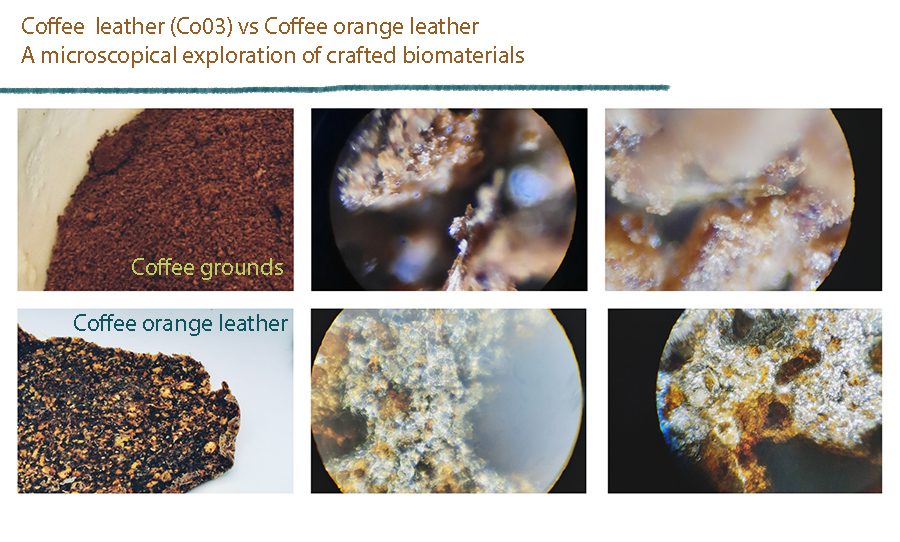
Comparing raw coffee grounds and crafted Coffee orange leather biocomposite
Experimenting with crafting alginate yarn, conductive and non conductive agar, coffee and coffee orange leather and coffee biocomposites
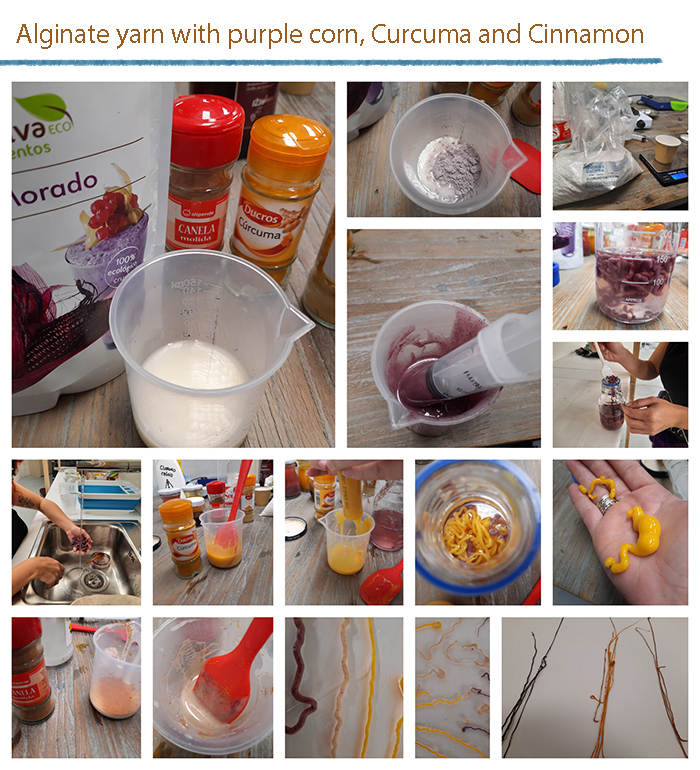
Alginate yarn
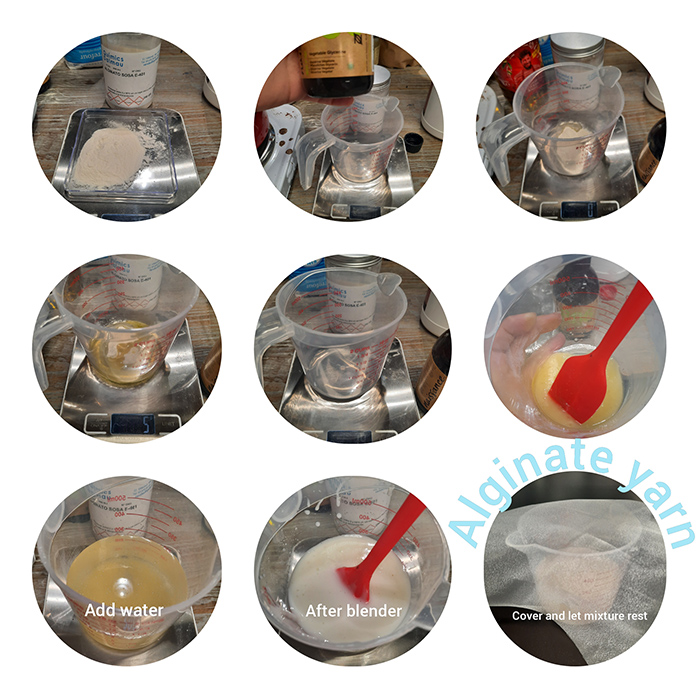
Recipe from fabricademy alumni Loes Bogers
Ingredients
-Sodium alginate powder - 6 gr- the polymer (so it becomes a solid)

-Glycerine - 10 gr- the plasticizer that bonds with the alginate (makes it flexible).

-Water - 200 ml/gr- to dissolve and mix the polymeer and plasticizer

-Optional: use a (diluted) natural dye instead for a colored plastic

-Sunflower oil - 5 gr- filler to reduce shrinkage

-Calcium chloride solution 10% - 300 ml (30 gr to 300 gr water)- is the curing agent: calcium chloride attracts moisture very strongly: spraying it onto the alginate plastic starts the curing process.
Tools
-Scale

-Spoon

-Blender

-optional: glass jar with lid, to store the alginate leftovers

-A bowl or jar of min. 300 ml,for the calcium chloride bath

-A large glass jar, to wind the string around for curing

-A deep plate, bowl or container, to catch the excess water coming from the string

-60 cc (or more) syringe, to extrude the alginate plastic into the calcium chloride bath. You can also use other improvised extruders like empty sauce bottles and whipped/cream batter extruders.

-Spray bottle (100 ml or more, for the calcium chloride solution)
Yield
-Before processing/drying/curing: approx. 200 ml of alginate plastic that can be stored for two weeks and used in many different recipes
-Approx. 300 ml of calcium chloride 10% solution that can be used for any alginate recipe.
Method
-Preparation: Weigh your ingredients for the alginate plastic (alginate, glycerine, water, sunflower oil).

-Optional: use a diluted natural dye instead of water in the same amount for a colored plastic [DILUTED DYES DID NOT WORK THAT WELL FOR ME]

-Put the oil, alginate and glycerine in a blender and add a dash of the water. Blend into a thick and homogenous paste. Then add the rest of the water and blend again (this is to avoid lumps).

-Leave the mixture overnight to allow the bubbles to come to the surface and pop.

-Make the calcium chloride solution by dissolving 30 gr in 300 gr hot water. Put some in a spray bottle and store the rest in a jar: this is your calcium chloride bath.
Extruding
-Prepare the work space by putting out your calcium chloride bath and spray, an empty jar to wrap the string around, a syringe and your alginate mixture.

-Fill the syringe with about 50 ml alginate plastic

-Extrude the alginate plastic into the calcium chloride bath, try to extrude continuously and uninterupted to created an even, long string. Repeat this process to make more strings.
Curing & drying
-Leave the string in the bath for a few minutes and then rinse in some tap water.

-The strings will be a bit curly at this stage. Wrap them around a jar to create a spool and stretch them out a little.

-Keep an eye on them the first day, the stretch might break the film on some points. Spray some extra calcium chloride to close the leaks.

-Let it cure until totally dry, you can take the string off the jar if you want to stretch them out into long straight strings
Observations etc
-The  alginate strings loose about 70% of their size/weight due to the fact that there is a high volume ratio of water in our recipe so when they start drying that water is evaporated and the strings shrink
-When I added Hibiscus liquid dye in the alginate/glycerine/oil mixture the mixture became thick and unmanageable
-Powder chromes such as cinnamon, purple corn and curcuma colour the material quite nicely but beware of the quantity and make sure you mix the powder well, perhaps by using a blender in a low speed
Agar bioplastic 1 samples (Recipe from lecture from Cecilia Raspanti)
Recipe
4gr Agar
15gr Glycerine
250 ml water
Method
Due to the large agar to water ratio this recipe works better when the liquid has reached a thicker honey like state and is then casted.

-Warm up the water on the stove (plain or dyed) in max 80 degrees celcius

-Add plasticizer (glycerine)-  more plastisizer means more flexibility, however adding too much means the moxture will remain sticky for longer

-Add the agar

-Mix till smooth

-Simmer for another 30 mins in in max 86 degrees celcius

-Pour on your chosen surface

-Let it dry in a dry room

-De mould when completely dry or risk deformation and water loss due to large agar to water ratio in the recipe
Observations
- The swatches have shrinked and lost at least 50 per cent of their weight due to the large water ratio in the recipe but remained pretty strong and thicker nonetheless
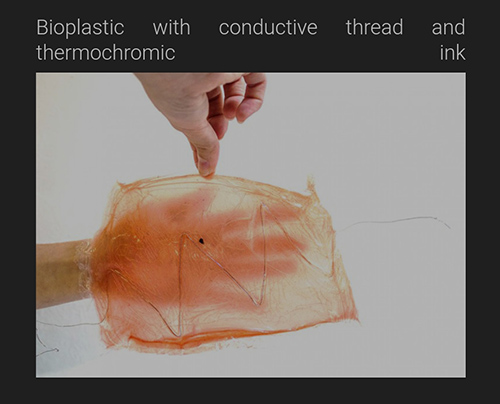
- The shrinked bioplastic can be surprisingly (surprisingly because if our coil membrane is too soft it will absorb the sound waves or if it is too hard it wont be able to vibrate when the waves come in contact with it and therefore cannot produce sound) used as a coil membrane for a speaker- you can sew a coil with Karl Grimm conductive thread or non enameled copper wire of thread and place a magnet on top and it works as a biospeaker (have a look at my work for [Wearables week 8](https://class.textile-academy.org/2022/marisa-satsia/assignments/week08/#bio-speaker-1-agar-bioplastic-1-and-copper-wire) where I use a sample of agar bioplastic from above and intergrate it into my wearables project)
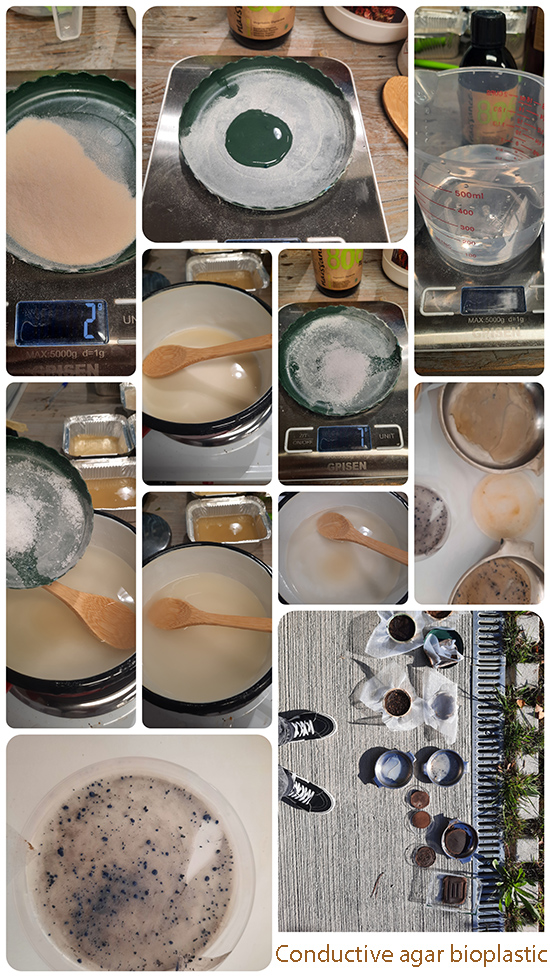
Conductive agar bioplastic by Elisabeth Lorenzi for Materiom
You can find the conductive agar recipe here.
Tools
Measuring Cup
Cooking pot, Stirring spoon
Weight
Mold
cooker/stove/hotplate
Flat surface
Water Dropper / Pippette
Composition
Agar agar 2 grams
Glycerol 1 ml
Water 210 ml
Salt 5 grams
Method
-Step one- Put the 2 grams of agar agar and 1ml of glycerol in a pot and then add a little bit of the water amount to mix it together.

-Step two- Add the rest of the water and put it over a stove/hotplate. Stir the mixture a few more times. Heat the mixture to 95 C or to just below boiling point.

-Step three- Add the 5grams of salt anf then keep stirring for a while. Allow the mixture to become some degrees cooler before putting it in a mold. It will get solid when it gets cool.

-Step four- Let the mixture cool and dry in the mold until it loses most of its moisture. It can take a few days or a week, depending on the environment room temperature and humidity level.

-Step five- If the bioplastic loses its conductive properties, all you need to do is rehydrate it a bit with a water dropper and let the agar biomaterial absorb the water.

-Variation notes: The variation on the salt proportion doesn’t make a more conductive mixture or sample.
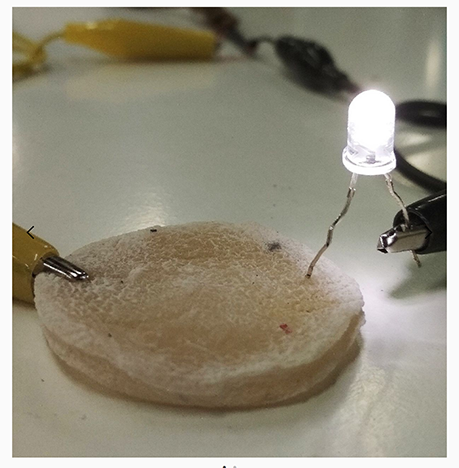
Image from Materiom
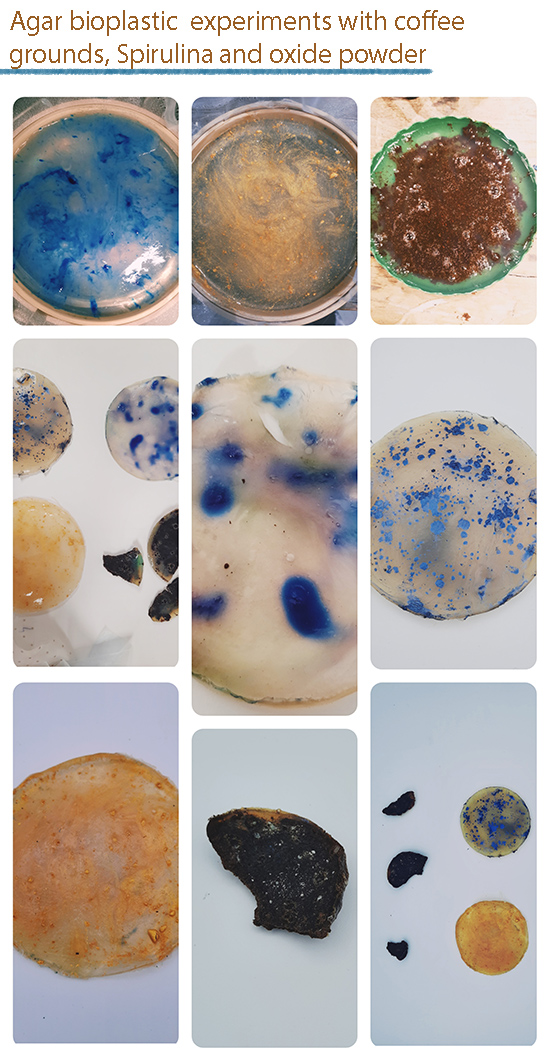
Unfortunately half of the samples dried up completely and I could not take them out of the mold and the other half were really mouldy after a whole weekend of drying in room temperature. I scraped a little sample and I used my microscope to compare them to the non conductive agar bioplastic samples I made. The mouldy samples were left outside to dry for a few hours however they lost all their volume/water and I was left with a paper thin sample just like the photo of comparing the conductive and non conductive samples below
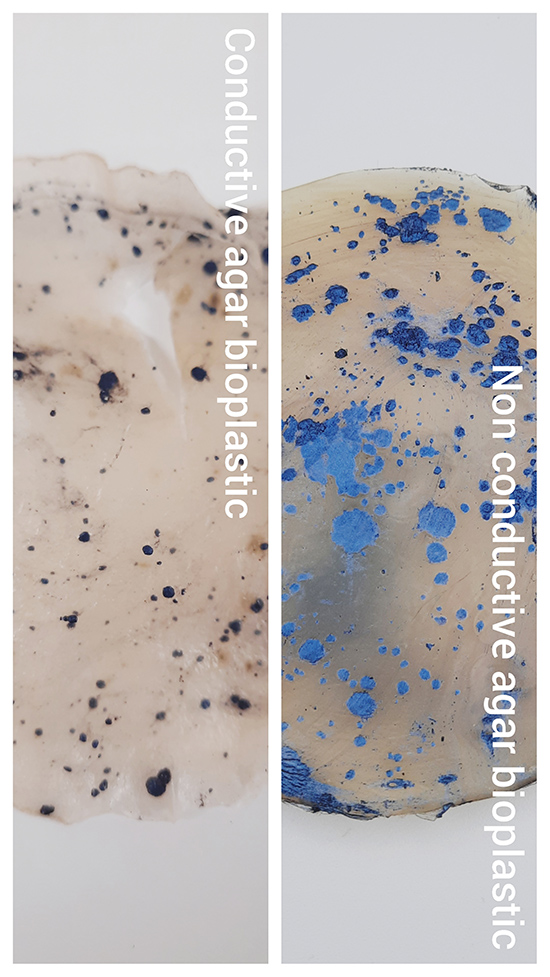
Comparing conductive and non conductive agar samples with Spirulina powder. Their main difference is that the conductive sample contains salt, less water, half of the amount of agar and very little glycerine compared to the non conductive sample
I can rehydrate the samples to make them conductive again and perhaps I could also try the paper thin samples for a wearables project in the following week. We will see! I am definitely trying this recipe again however this time I need to keep an eye on my casted material for at least 3 days.
Coffee Co03 leather biocomposite by Anastasia Pistofidou and coffee orange leather samples
We had a lot of coffee grounds so I decided to try 2 different coffee recipes with 2 different variations each! One of them is the Coffee CoO3 leather recipe by Anastasia Postofidou and the same recipe is being used here on the FABTEXTILES website for crafting and designing a coffee leather bag!!! I was so inspired by this coffee leather bag and the recipe in general that I started brainstorming for creating my own seamless coffee leather bag in the future.
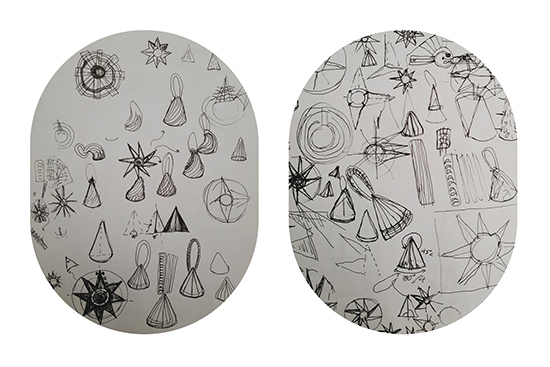
Some sketchbook doodles while brainstorming for a seamless coffee leather bag
RECIPE / COFFEE BIOLEATHER
2G sodium alginate
2G dried coffee grains of any organic waste in powder
2G olive oil
5G glycerin
33G water
(everything is in grams using a precision scale)

MIX for calcification
7G of calcium chloride in 100ml of water
STEP BY STEP INSTRUCTIONS:
1- Weight all the ingredients with a precision scale.
2- Mix the powder together with the glycerin and the olive oil.
3- Add the water and use a mechanical blender to obtain an homogeneous solution.
4- Cast in a silk screen print frame ( you can create your own using any textile and wood)
5- Mix the Calcium chloride with water in a sprayer bottle.
6- Spray the biomaterial on top and bottom with the calcium chloride solution.
7- Let the calcium chloride act for 5´ and rinse with clean water.
8- Let the composite sample dry in a dry and warm place for one week. Depending on the thickness and the size of the sample it may take longer. It will also vary due to the local temperature and humidity.
9- When the product is dry you can separate it from the frame.

Note: As the sample dries, it can become curved, so place it between two level surfaces and some weight on top so at the end we can obtain a really flat sheet
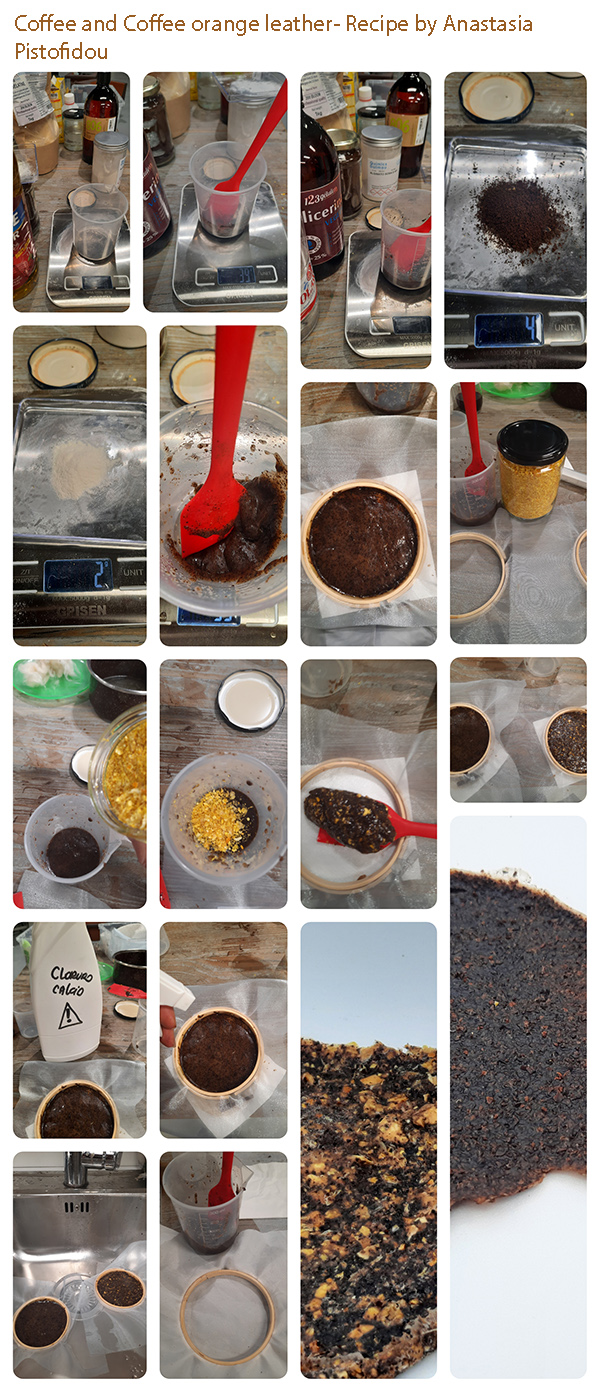
We also had a lot of orange peels and I just love the combination of orange and coffee from an olfactory sense so I decided to add orange and or mandarin peels to Anastasia's recipe. I wanted to see how the original coffee composite's characteristics and properties change when combined with another material such as the orange peels!
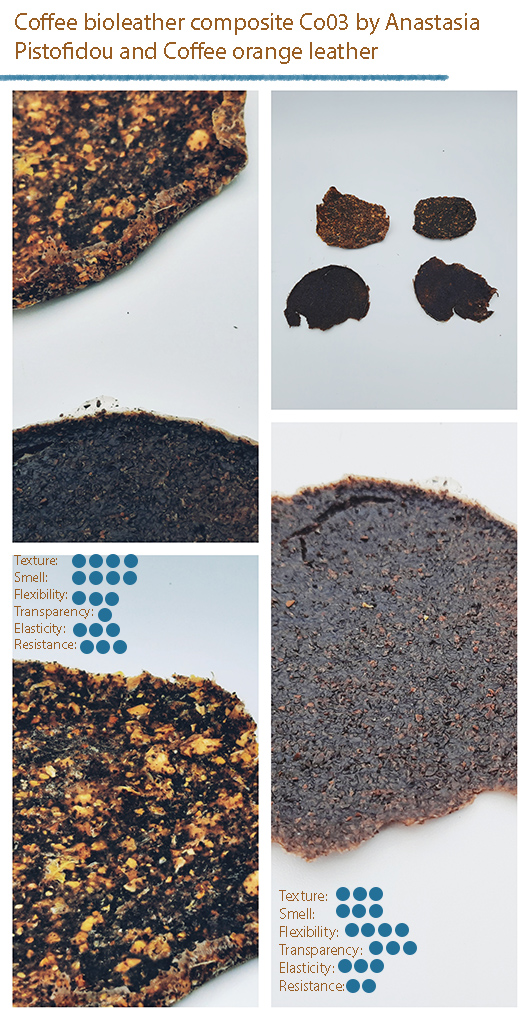
Here is a little chart showing the final crafted material from the recipe(s) above. For the Coffee orange leather we added the same amount of orange peels as the original coffee quantity (2 grams of Coffee grounds and 2-3 grams of orange peels)
Coffee agar alginate Co01 tests
Coffee | agar - alginate Co01 recipe, created by Antonia Bañados, Maquinario, Fab Lab Santiago for Materiom. I followed this recipe and made some samples and then I modified it to make it more runny and flexible using water and added Glycerine in order to use a syringe to extrude the mixture and experiment with that technique also.
The original recipe
Tools
-Cooker/stove/hotplate

-Teaspoon

-Measuring Cup

-Cooking pot

-Stirring spoon
Composition
-Agar agar 15 ml

-Glycerol 5 ml

-Water 250 ml

-Alginate 5 ml

-Coffee grounds [used] 0.5 Cups
Method
-Step one: Mix agar and alginate with water, add glycerin and coffee.

-Step two: Heat everything until it thickens and bubbles begin.

-Step three: Pour into the mold.

Drying time depends on the ventilation of the mold and the ambient temperature and humidity of the place.
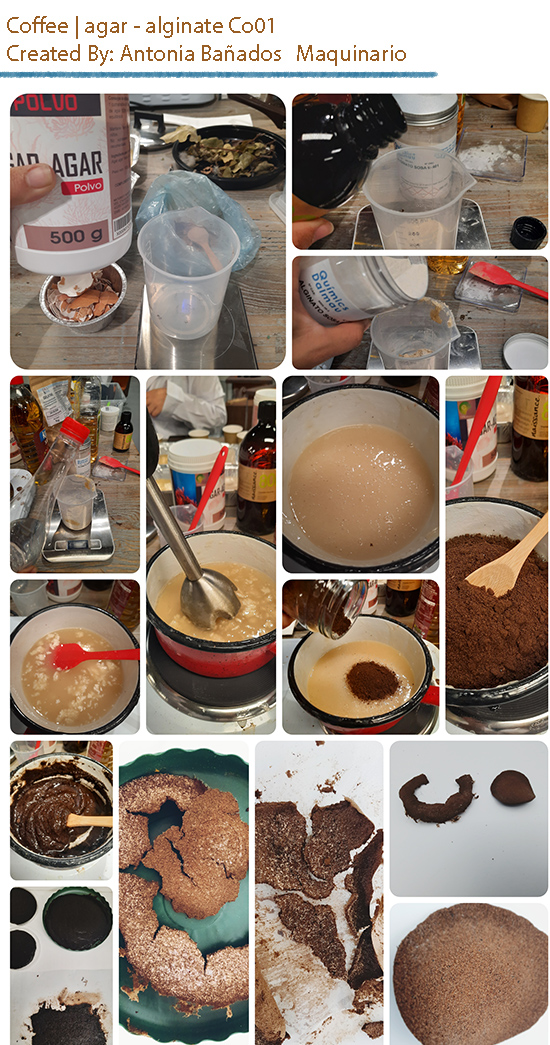
Here is my crafted exploration process for the original Co01 recipe
Modified flexible recipe
-Agar agar 15 ml

-Glycerol 10 ml

-Water 350 ml

-Alginate 5 ml

-Coffee grounds, 0.5 Cups
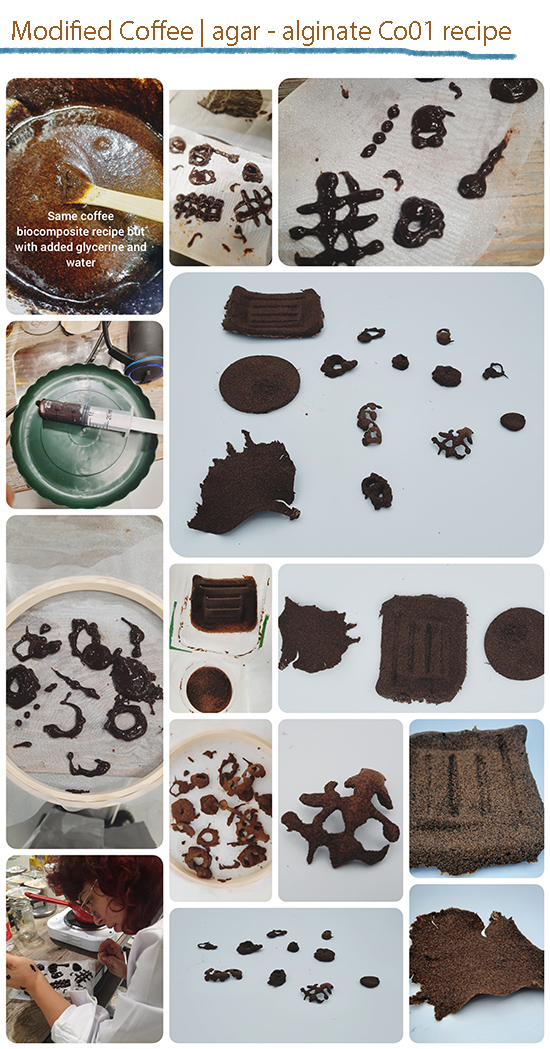
Here is my crafted exploration process for the modified flexible version of the Co01 recipe
The results!!
Future explorations- Conductive biotextiles/biocircuits and alternative photographic processes on bioplastic sheets- to be continued!
Useful links
- Coffee Bioleather Bag and recipe by Fabtextiles
- Coffee agar alginate Co01
- Coffee Composite Co03 by Anastasia Pistofidou for Materiom
- Alginate yearn/thread recipe by Loes Bogers
- Elisabeth Lorenzi
- Martha Gray Interalia magazine
- Giulia Tomasello, Future Flora
- Martha Gray website
- Conductive agar recipe, Elisabeth Lorenzi for Materiom
- Michaela Davidova interview at Alternative processes website
- Michaela Davidova website
- Bioplastic Cookbook by Anastasia Pistofidou
- "Work and Progress within the Seminar Skin2" at FABTEXTILES