8. Wearables
This week was amazing! I really enjoyed my exploration and I am finally feeling like I am starting to build upon my personal ideas and utilising the work and the inspiration from the previous weeks such as E-textiles week 5 and my agar conductive and non conductive bioplastic swatches from Biofabricating materials week 6!!! If you go back here, on week's 6 documentation you can also see my starting points and brainstorming process for developing my biocircuit and bioelectronic ideas.
I did not make a wearable this week but I experimented with different membranes and conductive materials for my speakers such as paper, fabric, agar bioplastic, leaves, Karl Grimm conductive thread, copper tape and copper wire that I sanded in order to remove the enamel. I also experimented with the conductive paint on paper and Karl Grimm threads and fabric that was dyed in thermochromic dyes.
This week's assignment:
-Document the concept, sketches, references also to artistic and scientific publications
-Create a swatch using an ATtiny with one input and one output, using hard-soft connection solutions and battery
-Create 2 actuator swatches. Test them with the Arduino or ATtiny.
-Learn how to program an ATTiny , add the libraries and links used for the code
-Document the schematic and the programming code, the libraries added and the power requirements
-Upload a small video of your object working
-EXTRA POINT Integrate it to a project
Research and Inspiration
This is the beggining of my bioelectronic explorations but I have been inspired and made connections in my head on how to use what I previously made in other weeks for this week and how to combine biomaterials (grown, crafted and/or hacked), microbes and microorganisms and perhaps natural materials in order to use them for electronic projects. I am extremely curious towards the use of diy biomaterials in electronic projects however the tricky part for me is the technical electronic aspects of these projects since I am new to e-textiles, wearables and skin electronics. If i get a few more weeks exploring specific materials and combination of processes and methodologies I have in mind I can come up for something for my final project!
Actuators!
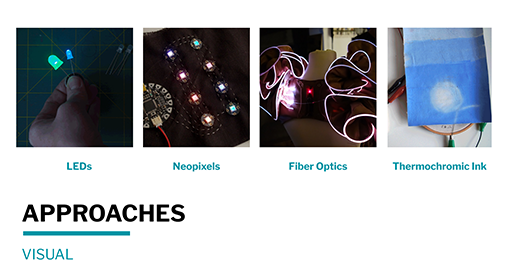
An actuator is a component of a circuit that moves or controls another part based on input. The actuator can produce VISUAL, SOUND OR MOTION state changes.
For the VISUAL:
-LED'S
-Neopixels
-Fibre optics
-Thermochromic inks
For the SOUND:
-Creating speakers by making tightly spaced coils from conductive material using the electromagnetic theory
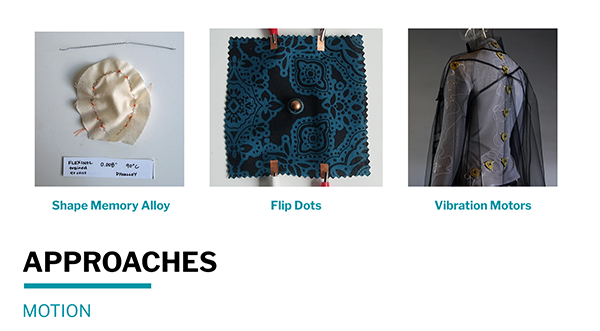
For MOTION:
-Shape Memory Allows (SMA's)
-Flip dots
-Vibration motors
The mosfet transistor circuit- WHY DO WE NEED IT
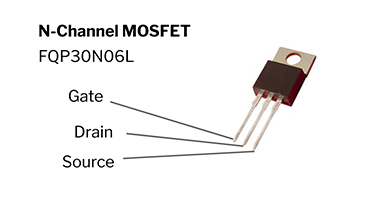
The first thing we did before we started making our speakers and thermochromic experiments was to create the MOSFET circuit. What is a MOSFET?
-It is a transistor
-It acts as a secondary power source for our projects
-WHY? Because we require a LOT MORE POWER than the pins of the Arduino to actuate something
-A mosfet transistor acts as an electrical switch which ALLOWS us to combine another power source with the Arduino by applying more voltage to the GATE using the Arduino which leads to more current flowing between the DRAIN and the SOURCE of the mosfet
-There a lot of different kinds of transistors (N channel and P channel) but we are using an N channel one for the projects below and particularly the ***IRF5410N***
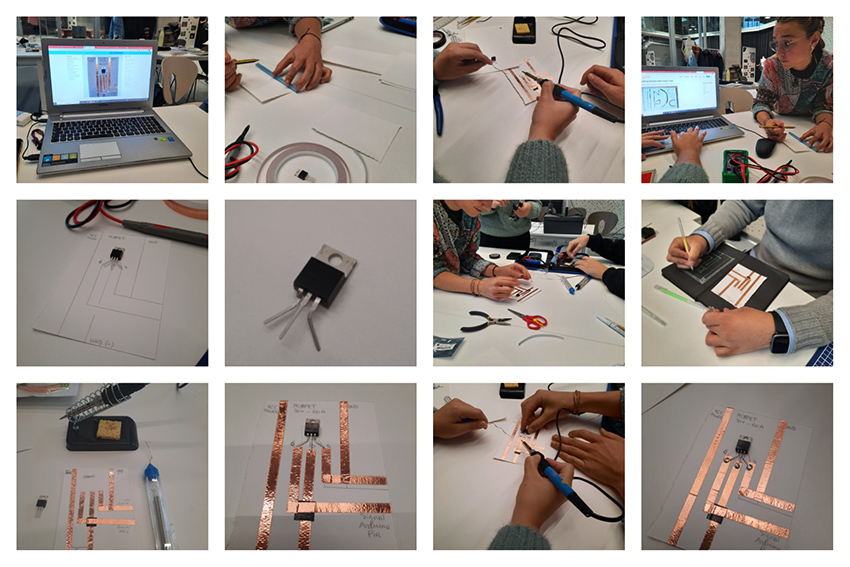
On the first day of the new week we decided to make the basic mosfet circuit as a team
According to the kind of actuator you want to make, your power needs change and therefore you need to use a different MOSFET circuit and perhaps a different kind of transistor. Generally we got a bit confused with the MOSFET circuits because after we made the first one in the picture below we realised that the circuits are different for every actuator.
We only had one particular kind of transistor available so we had to try and see if the different circuits would help us achieve something with sound because in most sound examples in Kobakant and in Liza's lecture she is using a TIP120 transistor.
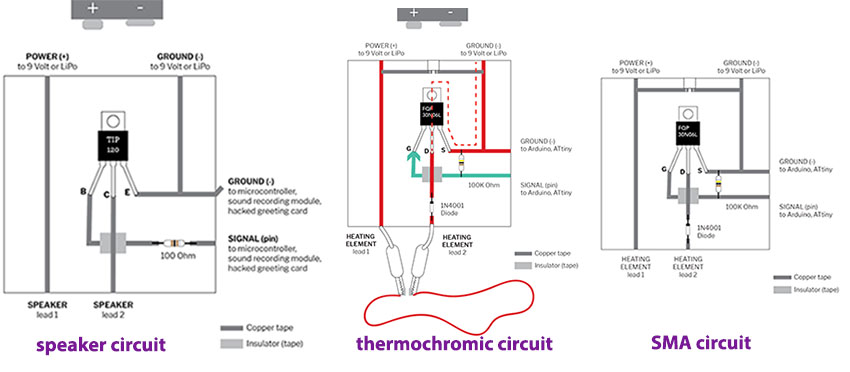
Screenshot of mosfet circuit for speakers, thermochromic inks and for sma from Liza's lecture
I really enjoyed this way of making circuits and it helps me think in terms of intergrating new electronic components or trying alternative "breadboards" to use for my explorations in the future for example attiny's etc. I saw some people from previous years making attiny soft breakout circuits on different surfaces and with different traces as well.
Bill of materials
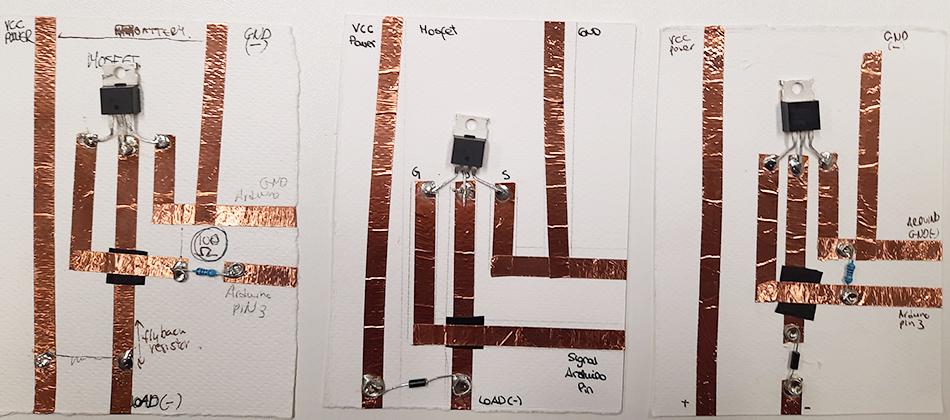
-We did this on paper with copper tape and then we soldered our transistor onto that circuit.
Actuator swatches and Arduino UNO
Speakers
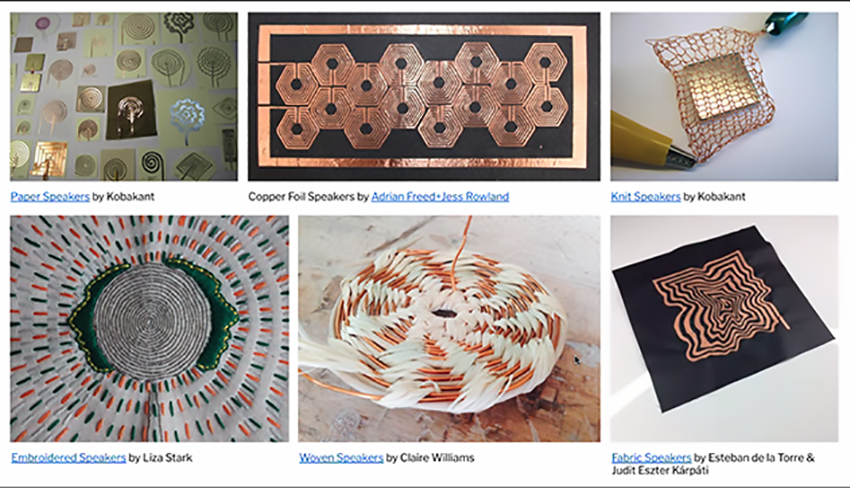
From Liza Stark's lecture on Actuators and specifically speakers
The idea I had was to explore the use of different material coil membranes for my speakers. I started off with a paper and copper tape coil then I moved to fabric and circular and triangular coil shapes with Karl Grimm conductive thread and finally I had this wild idea to use a biomaterial or leaves for my coil membranes and combine it with the couching embroidery technique and the copper wire.
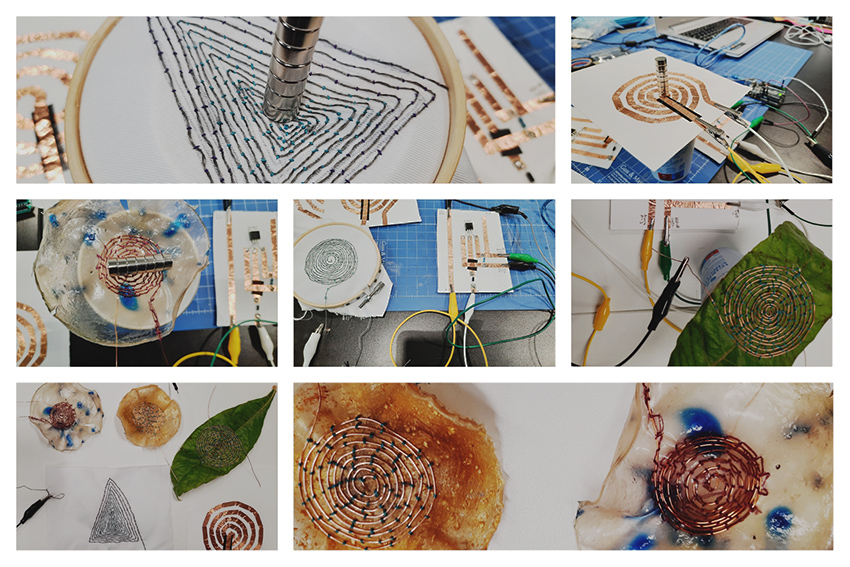
All my speaker swatches! I made a lot of them and tested each and everyone
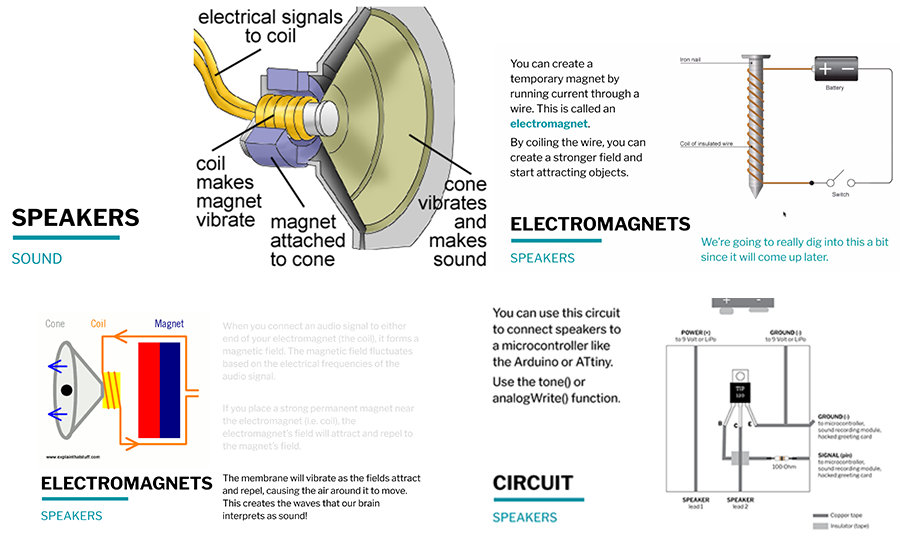
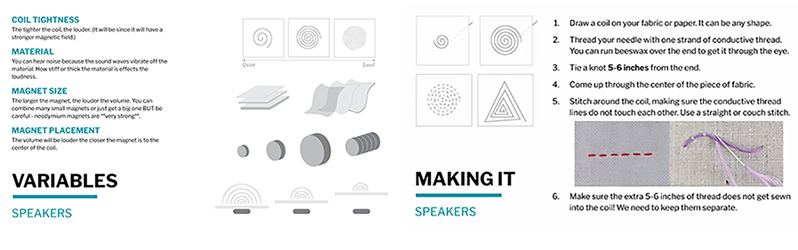
Speakers, sound and electromagnetism important information from Liza Stark's lecture
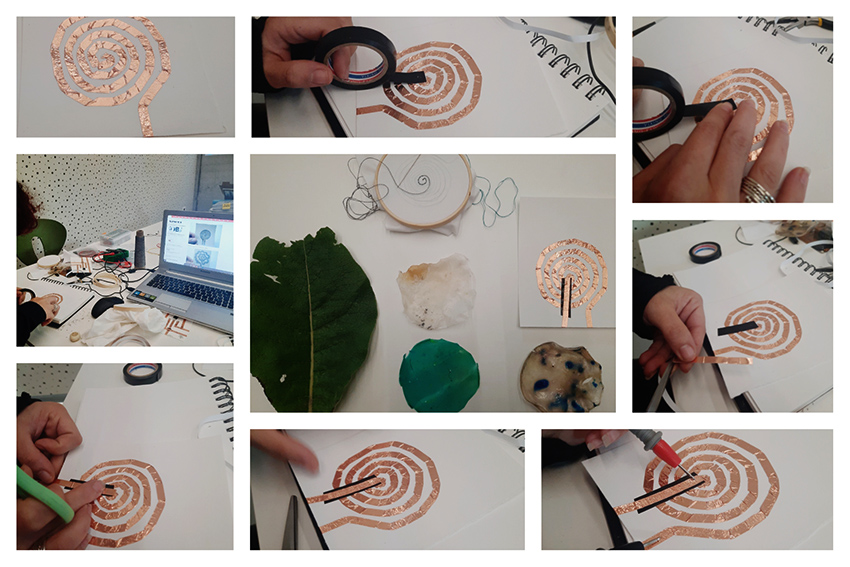
Paper and copper tape speaker
This was the first speaker I made after making my mosfet circuit. I used copper tape and insulating tape on paper!
Fabric and Karl Grimm conductive thread circular coil
There are a few things you should consider before starting your coil! Look below for some variables you need to take into consideration but also an insight into the couching embroidery technique which I used for all my speakers apart from the copper tape one obviously.
Bio Speaker 1- Agar bioplastic 1 and copper wire
I had to sand the copper wire before using it to make an antennae due to the fact that it was coated with enamel
After I sanded the enamel I used my multimeter to test the conductivity of the coil!
Bill of materials
-A piece of DRY biomaterial. Make sure this is totally dry before using. If you are gonna make a material for this experiment make sure at least 10 days pass from the day you made the material.
-Needle and thread
-Copper wire
Checking the conductivity of my biospeaker from Marisa Satsia on Vimeo.
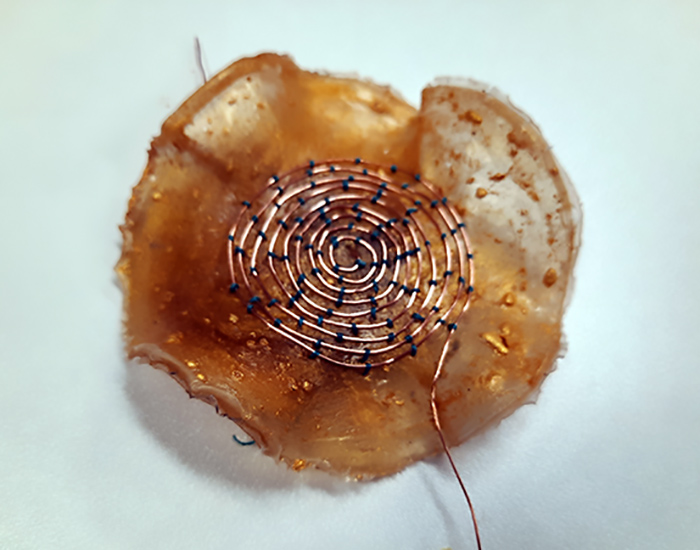
I used the couching embroidery technique (as explained above) to place and secure the coil on top of the agar bioplastic sample
You can find the recipe for agar bioplastic 1 on my documentation from week 6!
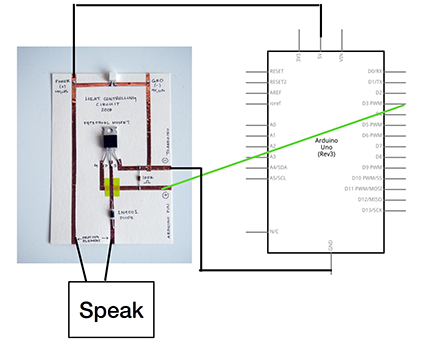
SCHEMATIC, CIRCUIT and CODE
For the transistor kind we had we ended up using the mosfet circuit and schematic from Liza's lecture but for the thermochromic dye (!). We suspect this circuit worked because we had a different transistor from the one that we needed for the sound actuation so logically a different mosfet circuit than the one we has in the lectures would work.
CODE
/*
Imperial March - Star Wars
Connect a piezo buzzer or speaker to pin 11 or select a new pin.
More songs available at https://github.com/robsoncouto/arduino-songs

Robson Couto, 2019
*/

#define NOTE_B0  31
#define NOTE_C1  33
#define NOTE_CS1 35
#define NOTE_D1  37
#define NOTE_DS1 39
#define NOTE_E1  41
#define NOTE_F1  44
#define NOTE_FS1 46
#define NOTE_G1  49
#define NOTE_GS1 52
#define NOTE_A1  55
#define NOTE_AS1 58
#define NOTE_B1  62
#define NOTE_C2  65
#define NOTE_CS2 69
#define NOTE_D2  73
#define NOTE_DS2 78
#define NOTE_E2  82
#define NOTE_F2  87
#define NOTE_FS2 93
#define NOTE_G2  98
#define NOTE_GS2 104
#define NOTE_A2  110
#define NOTE_AS2 117
#define NOTE_B2  123
#define NOTE_C3  131
#define NOTE_CS3 139
#define NOTE_D3  147
#define NOTE_DS3 156
#define NOTE_E3  165
#define NOTE_F3  175
#define NOTE_FS3 185
#define NOTE_G3  196
#define NOTE_GS3 208
#define NOTE_A3  220
#define NOTE_AS3 233
#define NOTE_B3  247
#define NOTE_C4  262
#define NOTE_CS4 277
#define NOTE_D4  294
#define NOTE_DS4 311
#define NOTE_E4  330
#define NOTE_F4  349
#define NOTE_FS4 370
#define NOTE_G4  392
#define NOTE_GS4 415
#define NOTE_A4  440
#define NOTE_AS4 466
#define NOTE_B4  494
#define NOTE_C5  523
#define NOTE_CS5 554
#define NOTE_D5  587
#define NOTE_DS5 622
#define NOTE_E5  659
#define NOTE_F5  698
#define NOTE_FS5 740
#define NOTE_G5  784
#define NOTE_GS5 831
#define NOTE_A5  880
#define NOTE_AS5 932
#define NOTE_B5  988
#define NOTE_C6  1047
#define NOTE_CS6 1109
#define NOTE_D6  1175
#define NOTE_DS6 1245
#define NOTE_E6  1319
#define NOTE_F6  1397
#define NOTE_FS6 1480
#define NOTE_G6  1568
#define NOTE_GS6 1661
#define NOTE_A6  1760
#define NOTE_AS6 1865
#define NOTE_B6  1976
#define NOTE_C7  2093
#define NOTE_CS7 2217
#define NOTE_D7  2349
#define NOTE_DS7 2489
#define NOTE_E7  2637
#define NOTE_F7  2794
#define NOTE_FS7 2960
#define NOTE_G7  3136
#define NOTE_GS7 3322
#define NOTE_A7  3520
#define NOTE_AS7 3729
#define NOTE_B7  3951
#define NOTE_C8  4186
#define NOTE_CS8 4435
#define NOTE_D8  4699
#define NOTE_DS8 4978
#define REST      0


// change this to make the song slower or faster
int tempo = 120;

// change this to whichever pin you want to use
int buzzer = 3;

// notes of the moledy followed by the duration.
// a 4 means a quarter note, 8 an eighteenth , 16 sixteenth, so on
// !!negative numbers are used to represent dotted notes,
// so -4 means a dotted quarter note, that is, a quarter plus an eighteenth!!
int melody[] = {

// Dart Vader theme (Imperial March) - Star wars
// Score available at https://musescore.com/user/202909/scores/1141521
// The tenor saxophone part was used

NOTE_A4,-4, NOTE_A4,-4, NOTE_A4,16, NOTE_A4,16, NOTE_A4,16, NOTE_A4,16, NOTE_F4,8, REST,8,
NOTE_A4,-4, NOTE_A4,-4, NOTE_A4,16, NOTE_A4,16, NOTE_A4,16, NOTE_A4,16, NOTE_F4,8, REST,8,
NOTE_A4,4, NOTE_A4,4, NOTE_A4,4, NOTE_F4,-8, NOTE_C5,16,

NOTE_A4,4, NOTE_F4,-8, NOTE_C5,16, NOTE_A4,2,//4
NOTE_E5,4, NOTE_E5,4, NOTE_E5,4, NOTE_F5,-8, NOTE_C5,16,
NOTE_A4,4, NOTE_F4,-8, NOTE_C5,16, NOTE_A4,2,

NOTE_A5,4, NOTE_A4,-8, NOTE_A4,16, NOTE_A5,4, NOTE_GS5,-8, NOTE_G5,16, //7
NOTE_DS5,16, NOTE_D5,16, NOTE_DS5,8, REST,8, NOTE_A4,8, NOTE_DS5,4, NOTE_D5,-8, NOTE_CS5,16,

NOTE_C5,16, NOTE_B4,16, NOTE_C5,16, REST,8, NOTE_F4,8, NOTE_GS4,4, NOTE_F4,-8, NOTE_A4,-16,//9
NOTE_C5,4, NOTE_A4,-8, NOTE_C5,16, NOTE_E5,2,

NOTE_A5,4, NOTE_A4,-8, NOTE_A4,16, NOTE_A5,4, NOTE_GS5,-8, NOTE_G5,16, //7
NOTE_DS5,16, NOTE_D5,16, NOTE_DS5,8, REST,8, NOTE_A4,8, NOTE_DS5,4, NOTE_D5,-8, NOTE_CS5,16,

NOTE_C5,16, NOTE_B4,16, NOTE_C5,16, REST,8, NOTE_F4,8, NOTE_GS4,4, NOTE_F4,-8, NOTE_A4,-16,//9
NOTE_A4,4, NOTE_F4,-8, NOTE_C5,16, NOTE_A4,2,

};

// sizeof gives the number of bytes, each int value is composed of two bytes (16 bits)
// there are two values per note (pitch and duration), so for each note there are four bytes
int notes = sizeof(melody) / sizeof(melody[0]) / 2;

// this calculates the duration of a whole note in ms
int wholenote = (60000 * 4) / tempo;

int divider = 0, noteDuration = 0;

void setup() {

}

void loop() {
// no need to repeat the melody.
play_melody();
}

void play_melody(){
// iterate over the notes of the melody.
// Remember, the array is twice the number of notes (notes + durations)
for (int thisNote = 0; thisNote < notes * 2; thisNote = thisNote + 2) {

// calculates the duration of each note
divider = melody[thisNote + 1];
if (divider > 0) {
// regular note, just proceed
noteDuration = (wholenote) / divider;
} else if (divider < 0) {
// dotted notes are represented with negative durations!!
noteDuration = (wholenote) / abs(divider);
noteDuration *= 1.5; // increases the duration in half for dotted notes
}

// we only play the note for 90% of the duration, leaving 10% as a pause
tone(buzzer, melody[thisNote], noteDuration*0.9);

// Wait for the specief duration before playing the next note.
delay(noteDuration);

// stop the waveform generation before the next note.
noTone(buzzer);
}
}
Bio Speaker 2- Mespilia leaf biospeaker
Checking the conductivity of my biospeaker 2 from Marisa Satsia on Vimeo.
First I had to check whether my copper coil is conductive so I used my multimeter!

Combining my leaf biospeaker with my teardrop digital sensor to control the sound coming out of my speaker
Bill of materials
-Copper wire (you can remove the enamel, the coating by sanding it to make it conductive)
-A leaf of your choice
-Thread and needle (For couching emboidery technique to put the coil on the leaf)
SCHEMATIC, CIRCUIT and CODE
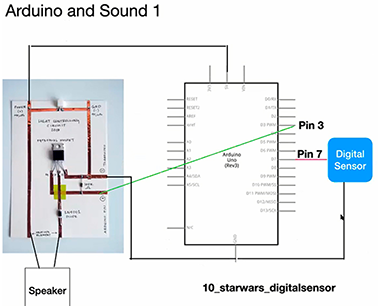
And this is the code I used:
/*
Jigglypuff's Song
Connect a piezo buzzer or speaker to pin 11 or select a new pin.
More songs available at https://github.com/robsoncouto/arduino-songs

Robson Couto, 2019
*/
#define NOTE_B0  31
#define NOTE_C1  33
#define NOTE_CS1 35
#define NOTE_D1  37
#define NOTE_DS1 39
#define NOTE_E1  41
#define NOTE_F1  44
#define NOTE_FS1 46
#define NOTE_G1  49
#define NOTE_GS1 52
#define NOTE_A1  55
#define NOTE_AS1 58
#define NOTE_B1  62
#define NOTE_C2  65
#define NOTE_CS2 69
#define NOTE_D2  73
#define NOTE_DS2 78
#define NOTE_E2  82
#define NOTE_F2  87
#define NOTE_FS2 93
#define NOTE_G2  98
#define NOTE_GS2 104
#define NOTE_A2  110
#define NOTE_AS2 117
#define NOTE_B2  123
#define NOTE_C3  131
#define NOTE_CS3 139
#define NOTE_D3  147
#define NOTE_DS3 156
#define NOTE_E3  165
#define NOTE_F3  175
#define NOTE_FS3 185
#define NOTE_G3  196
#define NOTE_GS3 208
#define NOTE_A3  220
#define NOTE_AS3 233
#define NOTE_B3  247
#define NOTE_C4  262
#define NOTE_CS4 277
#define NOTE_D4  294
#define NOTE_DS4 311
#define NOTE_E4  330
#define NOTE_F4  349
#define NOTE_FS4 370
#define NOTE_G4  392
#define NOTE_GS4 415
#define NOTE_A4  440
#define NOTE_AS4 466
#define NOTE_B4  494
#define NOTE_C5  523
#define NOTE_CS5 554
#define NOTE_D5  587
#define NOTE_DS5 622
#define NOTE_E5  659
#define NOTE_F5  698
#define NOTE_FS5 740
#define NOTE_G5  784
#define NOTE_GS5 831
#define NOTE_A5  880
#define NOTE_AS5 932
#define NOTE_B5  988
#define NOTE_C6  1047
#define NOTE_CS6 1109
#define NOTE_D6  1175
#define NOTE_DS6 1245
#define NOTE_E6  1319
#define NOTE_F6  1397
#define NOTE_FS6 1480
#define NOTE_G6  1568
#define NOTE_GS6 1661
#define NOTE_A6  1760
#define NOTE_AS6 1865
#define NOTE_B6  1976
#define NOTE_C7  2093
#define NOTE_CS7 2217
#define NOTE_D7  2349
#define NOTE_DS7 2489
#define NOTE_E7  2637
#define NOTE_F7  2794
#define NOTE_FS7 2960
#define NOTE_G7  3136
#define NOTE_GS7 3322
#define NOTE_A7  3520
#define NOTE_AS7 3729
#define NOTE_B7  3951
#define NOTE_C8  4186
#define NOTE_CS8 4435
#define NOTE_D8  4699
#define NOTE_DS8 4978
#define REST      0


// change this to make the song slower or faster
int tempo = 85;

// change this to whichever pin you want to use
int buzzer = 11;

// notes of the moledy followed by the duration.
// a 4 means a quarter note, 8 an eighteenth , 16 sixteenth, so on
// !!negative numbers are used to represent dotted notes,
// so -4 means a dotted quarter note, that is, a quarter plus an eighteenth!!
int melody[] = {

// Jigglypuff's Song
// Score available at https://musescore.com/user/28109683/scores/5044153

NOTE_D5,-4, NOTE_A5,8, NOTE_FS5,8, NOTE_D5,8,
NOTE_E5,-4, NOTE_FS5,8, NOTE_G5,4,
NOTE_FS5,-4, NOTE_E5,8, NOTE_FS5,4,
NOTE_D5,-2,
NOTE_D5,-4, NOTE_A5,8, NOTE_FS5,8, NOTE_D5,8,
NOTE_E5,-4, NOTE_FS5,8, NOTE_G5,4,
NOTE_FS5,-1,
NOTE_D5,-4, NOTE_A5,8, NOTE_FS5,8, NOTE_D5,8,
NOTE_E5,-4, NOTE_FS5,8, NOTE_G5,4,

NOTE_FS5,-4, NOTE_E5,8, NOTE_FS5,4,
NOTE_D5,-2,
NOTE_D5,-4, NOTE_A5,8, NOTE_FS5,8, NOTE_D5,8,
NOTE_E5,-4, NOTE_FS5,8, NOTE_G5,4,
NOTE_FS5,-1,

};

// sizeof gives the number of bytes, each int value is composed of two bytes (16 bits)
// there are two values per note (pitch and duration), so for each note there are four bytes
int notes = sizeof(melody) / sizeof(melody[0]) / 2;

// this calculates the duration of a whole note in ms
int wholenote = (60000 * 4) / tempo;

int divider = 0, noteDuration = 0;

//variable for the senor
int sensor_pin = 7;
int sensor_value = 0;

void setup() {

pinMode(sensor_pin, INPUT_PULLUP);
Serial.begin(9600);
}

void loop() {

//read and save the sensor voltage
sensor_value = digitalRead(sensor_pin);
Serial.println(sensor_value);

if(sensor_value == LOW){  //if the sensor is pressed
play_melody();  //play the melody
}

}

void play_melody(){
// iterate over the notes of the melody.
// Remember, the array is twice the number of notes (notes + durations)
for (int thisNote = 0; thisNote < notes * 2; thisNote = thisNote + 2) {

// calculates the duration of each note
divider = melody[thisNote + 1];
if (divider > 0) {
// regular note, just proceed
noteDuration = (wholenote) / divider;
} else if (divider < 0) {
// dotted notes are represented with negative durations!!
noteDuration = (wholenote) / abs(divider);
noteDuration *= 1.5; // increases the duration in half for dotted notes
}

// we only play the note for 90% of the duration, leaving 10% as a pause
tone(buzzer, melody[thisNote], noteDuration * 0.9);

// Wait for the specief duration before playing the next note.
delay(noteDuration);

// stop the waveform generation before the next note.
noTone(buzzer);
}
Thermochromic dye experiments
How to

Fabric dyed with thermochromic paint and Karl Grimm conductive thread
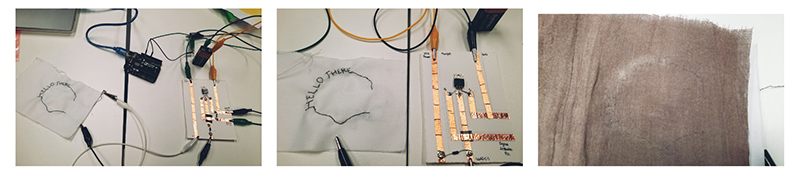
Paper painted with thermochromic paint and Karl Grimm conductive thread
Bill of materials
-Concuctive thread
-Thermochromic ink
-Paper
-Paper tape
I taped my conductive thread trace on the back of the painted paper and secured the positive and negative poles of the thread with conductive tape so i can place my alligator clips there for my experiment.
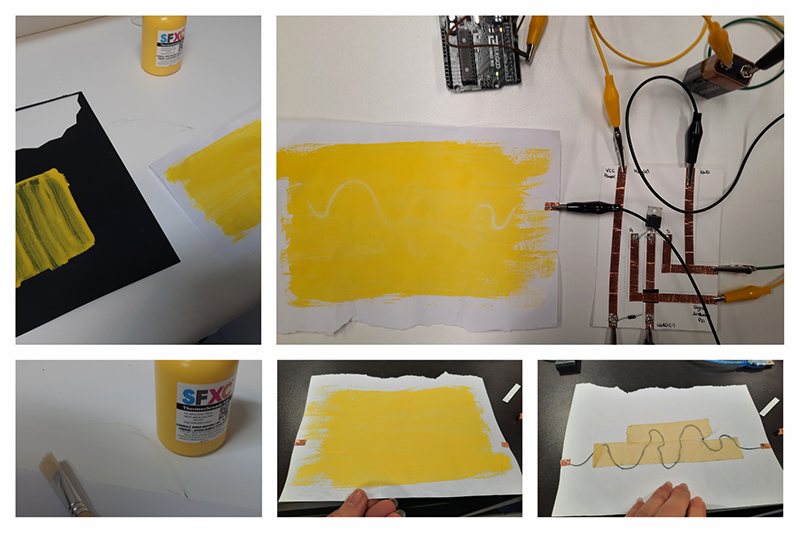
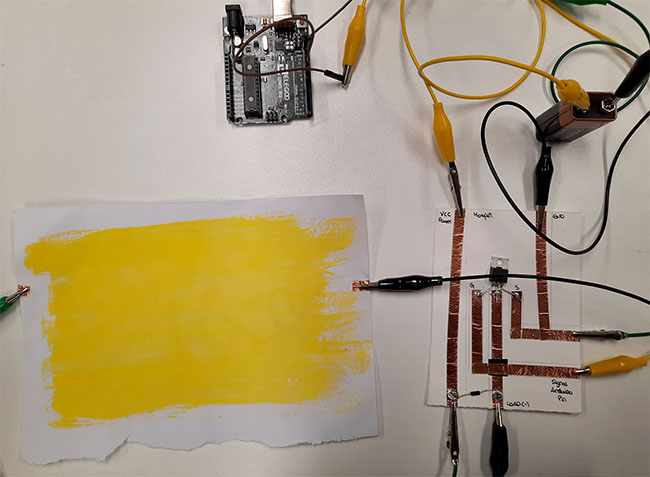
SCHEMATIC, CIRCUIT and CODE
Here is a photo of the mosfet ciruit we used for the thermochromic experiments. We also used a 9V battery and an Arduino. We put the flyback DIODE between the load and it worked.
Code from Liza Stark
void setup() {
// put your setup code here, to run once:

pinMode(9, OUTPUT);
Serial.begin(9600);

}

void loop() {
// put your main code here, to run repeatedly:

//Change the second value to change the thermochormic ink's
//behaviour and transparency:
analogWrite(9,150);
Serial.println("ON");
//Change the delay to keep the heat on longer
delay(4000);

//Turn it off to give your circuit a break
analogWrite(9,0);
Serial.println("OFF");
//Increase the delay to bring the color back
delay(5000);

}
Useful links
- Liza Stark heating circuits for-thermochromic inks
- Liza Stark Custom mono amp for textile speakers
- E-textile swatch exchange
- Marisa Satsia on Vimeo
- Heating circuits for thermochromic inks, Liza Stark website
- Agar Bioplastic 1 recipe and sample