8. Wearables
Research
This week the bar is definitely raised for me, as I am not an electronics enthusiast. Let's just say I'm more into innovative but traditional fashion :).
Unfortunately, I was unable to attend class during the week and only found myself working on my assignment a few months later. But let's start with some inspiration.
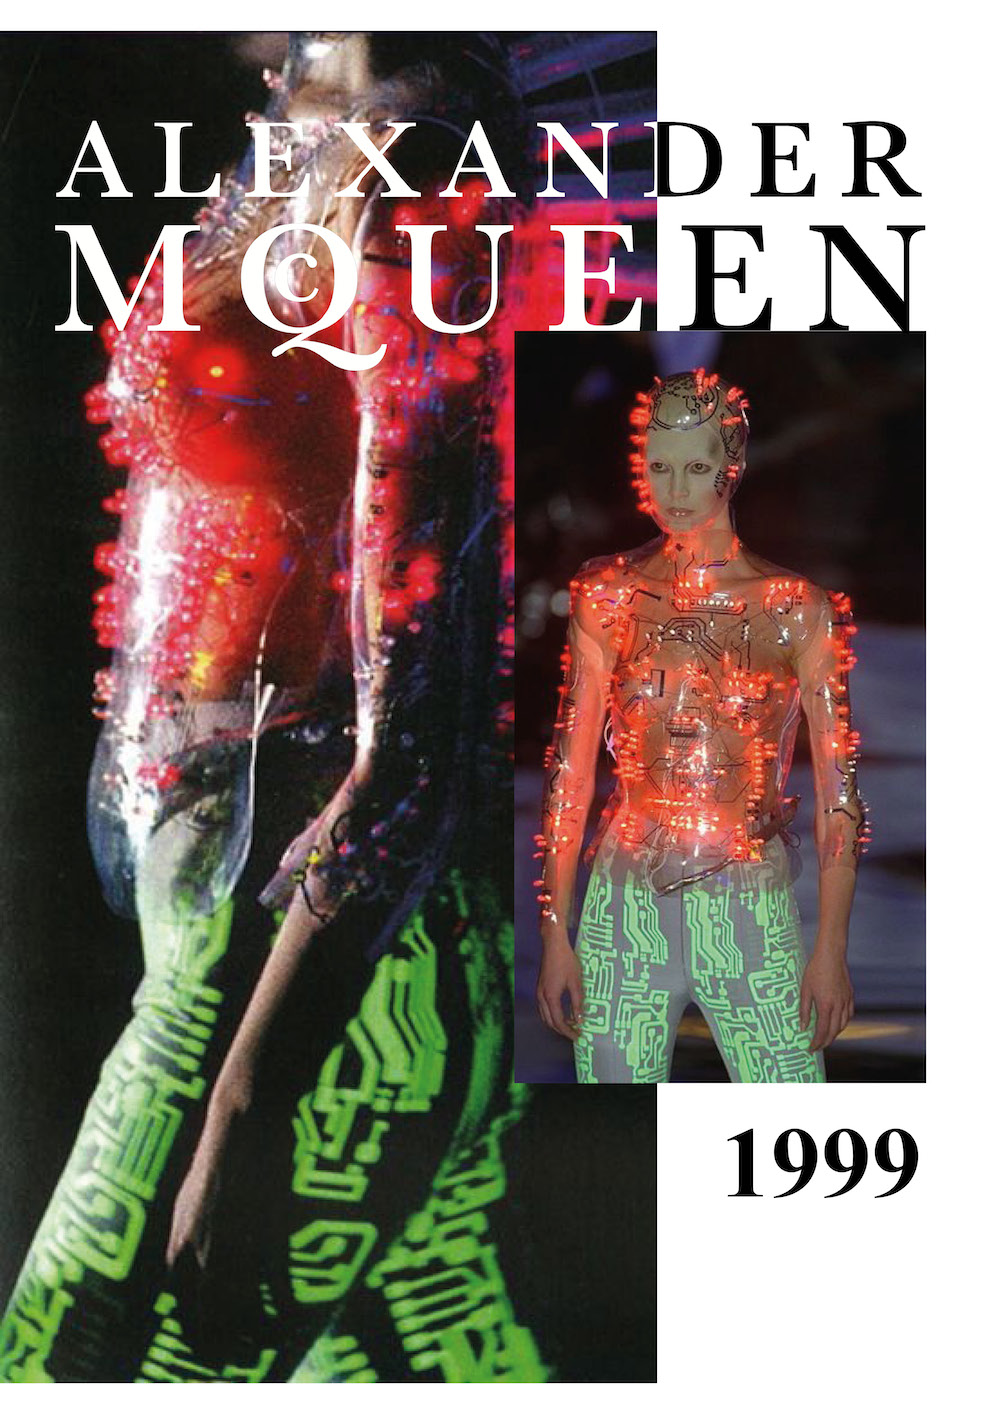
The visionary Alexander McQueen came up with something in the 90s, as you can see from the picture below.
I have always had a great interest in developing projects involving the senses, many of my projects involve this type of intervention. My thesis project, KLEIS, actually proposed a trendy book that was read through the involvement of the senses. What I like about werable is definitely the visual and sound interaction that can be created.
Below you will find some projects by some artists that I found really interesting and in line with my interests.
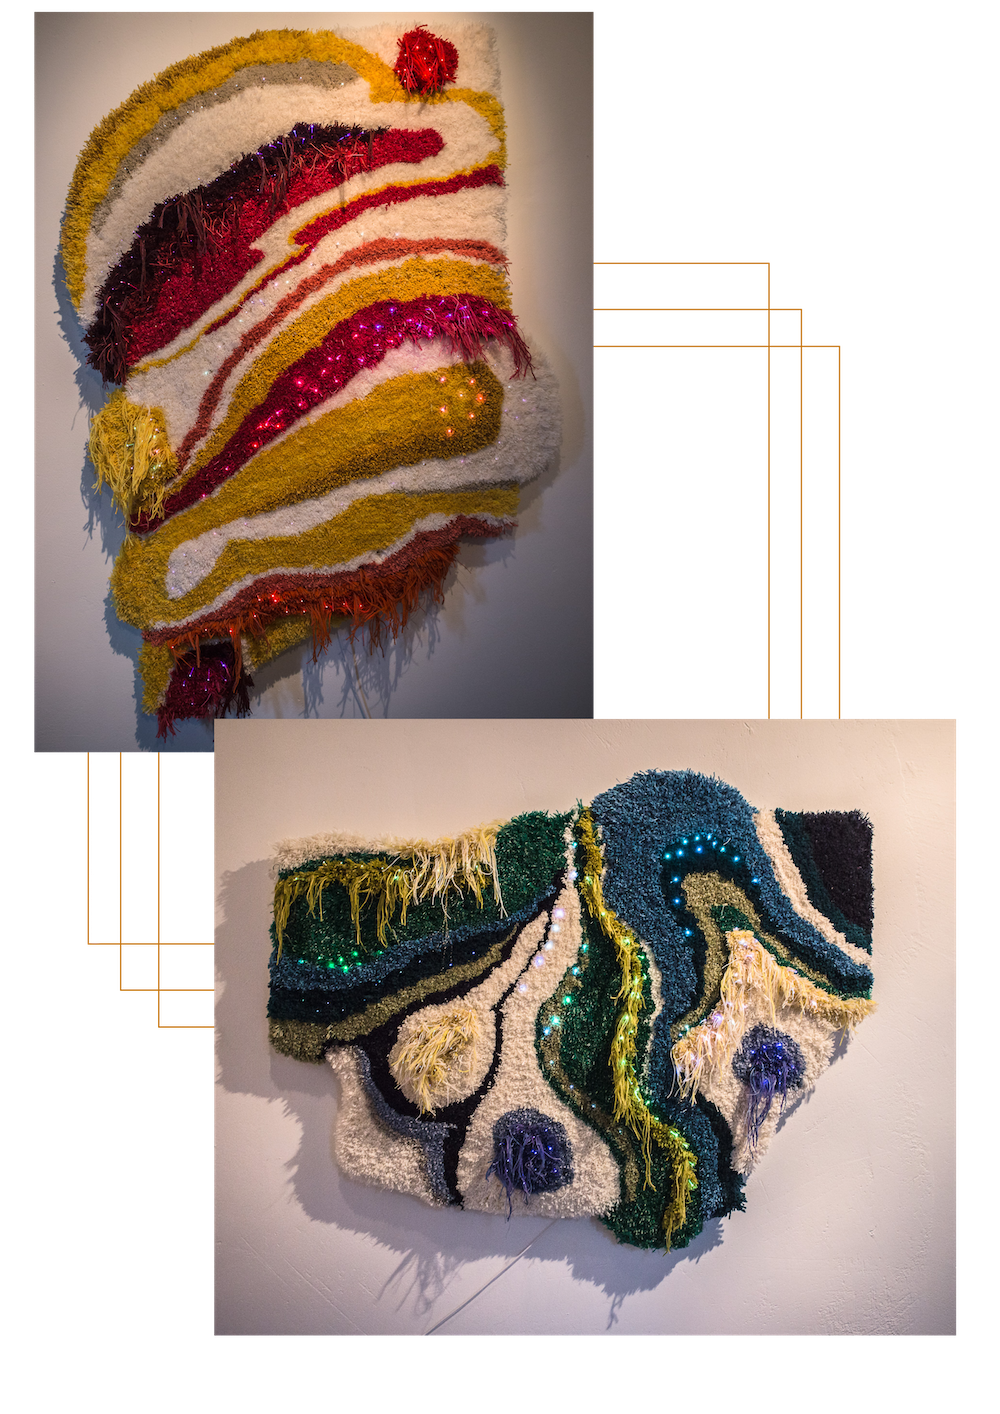
But if I have to express a sincere opinion, the projects that fascinate me most are the perfect combination of craftsmanship and technology, such as the creation of these carpets by the artist MALIN TADAA
Artists
I am not a fan of light-up clothes or accessories but I have found some very interesting projects on weaving combined with electronics. I will put some references below. If I had to choose a way to use this approach to fashion or design I think I would use textile art. And so starting from tradition, from something purely handmade, I would work to create something interactive. Exactly like some works below:
Helga Matos
The first artist is Helga Matos
She is a textile designer interested in innovative approaches in the use and creation of materials, techniques and concepts. She is passionate about creating textiles and constructing surfaces with beautiful materials. The projects she has worked on in recent years have allowed her to introduce other techniques into her weaving work to express her ideas and concepts.
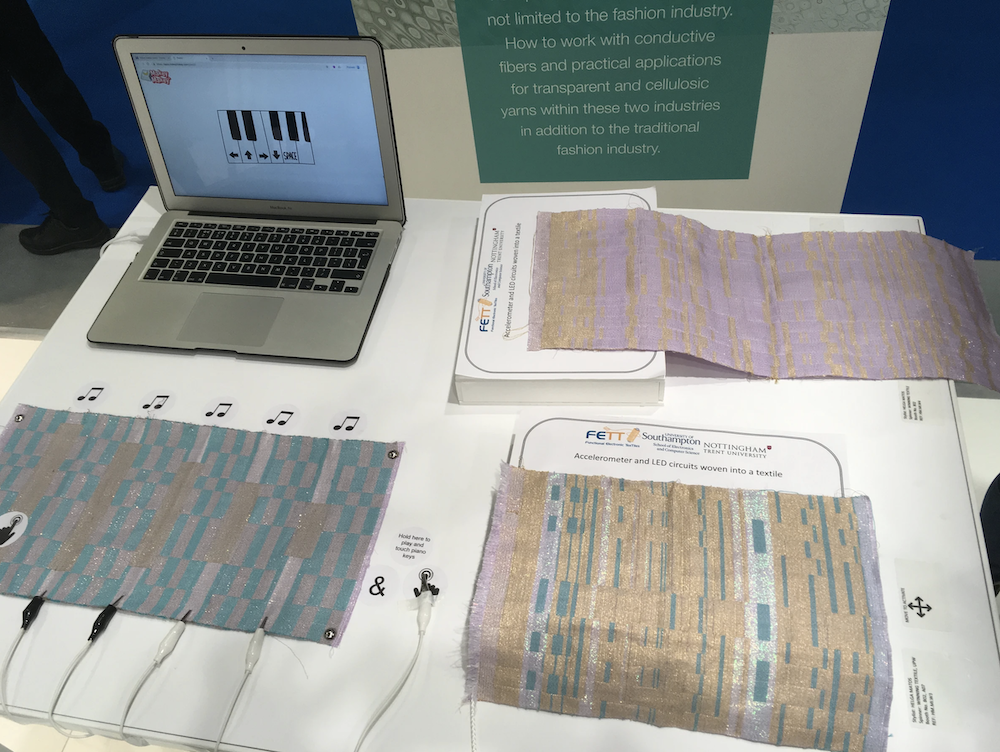
The first project I suggest you check out is called WOVEN PIANO it is really interesting how she manages to mix such an ancient technique of weaving with something so futuristic. But above all, the thing I like most is the interaction she has managed to create with our tactile and aural senses.
Another amazing project is called WAVE FABRIC,I suggest you look at this link to see the video on textiles. Here below I put some links about different kind of textiles that she made.
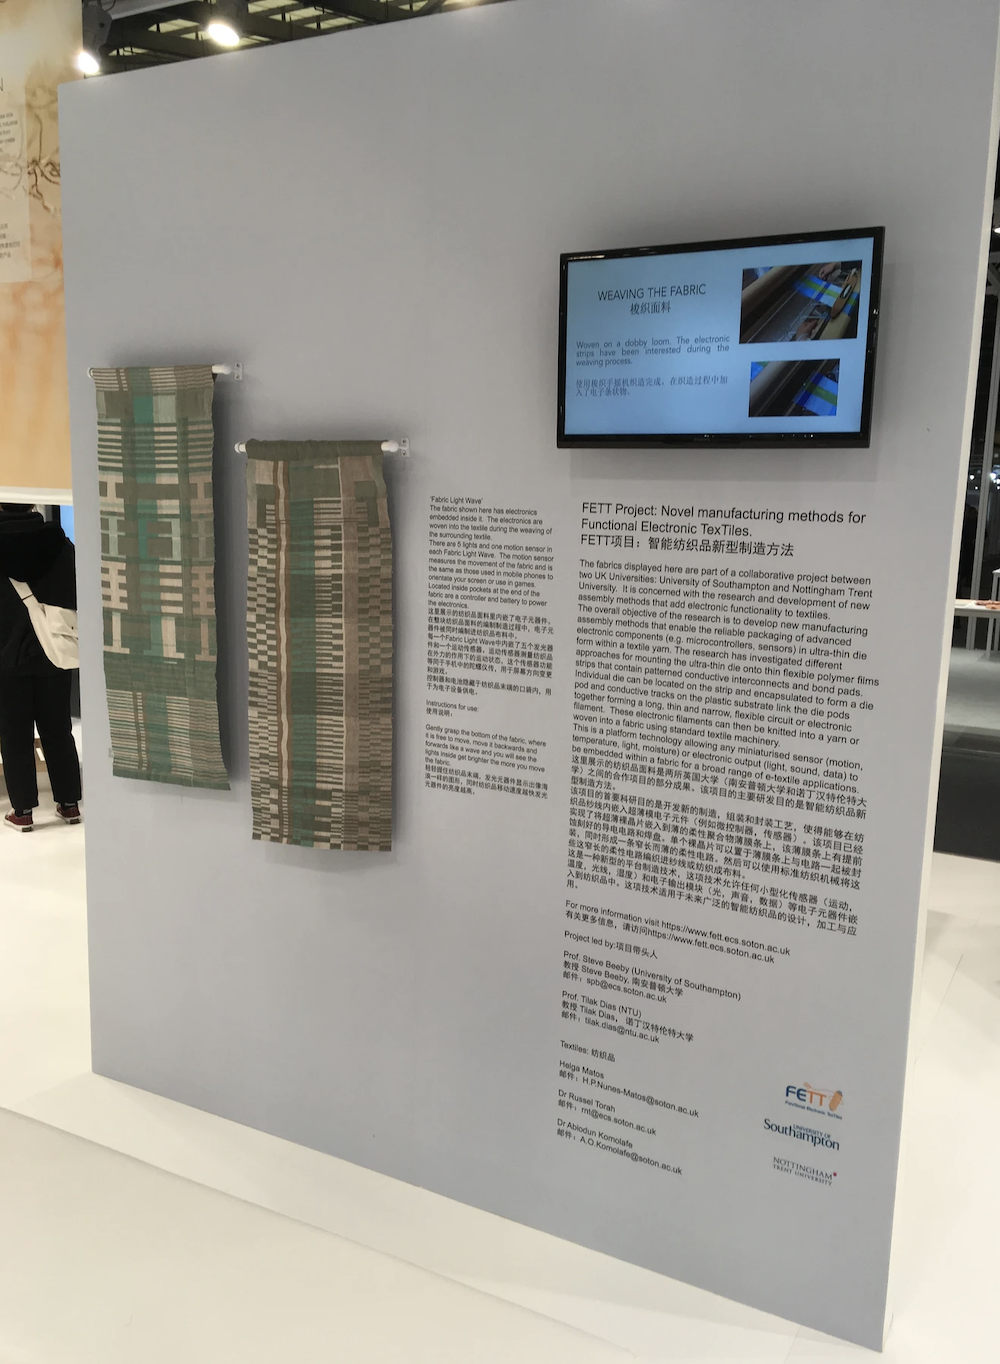
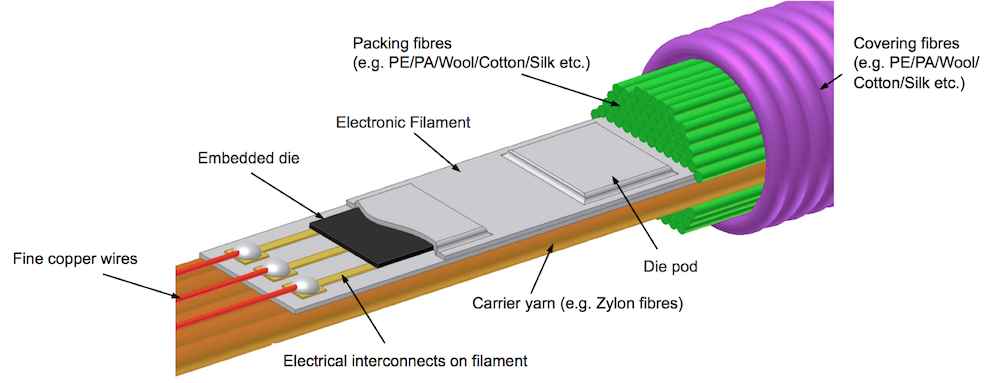
The fabrics in the video are part of a collaborative project between the University of Southampton, Nottingham Trent University and 10 commercial partners. It is concerned with the research and development of new assembly methods that add electronic functionality to textiles. The overall objective of the research is to develop new manufacturing assembly methods that enable the reliable packaging of advanced electronic components (e.g. microcontrollers, sensors) in ultra-thin die form within a textile yarn. The programme of research will investigate approaches for mounting the ultra-thin die onto thin flexible polymer films strips that contain patterned conductive interconnects and bond pads. Individual die will be located on the strip and encapsulated to form a die pod and conductive tracks on the plastic substrate will link the die pods together forming a long, very thin, flexible circuit or electronic filament.
For more information visit https://www.fett.ecs.soton.ac.uk
A motion fabric demonstrator we made for the display for the Material Innovation trend at Spinexpo Shanghai . The electronics are embedded inside the fabric during the weaving process. There are 4 lights and one motion sensor. The motion sensor measures the movement of the fabric and is the same as those used in mobile phones to orientate your screen or use in games. Located inside the pockets at the side of the fabric are a controller and battery to power the electronics.
Gently grabs the side of the fabric and tilt it backwards, forwards, left and right- you will see a different light turn on when you move the fabric and it will get brighter the more you tilt.
This swatch has electronics embedded inside during the weaving process. This example has four LEDs, accelerometers and battery to power it all. Each accelerometer activates the appropriate LED to light up according to the direction that the fabric tilts. This demonstrator was shown at the Wearable Technology show in London in 2018
MALIN TADAA

Malin Bobeck Optical Fiber Textiles from Malin Bobeck Tadaa on Vimeo.
“My work is my meditation, and Imbued with Awe came out of the dedication to that meditation. I believe the experience of Awe comes from within ourselves, and that through practice, we all have the ability to create it.” - Malin Bobeck Tadaa
Malin Bobeck Tadaa is an awarded textile artist based in Stockholm, Sweden. With her self-developed methodology of weaving LEDs, sensors, and electronics, into fabrics, she creates one-of-a-kind artworks. The optical fibers make her art both visual and tactile and invite the visitor to interact and influence it. The audience doesn’t just admire her art, they become a part of her installations.
TRAVELING LIGHT
Look at this amazing project called TRAVELING LIGHT

IMBUED WITH AWE

Imbued with Awe is an optical fiber textile artwork, connected in real-time, via Wi-Fi, to be remote controlled from the blockchain. It connects to Non-Fungible Tokens, whose owners are invited to go through a sacred ritual where they Imbue the artwork with their sense of Awe. These emotions, these sacred words are stored on the Ethereum blockchain and are used to create the color and light that flows through the artwork itself.
Imbued with Awe is the second in a series of seven Imbued artworks by award-winning Swedish artist Malin Bobeck Tadaa. Each artwork is inspired by a ritualistic use of textile from human history. Imbued with Awe represents the sacred, the use of textile to connect us with the divine. It draws inspiration from the Swedish “Åkdyna”, the pillow you placed in your wagon to carry you to church. It is an invitation to journey towards that connection with something bigger than yourself.
Medium: Custom woven optical fiber fabric. Woven by the artist at Ekelund Weavers in Horred, Sweden. Made with a cotton warp and optical fiber, cotton and shrinking yarn in the weft. 250 addressable LEDs, controlled by a ESP32 microcontroller. Wooden frame.
Tactile Refuge - Interactive textile installation
Tactile Refuge - Interactive textile installation from Malin Bobeck Tadaa on Vimeo.
Interactive fiber optic textile sculpture - Those Who Affected Me
Interactive fiber optic textile sculpture - Those Who Affected Me - Background story from Malin Bobeck Tadaa on Vimeo.
EMERGING SENSATION
EMERGING SENSATION - Behind the scenes - Malin Bobeck Tadaa from Malin Bobeck Tadaa on Vimeo.
DISCOVERING ARDUINO
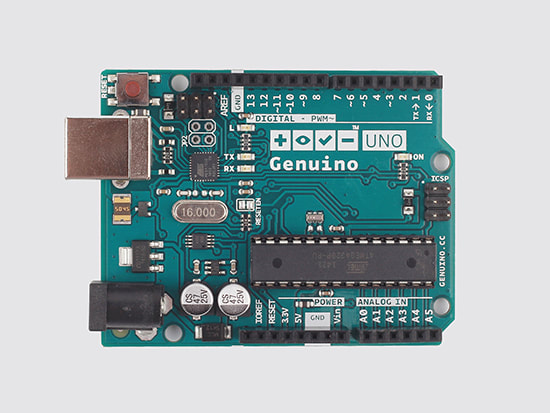
Arduino is an open-source i.e., freely licensed board used to build robotics, electronics and automation projects.
Arduino is a programmable board with a microcontroller and including a software part, or IDE, that runs on a computer and is used to write and load computer code (in the "C" language) into the board itself.
Arduino is a small electronic board equipped with a central microcontroller (the microcontroller is the brain of our system) and a few electronic components so that it is easier to connect with external devices of various kinds.
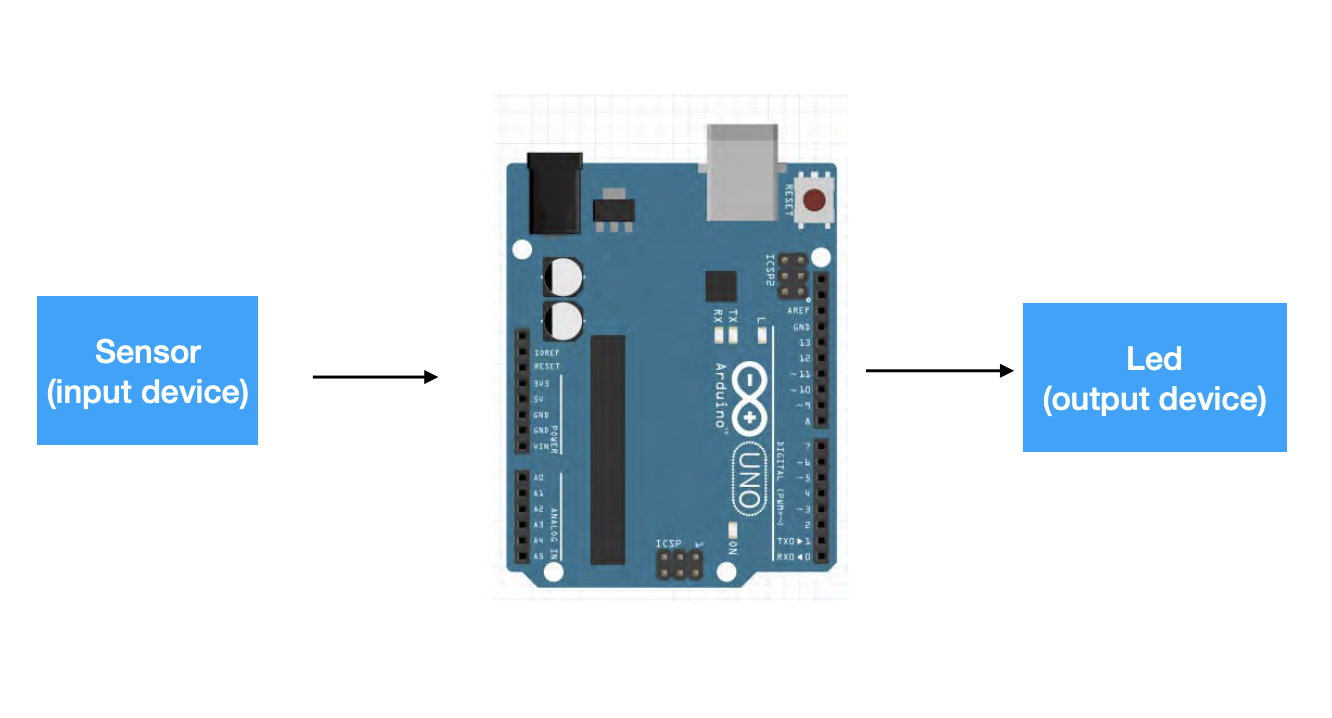
HOW WE WILL USE ARDUINO
- control a Led
- read a sensor
- to control a Led based on the interaction with the sensor
WHAT DO WE NEED
- make a circuit (with Arduino)
- ‘write’ (use the right) the code for the circuit
FIRST TEST with Arduino
It remains a bit difficult for me to explain in English some of the technical information of Arduino, so I will only write you what I have performed in testing, if you follow these steps you will not go wrong, (I hope).
Here below you will find just the informations to how to connect your Arduino to the Software.
-
First, get an Arduino and a USB cable to connect your board to the computer. Make sure the connection is good, often depending on the cable or Arduino you use you may have difficulty with readability.
-
Download the Arduino Software, I downloaded the IDE version 2.1.0. I will put the link below to download it:
-Open Arduino on your computer and go to select board and check that your Arduino is read, it may not show up, you have to do several tests to see if it works or not.
- If it reads it to you you are ready to code and transfer your coding directly to the Arduino you have.
But now let's talk about what we need to use with Arduino for our first test:
MAKE A CODE on the Software
It is important to know that every time you create a code that you transmit to Arduino it will store it forever, so when you create other codes remember to always transmit them to your external Arduino so that they are updated.
- To make a test you can try to Open an example code - FILE - EXAMPLES - BASIC - BLINK. Open the code, and transfer to Arduino, I put the example code that I used here below:
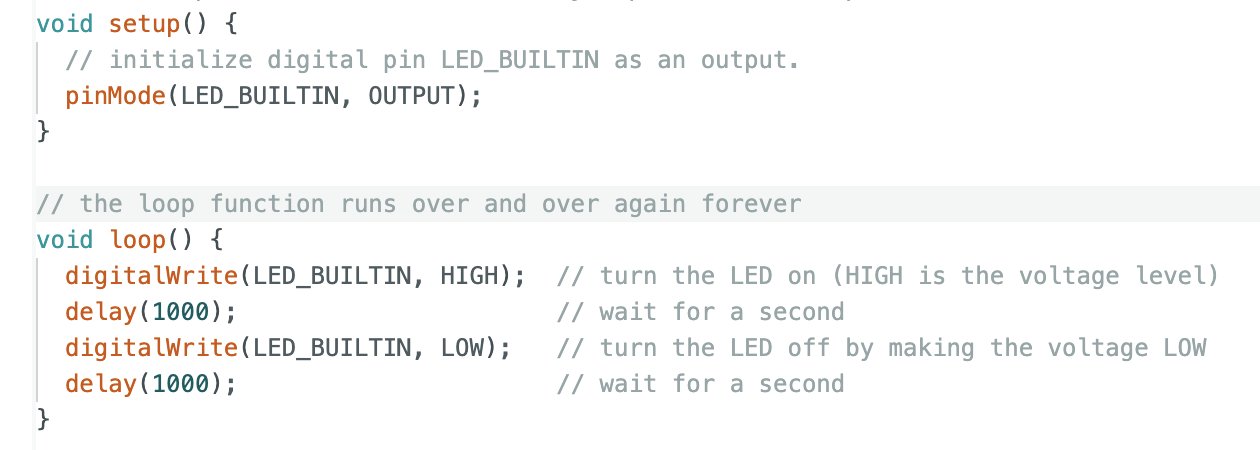
According to this code you will transmit inputs to your external Arduino to turn on the LED indefinitely.
MAKE the CIRCUIT on your BREARBOARDS
- The breadboards will become your best friend cause you can create and test your circuit there. So the flow will be, create a circuit on your cardboards through various tools that I put below, once you create the circuit you will write the code on the Arduino software, once you write the code you will transfer it to your external Arduino that will be connected to your breadboard and so it will do what you told it to do.
TOOLS
- BREADBOARD
- JUMPER
- RESISTOR
- LED
How I connect everyrthing together:
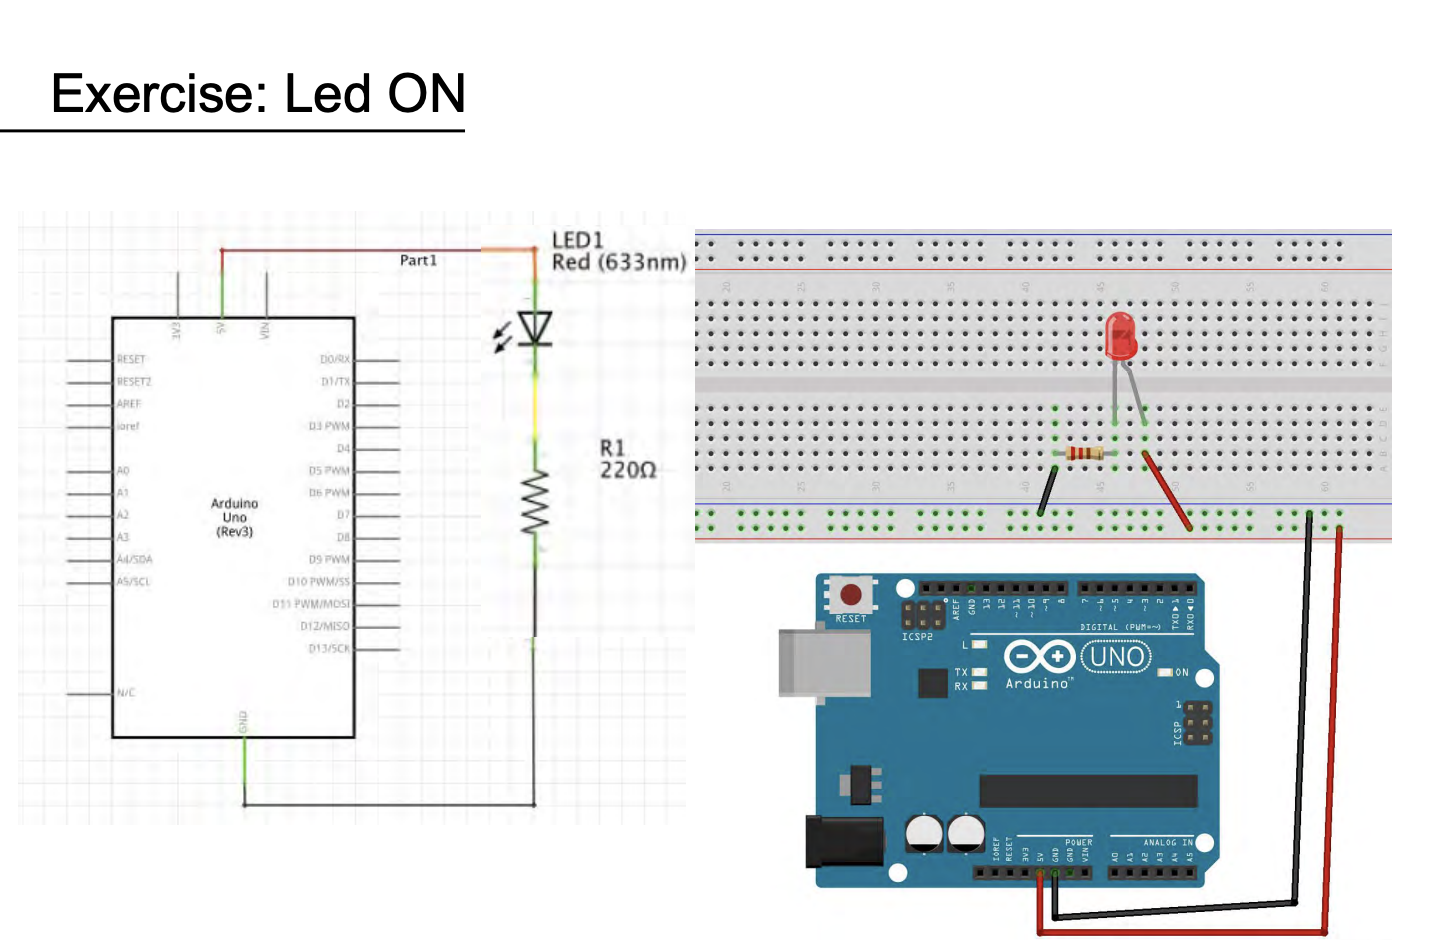
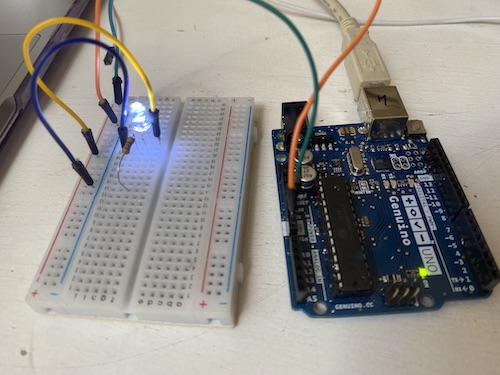
At this point that you have your circuit ready and written the code we can upload the code to Arduino via the connected USB cable and you will see the LED light up.
With this text what I have done is simply to allow the LED to turn on once.
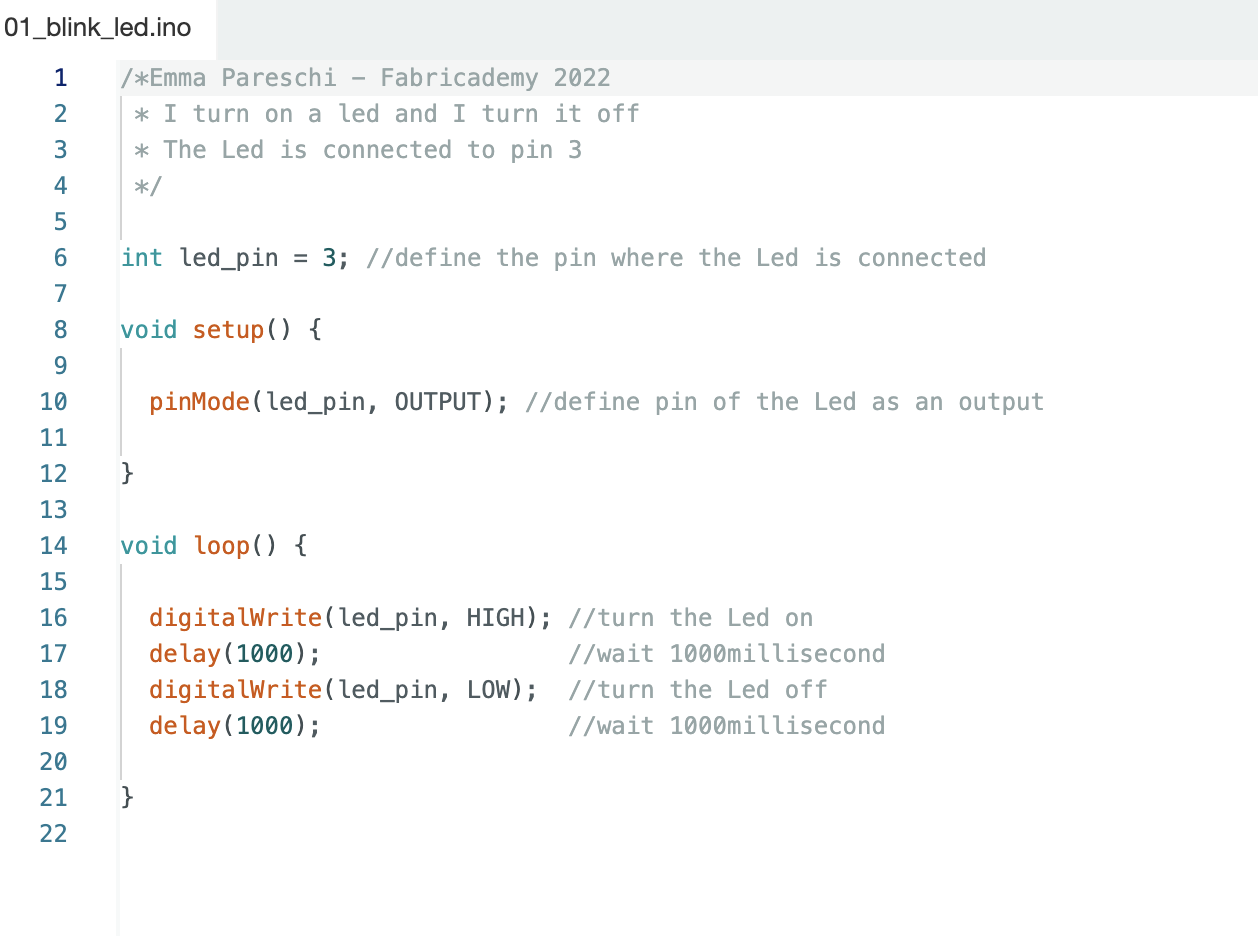
SECOND TEST with Arduino : LED BLINKING IN LOOP
But if you want to control the turning on and off of the led and not just keep it ON you can do it this way: instead of connecting the let to the 5 volt power pin I connect it to pin n°3 which I only change by connecting it near the long leg of the led. Also, the code in the Arduino software must also be changed at this point, i'll leave you the code below:
if you want to change the flicker time, you only need to change the delay time.
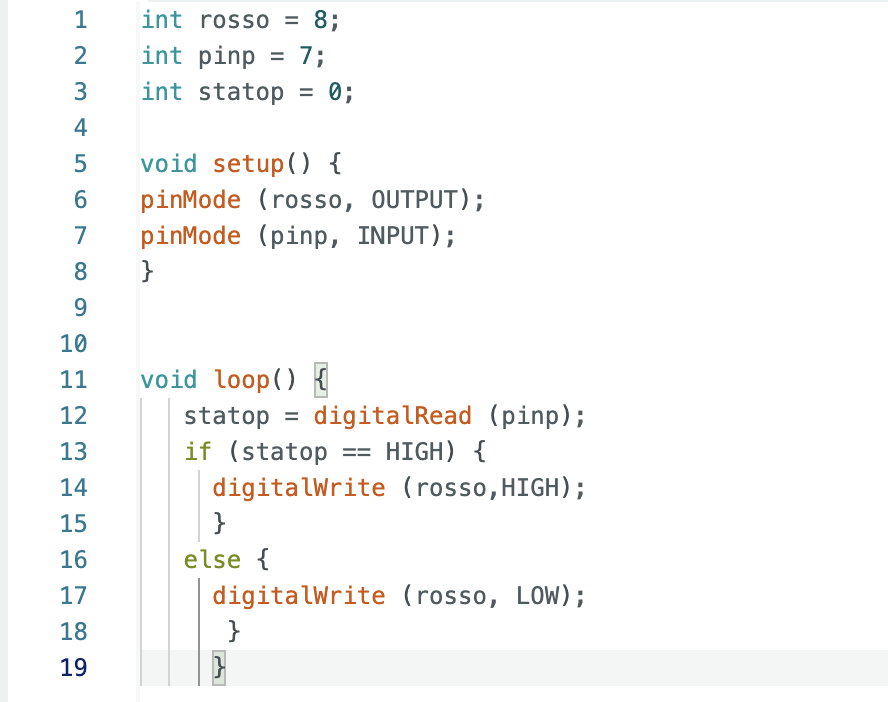
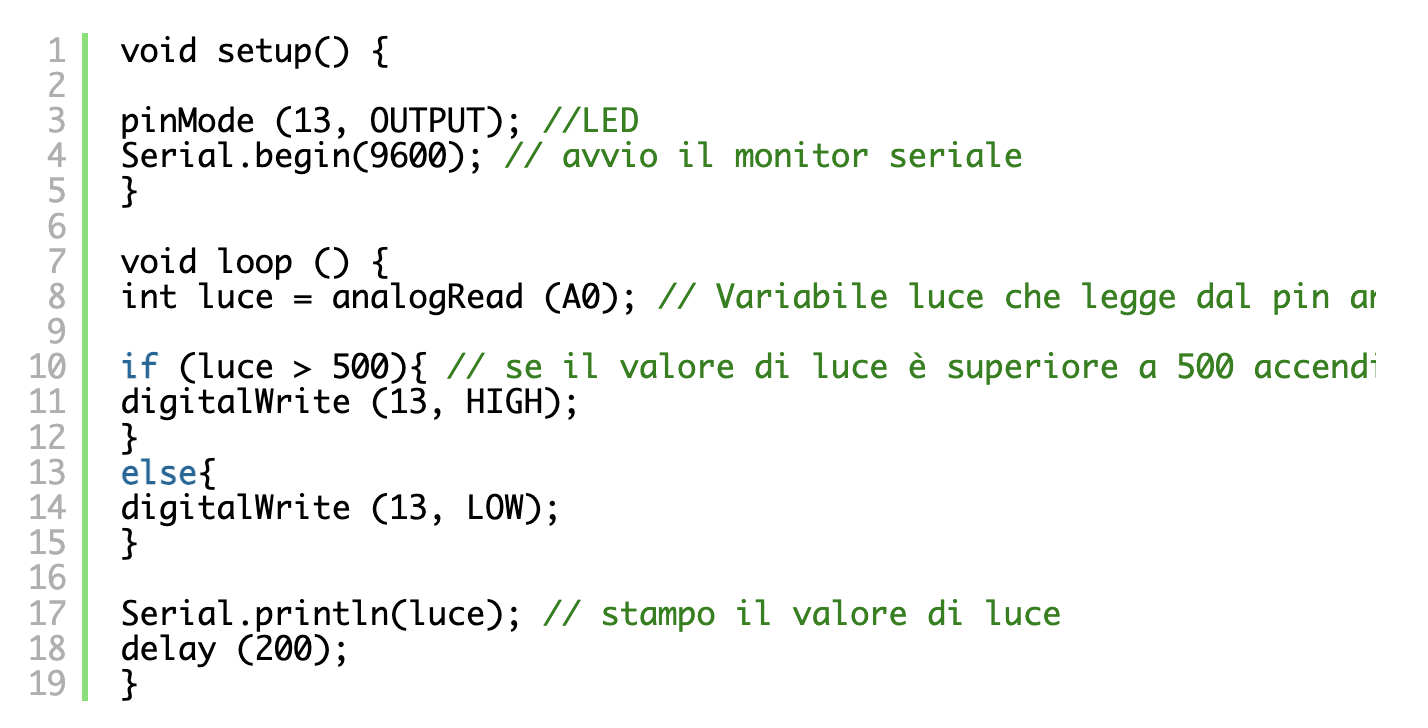
THIRD TEST with Arduino : Using a PHOTOSENSOR to make an LED light up.
If you want to create a PHOTOSENSOR CIRCUIT similar you will use a photosensor for measuring brightness: we are talking about the photoresistor or twilight sensor. We will see how to make a system that turns on an LED when the brightness decreases. It can be useful to learn how to build lighting systems that turn on when the sunlight starts to decrease.
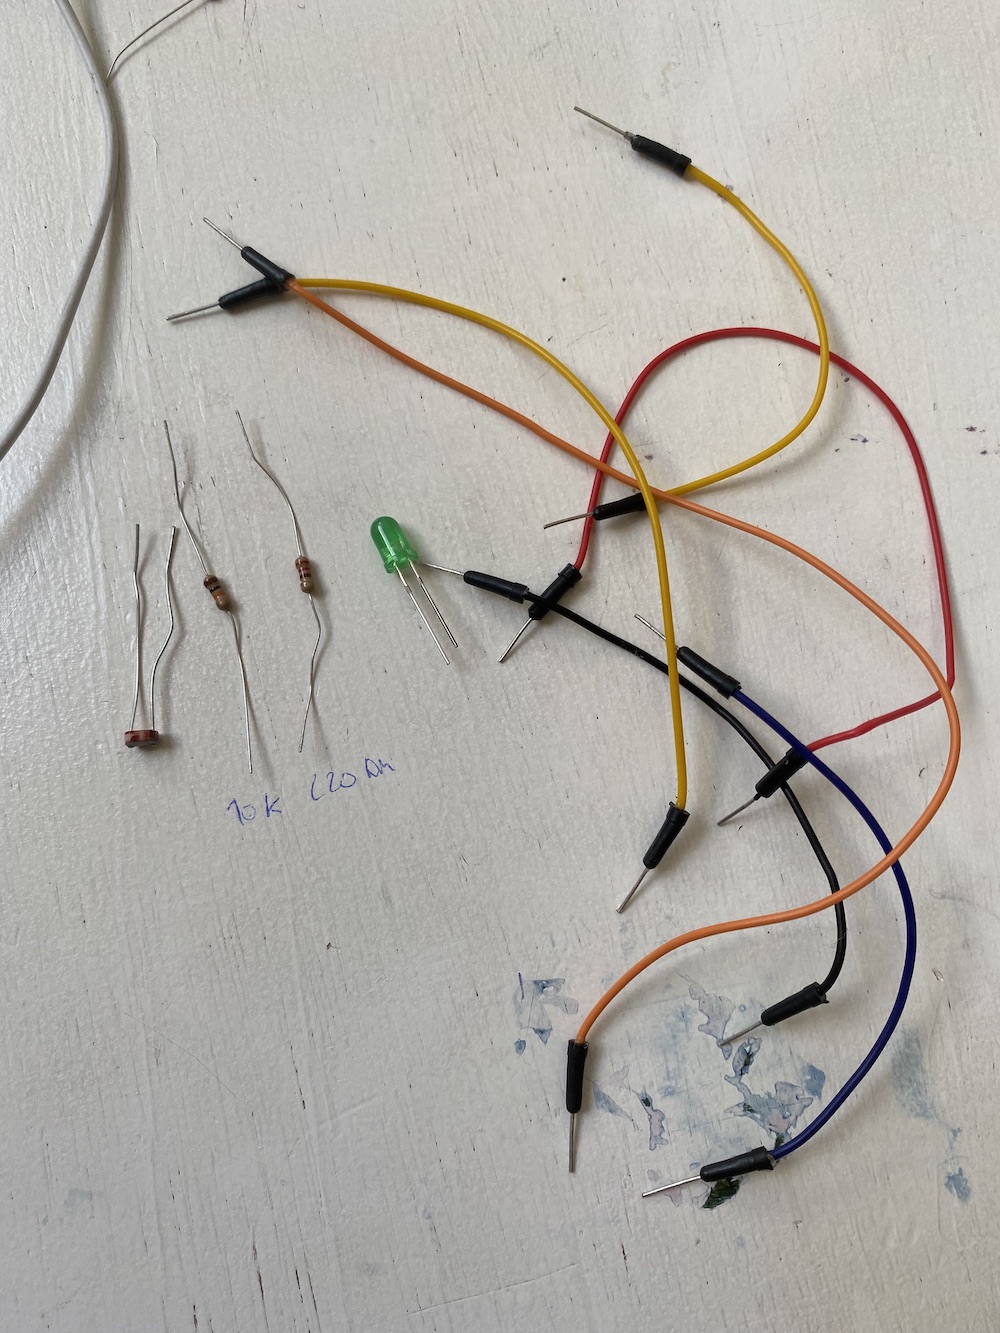
First you need Arduino UNO, an LED, jumpers, a 220 OHM resistor, a 10000 OHM resistor, and a photosensor. Remember that the first resistor is for the LED, while the second resistor we will use for the photoresistor.
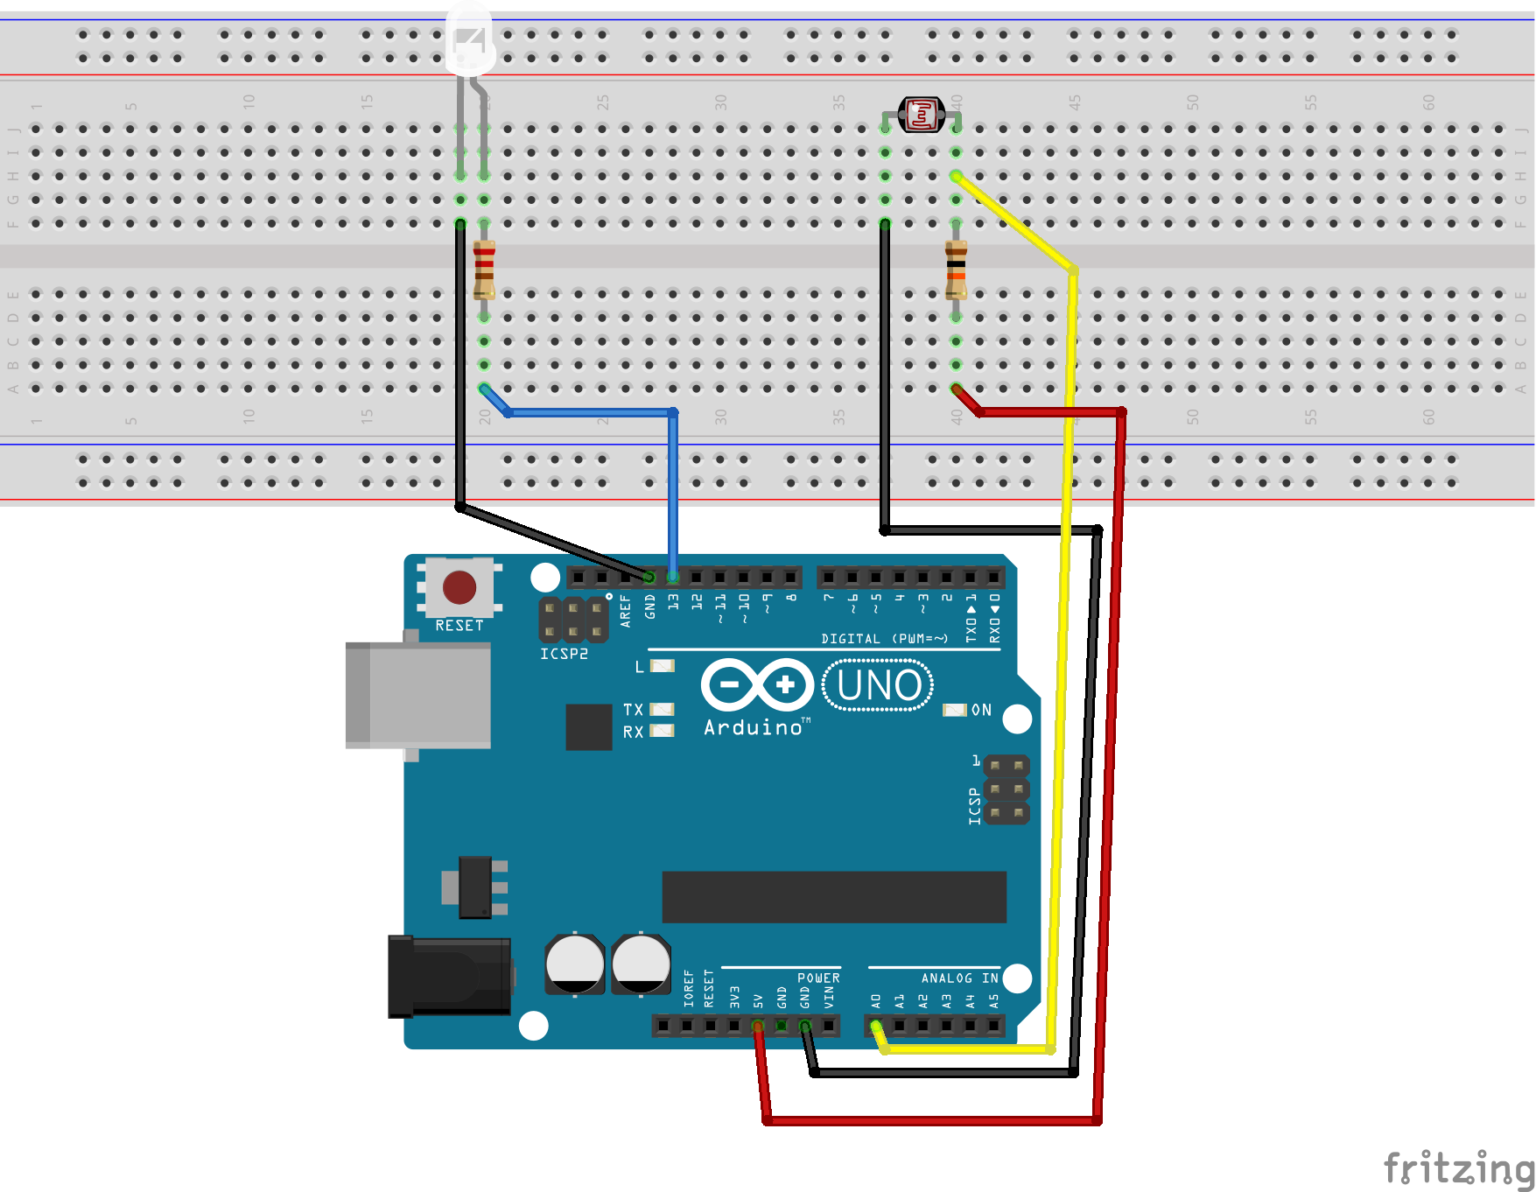
In the code we find the start of the serial monitor, arranged in the VOID SETUP, while in the VOID LOOP we declare the variable light in integer, since the analog signal is a positive integer between 0 and 1023. To verify that light is greater than the value 500 to turn on the LED, we will use an IF/Else, a function that checks whether the condition set (light>500) is true or not. If it is true, the LED will turn on; if not, the LED will remain off.
Here below a short video about my photosensor circuit:
FOURTH TEST with Arduino : SWITCH BUTTON
Here below the code I used to power my circuit: