8. Wearables
Research
Coming off the heels of Grasshopper week, feeling overwhelmed and disoriented by the insturction I decided to focus this wearables week more on Thermochromic ink, how it interacts with different materials and interactions. After many attempts in many directions, I think it's safe to say this was a fail week. Fail, and learning, and also fail and understanding what I'm really good at ;)
This week I was very much inspired by EJTECH which is a duo combining textile works and electronics.
Maggie Orth was one of the pioneers in this area. In her worlk, 100 Electronic Art Years, 2009, Maggie wove conductive yarns with hand woven cotton rayon some dyed with thermochromic ink.
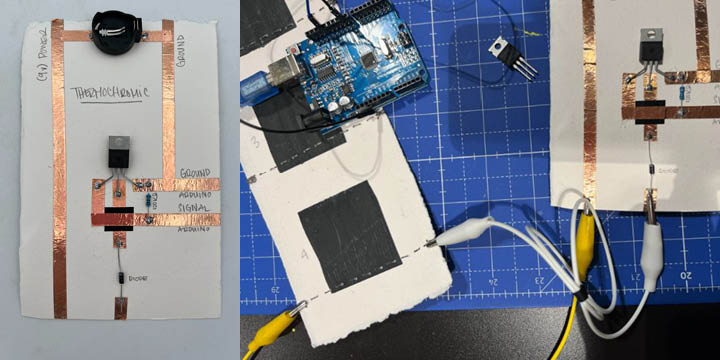
For this week I decided to take a very experimental approach, trying different methods, and applications with the thermochromic ink. In order to create and test all of the experiments below I created at thermochromic transistor as directed within Liza Starks's tutorial as seen in images below.
Thermochromic Fibers
Painting Thermochromic
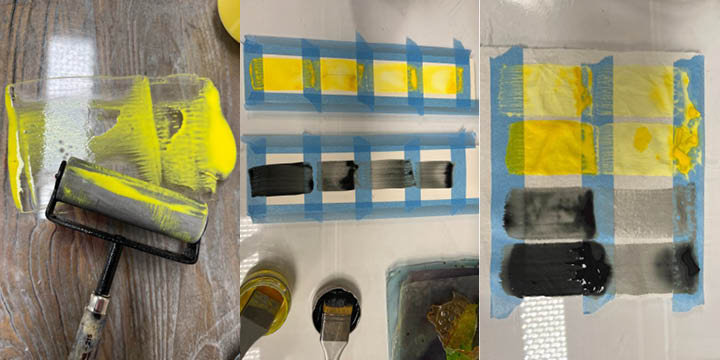 Working with Irati in the Base BioDesign Print Center, I learned about the viscocity of my materials and set up material tests. the first of which was on thick printing paper. I painted 4 swatches, each with an additional layer of paint in order to udnerstand how the different in layering may be affected by elecrical heat. A critical learning from Irati here was that I needed to apply the paint in a single stroke, in order to ensure an even application of the paint; that rolling in this case was not the best option given the high viscosity and lower pigment levels in our paint. All tests were run using 5v of power.
Thermochemic ink test from Lisa Boulton on Vimeo.
Inital tests were ineffective as a result of a broken MOSFAT transisior however when 5 votes were applied in later tests you will see that an affect was made in the black samples. Interestingly, there was no difference in the effectiveness of the change regardless of how thick the paint was.
Copper tape Thermochromic from Lisa Boulton on Vimeo.
Another test was run again using copper tape which appeared to be completedly ineffective at causing an affect on the ink. I suspect this is because the tape allowed for too much electron loss.
Thermochromic knit from Lisa Boulton on Vimeo.
In this experiement, I dipped acrylic yarn into watered down thermophromic paint then knit it with a conductive thread in order to understand how the current might travel express or short within the fabric
Thermochromic BioPlastics
Looking to Hanna Jaafreh's work on bio materials I used a recipe of:
* 4g Agar
* 2.5g gylcerine
* 394g of water
* 5.5g of thermochromic ink*
Method: water was warmed to around 80*C then glycerine was added. Agar was slowly mixed in and stirred for about 25 minutes until thick. The 5.5g of thermochromic ink was then added.
 Using conductive thread I created 2 test forms, "Lisa" and "Time", again channeling my need for personal brain space after Grasshopper week. The text forms were placed in small trays one of which had a texture on the bottom.
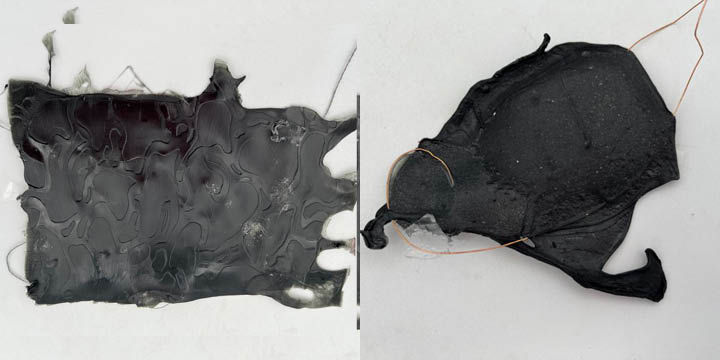 Unfortunately I had little material and the trays were not completely full creating a bit of a blobby shape. I painted an initial layer of the bioplastic, in which i layed the text - then ppired the biomaterial overtop again and spread where necassary in order to cover the conductive material completely.
 Tests on the copper "time" experiment proved completely ineffective - resulting in no change in the material. The conductive thread with "Lisa" however did show limited results over time with again 5v applied.
Thermochromic Algenate
 Using as remnant of a colleagues Algenate mix I creates an Algenate medallion. The following recipe and process was used to create the material:
* 12g Alginate
* 30g Glycerine
* 400ml water
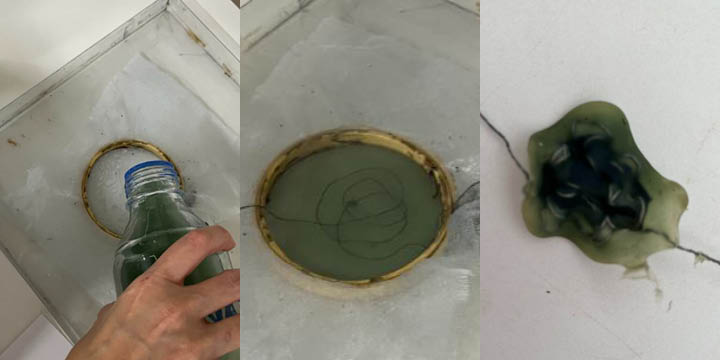
I poured the alegante mixture into a embrodery hoop with a mesh backing and placed it in a bath of the following mixture being sure to leave the top of the algemixture untouched by the solution.
* 10ml Sodium Chloride
* 100ml water
I coiled a piece of thermochromic ink ontop of the algenate in the abroidery hoop. I then applied a layer of algenate that had 2ml of thermochromic ink mixed in ontop. Finally I sprayed the entire pieve with the sodium chloride mixture in order to seal the piece together.
Again, results were effective but modest with 5v applied. It appears as though the string portions which were closer to the surface of the algenate had a more profound affect in terms of colour change. The resultuing texture of the algenate was significantly distorted and the over all scale of the piece reduced by about 40%.
Speaker
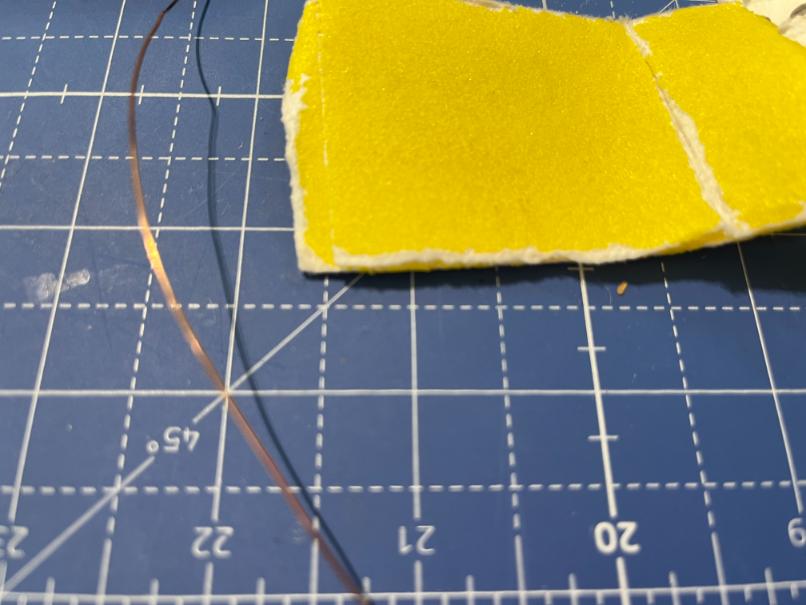
In an attempt to play some more with an ardino I built some speakers to test out some more wearable tech. Largely I followed Kobakant's instructions in the creation of my prototype. Following much of Marisa Satsia's process I started by sanding down my copper wire in order to remove some of the enamle and improve the material conductivity.
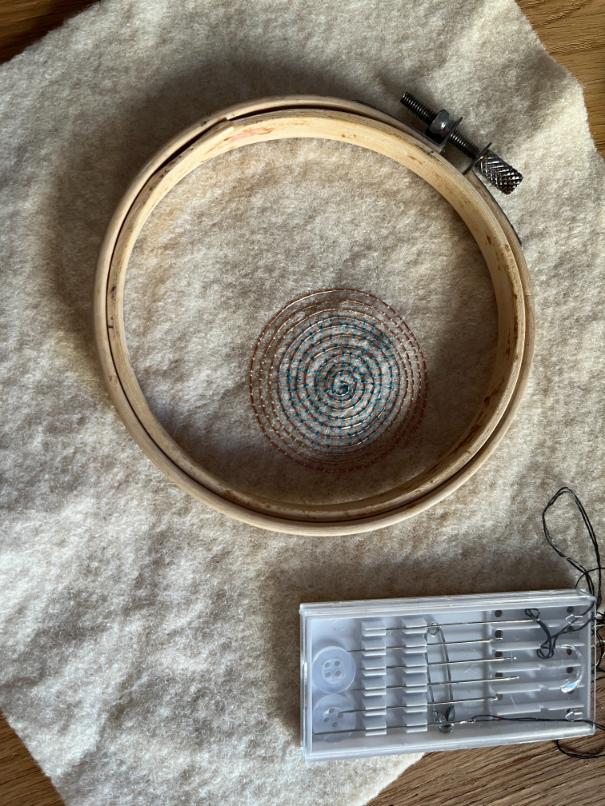 In order to secure the sanded copper to the wool textile I used a method called couching
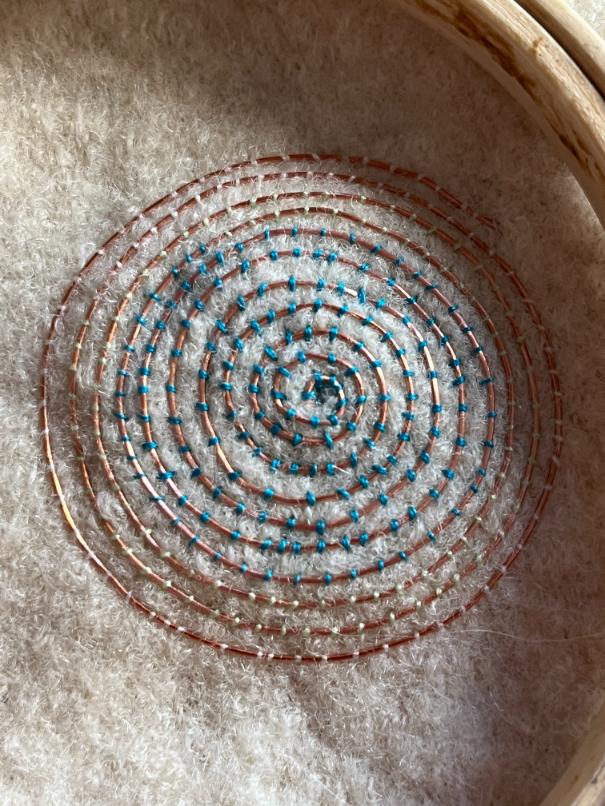
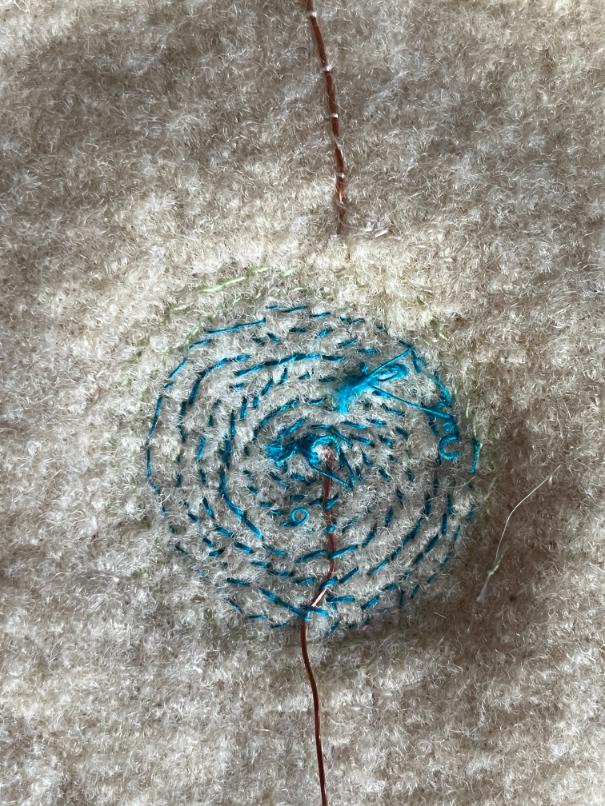 I designed this piece on the felt and with copper hidden on the backside of the textile such that it might be re-purposed in the skinterfaces week; ensureing that it could be comfortable to be worn against the skin.
/*
Jigglypuff's Song
Connect a piezo buzzer or speaker to pin 11 or select a new pin.
More songs available at https://github.com/robsoncouto/arduino-songs

Robson Couto, 2019
*/
#define NOTE_B0  31
#define NOTE_C1  33
#define NOTE_CS1 35
#define NOTE_D1  37
#define NOTE_DS1 39
#define NOTE_E1  41
#define NOTE_F1  44
#define NOTE_FS1 46
#define NOTE_G1  49
#define NOTE_GS1 52
#define NOTE_A1  55
#define NOTE_AS1 58
#define NOTE_B1  62
#define NOTE_C2  65
#define NOTE_CS2 69
#define NOTE_D2  73
#define NOTE_DS2 78
#define NOTE_E2  82
#define NOTE_F2  87
#define NOTE_FS2 93
#define NOTE_G2  98
#define NOTE_GS2 104
#define NOTE_A2  110
#define NOTE_AS2 117
#define NOTE_B2  123
#define NOTE_C3  131
#define NOTE_CS3 139
#define NOTE_D3  147
#define NOTE_DS3 156
#define NOTE_E3  165
#define NOTE_F3  175
#define NOTE_FS3 185
#define NOTE_G3  196
#define NOTE_GS3 208
#define NOTE_A3  220
#define NOTE_AS3 233
#define NOTE_B3  247
#define NOTE_C4  262
#define NOTE_CS4 277
#define NOTE_D4  294
#define NOTE_DS4 311
#define NOTE_E4  330
#define NOTE_F4  349
#define NOTE_FS4 370
#define NOTE_G4  392
#define NOTE_GS4 415
#define NOTE_A4  440
#define NOTE_AS4 466
#define NOTE_B4  494
#define NOTE_C5  523
#define NOTE_CS5 554
#define NOTE_D5  587
#define NOTE_DS5 622
#define NOTE_E5  659
#define NOTE_F5  698
#define NOTE_FS5 740
#define NOTE_G5  784
#define NOTE_GS5 831
#define NOTE_A5  880
#define NOTE_AS5 932
#define NOTE_B5  988
#define NOTE_C6  1047
#define NOTE_CS6 1109
#define NOTE_D6  1175
#define NOTE_DS6 1245
#define NOTE_E6  1319
#define NOTE_F6  1397
#define NOTE_FS6 1480
#define NOTE_G6  1568
#define NOTE_GS6 1661
#define NOTE_A6  1760
#define NOTE_AS6 1865
#define NOTE_B6  1976
#define NOTE_C7  2093
#define NOTE_CS7 2217
#define NOTE_D7  2349
#define NOTE_DS7 2489
#define NOTE_E7  2637
#define NOTE_F7  2794
#define NOTE_FS7 2960
#define NOTE_G7  3136
#define NOTE_GS7 3322
#define NOTE_A7  3520
#define NOTE_AS7 3729
#define NOTE_B7  3951
#define NOTE_C8  4186
#define NOTE_CS8 4435
#define NOTE_D8  4699
#define NOTE_DS8 4978
#define REST      0


// change this to make the song slower or faster
int tempo = 85;

// change this to whichever pin you want to use
int buzzer = 11;

// notes of the moledy followed by the duration.
// a 4 means a quarter note, 8 an eighteenth , 16 sixteenth, so on
// !!negative numbers are used to represent dotted notes,
// so -4 means a dotted quarter note, that is, a quarter plus an eighteenth!!
int melody[] = {

// Jigglypuff's Song
// Score available at https://musescore.com/user/28109683/scores/5044153

NOTE_D5,-4, NOTE_A5,8, NOTE_FS5,8, NOTE_D5,8,
NOTE_E5,-4, NOTE_FS5,8, NOTE_G5,4,
NOTE_FS5,-4, NOTE_E5,8, NOTE_FS5,4,
NOTE_D5,-2,
NOTE_D5,-4, NOTE_A5,8, NOTE_FS5,8, NOTE_D5,8,
NOTE_E5,-4, NOTE_FS5,8, NOTE_G5,4,
NOTE_FS5,-1,
NOTE_D5,-4, NOTE_A5,8, NOTE_FS5,8, NOTE_D5,8,
NOTE_E5,-4, NOTE_FS5,8, NOTE_G5,4,

NOTE_FS5,-4, NOTE_E5,8, NOTE_FS5,4,
NOTE_D5,-2,
NOTE_D5,-4, NOTE_A5,8, NOTE_FS5,8, NOTE_D5,8,
NOTE_E5,-4, NOTE_FS5,8, NOTE_G5,4,
NOTE_FS5,-1,

};

// sizeof gives the number of bytes, each int value is composed of two bytes (16 bits)
// there are two values per note (pitch and duration), so for each note there are four bytes
int notes = sizeof(melody) / sizeof(melody[0]) / 2;

// this calculates the duration of a whole note in ms
int wholenote = (60000 * 4) / tempo;

int divider = 0, noteDuration = 0;

//variable for the senor
int sensor_pin = 7;
int sensor_value = 0;

void setup() {

pinMode(sensor_pin, INPUT_PULLUP);
Serial.begin(9600);
}

void loop() {

//read and save the sensor voltage
sensor_value = digitalRead(sensor_pin);
Serial.println(sensor_value);

if(sensor_value == LOW){  //if the sensor is pressed
play_melody();  //play the melody
}

}

void play_melody(){
// iterate over the notes of the melody.
// Remember, the array is twice the number of notes (notes + durations)
for (int thisNote = 0; thisNote < notes * 2; thisNote = thisNote + 2) {

// calculates the duration of each note
divider = melody[thisNote + 1];
if (divider > 0) {
// regular note, just proceed
noteDuration = (wholenote) / divider;
} else if (divider < 0) {
// dotted notes are represented with negative durations!!
noteDuration = (wholenote) / abs(divider);
noteDuration *= 1.5; // increases the duration in half for dotted notes
}

// we only play the note for 90% of the duration, leaving 10% as a pause
tone(buzzer, melody[thisNote], noteDuration * 0.9);

// Wait for the specief duration before playing the next note.
delay(noteDuration);

// stop the waveform generation before the next note.
noTone(buzzer);
}
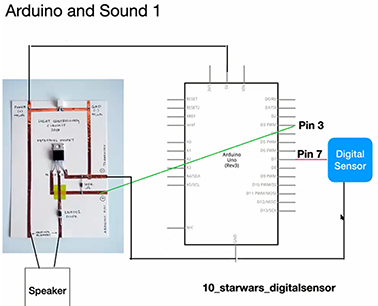
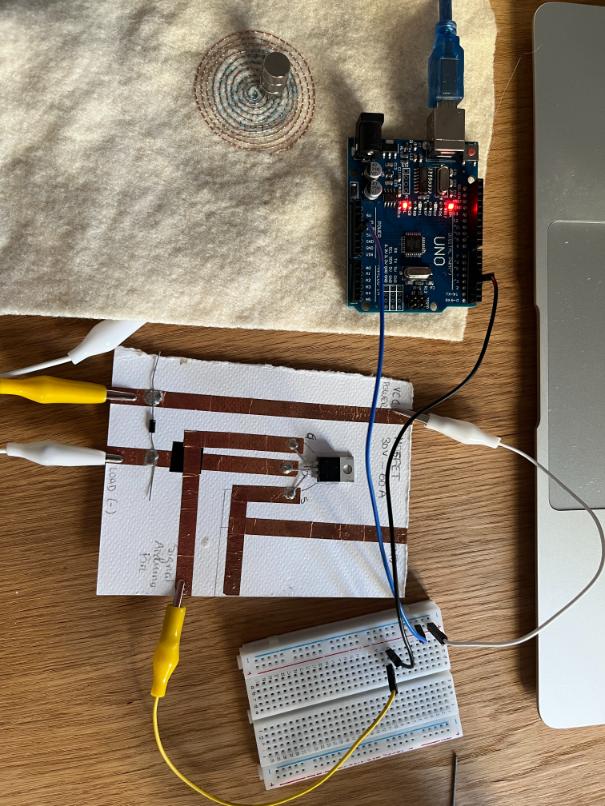
Once the code had been uploaded to the Arduino I disconnected it and made the following circuit connections as described in Liza Starks Presentation:
 I applied the magnets to the textile and run the program however was unable to create a sound. This is possible for a number of reasons:
* Perhaps the transistor was ineffective
* Possibly I had a wiring error however I do not believe so
* The felt fabric was too thick and thus wouldn't allow for the vibration to create sound
* The magnets were not strong enough to register a sound
Tools
Thermochromic Textiles:
* Thick paintbrush
* Palette for paint
* Blowdryer to rapidly dry paint
* Conductive Thread
* Knitting needles
Thermochromic Biomatierals:
* Scale
* Silicone spoon
* Enamel pot
* Moulding tray
Speakers
* Needle + Thread
* Textile
* Copper Wire
* Rare Earth Magnets
* Arduino
* Transistor circuit (MOSFAT)