4. BioChromes
Introduction
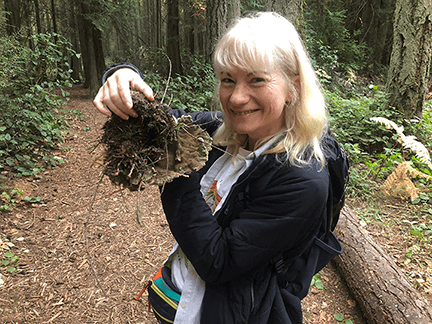
This time last year I went up to Port Townsend, WA to attend the International Fungi and Fabric Symposium, IFFS. This symposium was life changing! I learned about mushroom dying, mushroom paper making, fluorescent pigments found in mushrooms, how to forage for mushrooms (I found my very first Dyer's polypore!), and more.
 After attending IFFS I gained the courage to join the LA Mycology Society to immerse myself further into the mycology community. Below are some resources about mushrooms dyes, pigments, and inks that I have gathered over the past year:
Mushroom resources
Books
- Magic in the Dyepot by Ann Paulsen Harmer
- Mushrooms for Dyes, Paper, Pigments and Myco-stix by Miriam C. Rice
Websites
- Mushroom Color Altas
- LA Mycology Society
People:
- Sidnee Obersingleton: fungal pigment research
- Sam Shoemaker: mushroom scuplture, mycelial materials, bioart
- Jess Manganaro: cordecyps, bioart, fungal pigment research
- Alan Rockefeller: mushroom ID, science
Since learning how to work with mushrooms, I have been trying to learn all that I can about biopigments across the taxonomic kingdoms. I have not had much experience with plant dyes and so I focused this week around exploring those.
I am also very excited to try out bacterial dyes. I am currently writing up a lesson plan and lab for my high school students to dye fabric with different types of naturally pigmented-bacteria. I have included that lesson plan here as well and will update with my progress over the next couple of weeks.
Results
Plant-based dyes
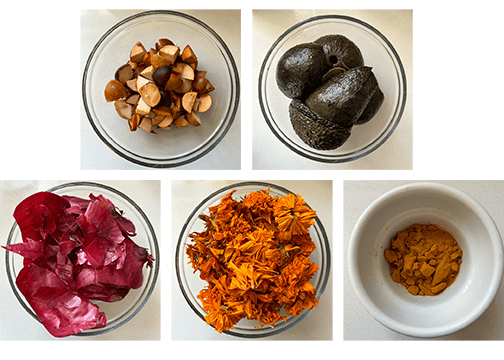
Figure 1. Preparing the plant-based dye materials. From left to right; avocado pits, avocado skins, red onion skins, marigolds, turmeric. Avocados and red onion skins were recycled from food waste. Marigolds were recycled from old bouquet. Avocado skins and pits were placed together in single dye bath. All dye materials (excpet for turmeric) were kept frozen until use.
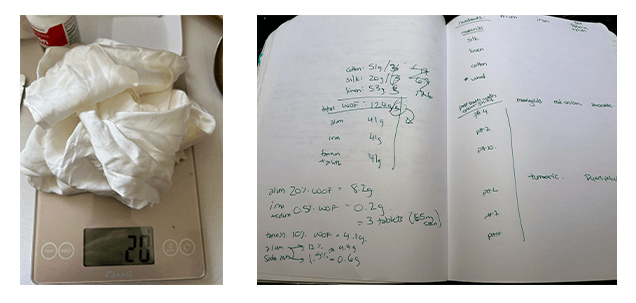
Figure 2. Weighing out the dry fabric. I calculated the total weight of Fiber (WOF) for each fabric type (silk, linen, and cotton). I then divided the total WOF by three to calculate the amount of each type of mordant I needed. I used the recipe provided by Botanical Colors, specific links are found under Methods and Materials.
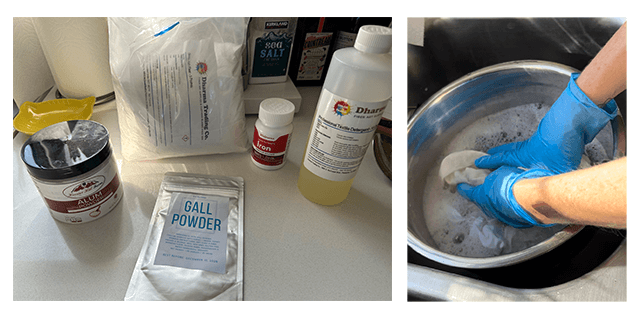
Figure 3. Scouring and mordanting the fabric. Next, I washed the fabric with Dharma Professional Textile Detergent. I rinsed the fabric thoroughly before dividing each piece into thirds in order to be split into the 3 different mordants I wanted to test (alum, tanning + alum, and iron). See Table 1 for further details on how I divided up the fabric.
Table 1. Breakdown of Materials/Mordant types/Dye types that were tested.
| Material name | Mordant | Dye | Material name | Mordant | Dye |
|---|---|---|---|---|---|
| Silk | Alum | Red onion skins | Linen | Alum | Red onion skins |
| Silk | Alum | Avocado | Linen | Alum | Avocado |
| Silk | Alum | Marigolds | Linen | Alum | Marigolds |
| Silk | Alum | Turmeric | Linen | Alum | Turmeric |
| Silk | Tannin + Alum | Red onion skins | Linen | Tannin + Alum | Red onion skins |
| Silk | Tannin + Alum | Avocado | Linen | Tannin + Alum | Avocado |
| Silk | Tannin + Alum | Marigolds | Linen | Tannin + Alum | Marigolds |
| Silk | Tannin + Alum | Turmeric | Linen | Tannin + Alum | Turmeric |
| Silk | Iron | Red onion skins | Linen | Iron | Red onion skins |
| Silk | Iron | Avocado | Linen | Iron | Avocado |
| Silk | Iron | Marigolds | Linen | Iron | Marigolds |
| Silk | Iron | Turmeric | Linen | Iron | Turmeric |
| Cotton | Alum | Red onion skins | Cotton | Alum | Avocado |
| Cotton | Alum | Marigolds | Cotton | Alum | Turmeric |
| Cotton | Tannin + Alum | Red onion skins | Cotton | Tannin + Alum | Avocado |
| Cotton | Tannin + Alum | Marigolds | Cotton | Tannin + Alum | Turmeric |
| Cotton | Iron | Red onion skins | Cotton | Iron | Avocado |
| Cotton | Iron | Marigolds | Cotton | Iron | Turmeric |
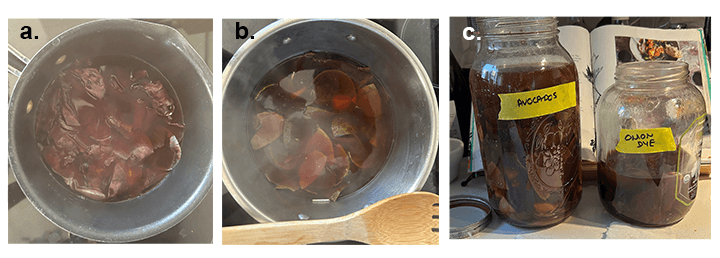
Figure 4. Making the dye baths. a & c) Red onion skin dye bath. I let them simmer for about an hour and then transferred them to a jar to further soak overnight. b & c) Avocado dye bath conisting of both skins and chopped up pits. I let them simmer for about an hour and then transferred them to a jar to further soak overnight. Prior to dyeing the fabric, I strained the dyes to remove debris.
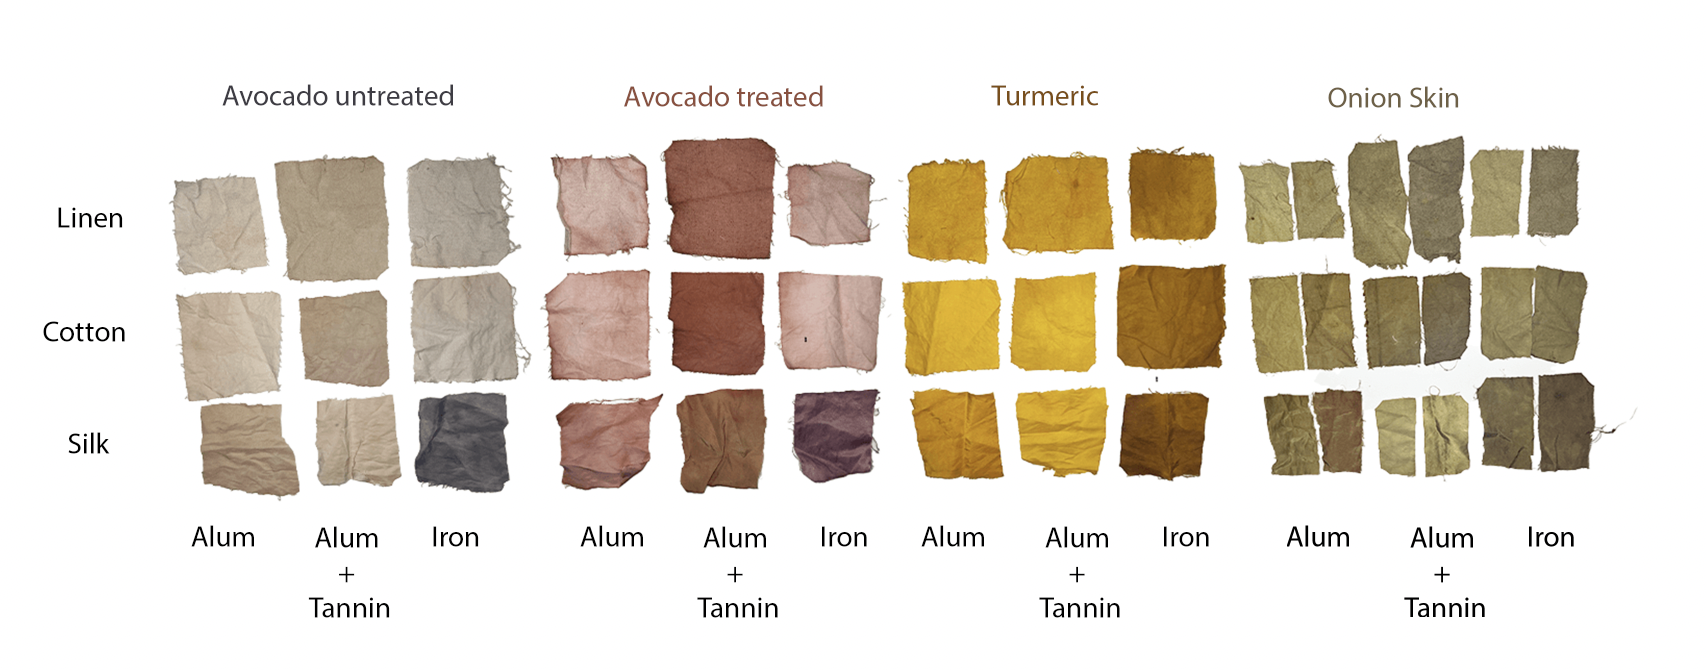 Figure 5. Final dye samples. From left to right, the first 3x3 set of samples are from the avocado skin and pit bath, no adjustments to bath were made. The next 3x3 set are from the avocado skin and pit bath, 1/2 teaspoon of soda ash was added to the bath prior to adding the fabric. The next 3x3 set are from the turmeric dye bath. The last 3x3 set are from the red onion skin bath. These are divided into halves because I read that pH changes the colour. The right half are in a more acidic bath than the left (I did not have a pH meter and so couldn't accurately read the pH). For all 3x3 sets, the rows are as follows; fabric at the top is linen, the middle is cotton, and the bottom is silk. For all 3x3 sets, the columns are as follows; alum, alum + tannin, and iron mordants.
Bacterial dyes
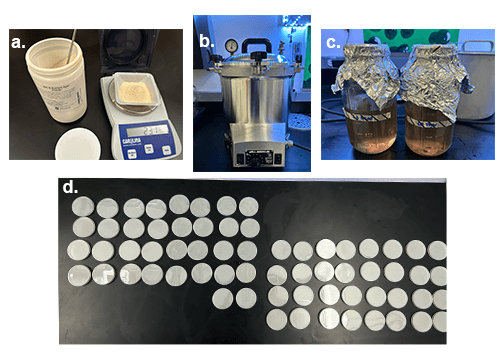
Figure 1. Preparing nutrient agar for my Advanced Biology class a) Weighing out the nutrient agar. b) AllAmerican pressure sterilizer was used to sterilize the nutrient agar (psi 15 for 30 min) c) Autoclave tape (black lined tape) let's me know that the sterilization process was successful! d) A total of 66 plates were made with 2L nutrient agar.
Inoculation process: video timelapse
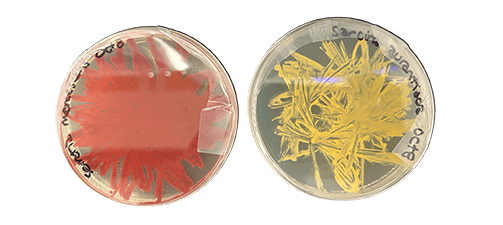
Figure 2. Two agar plates inoculated with naturally-pigmented bacteria Red: Serratia marsescens, Orange/yellow: Sarcina aurantiaca

Figure 3. Students painting agar plates with naturally-pigmented bacteria. Students were introduced to pigmented bacteria through agar art. This is a fun way to engage students in the practice of aseptic technique, microbiology, and introducing the concept of bioart. The students were instructed to draw an outline of the bottom of a petri dish and draw an outline of an image they want to paint within that petri dish circle. Students placed their agar plate on top of the outline to trace the invisible bacteria onto the plate. In about 24-48 hours at 30C, the bacteria will grow and multiply, becoming visible.
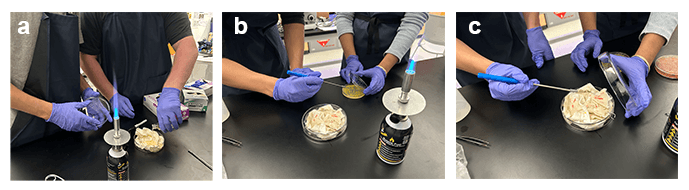
Figure 4. Students inoculate naturally-pigmented bacteria onto fabric. Sterilized pieces of fabric were placed into sterilized glass petri dishes. a) Student pours LB broth onto the fabric in the petri dish. b & c) Students transfer bacteria from agar stock plate to fabric soaked in LB broth.
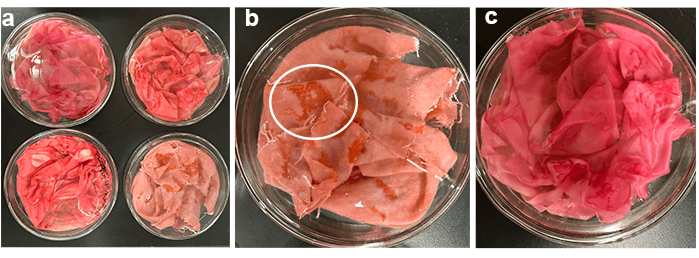
Figure 5. Visible bacterial growth and pigment leaching on fabric after 24hrs at 30oC. a) Four plates containing live bacterial cultures of Serratia marsescens growing on pieces of untreated sterilized fabric (linen, cotton, and silk). b) Close-up of linen fabric showing visible bacterial colonies growing on the surface. Circle indicates where there is a visible bacterial colony. c) Close-up of silk showing how the pigment is readily taken up by the fabric.
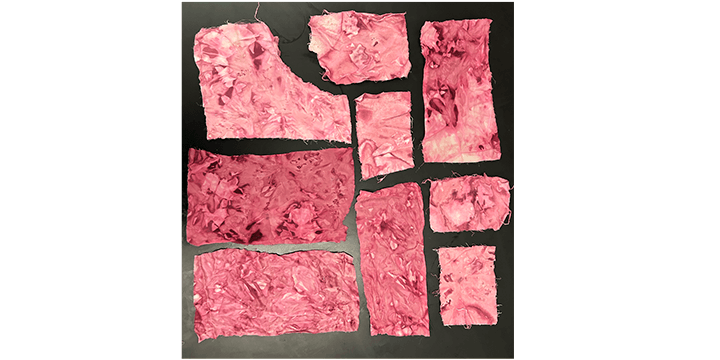
Figure 6. Final bacteria-dyed fabric. The live cultures were autoclaved to sterilize the bacteria which also steam dyed the fabric with the bacterial pigment. After sterilization, the fabric was taken out of the petri dishes and rinsed thoroughly with water. The fabric was then left to air dry.
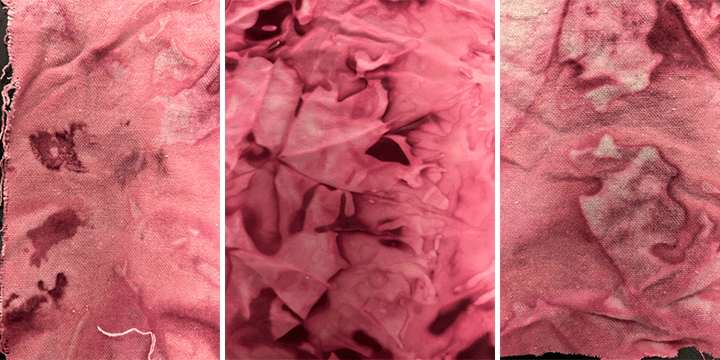
Figure 7. Close up of patterns created by bacterial growth on fabric. Patterns on the fabric are created by where the bacteria grew. The differences in fabric type dictated how bacterial colonies formed. (From left to right: linen, silk, cotton)
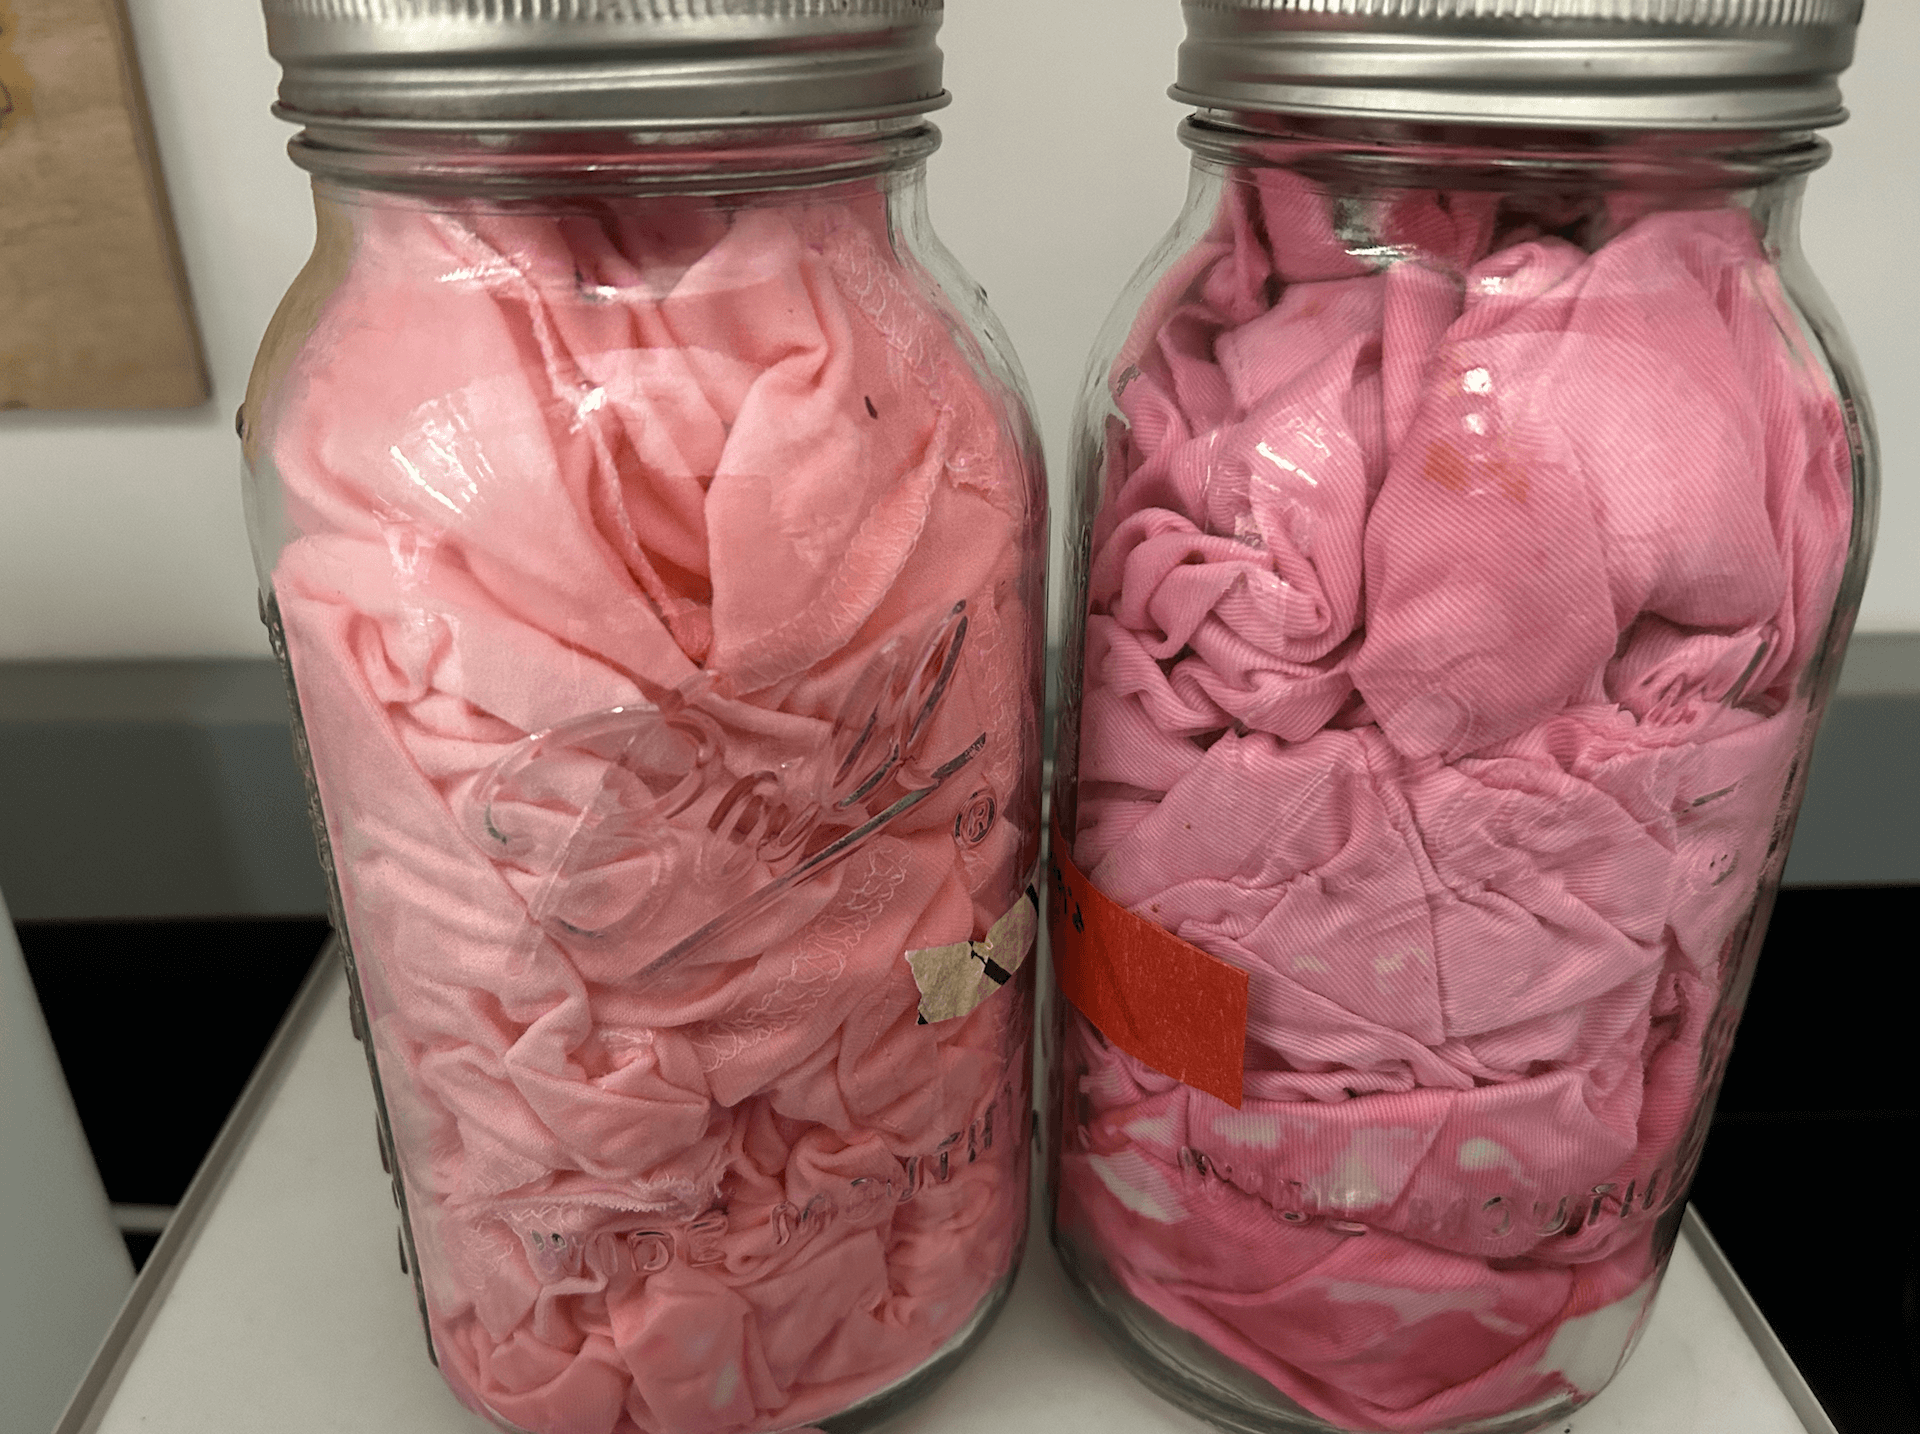 Figure 8. Dyeing my lab coat. I wanted to try using bacteria to dye something larger so I decided to dye my lab coat! It was essentially the same process as described except I used sterilized large mason jars that had been modified with a air filter to house the materials.
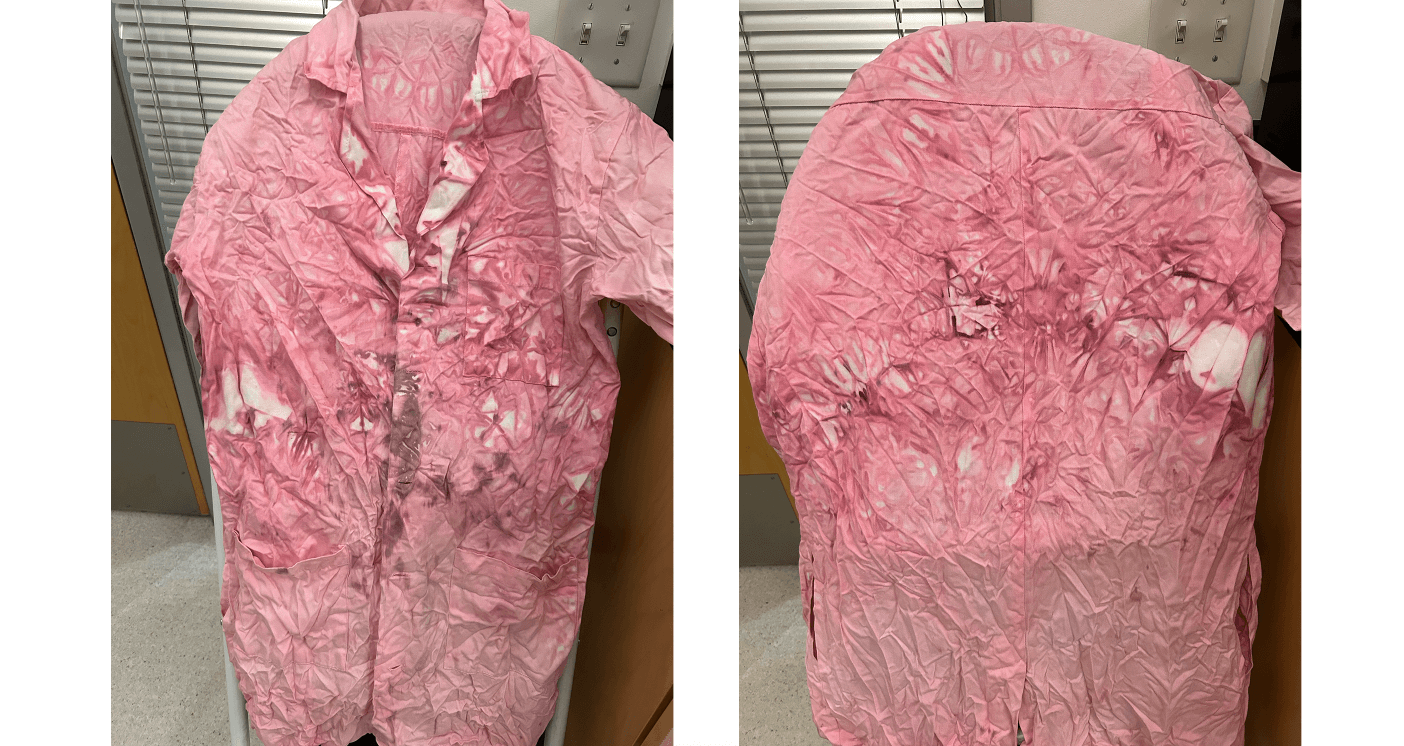 Figure 9. Final product! Bacterial dyed lab coat was a success! Next time I think I will try incubating the bacteria a bit longer to get a deeper colour. I incubated this for about 1 week.
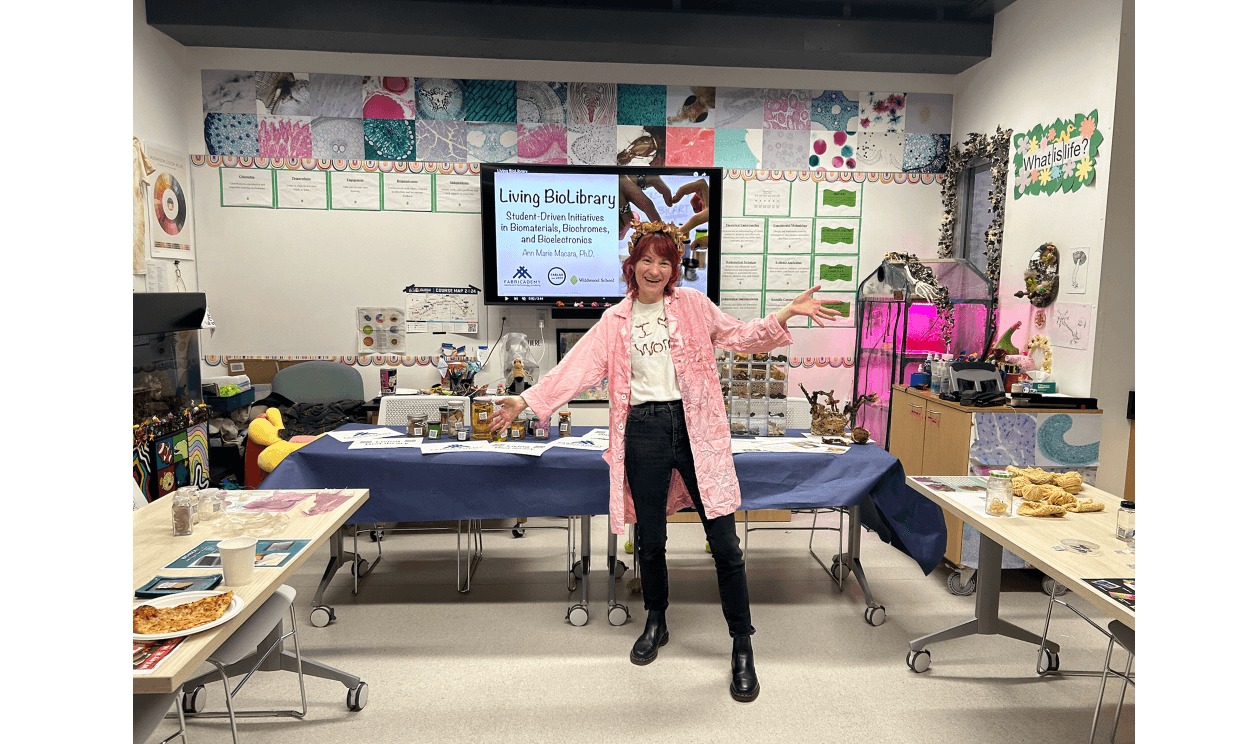 Figure 10. Lab Coat at Science Night! Science Night is a community open house event where friends and families come to the school to see the amazing science that is being done by 6th-12th grade students. Science Night is the culminating event for the students in Advanced Biology and Biotechnology. Students present their Bioart Projects to visitors and also get the opportunity to see each others work across classes. Check out my Living BioLibrary project to learn more about the projects presented at Science Night.
Mushroom Pigment
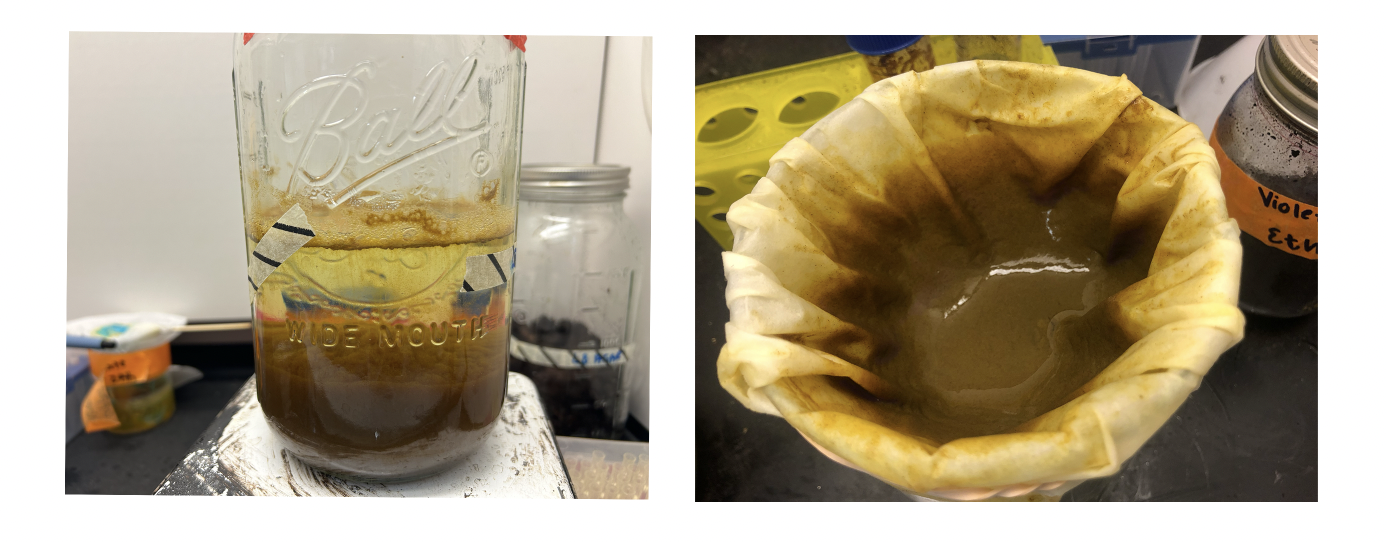 Figure 1. The Laking Process. First dye was extracted from the Dyer's polypore mushroom. Students used this dye bath for several of their projects. We used the remaining dye for this laking process. 10% alum solution was made and poured into the dye jar. Then a 2.5% soda ash solution was made and then carefully poured into the dye jar. The dye jar was allowed to sit overnight to separate. The left image shows the pigment nicely separated at the end of the waiting period. The top portion was carefully removed using a pipettor and then the bottom half of the solution containing the pigment was poured through a coffee filter to collect as shown on the right. The pigment on the coffee filter was allowed to dry and then stored.
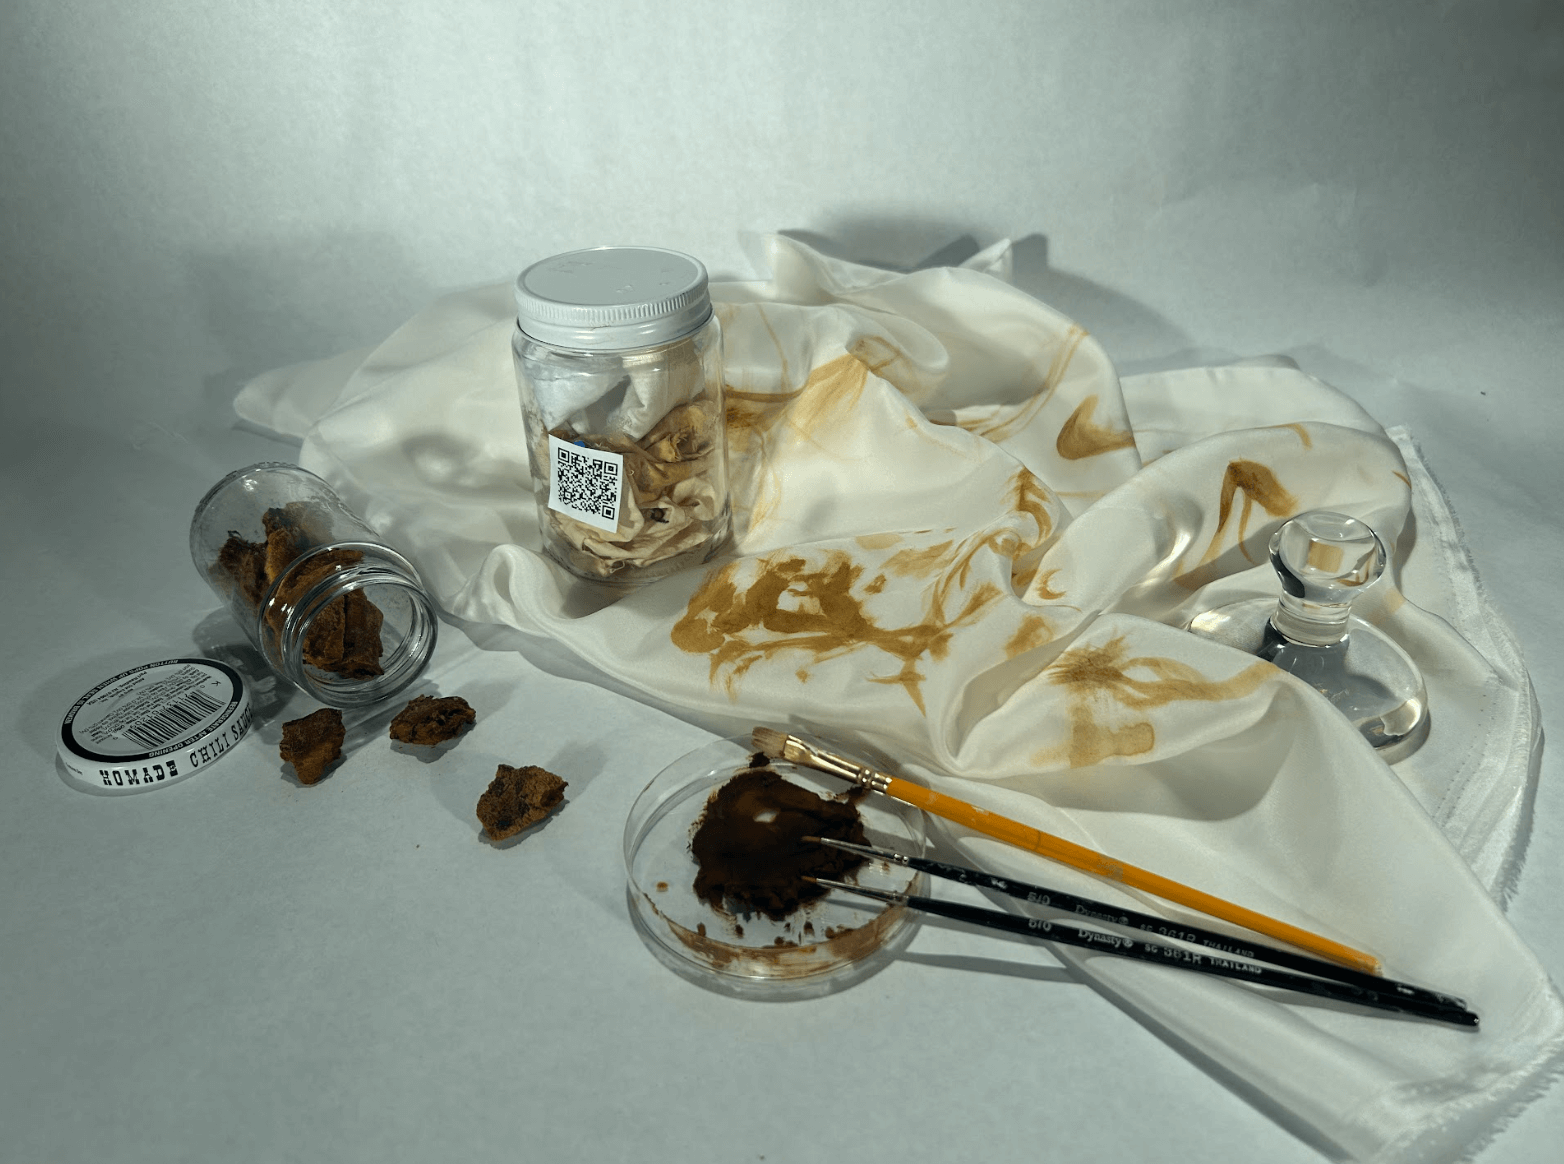 Figure 2. Student work. I like to lake the pigments of my mushroom dye baths to get the most out of the foraged material. The pigment can be reused to dye fabric or can be made into watercolour or ink. Students Diego W. ('24) and Jack B. ('24) moved through the laking process to create Dyer's polypore watercolour paint. See more about their project under the Living BioLibrary project page linked here under biochromes.
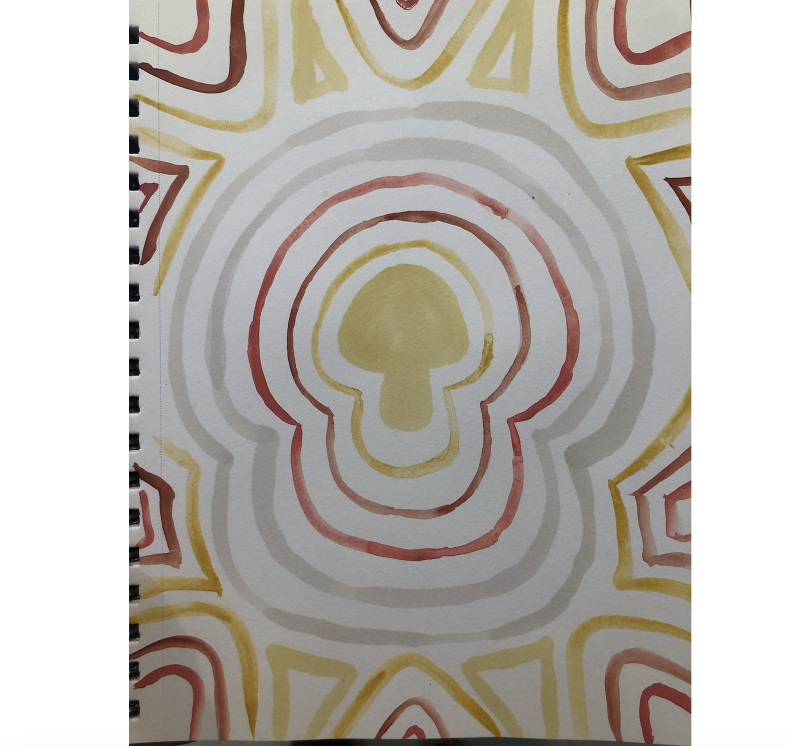 Figure 3. Mushroom water colour. Here is a water colour painting I made using pigment that I had laked from dye baths of various mushrooms.
Discussion
Plant-based dyes
I wanted to create these plant-based samples to include as part of my class resources. Students will learn how to extract dye and pigments from native California plants in the Botany unit in the spring. While the dye materials (other than marigolds) are not native CA plants, the general layout and methodology will serve as a good template for students as they design and perform their own experiments extracting dye and pigments. Unfortunately, after I dried the marigold flowers, I put them in a plastic bag to save for dyeing which was the wrong move. After 24 hours the flowers were covered in mold. Lesson learned to never store things in plastic bags!
Bacterial dyes
For my first exploration of bacterial dyes, I wanted to test different conditions. as with traditional plant-based and fungal-based dyes, alum is often used as a mordant. I was unsure whether bacteria would grow on alum as it is used as a pickling agent in food products. I set up an experiment for my students to perform for me. The first class tested untreated fabric and the bacteria grew wonderfully (as shown in Figure 6). The next class tested fabric that had been mordanted with alum and allowed to dry. The bacteria did not grow (at all!) on this pre-treated fabric (see Figure 8). We found that alum acts as an anti-microbrial agent. This anti-microbrial property of alum is discussed in several research articles some of which is summarized in this review article, A Review of Antimicrobial Properties of Alum and Sundry Applications. Therefore, bacterial dyes do not require pre-mordanted fabric in order to work.
Figure 8. Close up of fabric mordanted with alum. The red and yellow indicate the initial inoculation locations of two different species of naturally-pigmented bacteria. Neither species were able to successfully colonize on the alum treated fabric over the period of 48 horus at 30oC.
Methods and Materials
Mordants
Mordant resources:
- Botanical Colors Alum
- Botanical Colors Iron
- Botanical Colors Alum and Tannin
Mordant recipes used:
Alum: recipe modified from Botanical Colors
Step 1. Weigh out Aluminum potassium sulfate 20% of WOF.
Step 2. Bring water to boil.
Step 3. Add hot water to glass jar. Mix alum with water well.
Step 4. Add fabric and let sit overnight.
Alum + Tannin: recipe modified from Botanical Colors
Step 1. Prepare tannin separately from alum and soda ash.
- Powedered gall oak was used for the tannin. Weigh out tannin of 10% WOF.
- Weigh out aluminum potassium sulfate 12% of WOF. Place in separate jar.
- Weigh out soda ash 1.5% of WOF. Place in separate jar.
Step 2. Bring water to boil.
- Dissolve tannin in hot water.
- Soda ash and alum can be dissolved in room temp water.
Step 3. Place fabric in the hot tannin water jar overnight.
Step 4. Add the dissolved soad ash to the alum jar.
Step 5. Add the tannin-soaked fibers (do not rinse beforehand) into the alum+ soda ash jar. Let fabric sit overnight.
Iron: recipe modified from Botanical Colors
Step 1. Weigh out ferrous sulfate 0.5% of WOF.
Step 2. Add hot water to glass jar. Mix iron with water well.
Step 3. Add fabric and let sit for 30 minutes.
Plant-based dyes
Plant-based dye resources:
- Red onion skin dyes
- Avocado and Tumeric dyes
Bacterial dyes
Bacteria resources:
Scientific papers
- In Living Color
- Color of Survival
Bacteria materials
- Carolina Supplies: Pigmented Bacteria Set
- Glass Petri Dishes (120mm x 26mm)
- PPE (gloves, lab apron, goggles)
- AllAmerican Pressure Sterilizer
- LB Agar and Broth (from Media Recipes)
- Bunsen burner
- Sterile loops
Bacteria procedure
- Modified from Bioshades
Textiles:
Step 1. Washing Textiles:
- Wash textiles with Dharma Professional Textile Detergent, following product instructions.
- Allow textiles to air dry thoroughly.
Step 2. Autoclaving Textiles:
- Place dry textiles in an autoclave bag.
- Leave the bag unsealed to allow air to escape.
- Autoclave the bag for 30 minutes at 15 PSI (can autoclave at same time as broth and petri dishes).
Media:
Step 1. Preparing LB broth:
- recipe from Media Recipes
- Close the bottle with the cap.
- Gently mix the contents.
Step 2. Autoclaving LB Broth
- Unscrew the cap slightly, ensuring it's not fully sealed (or cover with aluminum foil, make sure it covers at least 1 inch down sides of bottle for autoclaving).
- Make sure the liquid only fills container half-way or lower so that it does not boil over.
- Autoclave LB broth for 30 minutes at 15 PSI.
Petri Dishes:
- Wrap each glass petri dish with aluminum foil.
- Autoclave for 30 minutes at 15 PSI.
Inoculating Fabric
Step 1. Practice aseptic technique:
- wear PPE (gloves, goggles, lab coat)
- wipe down area with 70% isopropyl alcohol
- turn on a bunsen burner (or similar)
- Sterilize the metal forcep with alcohol.
Step 2. Prepare the dishes:
- Open the autoclave bag, use the pincet to take out the textile, and place it in a petri dish.
- Close the petri dish securely.
- Unscrew the bottle cap and sterilize the neck over an open flame.
- Quickly open the petri dish and pour a thin layer of nutrient broth over the textiles.
Step 3. Inoculate the fabric:
- Take the metal inoculation loop and sterilize it by passing it through the flame.
- With quick and careful movements, slightly open the cap of the dish containing the bacteria.
- Dip the still warm inoculation loop into the medium adjacent to the bacteria, avoiding direct contact with the bacteria.
- Gently swipe the inoculation loop over the bacteria.
- Transfer the bacteria from the loop onto the fabric.
Step 4. Grow the bacteria:
- Grow bacteria at 30oC.
- Usually takes about 24-48 hours to grow.