3. Circular Open Source Fashion
Introduction
For this week, my goal was to create something fun and to practice uploading my documentation in real time to the best of my ability. This latter goal was harder to acheive but I managed to do more of documenting the actual process than I did the previous week. Luckily I have this week off from teaching classes so I have more time to update my pages! :)
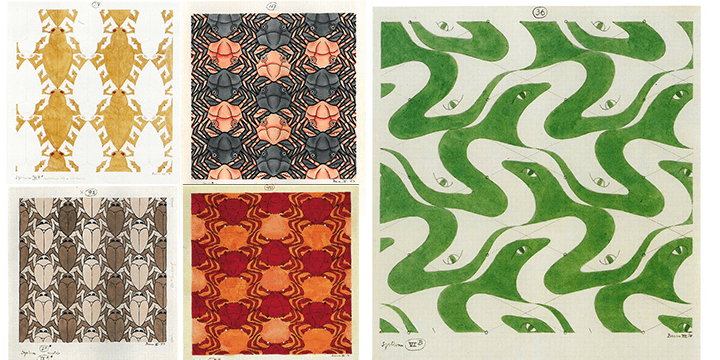
From left to right: Sketch No. 37, No. 117, No. 91, No. 40, and No. 36 by Maurits Cornelis Escher
As I was out on a run (I am training for the LA Marathon and so I have lots of time to think and meditate on my long runs), I had been thinking about what type of pattern I could make for this project. When I think of tessellations I immediately think of Escher. I really enjoy Escher's work on tessellating animals, especially insects (see images above). I have also been really enjoying following Myra Magdalen and the whimsical outfits she creates.
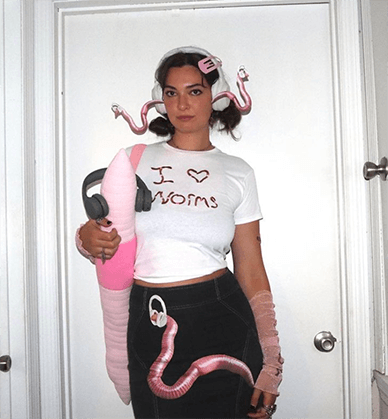
Myra Magdalen in her worm outfit posted on Instagram, Aug 7 2023
Once I had these two concepts in mind, I thought, "what if I combined a component of each?" My main goal is to have fun doing each of these weekly assignments to reduce the stress of having both a full time job and completing work for this program. So I thought, why not do something with...
In addition, worms, as decomposers, might serve as a representation of the 'zero waste' concept. Worms break down organic matter and mix the soil, playing an integral role in the cycle of life.
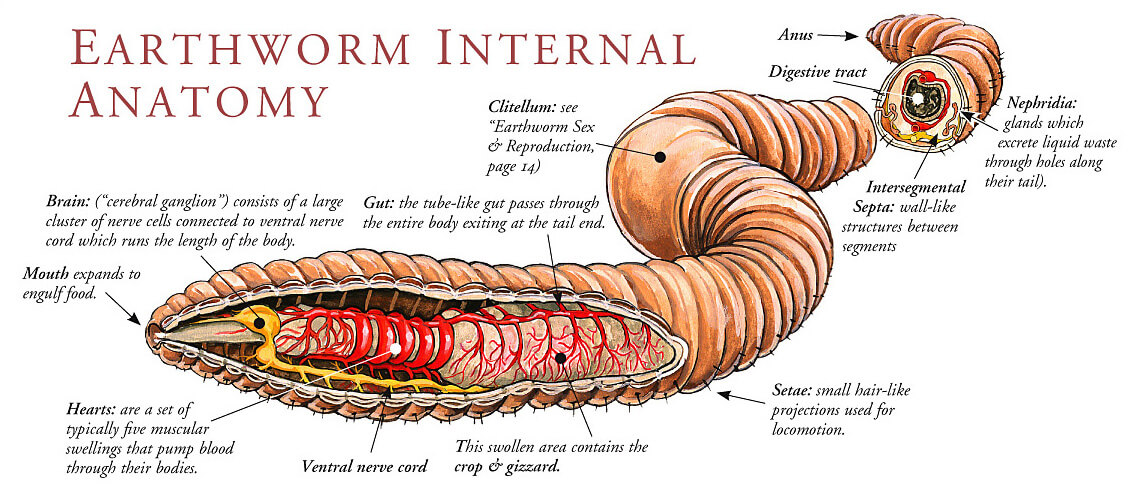 Earthworm Internal Anatomy by Kollath Graphic Design
In creating the actual assembly of the worms, I was inspired by Fabricademy student Kate Reed's modular neoprene swirls. I felt like I could do something similar due to the commonality of shapes between swirls and worms.
Results
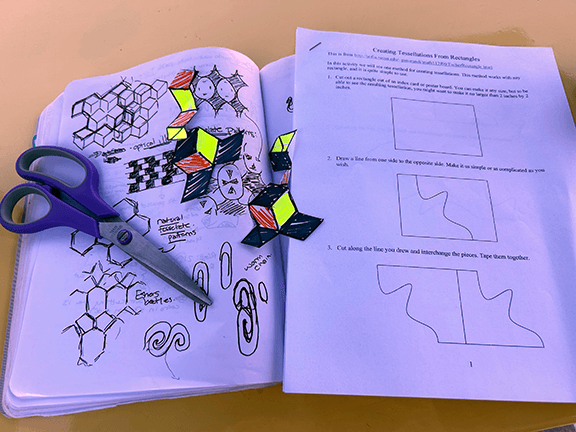
Figure 1. During my lunch break I constructed tessellations using a student worksheet. Excited about the connection with math, I went to math teacher Eric Strom for some advice. He kindly referred me to a worksheet he uses with students to create tessellations. I used the worksheet to construct a few tessellations. Although the shapes I created were unique and interesting, I realized I might be limited to abstract shapes using this method and might not be able to achieve the worm shapes I desired. See Methods and Materials below to get the step-by-step instructions on how to create a tessellation.
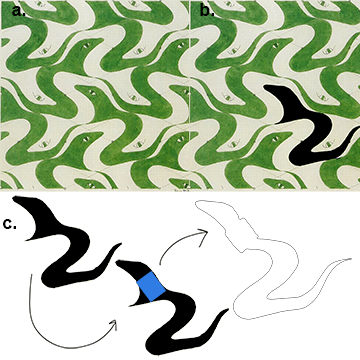
Figure 2. The process of modifying Escher's Sketch No. 36 into a worm form. a) I decided to modify Escher's Sketch No. 36 to create an outline of a worm. In this way, I would not have to create a brand new tessellation from scratch but rather alter an existing one to suit my needs. b) I used the magic selection tool in Adobe Photoshop to get the overall shape of the snake. c) I then modified the shape of the snake in Photoshop. I used a rectangle shape to help guide me in the creation of the worm's clitellum. The outline of the worm was created in Adobe Illustrator.
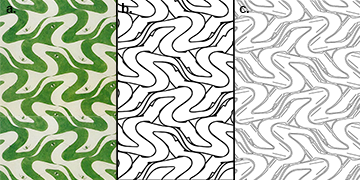
Figure 3. Forming the modules on Adobe Illustrator.
This was definitely a challenge. I tried to create the pattern directly on Illustrator but the worms were not fitting nicely with each other. So I made the pattern on Photoshop, then converted the raster to a vector on Illustrator to put the pieces together smoothly. The end product, however, is not a true tessellation but for my purposes it is enough. There is at least a reduction of felt waste. Maybe if I have more time I can try to figure out how to create a true worm tessellation and also figure out how to easily create a single path for the laser cutter.
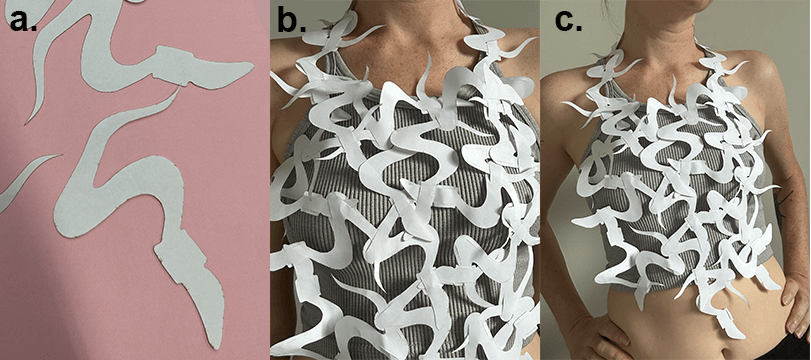
Figure 4. Modeling the paper worm shirt prototype. a) Laser cut paper worms (Glowforge, setting: 20lb copy paper). Because the paper worms flew away under the laser printer, I decided not to include the internal cuts where I would be interlocking the worms. Instead, I used a swiss army knife to cut and test placement of the incisions. b & c) After testing a few worms, I decided on the placement of the incisions and begun attaching the worms to each other, eventually forming a wearable tank top.

Figure 5. Cutting the felt worms. a) I looked up the settings for cutting 100% polyester felt on the Glowforge forums. It worked perfectly and cut my first piece of felt! b) Cut felt worms forming a tessellation. c) Even worms need to occasionally touch grass. 😅
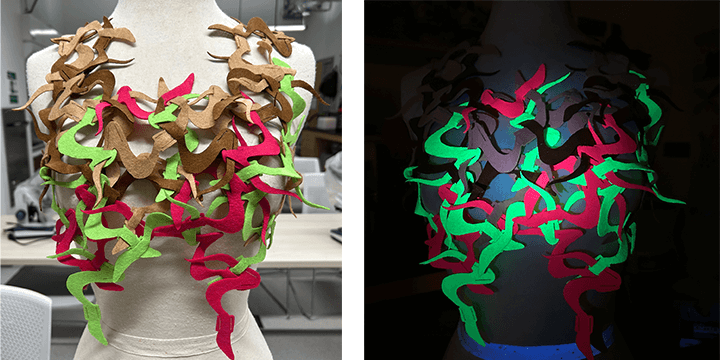 Figure 6. Progress on the final piece. a) Progress on the final piece so far. b) Neon colours also happen to be blue light reactive!
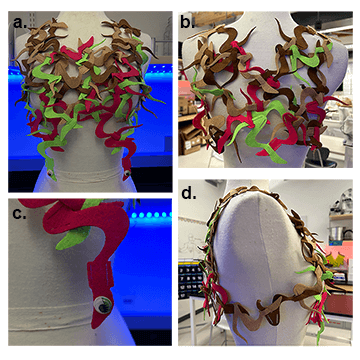
Figure 7. Final worm shirt!
a) Front view of the worm shirt. I added googly eyes to really tie the whole lewk together haha! b) Back of the shirt. c) Side view of shirt. d) Close up of how amazing the googly eyes are and how it gave the center piece worms some sassy personality that was desparately needed.
Discussion
Ultimately, I am proud of the work I completed! I had a lot of fun playing around with the design and in the creation of the shirt. My students also enjoyed watching the process. I even connected with teachers I don't normally interact with often. Through these new connections I hope to build a collaborative community and interweave art into science and math curriculum. Additionally, this is the first garment I ever made so there is that sense of accomplishment too. This piece also encompasses some of my keywords - it is joyful, playful, and fun.
Some challenges I encountered along the way was trying to create organic forms that tessellate and using Illustrator. I've never ued Illustrator to this extent before. I definitely learned a lot throughout the process of attempting to recreate and modify Escher's tessellation on Illustrator. It was very much trial and error. I feel that I got very close to completing what I set out to do. Given more time and more knowledge of Illustrator, I am sure I would be able to provide a seamless PDF for laser cutting. As it is right now, there will be thin strips of felt in between each worm. I still feel like this is a win for me overall. I went for a complicated pattern and put in my best effort. I really enjoy trying to solve problems like these as I feel that it challenges me to dive deeper into understanding the tools available to me. I could have definitely chosen an easier path but it would not have been as much fun! :)
Methods and Materials
Step by Step Guide to Create Tessellations from Rectangles:
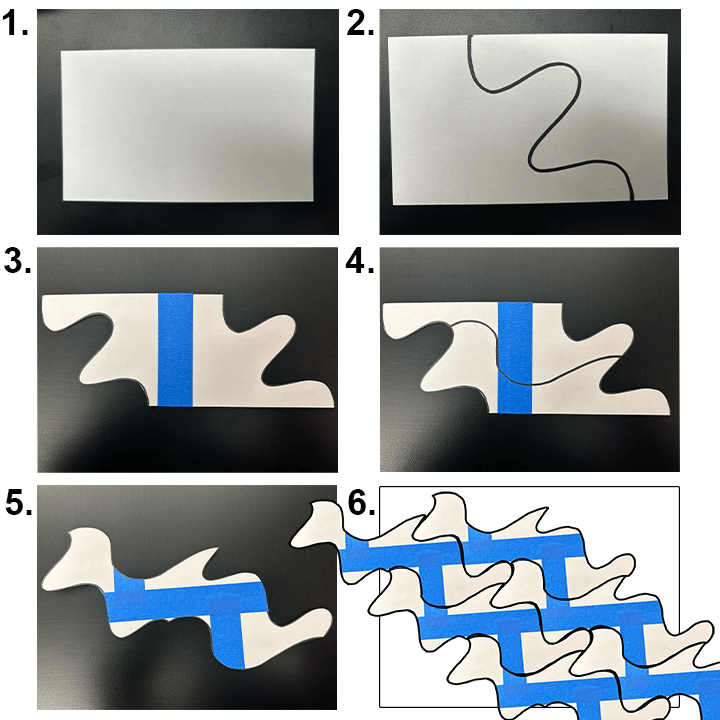
1. Cut a rectangle out of an index card or poster board. You can make it any size, but to be able to see the resulting tessellation, you might want to make it no larger than 2 inches by 2 inches.
2. Draw a line from one side to the opposite side. Make it as simple or as complicated as you wish.
3. Cut along the line you drew and interchange the piees. Tape them together.
4. Draw another line on the resulting figure perpendicular to the first line.
5. Cut along the line you just drew and interchange the peices. Tape them together.
6. The resulting shape will tessellate the plane (rotated 90 degrees clockise).
Adobe Illustrator Illustrator was used to prepare the modular design for laser cutting.
- Helpful resources: Converting Raster to Vector on Illustrator
Adobe Photoshop Photoshop was used to modify images.
TinyPNG.com TinyPNG.com was used to compress image files.
ChatGPT ChatGPT was used to help find code for Markdown to customize the site.
Glowforge
Settings to cut the paper worms: Speed 200, Power 10 (used teh Glowforge 20lb copy paper pre-programmed settings)
Settings to cut 100% polyester felt worms: Speed 300, Power 40, Material thickness 1mm
Important Note! When cutting felt you MUST vacuum out all the fuzz! Otherwise it will destroy the fan!
Fabrication Files
Uploaded to Open Source Circular Fashion, "Worm Partial Tessellation"