12. Skin Electronics
Introduction
I looked forward to every week's lesson, but it was this week's session that truly convinced me to apply to Fabricademy! I was introduced to the world of electronics about two years ago when I took Dogbotics DIY Synthesizer course (highly recommend!). I immediately fell in love with building circuits. There is something very satisfying about it, very much like solving a puzzle. Last year my Honors Advanced Biology students undertook the challenge to build a biodata sonification device that could record small electrical changes on plants and mushrooms. Since then, I've been dreaming of building some sort of wearable or skin electronic device that could respond to galvanic conductance. So... now is the time!
I rebuilt the biodata sonification device from the instructions by ElectricityforProgress (see video below) because I wanted to see how to build the circuit with just LEDS responding to galvanic conductance and not the sonification part. After some convos with ChatGPT it seems possible...let's see!
Biodata Sonification Device from ElectricityforProgress:
Inspirations:
* Building a Smarter Bandage
Results
Biosensor: pH Sensitive Lip Gloss
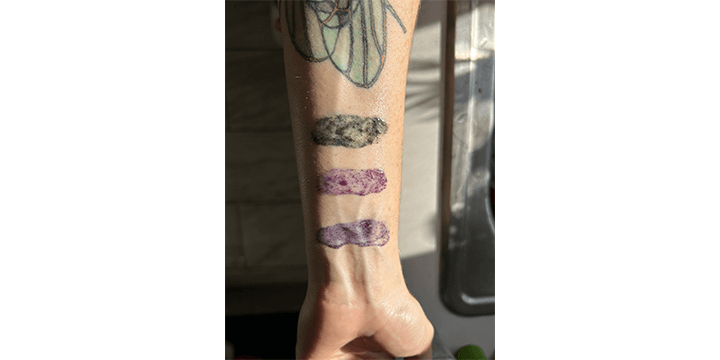
Testing out butterfly pea flower lip gloss. Top green band reacted to a basic solution (soda ash mixed with water). Middle pink band reacted to an acidic solution (vinegar mixed with water). Bottom purple band is a neutral pH.
Skin electronics: Adafruit Gemma MO
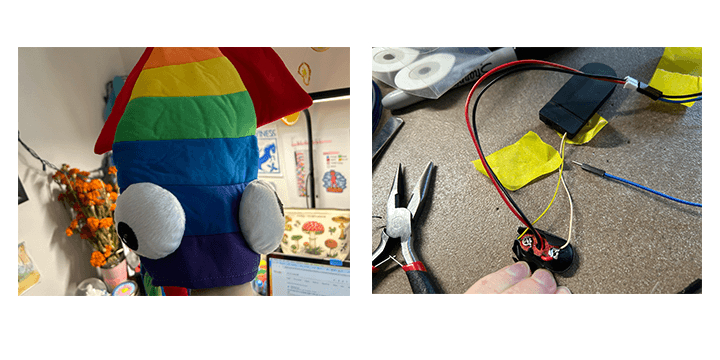
Figure 1. Finding a coincell battery holder in a squid. I realized too late that I didn't have the correct coincell battery holder but I remembered I have an old LED squid hat in the closet. Luckily it had the exact 2x3V coincell battery holder with switch that I needed! So I cut the two wires and removed it from the hat... I figured I could always reqire the squid hat with a much cooler LED display in the future if necessary. There was a white and yellow wire so I tested which one was positive and which one was negative using the multimeter. I then soldered the wires onto a 9V battery connecter that had the proper cable to connect to the Gemma MO. I ran into some issues along the way before getting the Gemma MO to work (see discussion below) but eventually I got it!

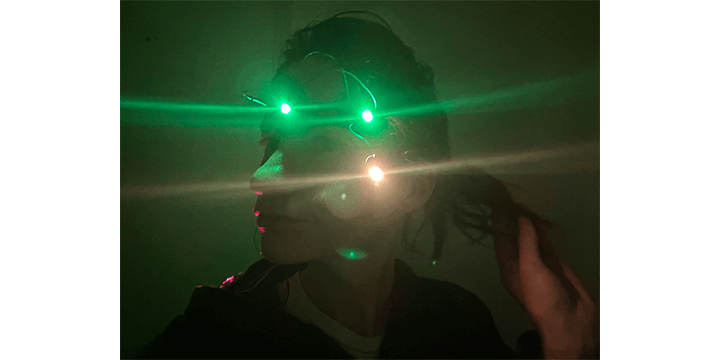
Figure 2. Troubleshooting Adafruit Gemma MO After a very long time of trying to figure out why my Gemma MO wasn't connecting to my Arduino IDE I finally got it to work (see dicussion for more deets on my pain). I successfully uploaded a test code to ensure that my Gemma was actually able to receive info. I was so excited about this that I forgot I could screenshot and instead grabbed my phone to document that my hours of frustration was worth it. Then I uploaded the Adafruit Space Face LED Galaxy Makeup Code and got a magical LED display on the neopixels! Hell yeah! After that worked I wanted to change the colours of the neopixels to make a rainbow effect. See videos below for results.
Gemma MO Neopixels working
I followed the Space Face LED Galaxy Makeup tutorial on Adafruit to build the following neopixel display and to learn the basics of skin electronics.
Completed Adafruit's Space Face LED Galaxy Makeup
Biosensor electronics: Galvanic Skin Response Sensor
At the very last minute I managed to pull together the circuit for the Galvanic Skin Response sensor!
Discussion
Biosensor: pH Sensitive Lip Gloss
I was really inspired by Katia Vega's pH sensitive lip gloss that used red cabbage pigment. I was looking online at different natural products that can shift colour in response to changes in pH levels. I landed on butterfly pea flower pigment as it gives vivid blue, purple, and greens hues. I also learned that anything that produces anthocyanins will change colour in response to pH.. I hadn't anticipated that the blue pea flower pigment would be hydrophilic and therefore it wouldn't go into solution in the oil-based lip gloss gel that I had purchased. I tried to add some 40% vodka to the solution in hopes that would be enough alcohol to mix with the gel but no luck. Unfortunately, I was at home when I tried this out and didn't have access to my lab supplies so I have to wait until I have time to try to dissolve the pigment in 90% ethanol.
Skin electronics: Adafruit Gemma MO
On Riding the Struggle Bus: By far the most frustrating and time consuming thing was linking the Adafruit Gemma MO board to Arduino IDE. There were several points were I got confused about the board needed (at first I tried using the Arduino Gemma MO board which did not work). It took a while to figure out I was actually using the wrong board and that I needed to upload Adafruit boards into the Board Manager. Eventually after moving through Adafruit's instructions I managed to get everything working. Part of the issue was that I am using a Mac and every instruction guide I found was using Windows and so the layout of Arduino IDE is different. This was a particularly sticky point where the instructions told me to open "preferences" but there are no preferences in the Mac Arduino IDE. Instead, they are called "settings." I am including a Mac-friendly instruction guide to uploading Boards to Board Manager below.
After struggling my way through connecting the Gemma to Arduino IDE, I was met with yet another setback. After uploading the code, I was ready to unplug the Gemma circuit from the computer and add the battery pack. I did not purchase the correct coincell battery holder but luckily I had an old LED squid hat that had one. So I cut the wires from the battery holder and was met with a yellow and white wire. So I used the multimeter to test which wire was positive and which was negative. I then soldered the wires into the corresponding positive and negative sides of another battery holder that fit into the Gemma MO battery slot. But when I plugged it in there no response! Oh no! After a few minutes of testing batteries and ensuring that current was flowing through my DIY battery holder I realized that the Gemma MO battery slot was actually BACKWARDS to the battery holder I was using... So then I had to resolder the whole battery device, check the cables, etc., plugged it back in and finally! Success!
Biosensor electronics: Galvanic Skin Response Sensor
I managed to try out the GSR sensor at the last minute and it worked! I used ChatGPT to help me modify the Adafruit LED makeup circuit and code to incorporate the electrodes. I would love to make this circuit more permanent in the future. I have an idea for attaching the LEDs and microcontroller to a headband and placing the electodes on my jaw muscles or temples. That way the LEDs will respond to my facial expressions.
This project was further explored in Week 8, Wearables.
Methods
Biosensor: pH Sensitive Lip Gloss
Butterfly Pea Flower Lip Gloss:
1. Follow the directions on the clear lip gloss base, use a 1:10 ratio of base to pigment.
2. Dispense lip gloss base into a container.
3. Add 90% alcohol (isopropyl or ethanol) to dissolve pigment in a separate container. I used 40% vodka in my experiment, I still need to actually test the 90% alcohol idea.
4. Add pigment mixture to the lip gloss base, mix thoroughly.
5. Apply!
Adafruit Gemma MO
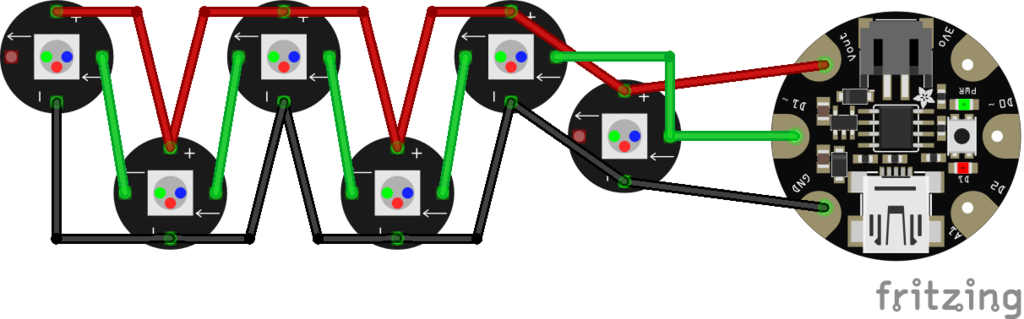 Circuit diagram from Adafruit
Adding the Adafruit Gemma MO Board on Arduino IDE for Mac Users:
1. Open Arduino IDE
2. Click on "Arduino IDE" on the top left menu and select "Settings" in the dropdown menu
3. Look for the "Additional Boards Manager URLs" field in the Preferences window.
4. Enter the URL for the board support package you want to install. Make sure each URL is on a new line if you are adding multiple URLs.
In this case I used the URL: https://adafruit.github.io/arduino-board-index/package_adafruit_index.json
You can find detailed instructions on how to upload boards from Adafruit onto Arduino IDE linked here.
5. Click the "OK" button to close the Preferences window.
6. Open "Boards Manager" in the dropdown menu under "Tools." Go to "Tools" > "Board" > "Boards Manager..." in the top menu.
7. To install the Board Package, click on "Board Manager" and select the board package you want to install and click the "Install" button. The Arduino IDE will download and install the board package. Once the installation is complete, close the Boards Manager.
8. Now, when you go to "Tools" > "Board," you should see the newly installed board in the list. Select the board you want to use.
9. Also, make sure to select the correct port under "Tools" > "Port" if you are working with a connected device.
Adafruit Gemma MO Test Code:
void setup() {
  pinMode(0, OUTPUT);  // Use pin 0 as an output (built-in LED)
}

void loop() {
  digitalWrite(0, HIGH);   // Turn on the LED
  delay(1000);              // Wait for a second
  digitalWrite(0, LOW);    // Turn off the LED
  delay(1000);              // Wait for a second
}
Code copied from Adafruit's Space Face LED Galaxy Makeup Tutorial
// SPDX-FileCopyrightText: 2017 Mikey Sklar for Adafruit Industries
//
// SPDX-License-Identifier: MIT

#include <Adafruit_NeoPixel.h>

#define PIN 1

// Parameter 1 = number of pixels in strip
// Parameter 2 = pin number (most are valid)
// Parameter 3 = pixel type flags, add together as needed:
//   NEO_KHZ800  800 KHz bitstream (most NeoPixel products w/WS2812 LEDs)
//   NEO_KHZ400  400 KHz (classic 'v1' (not v2) FLORA pixels, WS2811 drivers)
//   NEO_GRB     Pixels are wired for GRB bitstream (most NeoPixel products)
//   NEO_RGB     Pixels are wired for RGB bitstream (v1 FLORA pixels, not v2)
Adafruit_NeoPixel strip = Adafruit_NeoPixel(5, PIN, NEO_GRB + NEO_KHZ800);

void setup() {
  strip.begin();
  strip.show(); // Initialize all pixels to 'off'
}

void loop() {
  // all pixels show the same color:
  colorWipe(strip.Color(50, 0, 50), 50); // Purple
}

// Fill the dots one after the other with a color
void colorWipe(uint32_t c, uint8_t wait) {
  for(uint16_t i=0; i<strip.numPixels(); i++) {
      strip.setPixelColor(i, c);
      strip.show();
      delay(wait);
  }
}
#include <Adafruit_NeoPixel.h>

#define PIN 1

Adafruit_NeoPixel strip = Adafruit_NeoPixel(5, PIN, NEO_GRB + NEO_KHZ800);

void setup() {
  strip.begin();
  strip.show();
}

void loop() {
  rainbow(20); // Speed of the rainbow effect
}

void rainbow(uint8_t wait) {
  for (uint16_t j = 0; j < 256; j++) {
    for (uint16_t i = 0; i < strip.numPixels(); i++) {
      strip.setPixelColor(i, Wheel((i + j) & 255));
    }
    strip.show();
    delay(wait);
  }
}

// Input a value 0 to 255 to get a color value.
// The colors are a transition r - g - b - back to r.
uint32_t Wheel(byte WheelPos) {
  WheelPos = 255 - WheelPos;
  if (WheelPos < 85) {
    return strip.Color(255 - WheelPos * 3, 0, WheelPos * 3);
  }
  if (WheelPos < 170) {
    WheelPos -= 85;
    return strip.Color(0, WheelPos * 3, 255 - WheelPos * 3);
  }
  WheelPos -= 170;
  return strip.Color(WheelPos * 3, 255 - WheelPos * 3, 0);
}
Biosensor electronics: Galvanic Skin Response Sensor
Instructions to build circuit:
- Set up Neopixel LEDs as shown in the circuit diagram above for the Space Face LED Galaxy Makeup circuit.
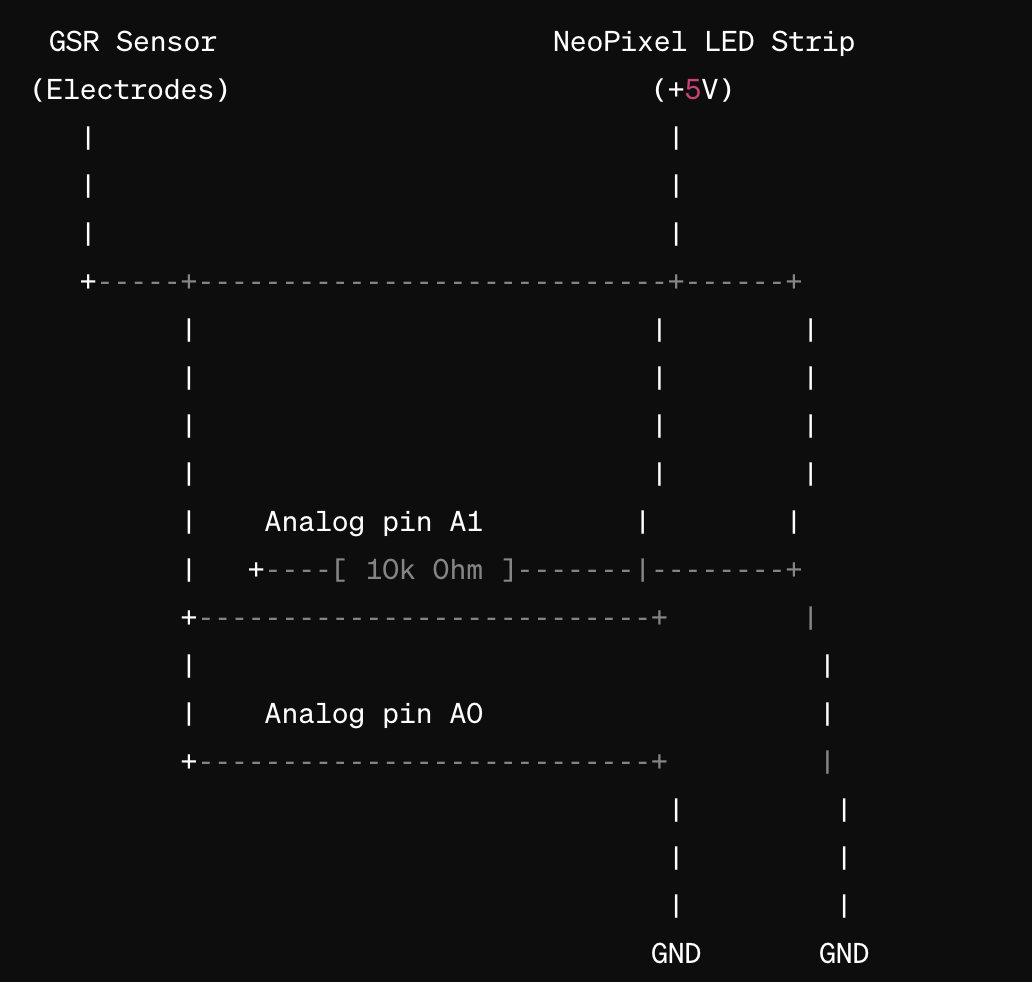
Connect the Electrodes (GSR sensor):
- Connect one electrode to analog pin A1 on the Gemma M0.
- Connect the other electrode to the ground (GND) pin on the Gemma M0.
- Add a 10k ohm resistor between one of the GSR sensor electrodes and analog pin A1 of the Gemma M0.
Circuit diagram:
diagram generated on ChatGPT
Adafruit Gemma MO Galvanic Skin Response Code:
code from ChatGPT
#include <Adafruit_NeoPixel.h>

#define GSR_PIN A1
#define NEOPIXEL_PIN A0
#define NUM_PIXELS 5
#define BRIGHTNESS 50

Adafruit_NeoPixel strip = Adafruit_NeoPixel(NUM_PIXELS, NEOPIXEL_PIN, NEO_GRB + NEO_KHZ800);

void setup() {
  strip.begin();
  strip.show(); // Initialize all pixels to 'off'
  Serial.begin(9600); // Initialize serial communication for debugging
}

void loop() {
  int gsrValue = analogRead(GSR_PIN);
  Serial.print("GSR Value: ");
  Serial.println(gsrValue);

  int mappedColor = map(gsrValue, 0, 1023, 0, 255);
  Serial.print("Mapped Color: ");
  Serial.println(mappedColor);

  colorWipe(strip.Color(mappedColor, 0, 255 - mappedColor), 50);
}

// Fill the dots one after the other with a color
void colorWipe(uint32_t c, uint8_t wait) {
  for (uint16_t i = 0; i < strip.numPixels(); i++) {
    strip.setPixelColor(i, c);
    strip.show();
    delay(wait);
  }
}
Materials
Biosensor: pH Sensitive Lip Gloss
- Butterfly Pea Flower Pigment
- Clear Lip Gloss Base
- 90% alcohol
Skin electronics: Adafruit Gemma MO
- Adafruit Gemma MO
- 6 FLORA NeoPixels
- 2x3V coincell battery holder and two CR2032 batteries
- Thin wire
- Scissors (or wire stripper)
- Soldering iron and solder
- Liquid latex
Biosensor electronics: Galvanic Skin Response Sensor
All of the electronic equipment listed above plus:
+ Electrodes
+ 10k Ohms resistor
References
- Adafruit Space Face LED Galaxy Makeup Project
- ChatGPT for coding questions
- Electricity for Progress
- Katia Vega's lecture