11. Soft Robotics
Introduction
I am so excited to try out soft robotics this week. I want to start building prosthetics in my Neuroscience class as part of their last unit. Learning the basics of soft robotics will help me incorporate this into my curriculum.
Results
Soft Robotics Toolkit
I wanted to try out the Soft Gripper Fabrication educators guide for students from Soft Robotics Toolkit. This method does not require 3D printing. Instead, you make a mold out of cardboard. This seems like a viable option for large groups of students.
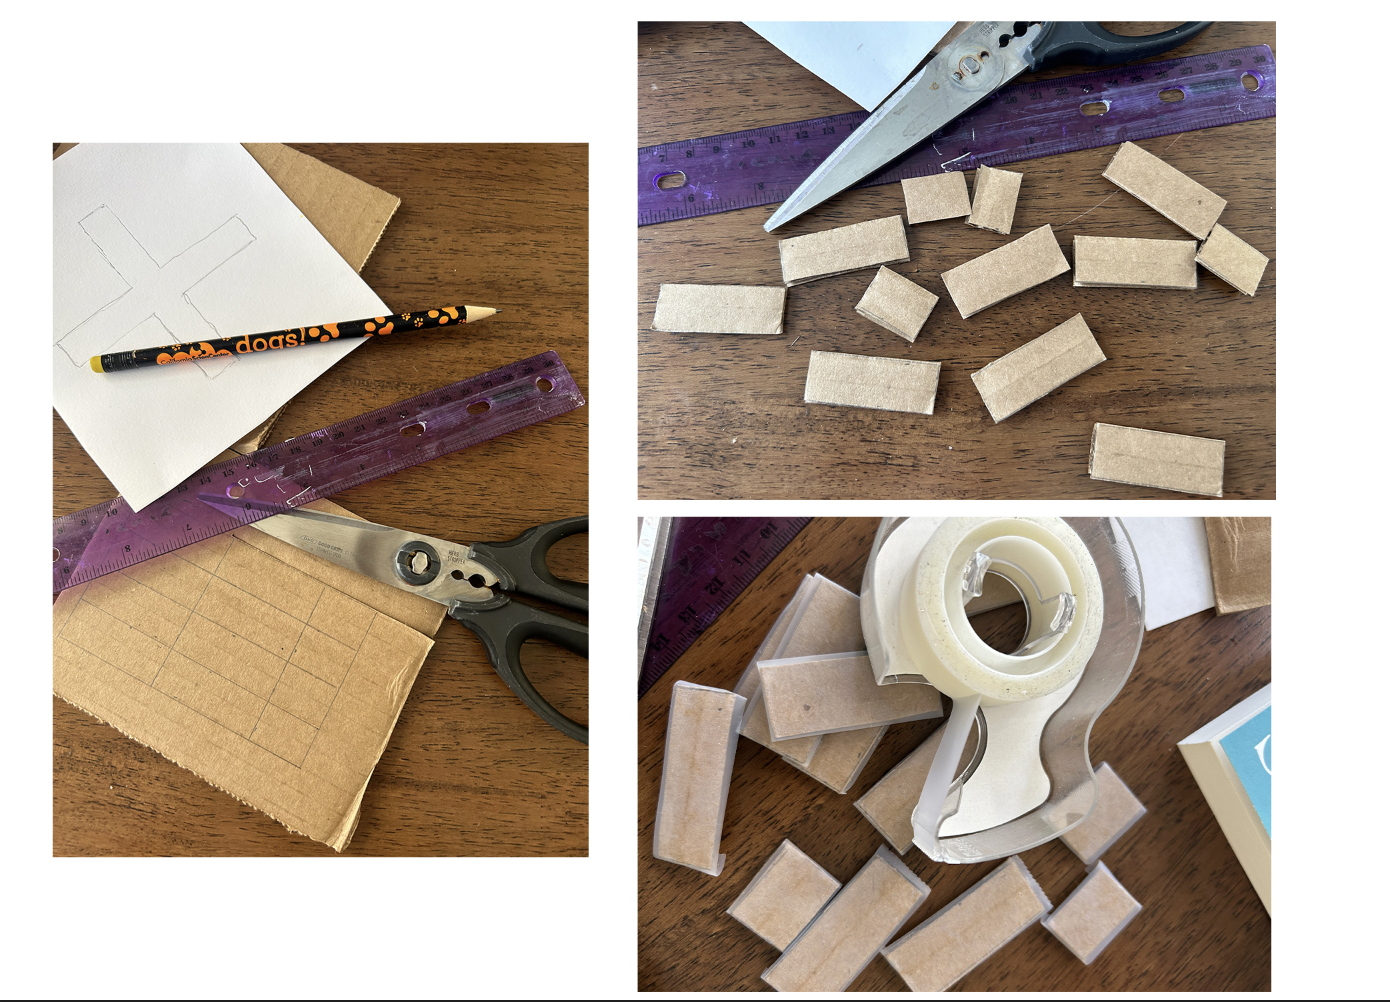 Figure 1. Cutting the cardboard. First step is to cut the cardboard to size using the given template and laminate one side with tape.
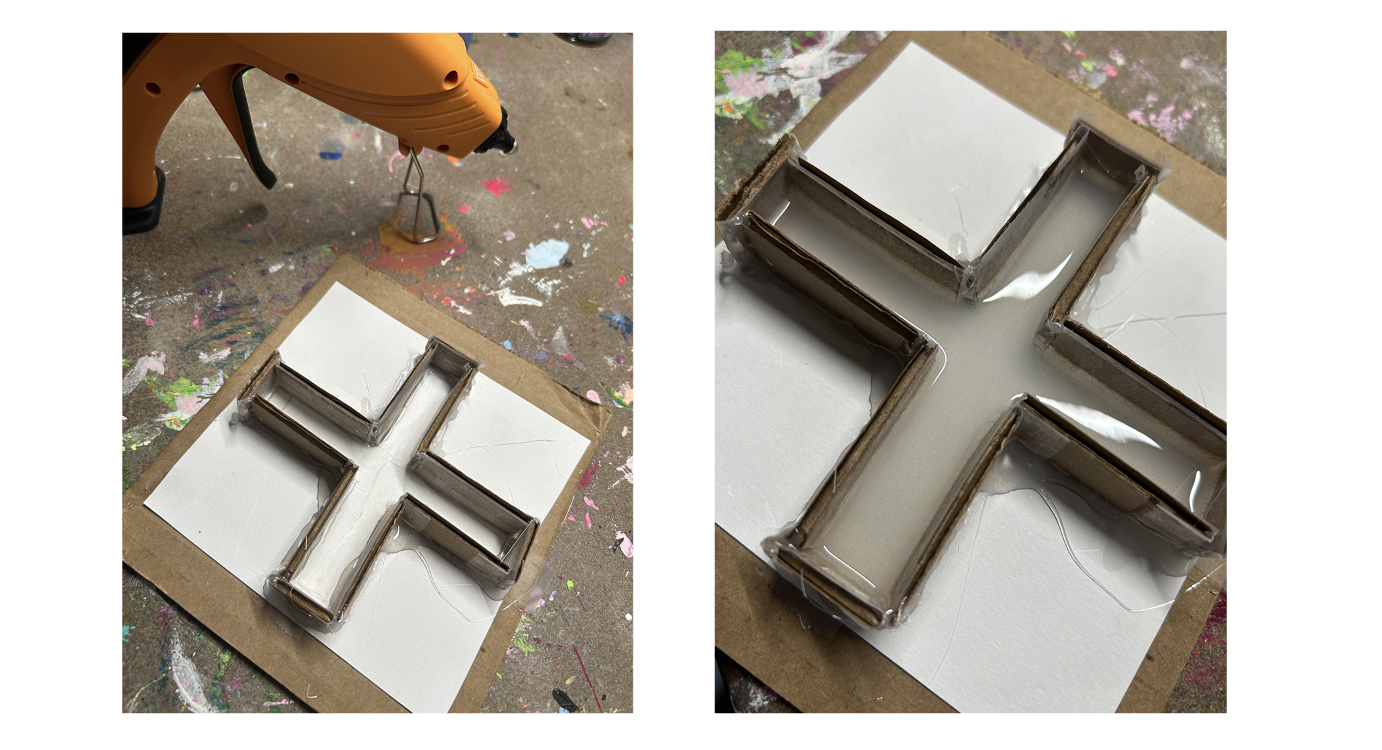 FIgure 2. Piecing together the cardboard. Next step is to glue the cardboard onto a base (also laminated with tape). I then mixed a 1:1 ratio of the 2-part silcone rubber components from Let's Resin. I tried dehydrating the silicone rubber at 140F for 20 minutes as suggested in the instructions but it didn't seem to work. I'm hoping I mixed the components well enough to cure.
After multiple attempts at trying to cure the Let's Resin silicone rubber, I gave up and searched under the Amazon reviews to see if I had gotten a bad batch. Turns out multiple people have had similar issues. I would recommend not buying Let's Resin silicone rubber until they sort out this issue.
I ordered silicone rubber from JDiction and that worked out much better!
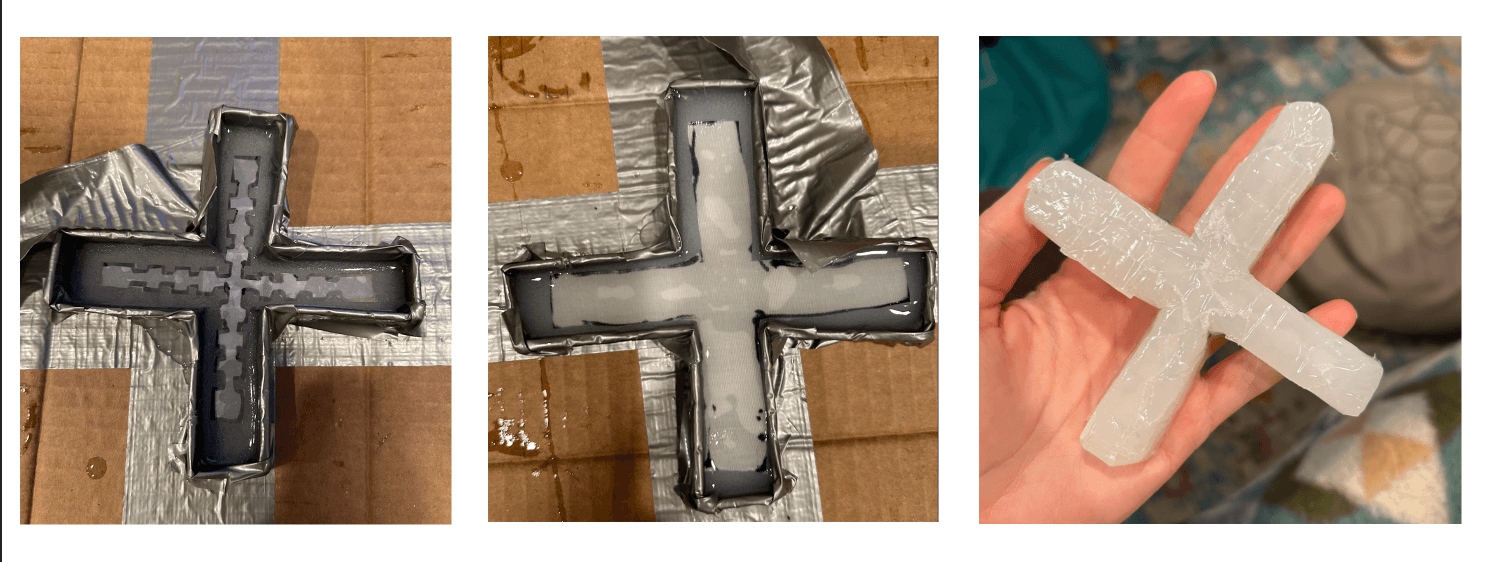 Figure 3. Completing the mold From left to right; I added the acetate (I used Scotch tape as a substitute) layer and let the silicone rubber cure at 140F for 20 minutes, I then added the fabric layer on top and cured it again to get the final form.
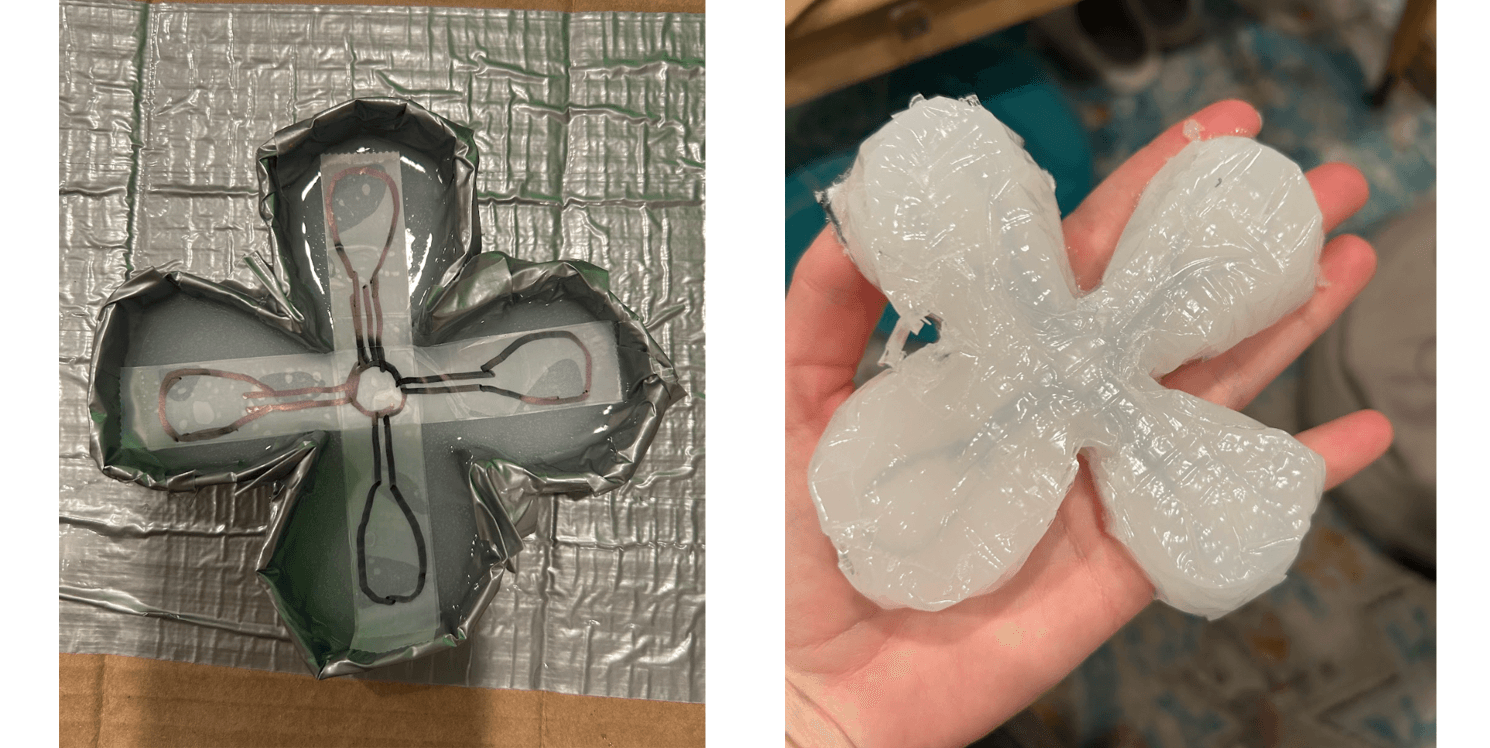 Figure 4. Flower robot free form design. I also set up a separate form to see how maleable creating cardboard molds would be. When giving this project to students, I would love to encourage them to come up with their own designs to test and I believe using cardbaord molds is a great way to lessen waste. Overall, creating a different mold with rounded edges was straight forward enough. If I had a glue gun available I am sure I could have done even more.
As described in the discussion, I cut one of the flower petals off so that I could access the inner wells. Above is a video where I filled the wells with blue food colouring to demonstrate that the wells were intact. Below is a video of a petal being filled with air to demonstrate that the design works.
3D printed soft robot
3D printed mold
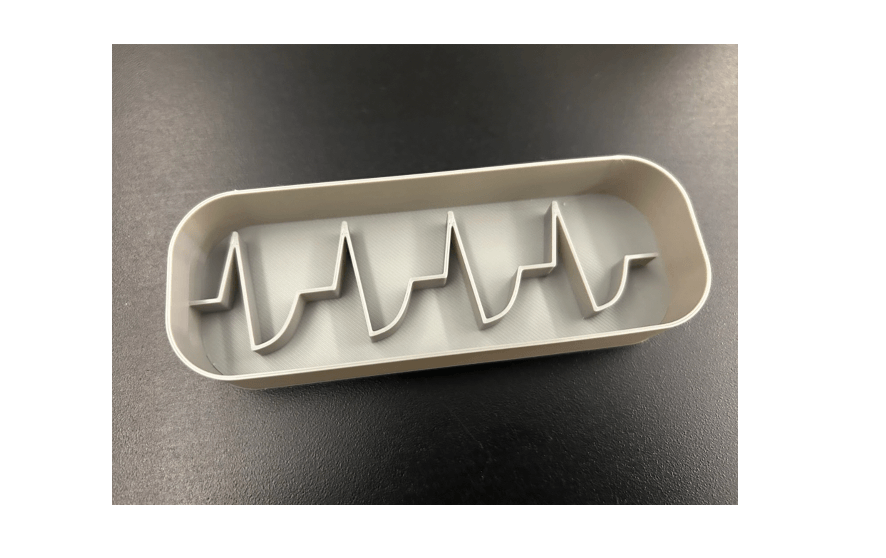 Figure 5. 3D printed mold. I wanted to try out making a 3D printed mold. The inner design is based on the action potential.
Bio-Silicone
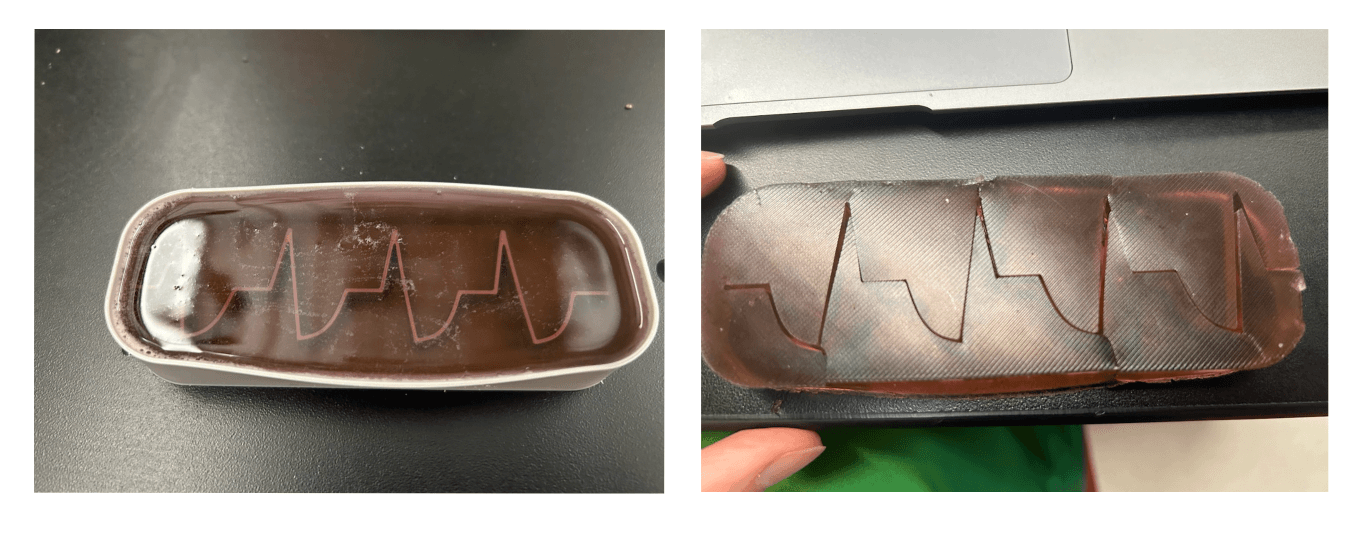 Figure 6. Bio-silicone. I wanted to experiment with bio-silicone while I was waiting for the new batch of silicone rubber to arrive and used the recipe from Loes Bogers. Unfortunately, the silicone was not flexible enough to expand.
Silicone Rubber
 Figure 7. Silicone rubber. I used a very similar method as the one described for the soft robotics toolkit. From left to right; silicone rubber form was cured in the 3D printed mold and the removed, the silicone form was flipped over and placed on a layer of wet silicone rubber on top of fabric, the fabric was cured to complete the soft robot form.
Unfortunately the chamber was too narrow and closed in on itself with this mold. I discuss troubleshooting this issue for future work in the discussion below.
Solenoid Air Pump
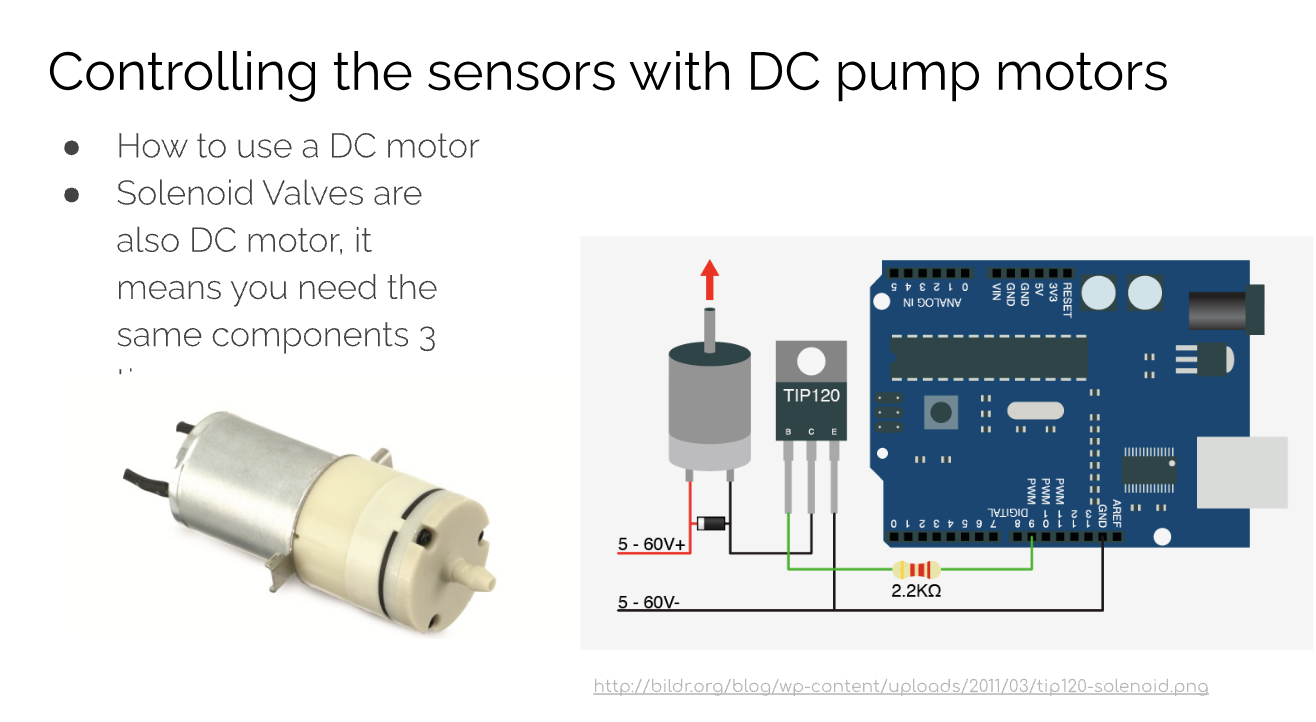
I tried to use Chat GPT to help me build a circuit for the 3V mini air pump from scratch. I think the two resistors used in the circuit were too high and the circuit did not work. I searched for other circuit diagrams for a similar setup and found one under the Arduino forums. I did not have a diode with me but tried out the circuit anyways (see circuit diagram under Methods and Materials). Using that persons setup I got it to work and I also used their code to program the Arduino to pump air in for 5 seconds and rest for 5 seconds.
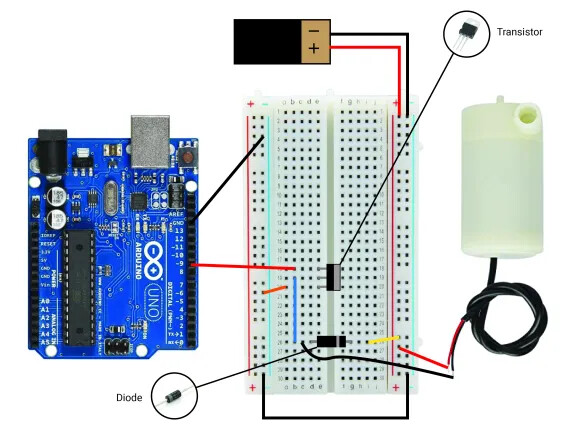
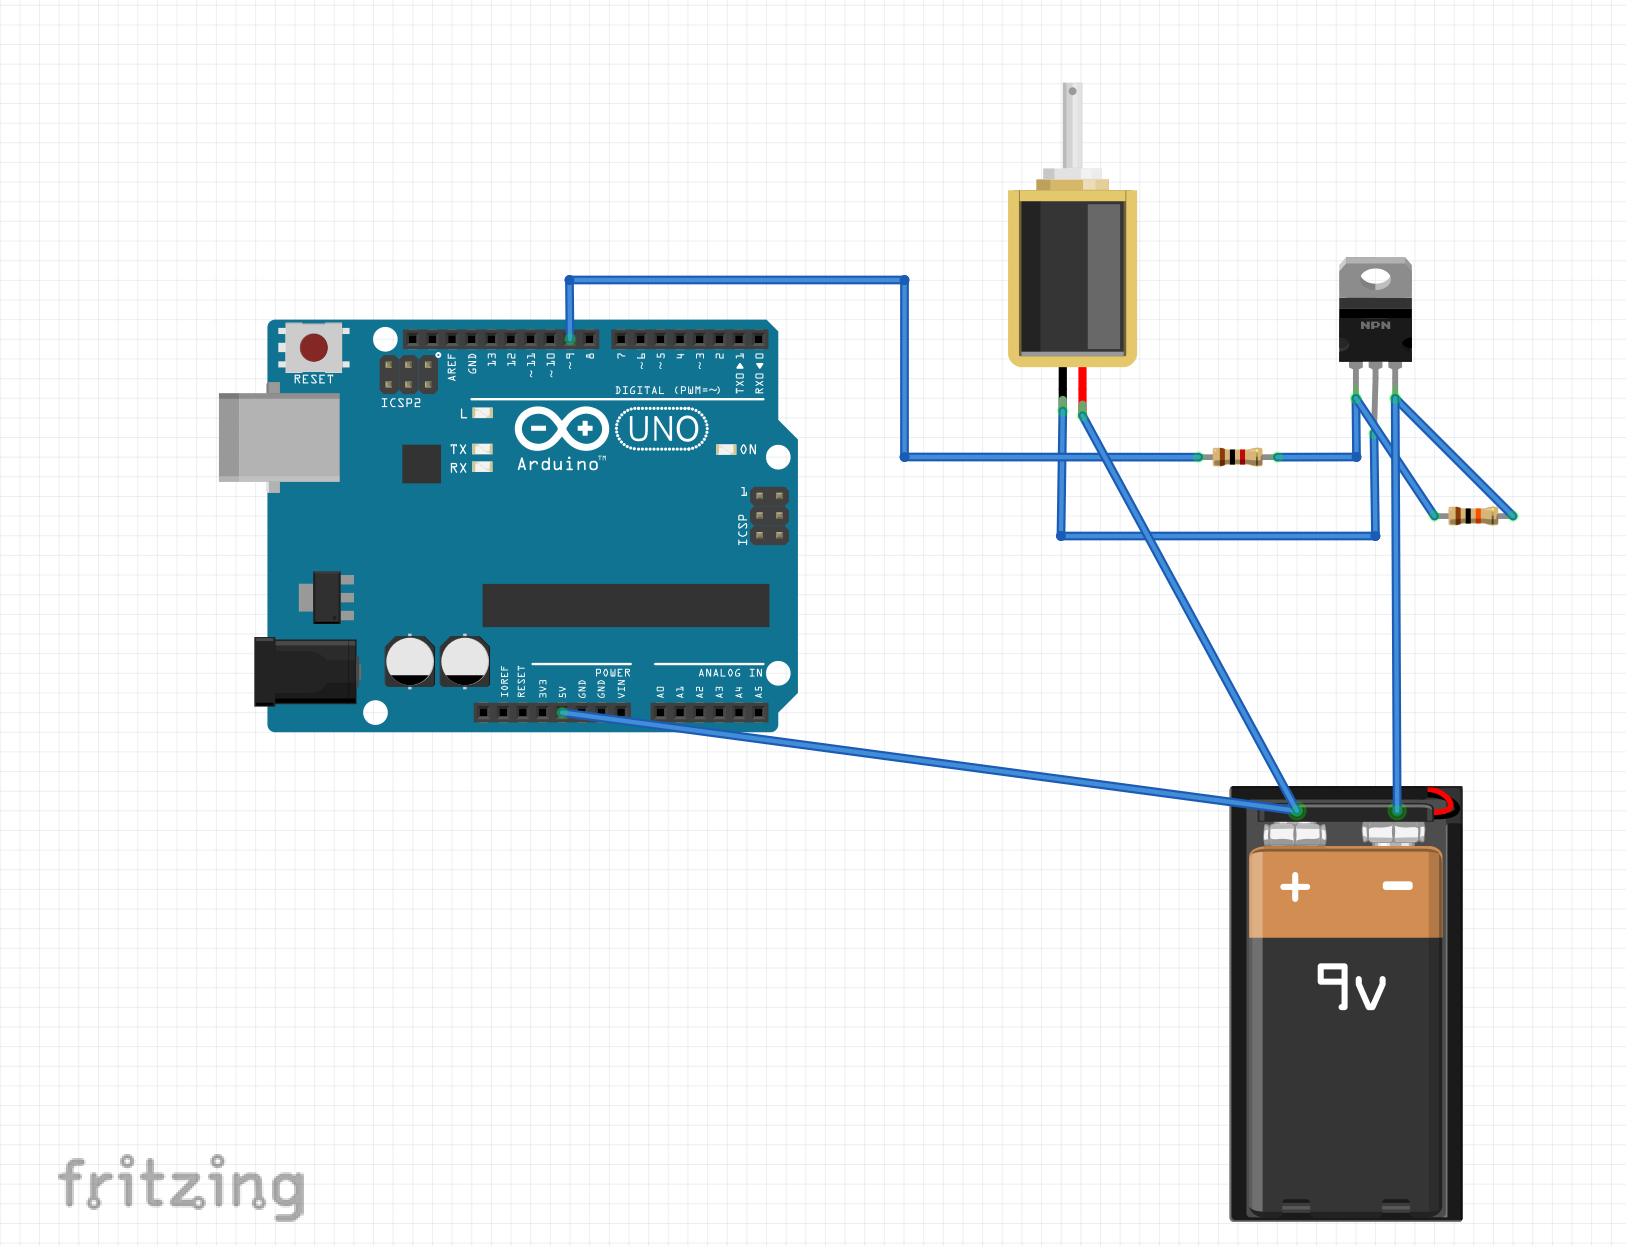 Figure 8. Solenoid circuit first attempt. First time using Fritzing to create a circuit diagram. I found it helpful to visualize where all the components were going. This circuit did not end up working probably because the resistance was too high.
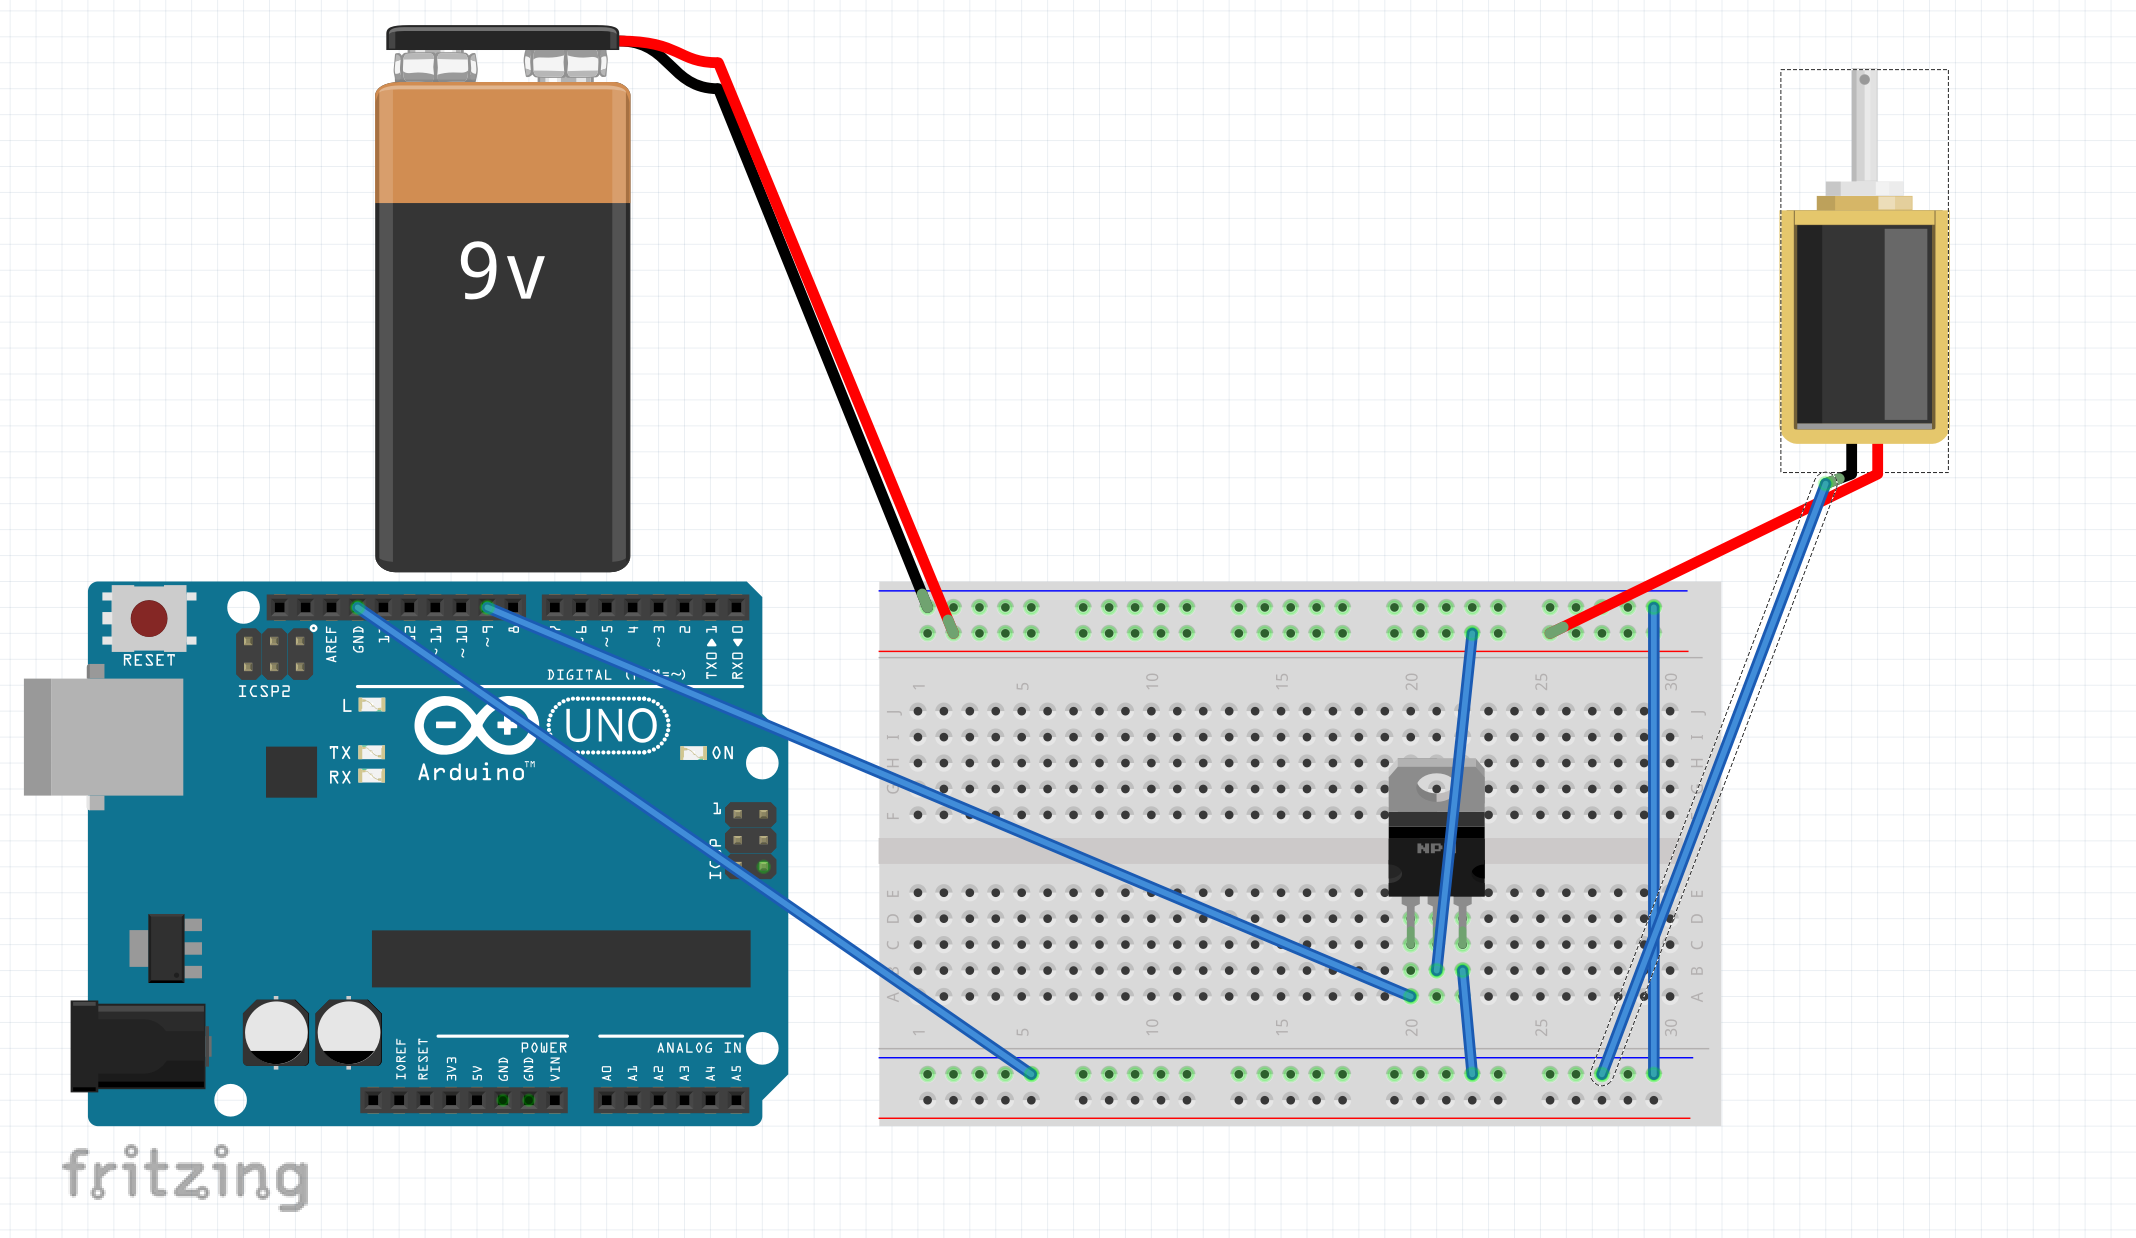
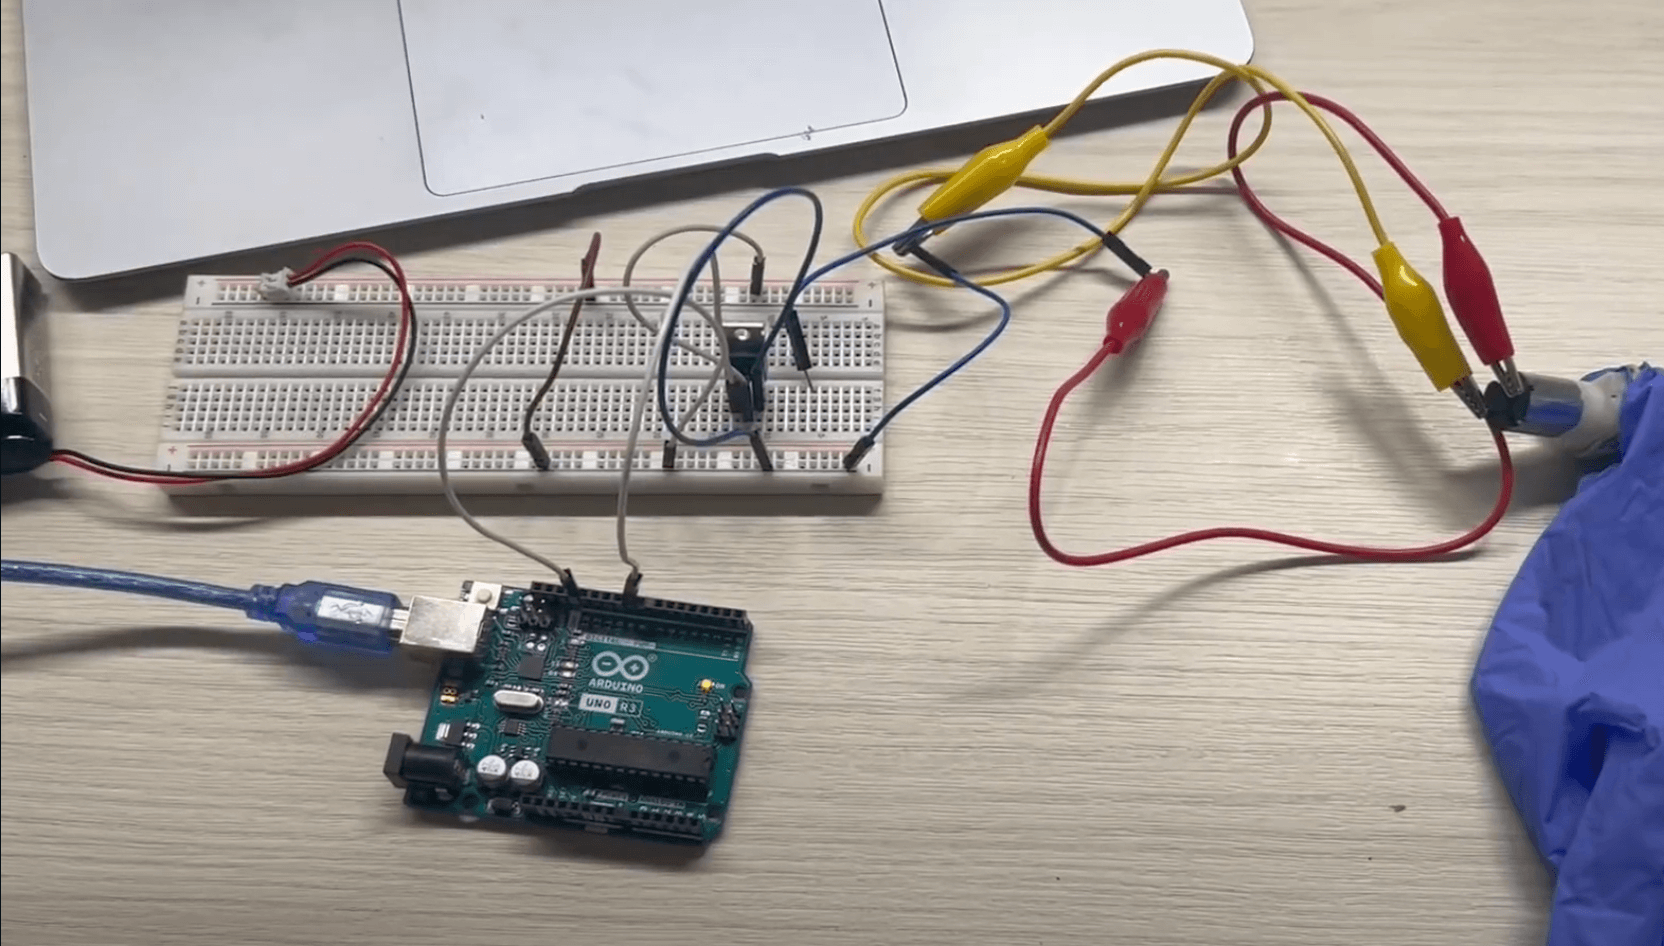 Figure 9. Final working circuit. I combined the above circuit in Figure 8 with the one from the Arduino forums to finally make it work.
Discussion
Soft Robotics Toolkit
Since I want to eventually incorporate soft robotics into my Neuroscience course as a way to explore prosthetics, I had one student volunteer to try out making the Gripper from the Soft Robotics Toolkit. The student followed all instructions carefully and used acetate paper. However, the acetate paper was curved and so did not sit in the middle of the mold, floating up to the surface. This also made it challenging to see where to insert the tube to inject air. Ultimately, the gripper did not end up working properly although they did manage to pump some air into a few chambers. The student also built the solenoid air pump device according to the above diagram.
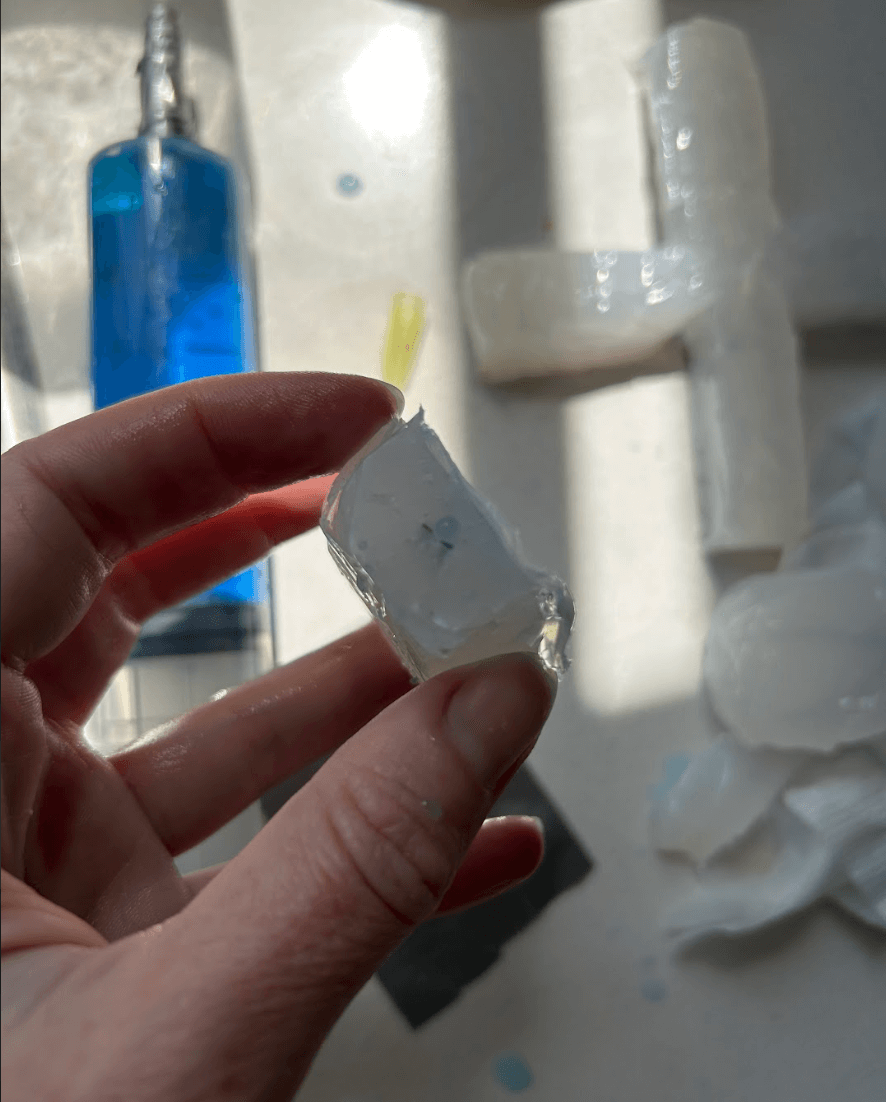
When I was finally able to complete the gripper myself, I also ran into a few issues that I have some ideas of how to troubleshoot moving forward when I implement this into my curriculum. The first issue was placing the tube in the correct layer in the gripper. This was due to the fact that the acetate paper (or tape) layer is so thin that it is easily missed. One way to solve this is to extend the acetate layer to the edge of the form so that it is more obvious as to where to insert the tube in order to properly inject air or water. I cut the flower robot to examine that the acetate layer was still functional and it was (as shown in picture below). I just wasn't getting the proper connection with the tubing.
The second issue may have been that the silicone rubber was too thick. Next time I will try thinner layers which I hope will reduce the amount of effort involved in forcing air or water through the chambers.
3D printed soft robot
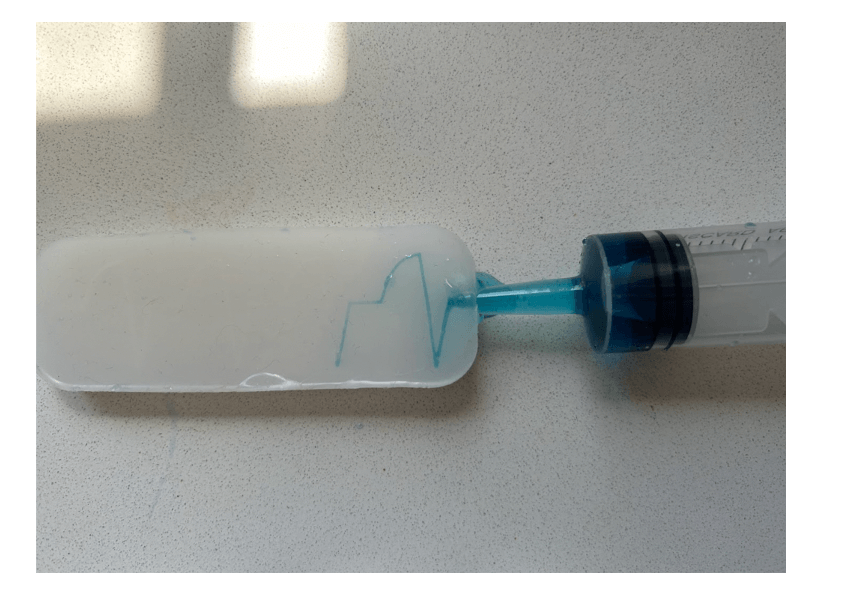
I also encountered some challenges with the 3D printed soft robot. The issue that I ran into was that the air pocket was too narrow and small and so it was blocked. In the future, when creating a 3D printed model, I need to ensure that the air pockets are wide enough. I tried filling the wells with blue food colouring so that I could visually see the issue (see image below).
Methods and Materials
Solenoid Air Pump:
Circuit Diagram:
Code:
*from Arduino forums
const int pumpPin =  9;

void setup() {
  pinMode(pumpPin, OUTPUT);
}

void loop() {
    digitalWrite(pumpPin, HIGH);
    delay(5000);
    digitalWrite(pumpPin, LOW);
    delay(5000);
}
Soft Robotics Toolkit
Methods and materials for the soft gripper is located on the Soft Robotics Toolkit website. You can download the guide, template, and student worksheets.
References
3D printed soft robot
- Adobe Illustrator
- Autodesk Fusion
- Ultimaker Cura
- Ender 3 v2
Extrude a 2D image on Autodesk Fusion: Step 1. Start by importing or creating a sketch with your line drawing. Step 2. Choose the profile or line drawing you want to extrude by clicking on it. Step 3. Go to the toolbar and select the "Create" drop-down menu. Choose "Extrude" from the list. Step 4. In the Extrude dialog box, set the parameters for the extrusion, such as distance, direction, and operation (like join, cut, or intersect).