3. Circular Open Source Fashion
This week was really dense for me. It was hard to grasp all the concepts at once. There were so many key words being used and I had no idea how to compartmentalise them all.
But overall, I found the topic extremely interesting and the hands-on learning very enjoyable and gratifying.
From what I've gathered, the fashion industry has a couple of issues that this topic wants to challenge and improve:
- The fashion industry, especially fast-fashion, yields a lot of garment waste that ends up in landfills, making the industry one of the biggest carbon emitters.
- There is the issue of "one-size" does not fit all.
- The lack of open source information that enables a wider population to take part in constructing clothes that fit their own needs.
This week suggests that we can start to tackle some of these problems with digital fabrication. More specifically, by practicing open source and modular fashion.
To deal with the first two problems of waste and sizes, we are asked to explore the idea of creating Modular pieces, that integrate Tessellation patterns.
-
Modular fashion is essentially creating a garment out of smaller assemblable pieces to generate less waste and allow for size and shape customization.
-
While Tessellation is the science and art of covering an infinite plane with shapes without any gaps or overlaps. When laser cutting patterns on a piece of garment, using tessellation generates less waste in garment as all spaces on the plane are used.
To deal with the 3rd problem, we are going to be sharing our fabrication file on an open source sharing platform, called oscircularfashion.com, that will enable others to access the design and modify it or assemble it themselves.
Learning Outcomes of this week
+ Research skills: the participant has acquired knowledge through references and concept developmen
+ Design skills: the participant has learnt through sketches & prototypes, material choices, 2D vector design
+ Fabrication skills: the participant acquired skills necessary for laser cutting, digital workflow, assemblying, material used and leftovers
+ Process skills: Anyone can go through the workflow, understand it and reproduce it
+ Final outcome: The assignment is assembled and either complete or tested
+ Originality: Has the design been thought through and elaborated?
Student checklist
+ Include some inspiration: research on artists or projects that work with modules and zero waste systems
+ Document, Design and prototype with paper and scissors modular configurations and interlocking connections
+ Document, Design and prototype digitally your modular configurations and interlocking connections in 2D
+ Document the process of testing and laser cutting your designs, including the machine settings, material type and thickness
+ Laser cut the modules. Create a modular or seamless garment, showing that the connection is well-designed and holds the pull/stretch.
+ Document the assembly process and tests
+ Upload the fabrication PDF file at oscircularfashion.com, in 1:1 scale accompanied by 1-5 pictures (preferably in white background)
+ Submit some of the modules to the analog or digital material library of the lab. (Recommended size 20cm x 20cm) (extra credit)
Research & Ideation
Intention of this week: creating modular elements, structures and connections that allow the user to change the shape of a garment, resize it or replace certain elements.
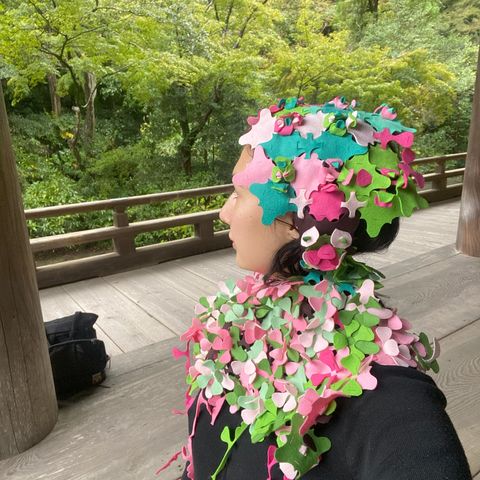
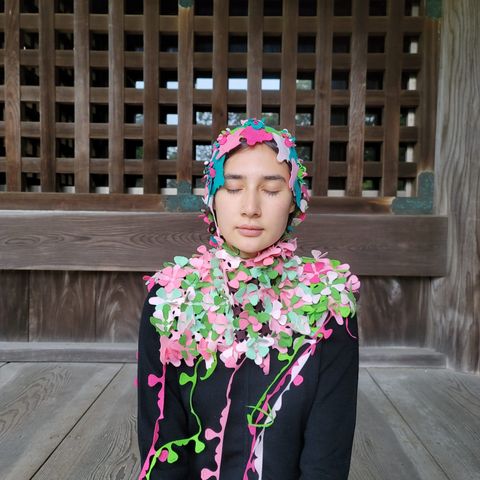
I wanted to start off with something small, like an accessory instead of a larger garment. So I chose to make a hat. And I remember falling in love with the balaclava that Kenzo designed for Noah Cyrus, so I decided I was going to craft my own version of a balaclava. I was also really inspired by Laora Guillerm's imitation of lace doilies in her modular design, which led me to look into hand-stitched balaclavas that have this fallen angel effect, similar to the long filamentous branches found in mycelia.
I was really impressed and inspired by the following alumni's work during Week 3:
Click here to see:
References & Inspiration
I referenced images from Pinterest for this week's moodboard.

Process and workflow
Step 1: Modular pattern
Even though it was recommended that we start our work in an analog fashion - with paper and a pair of scissors - I couldn't quite transition to working on a digital platform fast enough. After cutting out a couple circles on newspaper, I logged directly onto fusion. I chose fusion only because it's the digital fabrication software that I've spent the most time with, and feel most comfortable using, though, in this case, may not have been the most convenient choice compared to a 2D software like Inkscape or Adobe Illustrator.
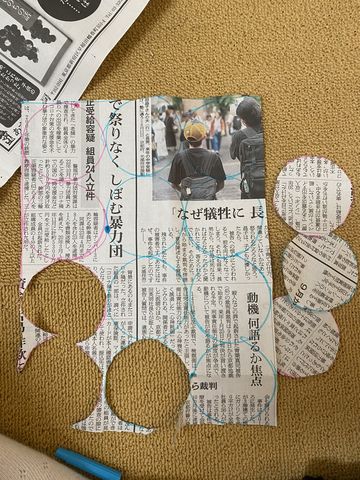
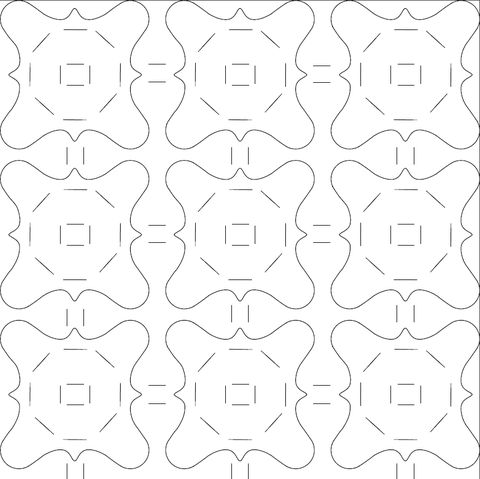
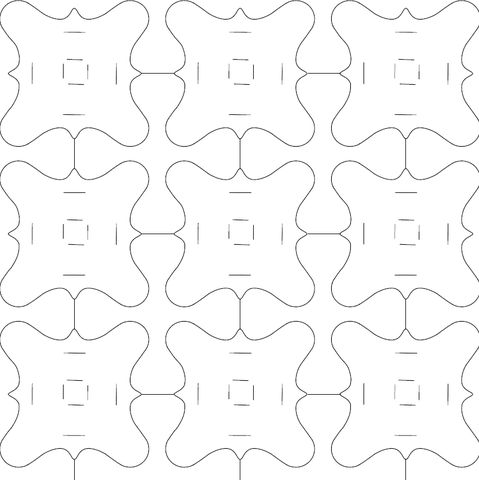
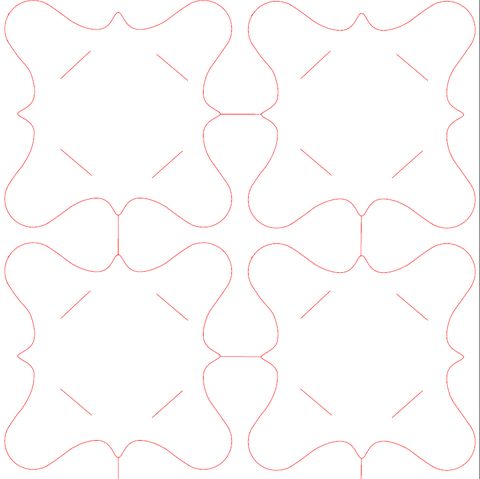
Anyhow, I drafted a tessellation that I played around with until I liked the shapes of both the positive and negative spaces. I had no idea how to join these shapes together, but I was satisfied that the tesselation pattern was going to be helpful in reducing the amount of garment that was going to go to waste.
Step 2: Laser Cut Samples + Explore Prototype
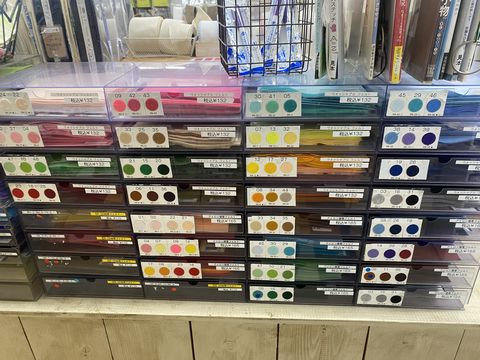
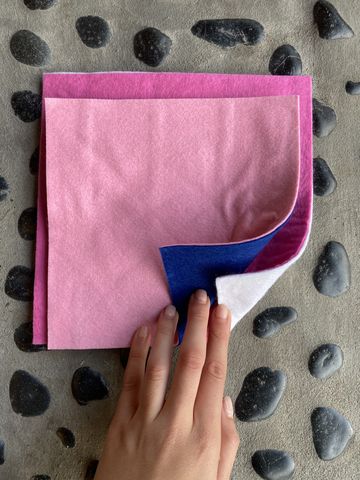
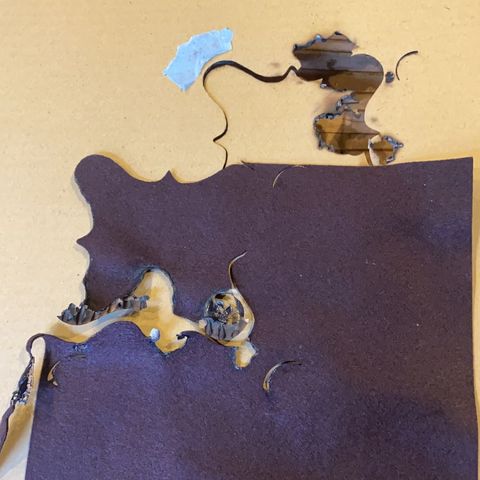
The next day, I needed to explore the idea of slots and connection between modular parts, so I went to the local fabric store, Kamakura Swany, and bought some felt samples (100% Polyestor). The next day I bought felt samples that were 40:60% wool:polyester, that didn't come out as clean as the 100% polyester ones. The wool was harder to laser, gave off an awful smell when burnt, and the fibers on the modules looked really messy. I also got 2mm thick felt samples that did not manage to get cut by the laser cutter with the same settings for the 1mm. I stuck with 1mm.
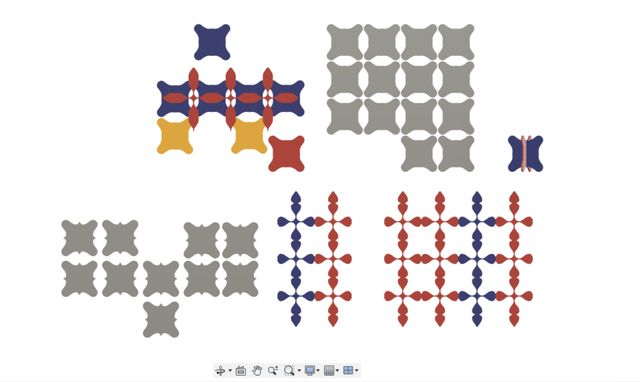
In order to laser cut the tesselation I had created, I needed to prepare my sketch on a 2D design software, such as Adobe Illustrator. I created repetitions of my square and also added slots after my teacher, Rico, helped explain to me the mechanics. I also included a lot more slots in this first print just to give myself more vectors to play with.
I laser cut these felt samples on Rico's laser cut machine, called Muse3D. I imported my files into the online software called Retina Engrave and choose felt as the material. Rico's laser cut machine operates at 45w so the settings I used were: Speed 80%, Power 20%, and Current 60%.
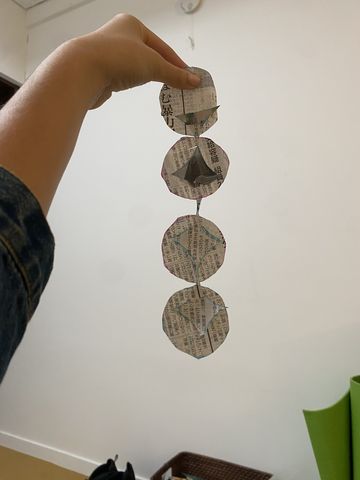
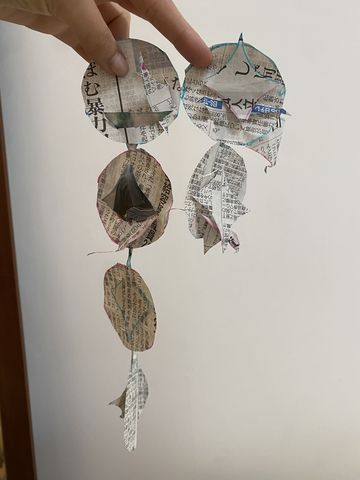
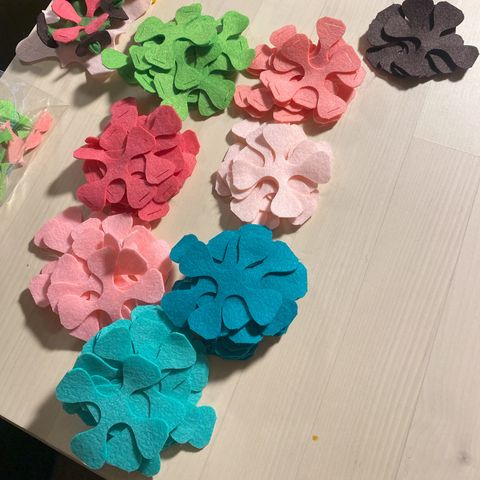
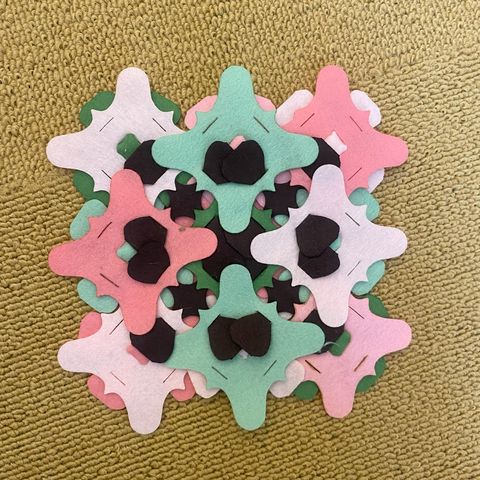
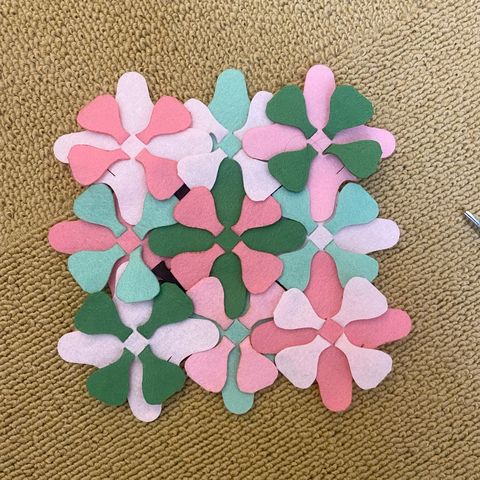
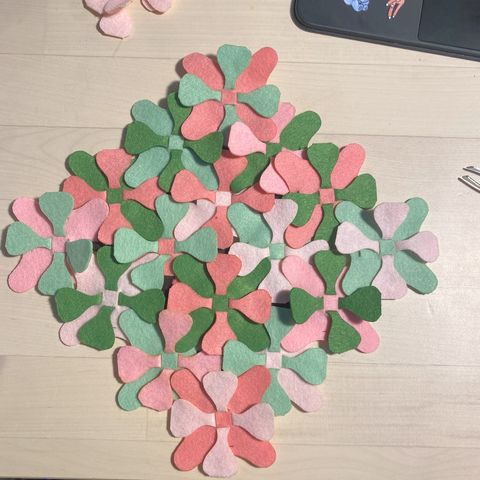
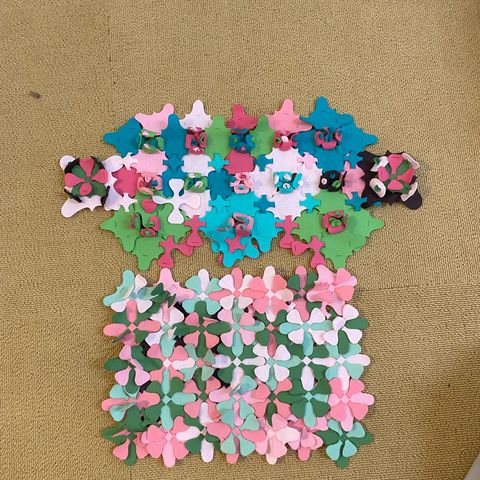
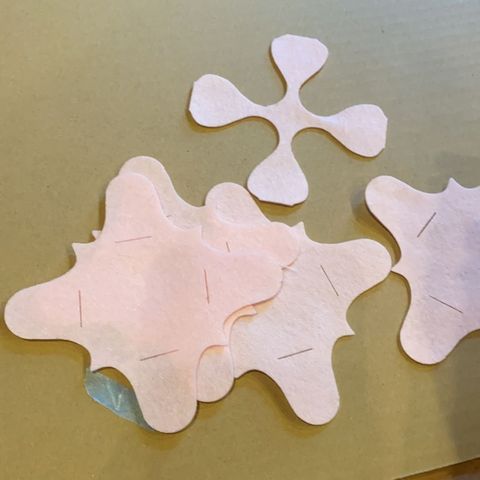
Then I got to have fun assembling my modular patterns in all the ways I could find until I figured out a couple different configurations that I like. During this process, I also cut by hand a couple slots that I had not thought to put into my design before printing.
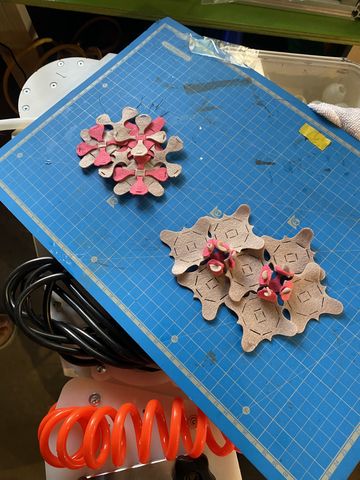
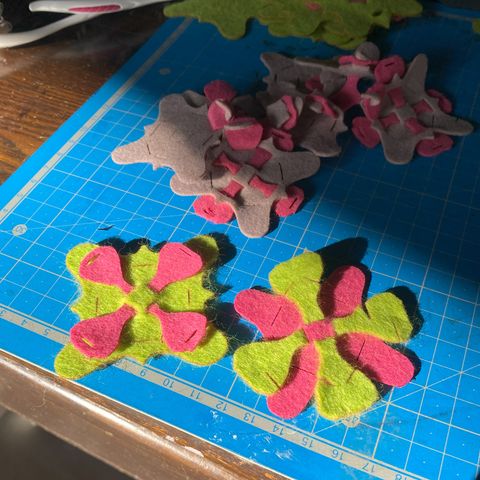
Playing with the modular parts and assembling them by hand really helped me gain an intuitive understanding of what I could make, which direction I wanted to assemble my parts in, and all the possibilities that my shape could make. There was so much I could do with two repeating shapes.
Step 3: Revising my Digital Files
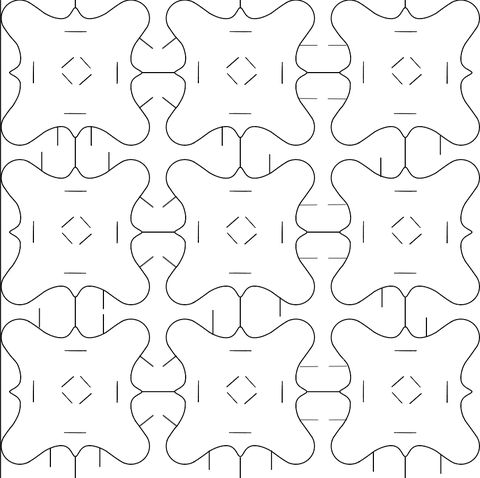
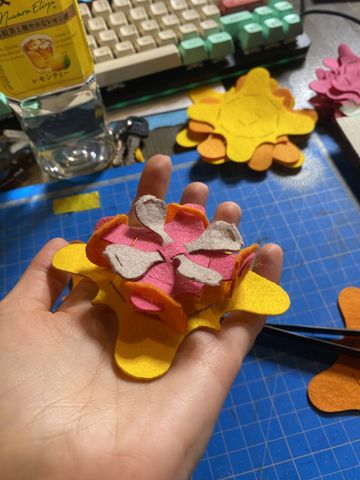
After finalizing which constructions I liked best, I went back to the digital files and revised the slots I wanted to keep and the ones I wanted to delete. I also played around with size and volume. For the parts covering the ears, for example, I wanted to integrate the larger patterns.
Step 4: Fabricating My Hat
Once I started fabricating my hat, I realised I was using a lot more of the cross pieces than the square pieces, so I wanted to integrate a pattern that would use up more square pieces and fewer crosses so that there would be less waste. I decided to combine two patterns. One pattern that uses more crosses, and the other that uses more squares.
So I went back to Illustrator and revised the size of my tessellation.
I went to FabLab Kamakura the next day to print out some of the large squares. Since the Trotec laser cut machine at FabLab was different to Rico's and operates at 60w, as opposed to 45w, the settings were slightly different.
At first, I totally forgot to change the material to felt, and ended up burning and melting my felt sample with the first cut.
I had the power at 85% and speed at 0.25. The power was wayy too high and the speed way too low. So I changed the settings to Power 10%, and speed 4. This worked out perfectly.
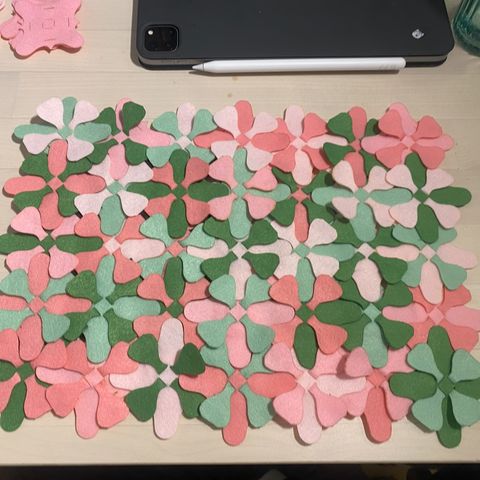
Step 5: Assembling all the pieces
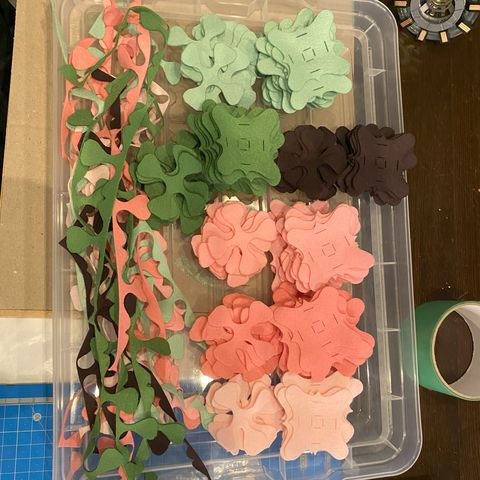
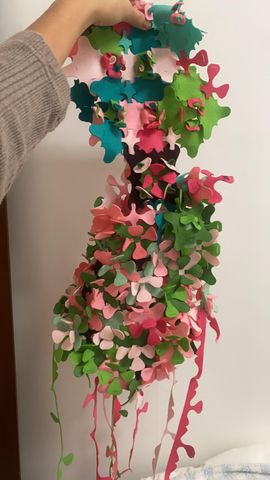
I laser cut about 50 felt samples that were 18cm x 18cm and 1mm thick. From each felt sample I would get 9 of the square-shaped module, and 4 of the cross-shaped module. All together, I'm estimating that I used about 200 squares and 200 crosses.
Step 6: Sharing my fabrication files
You can see my project and digital files that I uploaded onto the Open Source Circular Fashion website oscircularfashion.com.
You can also acess my final digital fabrication files at the bottom of this page, under Fabrication Files.
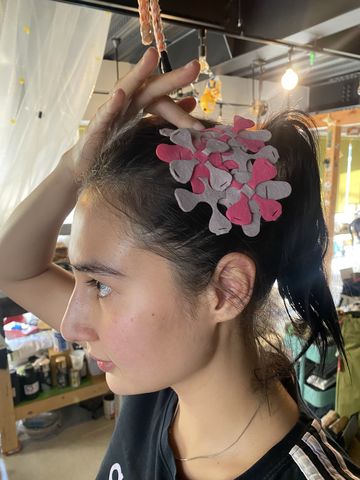
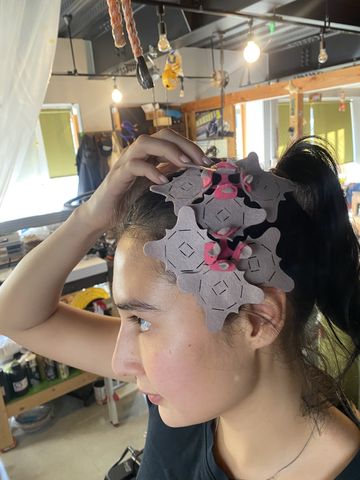
Octopus Balaclava


Reflections
- I need to find a more secure lock/tie for the back of the hat, at the moment the hat is still fragile to tension and will unlock.
- This was kind of my first time going into a fabric store to purchase any sort of fabric so I went a little crazy with the choices they had to offer. If I were to do it again I would choose a more calm approach and confine myself to a more neutral color palette. Also to enable the shape of the modules to do it's thing. Maybe choose two colors that would allow the modules to be accented and pop out.
- I wanted to create a look that didn't have any gaps, and would cover all parts of the skin, due to the intention of creating a winter hat, however, that did generate a lot of overlaps in my design, and overlap in my patterns can be seen kind of as a waste of fabric. I've seen other's designs where the slots are right next to the edge of the square, my slots are more in the middle -- which also teaches me that the positions of slots are immensely important and can change the whole configuration of module assembly.