6. BioFabricating Materials
I was so inspired by the outcome of experiments and fully fledged projects that were shown to us this week for my most anticipated topic of Fabricademy: BIO-MATERIALS.
As a result of my experimentations with resin in the past to make large scale sculptures, I was curious to look into a material similar to resin - one that could be casted into the shape I desired. That's how I came across the bio-material class on the Fabricademy website.
I experimented with making bio-materials in my own kitchen in Thailand before the class started, and while some of the results really shocked and pleased me, I was devastated by how quickly the material grew mold in the tropical heat. Perhaps I will have better luck trying these recipes out in the Kamakura Autumn. (Spoiler alert: I did!)....
Cecilia guided us through a very detailed and coherent class on bio-materials. Here are some key ideas of what this week entails:
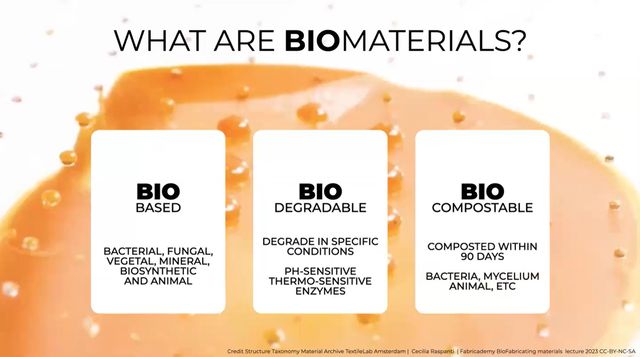
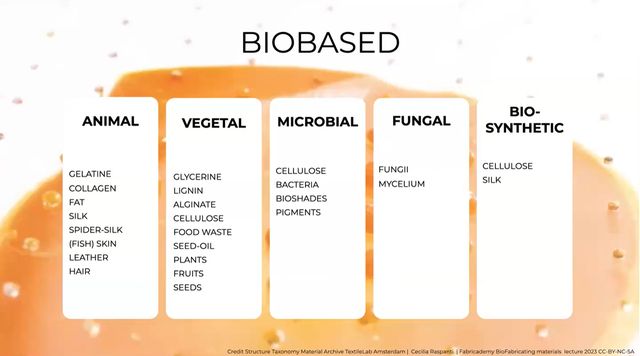
Where are bio-based materials derived from?
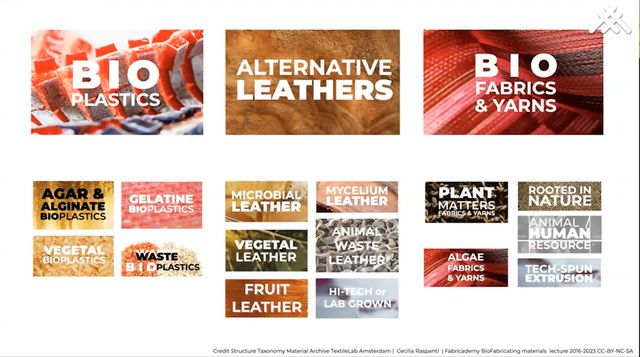
We will be focused on generating 3 types of outcomes in terms of materials:
- Bio-Plastics and Foils
- Alternative Leathers
- Bio Yarn and Threads
This image lays out the three types of materials and where they can derive from:
Ultimately there are 2 ways that we can go about cultivating our own bio-materials:
1. Growing / Gardening our ingredients
2. Crafting / Cooking our ingredients
weekly assignment
Learnign Outcomes
+ Research skills: the participant has acquired knowledge through references and Concept development
+ Technical skills: Master techniques for growing and crafting personalised materials
+ Process skills: Anyone can go through the process, compare and explore the recipes
+ Final outcome: create a material chart
+ Originality: Has the design been thought through and elaborated?
Student checklist:
[x] Include some inspiration: research on artists, projects, platforms that work with biomaterials, local ingedients and resources
[x] Produce at least one crafted and one grown material:
+ Crafted material - explore the different recipes and understand how to adjust them based on the ingredients:
+ Grown material - explore the different recipes and understand how to adjust them based on the ingredients
[x] Document your recipes, the ingredients and process and if there have been changes, document your unexpected discoveries
[x] Name your materials, classify them by typology and display them in a systematic order of samples
[x] Submit some of your swatches to the analog material library of your lab. (20cm x 20cm approx.)
Research
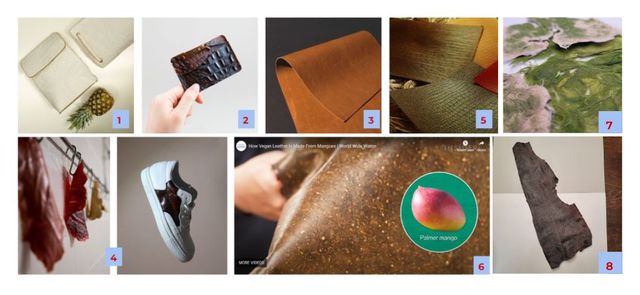
1. Piñatex by Ananas Anam
Called Piñatex, the material makes use of fibres derived from pineapple leaves, which are sourced from a plantation in the Philippines where they would otherwise be burned or left to rot. These fibres are then mixed with polylactic acid (PLA), a bioplastic derived from corn, before being formed into a non-woven mesh, finished and coated to create a flexible yet durable material.
2. Tômtex by Uyen Tran
Tômtex is made from waste coffee grounds and the biopolymer chitin, which is found in the exoskeleton of crustaceans and in this case is sourced from discarded seafood shells.
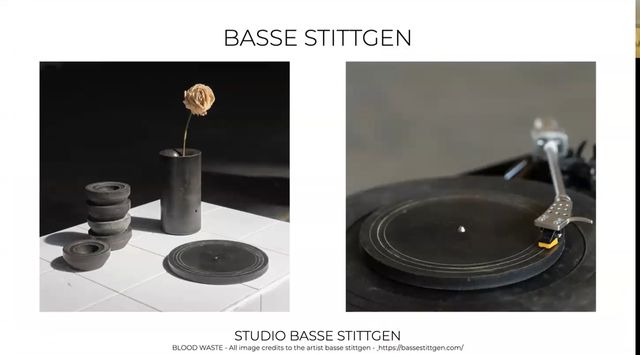
3. Bio-leather by Shahar Livne
The designer uses blood as an ink-like colorant and plasticiser.
Discarded animal fat and bones from a slaughterhouse are tinted and plasticised using waste blood to create Israeli designer Shahar Livne's bio-leather.
4. Lino Leather by Don Kwaning
Although it resembles plastic, linoleum actually consists of linseed oil mixed with a filler such as powdered cork, which is applied to a cloth backing and left to harden.
Their mission is to protect our only planet, by creating plant-based leather from banana crop waste.
6. Mango Leather
This video shows an insider perspective at a Dutch company that uses mango waste to make bio-leather.
7. Fish Skin
Rico, my teacher, experimented with Fish skin leather during his Fabricademy course, check out his process here.
8. Algae Leather/Yarn
Rico also made Algae yarn out of the algae surplus in his fish tanks, it turned out beautiful! Again, read more about how he did it, here.
To find more bio-material projects, check out dezeen's bio-material section.
References & Inspiration
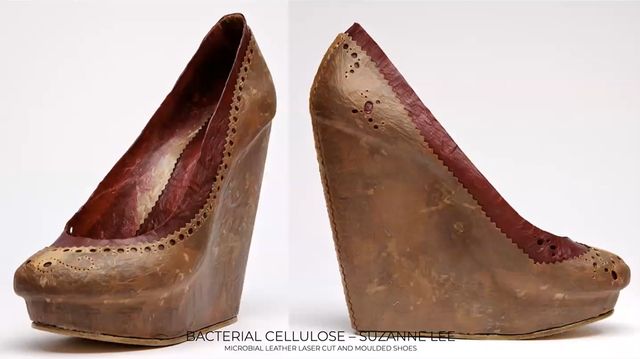
Like I said, I was really inspired by a lot of student work for this week's assignment, and grew really excited with the idea of making my own shoes out of biomaterials. I am a bit of a shoe-aholic so to have seen an image of shoes made out of Kombucha leather, to see these the combination of two of my favorite things, really blew my mind.
Here are some images/inspiration shown in the slides Cecilia shared with us:

Previous Work
Because I really fell in love with the idea of making my own shoes with bio-materials, I knew I wanted to exercise a lot of recipes for bio-leathers, as well as different varieties of bio plastics (such as bio-foam, bio-silicone and bio-resin).
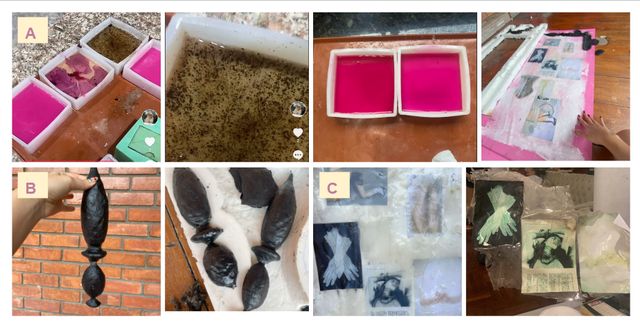
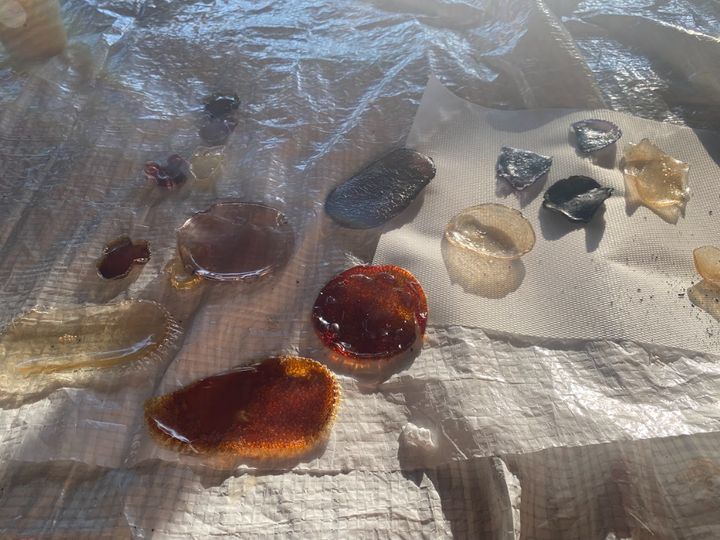
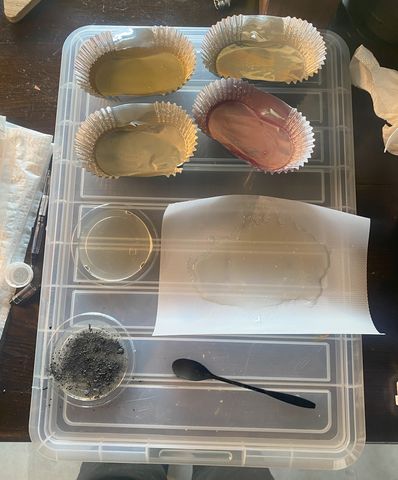
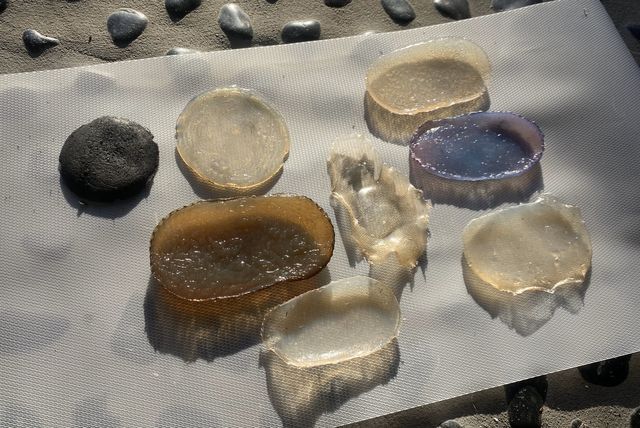
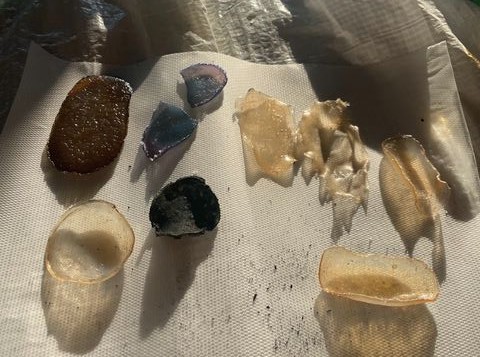
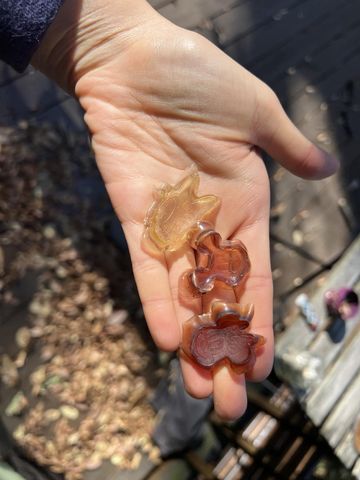
A. This is a bio-silicone and bio-resin recipe. I tried them again this week. Find the recipes below under the Gelatine-based recipes. In Thailand, the heat and moisture attracted mold on the materials after about a week.
B. This is a bio-resin recipe.. It ended up being way floppier, flexible, more bendy than I intended it to be. It was a 6:1 ratio of gelatine:glycerine. Mold also really quickly grew on these materials. (Probably because of the rainy season, now that I think about it!) So lots of humidity + moisture = mold.
C. This is an agar bio-foil combo with bio-jelly. After 2 days, the material was really fragile and broke apart very easily. After about a week it firmed up some more, but also shrunk. The recipe can be found under the Agar-based and Gelatine-based recipes.
BIO-PLASTICS

Agar-based Recipes
* Agar agar; 12 grams (2:3 agar:glycerol)
* Water; 400 ml
* Glycerol; 18ml
* Simmer and mix all ingredients
* Reach boil, lower heat
* Simmer and constantly stir for 20 min
* When it thickens into a gel, remove from heat and cast
After 2-3 days:
The results varied immensely depending on how thick I casted the material.
The thicker ones were more like a jelly and the thinner ones more like a foil.
As expected, the more days they dried, the more they shrank.
Structure: Strong, flexible

After 5 weeks:
Shrunk a lot, still more flexible than the bioresin.
Day of
After 2 days (still a bit wet)
After 3 days (some more shrinkage)
Scroll down for videos:
This is a video taken after 2 days of drying:
This is a video taken after 3 days of drying.
- Replace the water with a (diluted) natural colorant such as a vegetable dye or water-based ink (e.g. hibiscus, beetroot, madder)
- Add less glycerine for a less flexible foil: try 1:1 or 2:1 (agar:glycerin)
- Add sunflower oil filler or eggshells to reduce shrinkage
- Thinner casting for strength
Gelatine-based Recipes
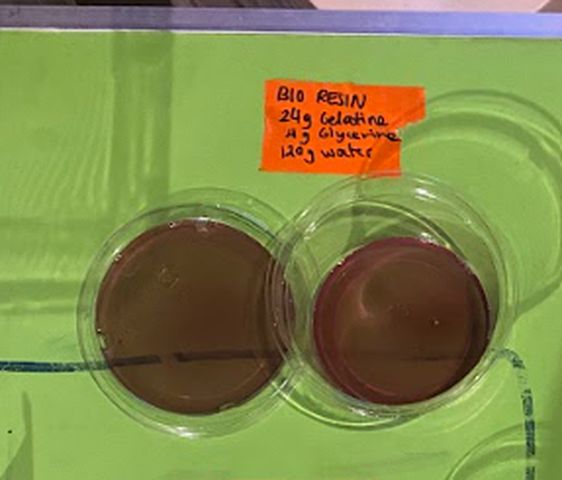
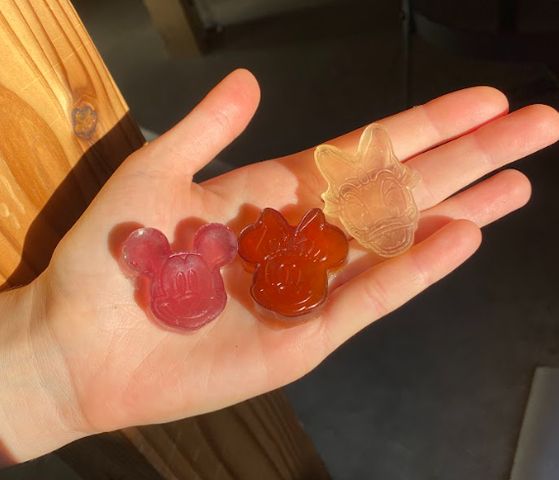
Bio-Resin
* 24g Gelatin powder - 6:1 ratio (gelatine:glycerol)
* 4g Glycerine
* 120ml Water
* measure ingredients
* bring the water to the boil
* optional: add natural dye if you wish to use color
* add the glycerine
* add the gelatine
After 2-3 days:
A lot more firm, rigid, dense (as opposed to bendy)
than the bio-foam and bio-silicone (which was a 1:1 ratio of gelatine:glycerol).
Shrunk a bit after 3 days without any filler. But behaves a lot like resin.
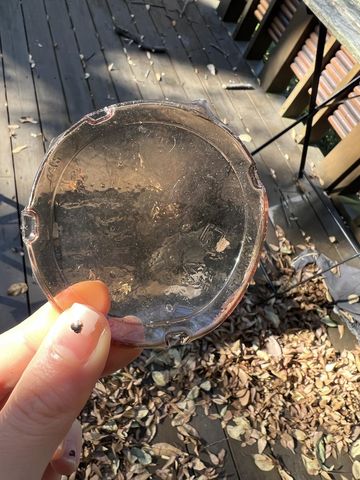
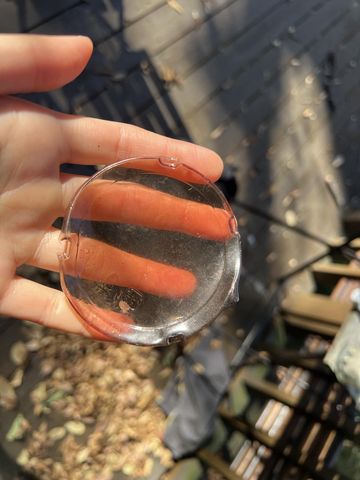
After 5 weeks:
A lot of shrinkage. More water evaporated making it a lot harder/ more brittle.
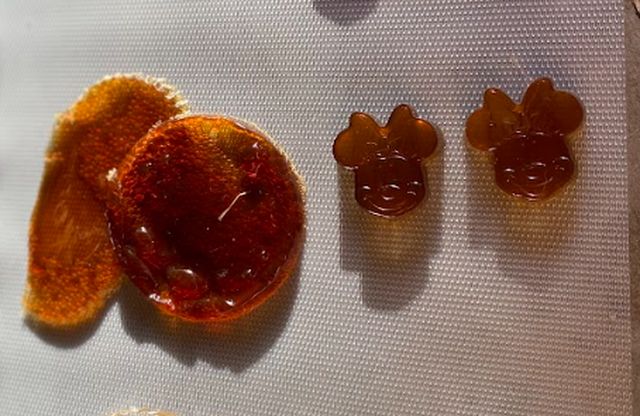
Day of
After 2 days (Mickey)
After 5 weeks:
2+3 days after drying
- Add a natural colorant such as a vegetable dye or water-based ink (e.g. hibiscus, beetroot, madder)
- Add less glycerine for a more rigid plastic (try a 7:1, 8:1, 12:1 ratio)
- Stiffeners such as fibers, yarn or natural debris may be added for more structure and reinforcement.
- Fillers such as almond or sunflower oil, can be added to prevent additional shrinkage but might affect stickyness.
- Re-use your bioresin scraps and experiments. Remelting dried bioresin in a dash of water will give you an already very concentrated mixture (the water has evaporated during its drying time) that helps you cast objects that will
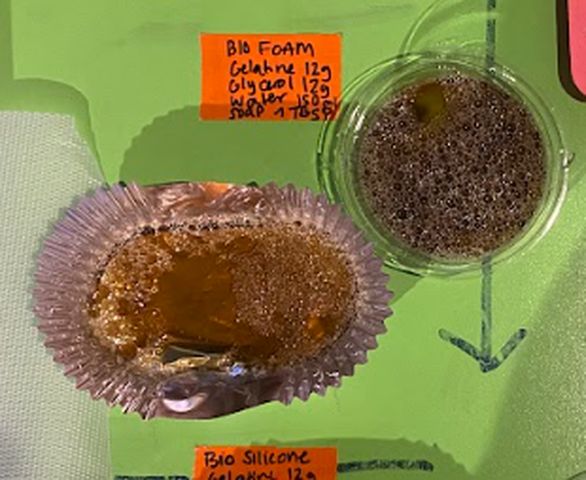
Bio-Foam
* 12g Gelatin
* 12g Glycerine
* 150ml Water
* 1tbsp Dish Soap
* Measure ingredients
* Simmer and slowly stir the mixture between 60-80 degrees celcius for 20 minutes
or until it's thick like a syrup or honey, then add in the soap
* Whisk vigorously to create foam bubbles and simmer for another 2-5 minutes until the mixture thickens

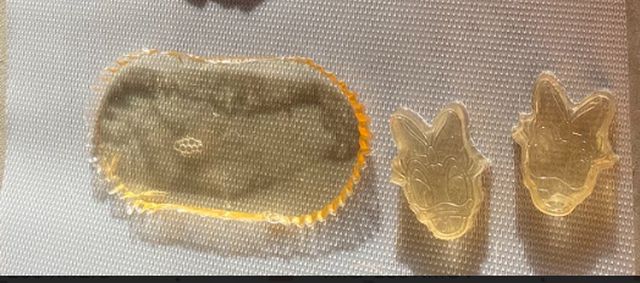
After 2-3 days:
More flexible than the bio-resin due to adding more glycerine (1:1 ratio).
Nice translucency. Really bouncy, and flexible, still got some strength.

After 5 weeks:
Shrinkage. Still strong and flexible.
Day of
After 2 days
After 5 weeks:

- Replace the water with a (diluted) natural colorant such as a vegetable dye or water-based ink (e.g. hibiscus, beetroot, madder)
- Add less glycerine for a less flexible foil: try 1:1 or 2:1 (gelatin:glycerin)
- Soaking the foam model in water for 2 hours and then letting it dry again makes it firmer. First it expands, then it shrinks again and gets quite rigid.
- Add sunflower oil filler or eggshells to reduce shrinkage
- Stiffeners such as fibers or natural debris may be added for more structure and reinforcement.
Bio-Silicone
* 12g Gelatin
* 12g Glycerine
* 100ml Water
* Measure ingredients
* Bring the water to the boil
* Optional: add natural dye if you wish to use color
* Add the glycerine
* Add the gelatine
* Keep the temperature below 80 degrees celcius while stirring very very slowly and gently to avoid making bubbles.
After 2-3 days:
Very flexible. Strong when stretched. Bouncy.

After 5 weeks:
Shrunk and stiffened.
After 5 weeks:
 Top to bottom: bio- Silicone, Resin, Foam
Alginate-based Recipes
Coffee Ground Composite
* 4g Sodium Alginate
* 10g Glycerol
* 10g Coffee grounds
* 10ml Vinegar
* 200ml Water
* Step 1: **24-48 hours prior**:
make 2% alginate solution = 200ml Water, 4 grams Alginate,
let it hydrate for at least 24 hours.
* Mix 10g coffee grounds with 40g of the hydrated 2% alginate solution
and 10g of glycerol.
Carefully stir the mix, avoiding the creation of bubbles, until it is fully integrated.
Pour in mold, leave for 15 min
* Pour gently on top the 5-10 ml of vinegar.
It will start reacting and coagulating.
Leave it to react for 15 minutes
* Separate the mix from the mold gently in order to leave space for the vinegar to penetrate the sides.
Wait for an hour.
* Take the sample out of the mold and turn it around to allow the vinegar to reach the other side of the biocomposite.
Leave it for an hour more.
* Take it out of the mold, rinse it under tap water to clean the vinegar and leave it to dry
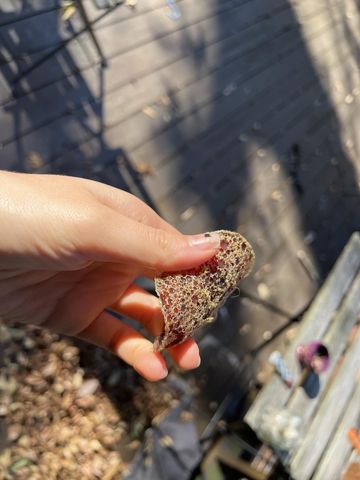
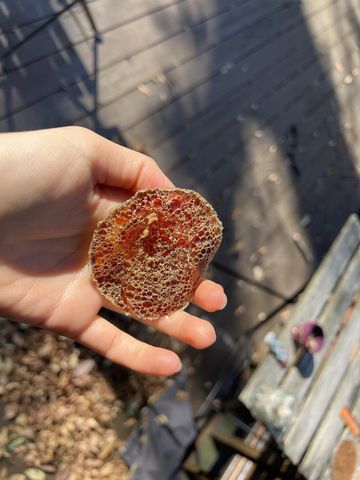
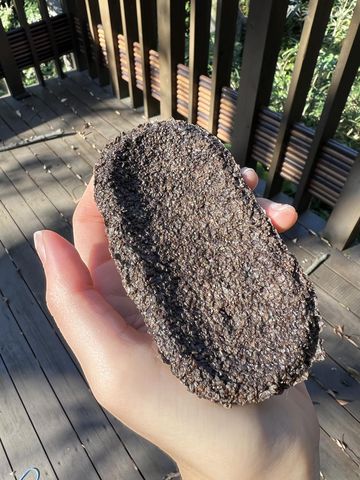
After 2-3 days:
Still needs time to dry. A bit gooey.
After spraying some Calcium chloride (recipe below), it firmed up a bit more.
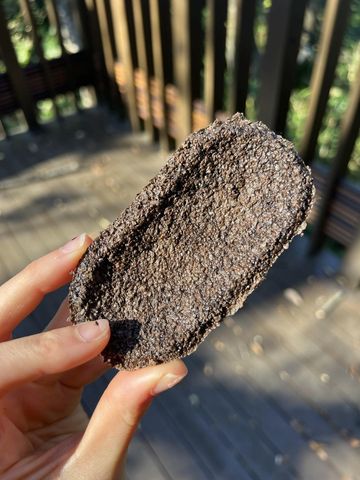
After 5 weeks:
In great shape. Good structure, quite strong. Held itself together well.
Day of
After 5 weeks:
Eggshell Composite
* 4g Sodium Alginate
* 200ml Water
* 15g Eggshells
* 10ml Vinegar
* Step 1: **24-48 hours prior**:
make 2% alginate solution = 200ml Water, 4 grams Alginate,
let it hydrate for at least 24 hours.
* Mix 10g coffee grounds with 40g of the hydrated 2% alginate solution
and 10g of glycerol.
Carefully stir the mix, avoiding the creation of bubbles, until it is fully integrated.
Pour in mold, leave for 15 min
* Pour gently on top the 5-10 ml of vinegar.
It will start reacting and coagulating.
Leave it to react for 15 minutes
* Separate the mix from the mold gently in order to leave space for the vinegar to penetrate the sides.
Wait for an hour.
* Take the sample out of the mold and turn it around to allow the vinegar to reach the other side of the biocomposite.
Leave it for an hour more.
* Take it out of the mold, rinse it under tap water to clean the vinegar and leave it to dry
After 2-3 days:
Still gooey, a lot less firm than the coffee ground recipe above.

After 5 weeks:
Kind of disintegrated. No strength nor structure.
Day of
After 5 weeks:
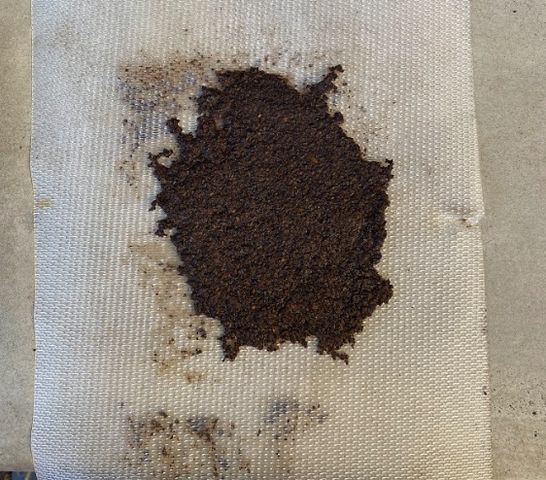
Coffee Grounds Composite #2
* 2g Sodium Aginate
* 5g Glycerol
* 2g Coffee Grounds
* Calcium Chloride spray (7g calcium chloride, 35g water)
* Mix 2g coffee ground, 2g sodium alginate solution (see recipe above), 2 g olive oil, 2g glycerine
* Add 35g water
* Make spray bottle: 7g calcium chloride, 35g water
* Spray sheet with spray bottle
* Leave for 5 minutes
* Let the composite sample dry in a dry and warm place for one week.
After 2-3 days:
Still needs time to dry. Still a bit wet and fragile. But forming a nice sheet.

After 5 weeks:
Never dried, stayed damp (likely because I sprayed way too much Calcium Chloride). No structure, no strength.
Day of
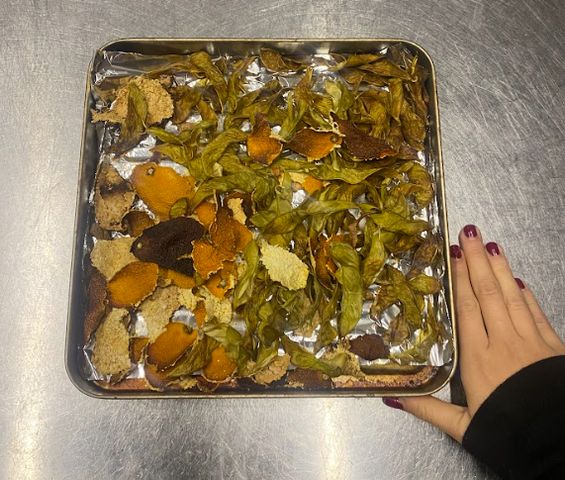
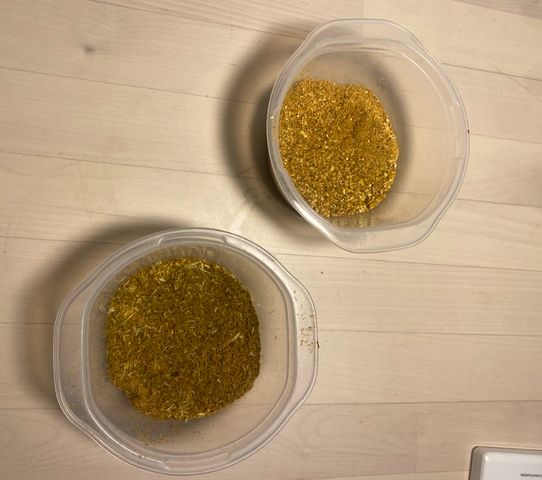
Fruit waste
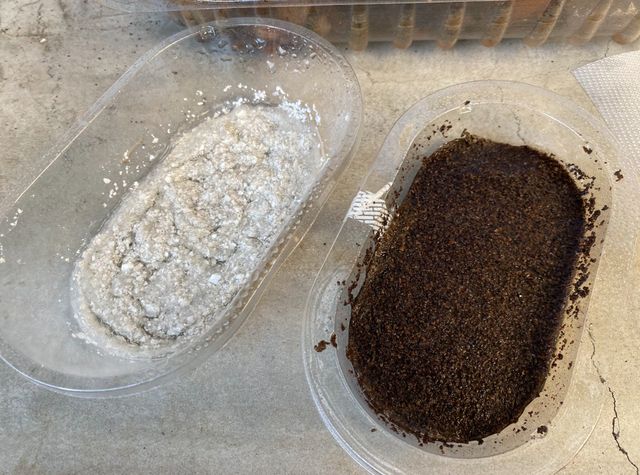
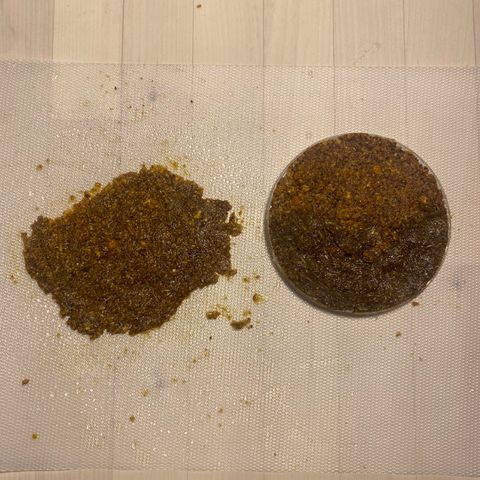
For these two variations, I used the same ingredient and recipe for the Coffee Grounds Composite Recipe #2, swapping coffee grounds with grounded edamame skin and grounded madarin skin.
For both recipes, I needed to dry the skins and blend them:
ALTERNATIVE LEATHER
While my Bio-Plastic experiments were quite successful, my bio-leather recipes could use some more time...
Kombucha Leather
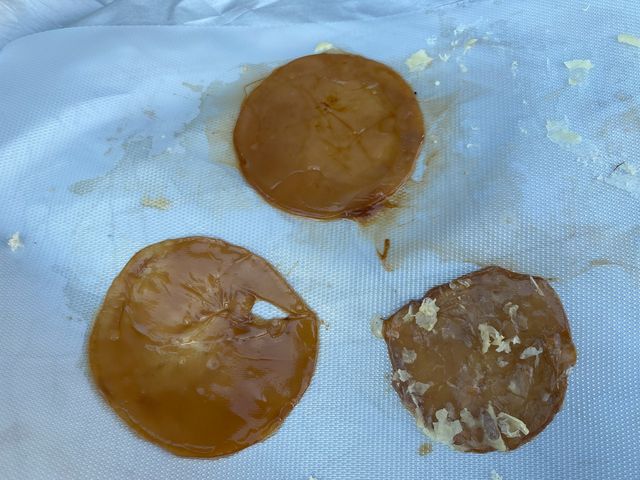
For this one, I really didn't do the difficult part of growing scoby (which, ultiamtely, isn't very difficult... except for the part where you need an already existing colony of growing bacteria to create more...)
Luckily, Rico already had multiple Scoby Hotels at home, so all I did was harvest and dry it in the sun. I tried to cover one with beeswax but it didn't go so well. They aren't completely dried yet, the picture above is the scoby after about a day in the sun.
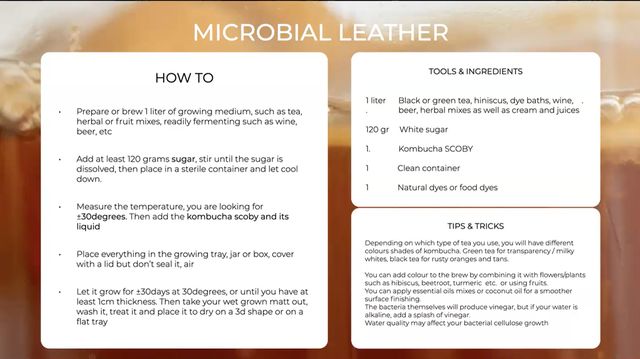
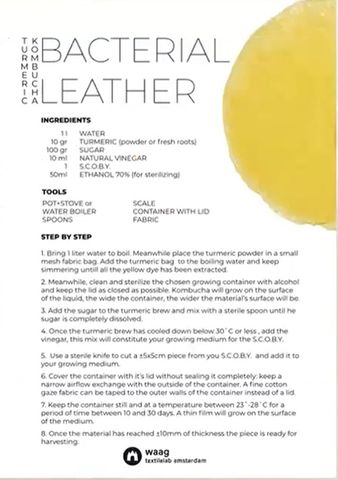
But for future experiments, when I'm back in Thailand, I will need to grow my own scoby hotel, so below is a great recipe to follow:
Mycelium Leather
We found some mycellium in a year-old coffee grounds jar and soaked it in a Glycerin (+Potash) solution for 2 days. Not sure what happened to it...
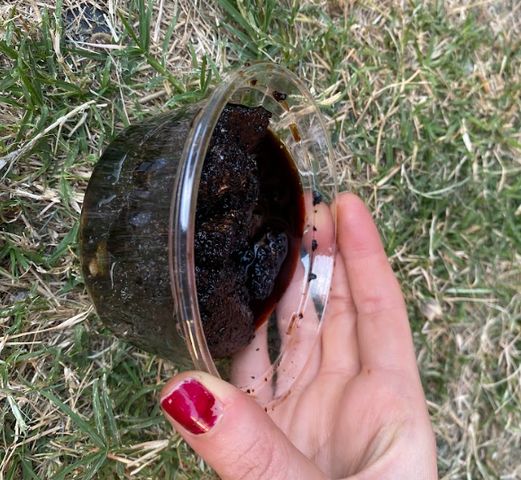
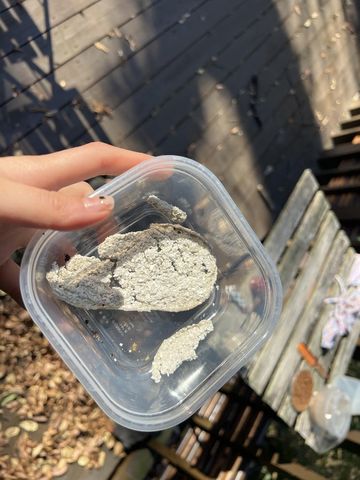
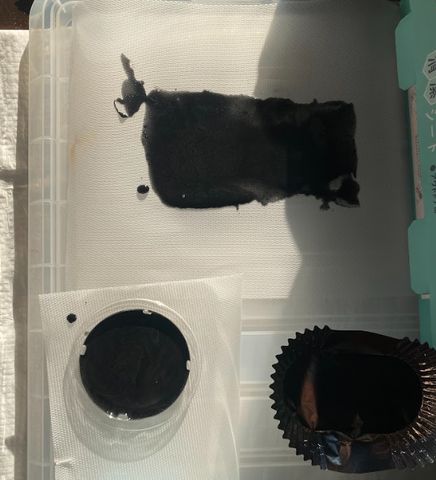
Charcoal Leather
This was a Gelatine-based material.
* 10g Gelatine
* 10g Glycerine
* 40g Water
* 3g Activated Charcoal
* Weigh your ingredients
* Grind the activated charcoal until is very thin
* Bring the water to the stove
* Add the gelatine, wait for it to dissolve completely
* Add the glycerine
* Add the activated charcoal
* Simmer and slowly stir the mixture between 60-80 degrees celsius for 50-60 minutes, until it's like a syrup
After 2-3 days:
When casted as a really thin sheet, looks a lot like leather! Very flexible and strong.

After 5 weeks:
One of the best results. Strong, flexible, has structure, some shrinkage but not as noticeably as the other bioplastics.
Day of
After 5 weeks:

* Add less glycerine for a rigid, add more for a flexible
(up to 1 part glycerine, 1 part gelatine and a dash of water)
* Fillers such as almond or sunflower oil, chalk or egg shells
can be added to prevent additional shrinkage.
* Stiffeners such as fibers or natural debris may be added for more structure
and reinforcement.
Results/Reflection
FINDINGS:
- These recipes and projects take time. I need to check in after a week.
- I want to try leaving the materials in the mold for longer instead of taking them out after two days before they're dry.
- I still want to find out how long until/ if mold grows.
- I still want to try variations. Add filler to avoid shrinkage, add fibers to add strength.
- I really want to cultivate my own Scoby Hotel
- To keep moisture away, avoid mold, humidity needs to be controlled (put in box with salt or those particles that modify humidity)
But overall, I'm really happy with the pretty spectacular results of crafting bio-materials this week!