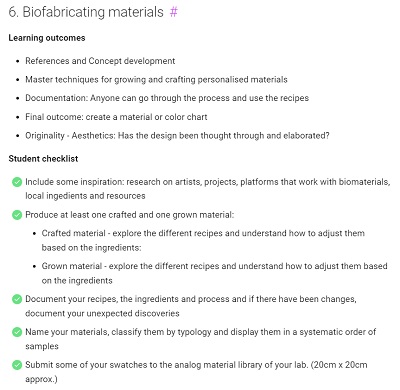
6. BioFabricating Materials
This week, I may have discovered my niche within the Fabricademy program! Lacking the fashion training that many of my student colleagues have...it is impossible for me to rise to their level in producing high-level wearables during the Fabricademy program (as much as I want to do so). While I admire and appreciate 'Haute Couture', I don't necessarily identify with it (I am simple)...and have a particular interested in technical or traditional clothing. My Fabricademy objective is to learn how to thoughtfully and sensitively make such wearables using all the technology at my disposal.
Over the past few weeks, I spent time in Indonesia and Thailand...and had a big dose of traditional textiles. I appreciate the simplicity of this subset of 'fashion' and particularly appreciate how traditional clothing encodes national or even regional and sub-regional cultures (in a time before Globalism). I appreciate the 'design' that originates from cultural, communal and geographic specificity. And most of all, I appreciate how the traditional items I encountered meets almost all of the objectives of Fabricademy...with only the application of digital technology being the exception.
Class Notes
Bio-Fabricating Materials
"This last century we have been crafting, designing and growing materials independently from their future use."
My biggest takeaway from this week's lecture was the idea that materials for wearable fabrication has a much longer life than the wearable that is fabricated from it. Why do we have a fabrication material that will last hundreds of years when the fabricated object's practical usage is much much shorter?
This week's explores the making of fabrication materials...Bio Materials...that not only have a shorter functional life...but is also biodegradable and thus planet friendly.
Assignment
Grow a material
- Kombucha
- Green Algae
Craft a material
- fish skin
- coffee grounds bioplastic
Research & Inspiration
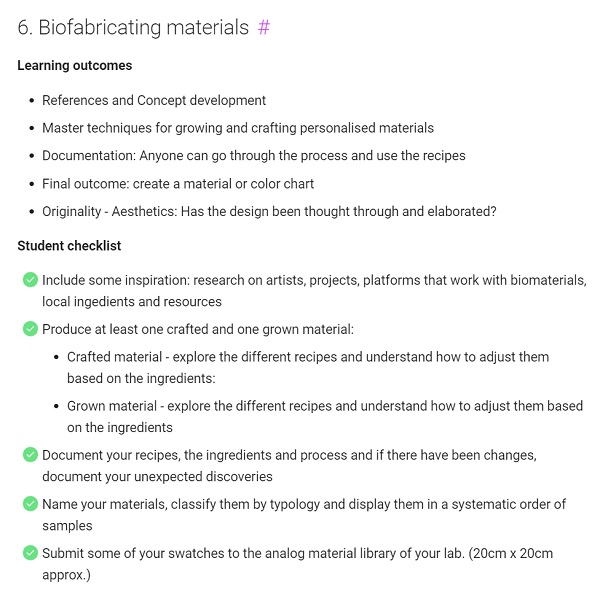
Yuima Nakazato & Spiber Brewed Protein Fiber
Coulture Collection "Atlas", 2021 by Yuima Nakazato
"In this collection, which makes full use of various cutting-edge technologies, YUIMA NAKAZATO's unique technology, Biosmocking, which applies special digital processing to Brewed ProteinTM, an artificial synthetic protein material made by biotechnology, Highly complex shapes and body information that cannot be created by hand alone are memorized in the cloth, making it possible to create works that transcend physical distances."
Biomaterials
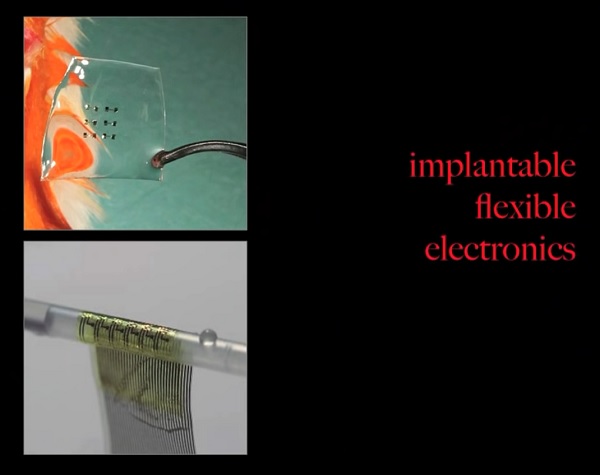
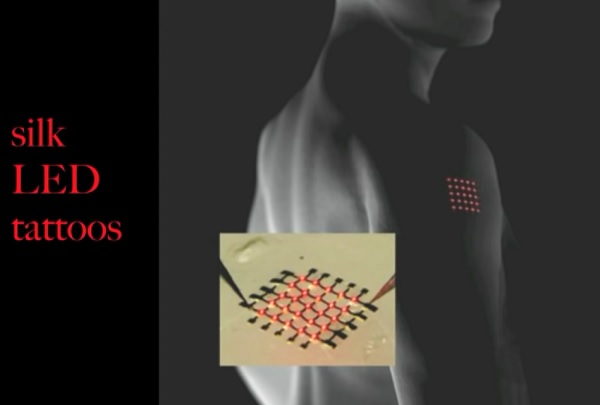
Fiorenzo Omenetto > biologically inspired materials "A new old material that could profoundly impact high-technology, material science, medicine, and global health"
Silk, the Ancient Material of the Future
- A material that is stable, sustainable, bio-degrades in water at room temperature, edible, implantable in the human body without triggering immune response
- Capable of microelectronics (nano-scale imprinting) and photonics
- Silk...natural kevlar...from water and natural protein
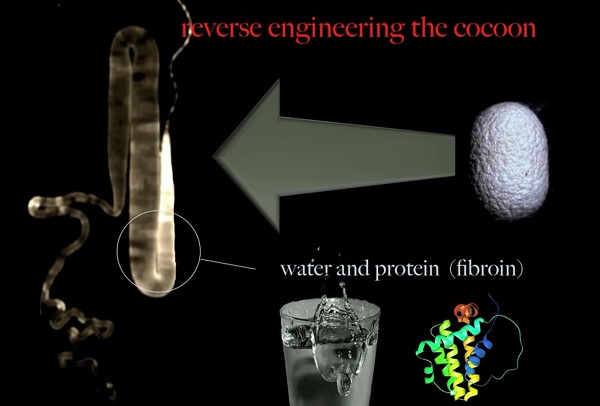
- Flexible electronics...digital tattoos
Jan-Georg Rosenblum > Carbon Negative Bio-Plastics
- Plastic trash ends up in landfills around the world...and eventually oceans...killing marine life, plankton and being consumed by fish (and eventually humans)
- Plastic production related to fossil fuel extraction (10% of total extraction used)
-
Reduce, reuse, recycle strategies are good...but not enough
-
But Petroleum plastic materials are...strong, lightweight...and used to make MANY things we (humans) use...including wind turbines and food packaging (preventing food spoilage & waste).
-
Can plastic material be imbued with 2 superpowers...carbon negativity and circularity
-
Traditional Petroleum Platic production vs Bio-Plastic production
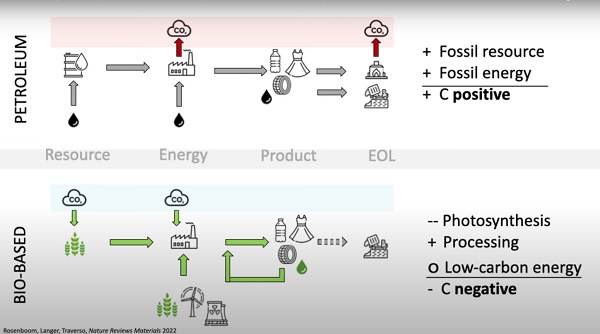
- Traditional production > consume fossil fuels to produce...emitting CO2
- Plant-based plastics > can be produced in a carbon negative way...using carbon neutral energy
- 2-types: 1st generation bio-mass & 2nd generation bio-mass
- 1st generation bio-mass: corn & wheat...microbes can digest to turn into building blocks for plastics...but primarily used as a food source
- 2nd generation bio-mass: waste products from corn and wheat, and general food waste...can be turned into Bio-Plastic!
- Bio-degradation cannot occur at landfills, because they are oxygen deprived...methane is created, an 80x worse climate gas (Landfill Emissions)
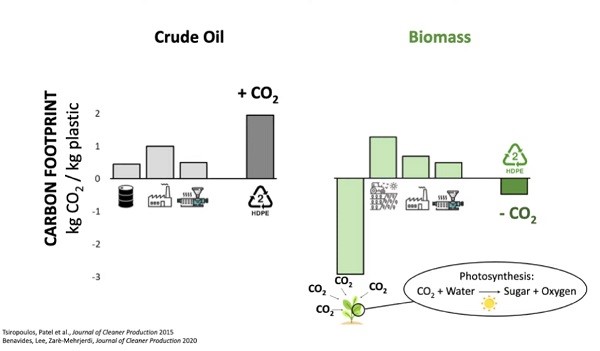
- High Density Polyethelene (HDPE): traditional production methods are very CO2 intesive
- HDPE can be made using bio-mass...can consume more energy to decimate the material and liberate sugars to be fermented into plastic building blocks > durable, but NOT degradable
- NOT all bio-plastics are degradable! Most are NOT.
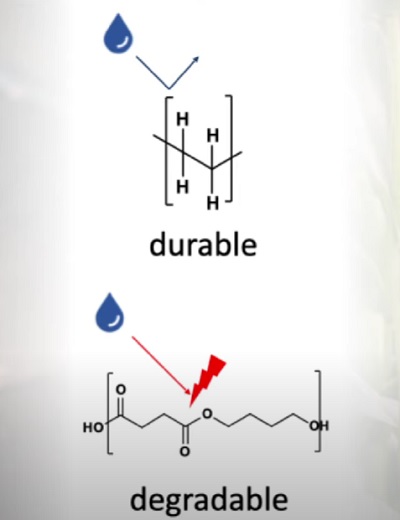
- Make degradable Bio-Plastic by making a chemical structure with bonds that are easy to break with H2O
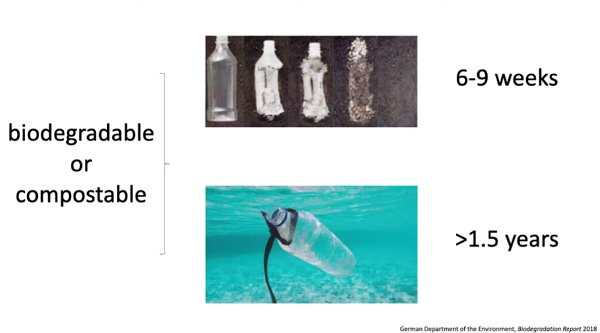
- Compostable Degradable requires specific conditions to degrade...high temperature, high moisture, high biological degradators...to degrade quickly
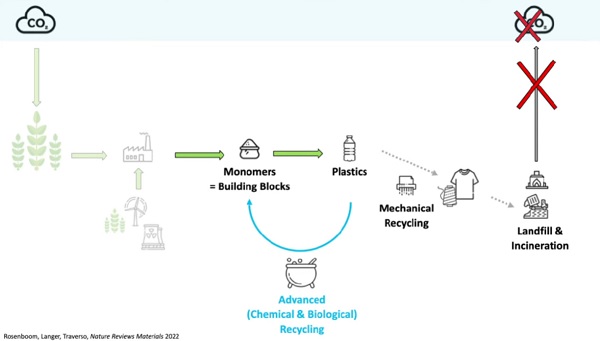
- Focus on improving Recycling and Circularity
- Typical Mechanical Recycling techniques works best on clear, clean plastic only...and the recycling process can only be repeated a couple of times...before heading to the Landfill.
- Advanced Recycling...is a technique under-development...uses Chemical & Biology to breakdown plastics back to original molecules...to make building blocks for new plastics. Allow true Upcycling and Circularity possibilities.
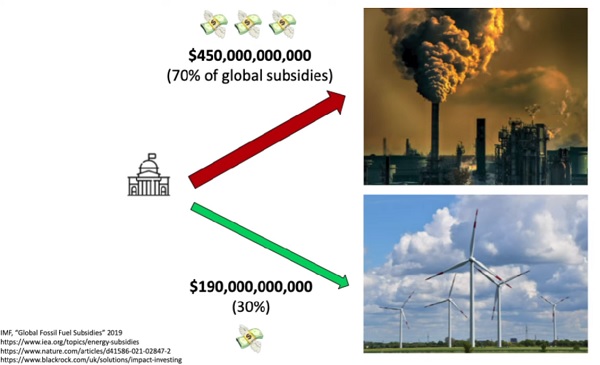
- Change is slow because subsidies for fossil fuel companies and products still dominant and strong (tax-breaks to for driling companies, etc.)
Algae can be the Plastic of the Future
mycellium technology
Bio Plastic
I discovered this YouTube video about using Algae to create bio-plastics
Why Algae Could be the Plastic of the Future
Shikui > Ecological Non-Toxic Japanese Lime Plaster
Wikipedia.
Hydrated lime (Calcium Hydroxide Ca(OH)2) + Calcium Carbonate (reprocessed eggshells) + seaweed extract for stability + soybean oil for workability. A thin two-coat application, their eslasticity provides good stress crack resistance. Humidity regulating, fire-resistant, antistatic (prevent dust accummulation), hypoallergenic, antifungal, and mold resistant. Shikkui surface coatings become harder as time passes as they continuously absorb CO2.
Limix...a shikkui plaster-based material, has a low carbon footprint in production, and a low energy consumption in production (85% less compared to baked ceramic tiles). It absorbs VOC odors and CO2. It is fully recyclable and decomposable.
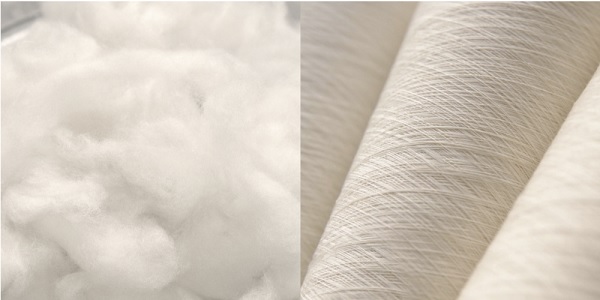
- Sodium Alginate is the chemical that is derived from kelp.
- Seaweed fabric is made using algae from the sea
- Brown algae called Ascophyllum Nodossum...Knotted Wrack...is normally used.
- Harvesting in the Icelandic Fjords means that there is no pollution and waste from ships traffic, so the seaweed is extremely clean and without pollutants.
- Seaweed fabric uses cellulose fiber and it is made using the same lycocell process as Tencel and some bamboo.
- SeaCell fabric...made by mixing cellulose with seaweed to create yarn
Assignment Work
- Make one crafted material > Fish Leather, Coffee Grounds Bio-Plastic
- Make one grown material > Algae felt, Komucha
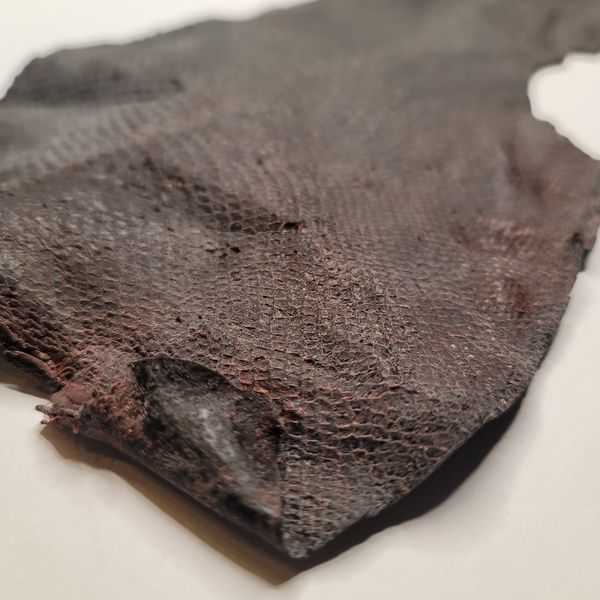
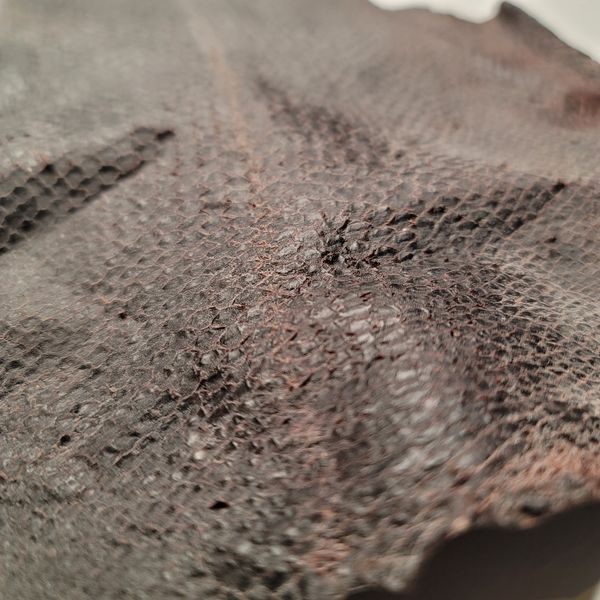
Crafted Material > Bio-Leather: Fish Skin
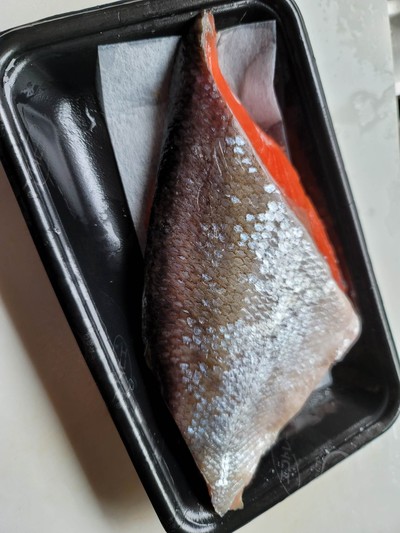
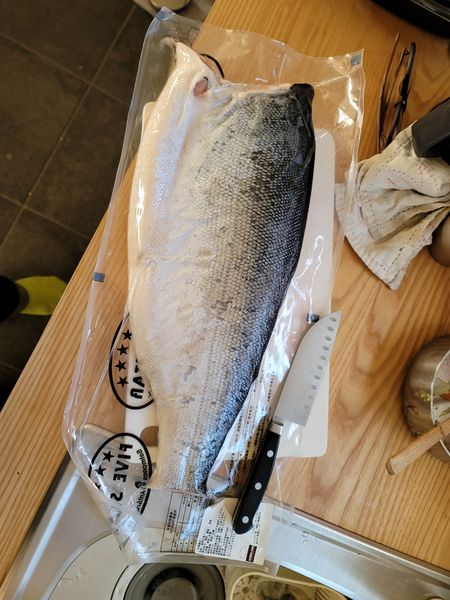
Turning salmon skin into leather.
Experiment 1
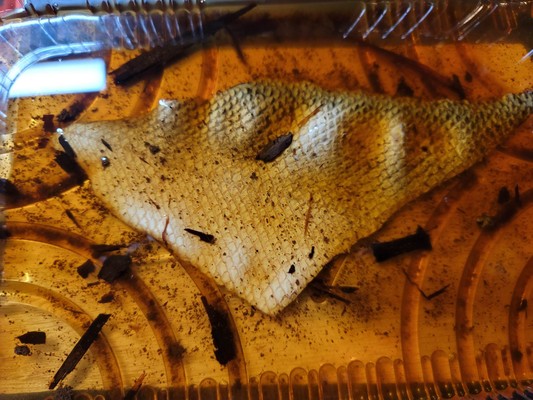
A piece of salmon purchased from the local fish store for Y527. The meat will be cooked for breakfast...and the skin to be crafted into leather.
I did research on the subject by watching a ton of videos on making Fish Skin Leather...and was surprised to learn that this craft is an age-old technique with many variations.
Separating the skin
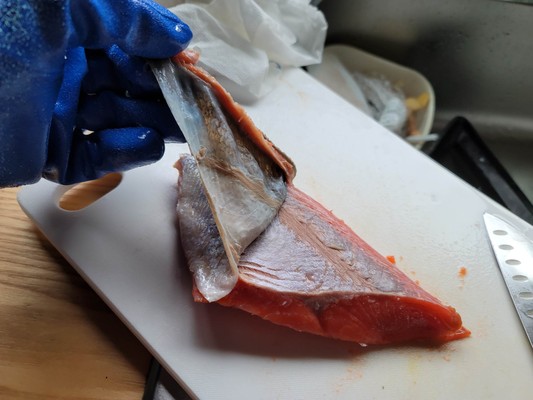

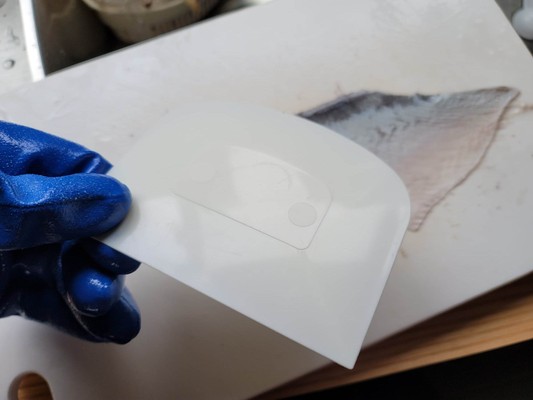
Removing any attached fish flesh, fats and scales...which would cause the fish leather to smell 'fishy'. I used the back of a knife initially
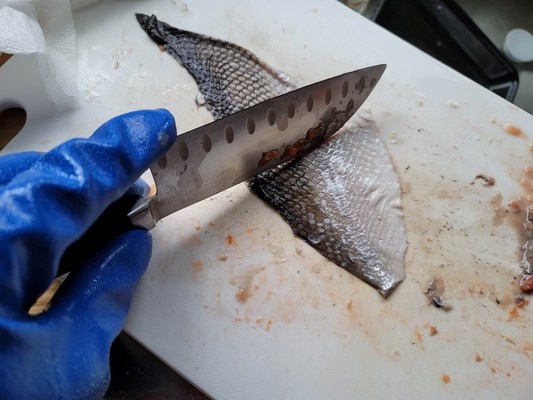
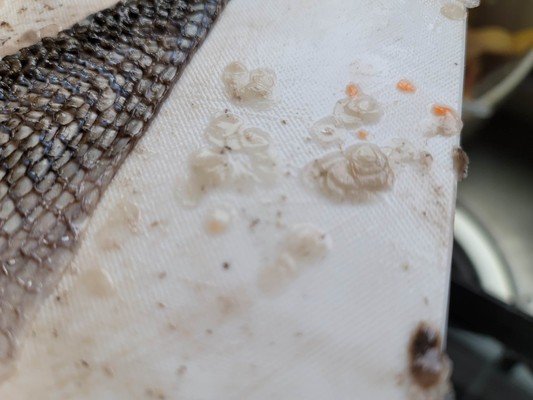
...but found a slightly flexible plastic scraper that did a much better job at removing scales.
After about 30mins of scraping...the skin is satisfactorily free of unwanted proteins and scales.

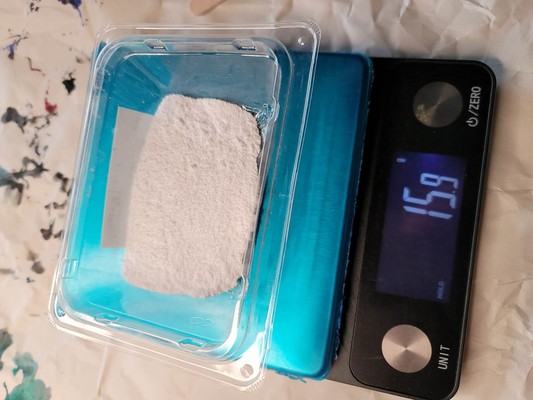
Next the wash...to clean the skin and rid the skin of most of its 'fishy' smell. I made a washing mixture comprised of...
- 800ml cold water
-
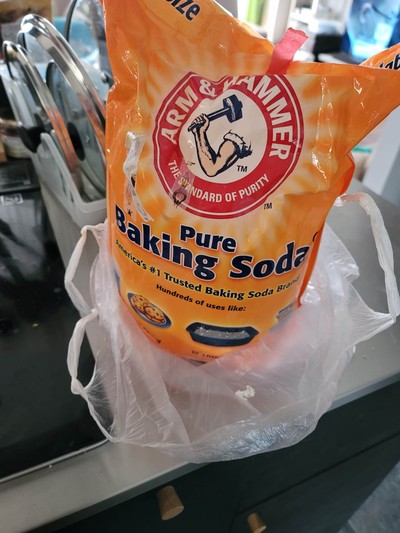
15g Sodium Bicarbonate (Soda Ash)
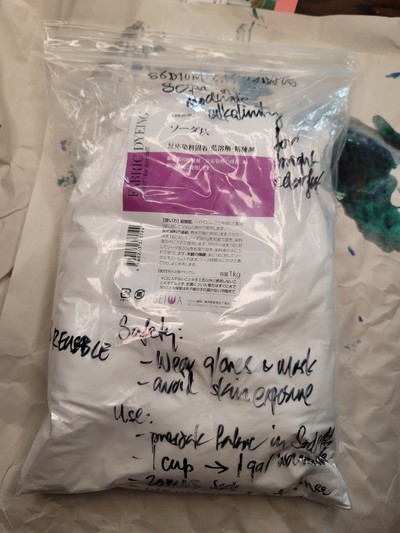
-
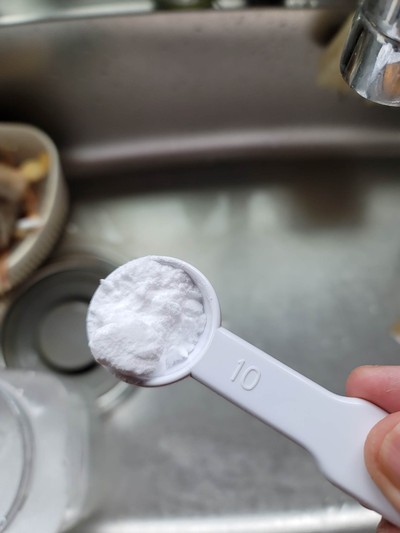
10g Sodium Carbonante (Baking Soda)
-
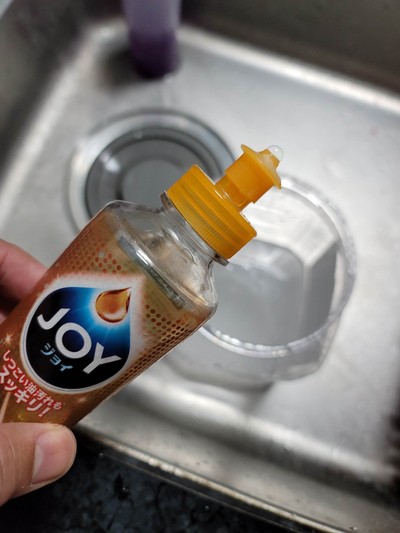
10 drops dishwashing soap
Mixing it all into a plastic container with a lid.
When the washing liquid is made...the fish skin is droped into it...with a handful of round stone.
I sealed the container with its lid and agitated the fish skin and stones in the washing liquid on and off for about 10mins...then letting it stand for a couple of hours.
With washing done...the next step is to tan the fish skin. My tanning liquid is a combination of...
- Water
- 4x Black Tea Bags
- Red Cedar Bark
...which I combined into a small glass saucepan, bringing it to a boil...then letting it simmer for about 1 hour. After simmering...I let the tanning liquid cool.
Once cool...I pour the liquid into a wide platic container into which I put the washed fish skin and stretche dit flat. Every so often...I would agitate the skin and flip it...to encourage the tannin to be absorbed into the skin.
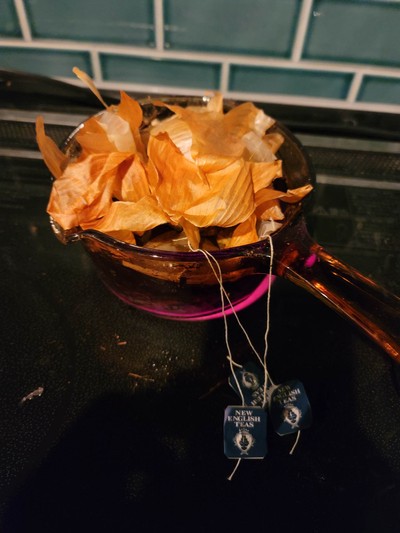
Based on my research...this tanning process will take 7 days to complete...with the tanning bath needing to be refreshed every day. I prepared the bath for Day 2 with the same ingredients...but added Onion Skin to try to dye the skin yellow while it is tanning.
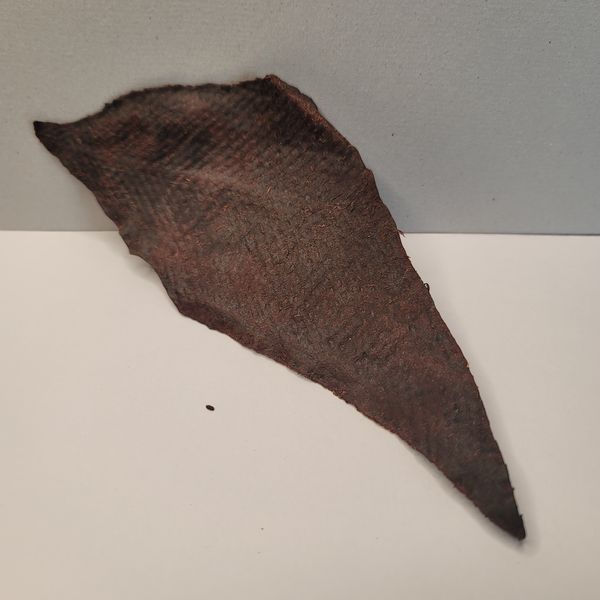
Results
After 7 days, I removed the fish skin from the tanning bath...now Fish Skin Leather. The color of the skin became dark brown, but the texture is still soft and flexible. I rubbed Coconut Oil onto the Fish Skin Leather with my hands.
The result is VERY much leather like...soft and supple like lamb skin. Pulling on the leather...it is stronger than expected. I would have to use tools to pull on the leather hard enough to tear it...I think.
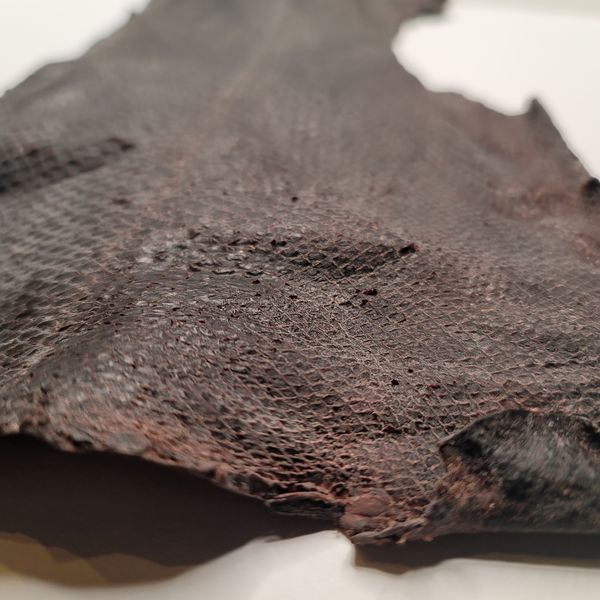
Experiment 2
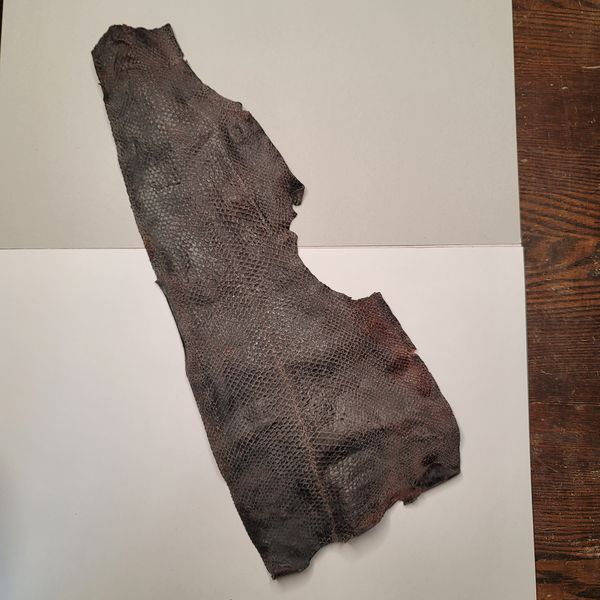
Using a much larger piece of salmon skin this time,
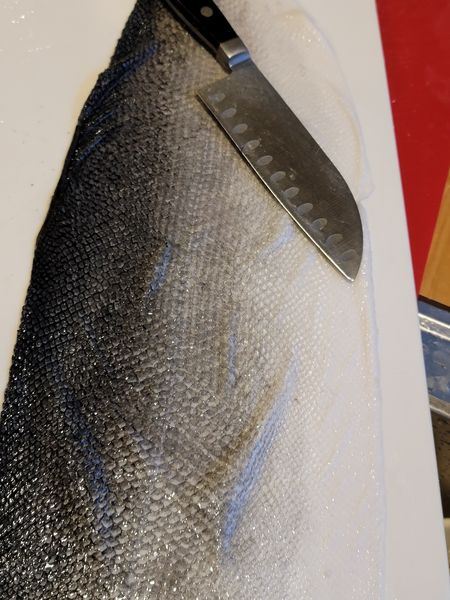
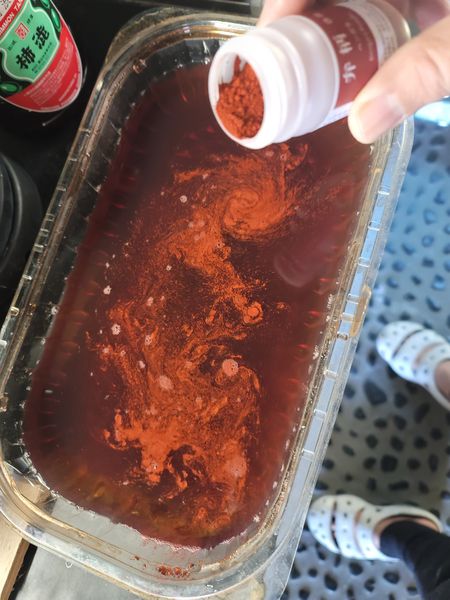
I thought I would try a different tanning bath to see what the results will be. To the black tea tanning bath...I added Kakishibu...a highly tannic Japanese persimmon extract.
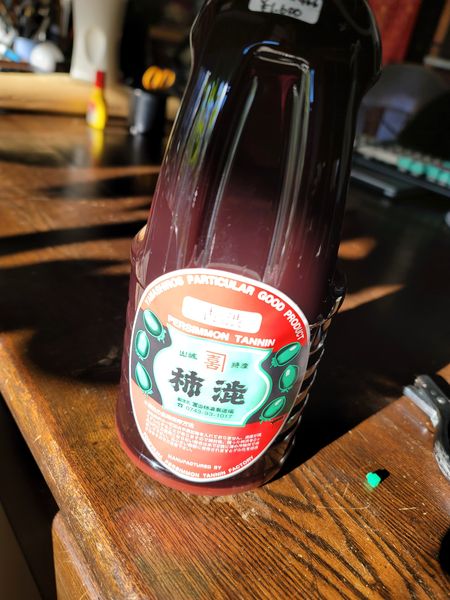
Starting at one capful, I increased the amount every day by one capful for 15 days.
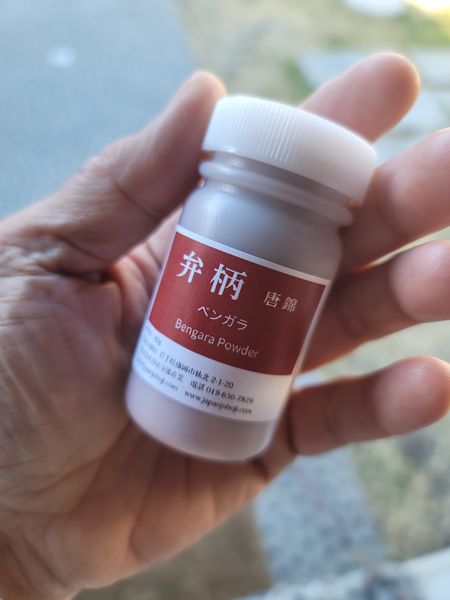
I also added some Red Bengara dye powder to the tanning bath...thinking that I could turn the leather red over the 15 day tanning process. It didn't work. The color somehow didn't penetrate into the leather.
Results
I tanned this big piece of fish skin for 15 days...slowly increasing the amount of Kikishibu in the tanning bath. Like the previous fish skin, I conditioned the leather by hand-rubbing Coconut Oil into the skin. The end result is a tough, semi-stiff, strong piece of leather. A very different texture than the leather from the first experiment.
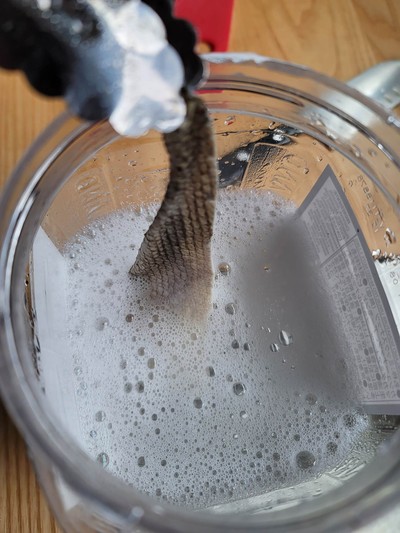
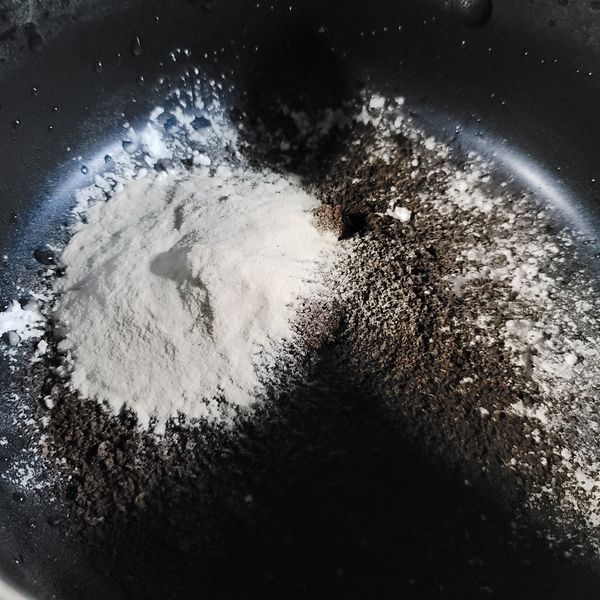
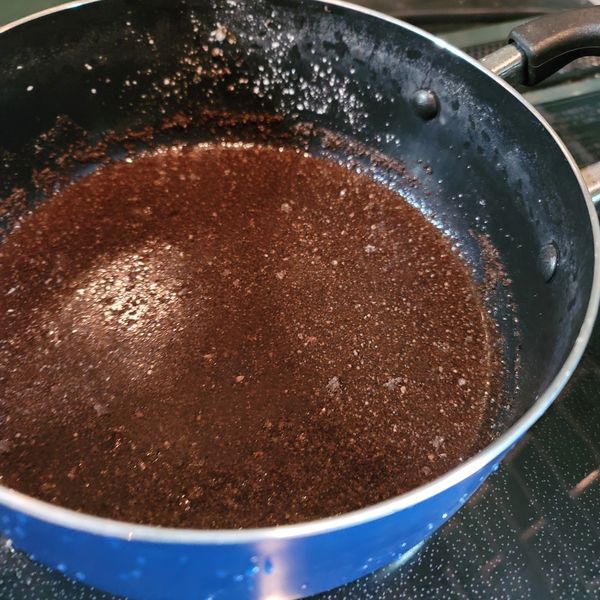
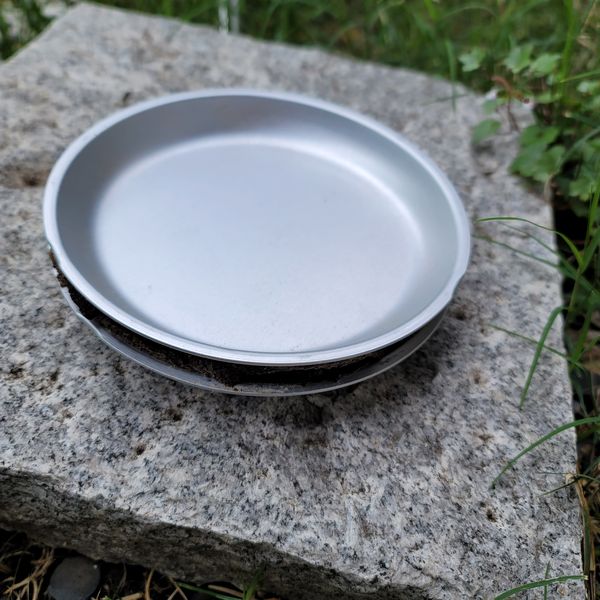
Crafted Material > Bio-Plastic: Coffee Ground
I followed this tutorial to make my Coffee Ground Bio-Plastic.
Recipe:
40g Coffee Grounds
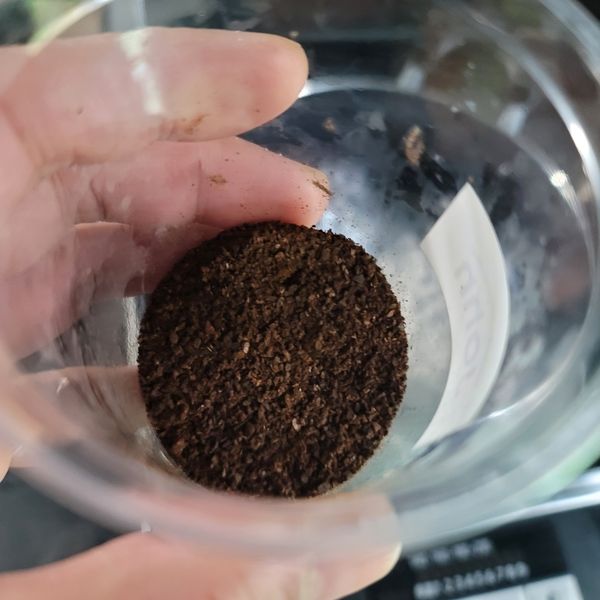
30g Starch
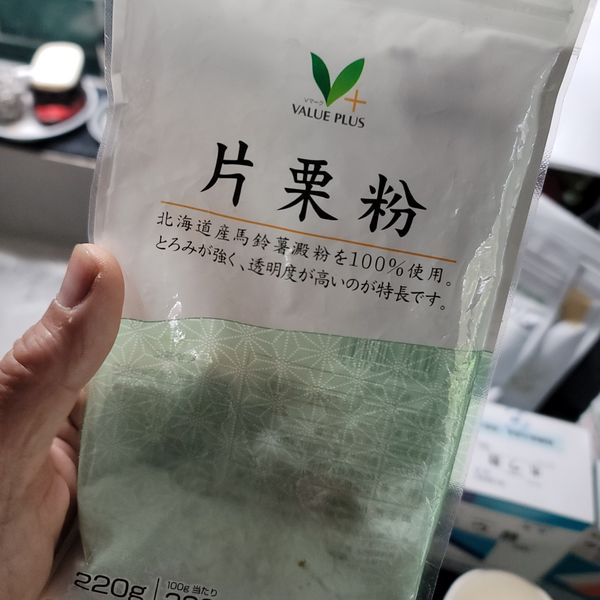
15g Agar Agar
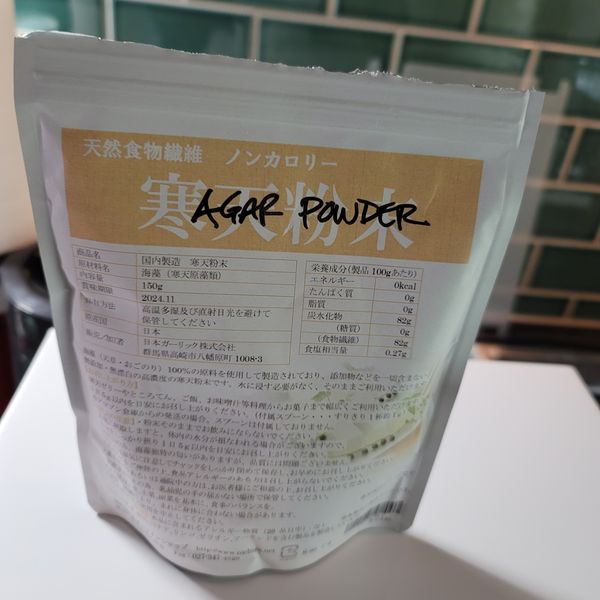
10ml Glycerin (the recipe calls for glycerol...but I only had glycerin)

10ml Vinegar (I used generic white cooking vinegar)
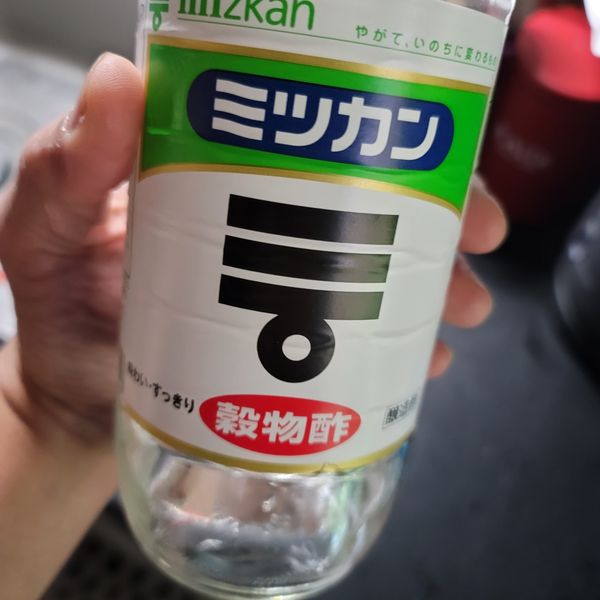
100ml Water
I mixed heated the above ingredients on a stove (stirring constantly over medium heat) until the mixture turned into a paste. The process was fast...taking only a few minutes to complete.
Then I transferred the mixture into a mold consisting of 2 small round aluminum plates.
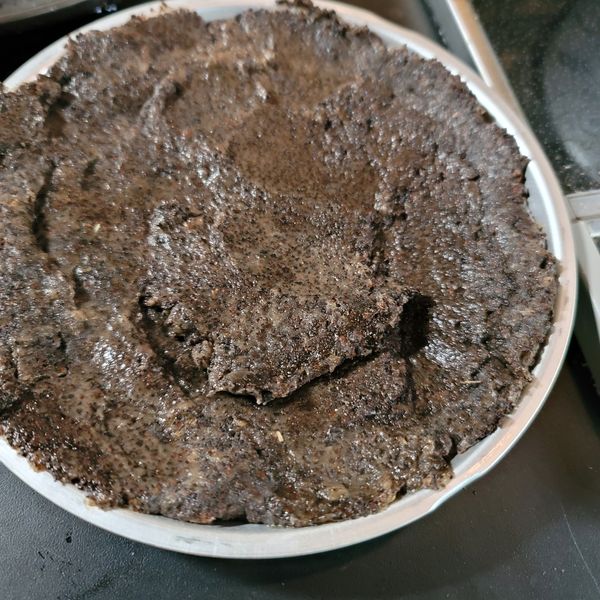
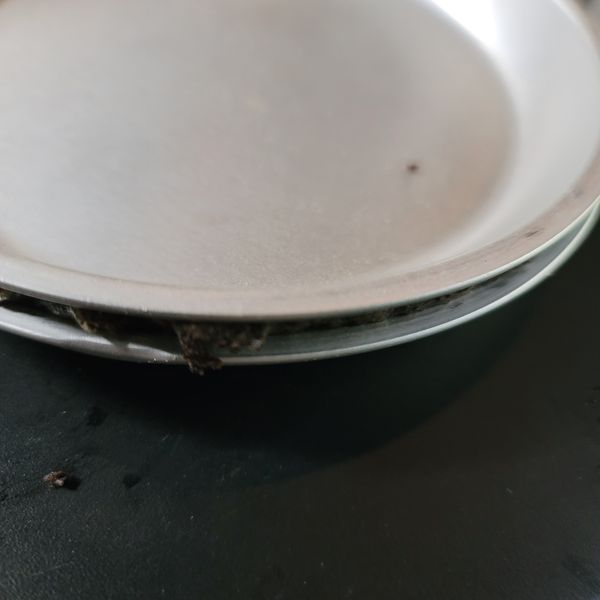
I put the aluminum mold into a small oven and ran it for 15mins at about 150C. The material expanded and steam released during the heating.
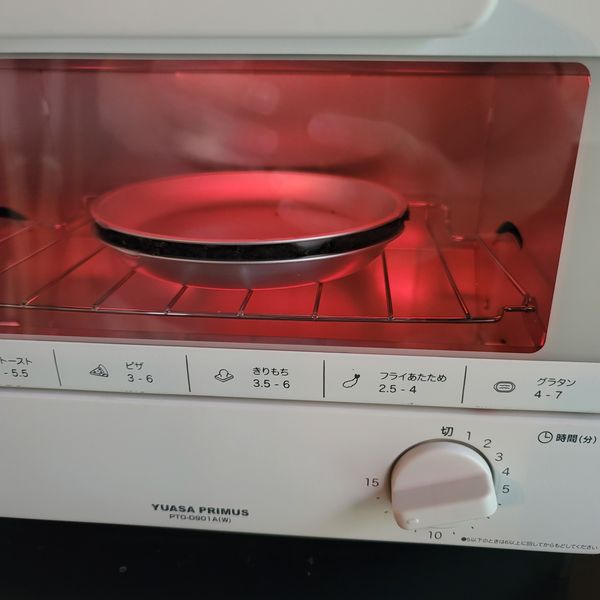
After 15mins, I leave it to cool and will repeat the process several times until I feel the bio-plastic has fully cured.
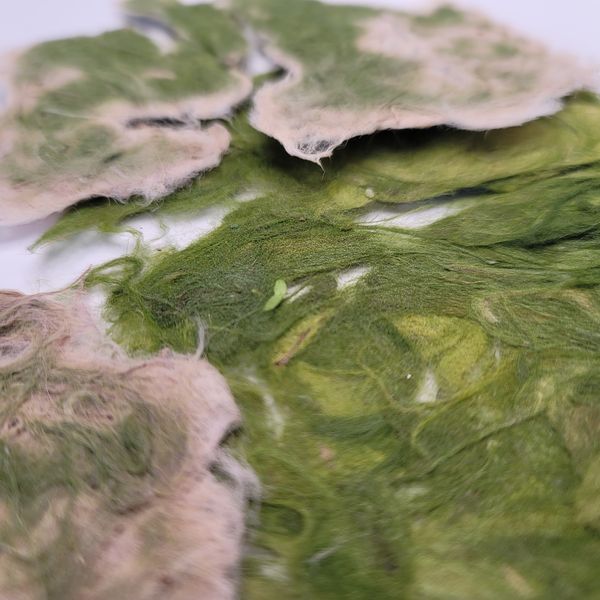
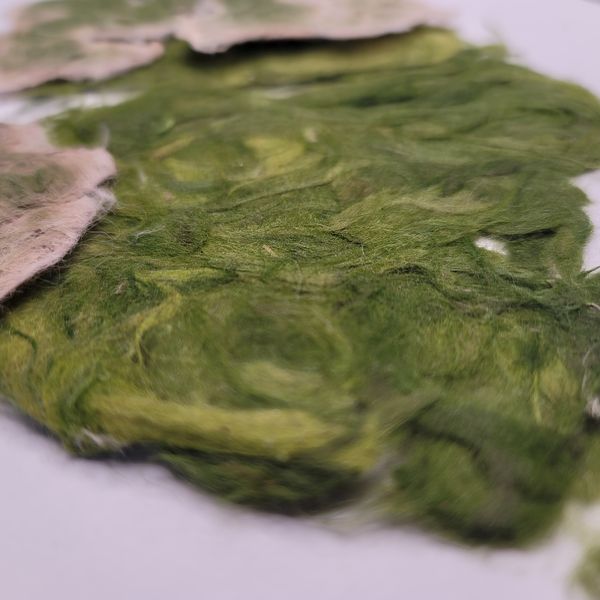
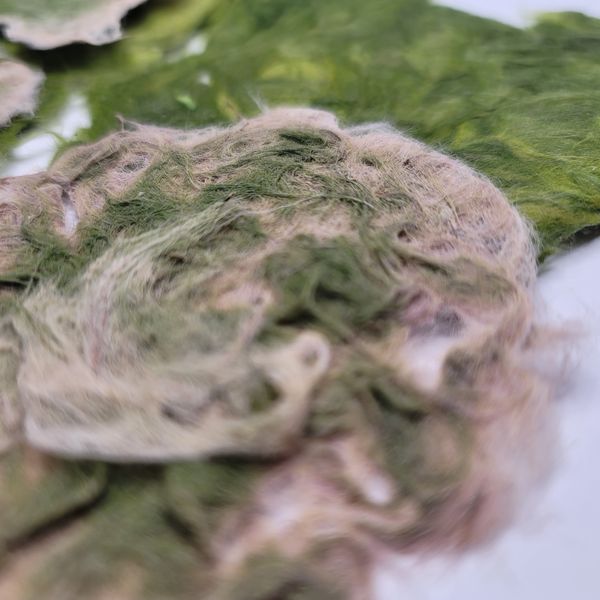
Grown Material > Bio-Plastic: Green Hair Algae
For many years now, one of my hobbies is Planted Freshwater Aquarium...an aquarium where live flora (underwater plants) and fauna (fish & shrimp) coexist in a symbiotic microcosm. Oxygen from the plants are consumed by the fish. Carbon-Dioxide and fish waste, in turn, feed the plants.
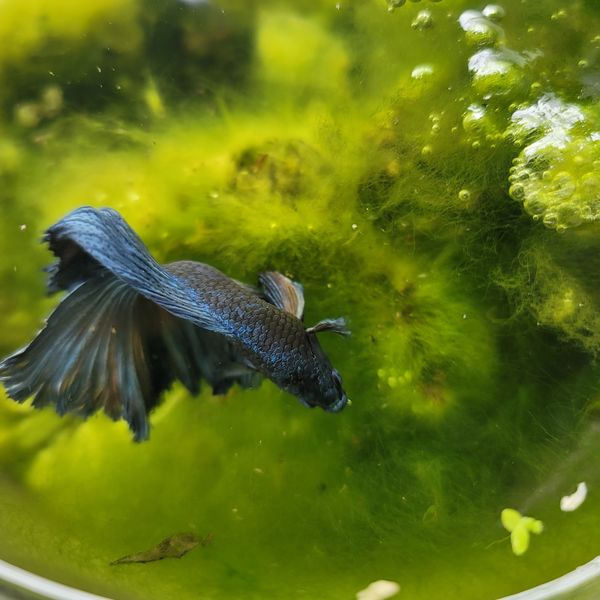
In my lab, I have a small planted acquarium that sits near the south-facing front window. While somewhat shaded by the building's eves, the tank does get some direct sunlight. This and the fact that I am lax in my tank maintenance routine means that algae flourishes...which I had periodically removed and discarded.
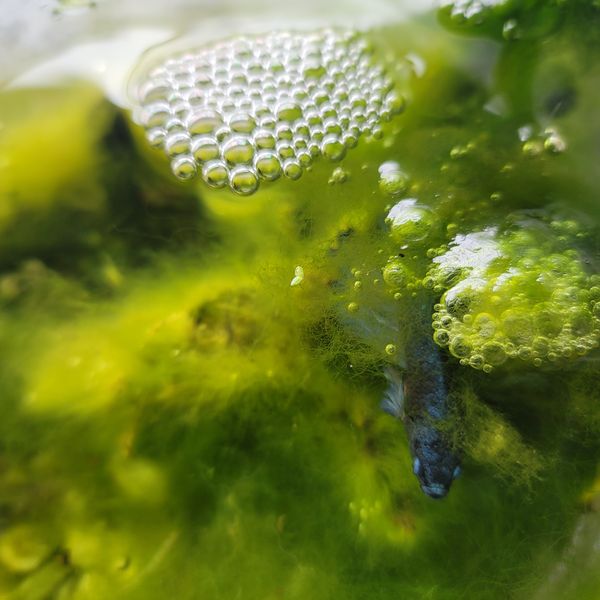
It occurred to me that for Fabricademy's Bio-materials assignment...I might be able to make use of this discarded algae. I noticed that removing the algae from the tank was challenging because of the fine hair-link texture of the algae...which easily tangles with itself and other objects in the planted tank. This characteristic reminded me of felt...and in particular those felt ball hand crafted animals. Could algae be turned into a plant-based felt textile?
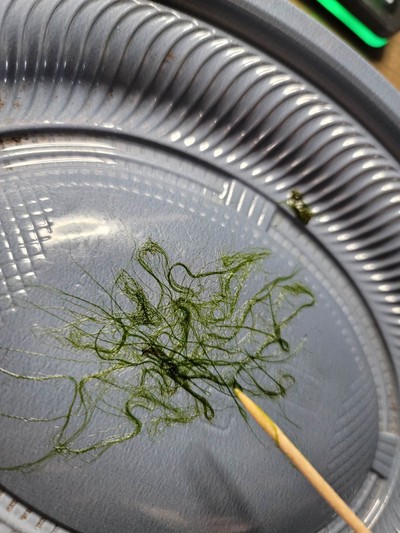
Green Hair Algae harvested from my aquarium.
The Algae are long thin strands that I feel can be loosely 'woven' into a material sheet.
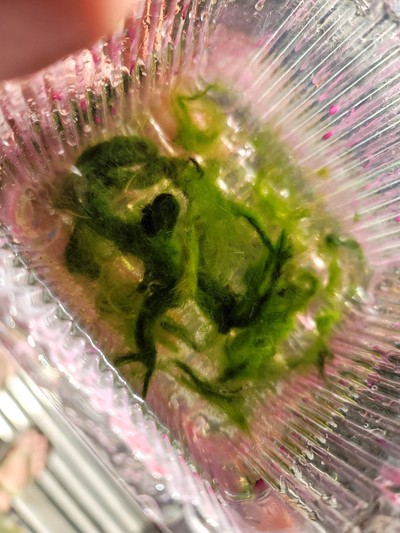
The Algae is washed under cold water to remove any attached dirt.
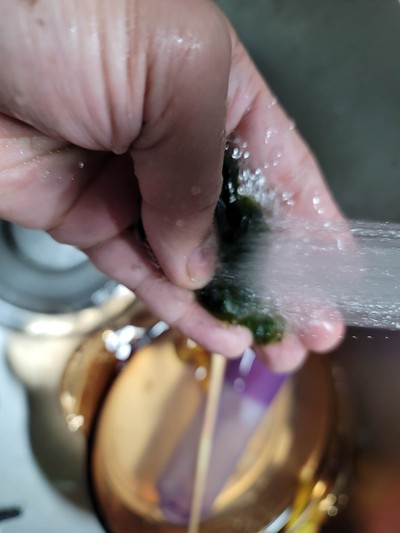
All the washed Algae is transferred to a plastic container and teased into a flat, tangled sheet with 2 tooth picks. Then left to air-dry in the shade.
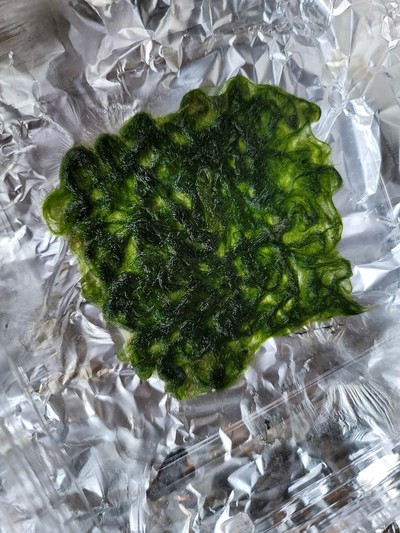
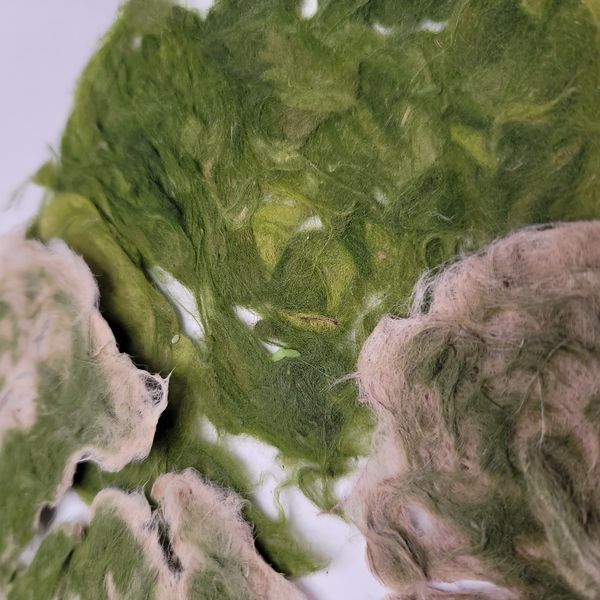
Results
After being left to air dry into flat sheets...the algae does indeed take on a felt like texture. Amazingly, even after fully drying the green color remains. Except for when I leave it exposed to direct sunlight...which acts to bleach the Algae Felt...turning it white. The Algae Felt looks like this...
Grown Material > Bio-Leather: Kombucha
I started drinking Kombucha about a year ago after discovering it in a cafe here in Kamakura. The idea that Kombucha could be made into a leather was fascinating to me.
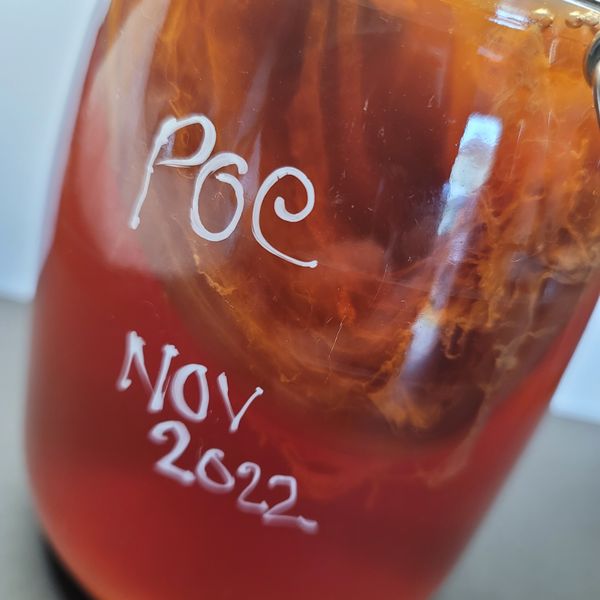
I started my attempt to grow Kombucha in December of 2022. Using some live starter material from a drink I got from my local cafe.
Recipe
- Starter bacterial from Kombucha drink
- 4 bags of Black Tea
- 4 tbsp of White Sugar
- 200ml water
- Medium-sized glass jar
- Cheese cloth
First, I made sweet tea. Boiling water...I added the tea bags and sugar...and left the tea and sugar to steep and eventually cool.
Second, I boiled more water and used it to clean and sterilize the glass jar.
Third, I pour the Starter Bacteria into the jar, then poured the cold sweet tea to fill the jar...covering the top of the jar with the cheese cloth and a rubber band (so the Kombucha can access oxygen).
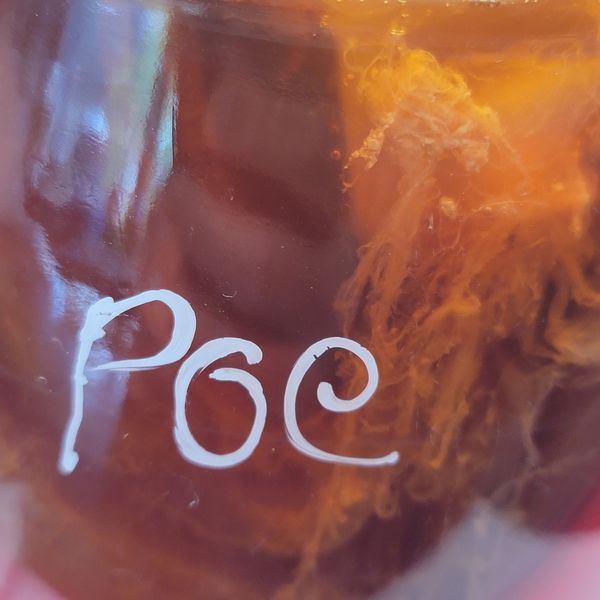
With that done, I put the jar (which I named 'Poe) in a dark place...crossing my fingers that Kombucha SCOBY will grow. Unfortuntely, this did not occur quickly. Winter in Japan is cold and no where in my house it it balmy and warm all the time. I let it sit over the winter...and while the SCOBY did happy emerge...it was rather thin and small. I added some spoonfuls of sugar to the mixture periodically...thinking that this would fuel the SCOBY's growth.
Montse Ciges visited Japan and my lab in April and shared an important Kombucha tip...the tea must be refreshed every 15 days!! Oops!
I did this...and with the warmer weather conditions...Poe grew dramatically!! Here is what Poe looks like now...
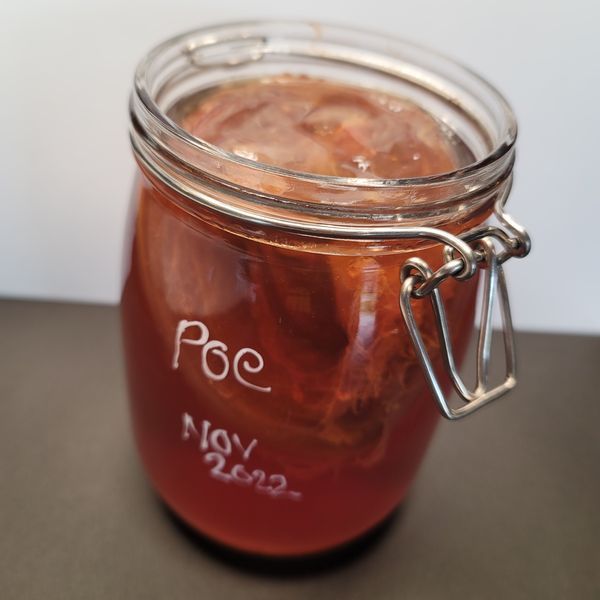
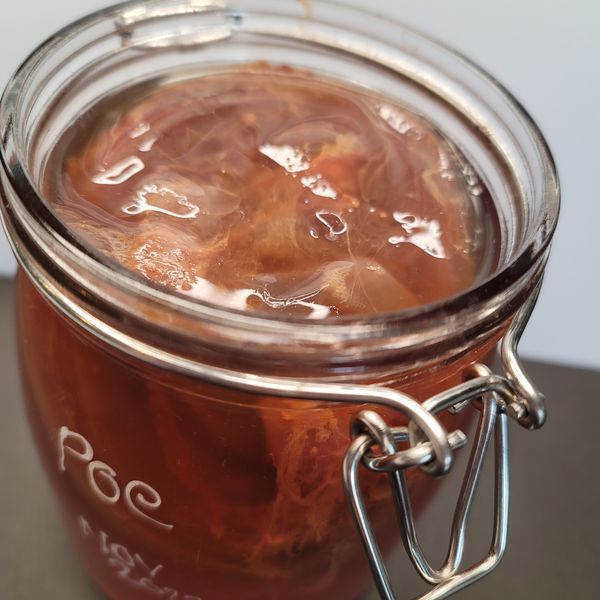
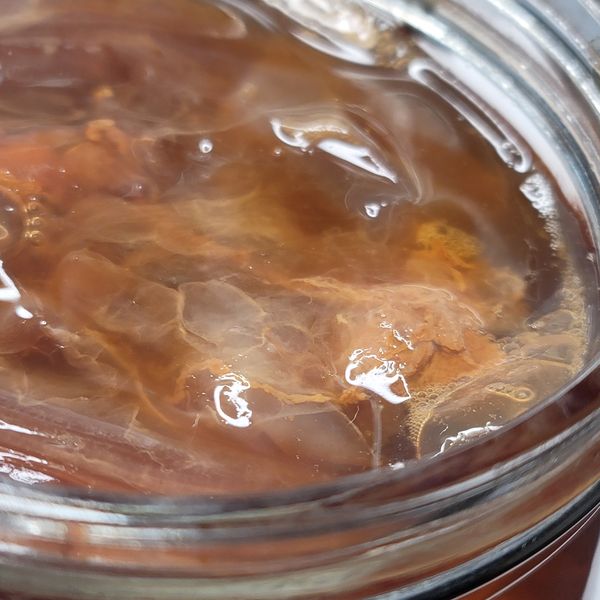
At this point, I am just thrilled that Poe managed to survive and grow this large. I am thinking now to transfer him to a bigger jar to grow larger. But I am very reluctant to turn him into leather. I have nurtured his growth for months...and I do see him as a living entity. What a dilemma...
The Kombucha Leather investigation will have to be postponed until later.
Appendix:
Class Notes
Bio-Fabricating Materials
Bio-Plastics
Procedure Summary
- gelatin (powdered, dried, pig skin)
- glycerol (produced by fermentation of vegetable sugars. fermentation = chemical process by which molecules such as glucose are broken down anarobically (microorganisms growing in the absence of air)...the foaming during manufacturing of wine and beer...the evolution of Co2 gas. Ethyl alcohol and Co2 the by products). Adds increasing levels of plasticity to the material.
- water
- Mix ingredients over heat
- Remove foam for transparency
- Pour into a glass/aluminum mold to 'cast' the bioplastic
- Dry...for a week
?? embed copper tape?
?? design an organic pattern mold?
Bio-Culture
Ingredients:
- organic cider vinegar
- sugar
- live Kombucha culture
- a symbiotic colony of bacteria and yeast (SCOBY)
- main bacteria...Gluconacetobacter Xylinum produces Nanofibris of cellulose that self-organizes into a nano structure
- green tea bags
Procedure Summary:
- make green tea with sugar
- cool tea to below 30c...pour into container
- add vinegar
- add kobucha culture
- cover container with breathable cloth (cheese cloth?)
- 2-4 weeks, maintain at 25c...material becomes 2cm thick...harvest the material
- dry material on a wooden sheet...let water evaporate completely...until the material is like vegetable leather
-
Coffee Ground Composite
- Coffee ground as 'aggregate'
- ...as binder
- ...as lateral fiber
- Bake for 6hrs at 160F
-
...mixed with bio-resin, natural oils, plant fibers
-
soybeans > glycerol
-
corn > sorbitol/dextrose
-
Coffee ground > compressed under high temperature and pressure
Homemade Strong (natural) Glue
Sugar = 300 gram
white plain Flour = 190 gram
Vinegar = 3 tablespoons or lemon juice
Baking soda= 2 tablespoons
Water= 1 litre room temperature
Remember do not stop stirring in the whole procedure.
Biztech Korea/Recycling of Used Coffee Grounds
How to make a Coffee Clay
- 5 tbsp Coffee Ground
- 5 tbsp Corn Flour
- ...mix
- PVA glue
- Baby Oil
- ...mix
- ...knead
DIY Bioplastic from Coffee Grounds
- Potato Flour 16g
- Lemon Juice 15ml
- Water 15ml
- Honey 9ml
- Low heat
- add dry coffee grounds
Coffee Grounds Based Bioplastic Making Procedure
- 40g coffee grounds
- 30g starch
- 15g agar agar
- 10ml glycerol
- 10ml vinegar
- 100ml water
- heat and stir constantly
- put in mold
- make in oven
Coffee 3D Printing Filament
(very informative video~!)
- Coffee Grounds + PLA
- Polymers: Reinforcing additives > carbon fiber
- Polymers: Functional additives > plasticisers (oils), impact modifiers...molecular level
- Polymers: Fillers...add volume > Coffee Grounds
- print with larger 0.6mm nozzle
Uses for Coffee Grounds
- Odor Neutralizer (fishy smell too??)
- Tenderize meat
- Exfoliant (water or coconut oil)
- Scour pots and pans and sinks
- fertilizer (nitrogen, potassium, phosperous, sulfer...stronger roots)
- natural dye
- repel insects & pests
- anti-inflamatory
- anti-flea
- compost
Spiber Brewed Protein Fiber
Spiber Brewed Protein textile material used by Yuima Nakazato. "Produced through a fermentation process using sugars and microbes...rather than petrochemicals or animal-derived raw materials."
More about Spiber Brewed Protein fiber which is meant to allow true upcycling.
Research: Fabrication with Natural Material
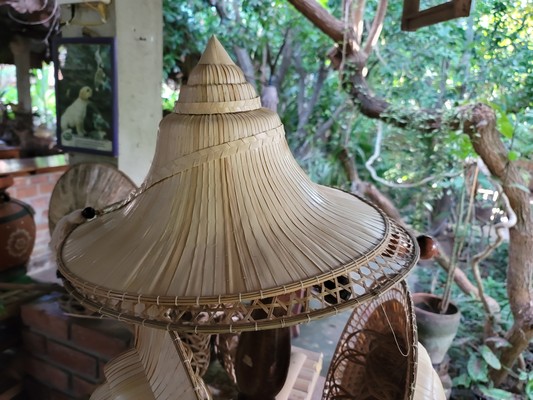
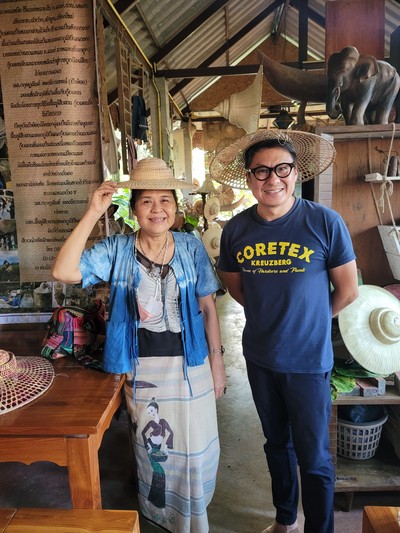
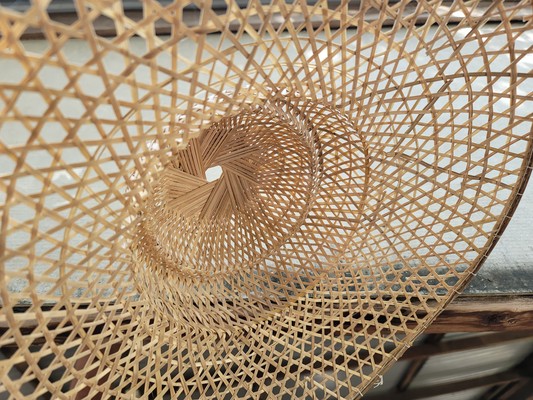
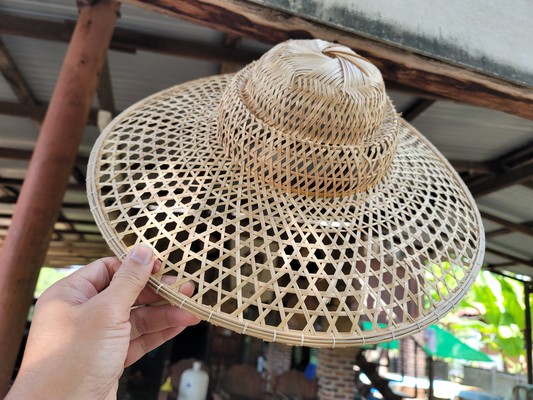
Phrae Koopblan
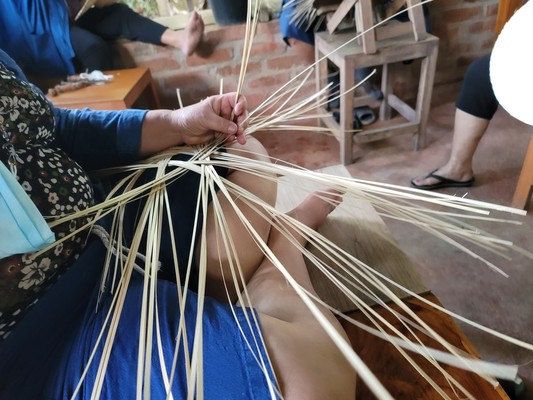
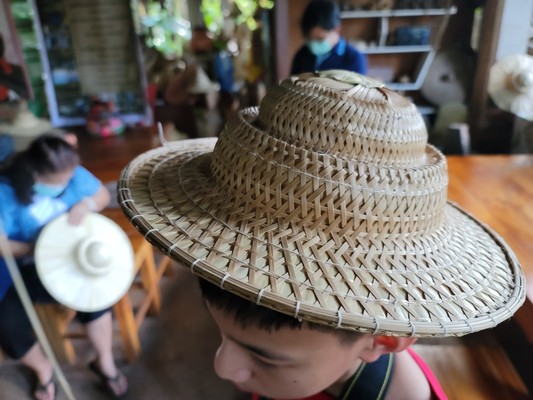
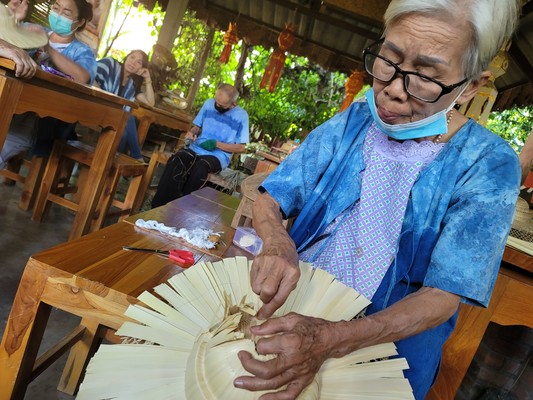
The Kooplan is a traditional, bamboo, hand-woven hat...a specialty of Namlaam Village in Phrae...and formerly worn by all villagers and farmers when they left their home. At the Hommai Baandin workshop, the nearly lost art of the Kooplan is being revived. Ms. Oy, a village member who returned to Namlaam Village after many years working in Bangkok realized that the knowledgeof the complicated procedure of making the Kooplan was slowly vanishing with the passing of the village elders.
Today, only 'Grandma Jib' has true expertise of Kooplan making. With the help of Ms. Oi and the Hommai Baandin workshop, Grandma Jib has been teaching a small group of enthusiasts who want to keep the Kooplan craft alive.

The group of capable artisans is now up to 28.
I was fortunate to have been able to spend a afternoon talking to the workshop members and try my hand at making the Kooplan hat.
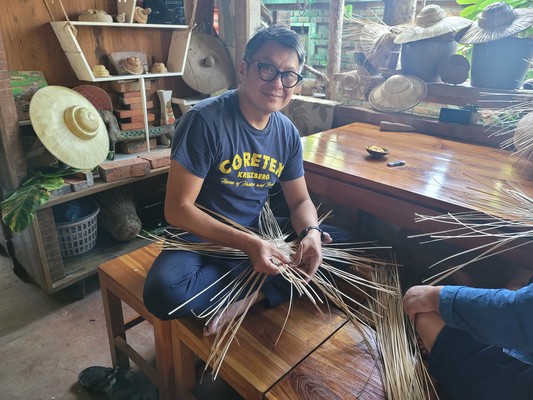
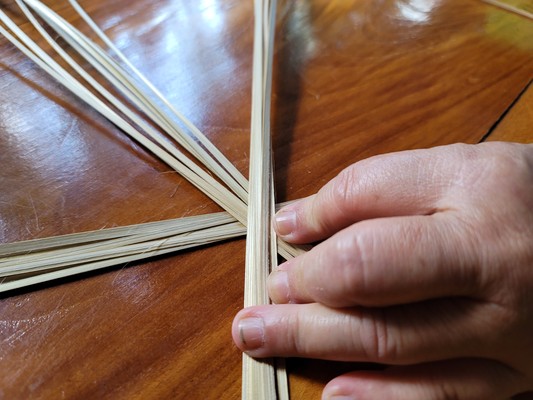
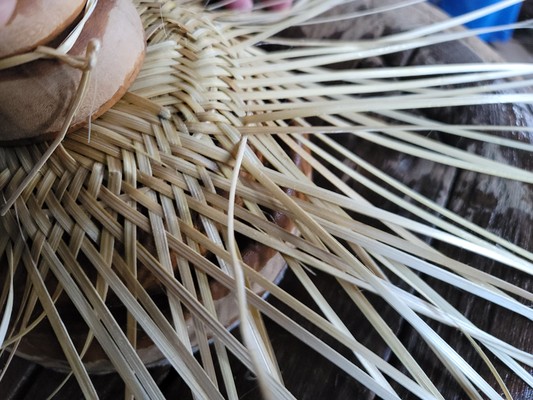
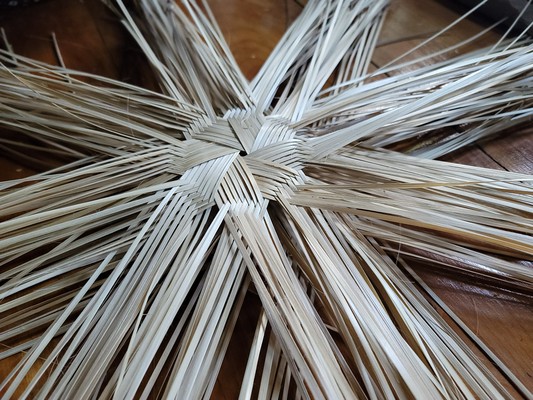
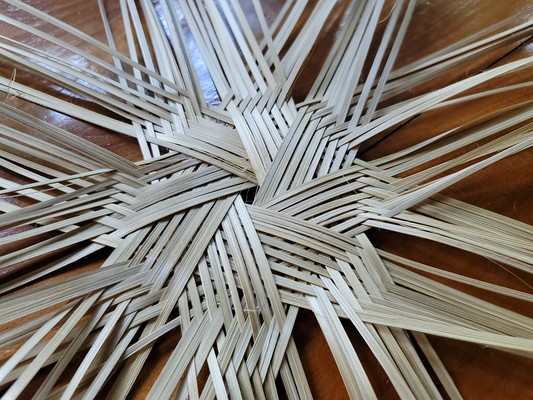
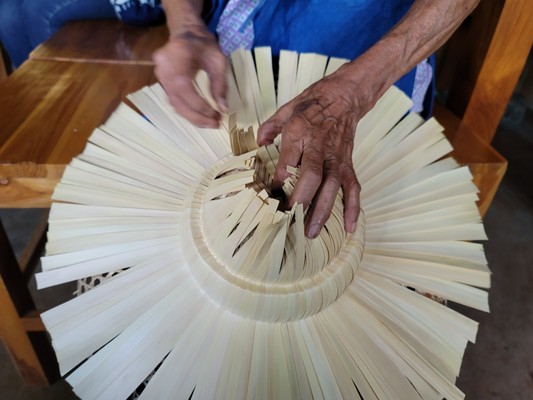
Fabrication of the Kooplan is a fully analog process, but involves some jigs or shaping 'machines' to give it its final form. From observing the team of 5 women (weavers) and 1 man (strip maker) A skilled artisan can produce 3-5 Kooplan hats in a 8hr day. The making process invloes many steps and several fabrication components.
- Bamboo stripping
- Top structure preparation
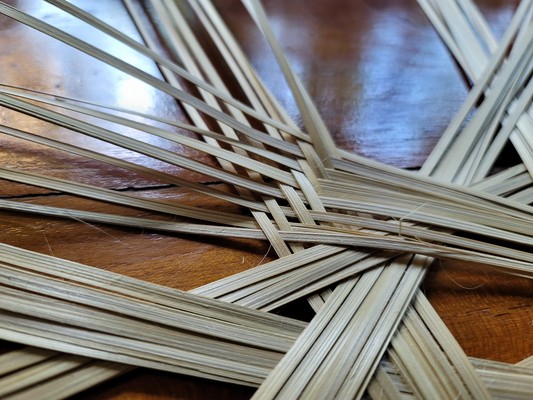
- Weaving
- Shaping
- Edge frame attachment
- Palm leaf attachment (sewn on)
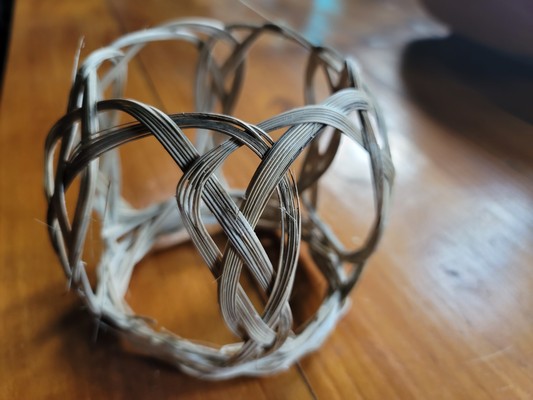
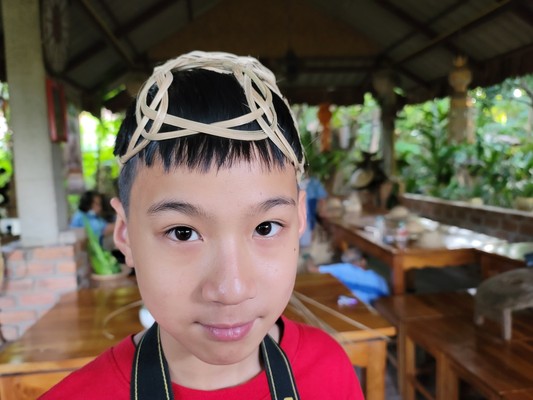
- Head nest attachment
The process begins with harvesting 1 year old bamboo...no younger or older...or the bamboo will not hav the desired elastic properties. The harvested bamboo is then dried for 5-7 days...to rid it of internal moisture and make it easier to split. Once dried, the bamboo is processed into many thin strips...approximately 5mm wide, 1mm thick and approximately arms length (around 800mm). The Kooplan requires 8 bunches of 8 bamboo strips. Apparently, the traditional Kooplan used 6 bunches of 6 strips which resulted in a 'simple' Kooplan...which could not command a high price at the market.
The decision to use 8-and-8 was to result in a a more complicated, more aesthetically pleasing Kooplan that could command a higher price when sold. Features of the Kooplan...
- lightweight
- eco-material
- adjustable and customizable
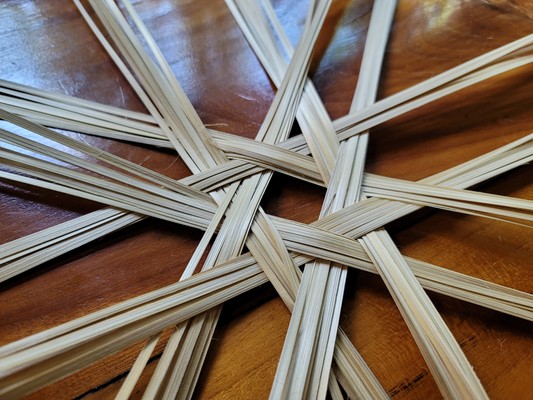
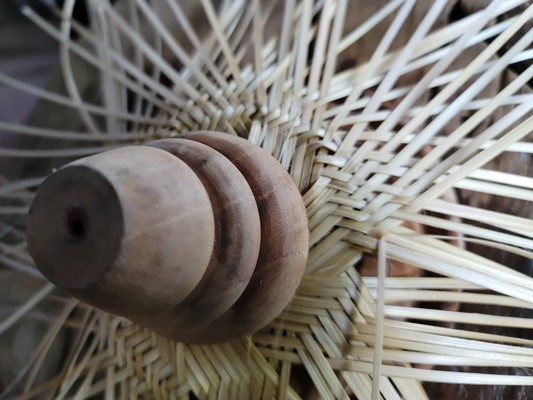
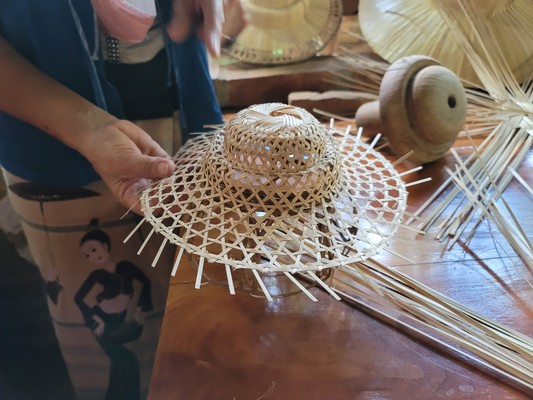
Center based structure...
The finished woven Kooplan structure...with shaped center dome and edge frame installed.

The Head Nest adjustable head band.
Attaching the Palm Leave covering
A Kooplan variant...looks like a police hat!