05. E-textiles
Research
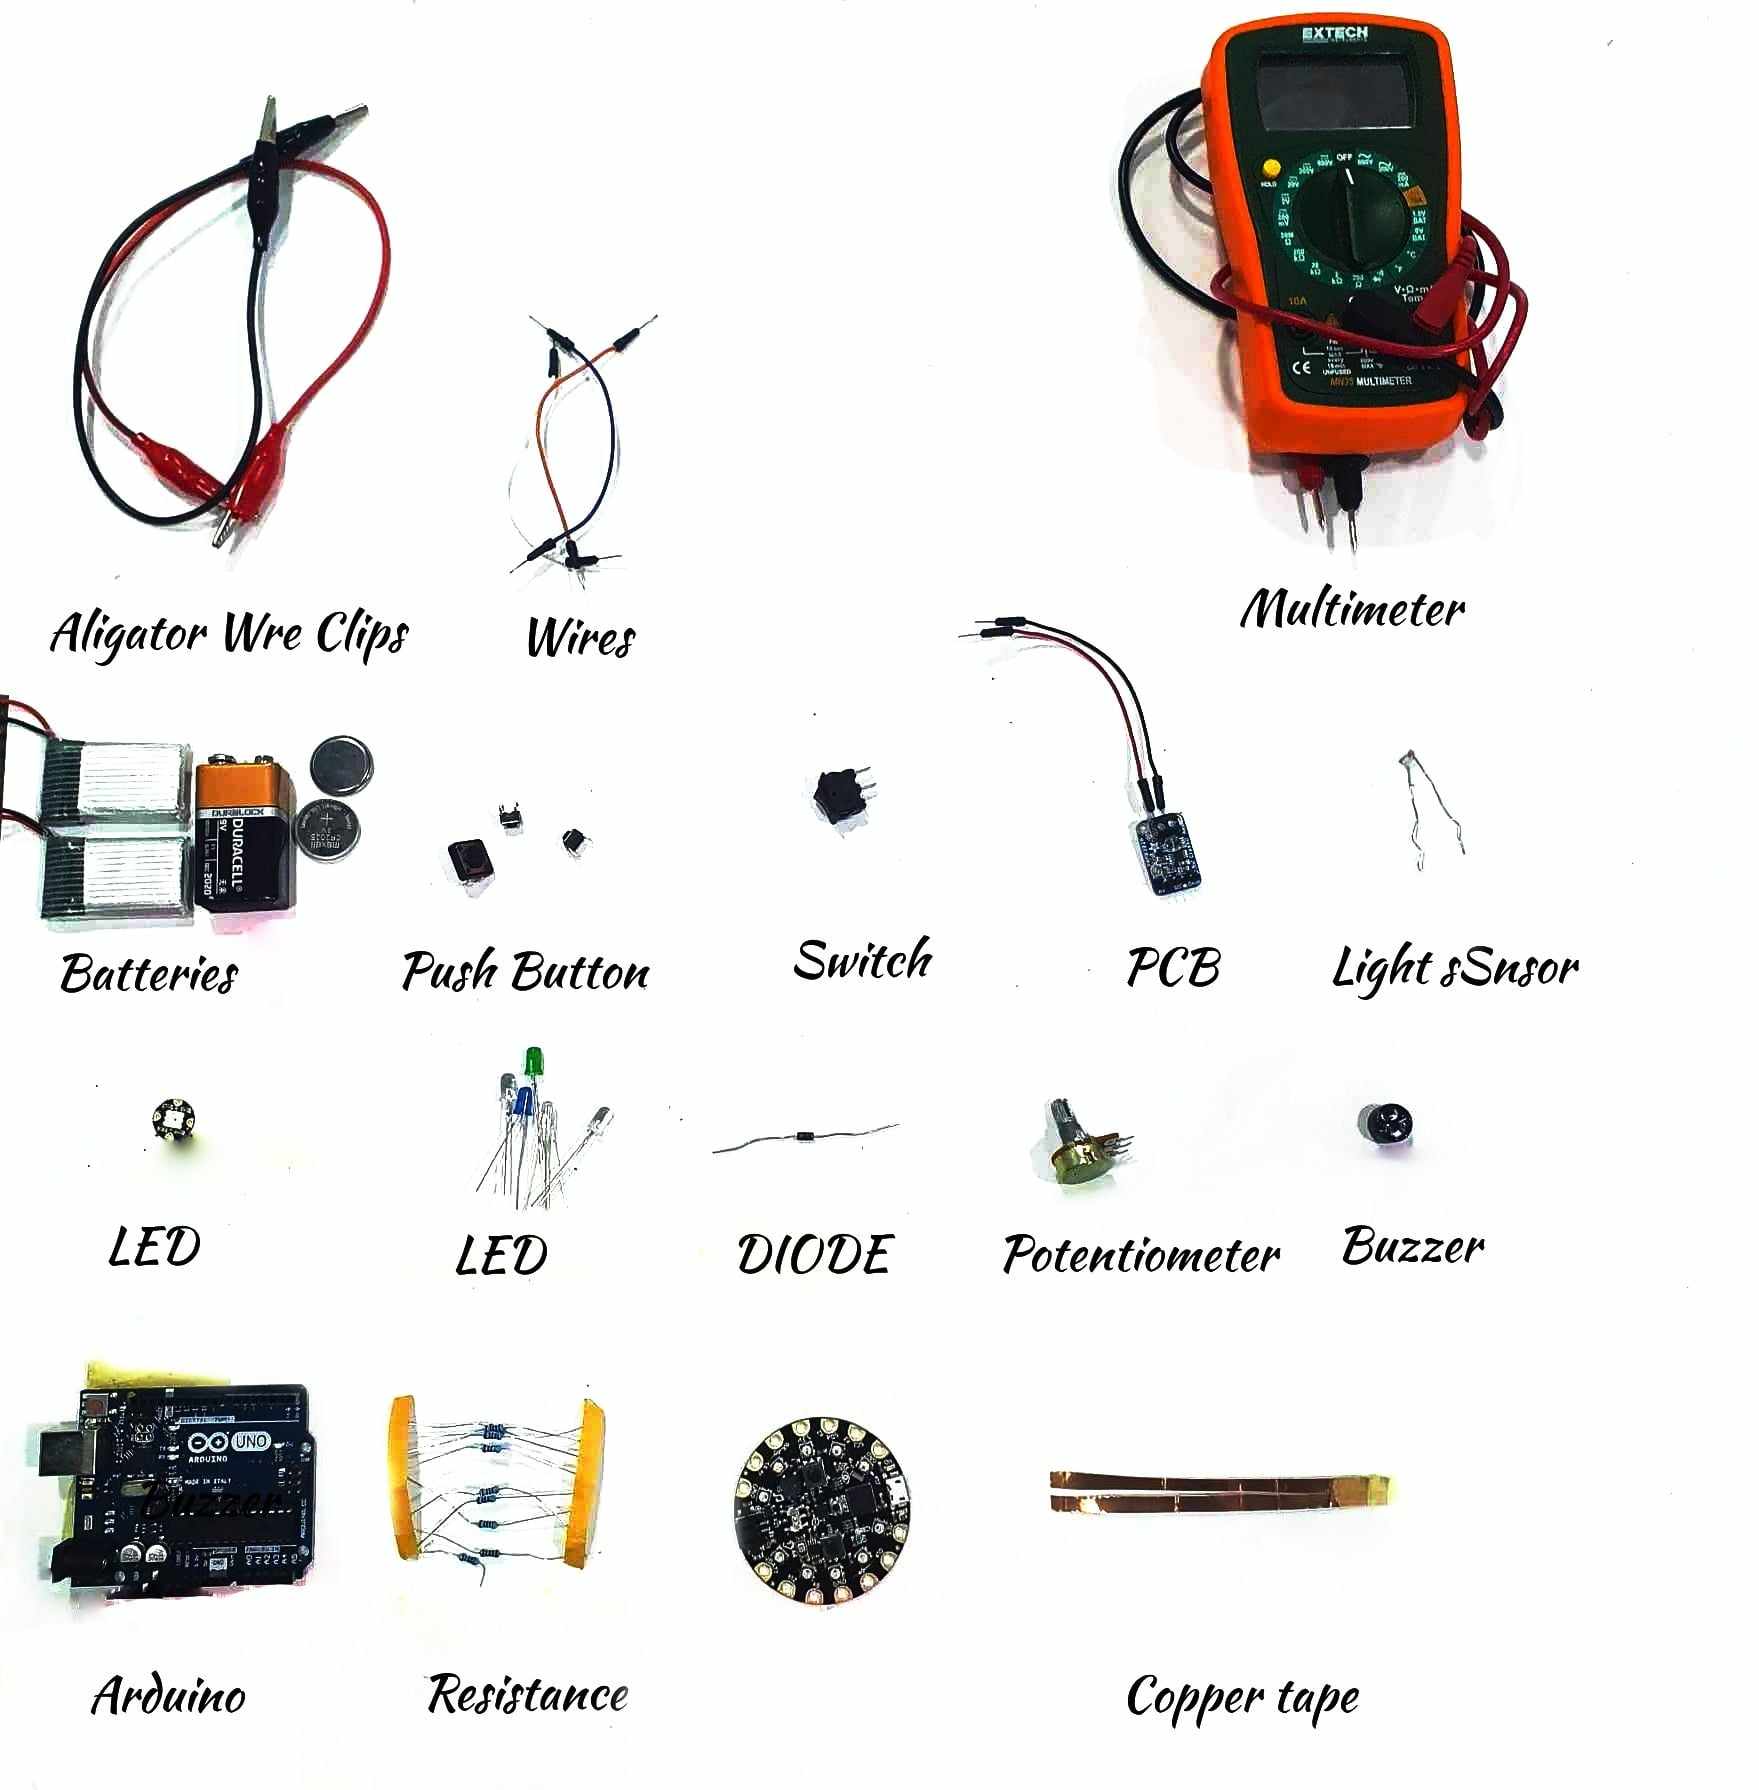
Our educational journey began with a comprehensive exploration of the diverse components that constitute circuits. Understanding the characteristics, functions, and applications of these components was the cornerstone of our venture into the world of E-textile.
In parallel with gaining knowledge about components, we embarked on a fascinating exploration of materials used in circuit construction. We discovered a multitude of materials, from conventional conductive materials like copper sheets to more advanced options such as conductive thread, velostat, and heat fabric. This diverse array of materials opened up a world of creative possibilities for our circuit designs. We learned how to choose the right materials for specific applications, taking into account factors like conductivity, flexibility, and durability, enabling us to craft circuits that catered to a wide range of needs.
Ohm's Laws
In addition to understanding components and materials, we delved into Ohm's Laws, which are fundamental principles in electronics. In simple terms, Ohm's Law states that the voltage ((V)) across a component is equal to the product of the current ((I)) flowing through it and the resistance ((R)) it offers. Our grasp of Ohm's Laws deepened our theoretical understanding and provided us with the tools to design circuits that adhered to the principles of electrical engineering. This knowledge became pivotal in creating circuits that operated efficiently and reliably.

Multimeter
Furthermore, a crucial aspect of our learning journey was the recognition of the indispensable role of a multimeter. We came to understand that this versatile instrument is not only a tool for measuring voltage, current, resistance, and continuity in circuits but also a valuable companion throughout the entire workflow of creating circuits. It allowed us to verify the functionality of our designs, troubleshoot issues, and fine-tune our creations with precision, ensuring that our circuits met the desired specifications.
Arduino
As we advanced in our journey, we also had the opportunity to become more familiar with the Arduino platform, a cornerstone of modern electronics innovation. Arduino's user-friendly interface and robust programming capabilities empowered us to bring our circuit designs to life in interactive and innovative ways. We explored various features, components, and coding techniques, allowing us to turn our theoretical knowledge into practical applications.

Tools
- Arduino UNO
- Arduino IDE
- Sewing needles
- Multimeter
- Arduino mainboard
- LEDs
- Pressure Sensor
- Tilt Sensor
Materials
- Fabric glue
- Conductive thread
- Conductive fabric
- Metal wire
- Velostat
- Non Conductive fabric
Process and workflow
Analogue Sensor
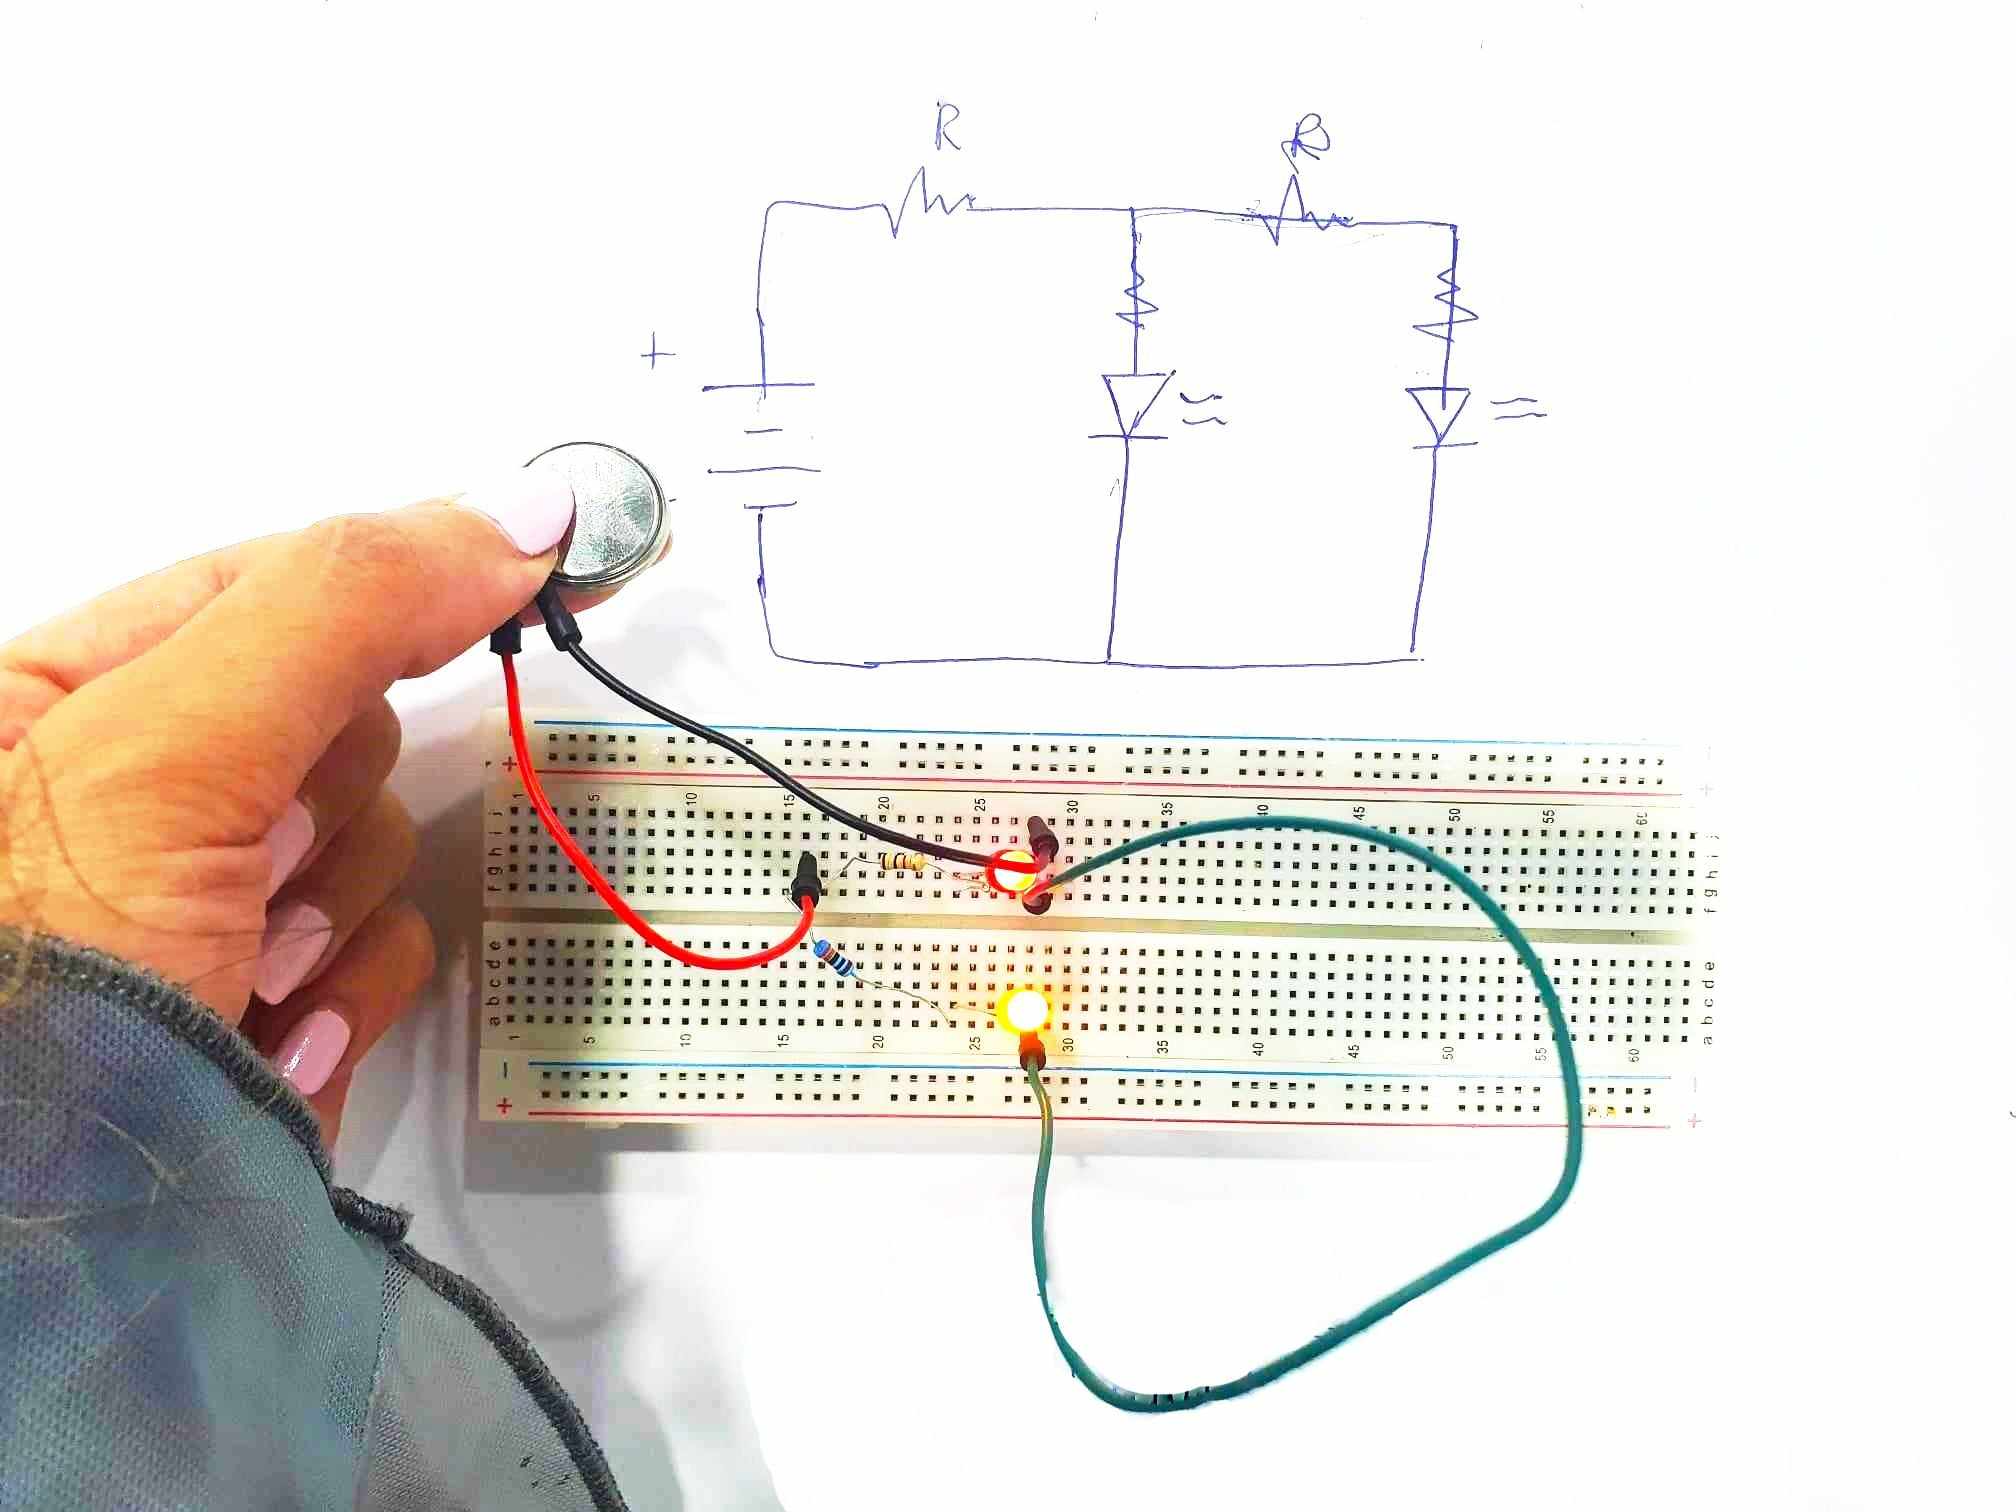
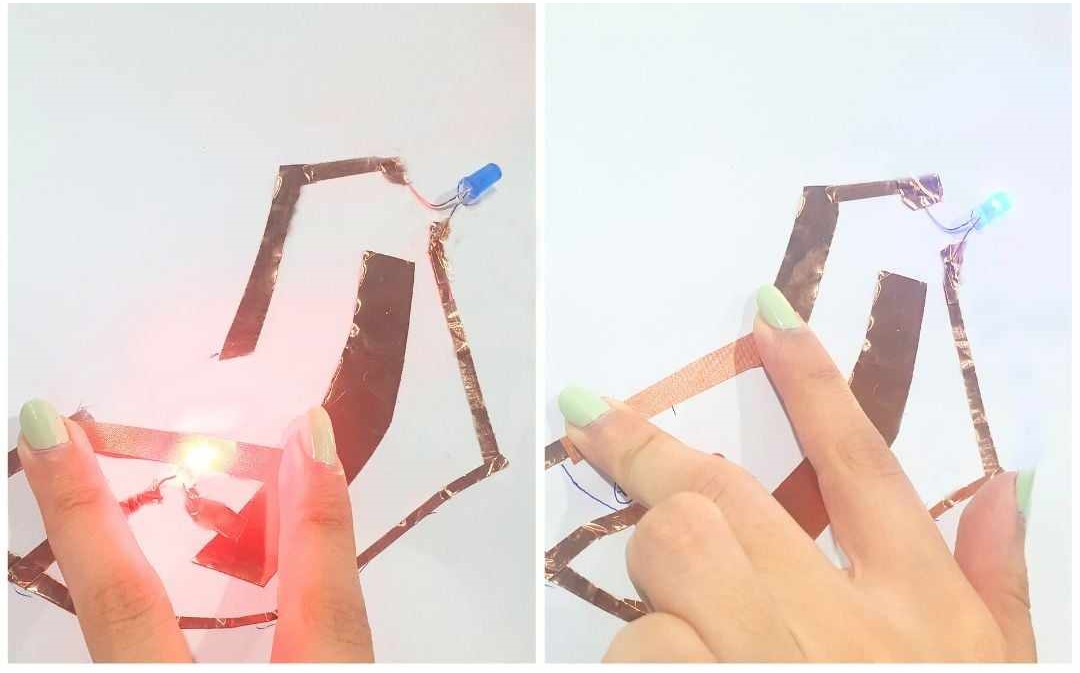
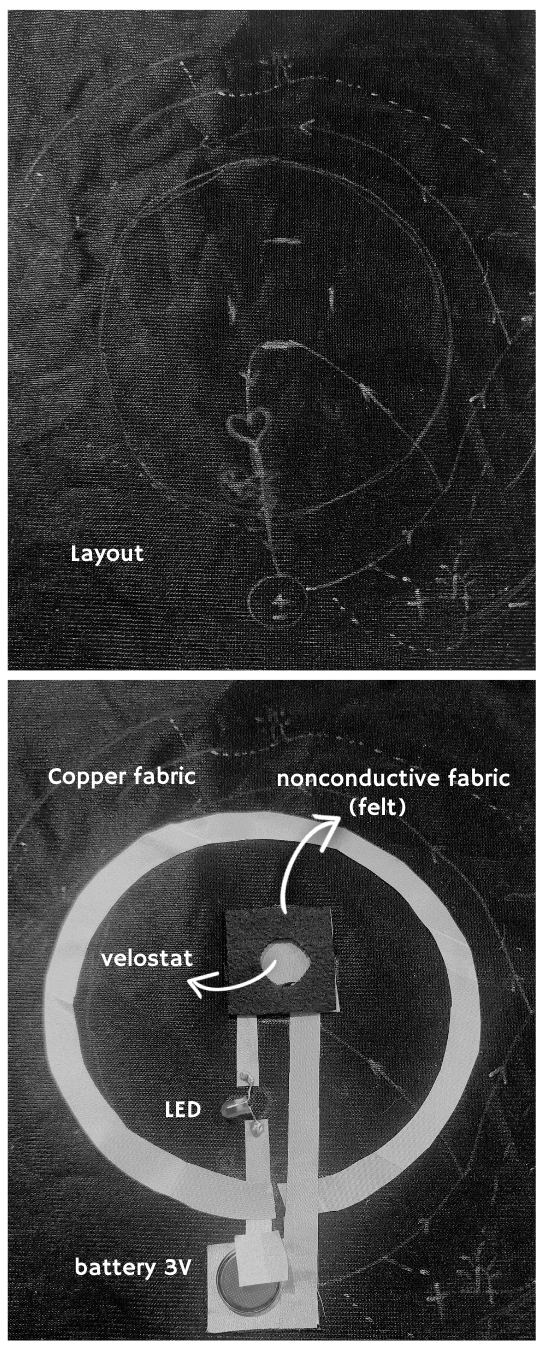
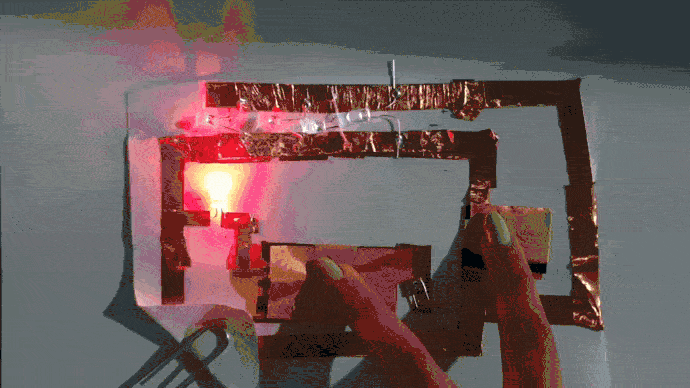
An analog pressure sensor, utilizing Velostat and copper fabric, dynamically maps pressure by varying voltage flow, resulting in increased LED brightness with decreased resistance.
Soft DIY Electronic components
-
I started by creating simplified conceptual circuits to enhance my comprehension of component behaviour and to become more proficient with the tools I'm using. It became evident to me that the accessibility of materials such as conductive thread and fabric is highly appealing for DIY textile designers. For instance, the seamless integration of these materials opens up a world of possibilities.
-
A pressure sensor, used to dynamically map pressure, has been constructed using Velostat material covered with copper fabric on both sides. This setup results in an increase in LED brightness as pressure is applied, due to a decrease in resistance.
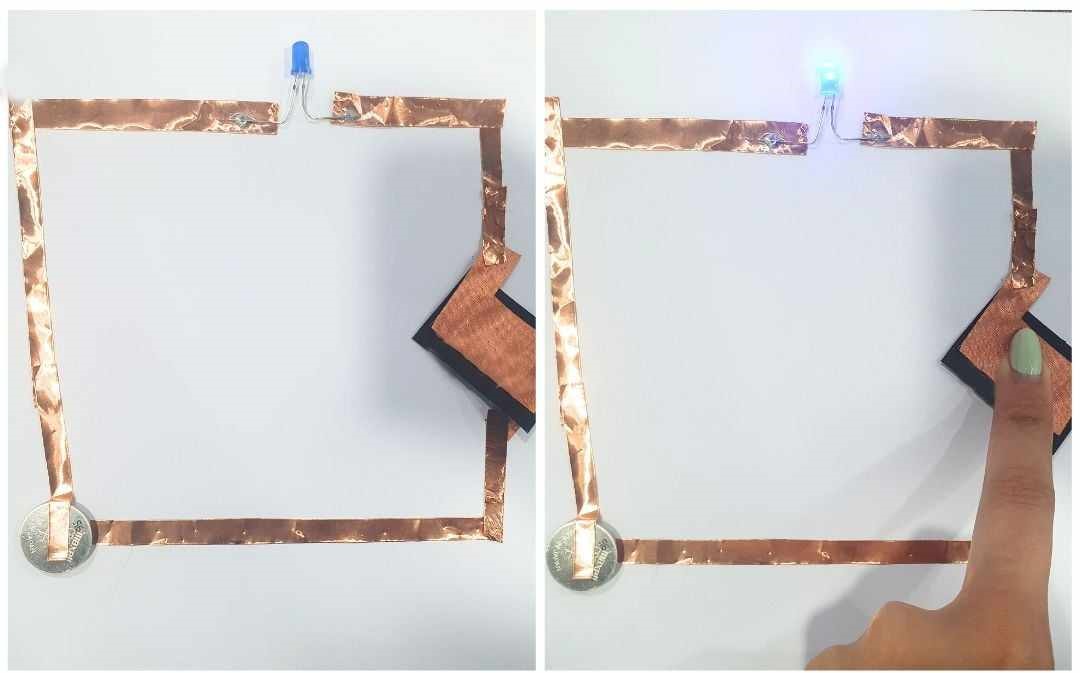
Digital Sensor (SWITCH)
On/Off Tilt Detection: Digital Solution" Explanation: Digital sensors provide discrete output signals indicating specific states or conditions. Example: A tilt switch sensor provides a binary output (on/off) to indicate the presence or absence of tilt
Soft DIY Electronic components
- Tilt is a straightforward, low-tech solution to create a more complex sensor system. It consists of two LEDs, one red and one blue. When a connection is established between the conductive thread or copper and the metal wire, as is the case in my final design, the circuit closes, causing the LED on the tilted side to illuminate.
Steps
Step 1
- Drafting the circuit layout and concept involved translating the ideas and knowledge into a visual plan. This blueprint guided the physical construction of the circuit and outlined its purpose and functionality.


Step 2
- Implementing the circuit plan using conductive fabric and thread involved the practical process of bringing the design to life. I used these materials to physically construct the circuit according to our plan, ensuring that it was functional and met our intended objectives.

Step 3
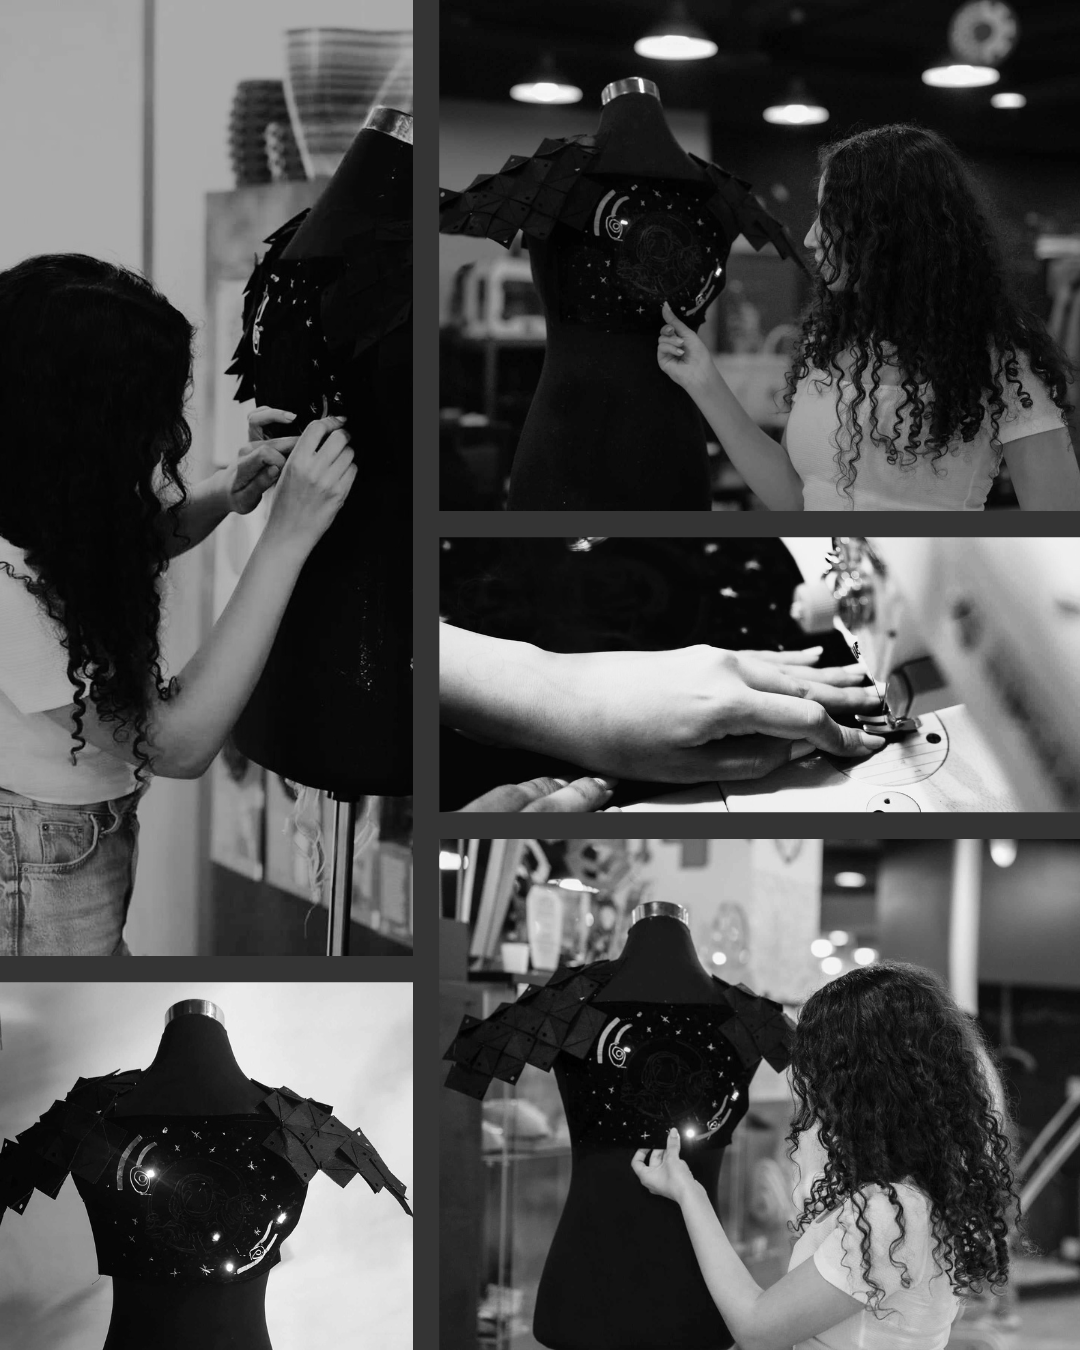
- I meticulously stitched together fabric components, soldered electrical connections, and assembled all the parts into a cohesive, functioning unit.

Step 4
- To gain a more comprehensive understanding of its appearance, I assembled the piece on a mannequin. This allowed me to visualize how the final product would look and gave us a better perspective on its overall aesthetics and functionality.

Reading with Arduino
A pressure sensor was crafted using Velostat material covered with copper fabric on both sides. Interfaced with an Arduino, the sensor's analog readings were captured by connecting one side of the copper fabric to the ground and the other side to the analog input pin.
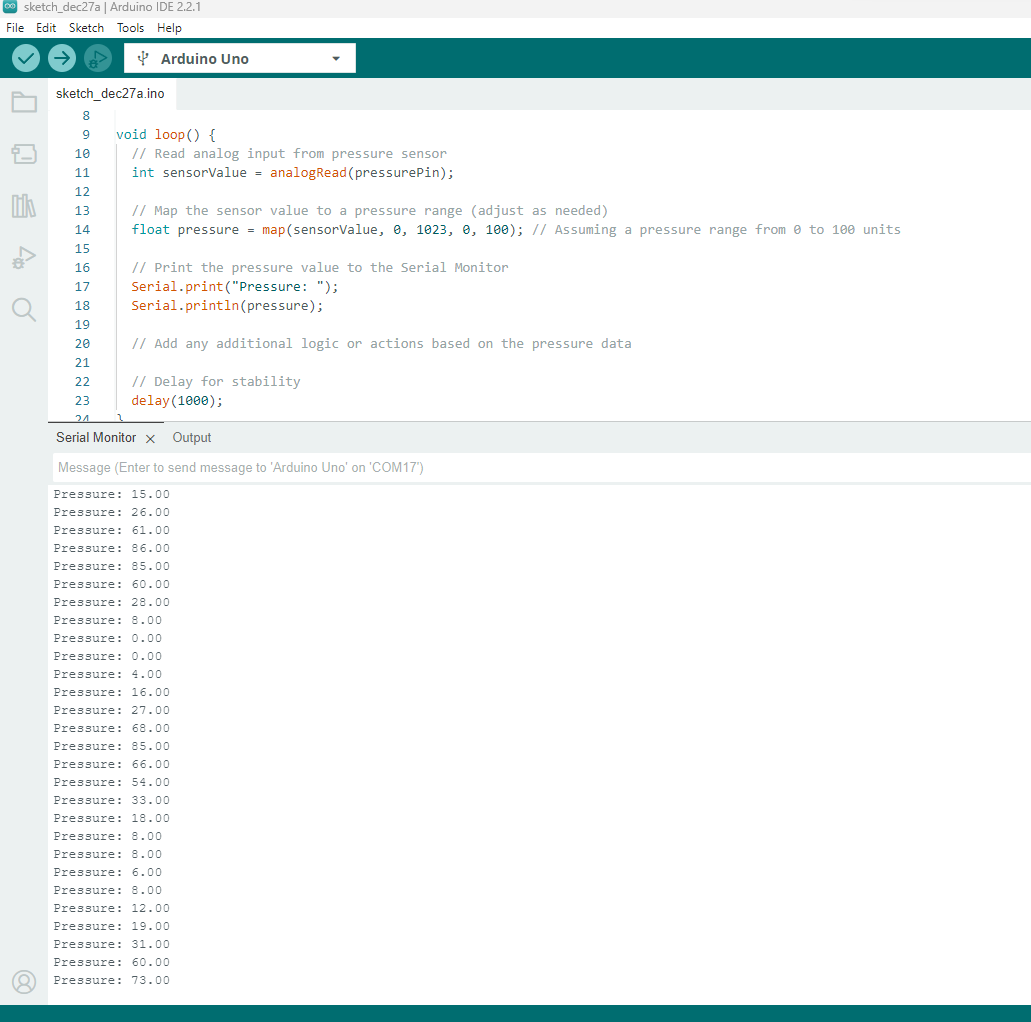
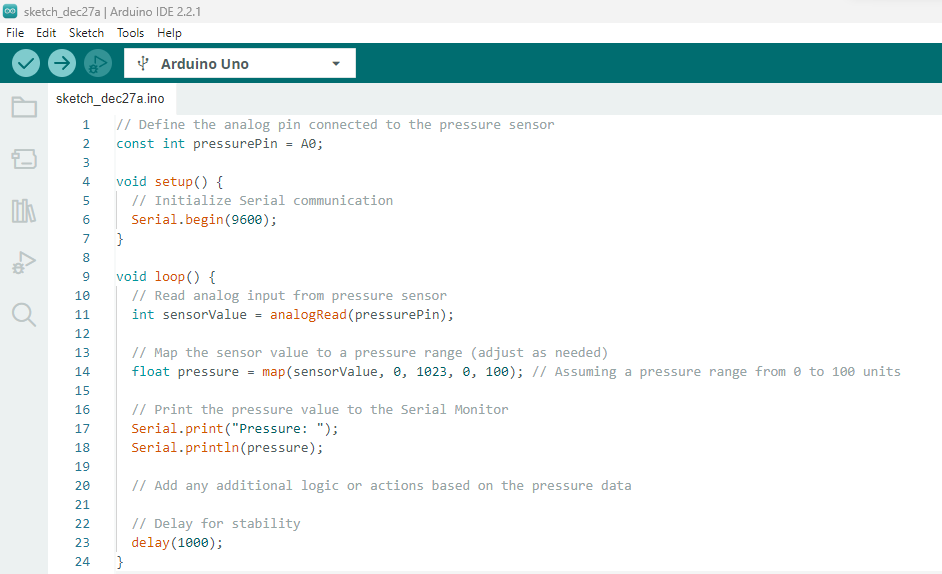

Code Example
- Developing a blinking code for Arduino involved crafting a program that instructed the Arduino microcontroller to turn an LED on and off in a rhythmic pattern. This code allowed me to control the timing and frequency of the LED's blinking, adding a dynamic element to our project.
void setup() {
  // put your setup code here, to run once:
pinMode(12,OUTPUT);
}

void loop() {
  // put your main code here, to run repeatedly:
digitalWrite(12,HIGH);
delay(1000);
digitalWrite(12,LOW);
delay(1000);
}

