Electronics
Initial design and Concept
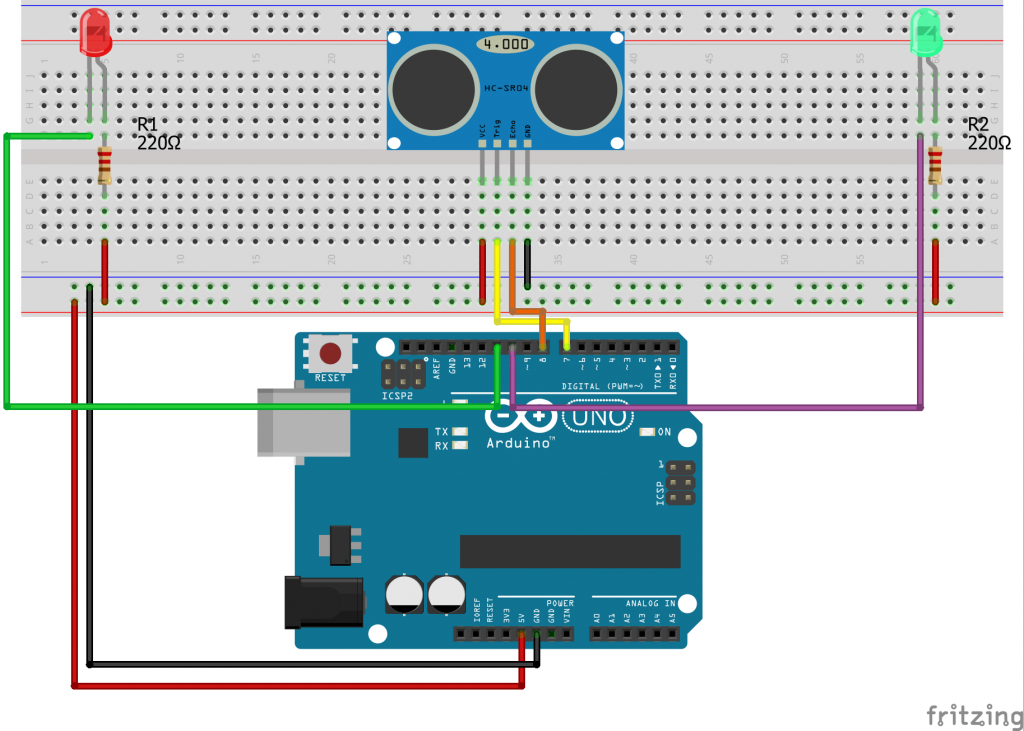
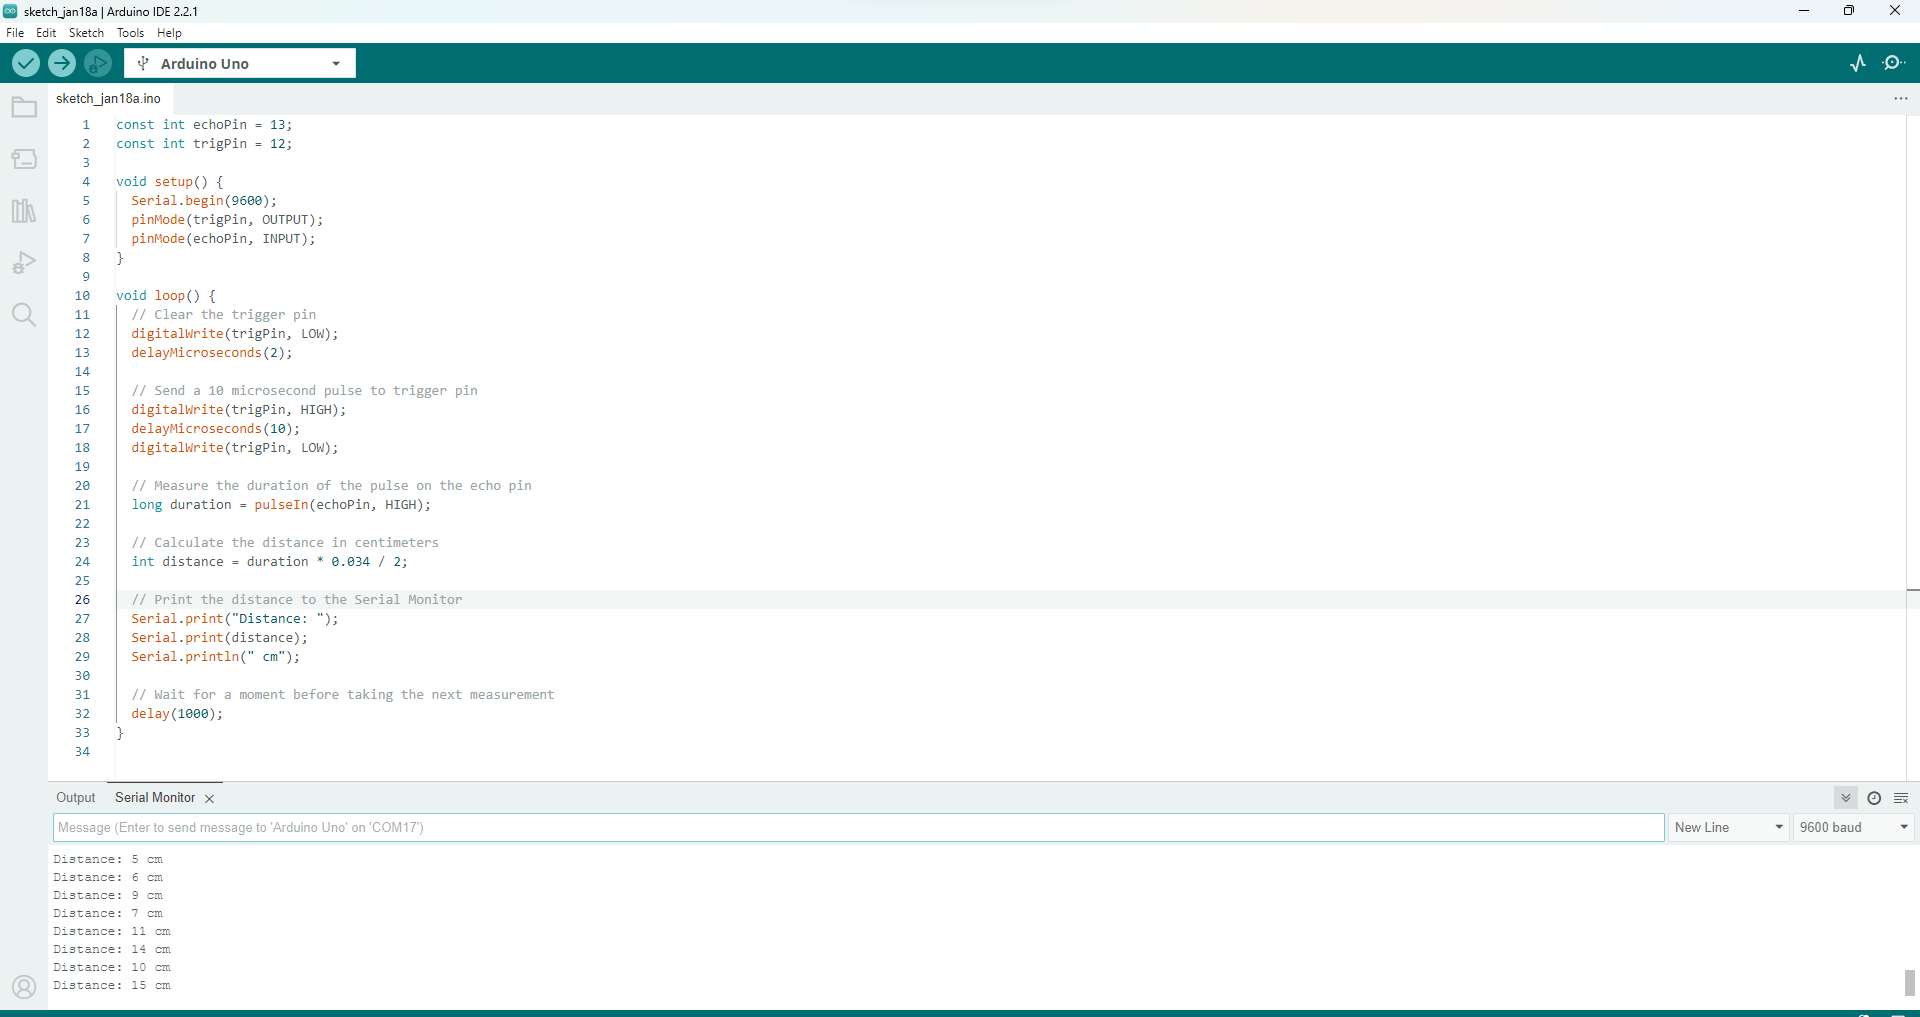
I set up a project to light an LED with an Arduino and an Ultrasonic Sensor HC-SR04. I defined a distance threshold of 30 centimeters, and the system activates the lights when an object is closer than this distance, turning them off otherwise. This straightforward control mechanism ensures efficient and practical illumination, as the LED is only lit when needed within the specified proximity.
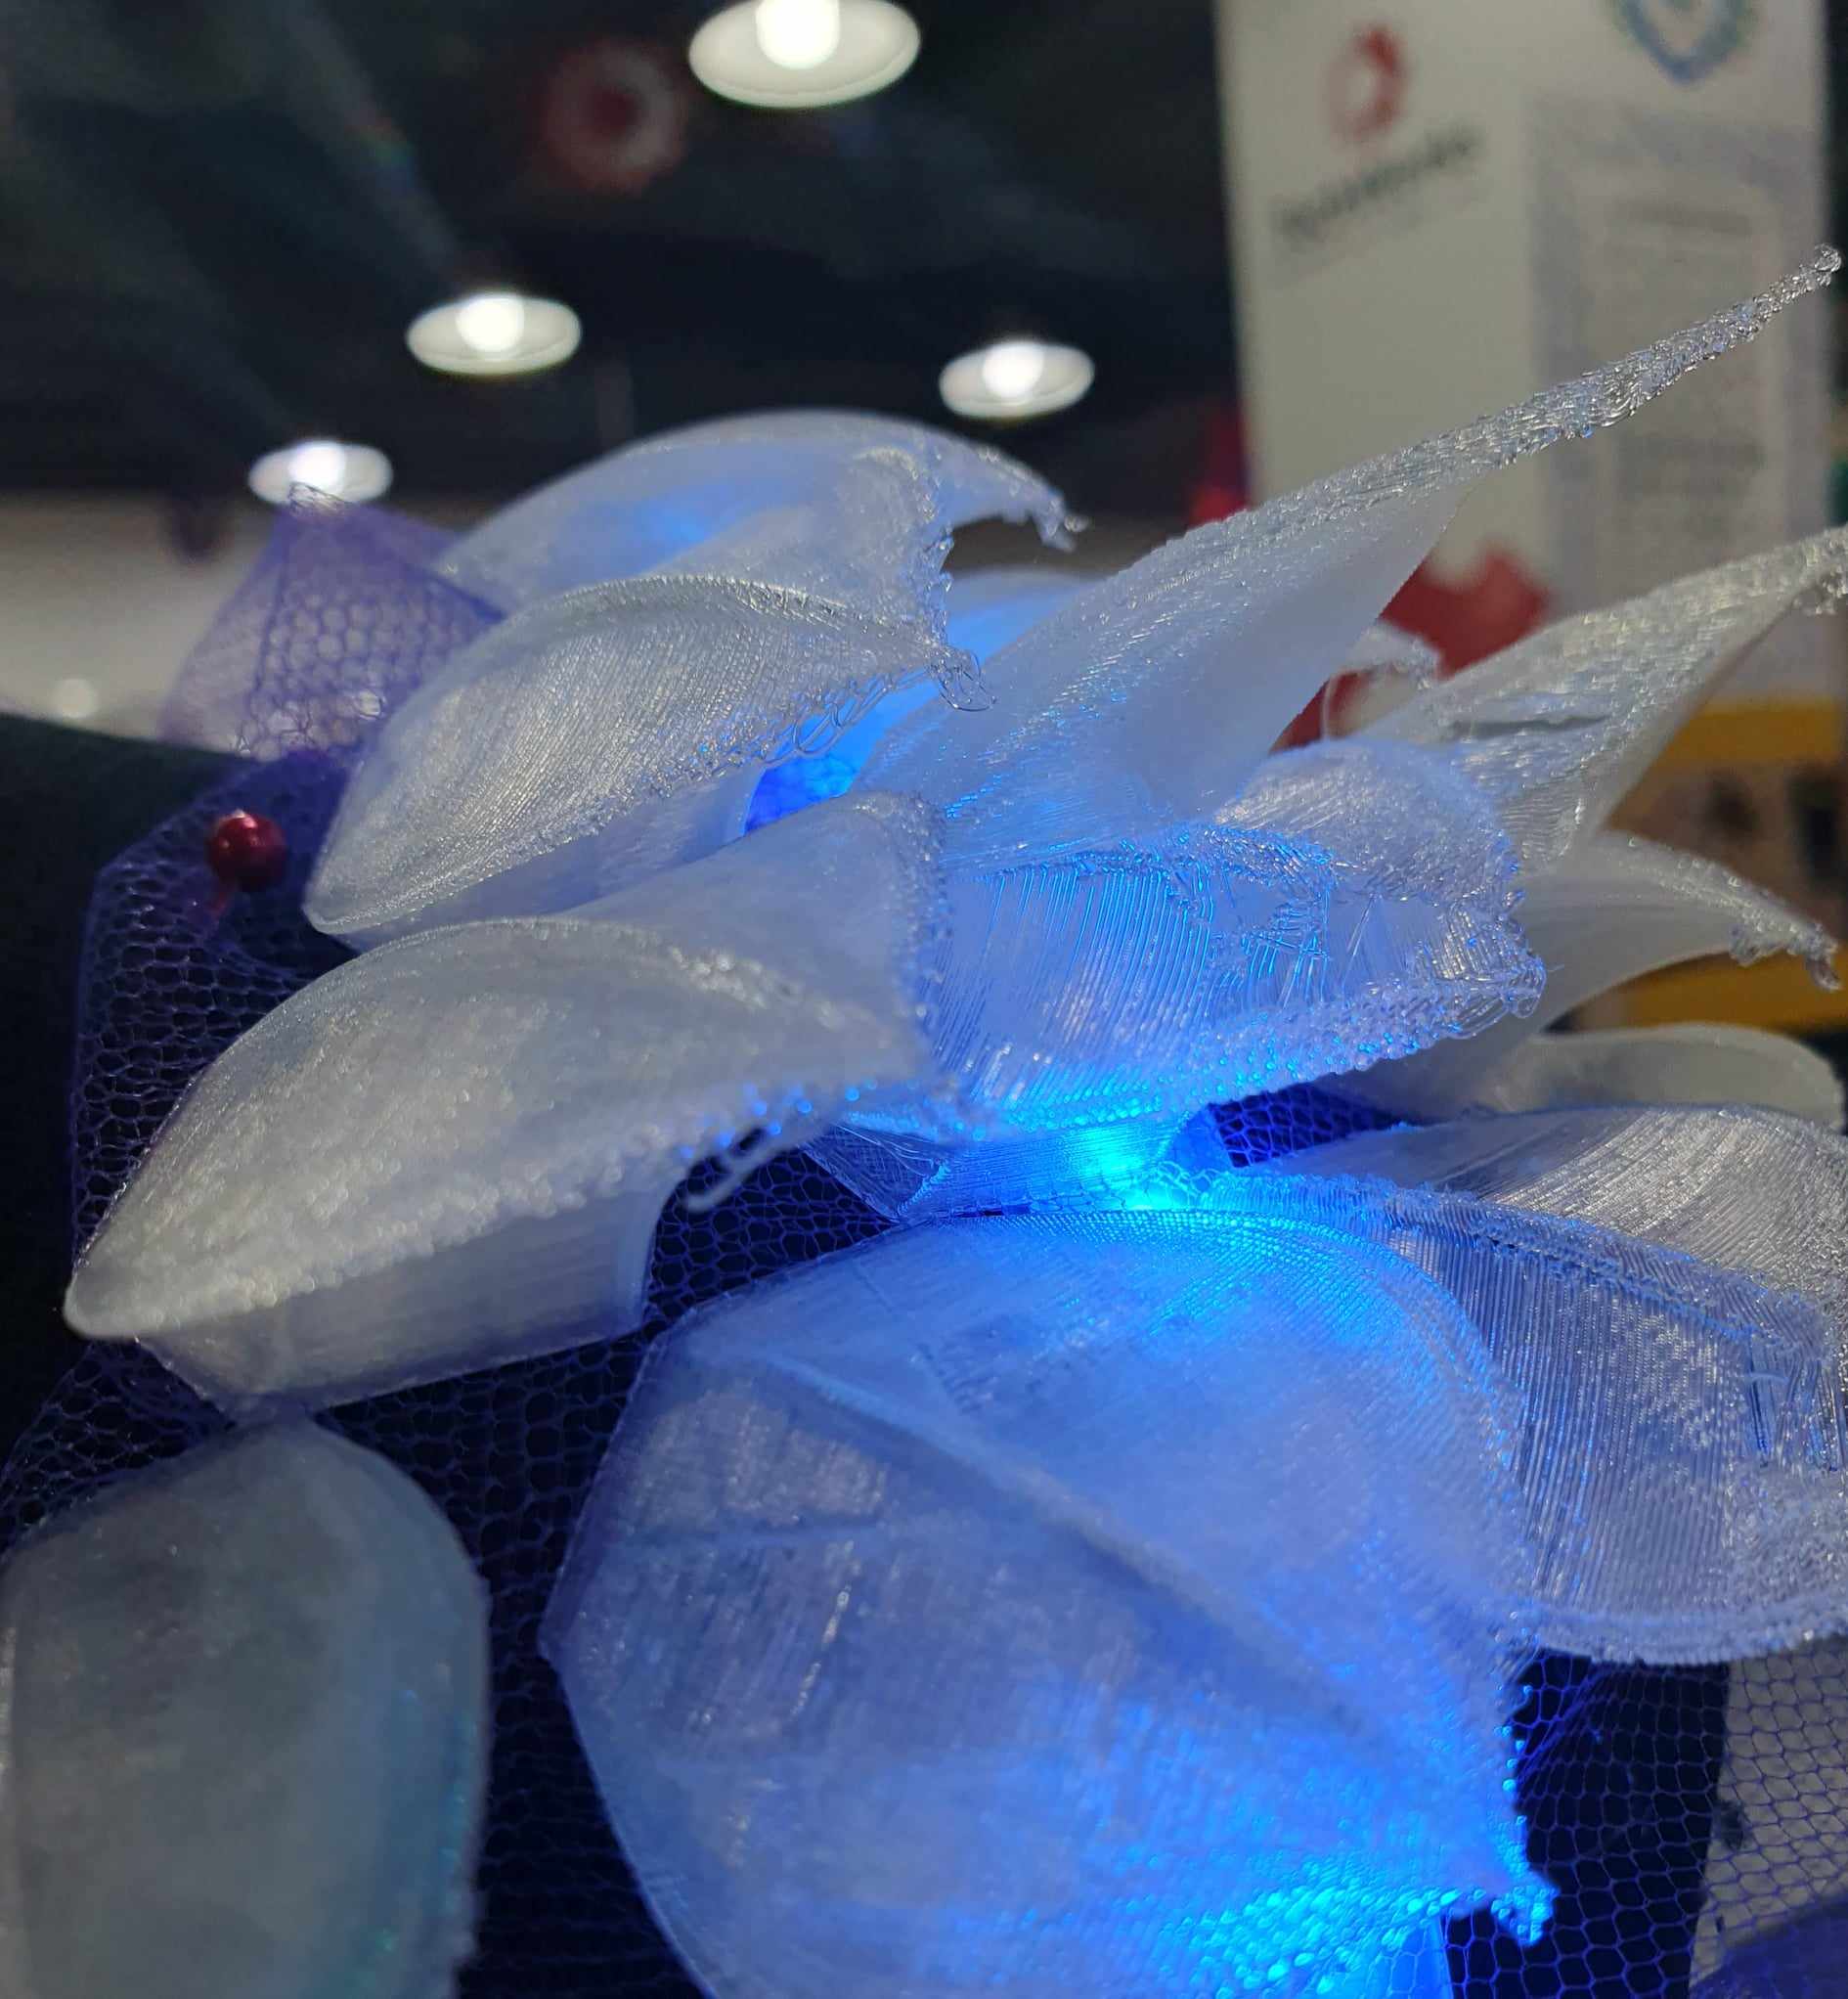
experimenting with the code on an LED RGB strip using Arduino. I affixed the scales on top of the led strip to observe how they appeared and illuminated and its lighting effects.
Copy Code used
const int echoPin = 13;
const int trigPin = 12;
const int ledPins = 8;
const int ledPin3s = 7;
const int ledPin33s = 5;


void setup() {
  Serial.begin(9600);
  pinMode(trigPin, OUTPUT);
  pinMode(echoPin, INPUT);

  // Set LED pins as OUTPUT
  pinMode(8, OUTPUT);
  pinMode(7, OUTPUT);
  pinMode(5, OUTPUT);
}

void loop() {
  // Clear the trigger pin
  digitalWrite(trigPin, LOW);
  delayMicroseconds(2);

  // Send a 10 microsecond pulse to trigger pin
  digitalWrite(trigPin, HIGH);
  delayMicroseconds(10);
  digitalWrite(trigPin, LOW);

  // Measure the duration of the pulse on the echo pin
  long duration = pulseIn(echoPin, HIGH);

  // Calculate the distance in centimeters
  int distance = duration * 0.034 / 2;

  // Print the distance to the Serial Monitor
  Serial.print("Distance: ");
  Serial.print(distance);
  Serial.println(" cm");

  // Control LEDs based on distance
  controlLeds(distance);

  // Wait for a moment before taking the next measurement
  delay(100);
}

void controlLeds(int distance) {
  // Check if the distance is 30 cm
  if (distance < 30) {
      digitalWrite(8, HIGH);
     digitalWrite(7, HIGH);
     digitalWrite(5, HIGH);

  } else {
    // Turn off all LEDs
      digitalWrite(8, LOW);
      digitalWrite(7, LOW);
      digitalWrite(5, LOW);
  }
}
Finalization
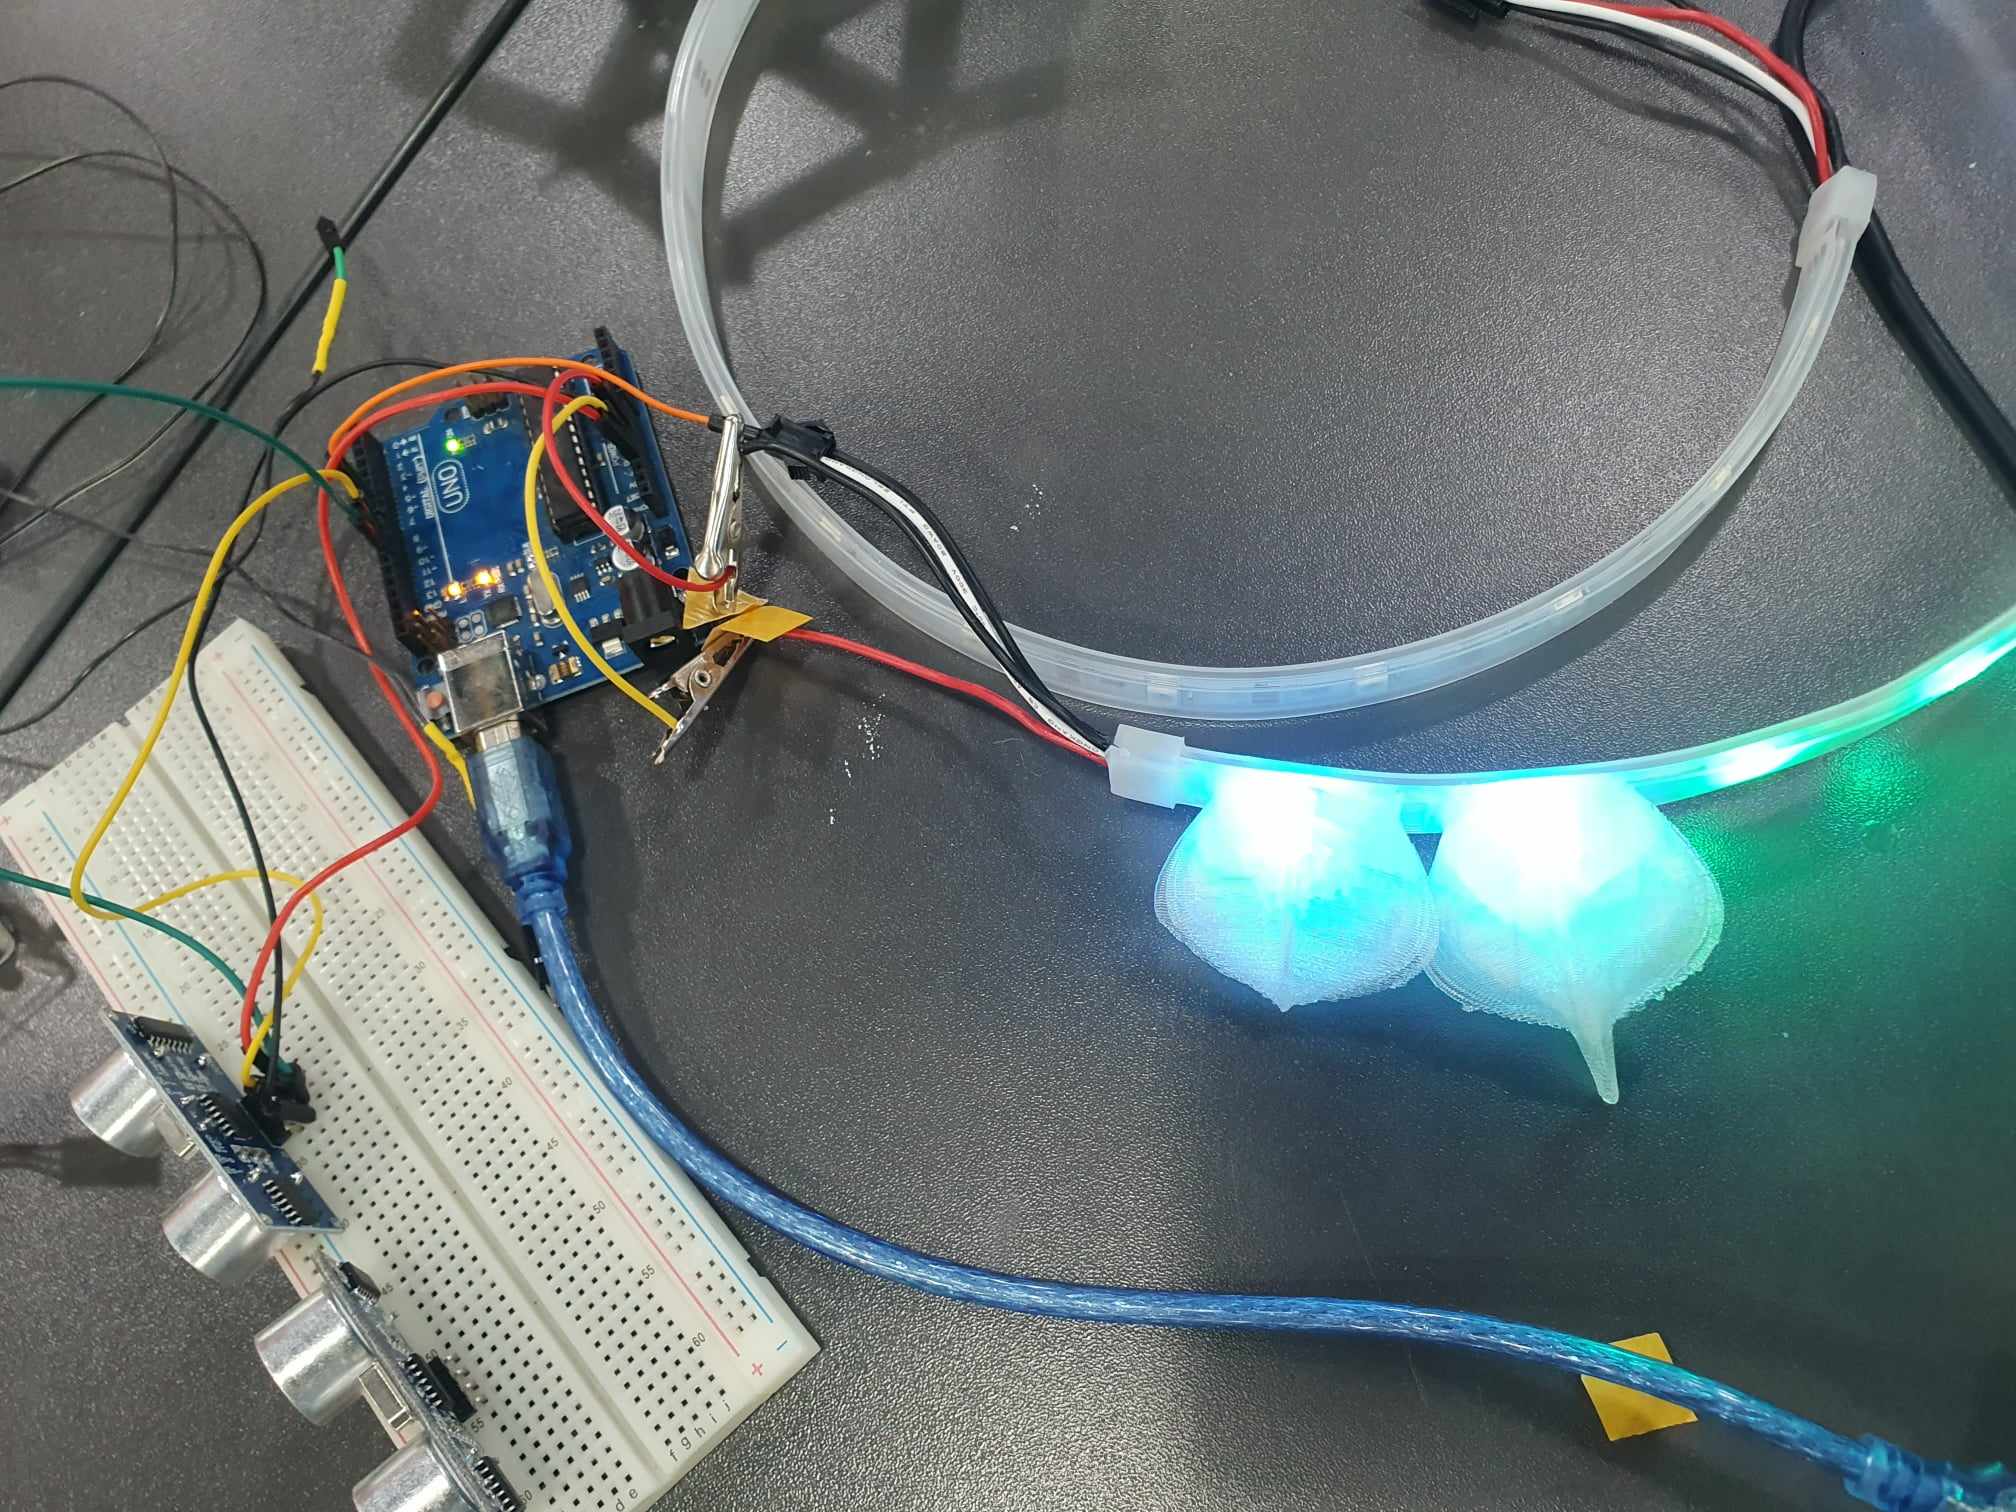
In this Arduino sketch, I've replaced the traditional LEDs with NeoPixels and introduced a dynamic color-changing feature based on distance. The NeoPixels respond gradually to the measured distance, creating an engaging visual effect. As the distance decreases, the shades of blue transition smoothly, producing a captivating gradient.

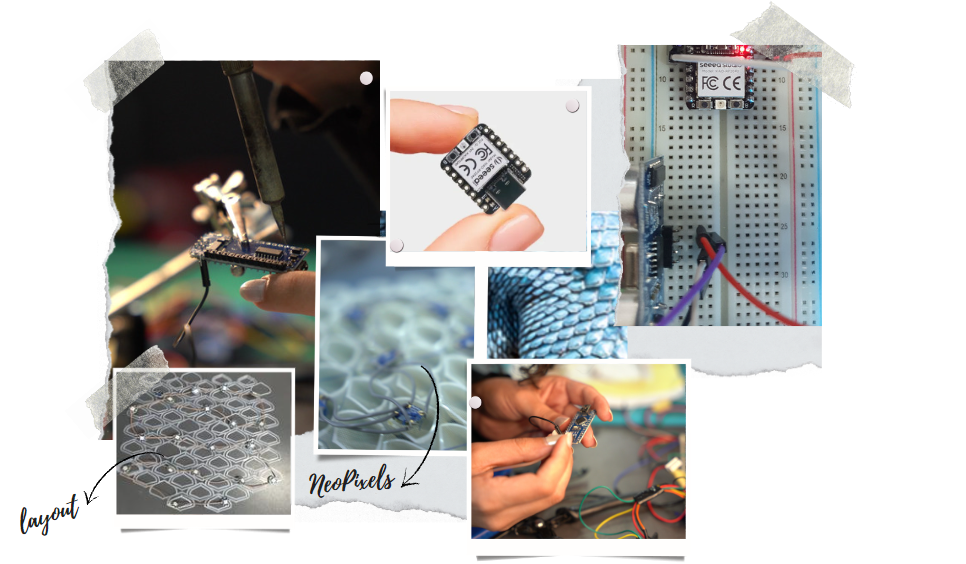

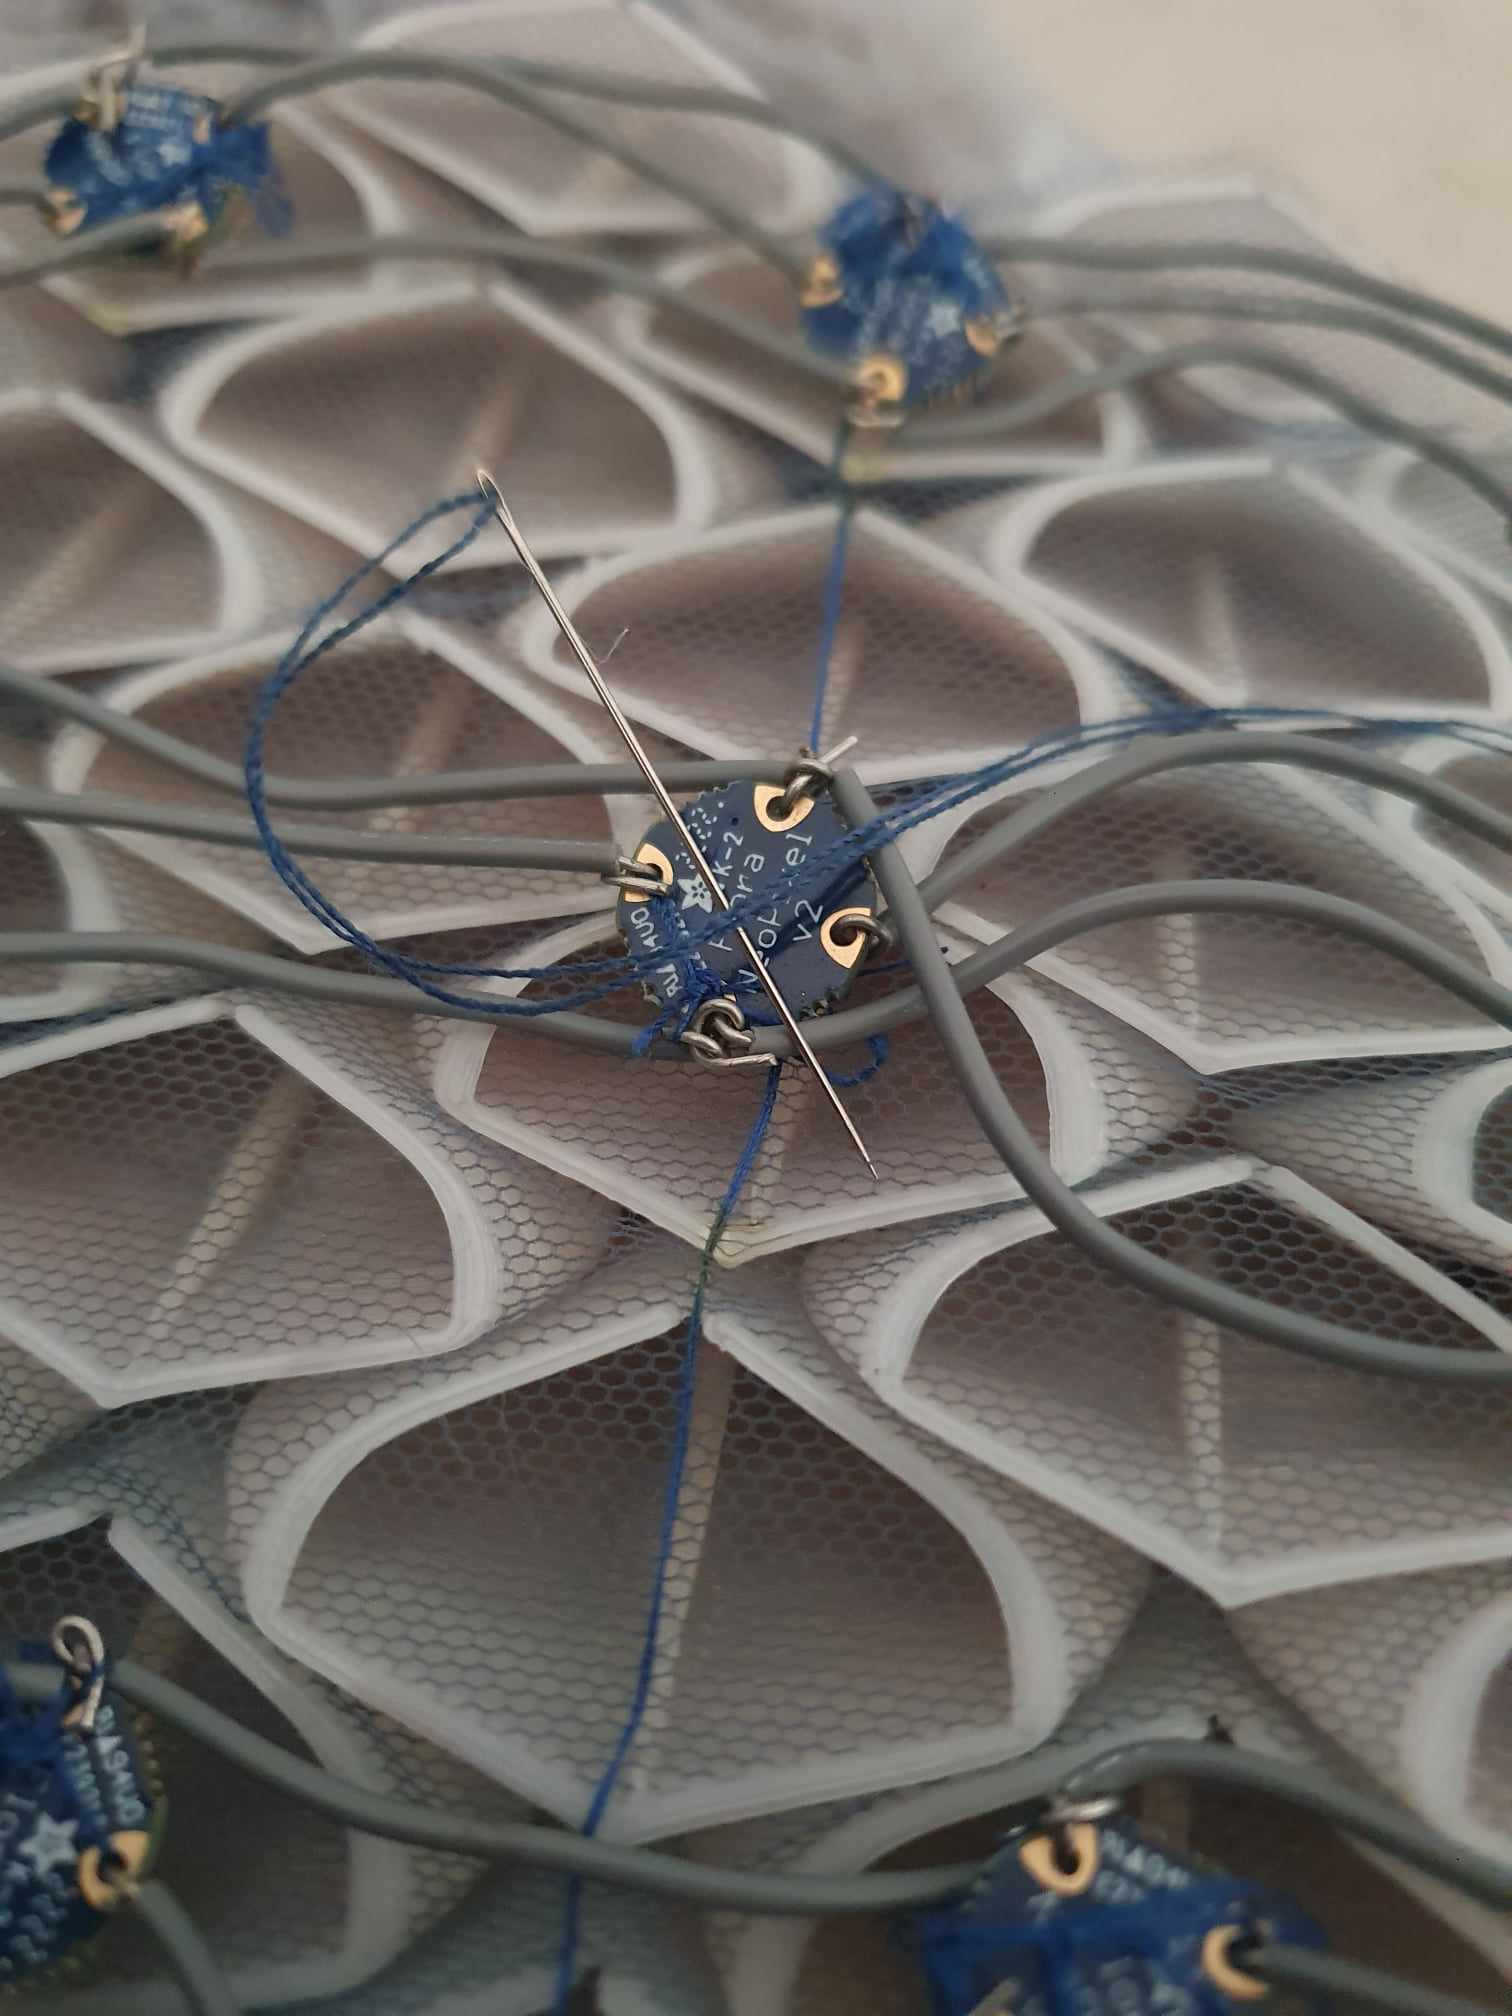
I secured the NeoPixels By sewing them directly into the mesh.
Copy Code used
#include <Adafruit_NeoPixel.h>
#include <NewPing.h>

#define PIN                    6          // Pin connected to the NeoPixels
#define NUMPIXELS              29         // Number of NeoPixels
#define TRIGGER_PIN            9          // Arduino pin tied to trigger pin on the ultrasonic sensor
#define ECHO_PIN               10         // Arduino pin tied to echo pin on the ultrasonic sensor
#define MAX_DISTANCE           200        // Maximum distance we want to ping for (in centimeters)
#define PIXEL_DISTANCE_THRESHOLD 5        // One pixel for every 5 cm increase in distance

Adafruit_NeoPixel pixels(NUMPIXELS, PIN, NEO_GRB + NEO_KHZ800);
NewPing sonar(TRIGGER_PIN, ECHO_PIN, MAX_DISTANCE);  // Create a NewPing object

void setup() {
  pixels.begin();
  Serial.begin(9600);  // Initialize serial communication for displaying sensor reading
}

void loop() {
  pixels.clear();  // Clear all pixel colors

  int distance = sonar.ping_cm();  // Measure distance in centimeters

  Serial.print("Distance: ");
  Serial.print(distance);
  Serial.println(" cm");

  // Calculate the number of pixels to light based on distance
  int numLitPixels = (distance <= PIXEL_DISTANCE_THRESHOLD) ? NUMPIXELS : distance / PIXEL_DISTANCE_THRESHOLD;
  numLitPixels = constrain(numLitPixels, 0, NUMPIXELS);

  // Fading lights in green and blue with twinkle effect (slower)
  for (int colorShift = 0; colorShift < 255; colorShift += 10) {
    for (int i = 0; i < numLitPixels; i++) {
      int green = (colorShift + i * 20) % 256;   // Adjusting green color component
      int blue = (colorShift + i * 20 + 85) % 256;  // Adjusting blue color component

      // Introduce a twinkle effect by randomly turning on and off pixels
      if (random(5) == 0) {  // Adjust the 5 to control twinkle density (lower value means more twinkles)
        pixels.setPixelColor(i, pixels.Color(0, green, blue));  // Set pixel color for twinkling pixels
      }
    }

    pixels.show();  // Update NeoPixel colors
    delay(100);      // Adjust delay for even slower fading speed
  }

  delay(100);  // Delay before the next iteration
}
Xiao board
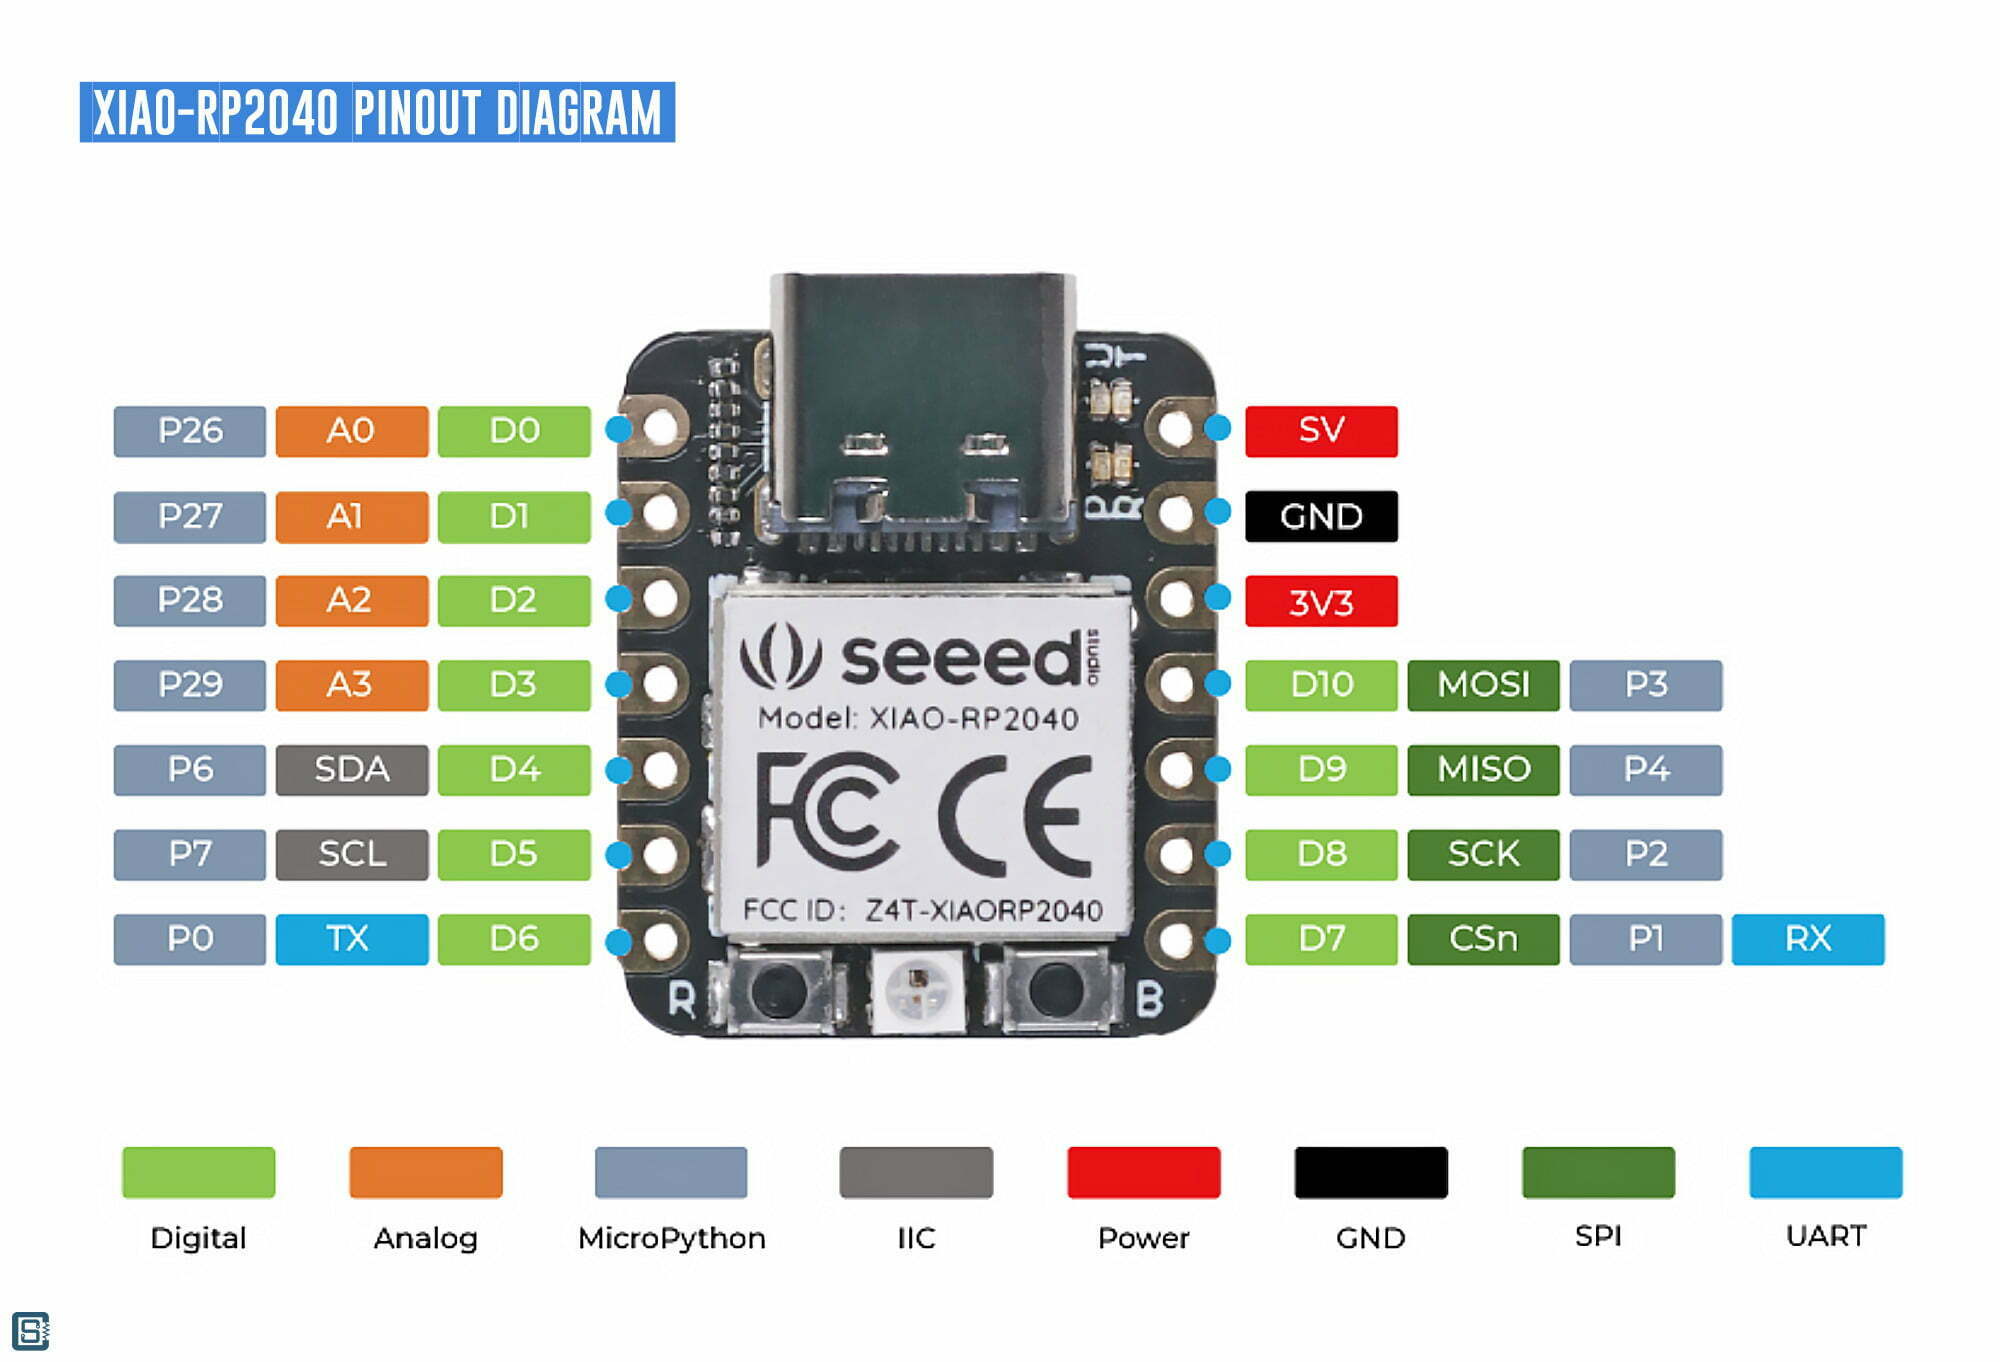
I chose the Xiao board due to its compact size, making it ideal for integrating seamlessly into my wearable garment. Its small form factor allows for easier placement within the shoulder piece while providing the necessary processing power for controlling the Neopixel RGB lights.
Additionally, the Xiao board's compatibility with Arduino IDE simplifies the development process, allowing me to easily write and upload code for controlling the Neopixel RGB lights and responding to input from the ultrasonic sensor.

#include <Arduino.h> // Include Arduino.h for millis() function
#include <Ultrasonic.h> // Include Ultrasonic library for distance measurement

#define NEOPIXEL_PIN            28          // Pin connected to the NeoPixel
#define NUMPIXELS               15         // Number of NeoPixels
#define TRIGGER_PIN             27          // RP2040 pin tied to trigger pin on the ultrasonic sensor
#define ECHO_PIN                26         // RP2040 pin tied to echo pin on the ultrasonic sensor
#define MAX_DISTANCE            200        // Maximum distance we want to ping for (in centimeters)
#define MIN_DISTANCE            70         // Minimum distance for lights to start turning on
#define PIXEL_DISTANCE_THRESHOLD 5         // Increased threshold for less sensitivity

Adafruit_NeoPixel pixels(NUMPIXELS, NEOPIXEL_PIN, NEO_GRB + NEO_KHZ800); // Define NeoPixel object
Ultrasonic ultrasonic(TRIGGER_PIN, ECHO_PIN);  // Create an Ultrasonic object

void setup() {
  pixels.begin();
  pixels.show(); // Initialize all pixels to ensure they are working
  Serial.begin(9600);  // Initialize serial communication
}

void loop() {
  int distance = ultrasonic.read(CM); // Measure distance in centimeters

  // Calculate the number of pixels to light up based on distance
  int numLitPixels = 0;
  if (distance <= MIN_DISTANCE) {
    numLitPixels = constrain((MIN_DISTANCE - distance) / PIXEL_DISTANCE_THRESHOLD, 0, NUMPIXELS);
  }

  // Set the color of the illuminated pixels with shades of blue and turquoise
  for (int i = 0; i < NUMPIXELS; i++) {
    if (i < numLitPixels) {
      // Set the color of the illuminated pixels with shades of blue and turquoise
      int brightness = 128 + 127 * sin((millis() / 500.0) + (i * 3.14 / NUMPIXELS)); // Smoothly fade in and out
      int blue = map(i, 0, numLitPixels - 1, 255, 0);       // Decreasing blue intensity
      int turquoise = map(i, 0, numLitPixels - 1, 0, 255); // Increasing turquoise intensity
      int green = (255 - turquoise + brightness) / 2;       // Half blue, half green
      pixels.setPixelColor(i, pixels.Color(0, green, blue)); // Set pixel color
    } else {
      // Turn off the rest of the lights
      pixels.setPixelColor(i, pixels.Color(0, 0, 0)); // Turn off the pixel
    }
  }

  pixels.show();

  // Print distance and number of lit pixels to the serial monitor
  Serial.print("Distance: ");
  Serial.print(distance);
  Serial.print(" cm, Lit Pixels: ");
  Serial.println(numLitPixels);

  delay(200); // Delay before updating the colors again
}
should piece Components
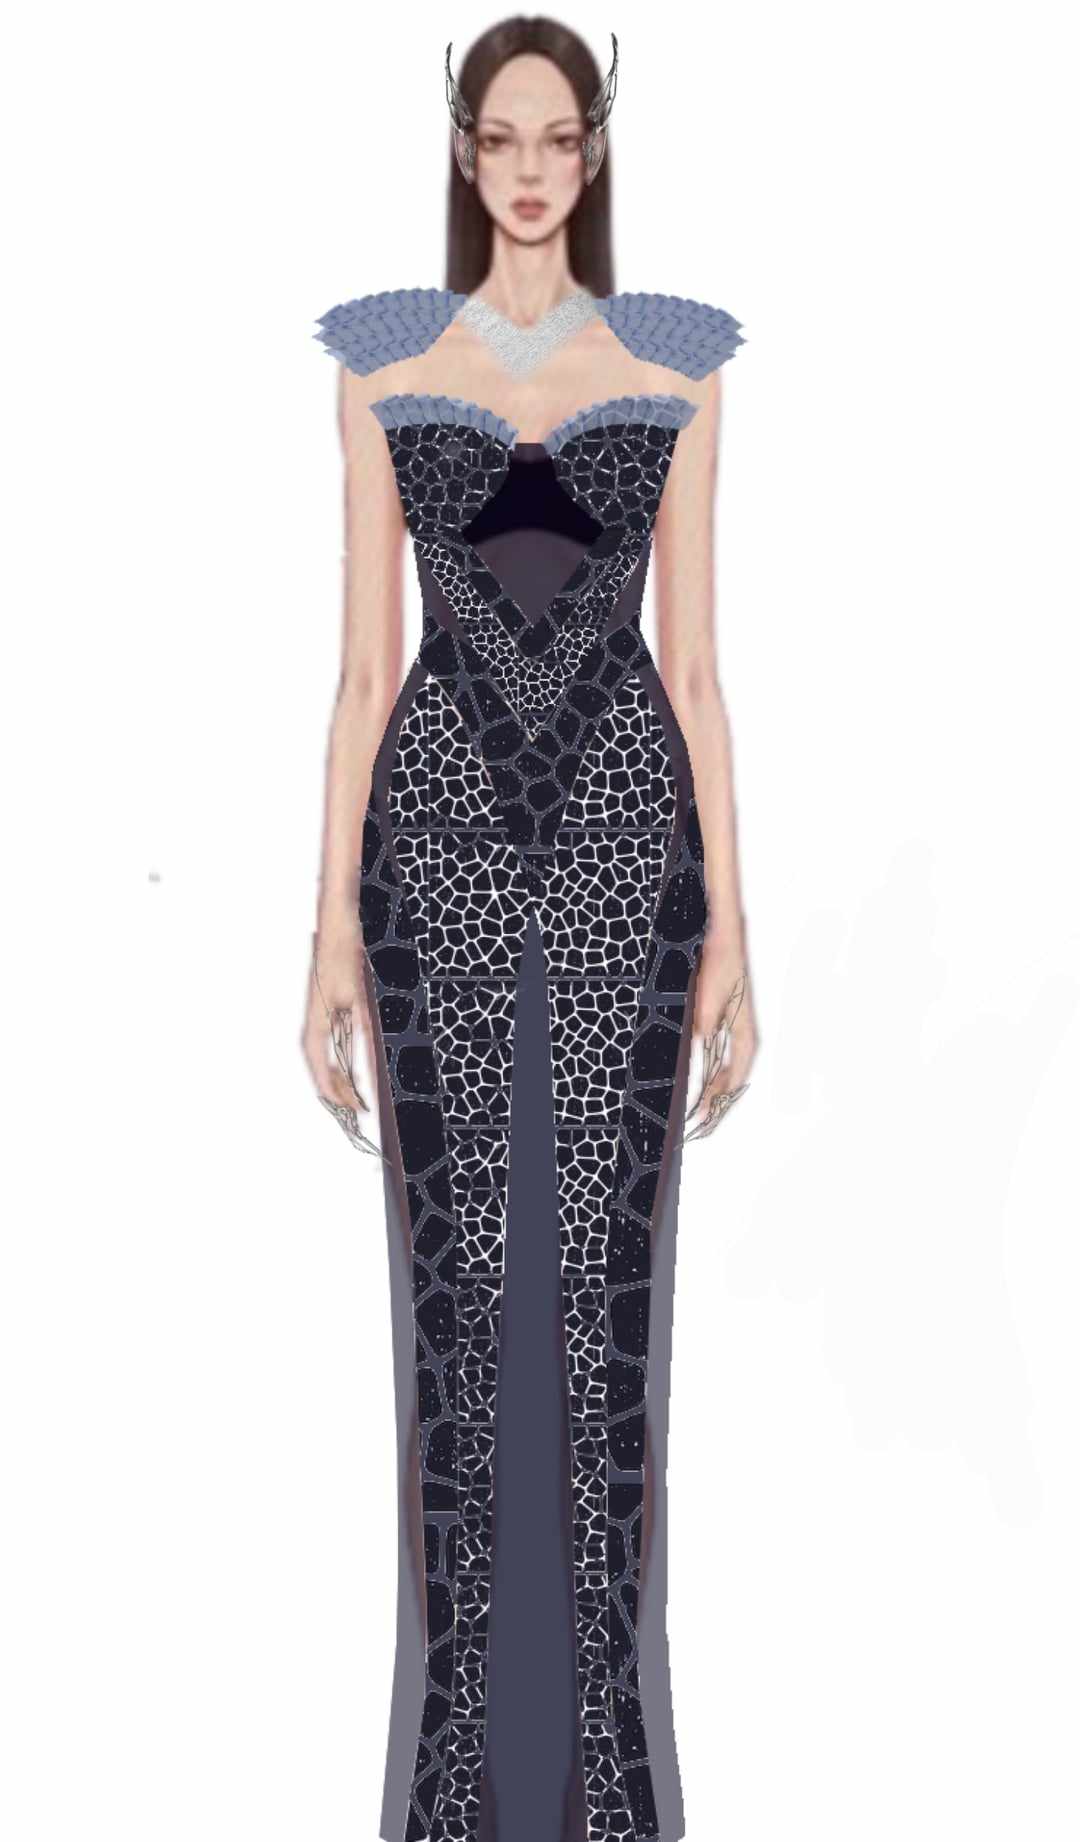
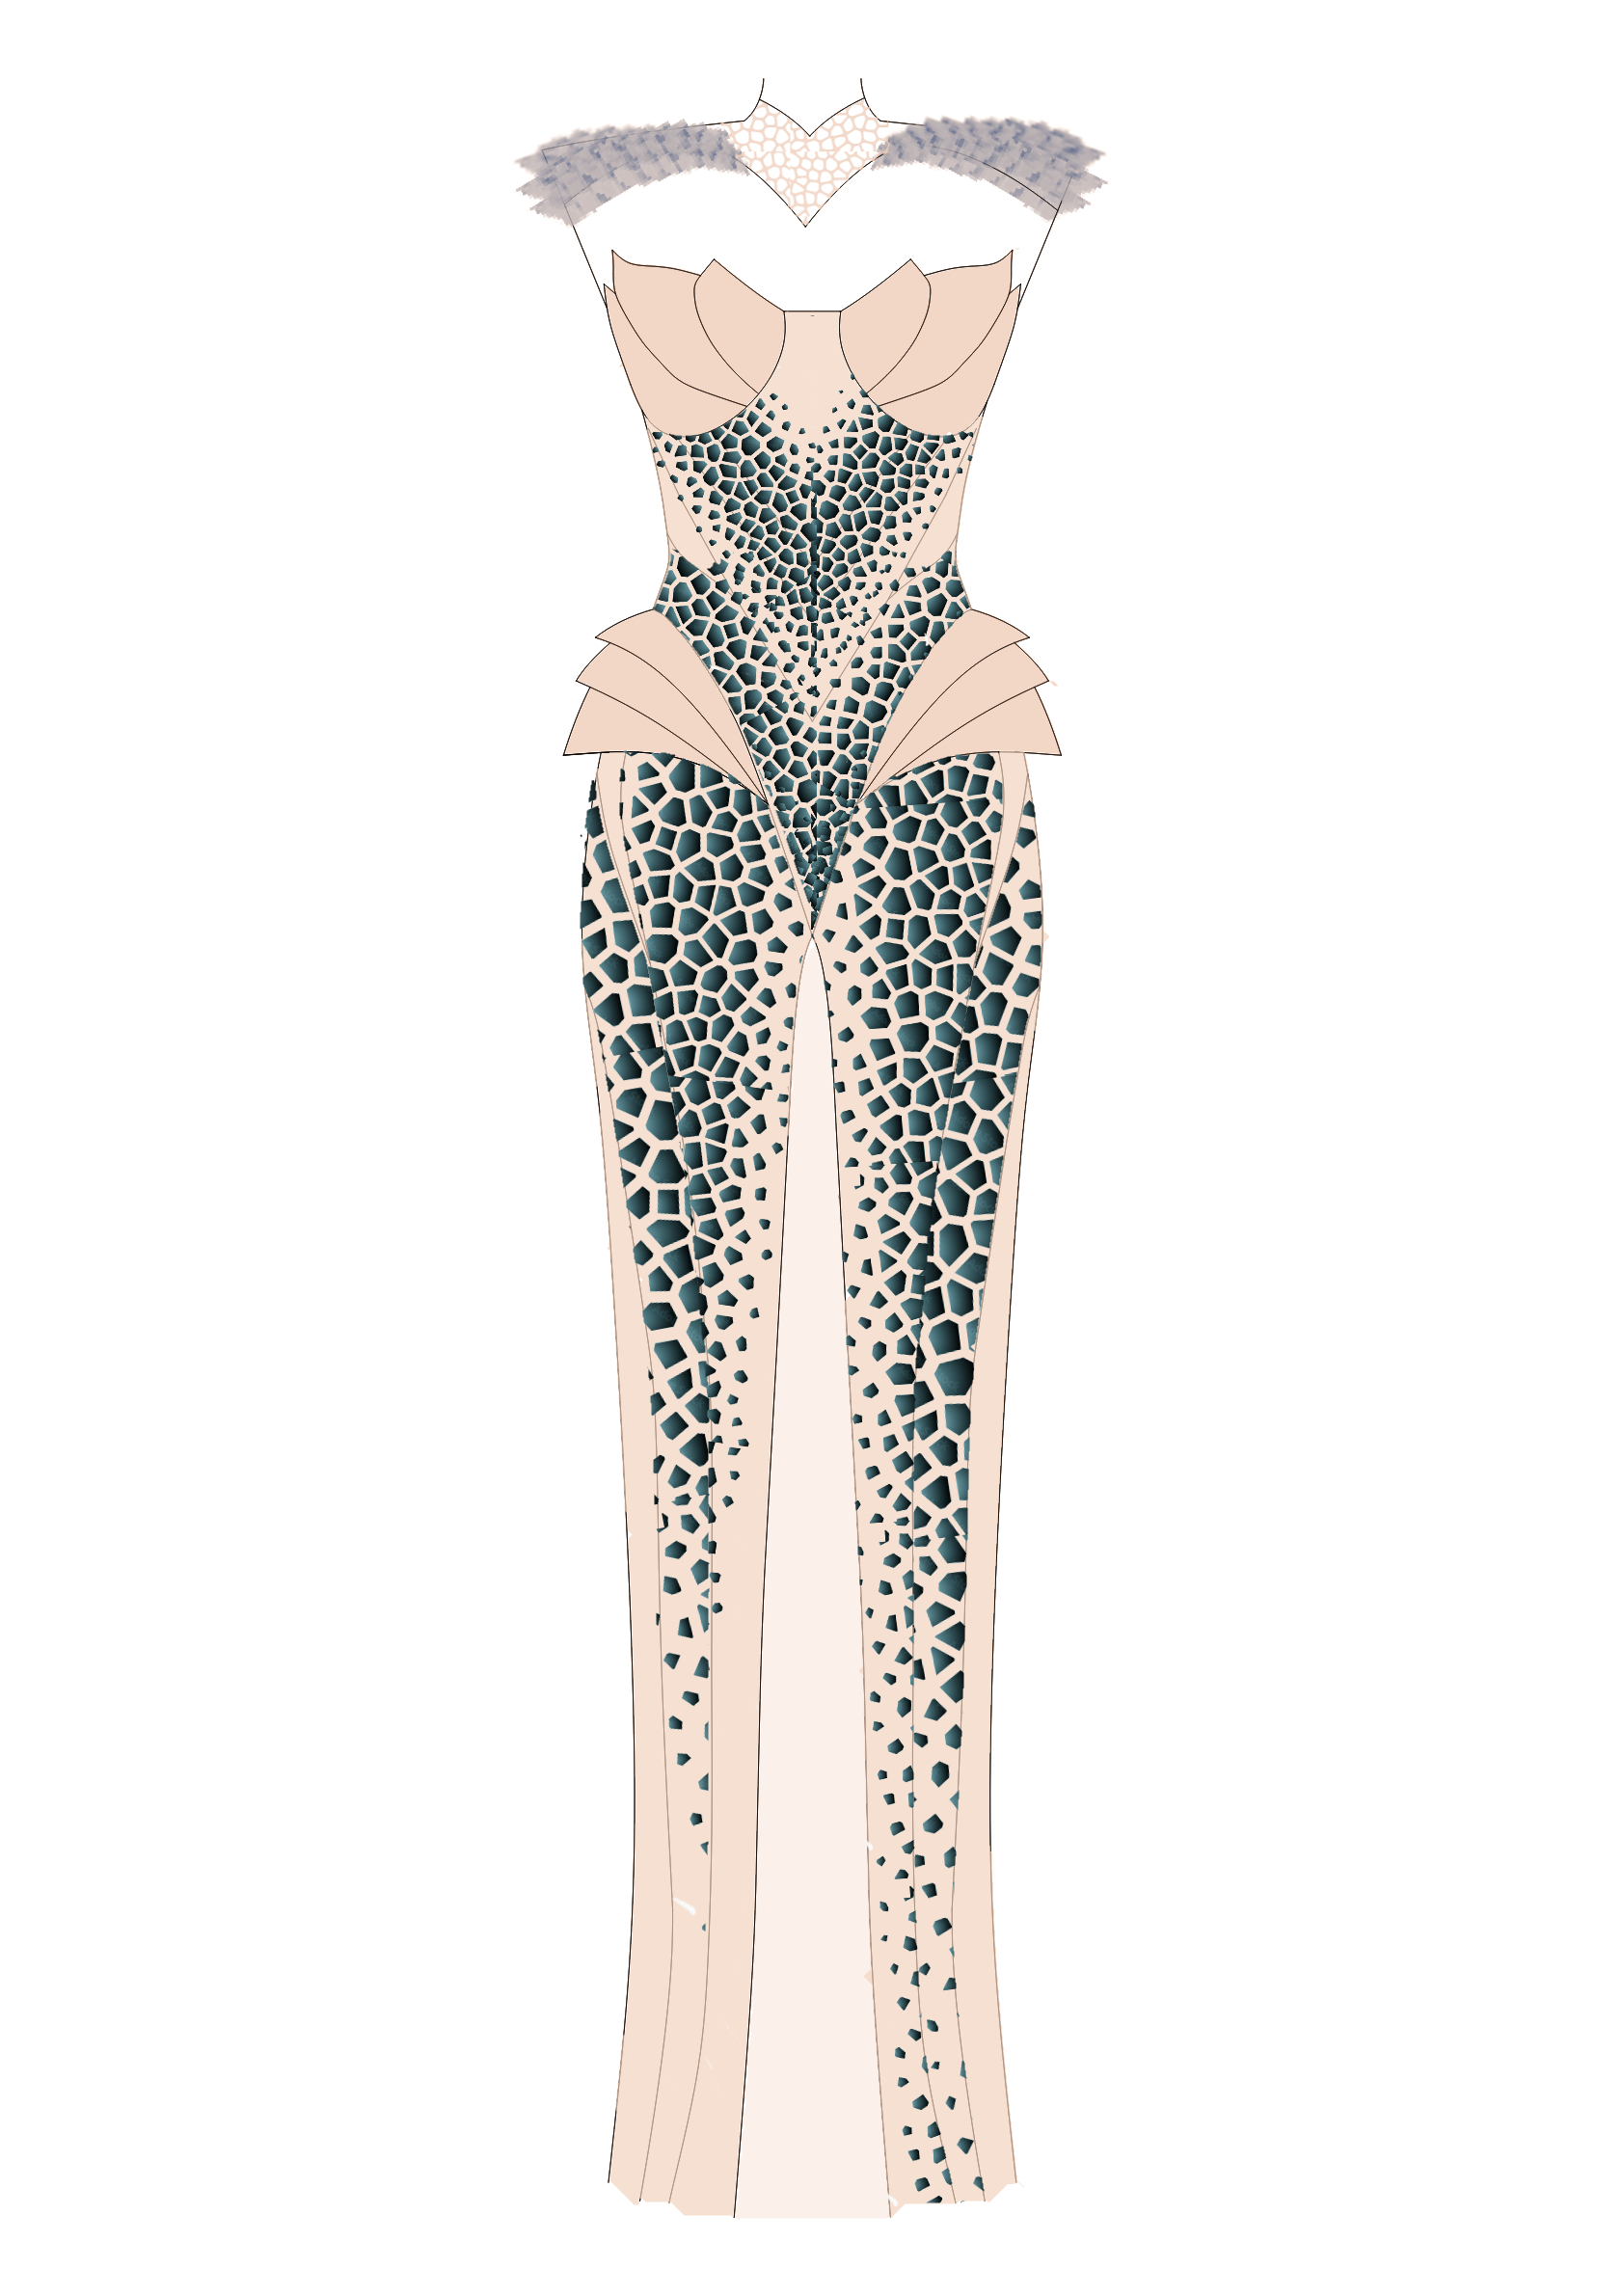
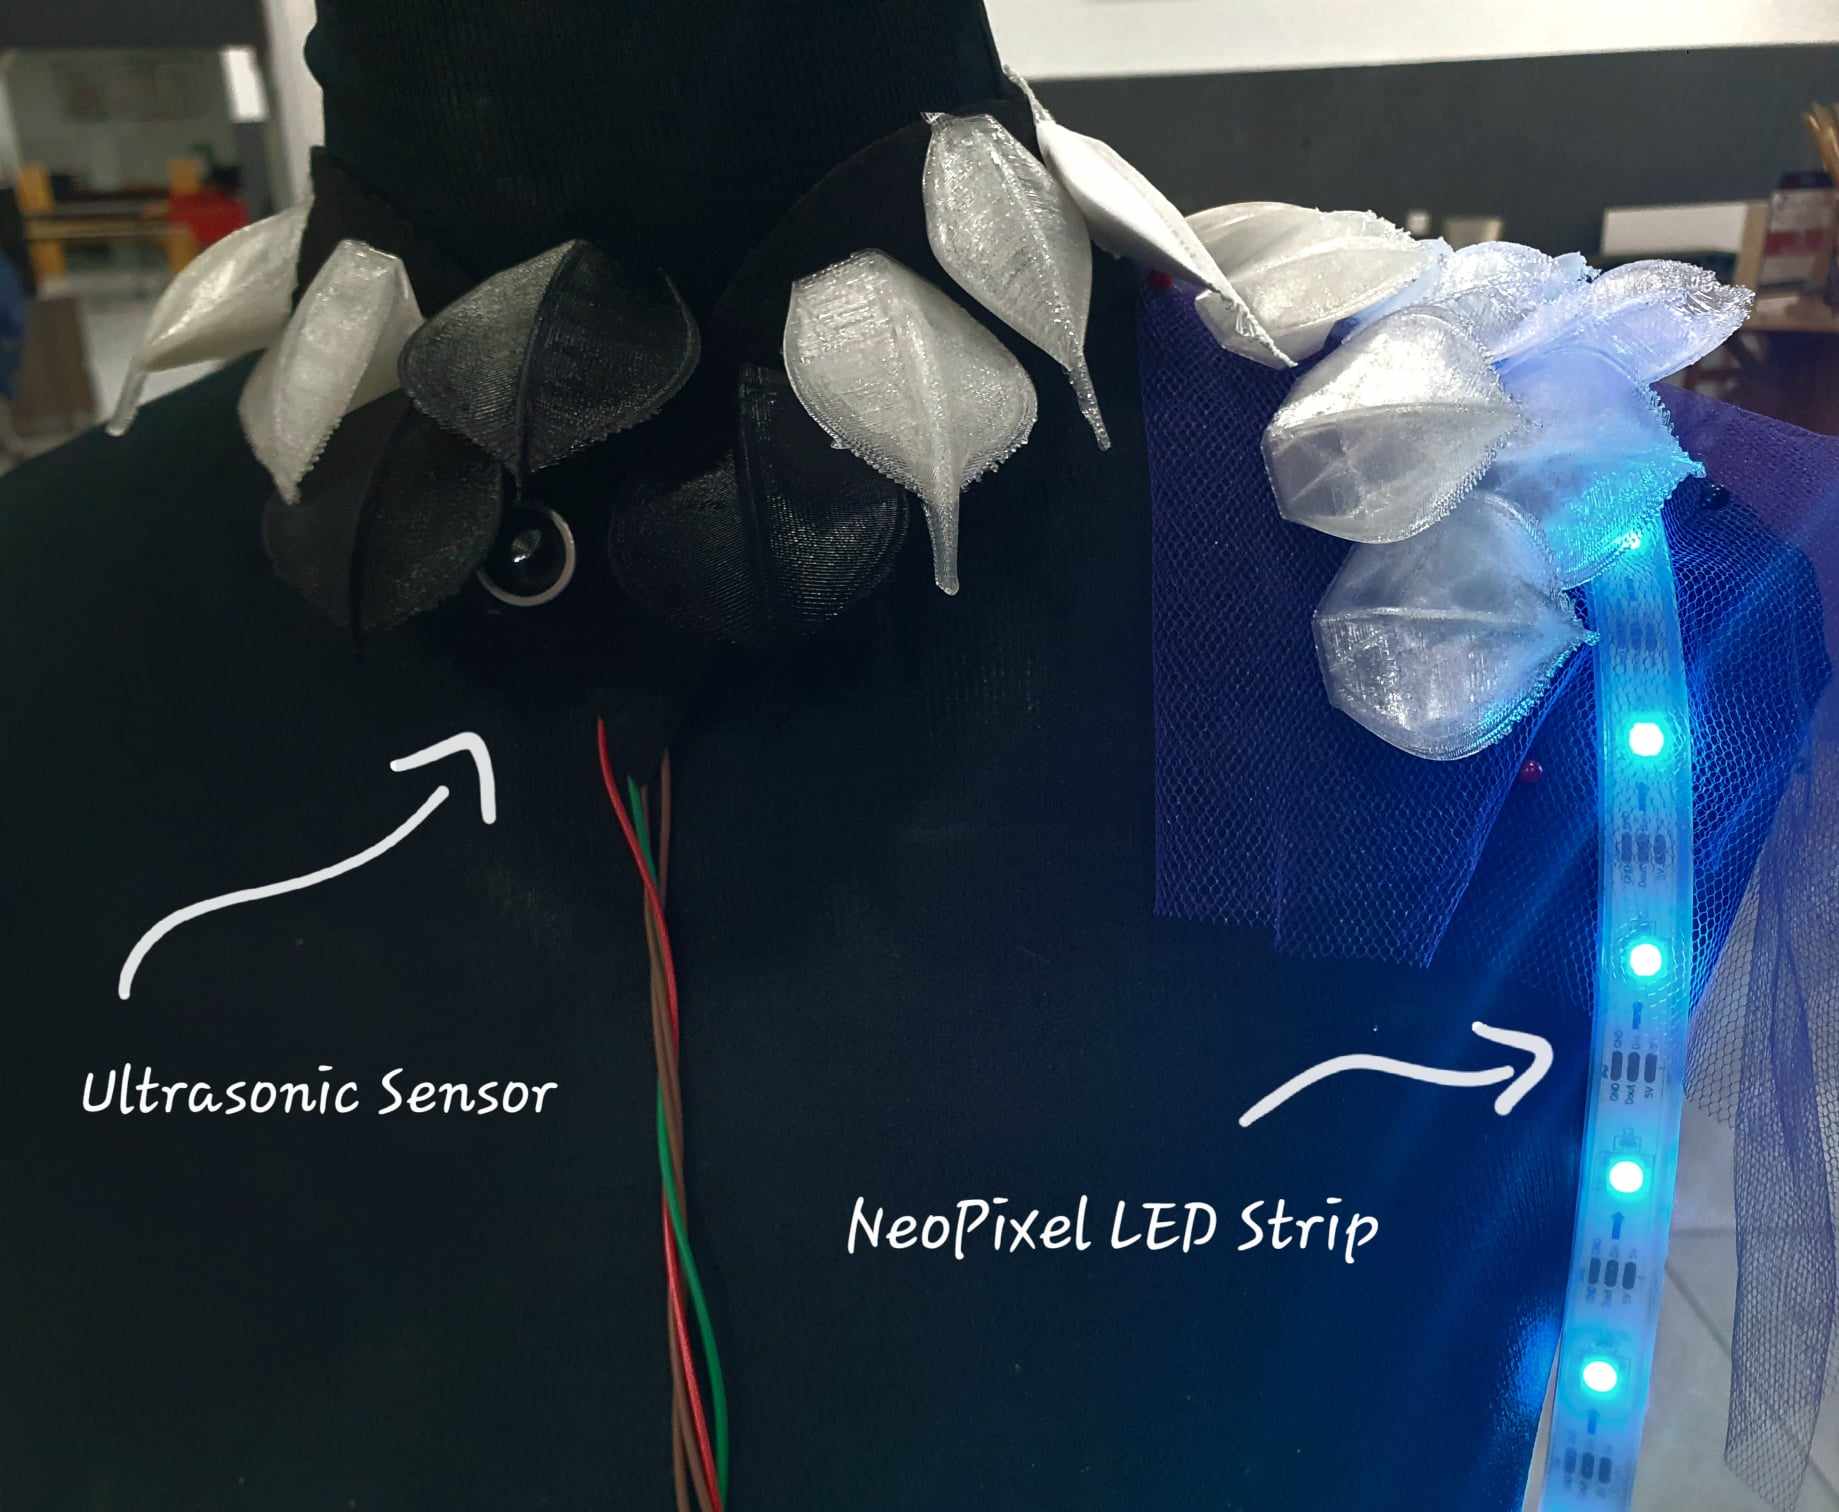
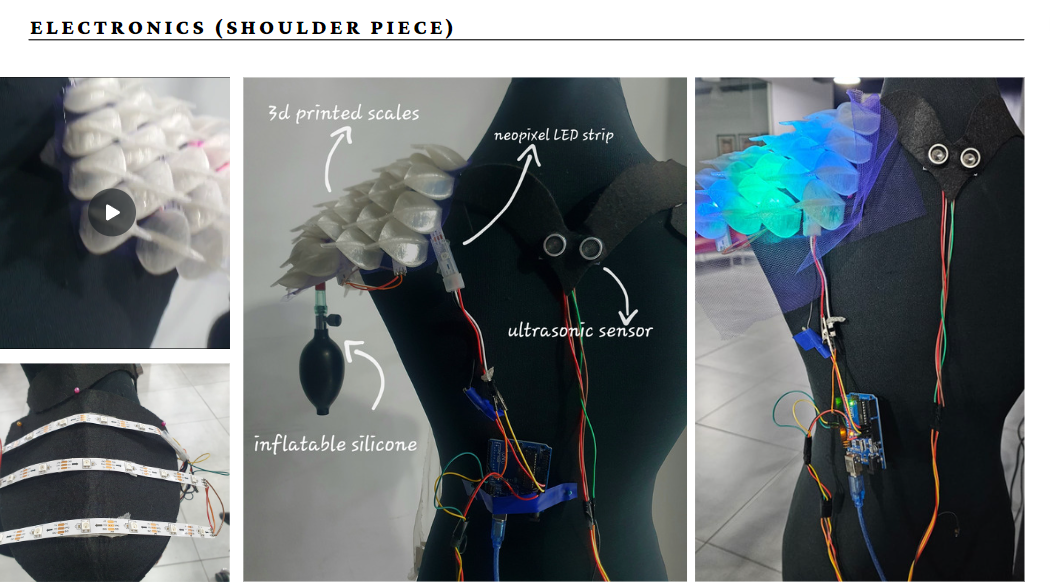
I used shoulder pads for structure and volume, sewing neopixels directly onto the 3D print fabric mesh. I wired and soldered them, connecting the two pieces with a necklace featuring a 3D printed pattern to hide the ultrasonic sensor behind seams easily.

I made a necklace to hide the ultrasonic sensor and the wires by printing Voronoi pattern on mesh and sewing it onto felt fabric.
