08. Wearables

Research & Inspiration
Pauline Van Dongen's Flip Dot Dress is a cool mix of clothes and technology. It has little dots that change colors, making it unique and fun to wear. It makes us think about how clothes can be more than just fabric – they can be a way to express ourselves and play with cool ideas.

Interactions
Explore different output mechanisms such as movement and thermochromic inks, learning how to create circuits with transistors
Basic Flip Dot
In this documentation, we'll explore a creative experiment involving wearables, specifically focusing on the integration of flip dot technology and a flapping wing mechanism. The experiment utilizes an Arduino microcontroller to control these dynamic elements. The hardware circuit is handmade, crafted from copper sheets, and features essential components like a diode, a transistor, and a resistor.
Diagram
Tools Used:
-
A copper coil is employed as the fundamental component for creating the flip dot mechanism. It serves as the core element around which the experiment revolves.
-
Alligator Cables (2):
Alligator cables are utilized to connect the copper coil to the power source, enabling the flow of electricity through the circuit.
- Small Piece of Magnet:
A small magnet is inserted into the copper coil to induce the flipping motion when the circuit is closed.
- 9 V Battery:
The 9 V battery serves as the power source for the basic flip dot experiment, supplying the necessary voltage for the circuit.
- Lighter:
The lighter is used to carefully burn the coating off the loose ends of the copper coil, rendering them conductive.
Steps
- Copper Coil Formation:
Create a tightly wound copper coil around a pen, leaving both ends of the coil loose.
- Coil End Treatment:
Burn the loose ends of the copper coil to remove the coating, ensuring conductivity.
- Alligator Cable Connection:
Attach an alligator cable to each end of the copper tape.
- Magnet Placement:
Place a small magnet inside the loop created by the copper coil.
- Battery Connection:
Connect the alligator cables to the terminals of a 9 V battery, closing the circuit and causing the magnet to flip.
Circuit with Transistor
Transistor
A transistor is a key semiconductor device for amplifying or switching electrical signals. With three terminals, it's crucial in modern electronics for controlling current flow.
Schematic of Transistor
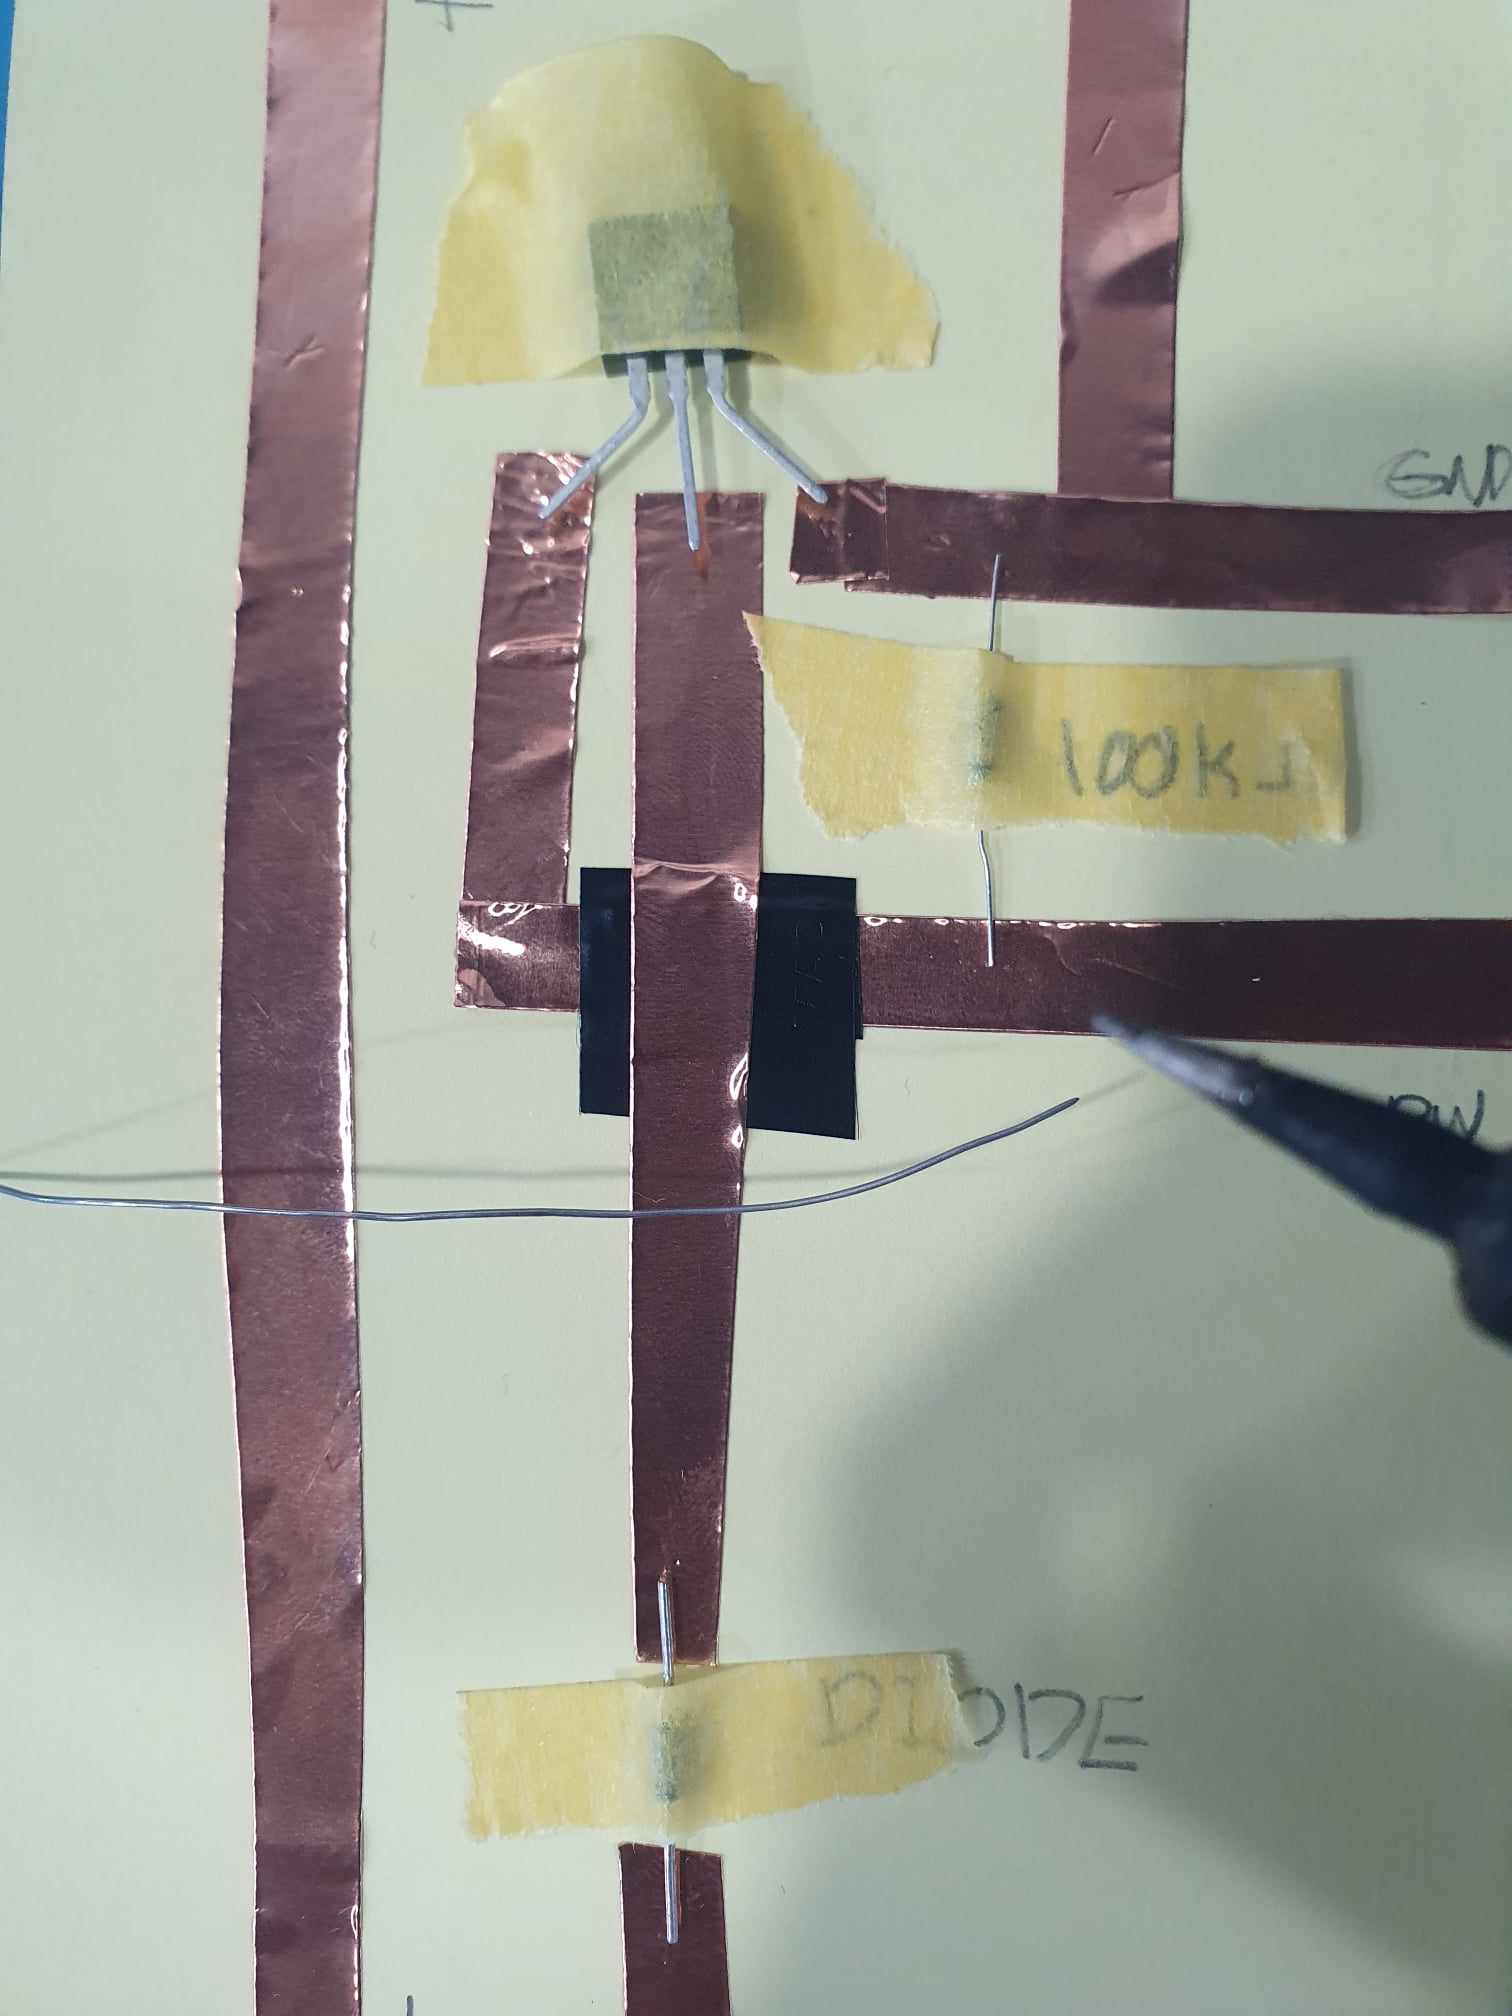
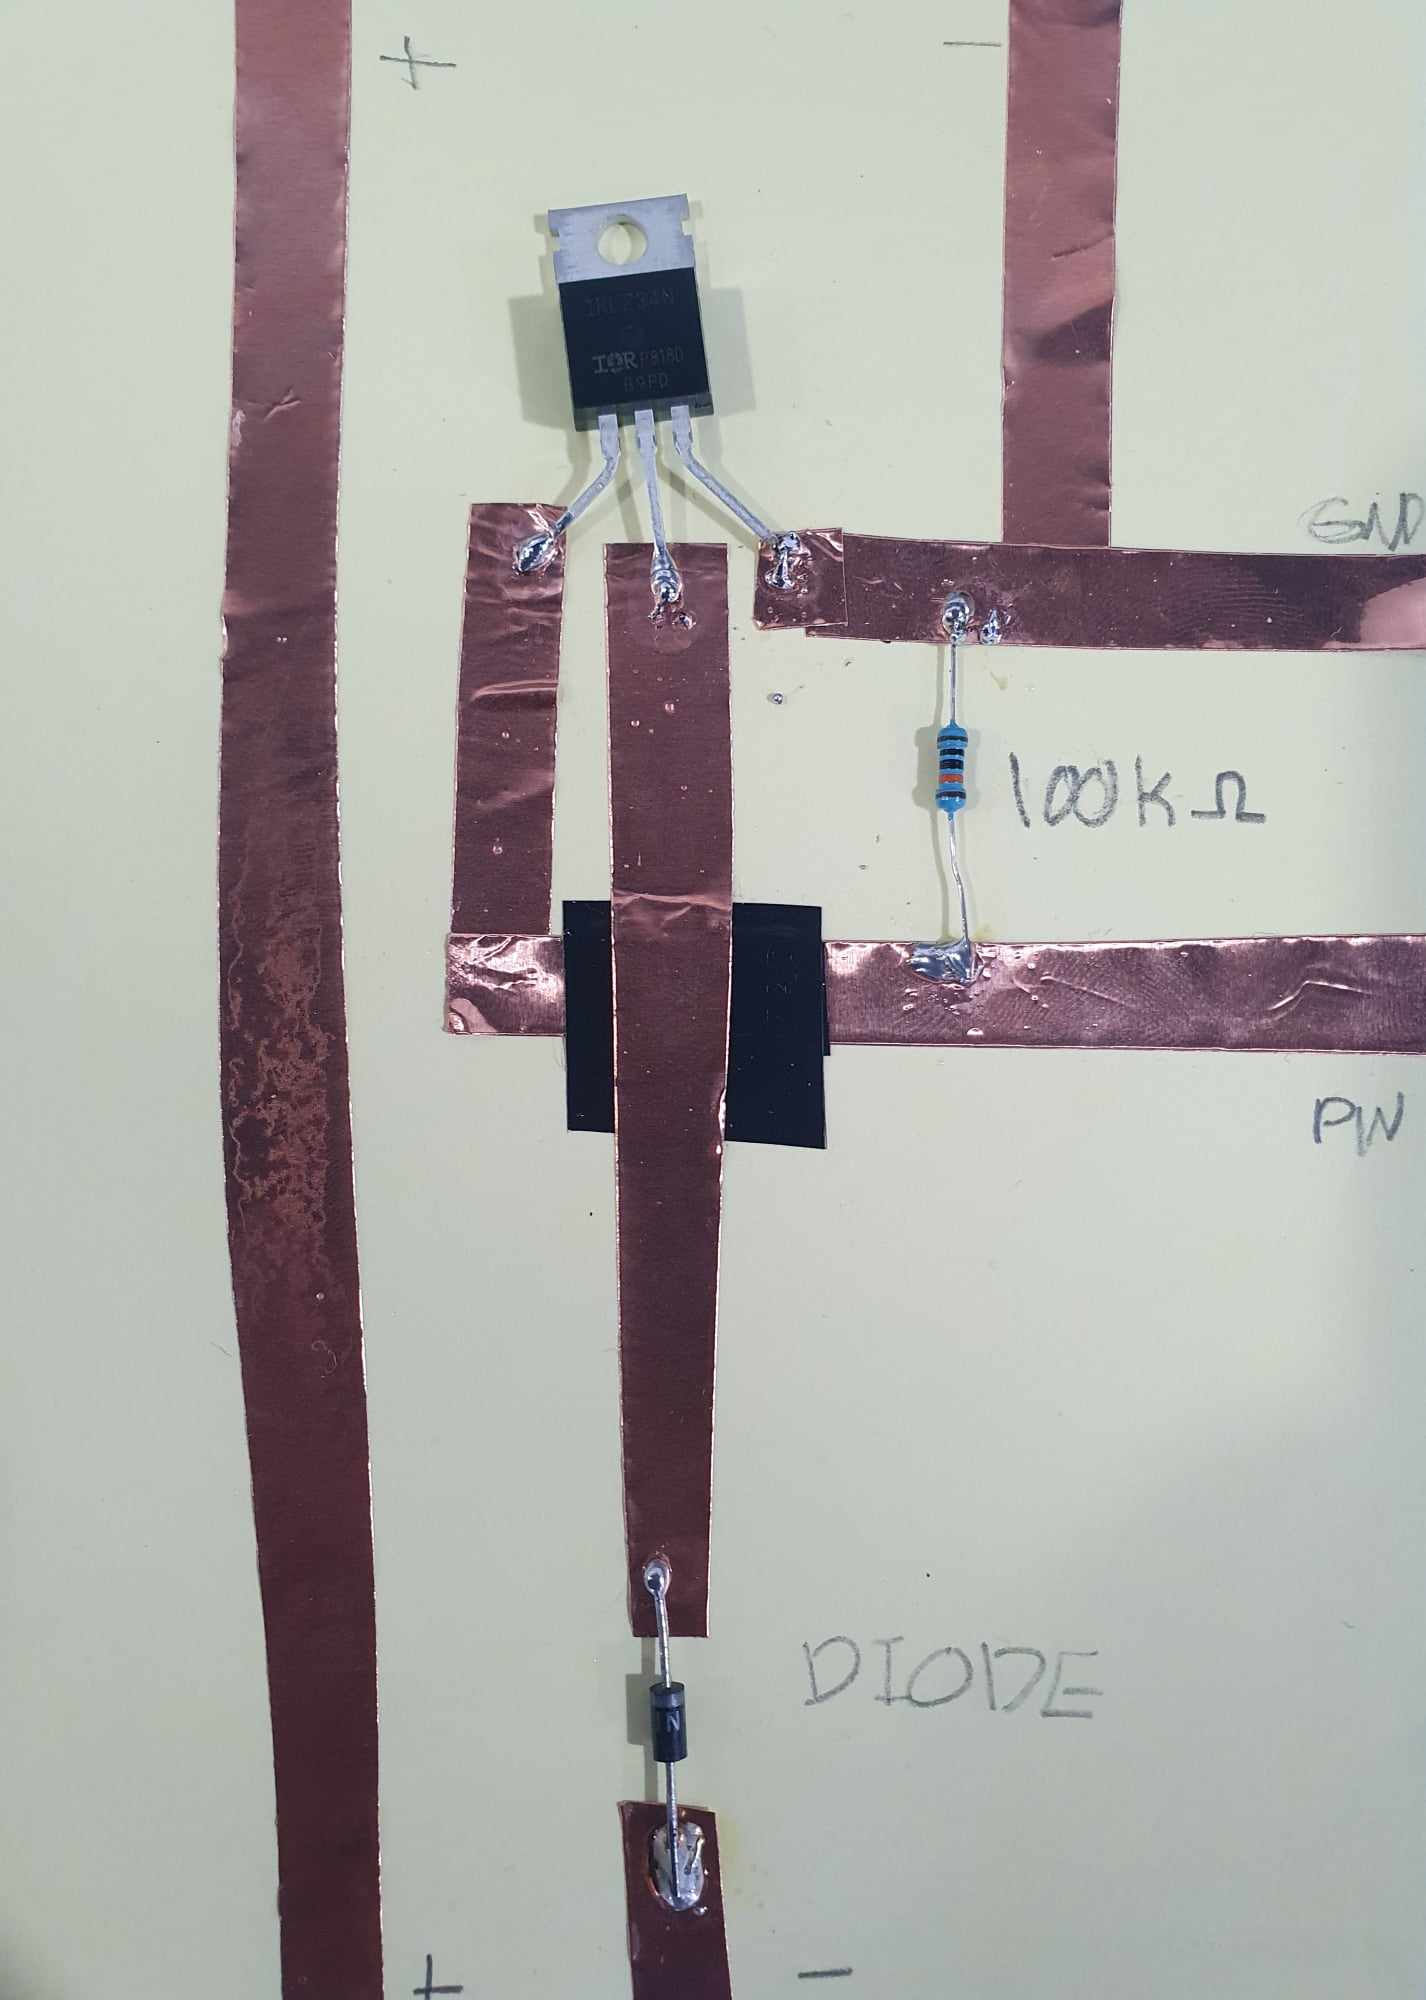
I soldered a circuit with a diode, TIP120 transistor and a 100 K Ohms resistor using copper tape.
Flip Dot Experiment with Arduino Generating Movements
Components Used:
- Handmade Copper Circuit:
Craft a sophisticated copper circuit in the lab, incorporating essential components such as a diode, a transistor, and a resistor. Solder these components onto the circuit for precise control over the electrical flow.
- Arduino Microcontroller:
Integrate an Arduino microcontroller into the circuit to bring programmability to the flip dot experiment. The Arduino will execute a custom Blink code, orchestrating the flipping sequence.
- Alligator Cables:
Use alligator cables to establish connections between the advanced copper circuit, the flip dot mechanism, and the Arduino microcontroller.
- Blink Code for Arduino:
Develop a custom Blink code using the Arduino Integrated Development Environment (IDE). This code will govern the flip dot sequence, providing a high level of control over the visual display.
// Pin definitions
#define DOT_PIN 7 // Connect to Arduino pin 7
#define GND_PIN GND // Connect to Arduino GND pin

void setup() {
  pinMode(DOT_PIN, OUTPUT); // Set the dot pin as an output
  pinMode(GND_PIN, OUTPUT); // Set the GND pin as an output
  digitalWrite(GND_PIN, LOW); // Set GND pin LOW
}

void loop() {
  digitalWrite(DOT_PIN, HIGH); // Turn the dot on
  delay(1000); // Wait for 1 second
  digitalWrite(DOT_PIN, LOW); // Turn the dot off
  delay(1000); // Wait for 1 second

}
Steps:
- Circuit Integration:
Connect the handmade copper circuit, which includes a diode, a transistor, and a resistor, to the flip dot mechanism. Establish a connection from the circuit to the Arduino microcontroller using alligator cables.
- Arduino Blink Code:
Open the Arduino IDE and create a custom Blink code. This code will control the flipping mechanism of the flip dot, allowing for precise timing and sequence adjustments.
- Upload Code to Arduino:
Upload the developed Blink code to the Arduino microcontroller. This step brings the programmed sequence to life, showcasing the potential for dynamic and controlled flip dot displays.
- Final outcomes:
Witness the magnet's movement within the flip dot mechanism as it responds to the programmed sequence.
Electromagnetic Flapping Wing

Materials Needed
- Base fabric (roughly 12 x 12 cm)
- Wing flap fabric (roughly 5 x 8 cm)
- Permanent magnet
- Enameled copper wire
- Shaft (roughly 7mm diameter)
- Copper tape
- Multimeter
- Soldering iron and solder
Steps
- Cut the Base Fabric:
Start by cutting a square piece of base fabric, measuring approximately 12 x 12 cm. This will serve as the foundation for your flapping wing.
- Cut the Wing Flap:
From a different fabric, cut a wing flap shape measuring roughly 5 x 8 cm. This component will be the movable part of your flapping mechanism.
- Create a Coil:
Wrap the enameled copper wire around a shaft with a diameter of about 7mm. Aim for around 80 turns, and carefully remove the coil from the shaft.
- Sew On the Coil:
Secure the coil onto the wing flap fabric by sewing it in place. Make sure the coil is centered over the magnete.
- Attach the Wing to the Base:
Sew the wing flap fabric onto the base fabric, aligning the magnete and coil with the wing. This connection establishes the movable part of the flapping mechanism.
- Sew the Magnet:
sew it into the base, securing it for the electromagnetic interaction.
- Attach Copper Tape Tabs:
Cut two small pieces of copper tape and adhere them to the base fabric. These tabs will function as the electrical contacts for your electromagnetic setup.
- Prepare the Coil for Soldering:
Use a cutter knife to carefully scrape off the insulation from both ends of the enameled copper wire. Tin the wire with solder to ensure good conductivity.
- Solder the Coil to Copper Tape Tabs:
Solder the ends of the coil to the copper tape tabs. Confirm a solid connection. The orientation of the coil and magnet will dictate the direction of the flapping motion.
- Check Continuity:
Use a multimeter to check for continuity between both contacts. Ensure there are no breaks in the coil wire to guarantee a seamless electrical pathway.
- Test the Electromagnetic Flapping:
Apply power to the copper tape tabs. Depending on the coil's orientation and the magnet's position, applying plus and minus to either end of the coil will induce a repelling or attracting motion, resulting in the flapping of the wing.

- This code continuously switches between applying positive and negative power to the coil, resulting in the flapping motion of the wing.
// Define digital pins for plus and minus
const int plusPin = 8; // Change to the appropriate pin number
const int minusPin = 9; // Change to the appropriate pin number

void setup() {
  // Initialize digital pins as outputs
  pinMode(plusPin, OUTPUT);
  pinMode(minusPin, OUTPUT);
}

void loop() {
  // Apply plus to one end of the coil
  digitalWrite(plusPin, HIGH);
  // Apply minus to the other end of the coil
  digitalWrite(minusPin, LOW);
  delay(1000); // Adjust delay time as needed for desired flapping frequency

  // Reverse the polarity to induce the opposite motion
  digitalWrite(plusPin, LOW);
  digitalWrite(minusPin, HIGH);
  delay(1000); // Adjust delay time as needed for desired flapping frequency
}
Thermochromic Dyes Experiment Generating Colors
Thermochromic Dyes
type of dye that changes color in response to temperature variations. These dyes contain molecules that undergo a reversible molecular rearrangement when exposed to heat, altering their absorption properties and resulting in a change in color.
Materials Used:
- Thermochromic Powder:
The key element that changes color when subjected to heat.
- Cotton Fabric:
A piece of fabric chosen for its ability to absorb the thermochromic dye.
- Copper Wire:
Used as a conductor to apply heat to the dyed fabric.
- Power Source:
Provided the energy required for the copper wire to generate heat.
Steps:
- Place thermochromic dye powder in a cup.
- Add hot water and mix.
- Submerge cotton fabric and soak.
- Rinse and dry fabric.

After dyeing a white cotton fabric with orange dye, I applied heat using a copper wire connected to a power source. Upon applying power, the fabric reverted back to its original white color.