Biochromes
Final work of this week
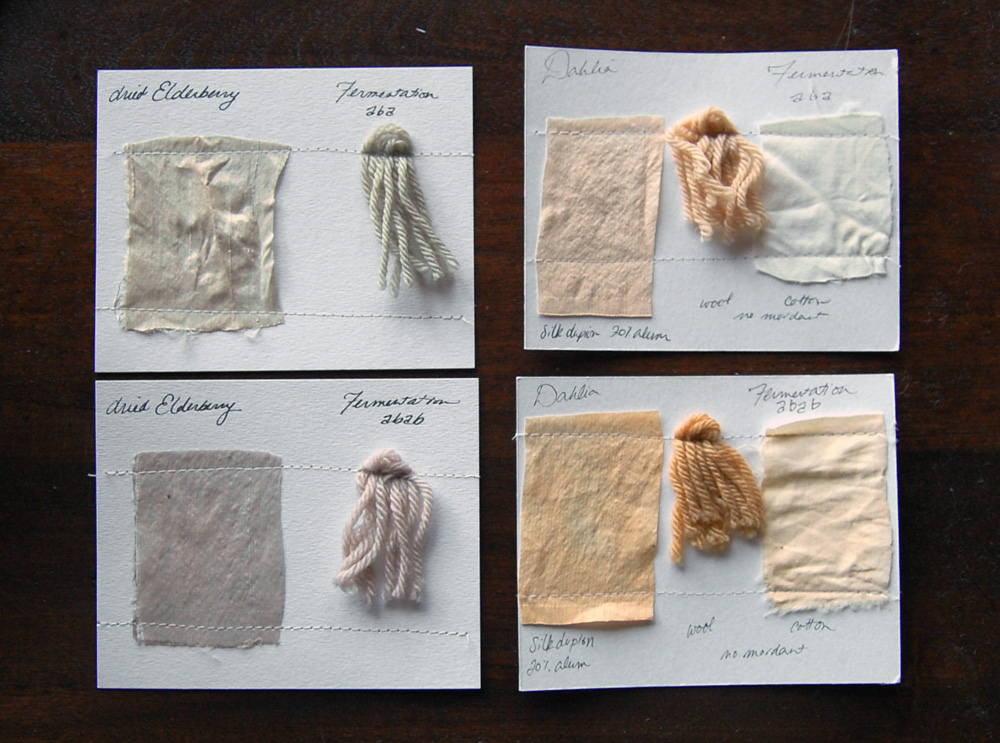
Alkanet batch 1 - No modifiers
My first attempt at dyeing was using alkanet without modifiers.
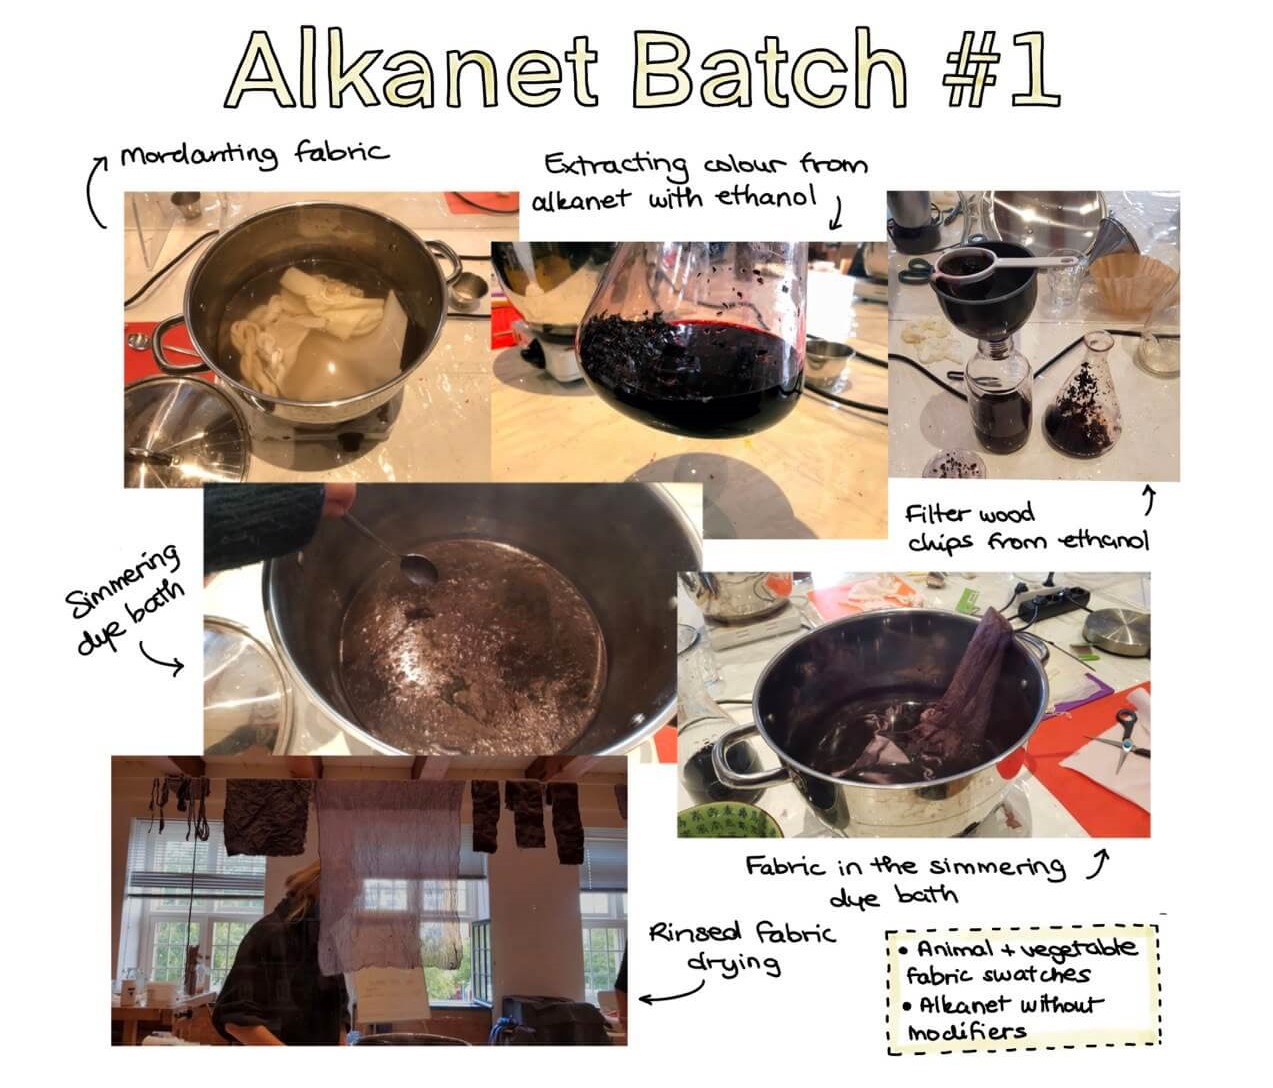

Click to see the steps and quantities used
| Step | Details |
|---|---|
| Weigh the fabric | In this case, a variety of animal (wool, silk) and vegetable (cotton, sugar cane yarn) fibers.
|
| Scour vegetable fabrics | Put them in boiling water with soda ash (2 Tbsp of soda per 5 liters of water) for 1 hour. |
| Rinse animal fabrics | Use cold water. |
| Mordant fabrics | Put them in boiling water containing the mordanting agents. After 1 hour, rinse with lukewarm water.
|
| Extract colour from dye stuff | Extract colour from 20 gr of alkanet chips using 300 ml ethanol in a flask, leaving it to soak for around an hour. |
| Remove dye stuff dye bath | Strain the coloured ethanol in a bottle to remove the alkanet chips. |
| Simmer dye bath | Mix the coloured ethanol with 1.5l of water and bring to simmer. The idea is to remove as much as possible the ethanol so that the dye binds with the mordanted fabric. At the beginning of this process, a chemical reaction occurred and a matte layer was visible on top of the simmering liquid. Cecilia indicated that when this happens the liquid has to be stirred to ensure is is evenly mixed. |
| Check color of the dye bath | Check with a swatch of fabric or paper the colour that the dye bath yields. It can be slightly modified using soda (to make it more blue-purple) or citric acid (to make it more red). I added a teaspoon of dissolved citric acid. If too much quantity of modifier is added, the colour can turn dull and greyish, so it is better to add it in small bits. It is also important to keep in mind that the colour of the final fabric will fade 1-2 shades, so a stronger color during the dye bath may be a good idea to achieve the desired result. |
| Add fabrics to the dye bath and simmer | The fabric should have enough water around to move freely. |
| Remove fabric from dye bath and rinse |
|
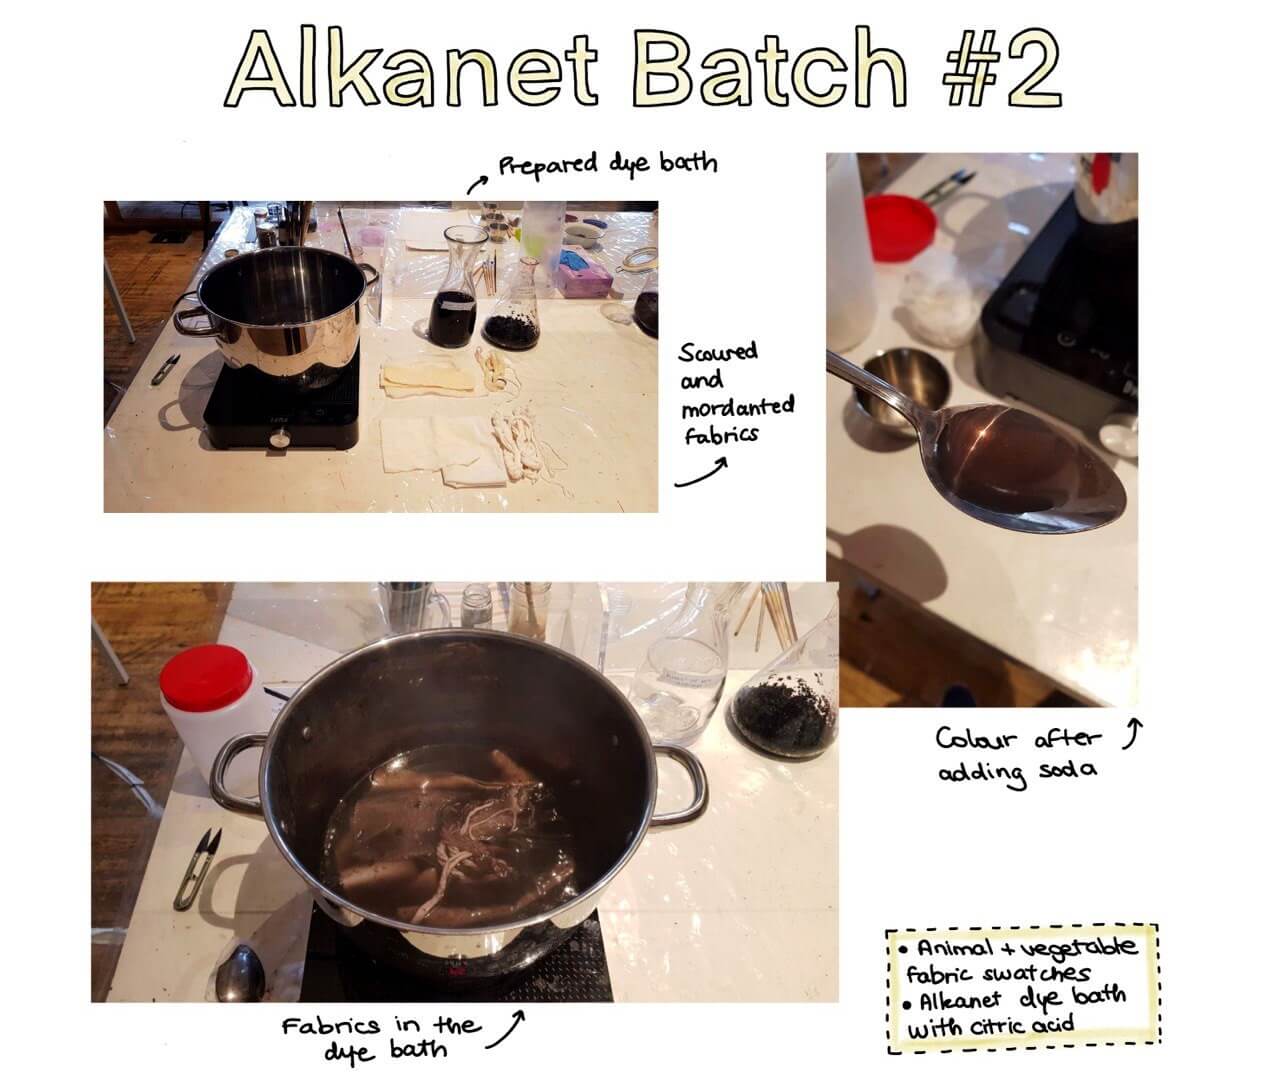
Alkanet batch 2 - Citric acid as modifier
With the unused dye bath from batch #1, I decided to try modifiers. I added 1 table spoon of citric acid to change colour to a red hue. However, I didn't take into account that the dye bath had been already simmered before, which meant the citric acid almost had no effect in the colour. Lesson learnt!

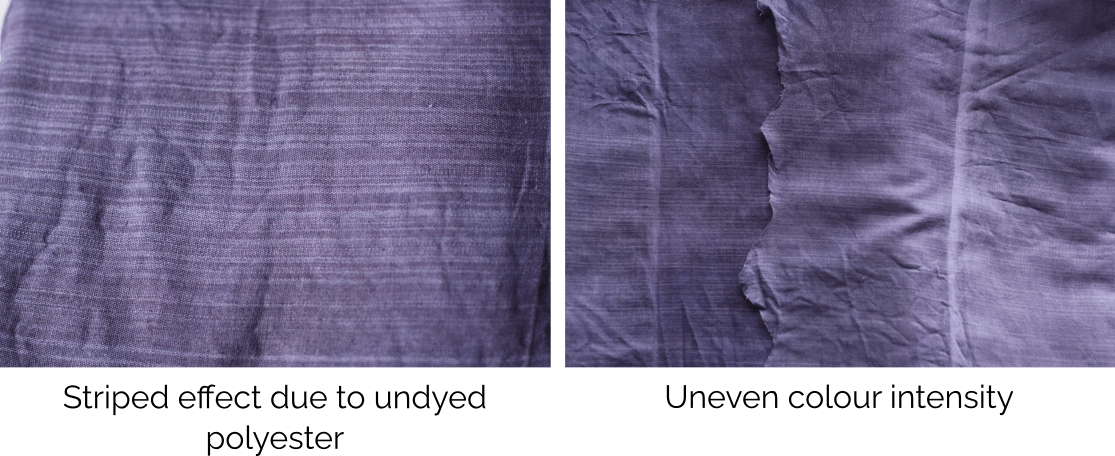
Lessons learnt after batch #1 and #2
The colour modifications should be done at the very beginning of the colour extraction (in the ethanol) for more visible results. By doing it after the ethanol has been removed, little difference is seen in the hues obtained:

Campeche on cotton-polyester
After seeing the gorgeous results of Rebecca's samples with campeche, I wanted to give it a go. I had unused fabric from the Circular Fashion assignment, so I thought it'd be a good candidate for this experiment. However, a bit risky since it is a cotton-polyester mix, and the polyester cannot be dyed using this method. That resulted in an uneven colour across the fabric and visible undyed lines. I like this effect, so I'm planning to sew a blouse with the dyed fabric.
Click to see the steps and quantities used
| Step | Details |
|---|---|
| Weigh fabric | Weight of fabric = 240 gr |
| Scour fabric | Scour fabric putting it in 5 liters of boiling water with 2 tablespoons of soda. Wait 1 hour and rinse. |
| Mordanting fabric |
|
| Prepare campeche |
|
| Add fabrics to dye bath | Let it simmer for 45 minutes. |
| Rinse fabric | Use lukewarm water. |
| Save dye bath | It can be used for future fabric dyeing or to make inks and extract pigment. |
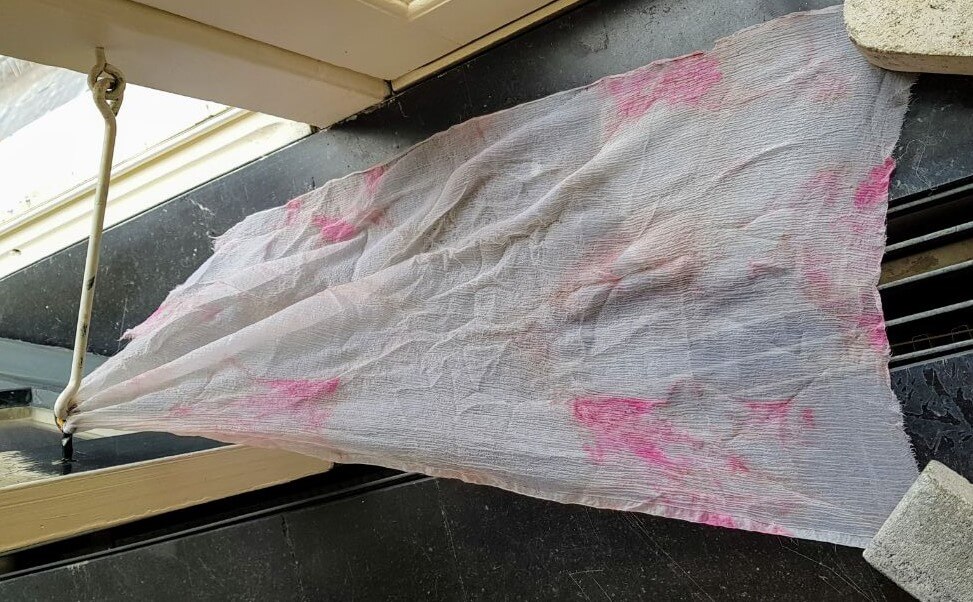
Bacteria dyed silk chiffon
Dyeing with bacteria is something I wouldn't have expected to learn a few years ago. It is quite fascinating! Furthermore, it needs a lot of care and patience for it to happen, so it puts you in a different mindset when doing it. As Cecilia said, it is like meditation, because you really need to focus on what you're doing in every step of the process.
 Picture taken by Margherita Soldati'
 Awesome drying setup in Waag
Click to see the steps and quantities used
| Step | Details |
|---|---|
| Fold fabric and stitch | The way in which fabric is fold affects the spread of bacteria, and therefore the resulting dye pattern. Wherever there's air, the easiest it will be for bacteria to reach, so tight folds or knots translate to fabric not being dyed in that area. I wanted to have a lot of colour in the dyed fabric, so I only did a few folds to have some simmetry, and then scrunched it to have a random scatter of bacteria. |
| Put fabric in petri dish and sterilize | Using pressure cooker and autoclave tape for about 30 minutes. 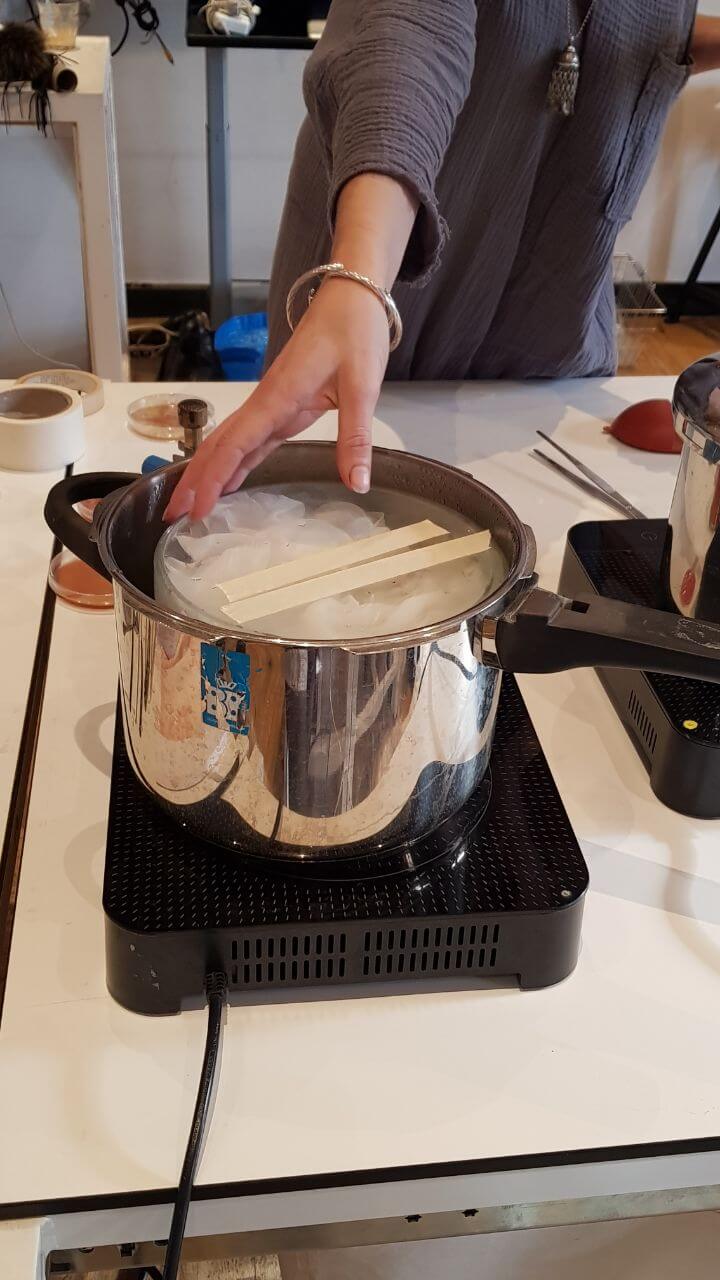 |
| Prepare bacteria food |
|
| Put food in the fabric | Pour sterilized food over and around sterilized fabric. |
| Transfer bacteria to fabric | We used the family Serrata Marcensces that had already grown on a few petri dishes.
 |
| Let bacterias grow | Place the petri dishes with inoculated fabric in an incubator for the bacteria to grow. |
| Kill bacteria colony | After enough growth, extract the fabric from the petri dish to observe the results. It is also necessary to kill the bacteria colony to prevent it from further spreading. |
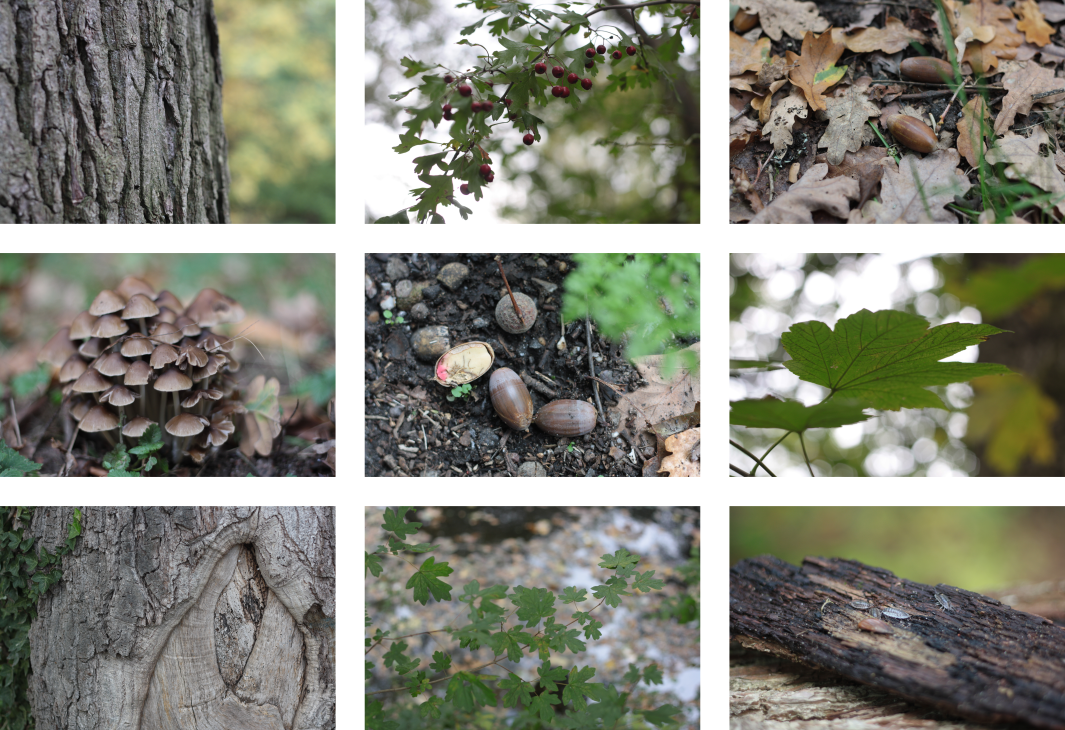
Collecting acorn caps and oak bark
As a final venture into natural coloring, I went to a nearby forest and collected bark that the oaks had shed and acorn caps that were lying on the floor. I would like to try and make watercolors with these in the near future.
A zero waste approach to dyeing
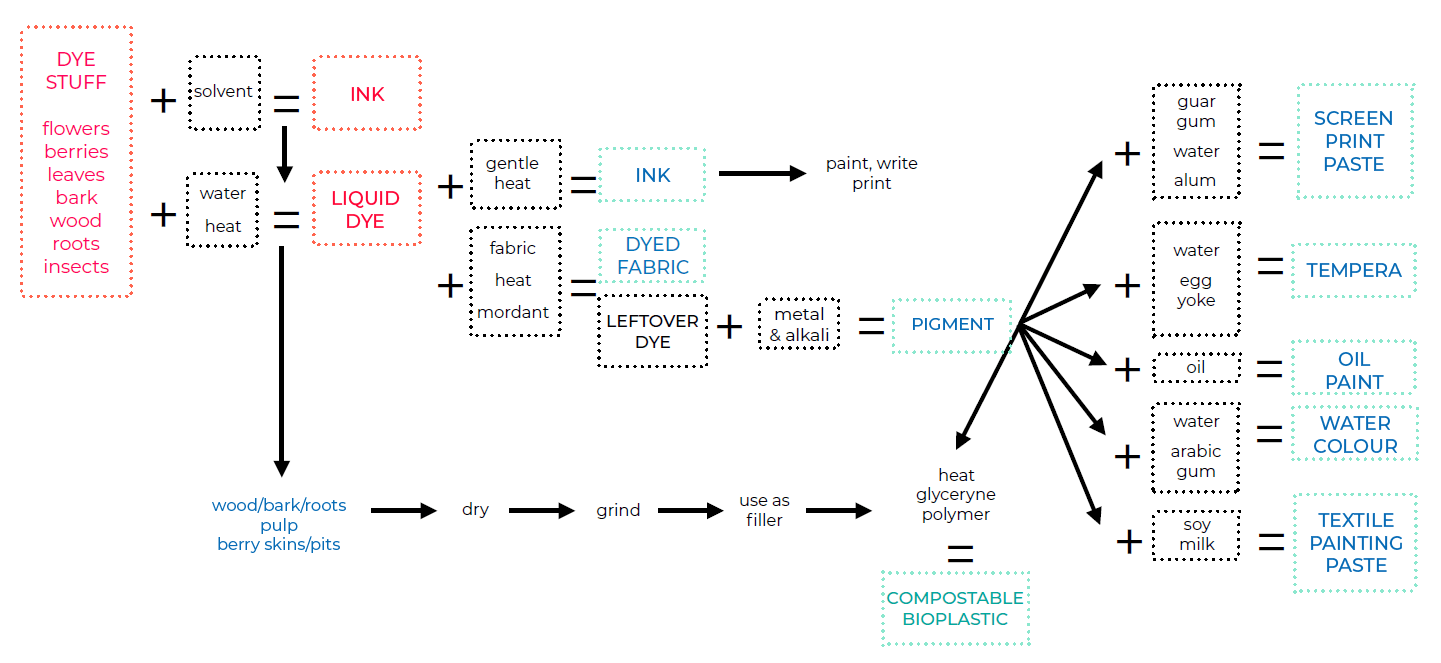 Diagram by Cecilia Raspanti
 Picture by Cecilia Raspanti
Natural dyes
Why go back to natural dyes?
From a industrial point of view, one would think that using synthetic dyes has countless advantages, and therefore there's no point in going back to using natural dyes. It is true that synthetic dyes provide some interesting features, like the stability and repeatability of results (which are great in an industrial setup), as well as the lower economic cost of them in most cases. However, they also bring imoprtant side effects, as the use of potentially harmful chemicals, and a way more contaminating dyeing process.
Going back to using natural dyes would improve the environmental impact to some extent, at least for the toxicity of the chemicals used. However, if the scale of production would be kept the same, the environmental impact could be huge in a different way, since materials would need to be harvested in large quantities.
I think that at this point we're not ready to completely substitute synthetic dyes with natural ones, but I believe we can start using them more in combination with synthetic ones, choosing carefully when developing a textile. A succesful change towards avoiding the harm of synthetic dyes can only happen if a different model of consumption goes along with it, in which production scales down, buyers are more educated in the cost of colorful textiles, so overall the process would be more conscious and respecful towards the enviroment.
That being said, from a personal perspective, I truly enjoyed discovering how to extract colour from natural ingredients. It gives a sense of reconnection with nature and with an older form of craftmanship. It ignites curiosity and experimentation, and it trains your flexibility and adaptability, since the results aren't always predictable. Overall, I'm pretty sure natural dyeing will be a recurrent technique in my future work.
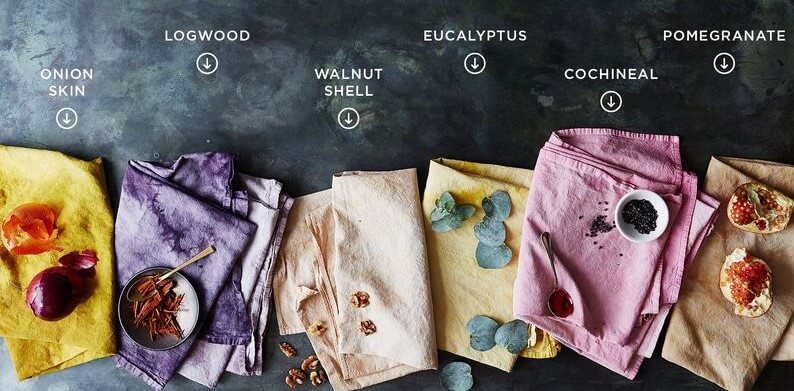
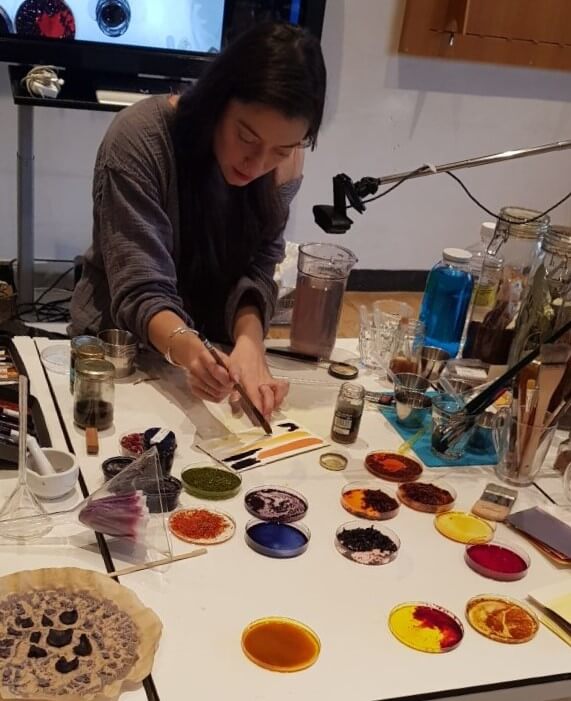
Examples of natural dye stuff
As Jason Logan writes in his book, everything has colour. There are countless materials that can be used as dye stuff. We were introduced to a few during Cecilia's class.
A way to see if something can be dye stuff
- Put it on ethanol, see if color comes out.
- Put it on boiling water and add a mordant to the infused water (copper, iron, alum...)
The process of dyeing
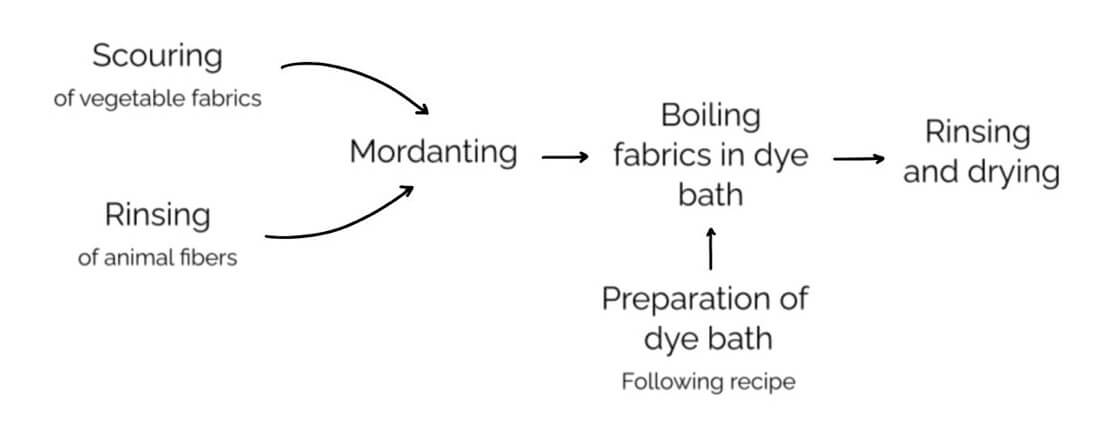
Preparing fibers
Weighing
First step is to weigh the fibers that are going to be dyed. This will be referred as WOF = Weight Of Fiber. This number will be used to calculate the amount of mordant needed.
Weight of fibre = WOF
From this point onwards, weight of fibre will be referred as WOF.
Scouring
This step is only done with vegetable fabrics. When we obtain them, especially if they're bought in a store, they usually have a patina applied to them and several kind of waxes and oils can be part of the fiber as a result of the production process. Scouring eliminates these oils so that the colour attaches to the fibers evenly, preventing patchy results.
To scour the fabric, it needs to be boiled for an hour in water with soda ash (2 Tbsp of soda per 5 liters of water).
Rinsing
Animal fibers need to be rinsed in cold or lukewarm water to remove dirt and oils. Avoid rubbing the fabrics as it could change their structure.
Mordanting
This is the process in which certain particles are added to the fabric so later the dye will bind with them. These particles attract the colour from the dye and fix it in the fibers of the fabric. Different materials can be used as mordants. In this class, we used alum.
Quantity of mordant
For the animal fabrics
- 10-20% of WOF in alum
- 8% of WOF in cream tartar
For the vegetable fabrics
- 10-15% of WOF in alum
Preparing dye bath
Depending on the dye stuff chosen, the preparation method will vary. This step consists on extracting the colour of the dye stuff by adding a vehicle, like hot water or ethanol. Each dye stuff has its own recipe, you can find some in Cecilia's slides.
Modifiers
In most cases one dye stuff can yield different colors. By adding modifiers, these different colors can be achieved. Modfiers can work by changing the PH of the dye bath or by interacting with the mordant agent.
Some modifiers are:
- Soda
- Citric acid
- Iron liquor
- Copper liquor
Applying dye bath to fibers
Simmer fibers in the dye bath. Depending on the shade you'd like to obtain, you can leave them longer or shorter.
Markers from dye stuff
A quick recipe to markers
- Add ethanol or boiling water to the dye stuff
- Extract liquid with a pipette to a clean recipient
- Add modifiers if desired
- Arabic gum can be added to change viscosity of the marker
Ready to brush on paper!
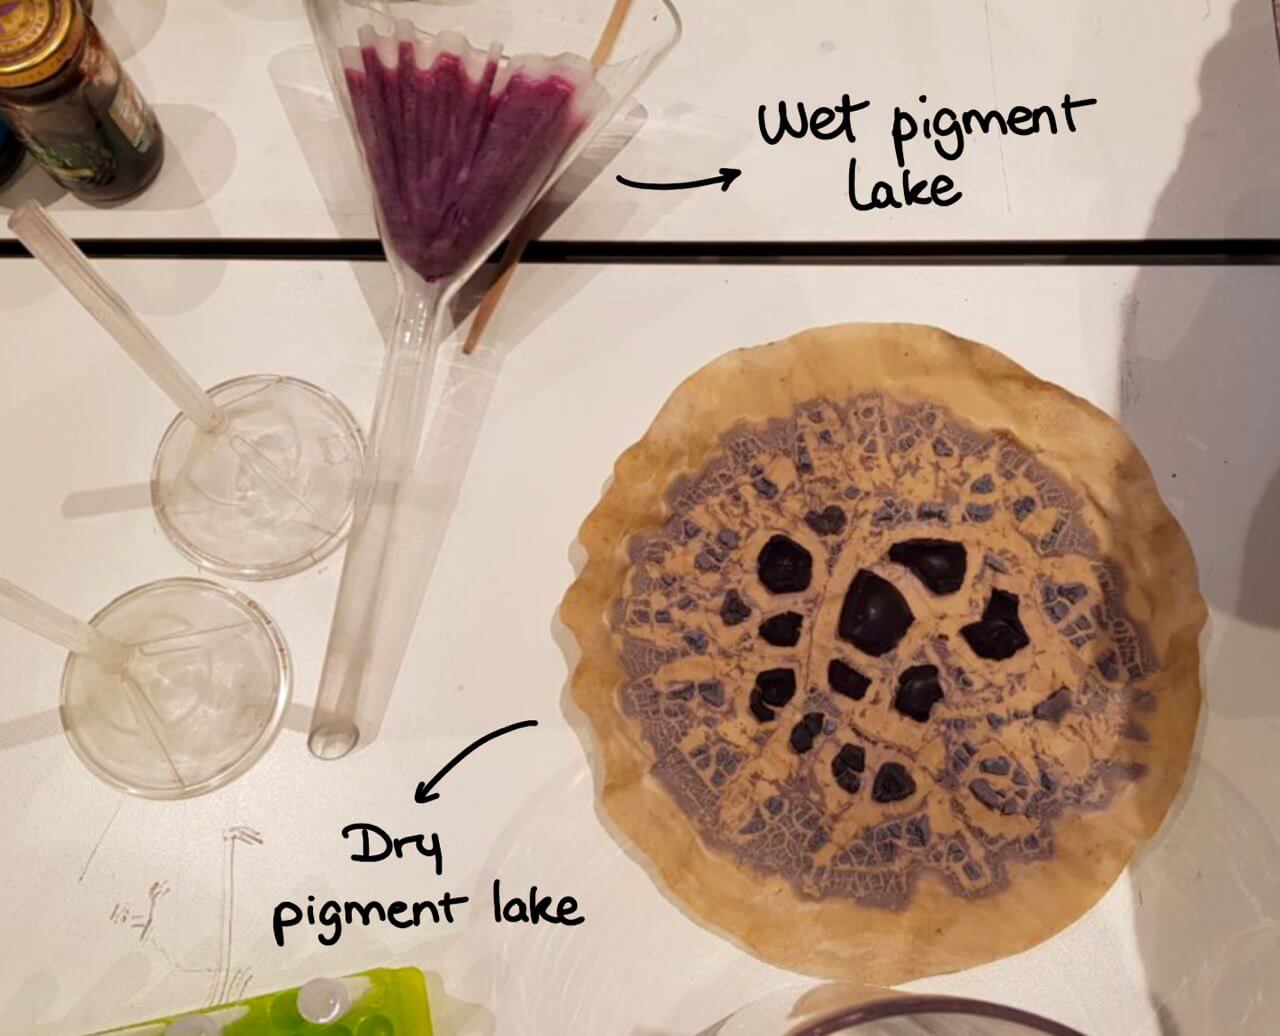
Pigments, inks and watercolors from a dye bath
A way to create inks and extract pigments can start with an already used dye bath. Usually there's still some color left after dyeing fibers, and that color can be enough for ink and pigment extraction.
| Step | Details |
|---|---|
| Get the dye bath | Get an already used dye bath or make one from scratch. |
| Add mordant | The mordant (alum, iron or copper) has to be added. It is hard to know how much color is left in the dye bath, so it is better to add the mordant in small increments. For example, for 500ml of dye bath you can start with 20gr alum. It is better to add the mordant already dissolved in hot water. |
| Add soda | The previous mix will be acid. We're now going to add a base component, causing a chemical reaction. Dissolve 1 Tbsp of soda in hot water, and slowly add to the dye bath with alum. |
| Wait for pigment to precipitate | After the chemical reaction settles, the water should separate from the pigment, which will start to sediment at the bottom of the recipient. The water on top should end up transparent. If it doesn't, more mordant (alum) should be added. |
| Filter pigment | Once the pigment has sedimented, you can pass it through a filter (paper or cotton for instance) to separate it from the water. |
| Process the pigment lake | From here there are two options:
|
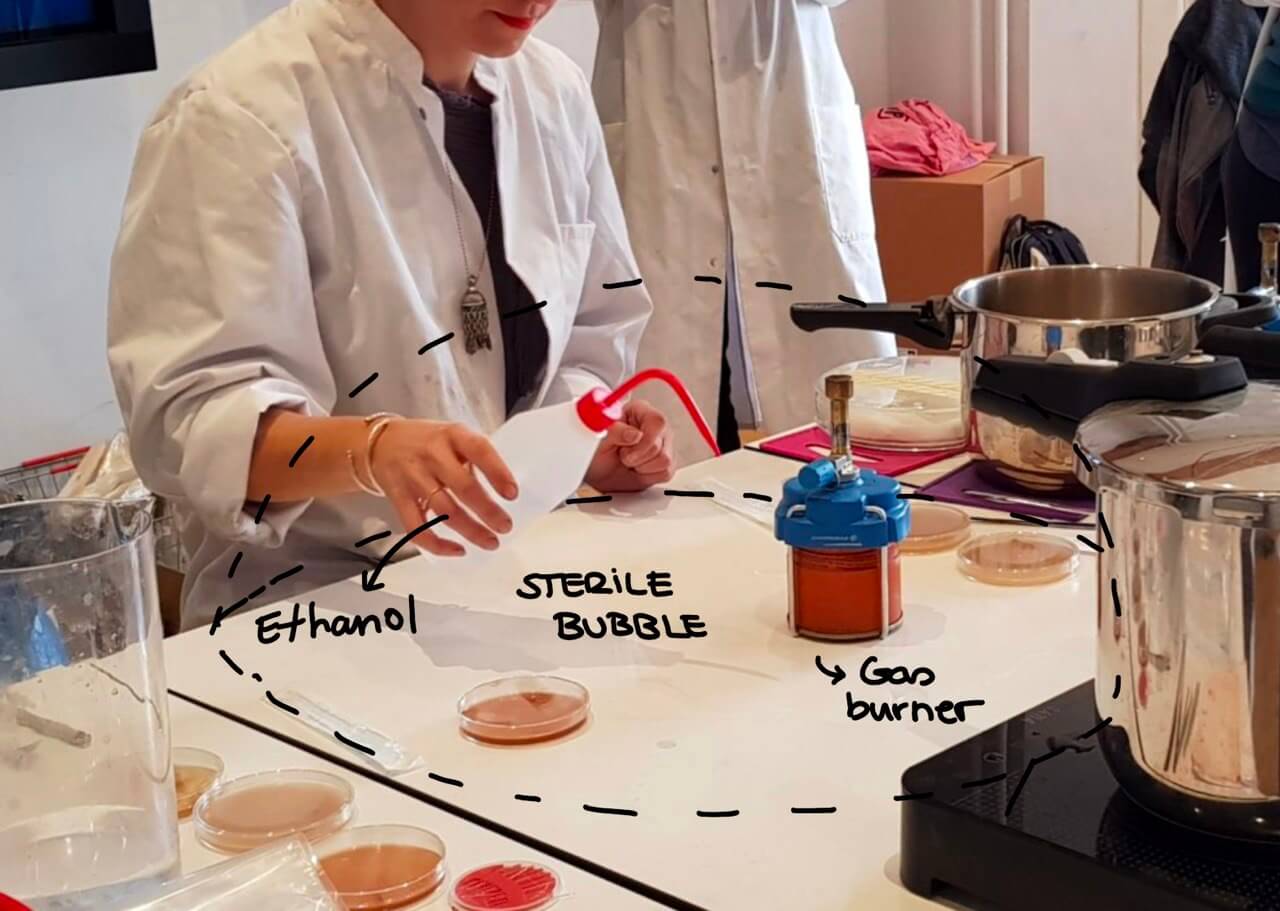
Bacterial dyes
A different way of approaching natural dyeing is using bacteria. In this case, we place a certain family of bacteria on the fabric, which will act as a substrate for their growth. If the bacteria have food and right conditions (sterilized environment to avoid other bacteria), they will grow on the target fibers and dye them along the way. There are several families of bacteria that can be used for dyeing, and each produces a different color. The website Bioshades has plenty of information about this.
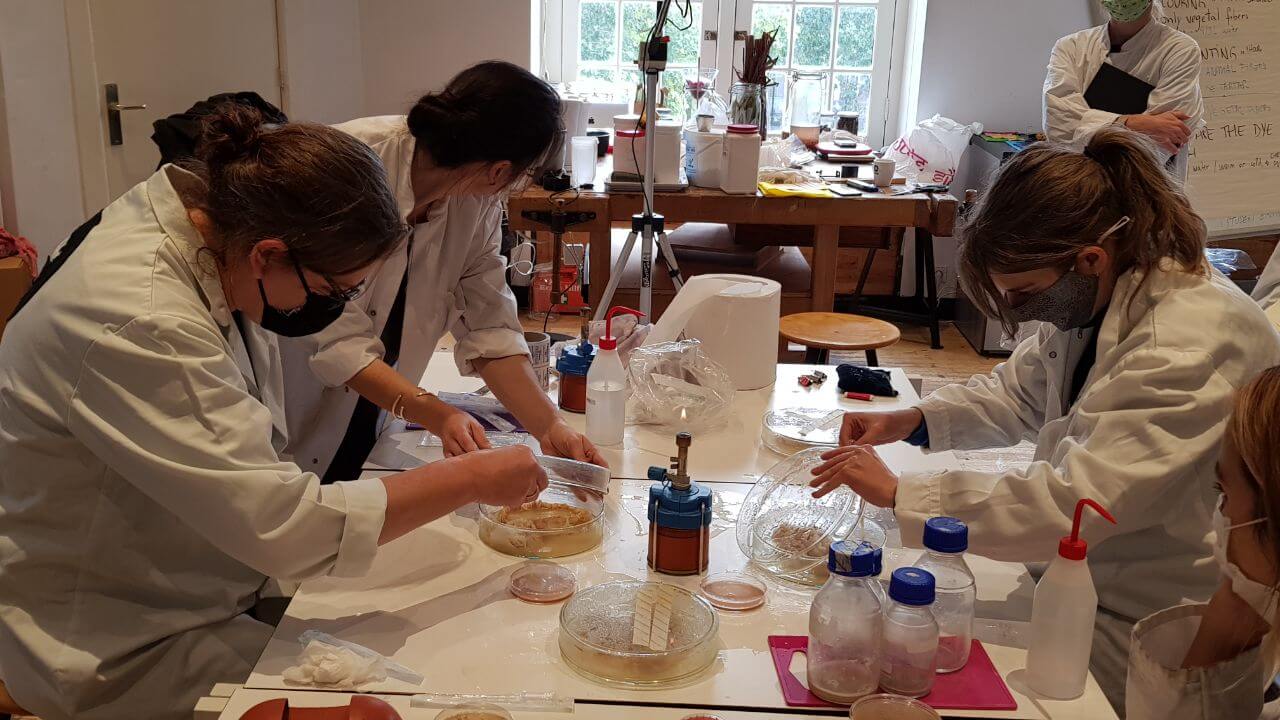
How to create a sterile working environment
When working with bacteria it is crucial to keep a sterile environment. An easy way to create a sterile bubble is by placing a gas burner on top of the working surface, which will be wet with ethanol. The ethanol evaporates and creates a sterile airflow with the burner. For this reason, it is important as well to work in a room where no other air flows interfere. The idea is to minimize contamination.
Bacteria dyeing process
| Step | Details |
|---|---|
| Fold fabric and stitch | The way in which fabric is fold affects the spread of bacteria, and therefore the resulting dye pattern. Wherever there's air, the easiest it will be for bacteria to reach, so tight folds or knots translate to fabric not being dyed in that area. |
| Put fabric in petri dish and sterilize | Using pressure cooker, put the fabrics in a glass recipient, add a bit of water to the cooker and let it cook for about 30 minutes since pressure is achieved. Autoclave tape can be attached to the fabric recipient to be sure the fabric has reached the necessary temperature to be sterilized. |
| Prepare bacteria food |
|
| Put food in the fabric | Pour sterilized food over and around sterilized fabric. |
| Transfer bacteria to fabric | We used the family Serrata Marcensces that had already grown on a few petri dishes.
|
| Let bacterias grow | Place the petri dishes with inoculated fabric in an incubator for the bacteria to grow. |
| Kill bacteria colony | After enough growth, we're ready to extract the fabric from the petri dish to observe the results. But it is first necessary to kill the bacteria colony to prevent it from further spreading. In order to do that, place a new piece of autoclave tape on the petri dish and place it in the pressure cooker for 15 minutes (once it has reached pressure). |
| Rinse and dry | Finally, rinse the fabric to eliminate the leftover bacteria food and let it air dry. |