Computational Couture
Final work of the week
During this week I focused on 3D printing fabric. I investigated the different approaches to it and printed several tests to achieve the desired result. I'm pretty sure this is going to be a key part of my final project.
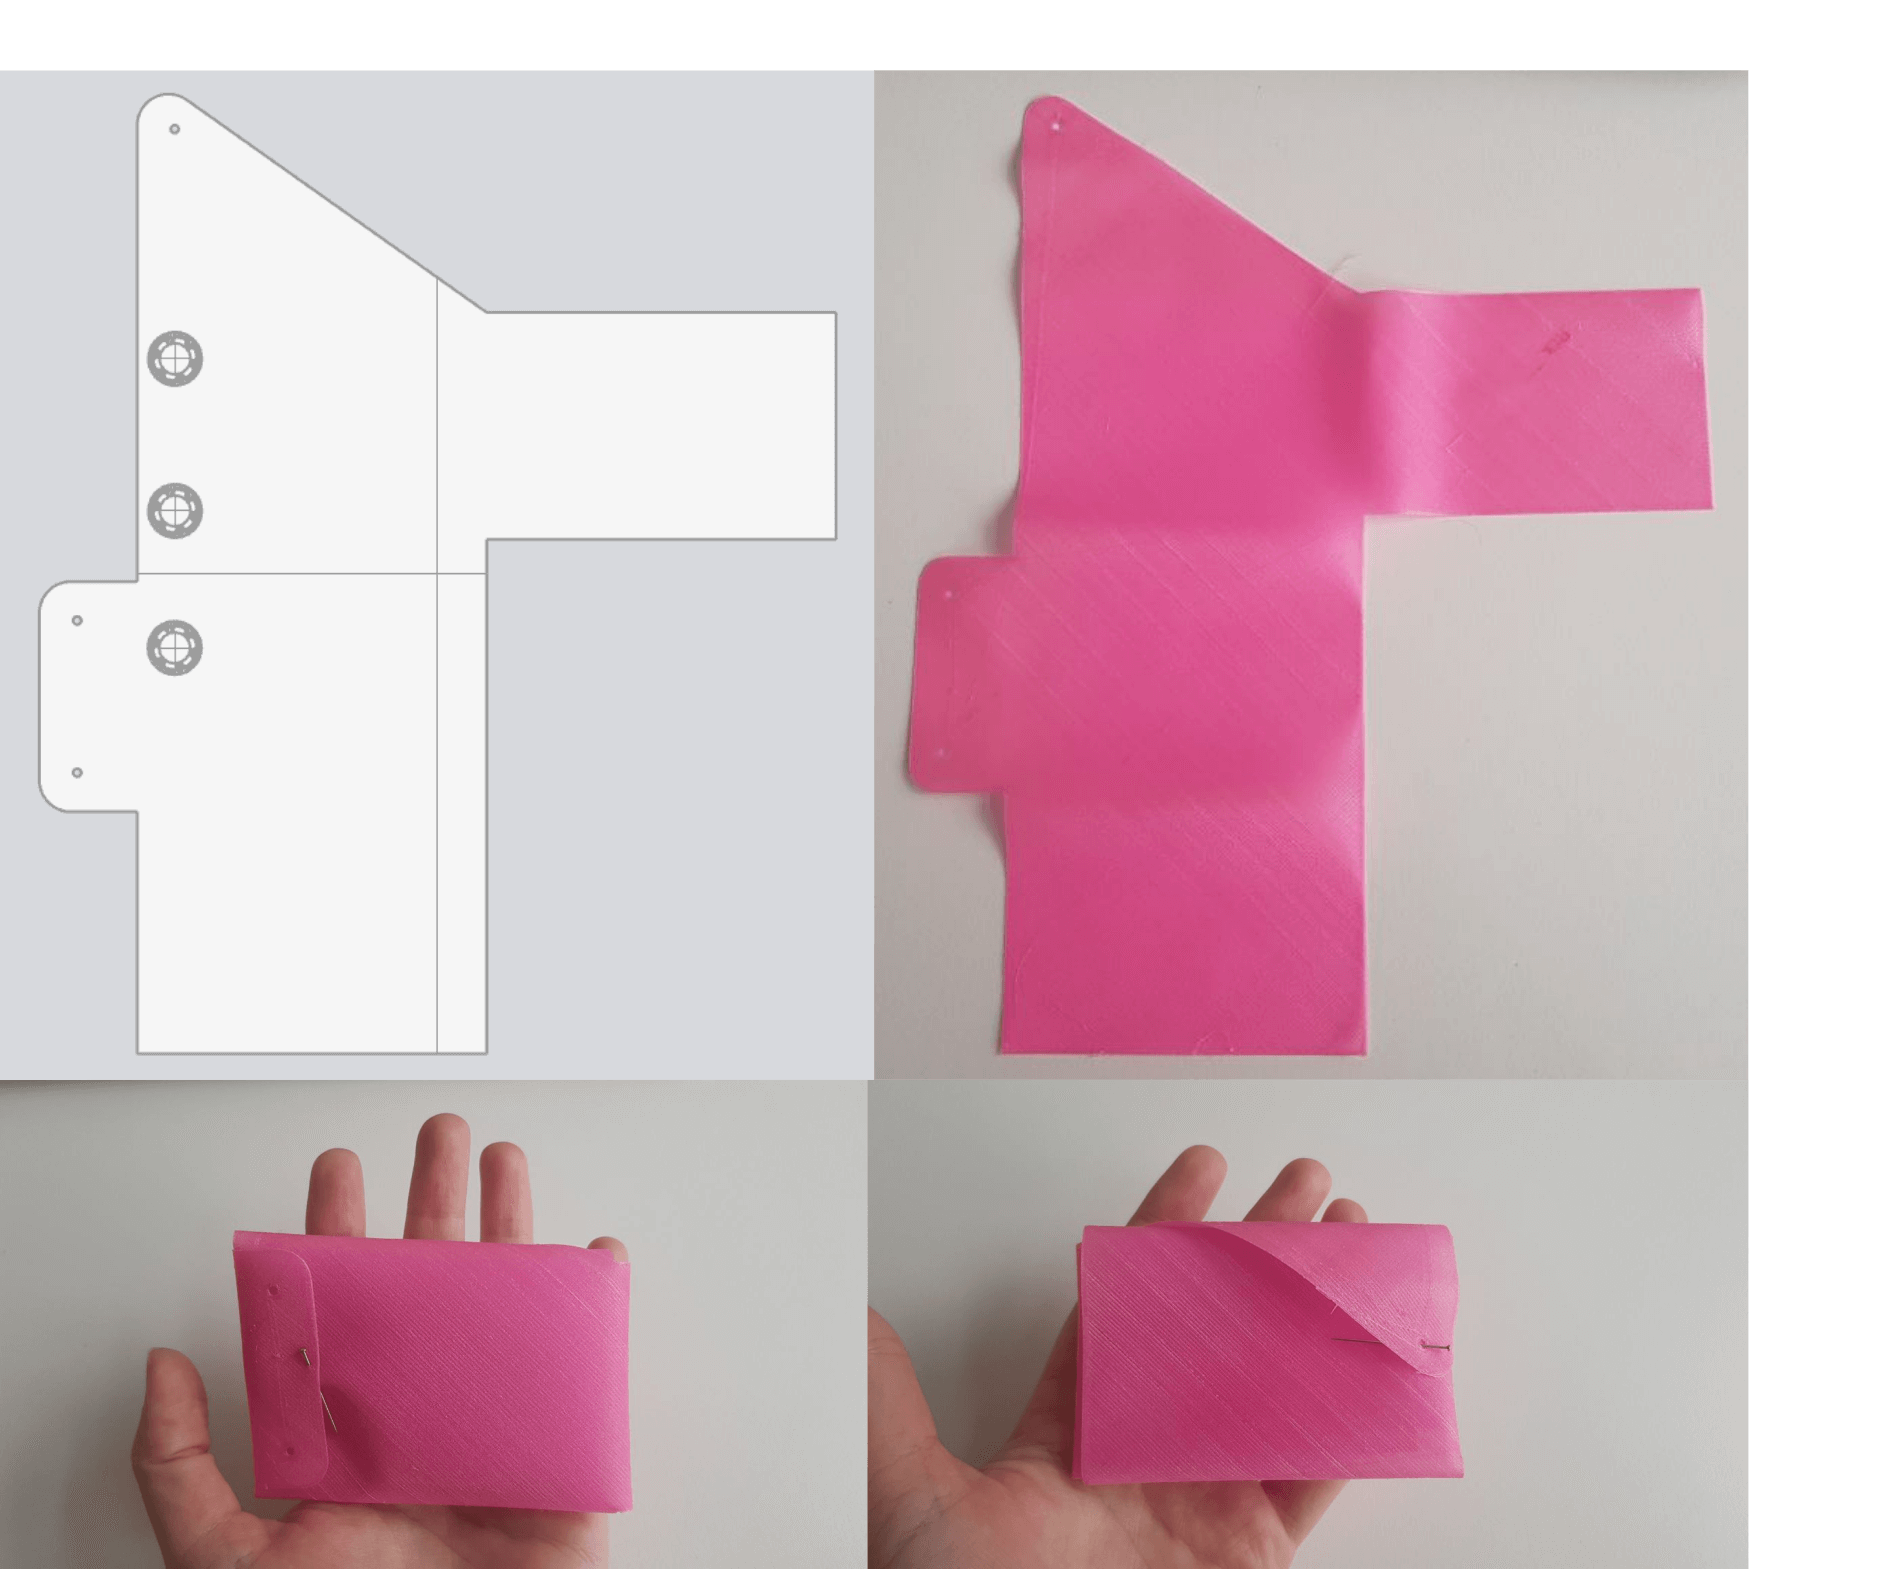
As an example of a item using the concept of 3D printed material as a fabric, I used Rhino to recreate an origami wallet that can be printed in 1.5 hours. However, it wasn't a very successful result, as it was made with TPE for the main body and PLA for the snaps. However, PLA doesn't stick to TPE, so the snaps didn't work at all.
Inspiration
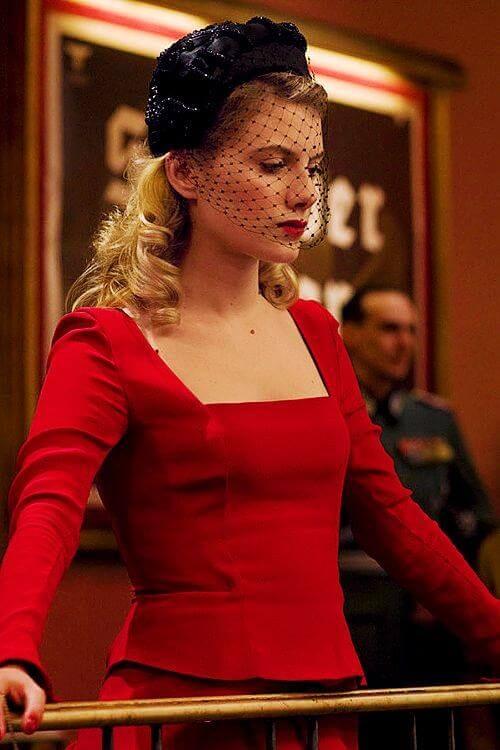
The night after the class on Tuesday I happened to watch Inglorious Basterds from Tarantino. When I saw the head piece that Shoshanna wears, I thought it would be a nice goal to reproduce it during this week using Rhino and 3D printing.
However, my goals shifted as I started creating different kinds of "fabric" using the 3D printer to recreate the head piece. And so, the rest of the week I mostly experimented with that.
3D printed fabric
In summary, I approached 3D printing fabric in 3 ways:
- Importing a picture of fabric in Cura + print
- Designing a fabric in Rhino + import to Cura + print
- Designing a block/shape in Rhino + import to Cura + change Cura settings to obtain a fabric like structure + print
The one that I found most interesting and full of potential is the last one.
By chance, a few days after I explored all these 3D printed fabric stuff, Sew Printed posted a video talking about the different ways of approaching the matter. I completely agree with her summary!
Net
The first step was to recreate the netting fabric. For that, I explored two different ways:
- Finding a picture from netting + importing it in Cura + printing
- Design a netting fabric in Rhino + printing
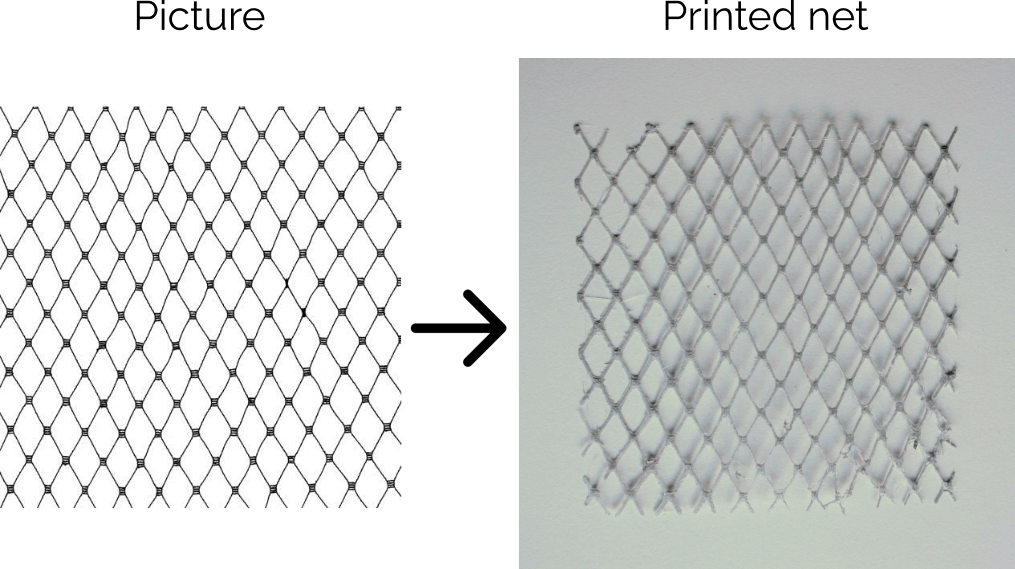
Using picture import function in Cura
This is the easiest in principle, although it requires some fiddling to obtain a nice result. Finding a picture of the netting fabric was easy. Then it is as simple as dragging and dropping it in Cura, but then settings have to be selected, and that's when you need to be more careful. Those settings depend on the picture you choose.
When the picture is dragged to Cura, you get a menu in which you can adjust parameters.
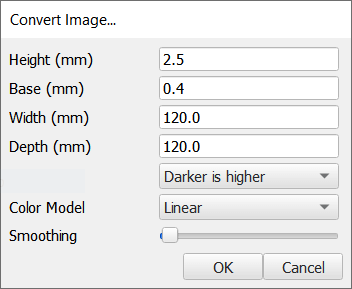
My goal was to only print the black parts of the picture, so I played with different thicknesses and smoothing, and checked the layer view until I got to a decent result. Once I was satisfied with the resulting gcode as shown in the Cura preview, I proceeded to print it in some silver PLA I had at hand.
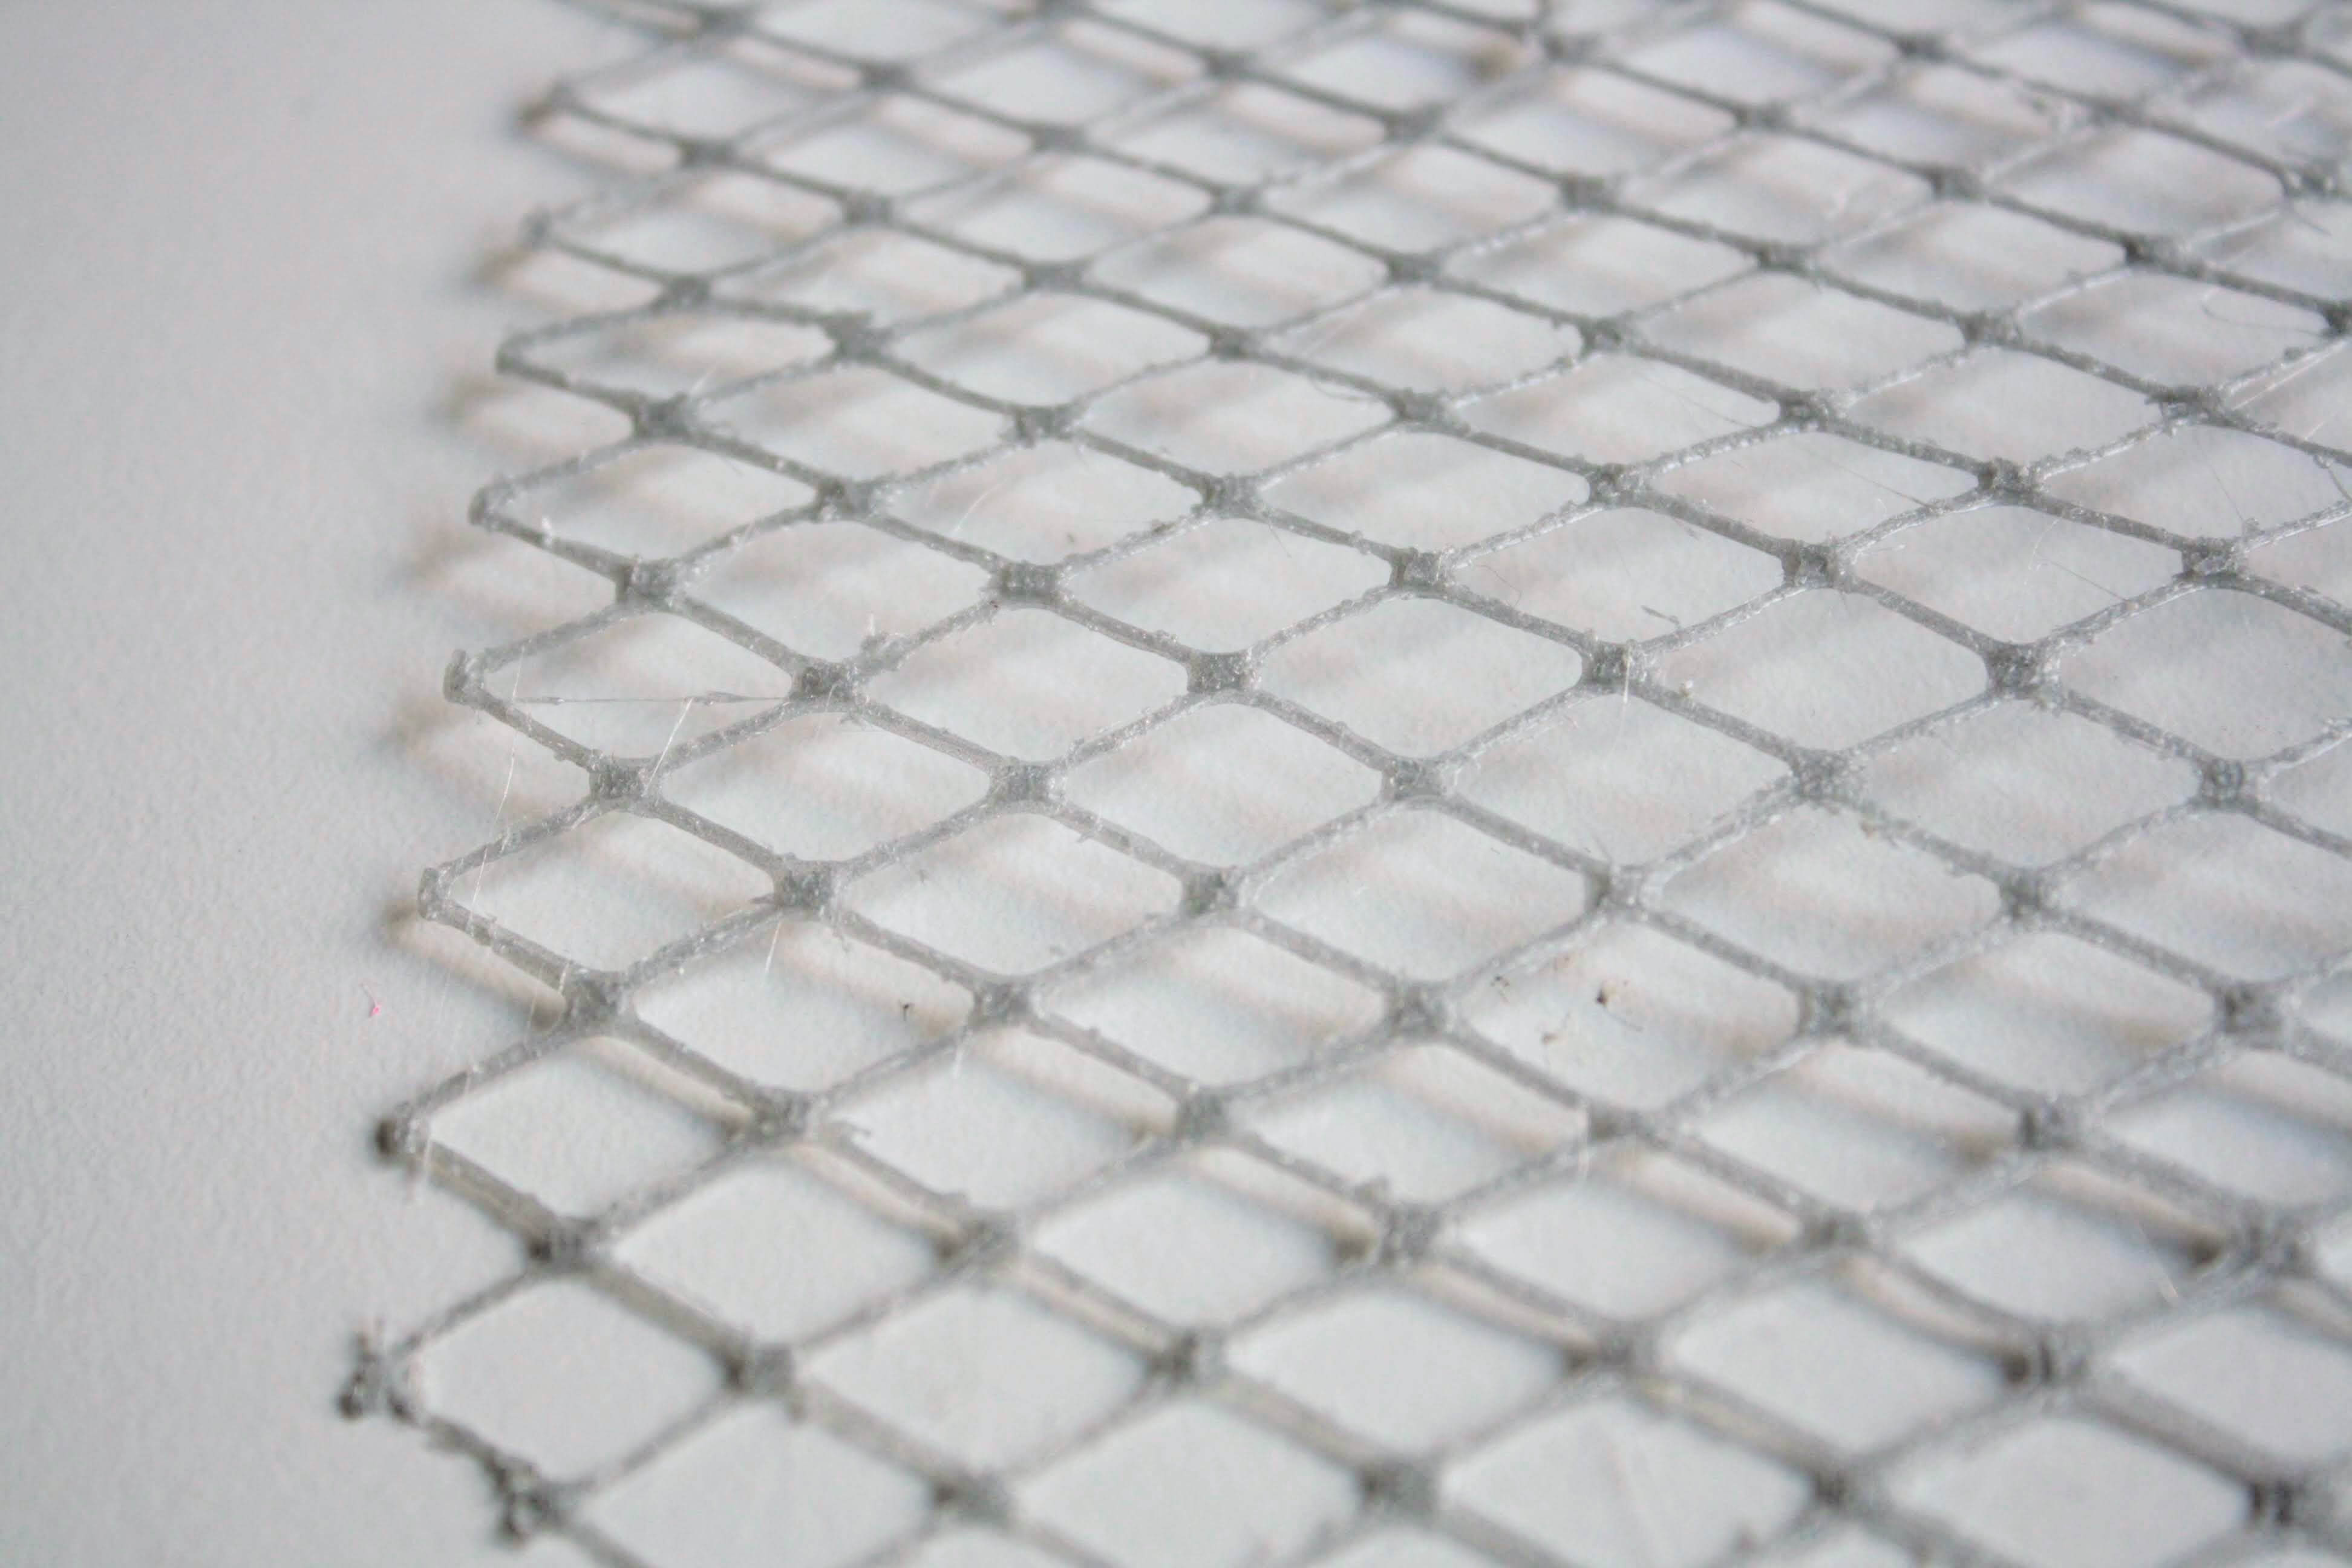
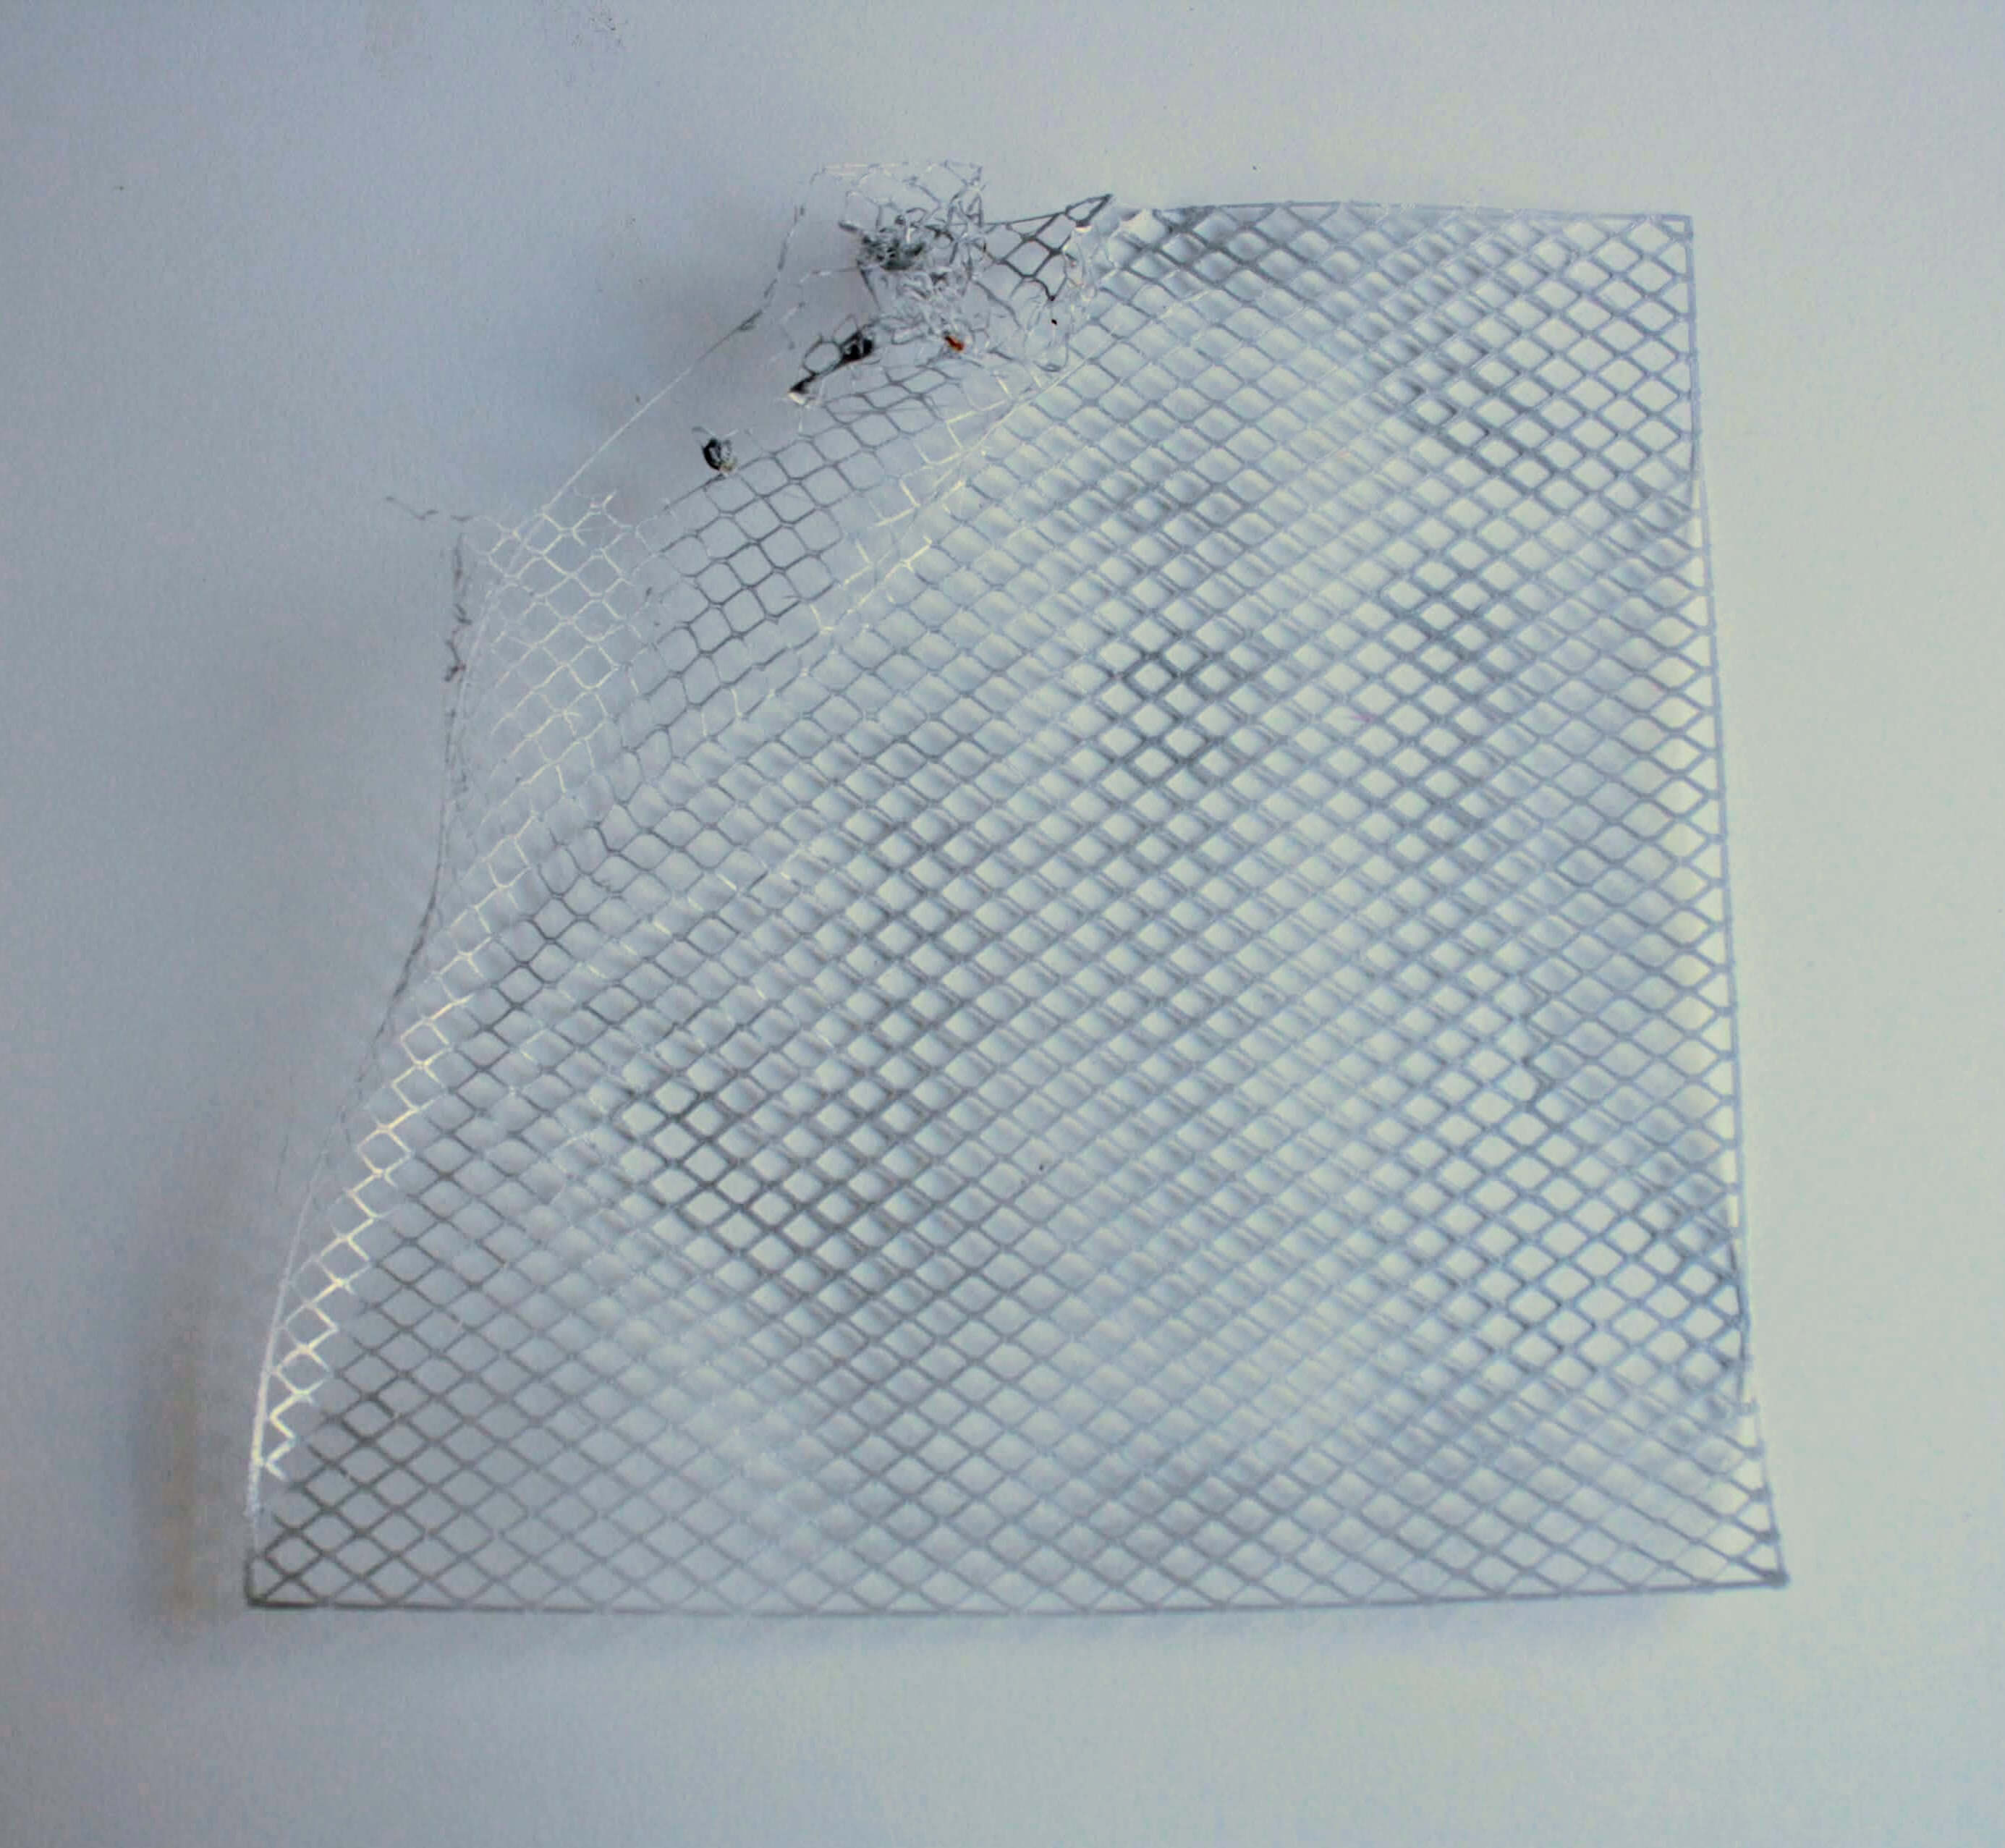
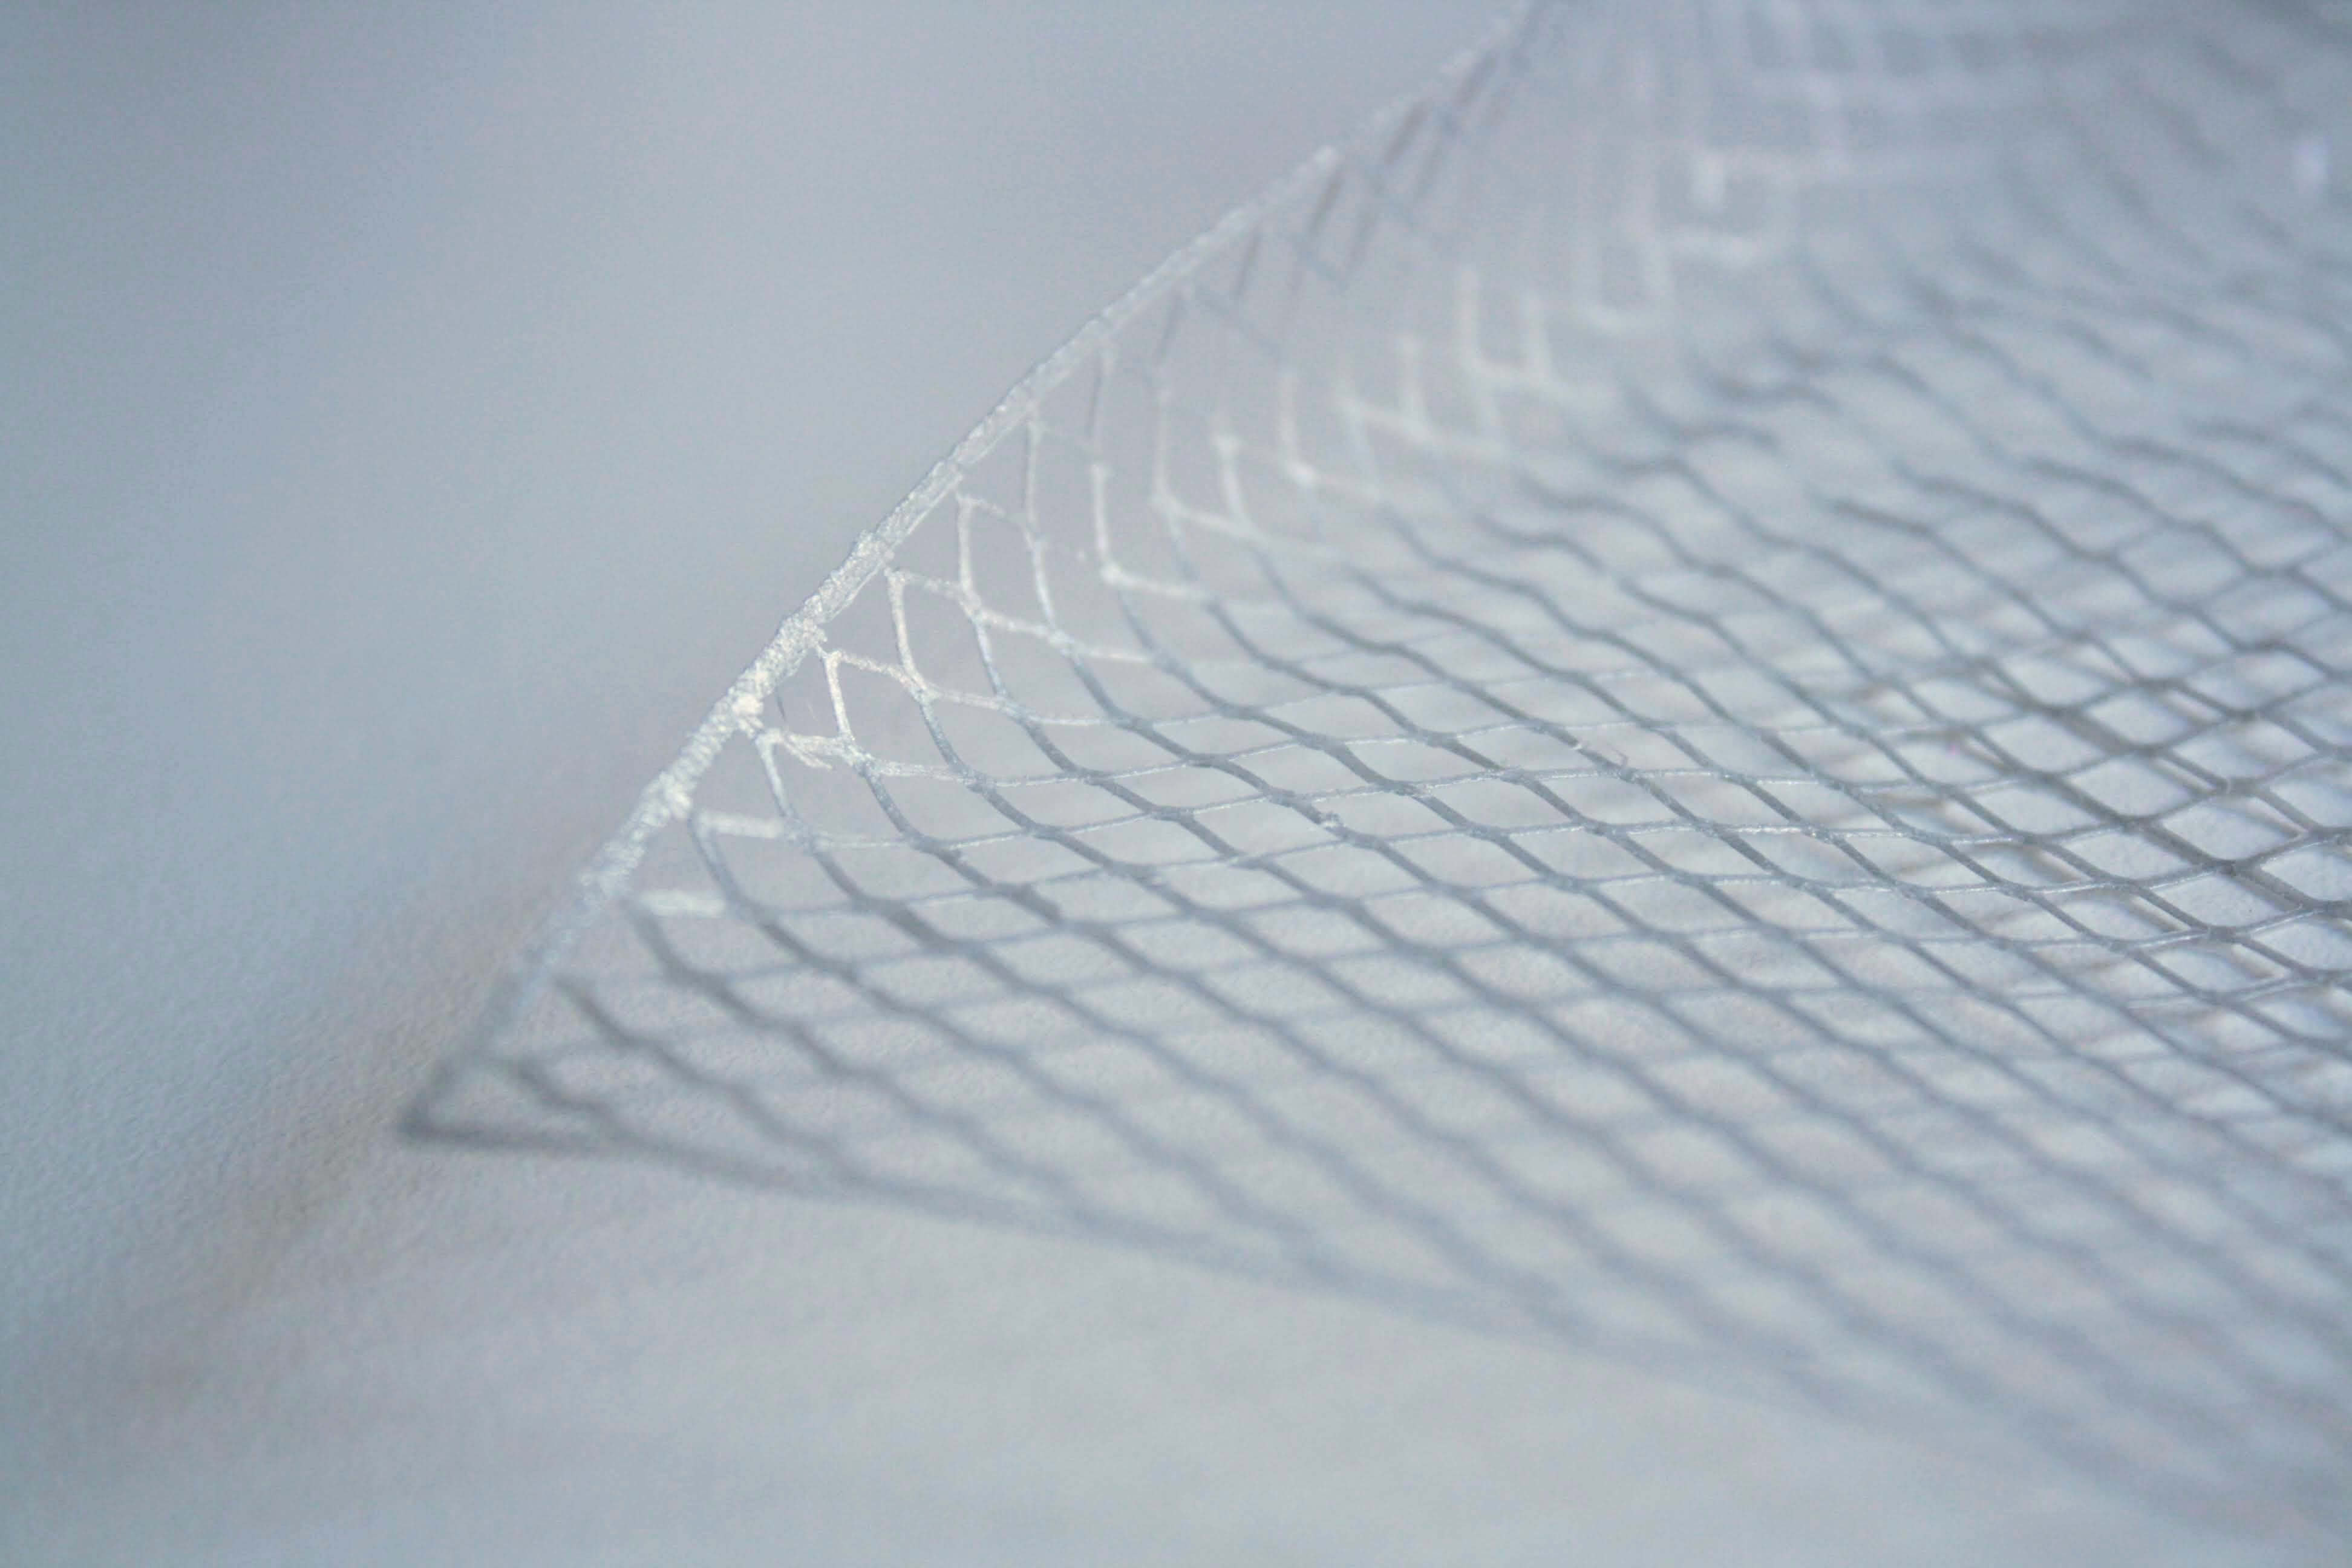
Modeling from scratch in Rhino
The next approach I tried was drawing a net structure in Rhino, exporting to OBJ file and importing it in Cura.
Source files
With standard settings, I printed the net in silver PLA. I had issues with adhesion, which resulted in the messy corner you see in the picture. Despite that, I think this design had potential to be used as the netting of the head piece I wanted to make.
Woven-like fabric
By this point I was slowly losing interest in making the headpiece and definitely intrigued by how to make fabric-like 3D printed objects. So I decided to make a few experiments to find out a 3D printed fabric I liked.
My first approach was to design a woven structure in Rhino which I could export to STL and import in Cura to print. However, I quickly realized that when designing such small details in Rhino (as fibers of a woven textile are), you have little control of how they are translated to a gcode in Cura. So after fiddling around for a while I had an eureka moment and instead of designing in Rhino the woven structure, I realized Cura had this feature all along! A.K.A.: infills.
When you prepare a 3D object to print in Cura or any other slicer, the shell of the object is kept as designed, but the inside is not printed solid. Instead, by default it will be a mesh of around 20% density to save material. So if I removed the outer shell of the object and leave only the infill, I'd had a perfectly nice mesh/woven-like structure to print.
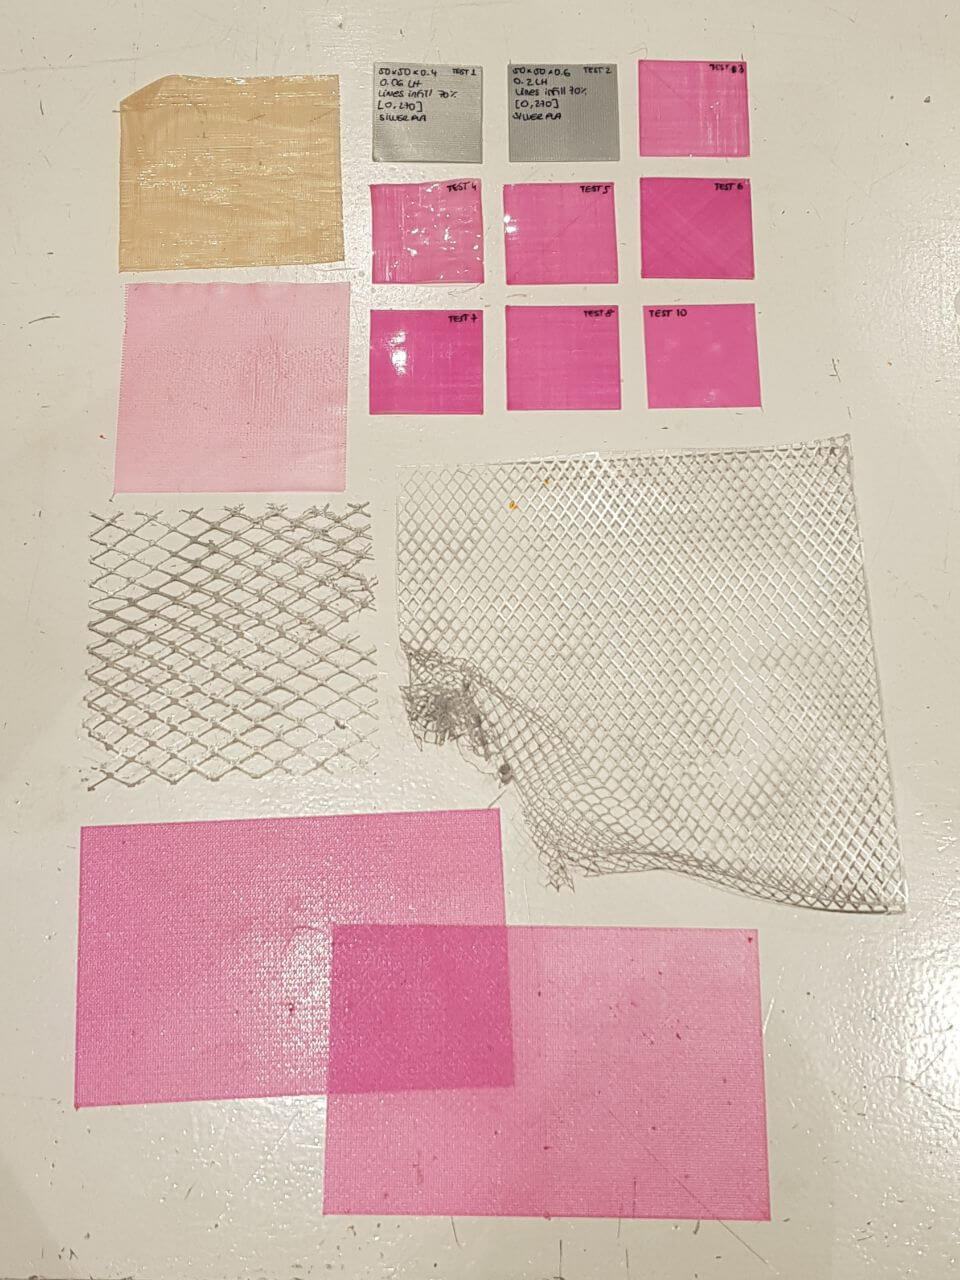
So, I made a square block in Rhino, exported it to STL and imported it in Cura. Then I started fiddling with the settings and printing the swatches. I documented the tests in a spreadsheet to keep track of the settings I was changing each time.
Fabric test log
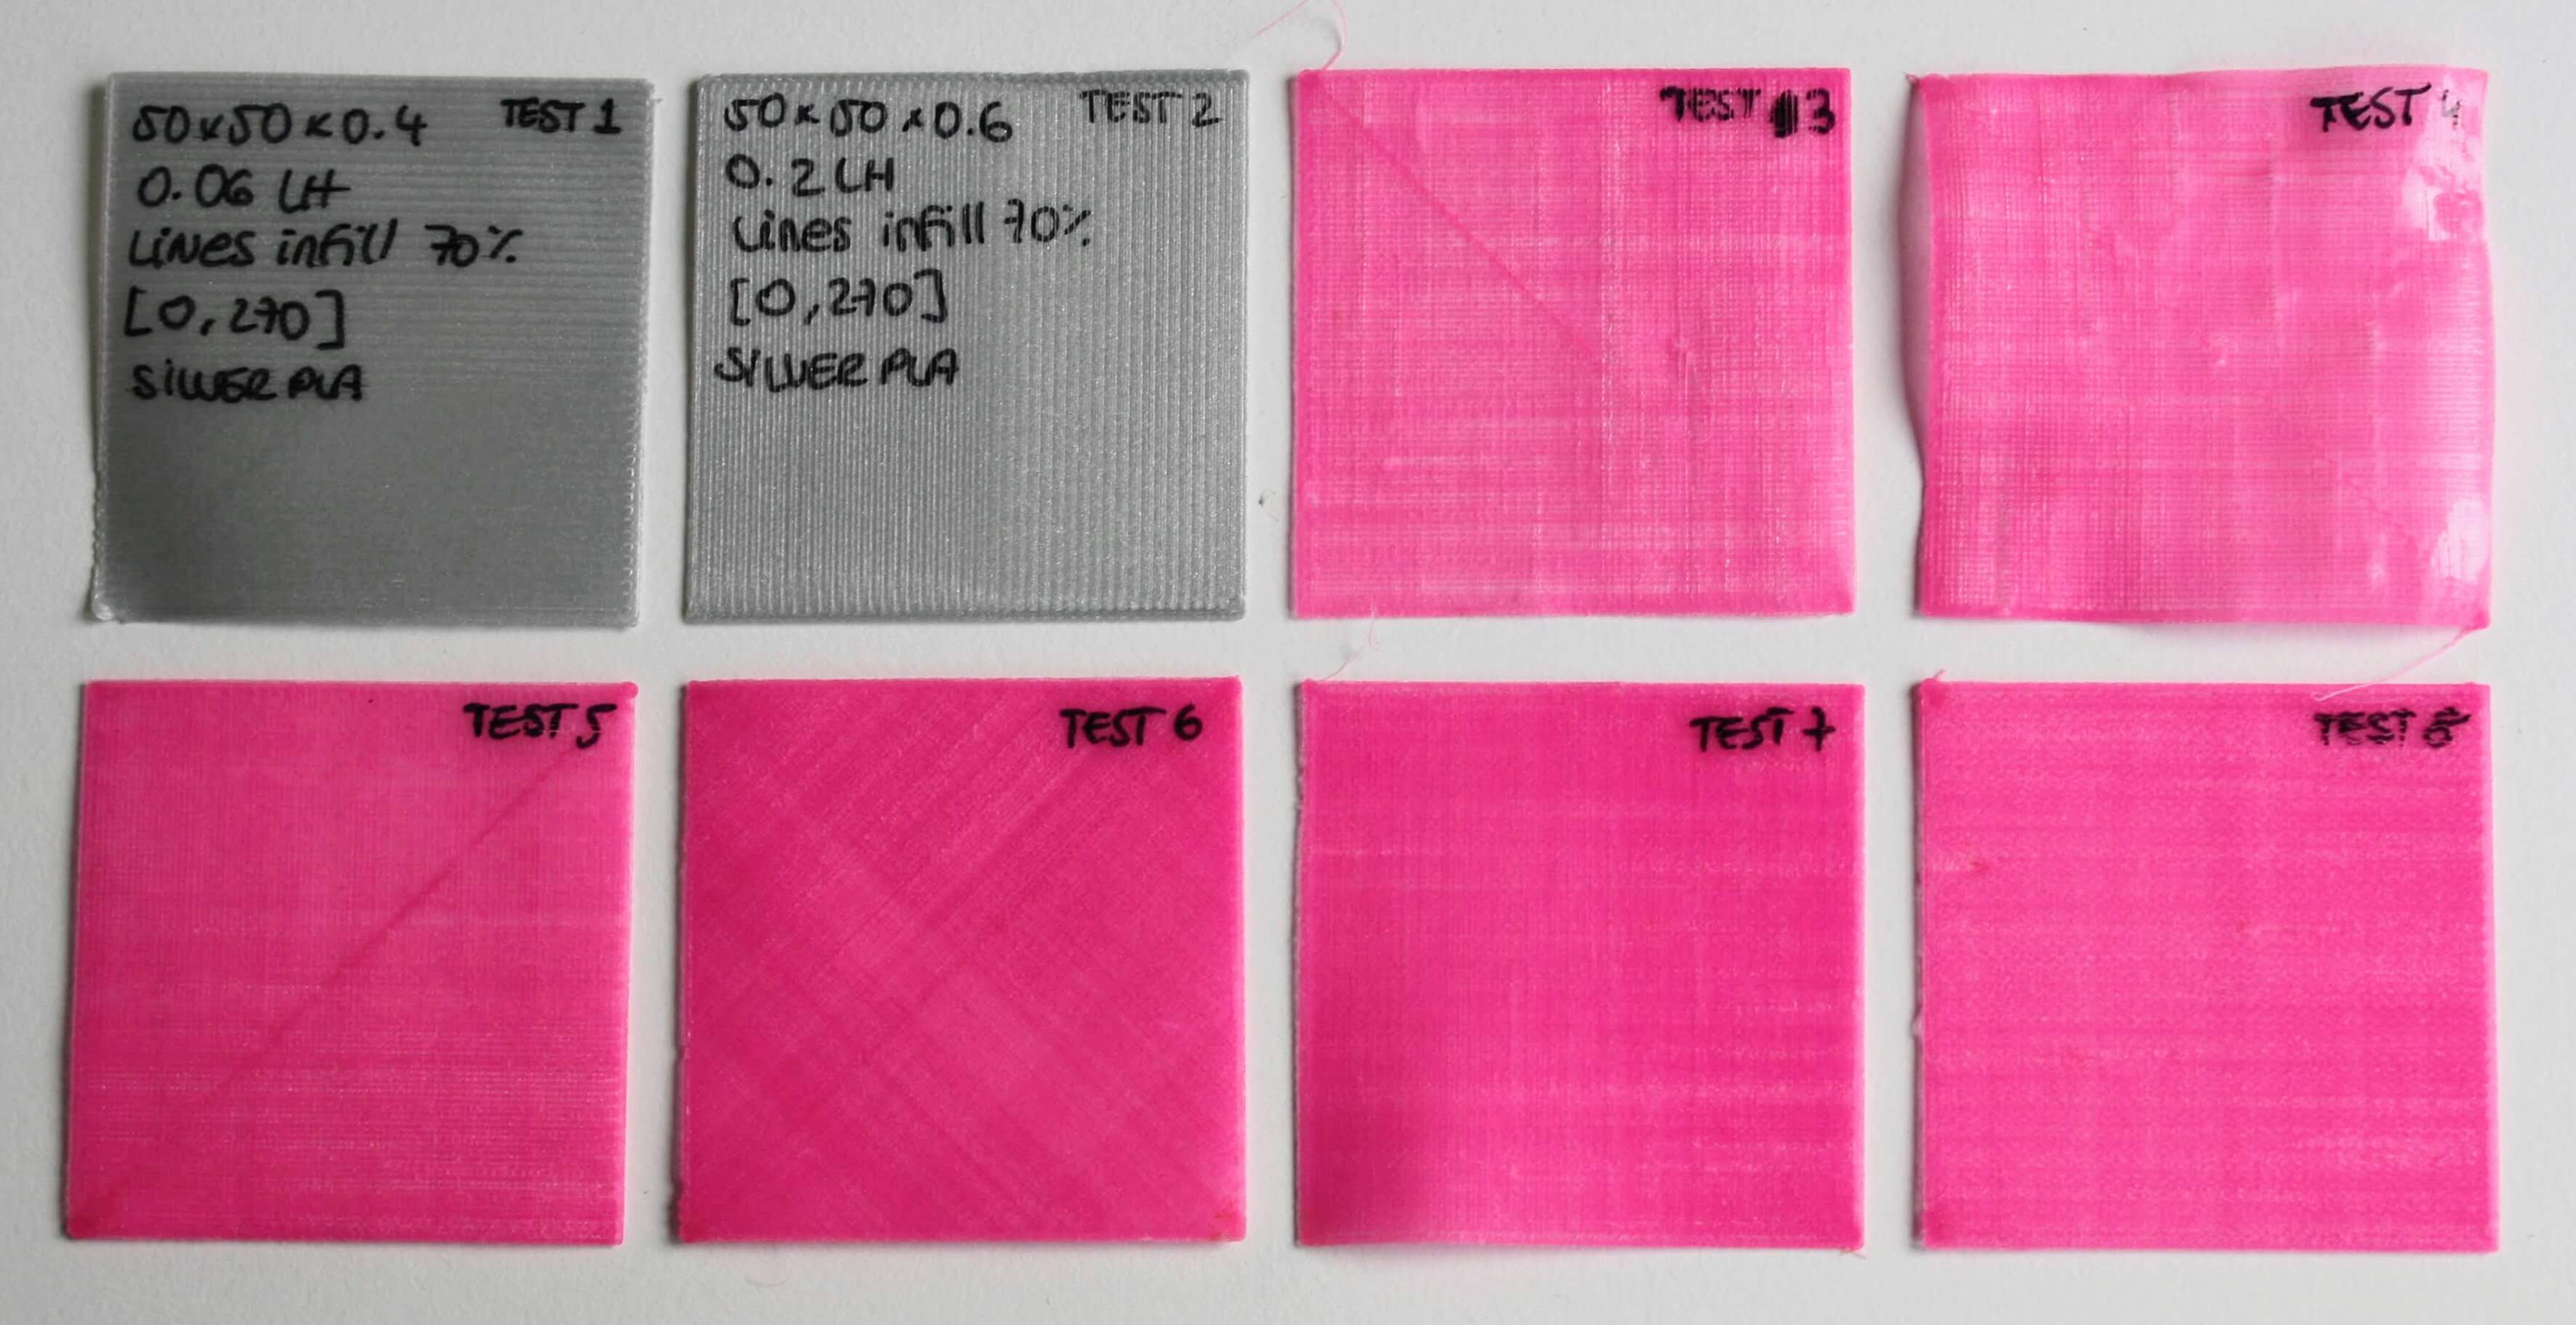
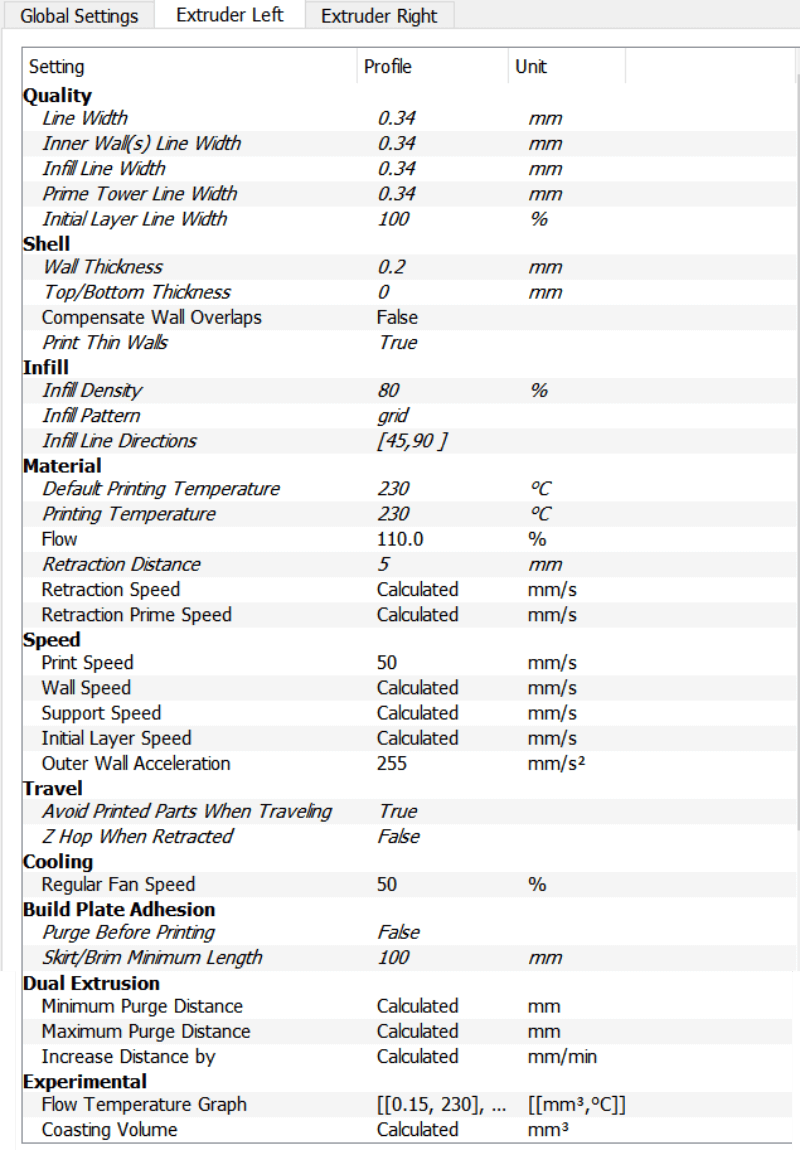
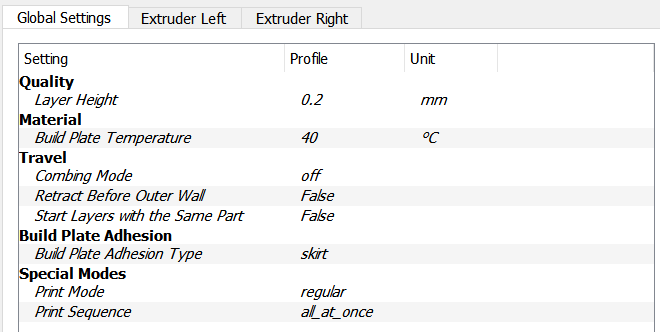
As a sample, here's the Cura project file for my last test, which I liked the best. I'm not sure to what extent opening this file in Cura imports all the profile settings, but I'll leave it for you to try ;) A bit below you can see all the details of the Cura profile used.
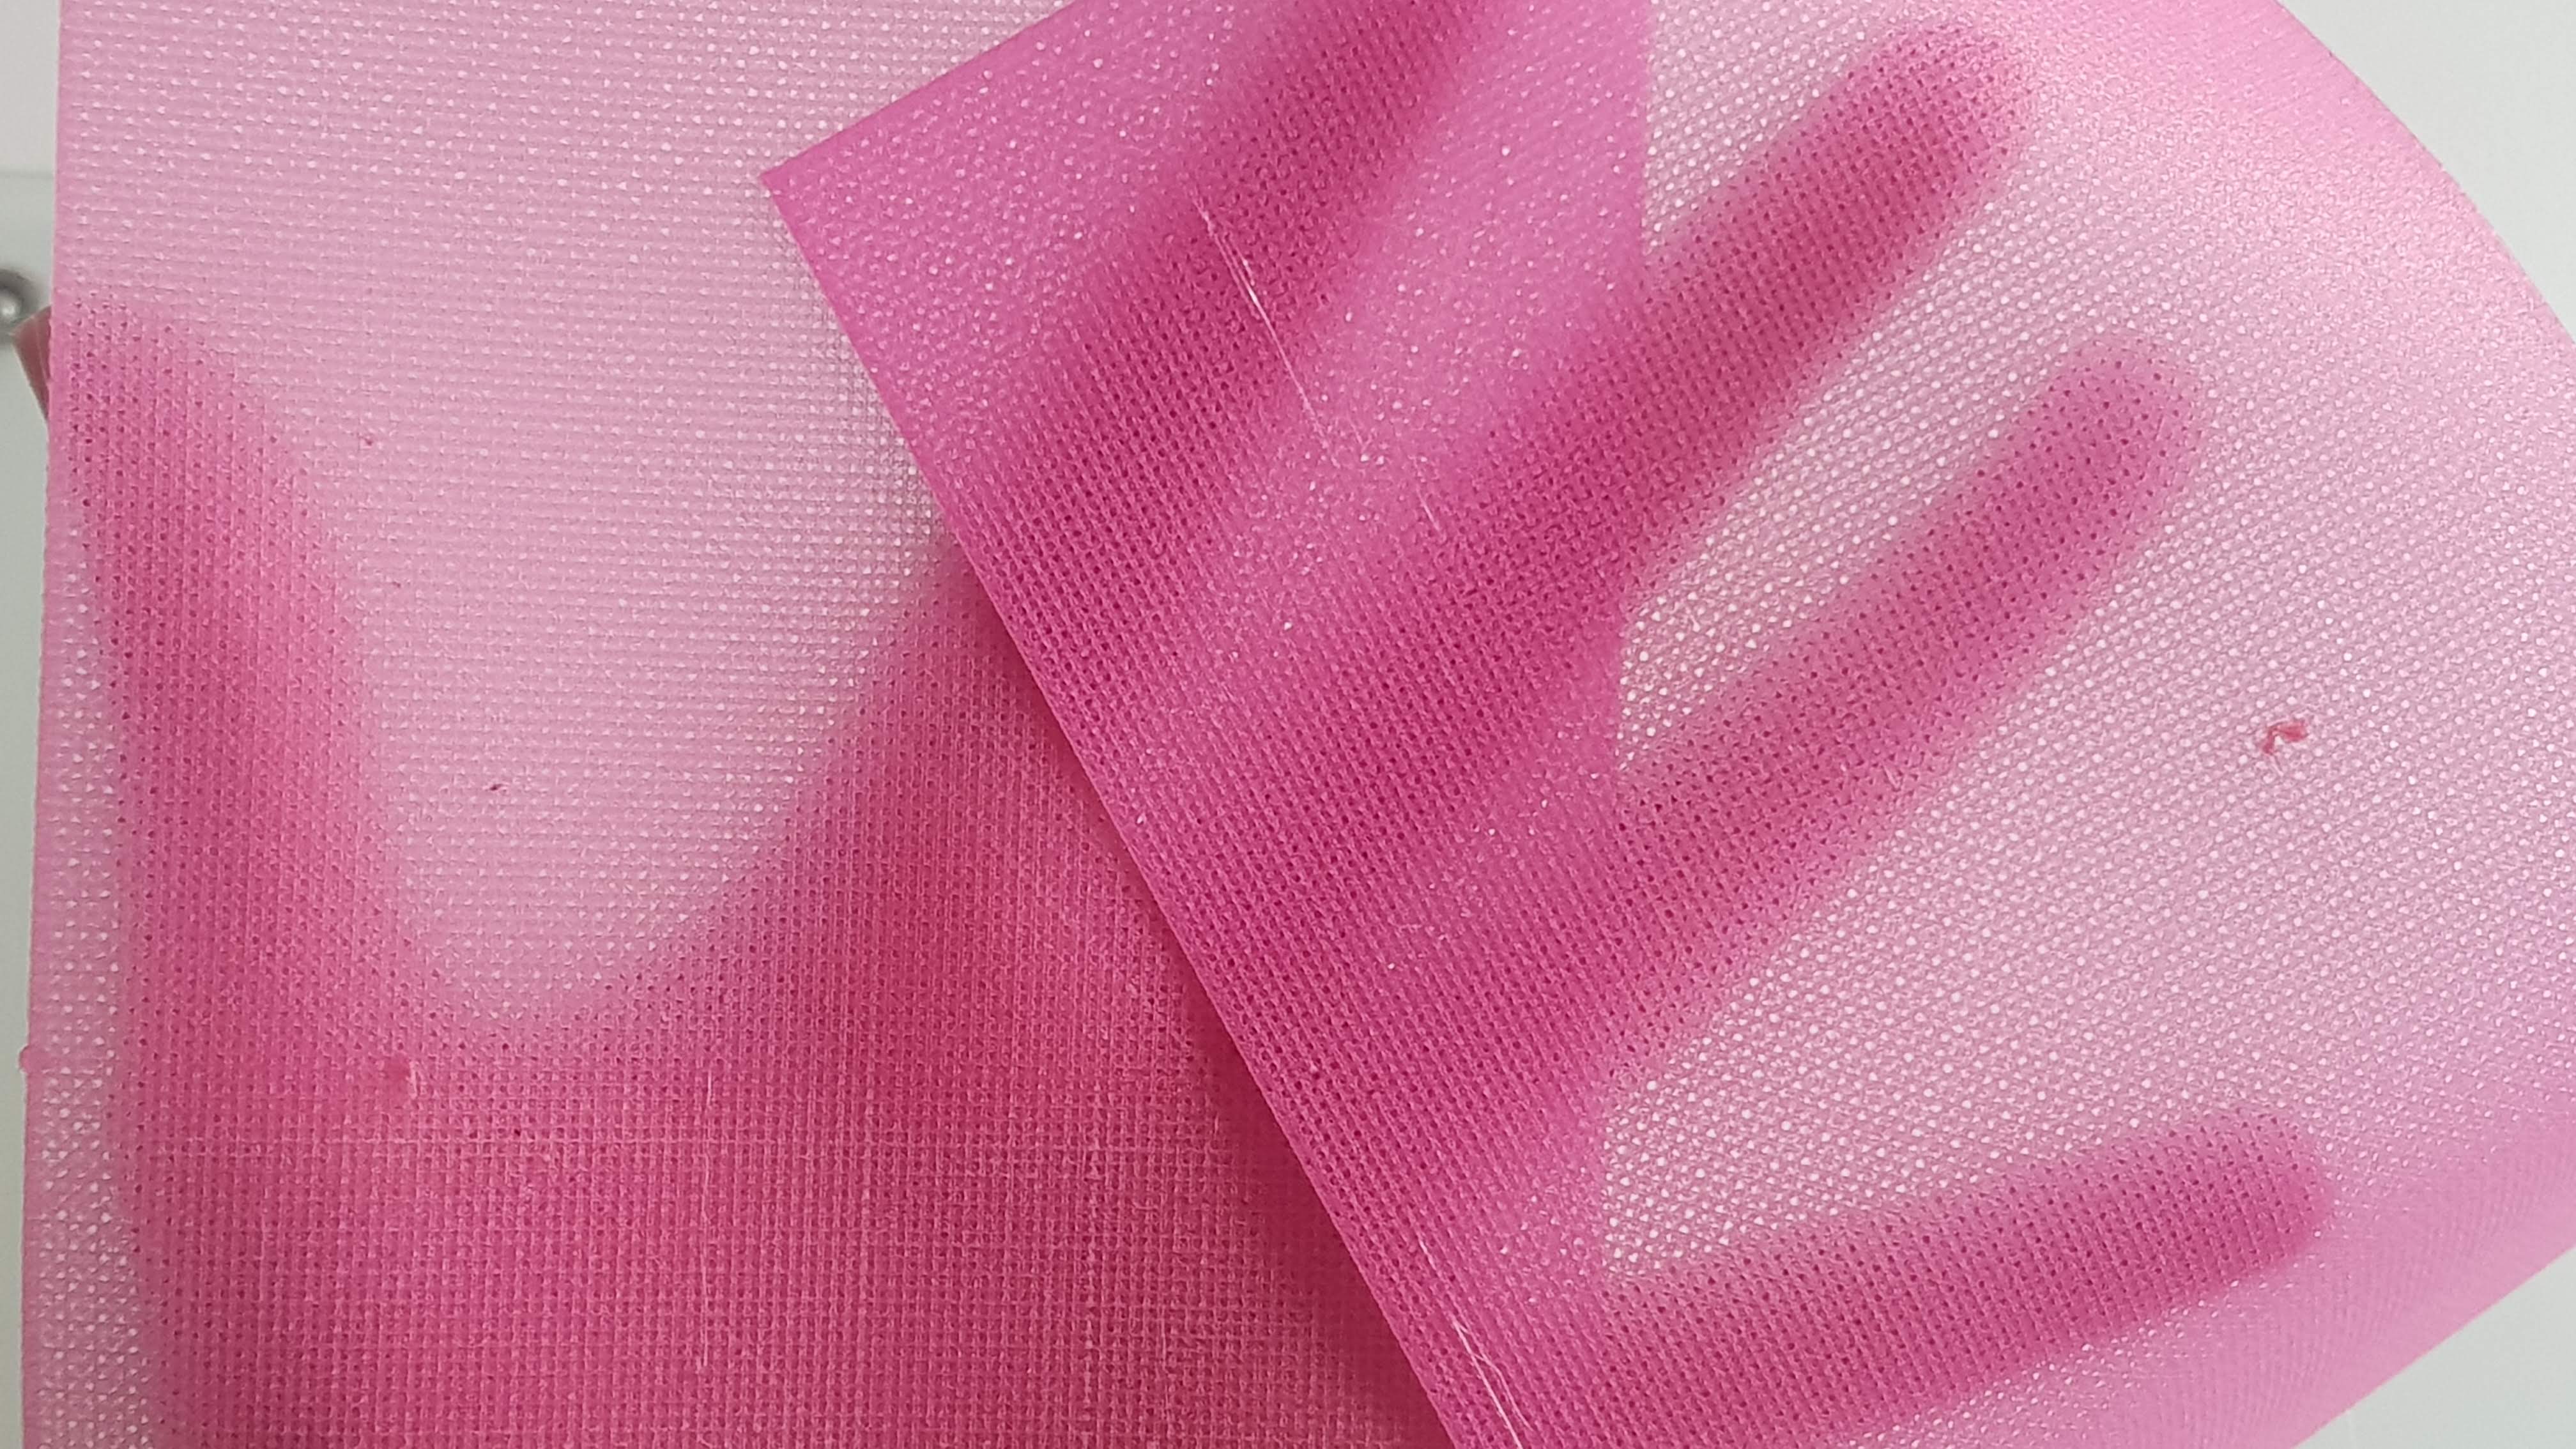
I finally got to a fabric-like structure that I was thrilled with. Using flexible filament opens a whole lot of opportunities as well.
How to print fabric with this method
If you want a quick test, you can try directly using this Cura project. I am not sure opening the project file imports all profile changes, so double check with the information given below.
To have full control of what you're doing, follow these steps:
- Prepare a 3D object with the desired dimensions and shape of your "fabric".
- Open it in Cura (I was using BCN3D's version of Cura, but Ultimaker Cura is a better option)
- Import this profile to Cura and use it to slice the 3D object, or adjust manually Cura settings as shown in the pictures below. The most important setting for the fabric appearance is Top/Bottom thickness which should be set to 0, so the infill gets exposed. You can also play with other available infill patterns for different kinds of structures.
- Print in TPE filament (I used TPE 82A Filaflex by Recreus)
Important considerations: Printing with flexible materials is especially challenging depending on the printer. I found Recreus' Filaflex particularly easy to manage, but for instance I couldn't make large prints with it on my Ultimaker 2. Luckily I have also a BCN3D Sigma R16 which did work pretty well even in large print jobs. In general, printers with the feeder close to the nozzle (direct drive) work best with flexible filaments.
A wallet
I wanted to put the 3D printed fabric into a usable object, and looking for inspiration I stumbled upon the wallet design of the picture:
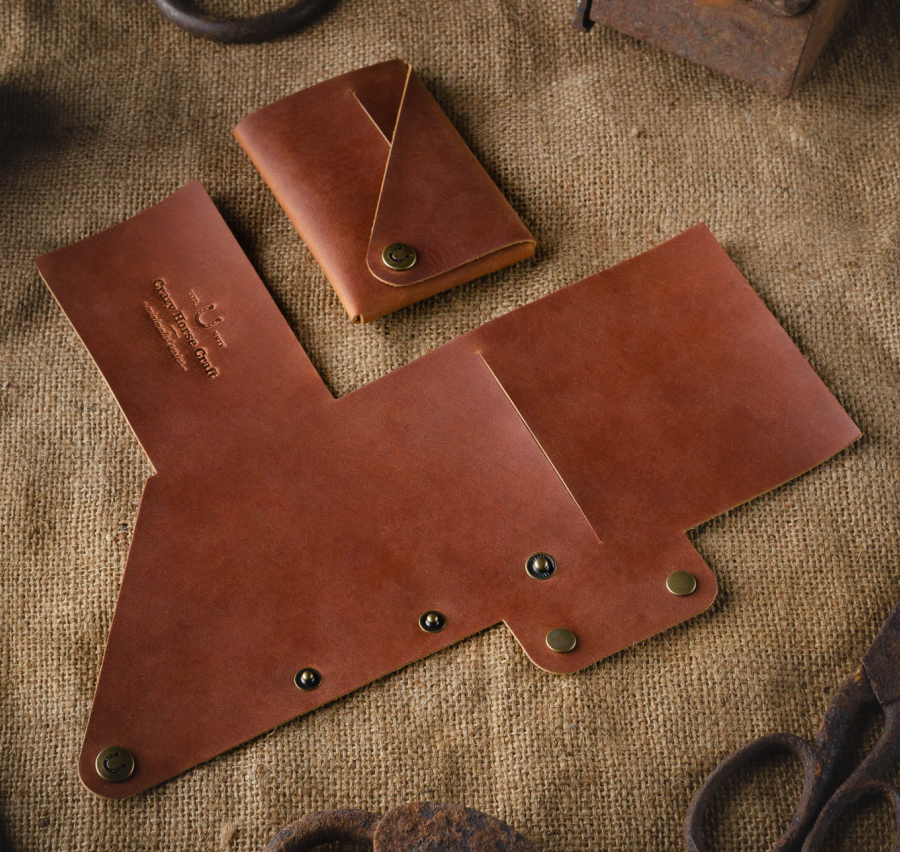
Source: Crazy Horse Craft
I checked the size of a standard card for reference, and traced the pattern in Rhino. I added to the design the snaps to be printed in a rigid plastic, so the wallet could be printed in one go and be ready to use. However, the PLA I chose didn't stick to the TPE with which the rest of the wallet is made of, so it wasn't a great success.
Get the Rhino file for the wallet here.
Print on top of fabric
As part of the exercises of this week we tried 3D printing on lycra fabric. I printed this auxetic pattern with silver PLA. It took a bit of fiddling to get the lycra fabric tense enough on the build plate and leveling the printer to the correct height. Actually you can see in the pictures some burning marks of the nozzle getting stuck on the fabric.
To tense the fabric on the build plate, painter's tape was used to attach it to the back of the glass.
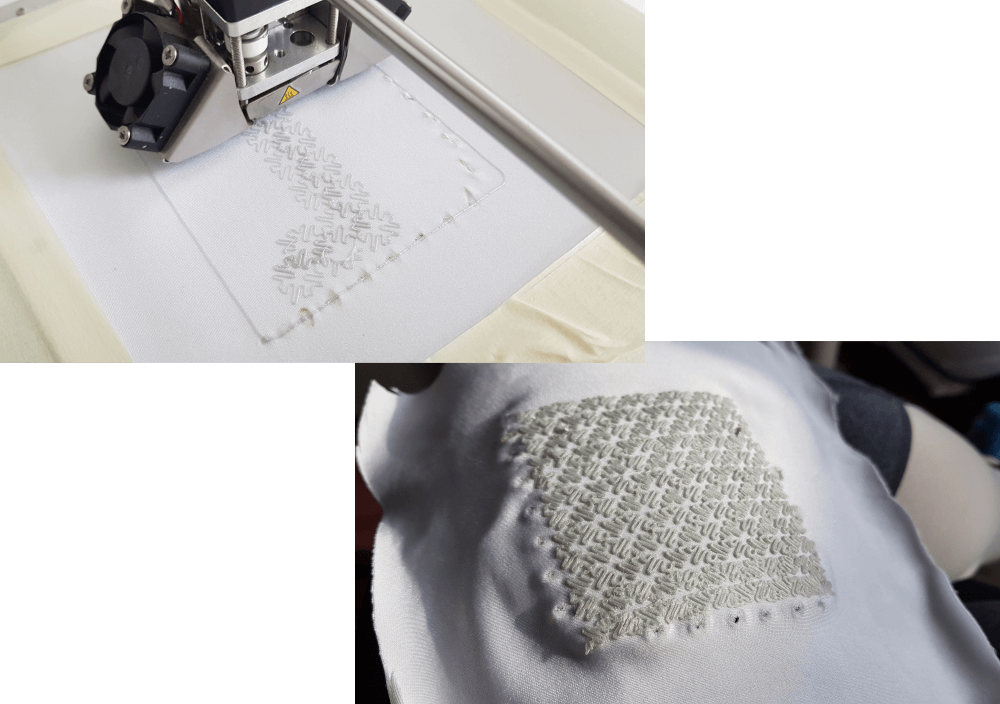
Unfortunately, even though the printing seemed to go fine, the plastic didn't completely stick to the fabric, so the efect of the auxetic pattern didn't work.
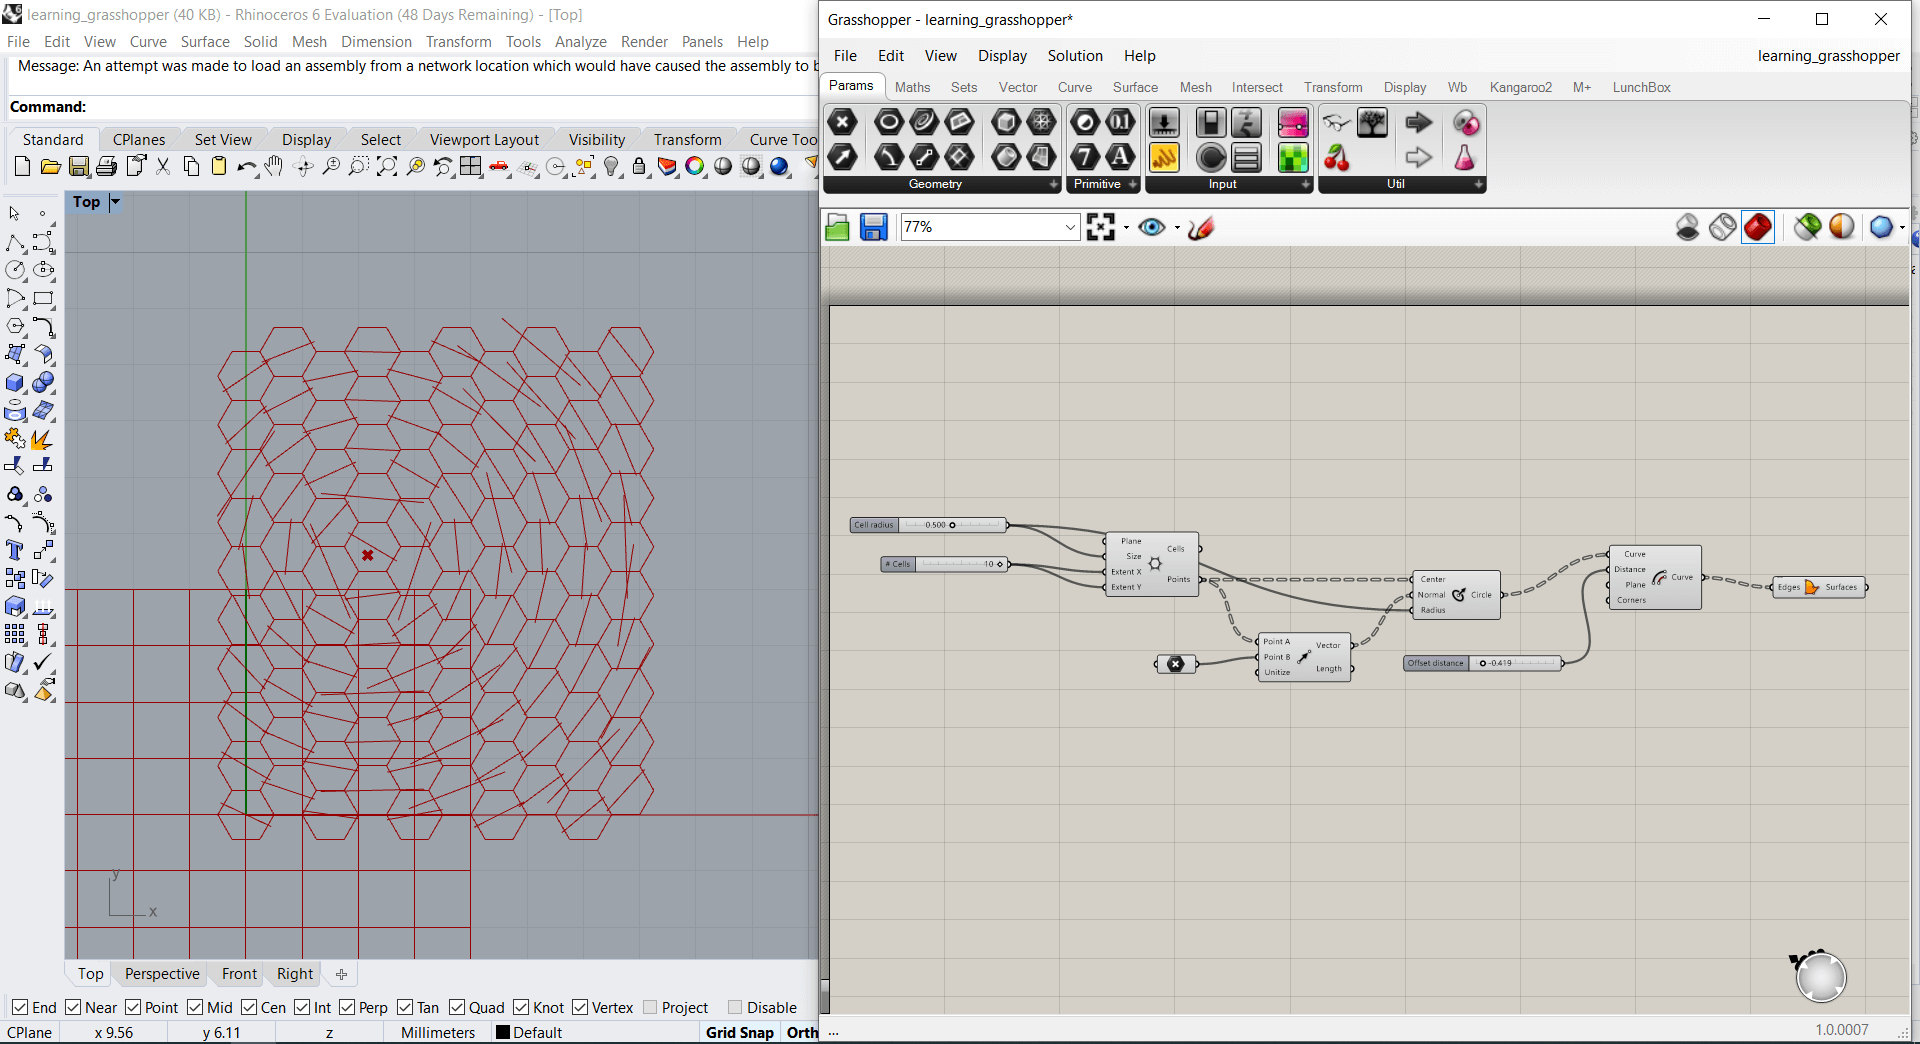
Grasshopper experiments
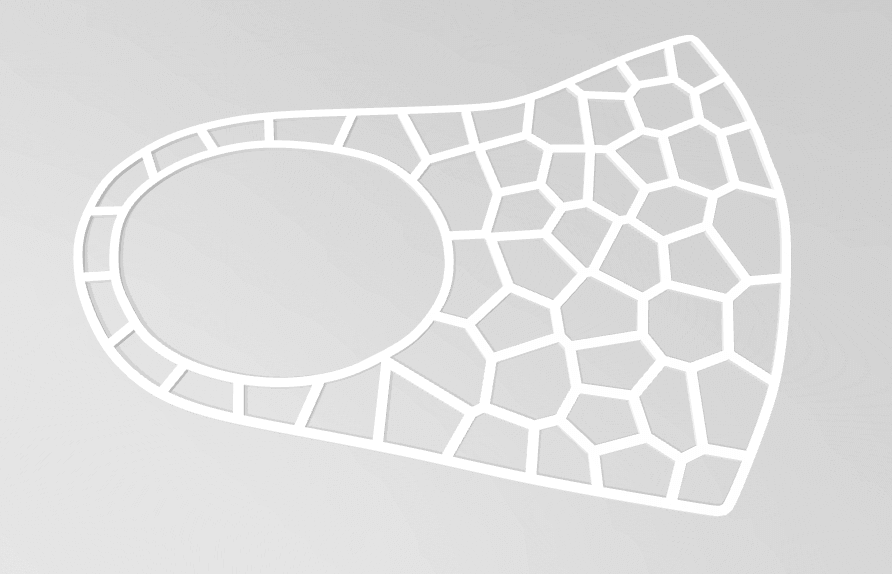
We had a couple of classes with Eugenio to learn the basics of Grasshopper. We designed a mask from scratch and decorated it with a voronoi algorithm generated pattern. Grasshopper takes a while to get into, as it requires first to get an idea of the available functions. So I couldn't get too far in using it during this week, but it is nice to have the fundamentals in case I need to dive into it in the future.
The class resulted on this voronoi patterned mask:
Sources
- "Wall Line Count" (Wall Thickness), "Top Layers" (Top Thickness), "Bottom Layers" (Bottom Thickness) to 0.
- Interesting documentation
- Interesting Rhino commands:
- Flow along sur
- Splop
- Kinds of 3D printed fabrics
- 3D printed outfit
- Nasa 3D printed fabric
- STL Snap buttons