Textile as scaffold
Final work of this week
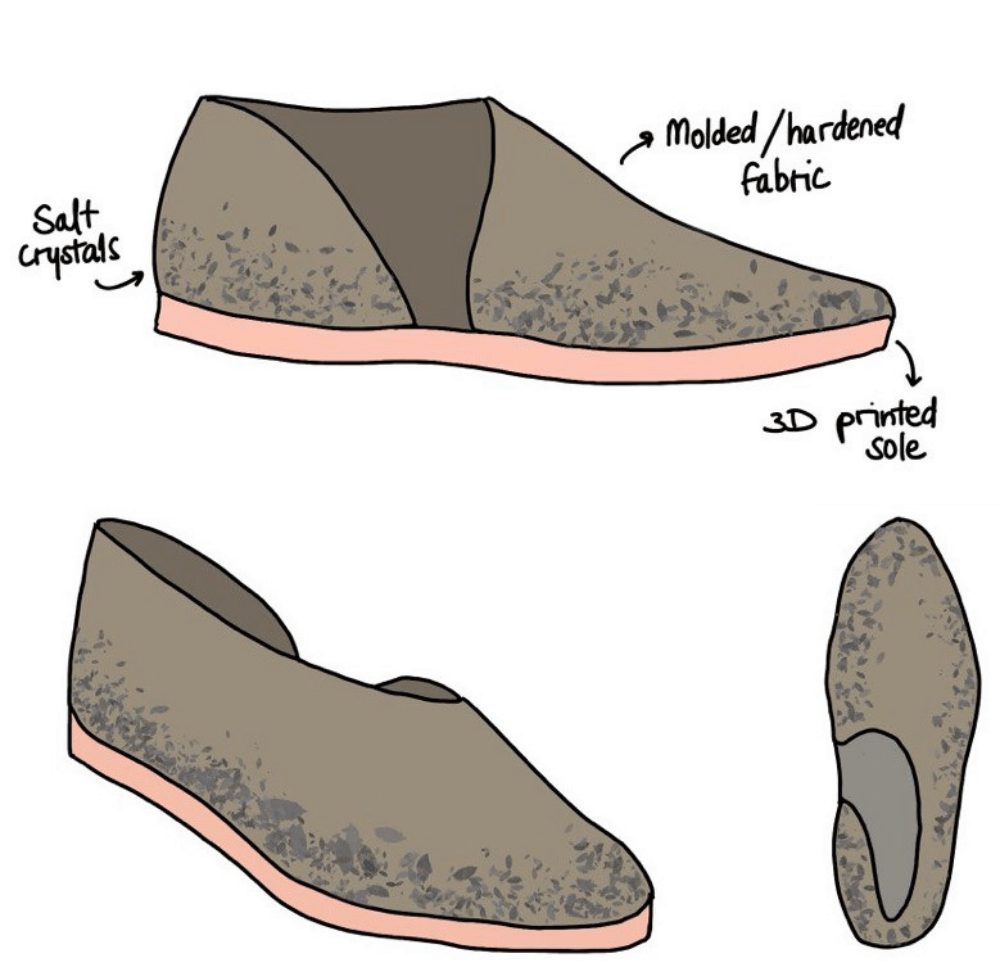
This week I wanted to do a lot but didn't have enough time! Soon after the lecture I started thinking of using the techniques to make shoes. Below you can see the concept I had in mind.
Shoe last
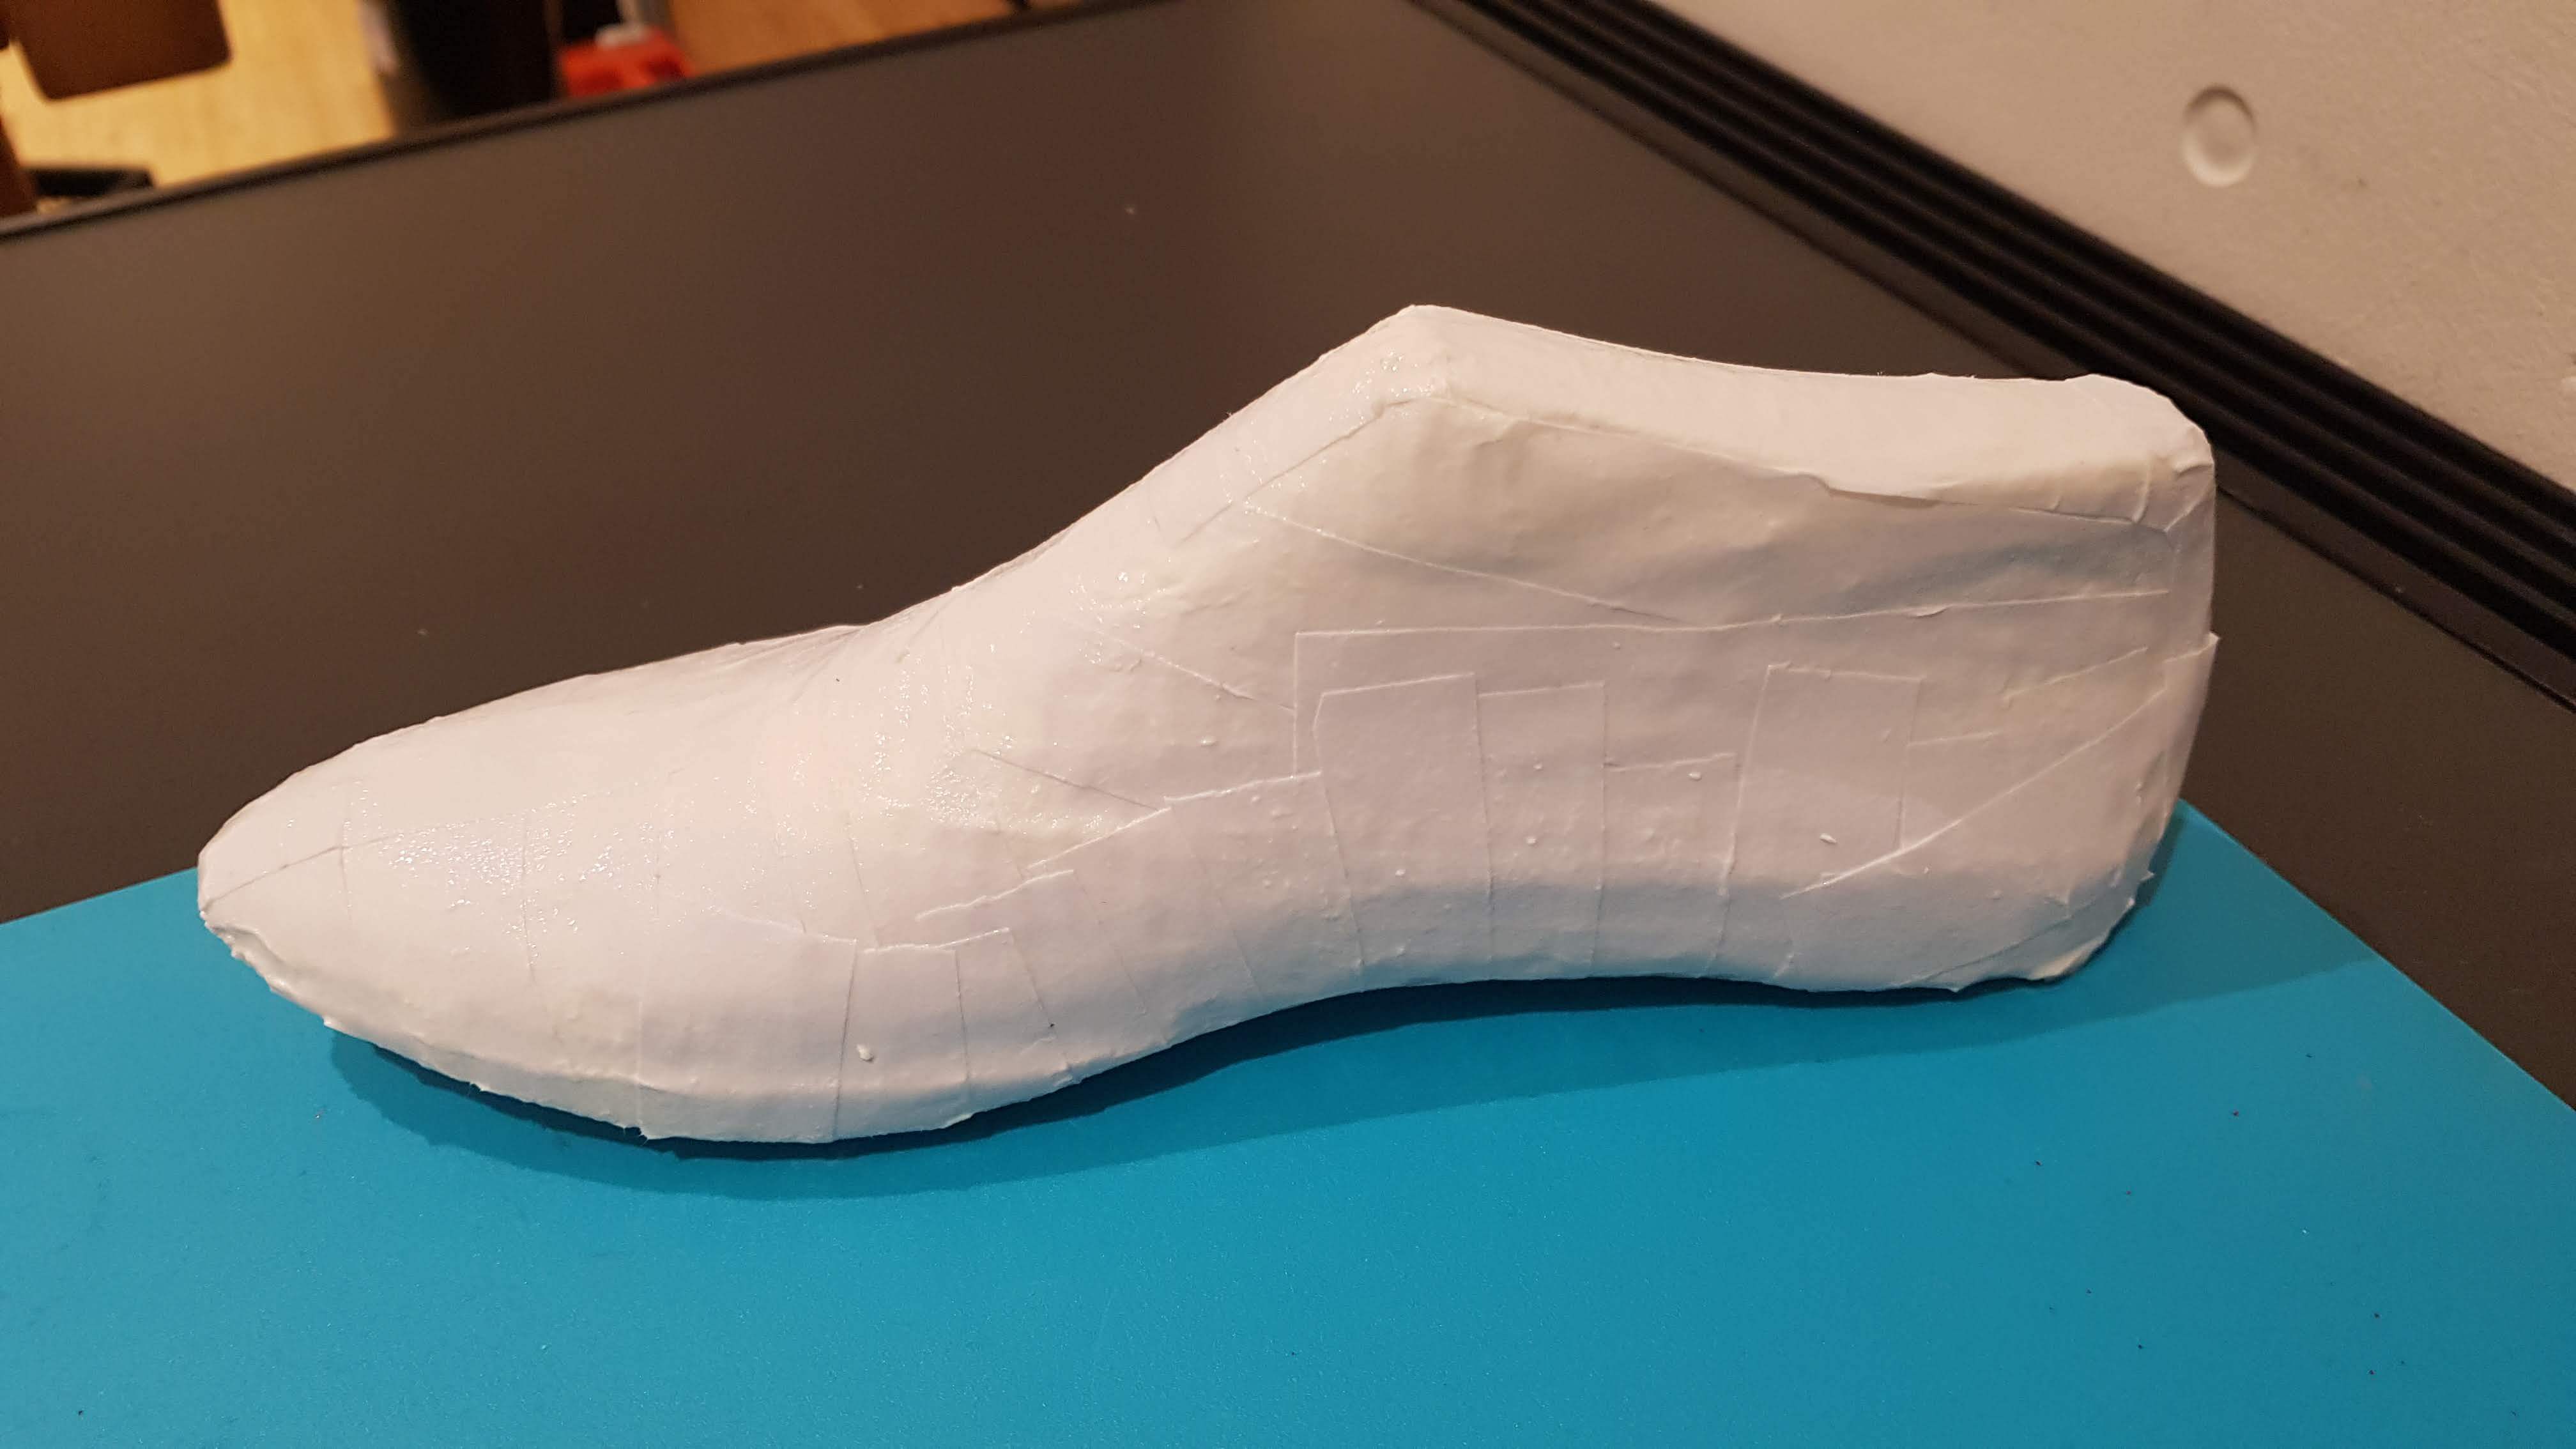
I wanted to learn how to use the CNC to make something functional, and I've been wanting to explore shoe making for a while. Therefore making a shoe last seemed like something I'd get some use of. Of course, not the easiest thing to CNC for the first time, but I like a good challenge.
In the end I managed to mill the shoe last in several pieces, attach them together and cover in paper and white glue mix (details can be found later in this document). I will be using this shoe last to experiment with moulding fabrics for shoe making.
Crystals on fabric and macrame
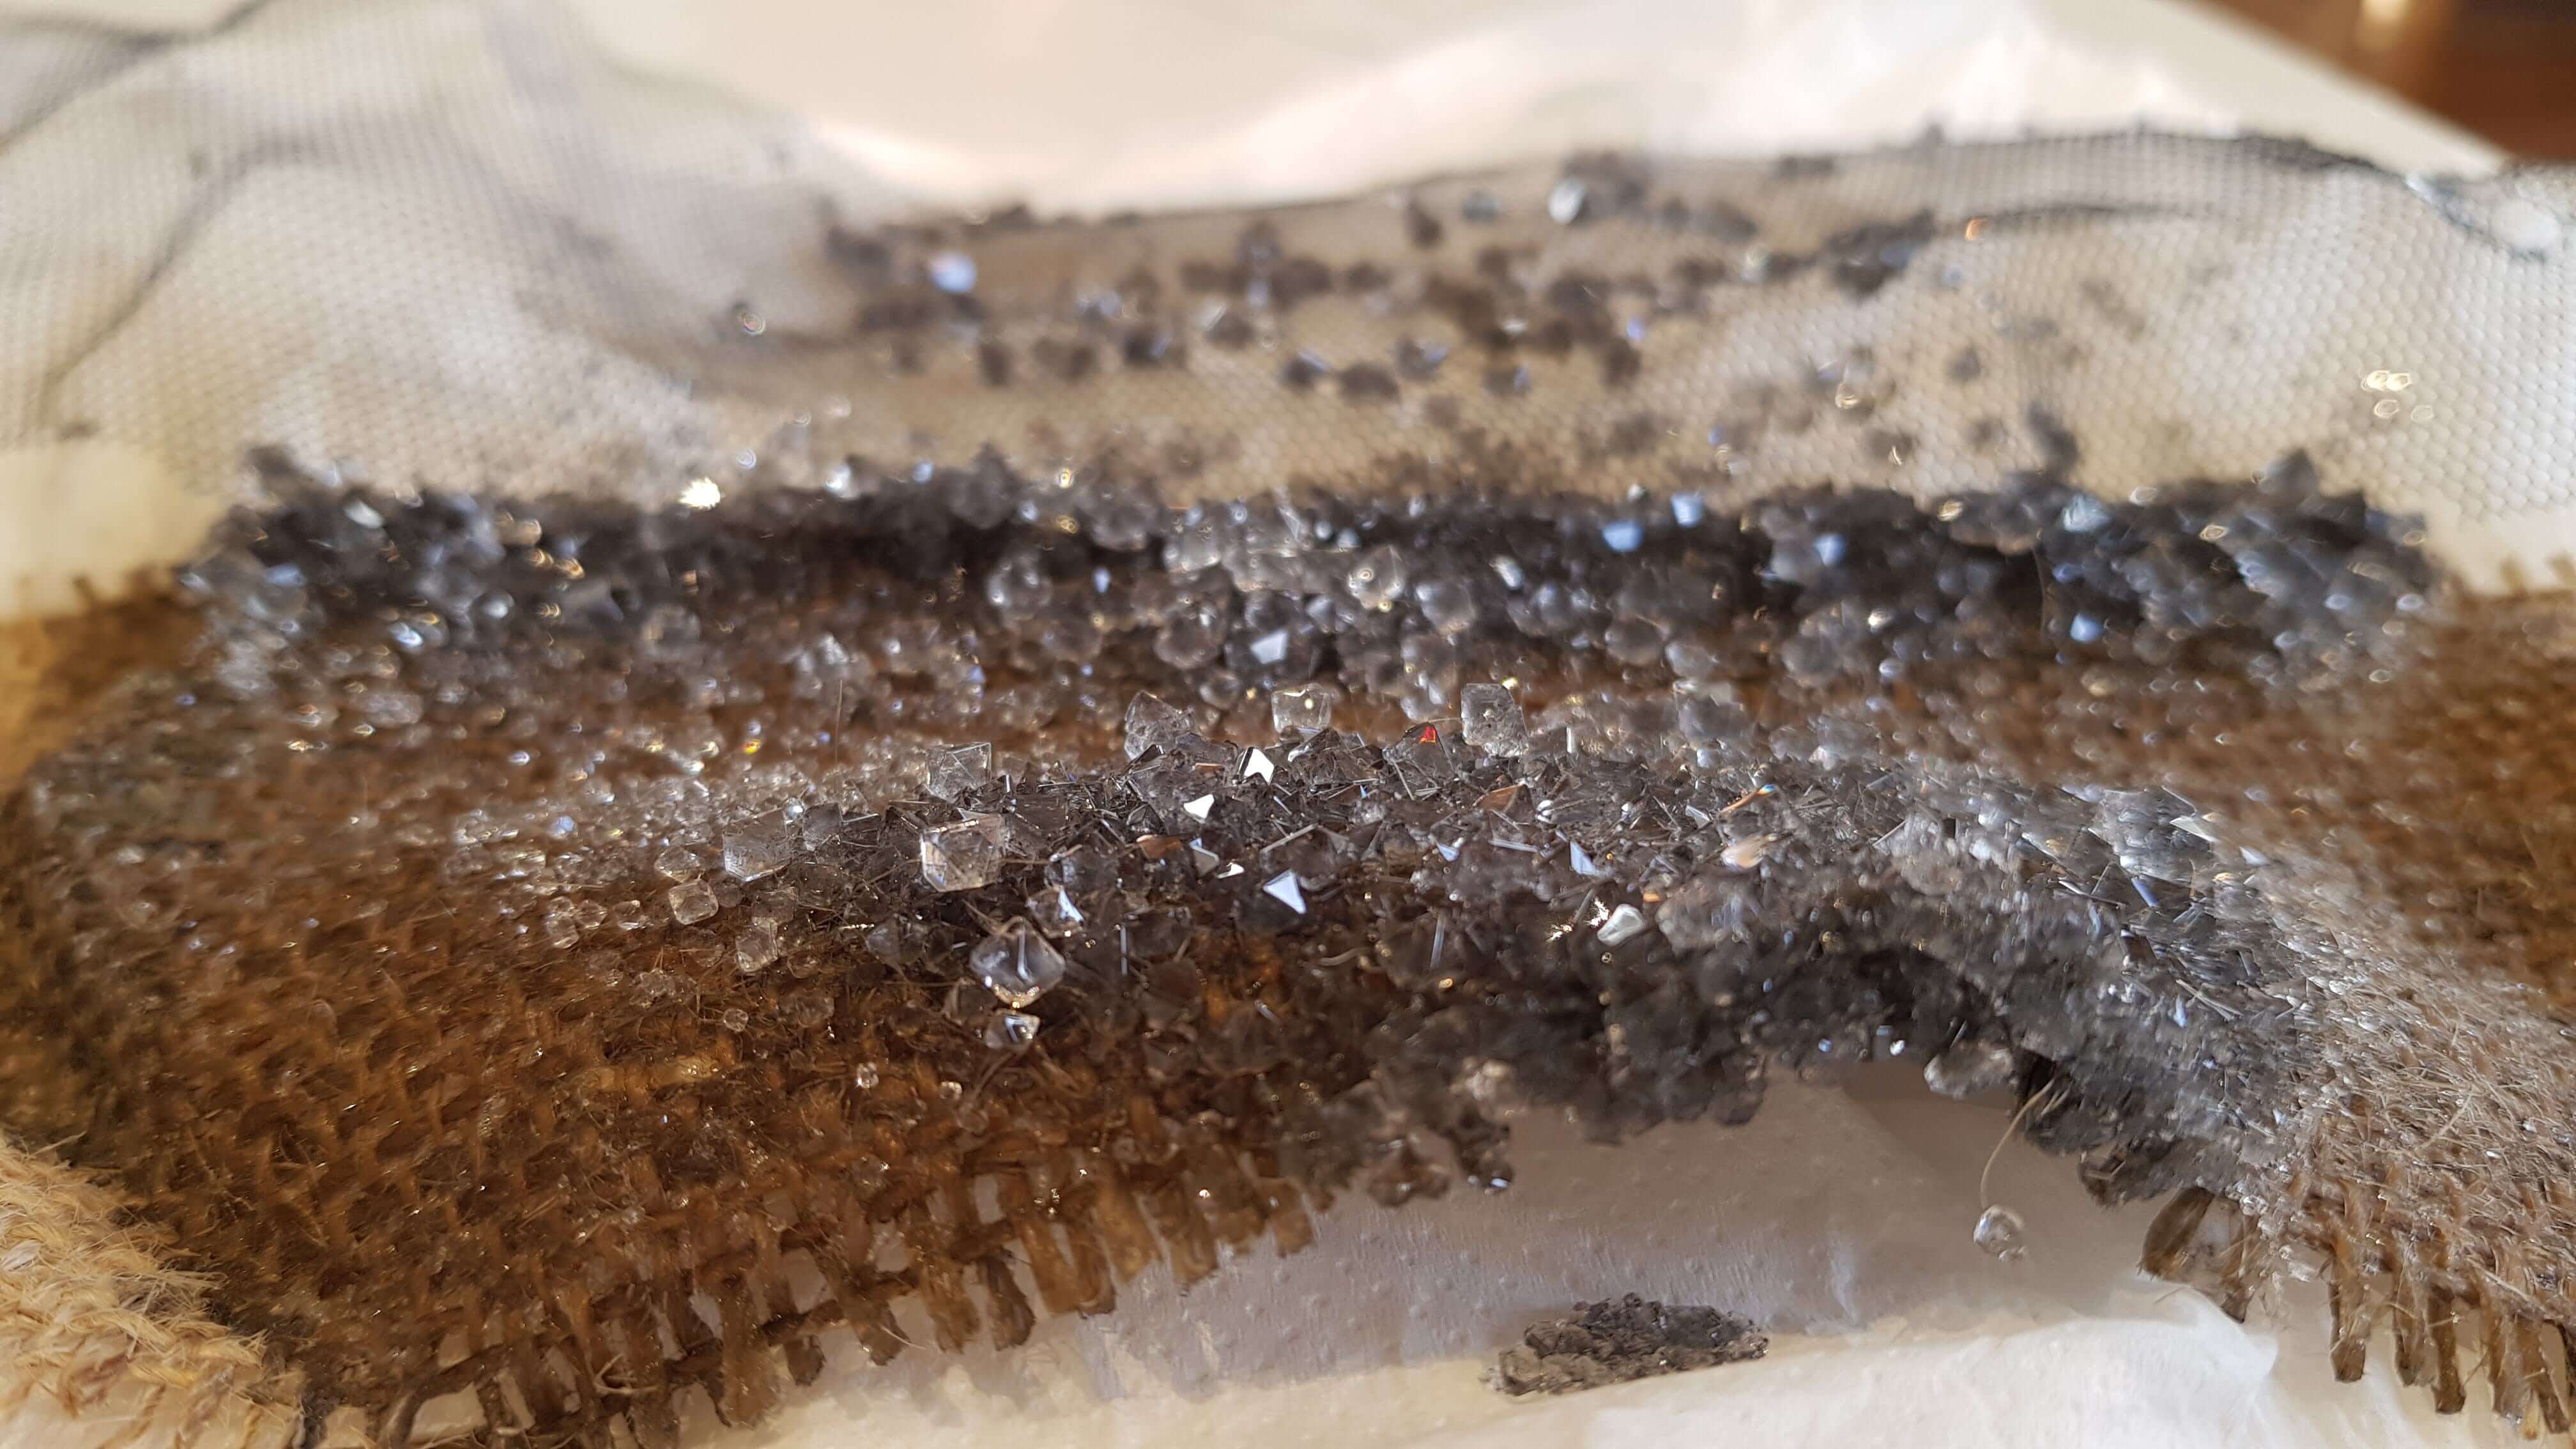
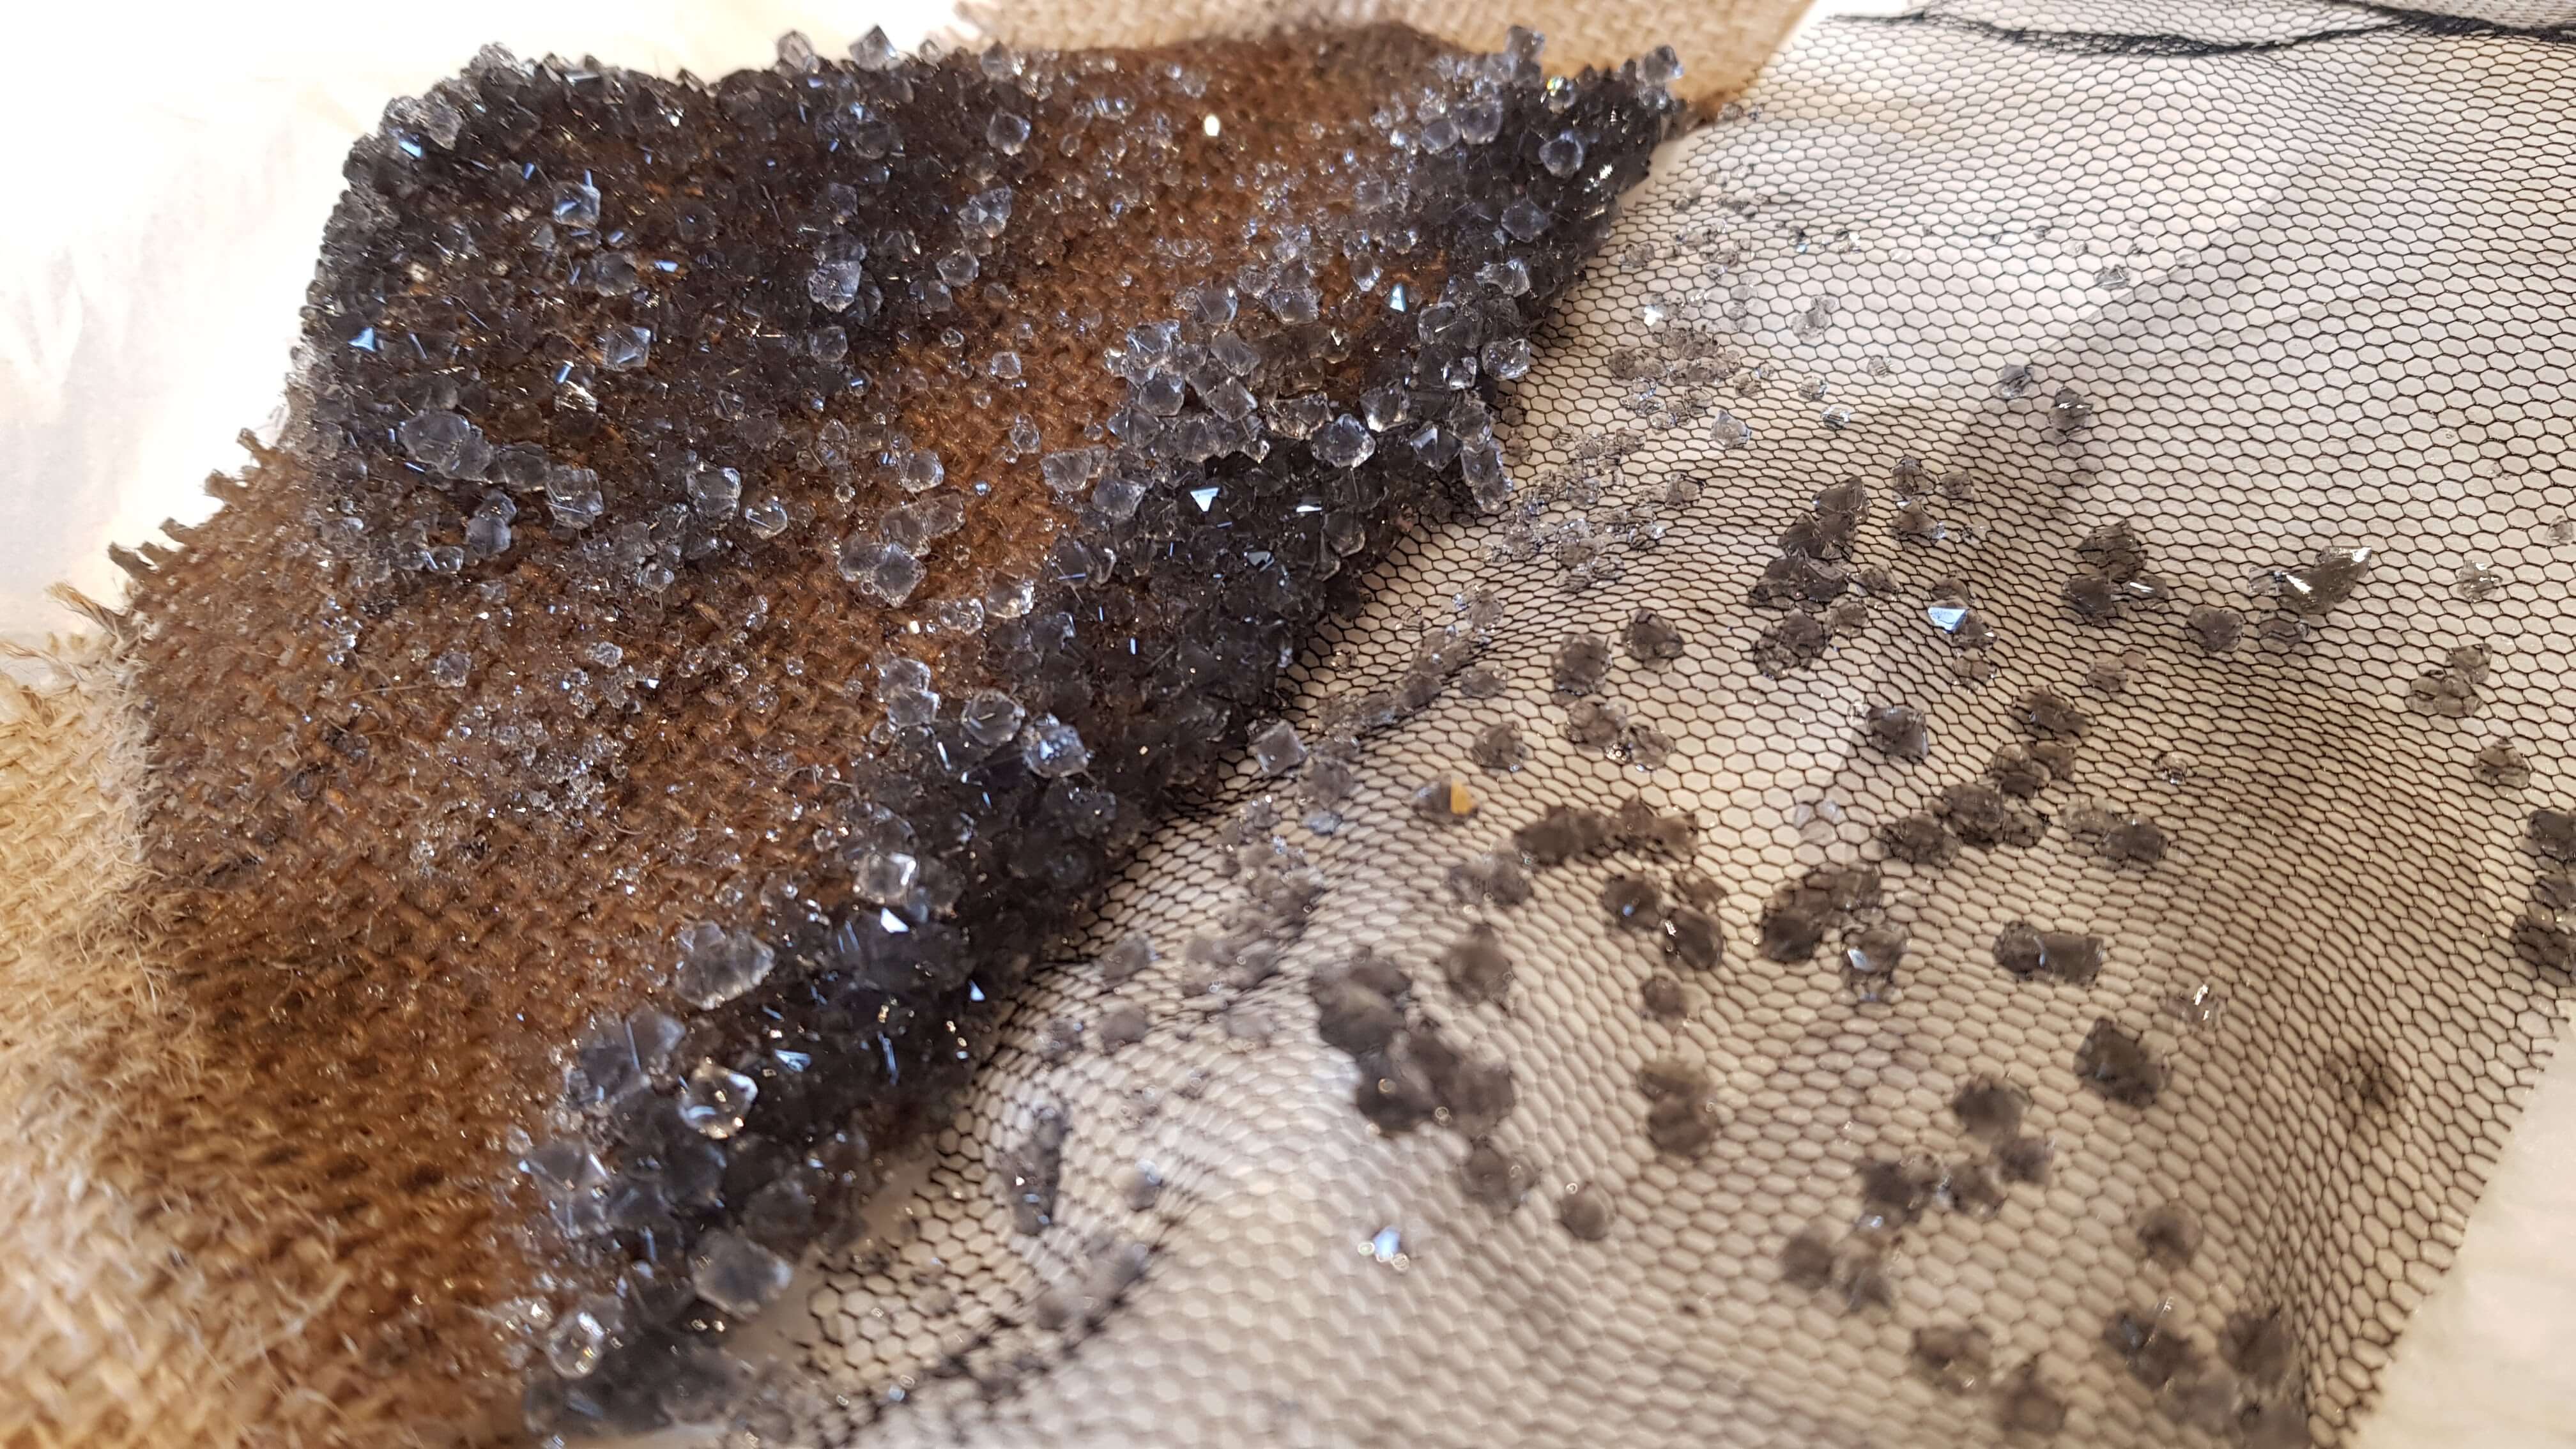
We had a lovely class with Margarita in which she explained how to grow crystals on textiles. As a test, I placed burlap, netting and a macrame piece (knitted by talented Rebecca) in alum salt bath. After a day, it had grown a lot of crystals as you can see in the pictures below.
This is just a test, but I'd like to combine it with the shoe making and molding of fabric using the shoe last shown before.
Inspiration
My inspiration for this week was a bit all over the place. Because I found the crystal making quite straightforward and with nice results, I started thinking: what would I grow crystals on? And from then my thought process diverged into different paths.
As for the moulding of materials, my mind went immediately for shoes.
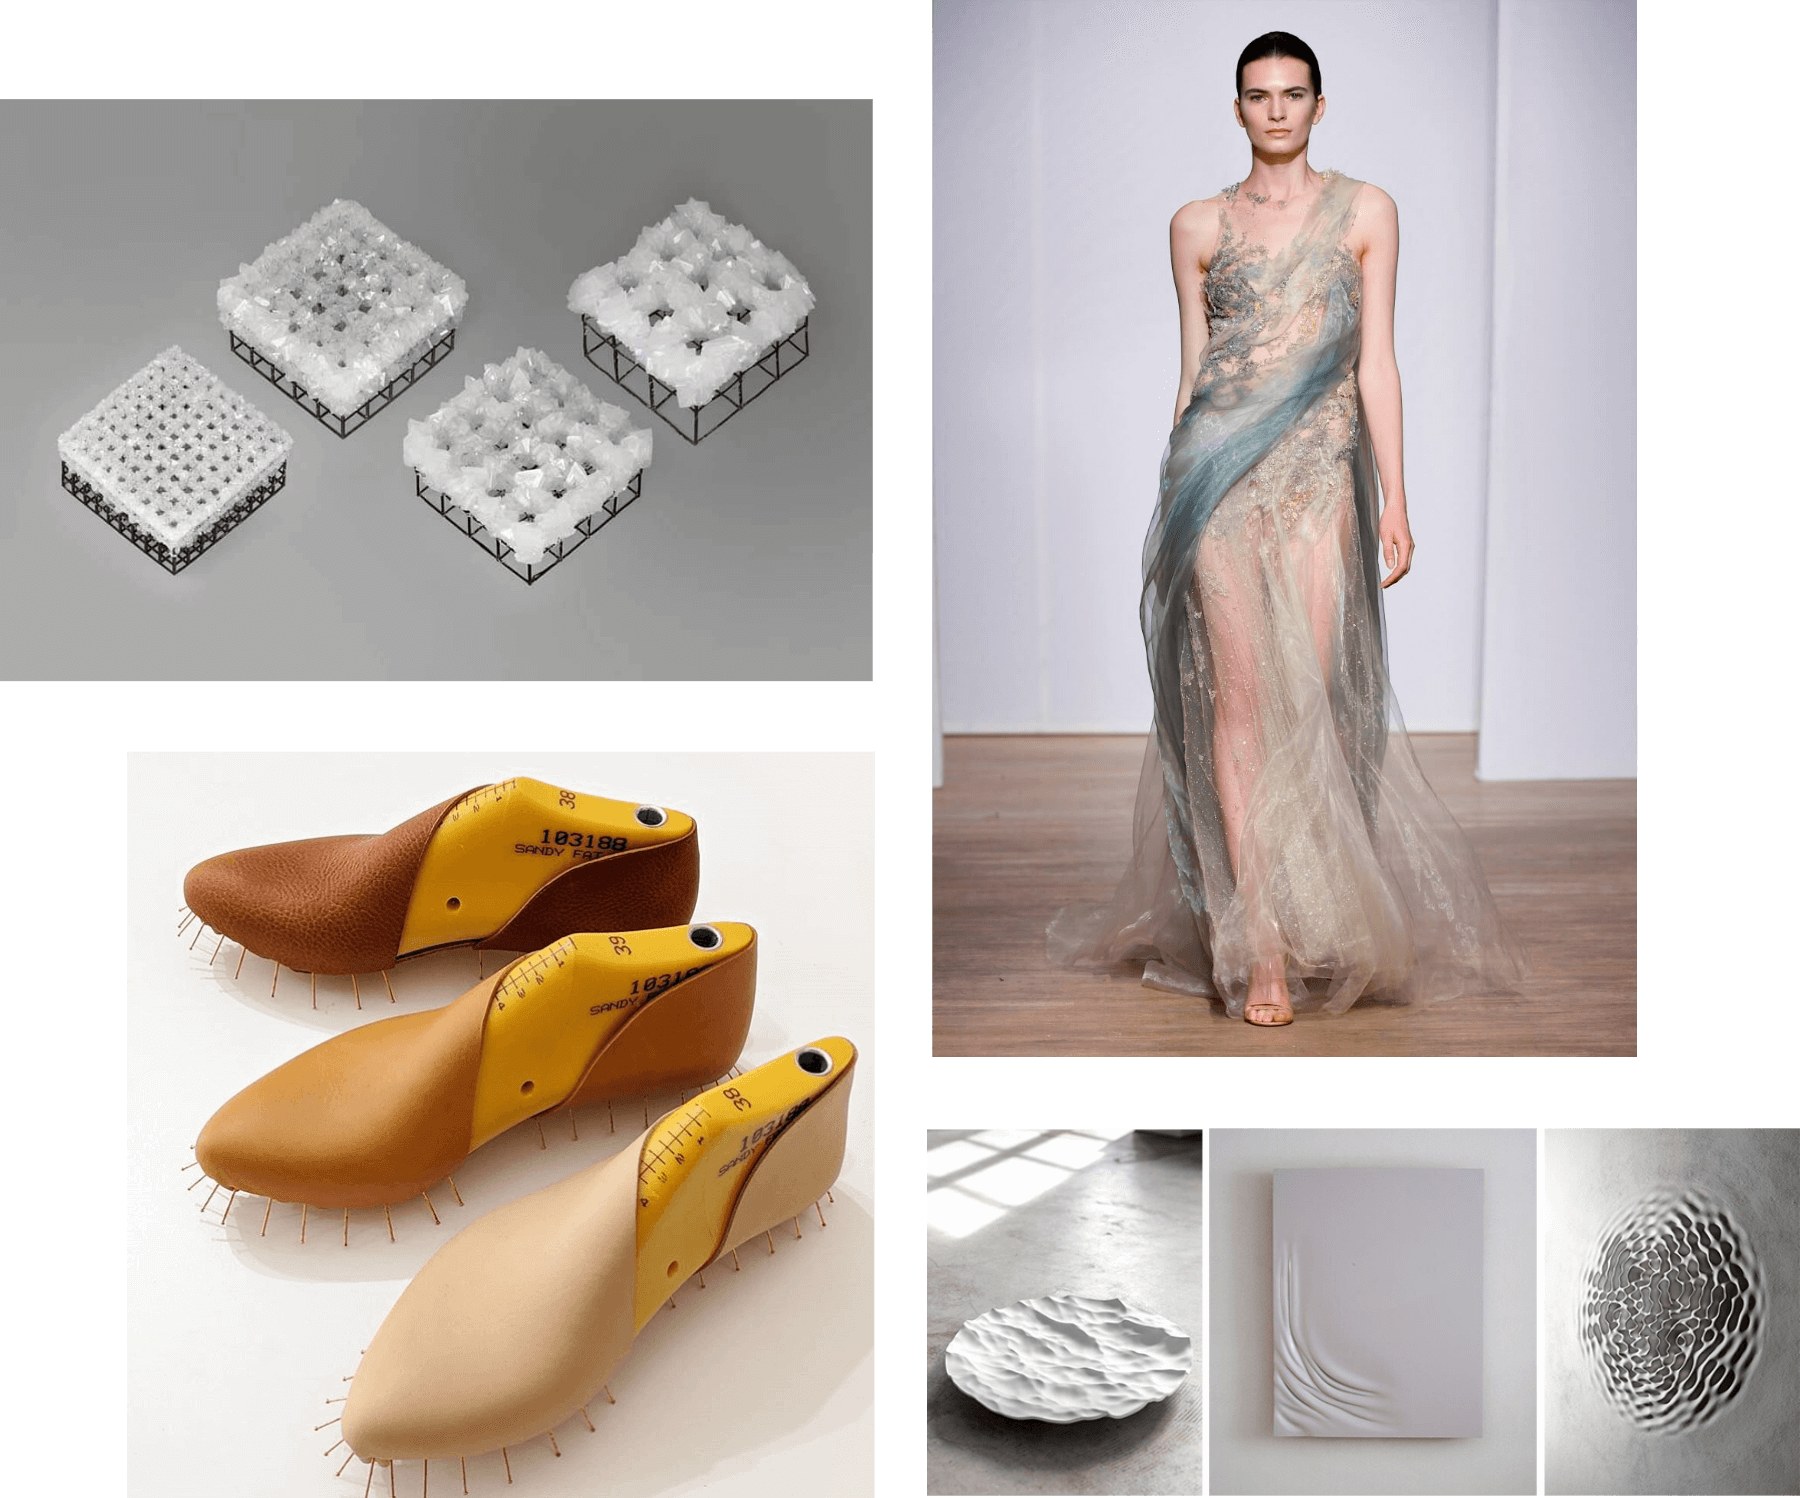
- Top left: Crystals grown on 3D printed structures. Source
- Top right: Yinqing Yin's haute couture with crystals. Source
- Bottom left: Sevilla Smith's simple aesthetic shoes. Source
- Bottom right: Organic shapes using CNC and casting. Source
Growing crystals on fabric
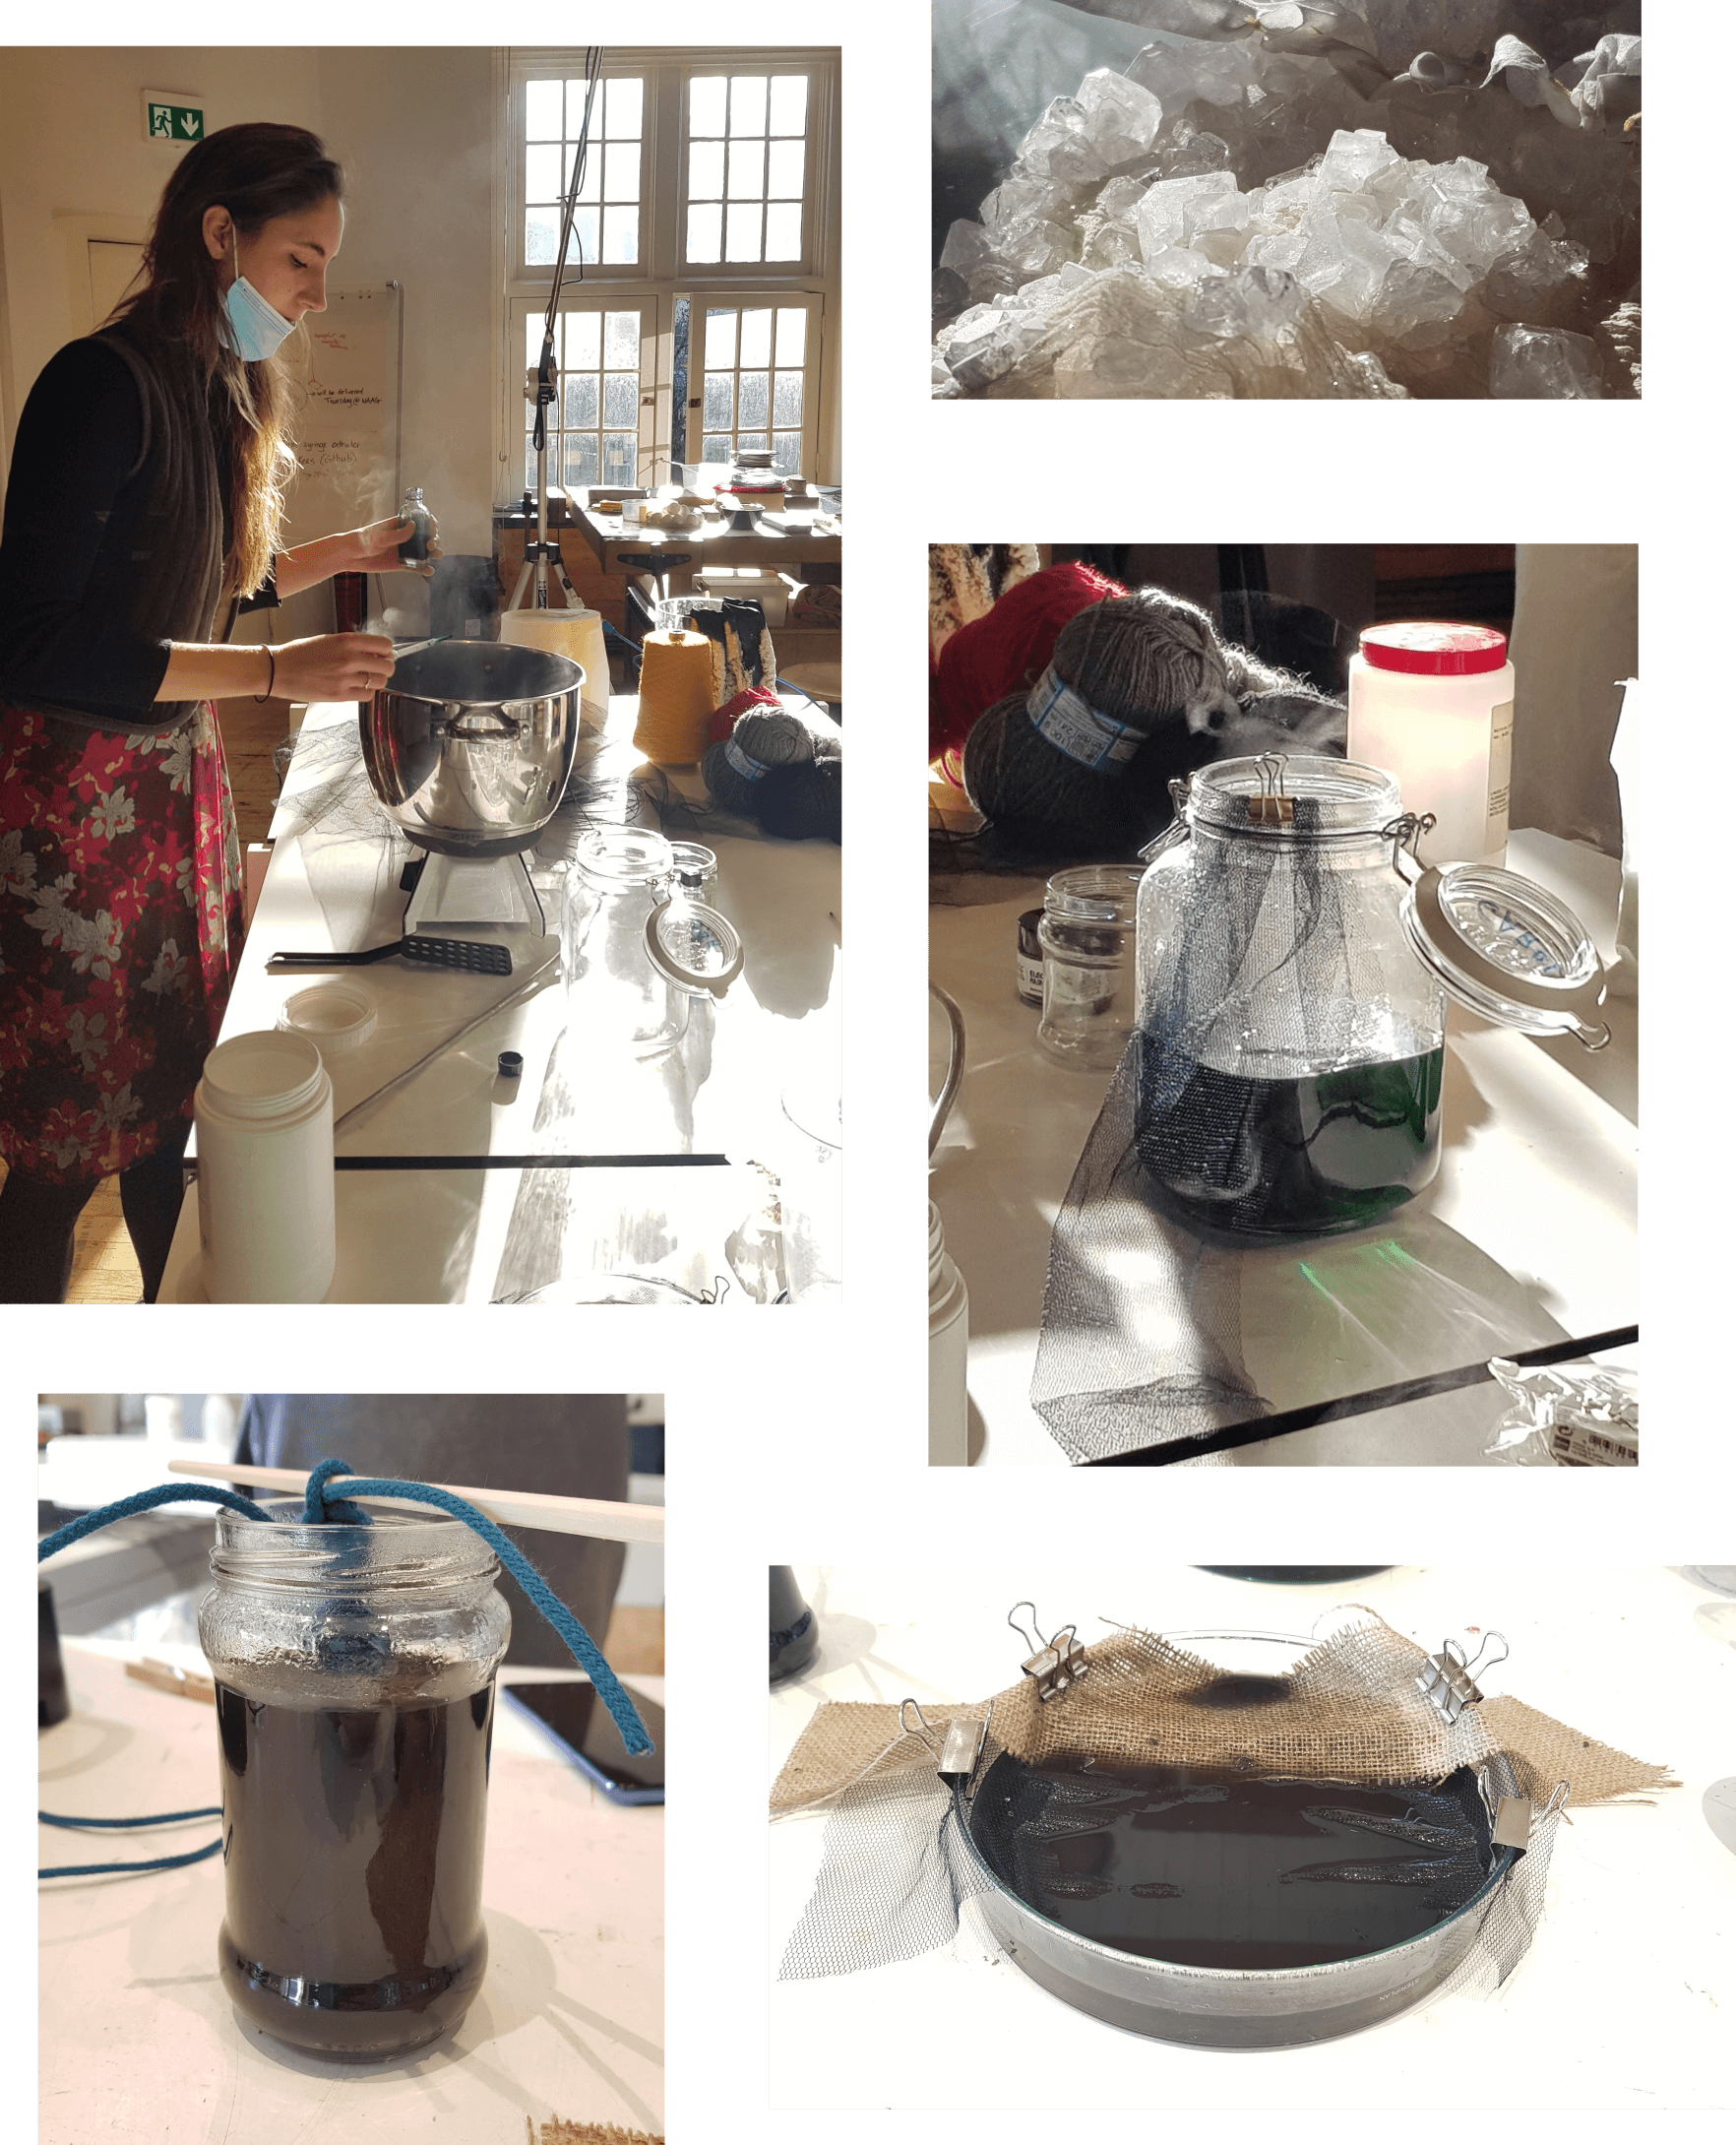
How to grow crystals on fabric
| Step | Description |
|---|---|
| Heat water in a pot | Bring water to simmer in a pot. The amount of water depends on how much fabric you'd like to cover in crystals. |
| Add salt until the solution is saturated | Once the water is simmering, add salt while stirring. Do it in batches and stop when no more salt can be dissolved. |
| Add color or other additives | At this stage you can add coloring to the water or other additives like conductive paint. |
| Transfer the solution to a recipient | Pour the solution in the recipient where your fabric will be placed. Find a spot that is stable and out of the way, as crystals will grow properly only if the fabric and recipient don't move. |
| Place fabric in the solution | Depending on the desired outcome, you can place the fabric touching the water surface, or completely sink it. If the fabric touches the bottom of the recipient it will most likely get attached to it. |
| Wait for the crystals to grow | The amount of time it takes for crystals to grow depends on the type of salt used. For example, with alum it takes only a few hours to form crystals. It is best to check the fabric every once in a while and remove it from the solution when the desired volume of crystals has been achieved. |
| Remove the fabric from the solution | Once you're happy with the result, remove the fabric from the solution and let it dry. |
| Reuse the leftover salt crystals | Most likely there will be crystals not only on your fabric but also on the recipient walls. You can reuse them for another crystal making session. |
Making a shoe last
Finding and adapting a 3D model
I knew I didn't have the time to design the shoe last myself, as that process alone requires tons of knowledge and it isn't easy. So I went on looking for a 3D model online hopefully on my size. And after browsing for quite a while in several 3D model websites, I found a free model in EUR 39! Hurra!
Before CNC milling the shoe last I needed to edit the 3D model to make it suitable for this fabrication technique. There are a few considerations to the 3D model when CNC milling:
- The size of the material. In my case, I wanted to use insulation foam as base material. This comes in several sizes, and what I had available at Waag was 3cm thick in pieces of different lengths and widths, mostly around 40x40 cm. So my limiting size was the thickness, 3cm, since my model was bigger than that.
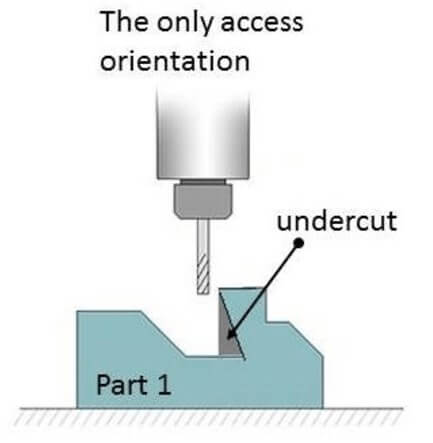
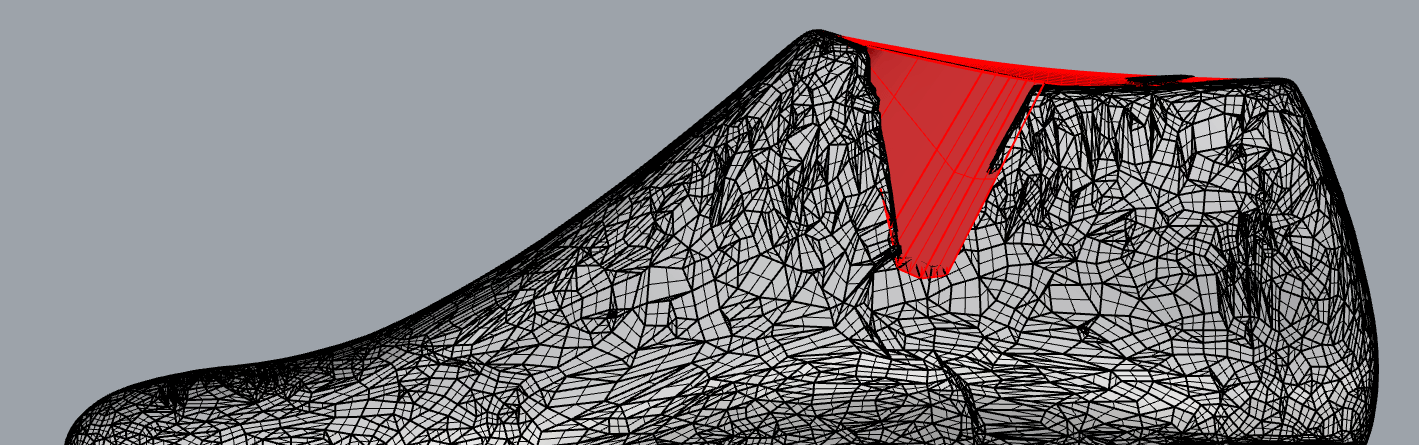
- The shape and orientation of the model in relation to the drill bit. The drill head of the CNC machine at Waag can move in 3 directions: X, Y and Z. The drill bit is oriented in Z, which means it can drill at different heights. However, it cannot rotate to an angle between the Z and XY plane, which means there are areas which the drill bit cannot reach. That is why to get the most accurate milling of the 3D model, it is important to identify how to orient the piece so there are not undercut sections like in the image below.
Optimize 3D model
I imported the model in Rhino and because of the high level of detail of the model it was quite heavy on the processing. I found online that Rhino has a command to reduce the number of faces of the mesh 3D model, which makes the processing easier (less faces = less operations to compute). The command is ReduceMesh, and I set it to 64 faces. The other modification I did to the model was filling the gap of the ankle, since I didn't need it for my purpose.
Measure twice cut once
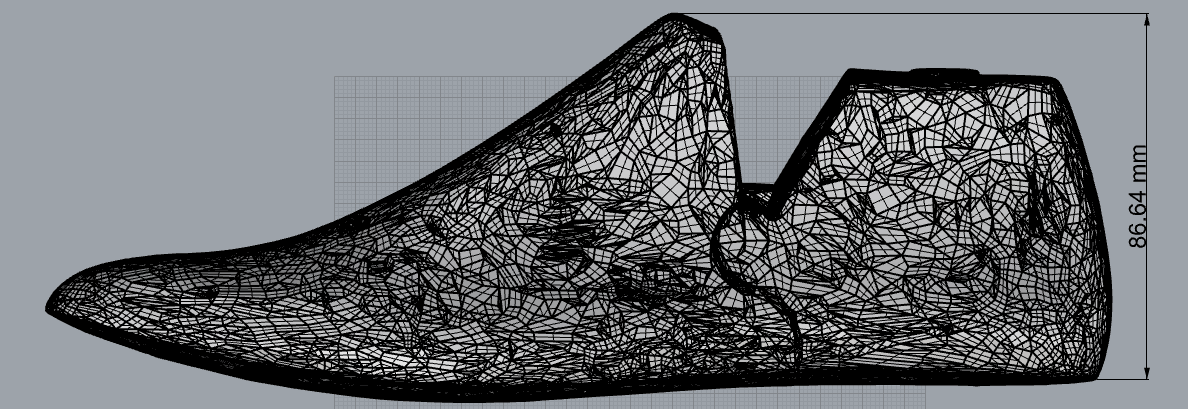
As mentioned before, material dimensions are crucial when CNC milling as they will limit the size of your piece. I measured the model in Rhino using Dim command and evaluated the best way to slice the last. I also measured the foam pieces I was going to use, and the limiting size was the thickness of 3cm, so I decided that would be my slicing thickness.
Slice in parts
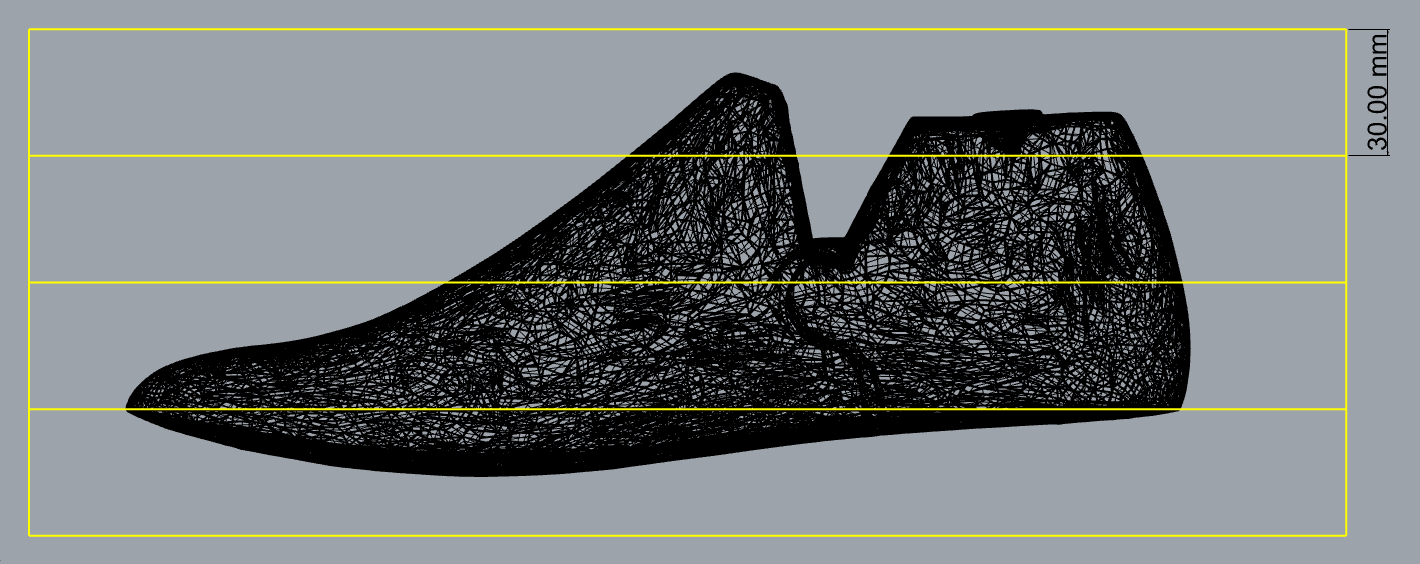
To slice the model in Rhino, I made boxes simulating the material dimensions. Then I placed them along the shoe last in a way that I could minimize undercuts as explained before. Using the command Slice, I obtained 5 different pieces to mill that together conform the complete shoe last.
You can see the result of these modifications below:
CNC milling
My class notes
Download here a PDF with the notes I took during Henk's class.
Preparing 3D models to CNC
Before the sliced shoe last can be milled, it needs to be translated from 3D object to instructions the CNC machine can understand. The process is quite similar to 3D printing, and the end result of this process is a text file which contains commands for the machine to follow. These commands are written in GCODE language and they are mostly instructions like move the drill head from point A to point B. They are called toolpaths.
To make the translation from 3D model to toolpath the software tool Shopbot Partworks 3D is used.
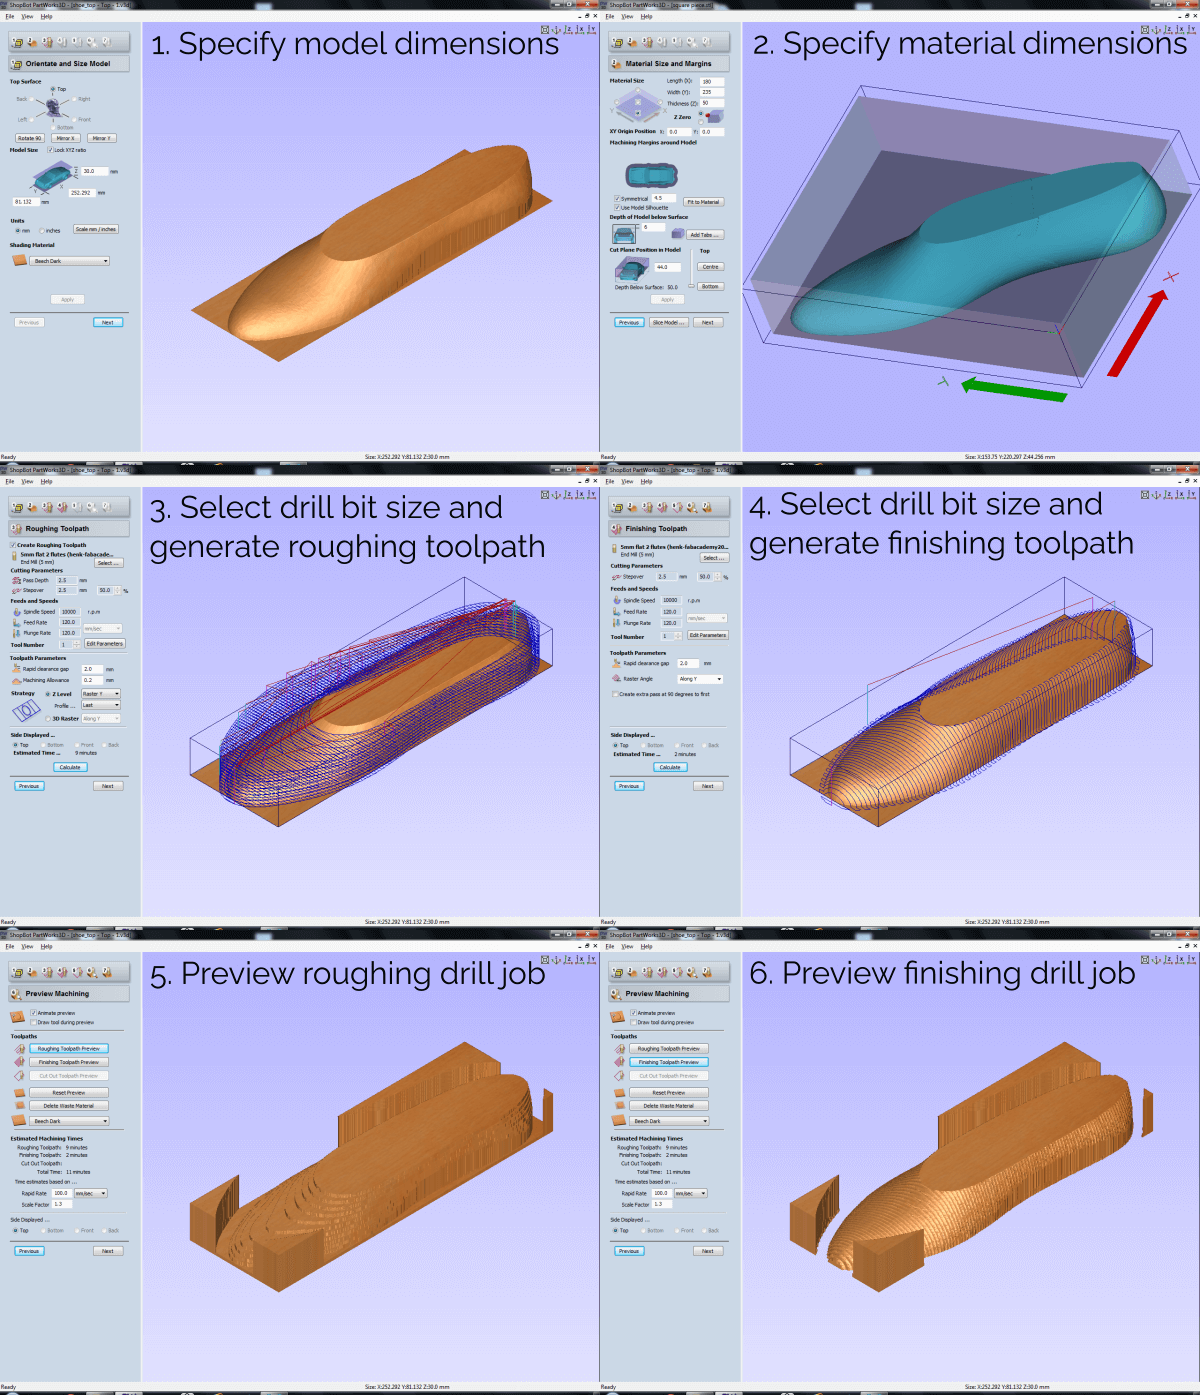
After this process the toolpath files are created and ready to load in the CNC machine.
Using the CNC machine
Once all the prep work is ready, it is time to work with the actual milling machine.
The detailed instructions with pictures can be found on my class notes PDF (here).
The overall process is as follows:
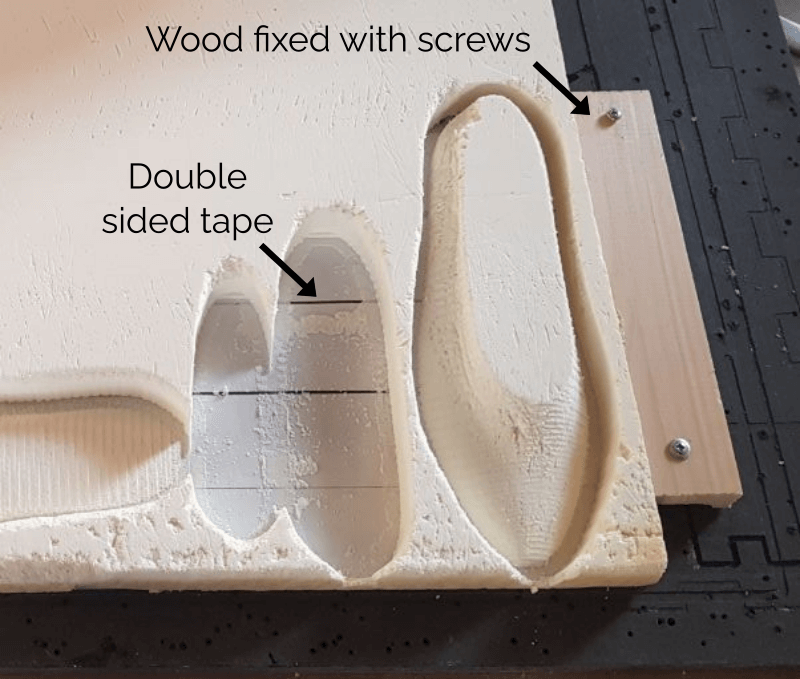
- First thing is to clean any remaining material bits from the bed.
- Second thing is to position the material that is going to be milled in the surface of the machine. Double sided tape and wood sticks can be used to fix the material on the CNC bed to make sure it doesn't move during operation.
-
Turn on the machine using the button on the right side.
-
Open Shopbot software on the computer connected to the CNC. Some calibrations are needed before starting the milling job.
- Set the origin (X=0, Y=0) of the machine. It is the reference point for us to know where the machine starts moving from. Button Set zero x,y.
- Set the anchor, which is the starting point of the milling job. Press the button Job home and move the spindle with the keyboard to the starting place on the material. Then set 0 for X and Y in the software.
- Set the Z height with the Z calibration tool. It is a metal plate that is placed on top of the material. The drill bit needs to touch it to detect it and know where the material starts.
-
Turn on the vacuum
- Turn on the spindle and set rpm to 100 (this depends on material, this is for foam).
- Press start in the software
- When it is finished, turn off everything, remove the key and clean the workshop.
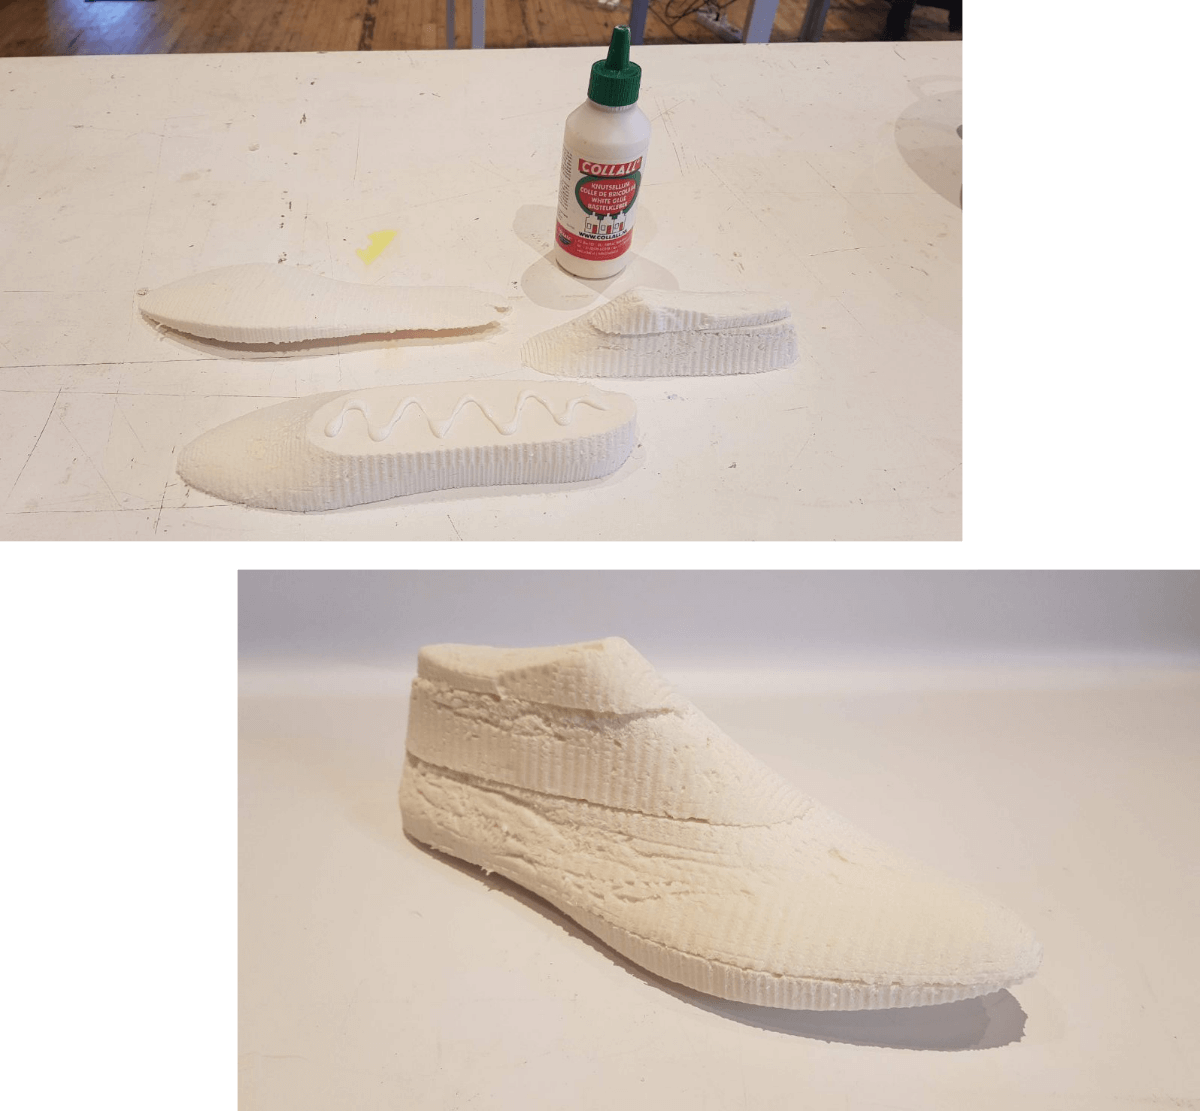
Attaching the parts together
To finish, I glued the foam parts together. To make the result more sturdy, I made a mix of 50% water and 50% white glue, cut paper strips and covered the shoe last in the mix of glue-water and paper strips.