9. TEXTILE SCAFFOLD
This week we learned about Technical Textiles and the various applications such as composites, polymerization, solidification, formwork for fabrics, crystallization and biocomposites, agglomerates. And I was... help, what do I want to test?!?!!
TEXTILE FORMWORK
I was very impressed with the possibility of using textile material as a support for other production processes, such as textile formwork that uses the material as a mold for pieces in cement or plaster.
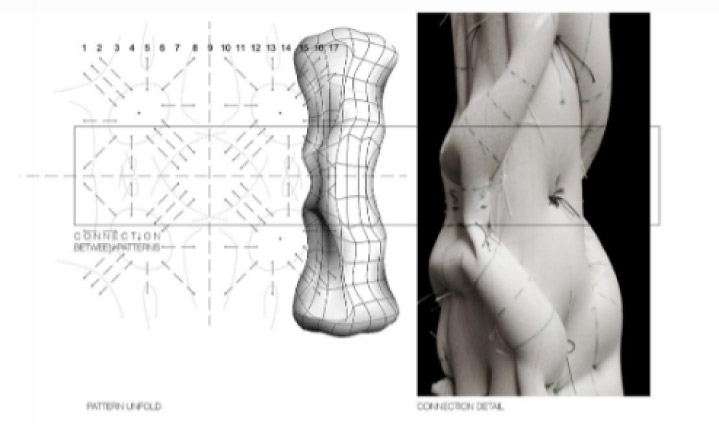 image from https://www.instructables.com/Cast-Concrete-With-Fabric-Texture/
It made me reflect on how textiles are commonly linked to products that appear/involve image (eg fashion/interiors), but how there is a wide area of research for textiles as a mediator of processes in which form and physical strength work together.
The ecological efficiency of the technique drew my attention, which can result in architectural columns and beams efficiently, being an economical way and, due to its flexibility, reusable for several foundries. In addition, the material gives the finished concrete a level of strength not obtained by other forms due to the filtration that occurs through the fabric (MY ADVENTURE BOOK, 2017).
“Not only is the shape the most efficient use of the material, but the shape itself is elegant and appears natural due to its basis in mathematics and physics. To the human eye, it just makes sense (ADVENTURE BOOK, 2017).”
These lectures was very inspiring and talks about the advantages and possibilities of Textile Formwork:
Fabric Formwork - Anne-Mette Manelius from The Building Centre on Vimeo.
1st try
I confess that, at first, I was a little insecure with the technique, not understanding for sure how to control it through digital fabrication and not yet having the skill for simulation files in 3D software. Even so, I decided to test it intuitively, building a wooden support and fastening the fabric using the moulage technique with the aid of pins. A lot of textile formwork uses cement to do the work, but I ended up choosing to work with plaster, like here/ where they use plaster as a generative material, developing patterns that generate different three-dimensional shapes.
By looking at the documentation of Fabricademy's past work, Agnes's report helped me understand the entire process.
So I followed the steps:
- Make your fabric molds and wooden supports;
- Place the fabric on the support;
- Mix the material (plastic, cement, or some other material you desire) and place on the fabric, let it dry;
- Remove from the mold, you can keep it that way or finish it off with a finish of your choice.
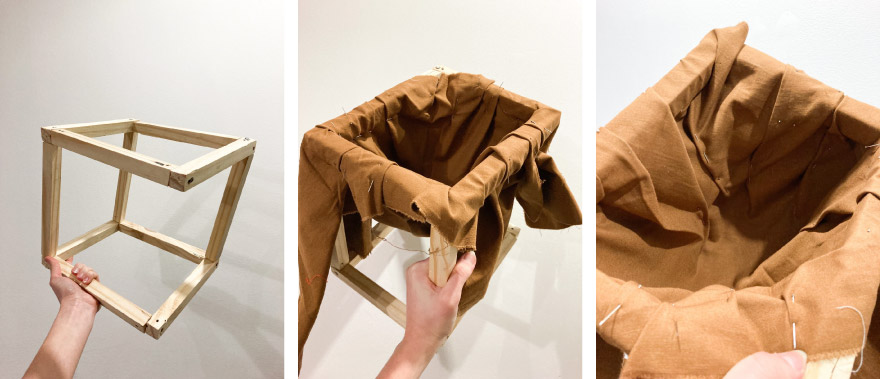
I made a 20cm x 20cm wooden cube to use as a support. I ended up miscalculating the quantity and missing material for the last edge of the cube. But it worked anyway. First, I tested the recipe indicated on the package using 100g of plaster for 700ml of water. The mixture hardened very quickly and was almost impossible to mold. Soon after inserting the plaster into the tissue, I was able to remove it.
here we can see the difficulty of modeling with the first recipe
fisrt result:
2nd test
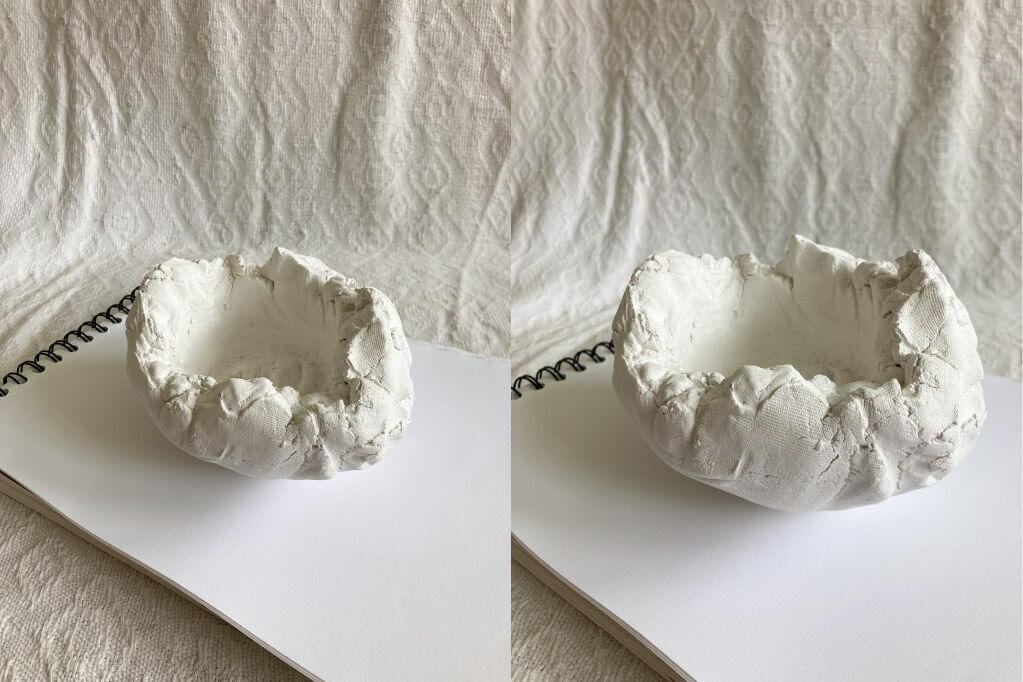
Then, I made a much more liquid mixture than the one indicated by the manufacturer (I didn't measure the quantities), I released a lot of water when putting it in the mold, but minutes later I was able to work with it on the support with ease. I worked so hard that I ended up letting the fabric get a lot into the material, and it was difficult to remove once it was dry, a piece of the piece ended up breaking. In this test, I realized that the chosen fabric might not have been the right one due to its thickness and stiffness. (cotton twill with spandex). I also noticed that some of the pins I was using to secure the fabric ended up rusting in the drying process.

second result:
3rd test
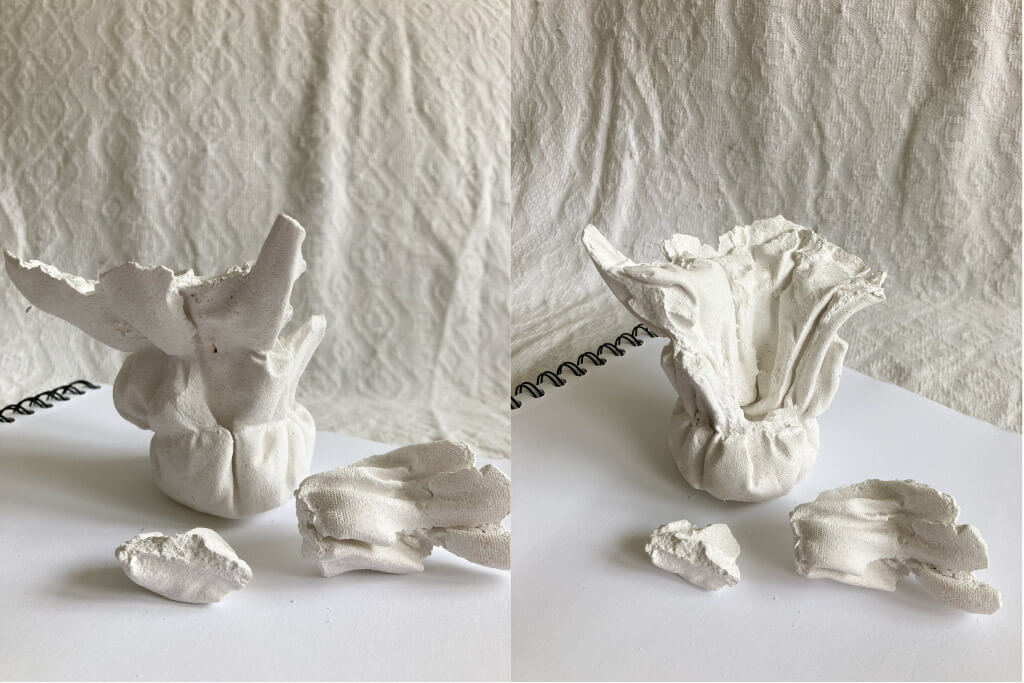
So I decided to do a third test with a very fine polyester mesh. For this one, I made a cylinder with the top open. I left the width of the rectangle a little wider than the length of the circle at the base of the cylinder so I could drape the material a little in the seam. I also sewed some tapes to the outside surface to help secure the fabric pattern to the holder.
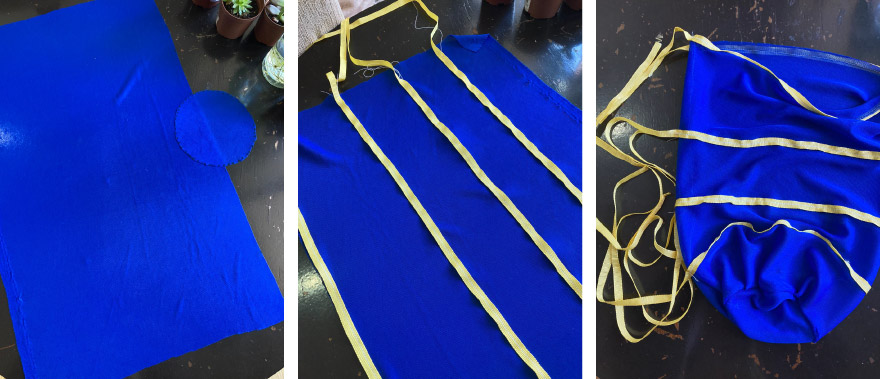
video of the process:
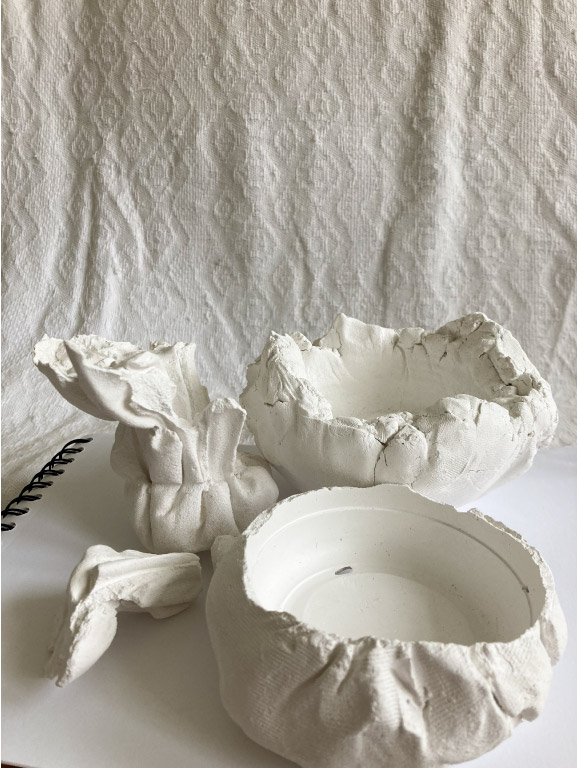
final result:
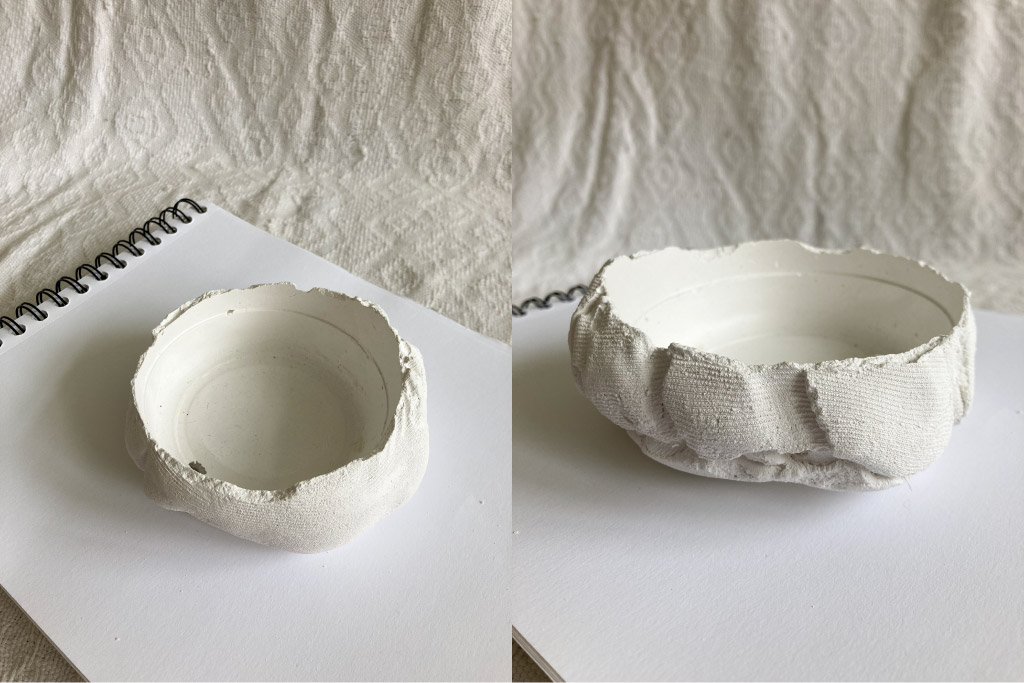
This one was better, but it ended up being quite low because the plaster was too soft! It also ended up with a hole in the bottom.
Anyway, it's helping me to keep my watches!
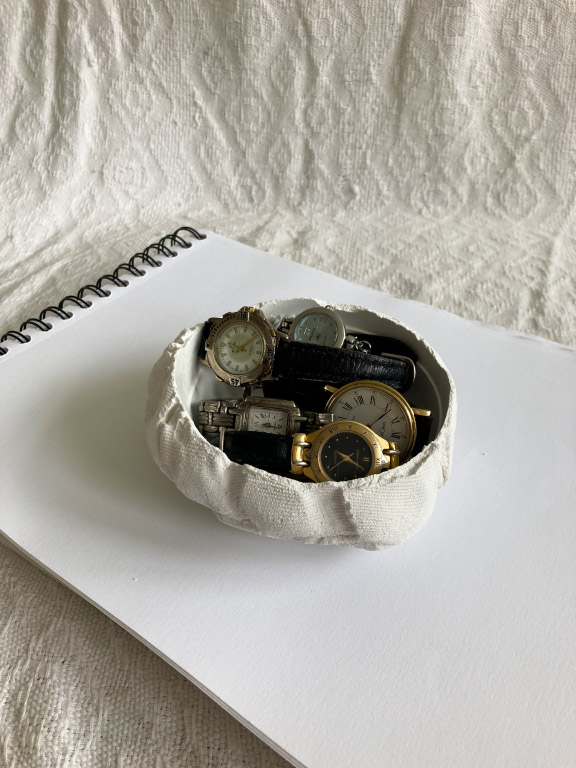
Even though they didn't work out 100%, I liked the appearance of the plaster at the end!
important note: this process do a lot of mess!

CRYSTALLIZATION - ALUM
I decided to test the crystallization with alum, since I already had the material at home due to biochrome week. For this, the documentation of Lucrecia Strano, Paulina Martina and annie ferlatte helped me a lot.
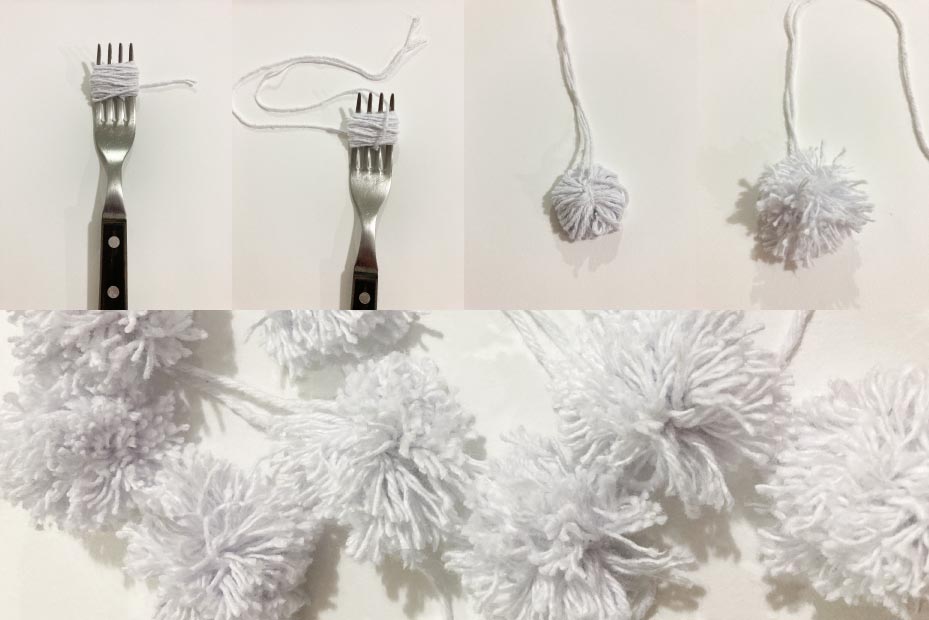
I decided to use the crystallization to make my Christmas ornaments this year, for that I made nine cotton string pompoms. Following these steps:
- Wind the string around the fork approximately 30 times.
- With another piece of string, make a knot passing through the middle of the fork and all the rings.
- Remove from fork and cut rings.
- Unravel the pompom strings.
1srt test
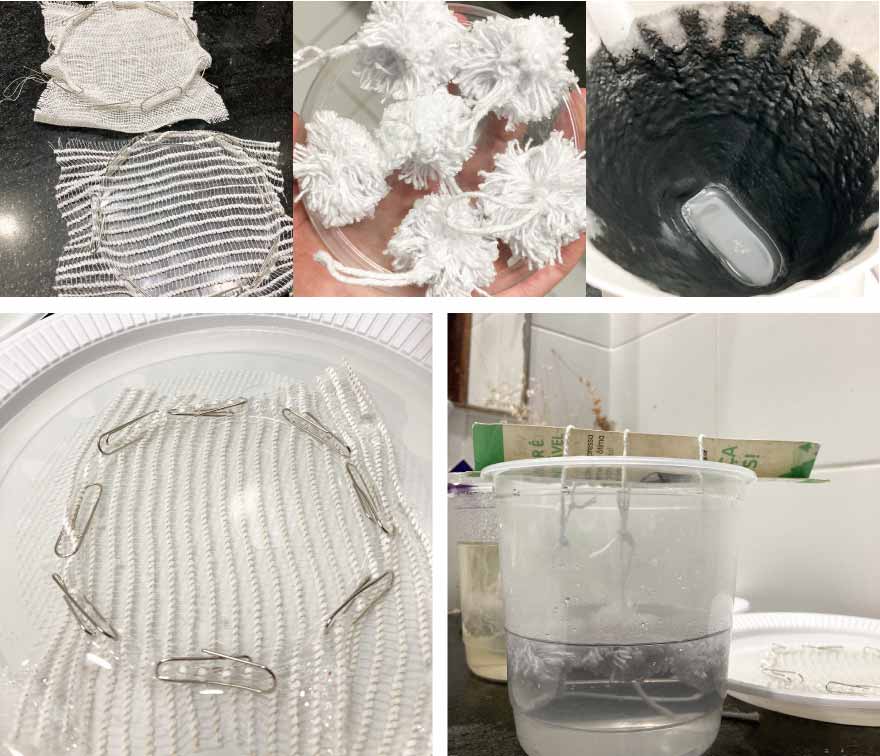
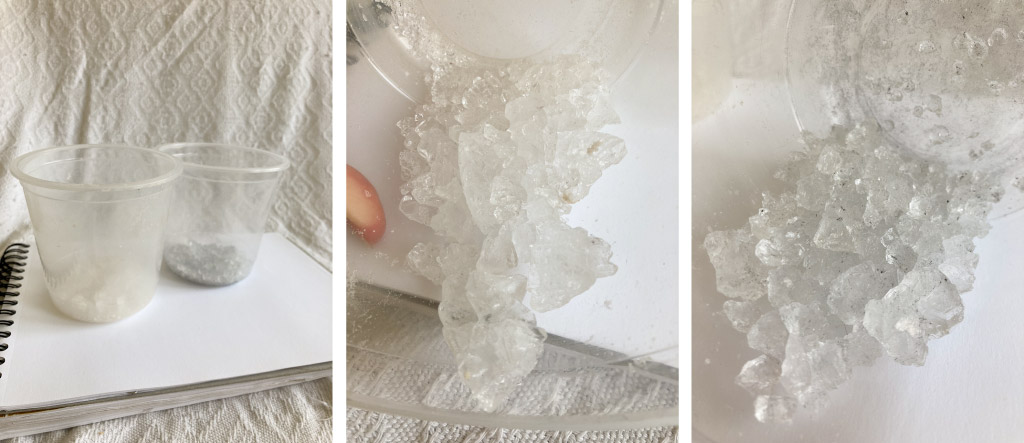
For crystallization I used:
- A digital scale
- Pots sanitized with 96% alcohol
- Pan sanitized with 96% alcohol
- Spoons sanitized with 96% alcohol
- Coffee filter and coffee filter paper
- Alum
- Water
- White glue
- Activated charcoal
- Elements to crystallize: LED, four fabric samples (open weave, two very open and another 2 a little less, 9 string pompoms
- Rulers and string (to secure the elements on top of the pots) You can also add pigments to your recipe so they crystallize with color.
| Alum | H20 |
|---|---|
| 200g | 1L |
- Boil water with alum, ensure all alum is dissolved. If using any pigment/activated carbon, add it at this stage.
- Filter the solution (it is good to run hot water through the filter before actually filtering the solution).
- Apply white glue and fix alum grains where you want to crystallize the object (this is not a necessary step, only if you want to crystallize in a specific location on the material).
- Secure the objects with the bar and hang them over the pot with the help of a ruler or other support. You can make these brackets on the laser cutting machine if you prefer.
- Cover the objects with the alum solution and leave for a few days to crystallize.
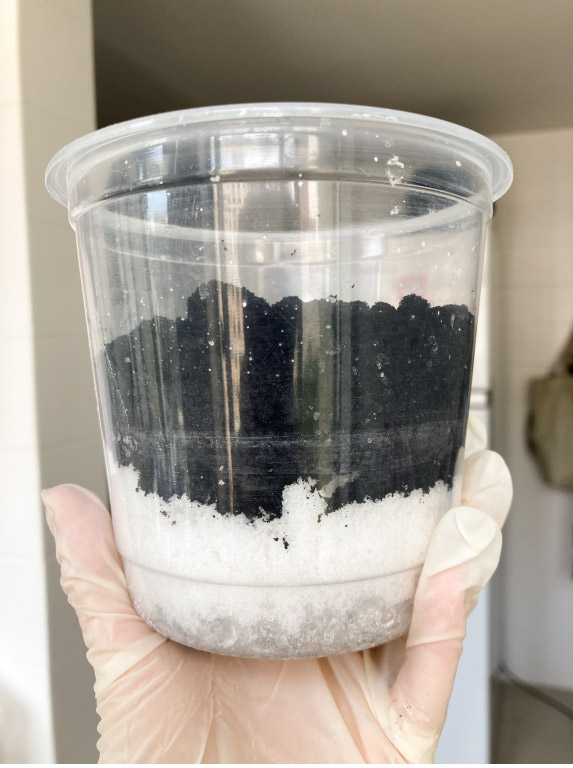
I did this process twice, once with just alum in the recipe and once with activated charcoal (I put the quantity in the eye). But when filtering the solution with activated carbon, the water came out almost clean and the pigment was all in the filter, so I think I should have added more. When talking to Angela, she commented that this may have happened because activated charcoal works as a filter, and the alum of the substance may have filtered.
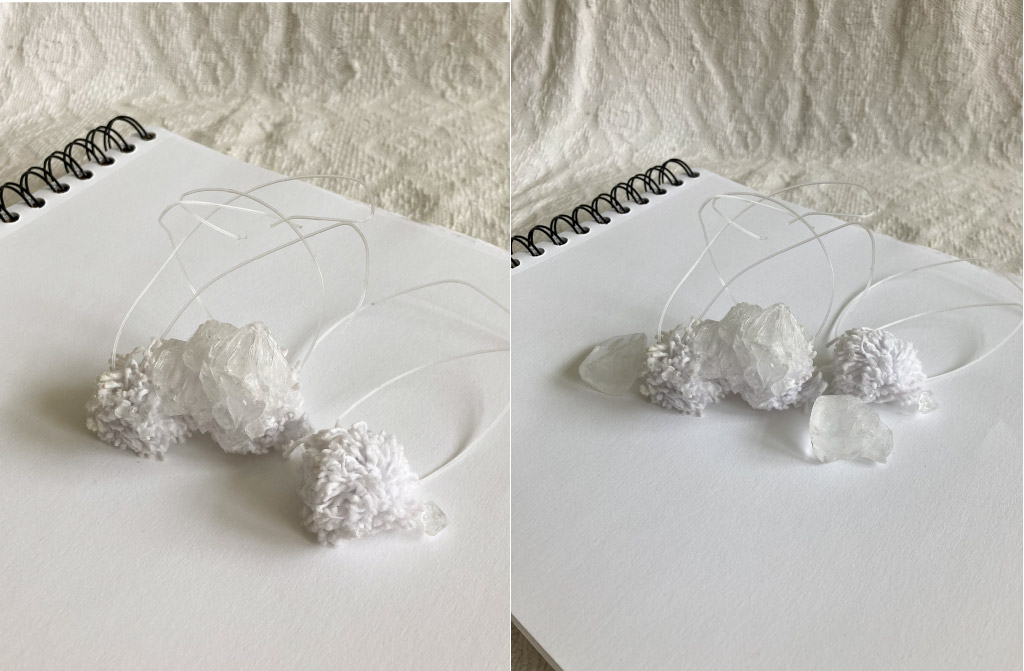
These were my results, I didn't like the crystallization on the pom poms and fabrics (both thicker weave and very thin weave). The crystals were practically all at the bottom of the pot.
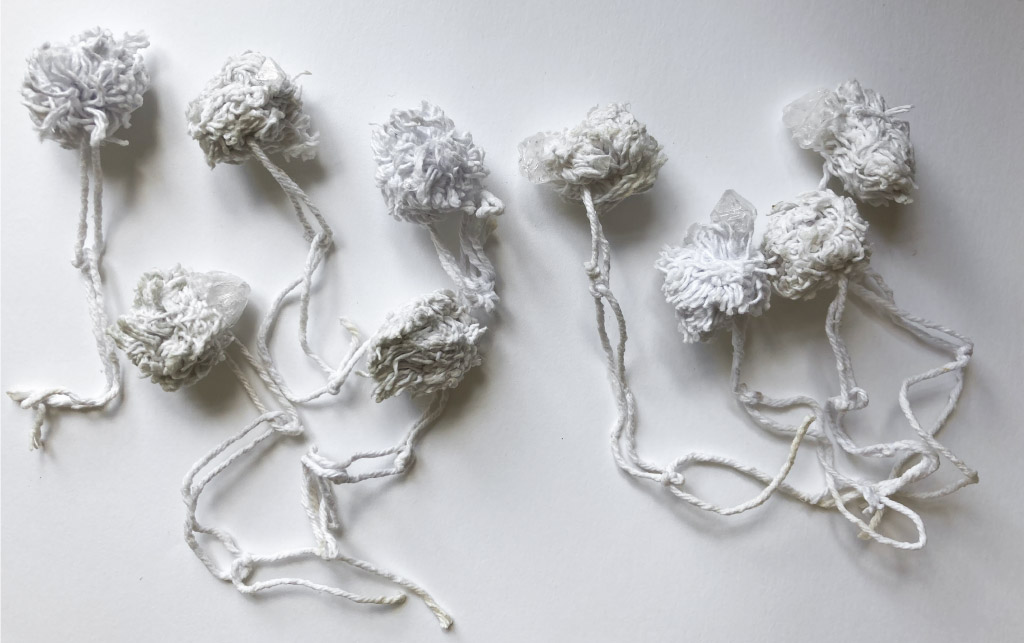
- pom poms - just alum/alum + activated charcoal:
- fabrics - just alum
- fabrics - alum + activated charcoal:
- all of them:
Images of the crystals in the bottom of the pot:
2nd test
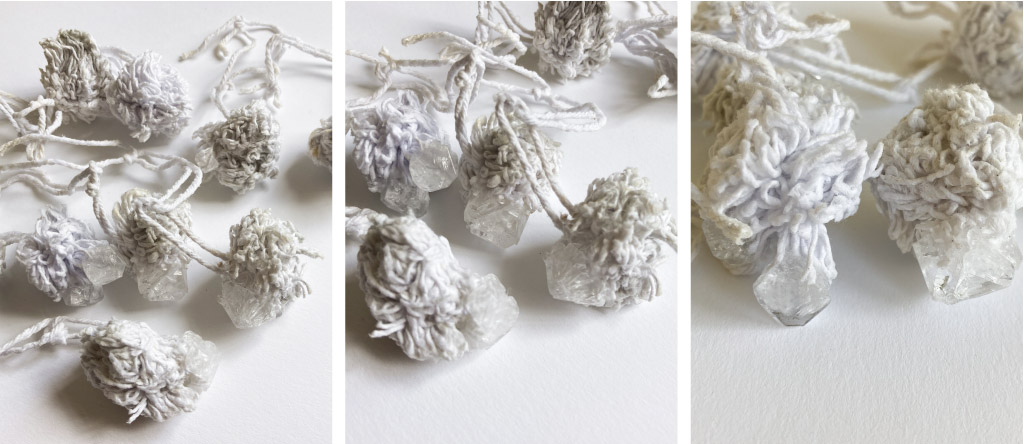
So, I decided to give it a second try. I redid the filtering process only for the crystals made only with alum, I did not filter the activated carbon one.
I added a lot of alum to the rest of the leftover saturation bath. Same for activated carbon... I didn't measure.
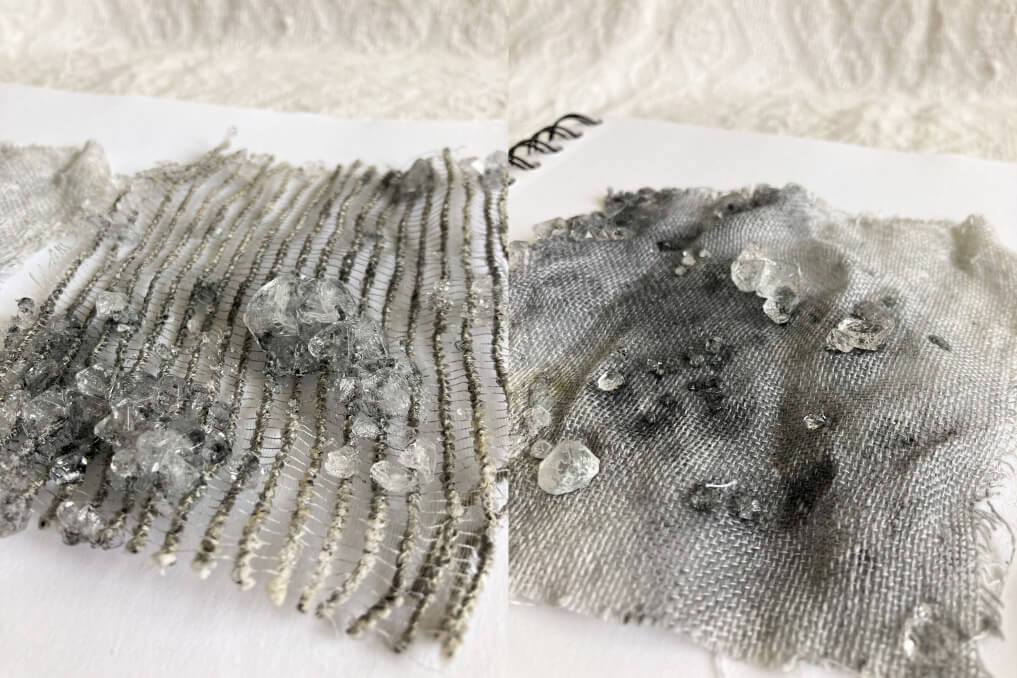
For this attempt, I remade the pom poms (but I decided to make only 3 of each case that went wrong), but I reused the fabrics from the previous tests that were already crystallized.
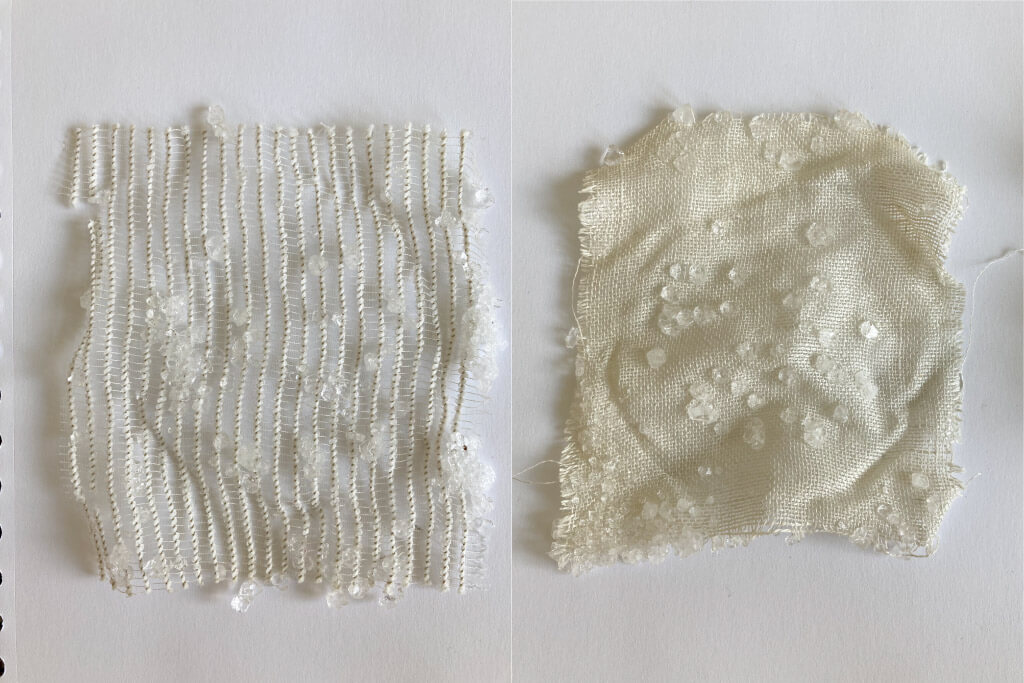
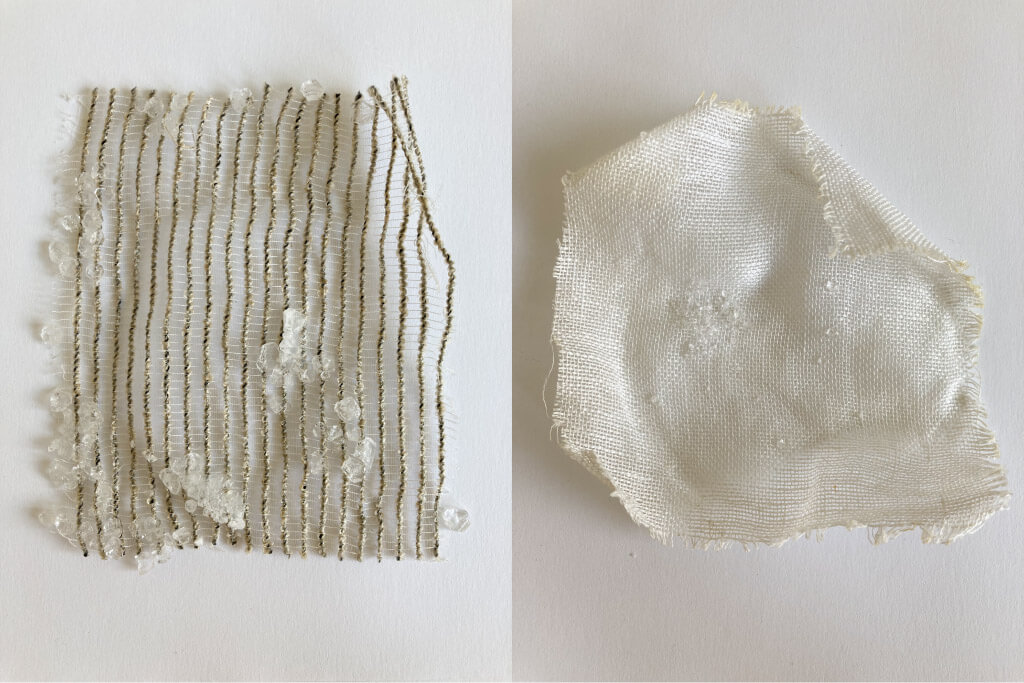
Here, I didn't like the result of the alum crystallization with the pompoms again, but I liked the results on the fabrics and the result with activated charcoal surprised me (although it was not conductive).
- pom pomns - just alum:
- fabrics - just alum:

- pom poms - alum + activated charcoal:
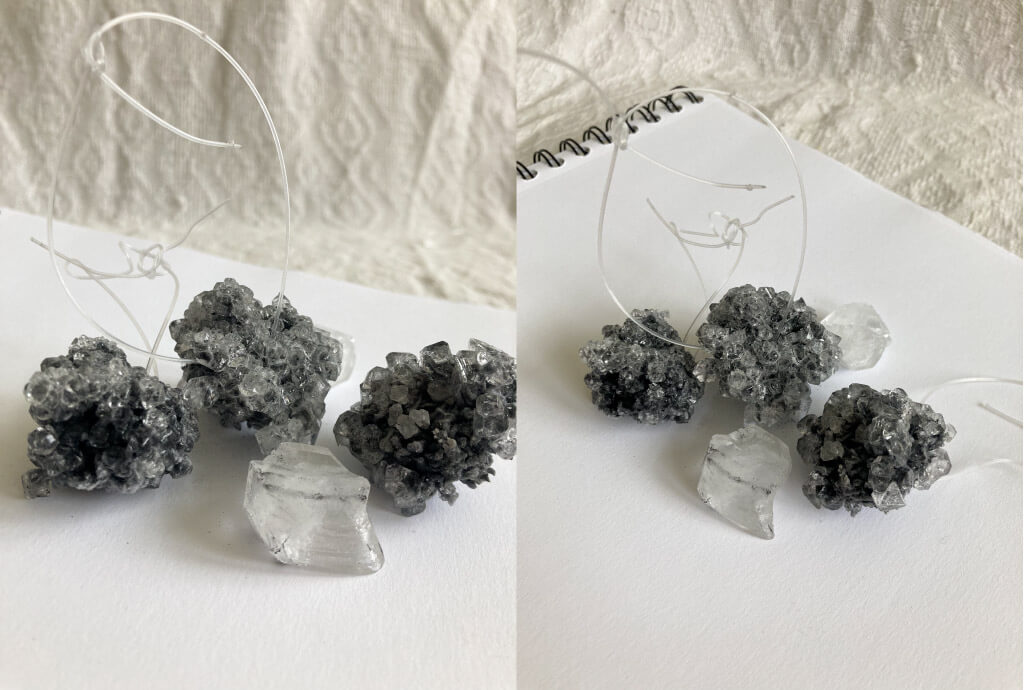

- fabrics - alum + activated charcoal:
all my pom poms:
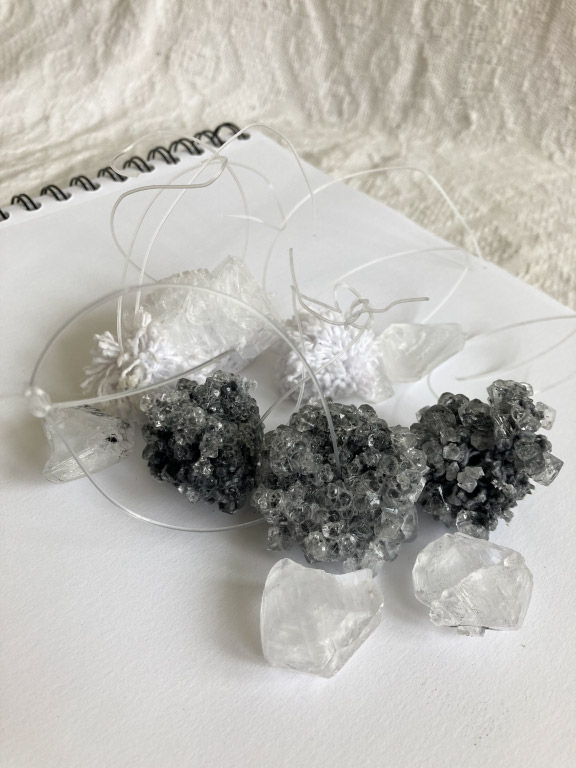
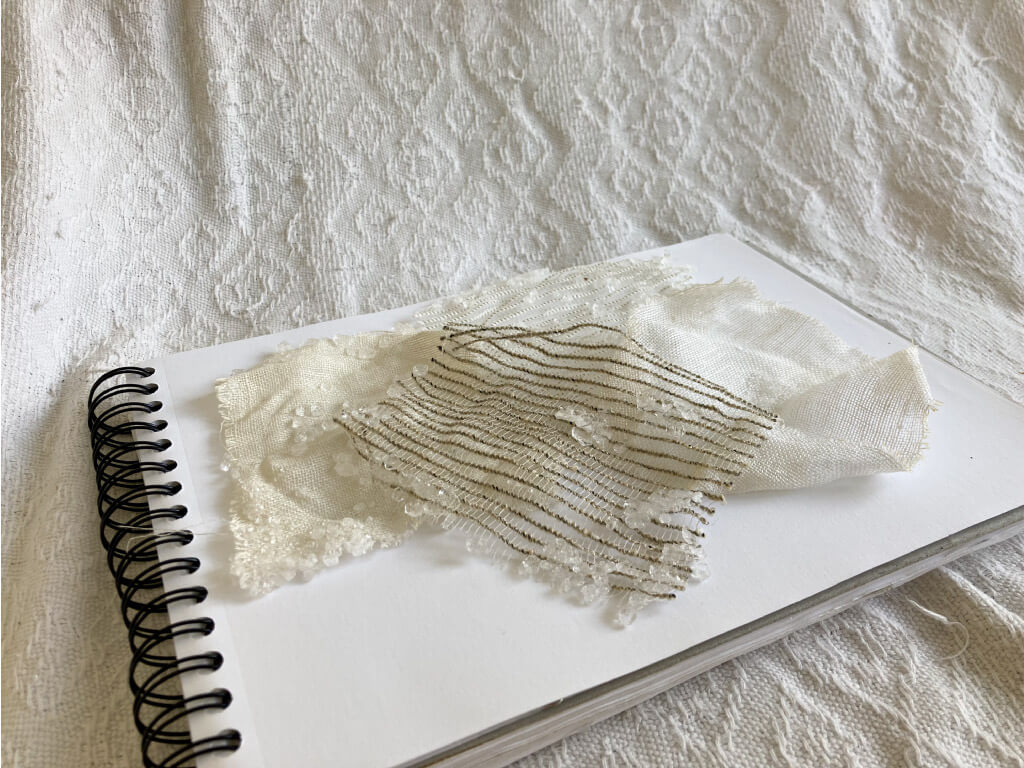
all my fabrics:

COMPOSITES
This class reminded me of a project I participated in during college that aimed to make sound insulation boards with shredded post-consumer textile waste. I also ended up discovering the Fab-BRICK project which is very similar to what we were doing at the time.
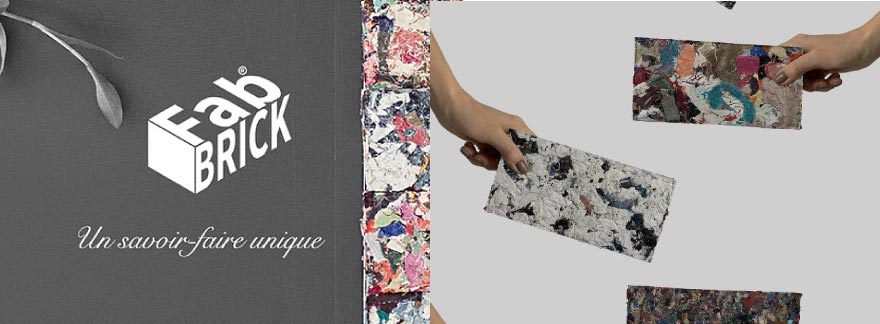 images from https://www.fab-brick.com/
As I tested doing this in bioplastics week (although the material has to be researched further) I decided not to do it this test and leave for the next hour. But looking through the documentation of previous work, the Lara Campo's report helped me get an idea about the scope of composites in general.
However, when viewing the documentation from Angela and the class about paper making, I was curious about the possibility of making paper with shredded textile waste and decided to test making this composite.
paper
Unfortunately, I didn't have easy access to the residue from my research season for this week, so I ended up buying some shredded material at a construction shop. The material is basically the same, the only difference is that the residue most likely came from industrial processes and not post-consumer as we used to do at the time, but for prototyping purposes it works the same.
very curious to test the paper made from babana fiber, but unfortunately I won't be able to do it this week and will have to stay for another time :(
router CNC
I had the idea to mold the paper into the shape of my bust, and as I was very curious to test the router, I decided to use my digital body that I made in week 2 on digital bodies and mill it in the router . For this, I used an industrial EVA (Ethylene Vinyl Acetate) 300mm x 300mm wide and 50mm high.
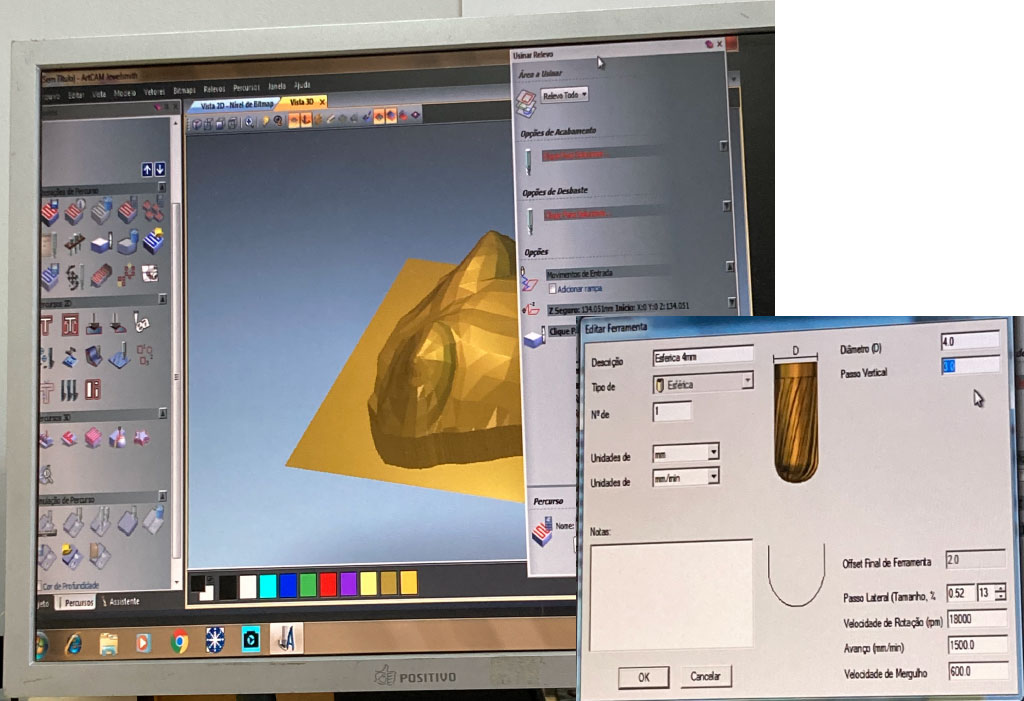
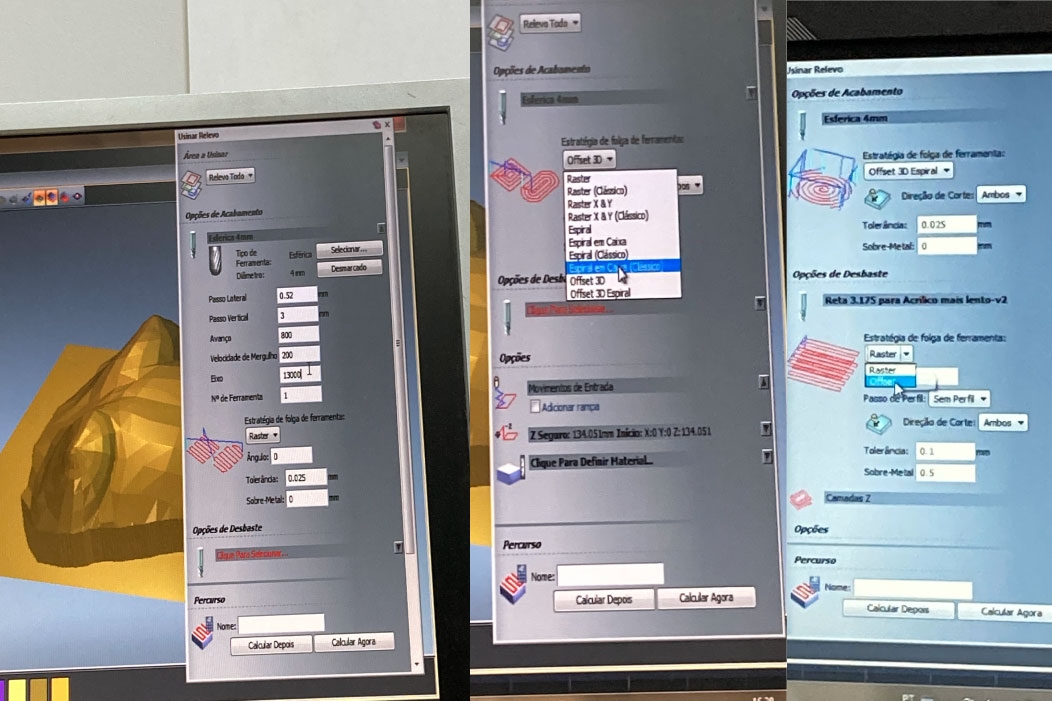
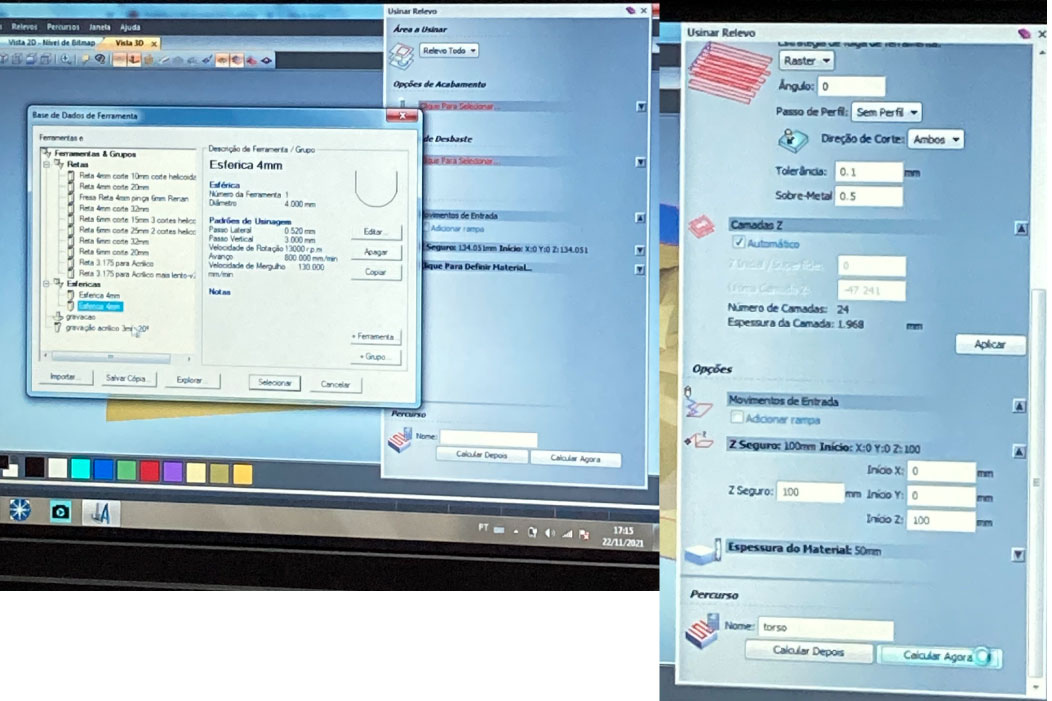
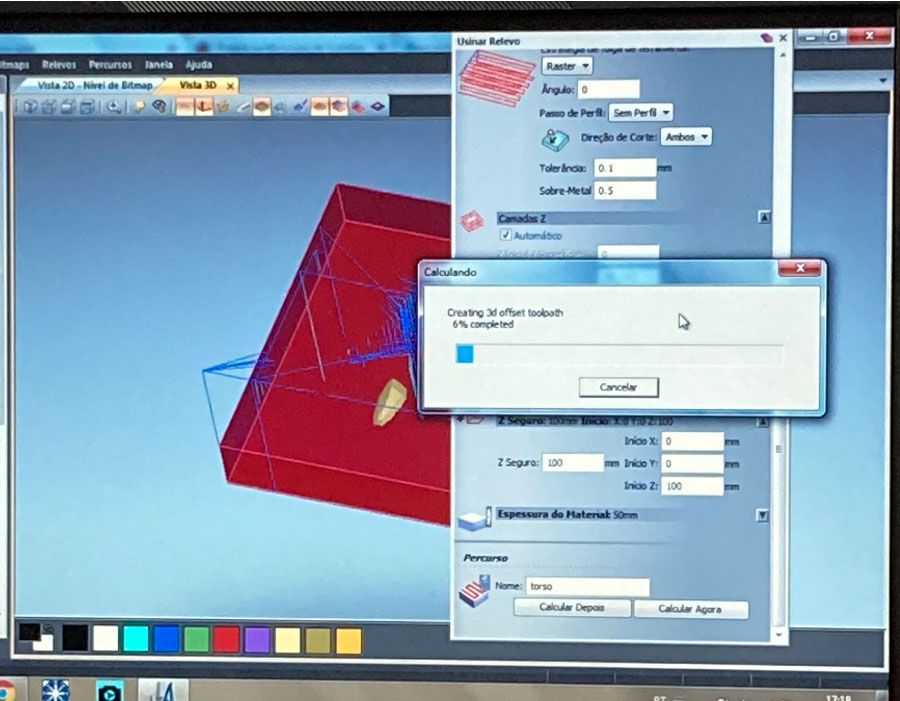
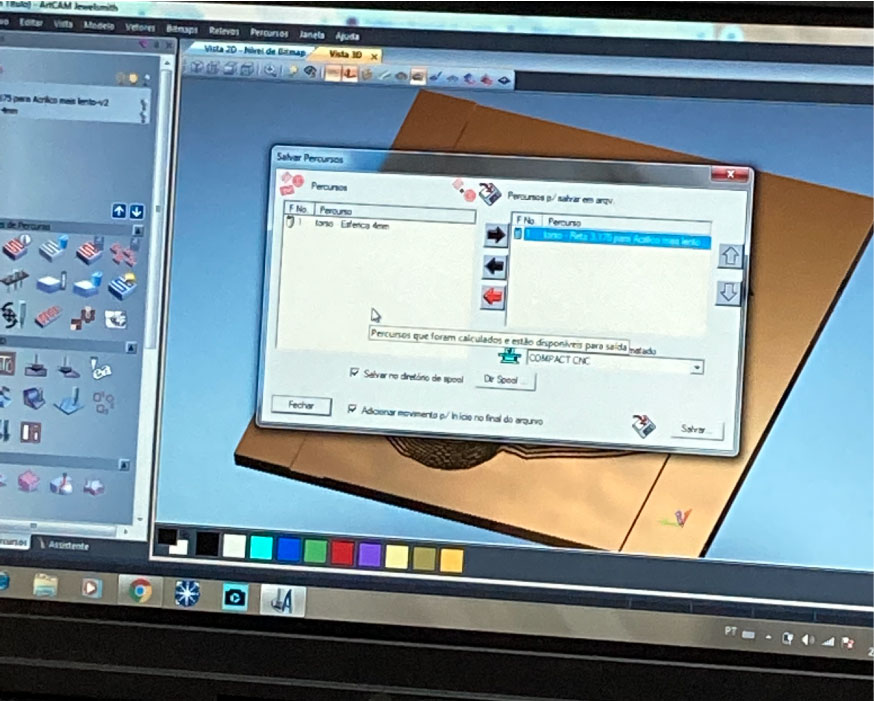
To run the project on the router, we set some parameters in ArtCAM (software).
Some pictures of the screen during the process of preparing the file (the lab helped me a lot with these file, once I had never used the CNC machine before):
Open the program, put the measures of the material;
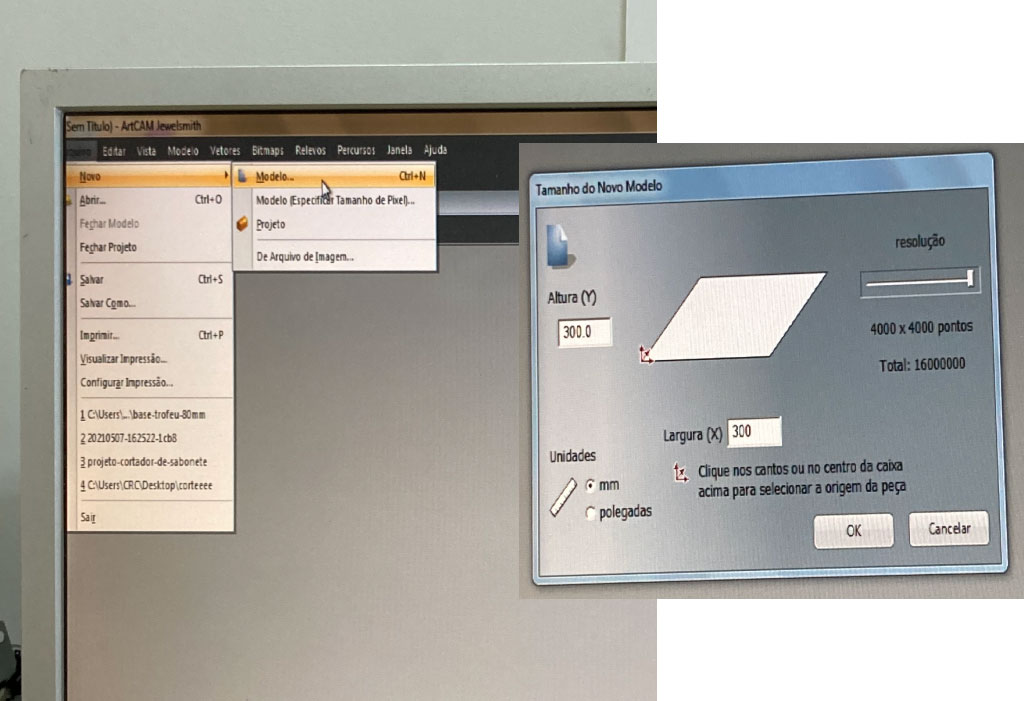
Import the file and adjust the parameters:
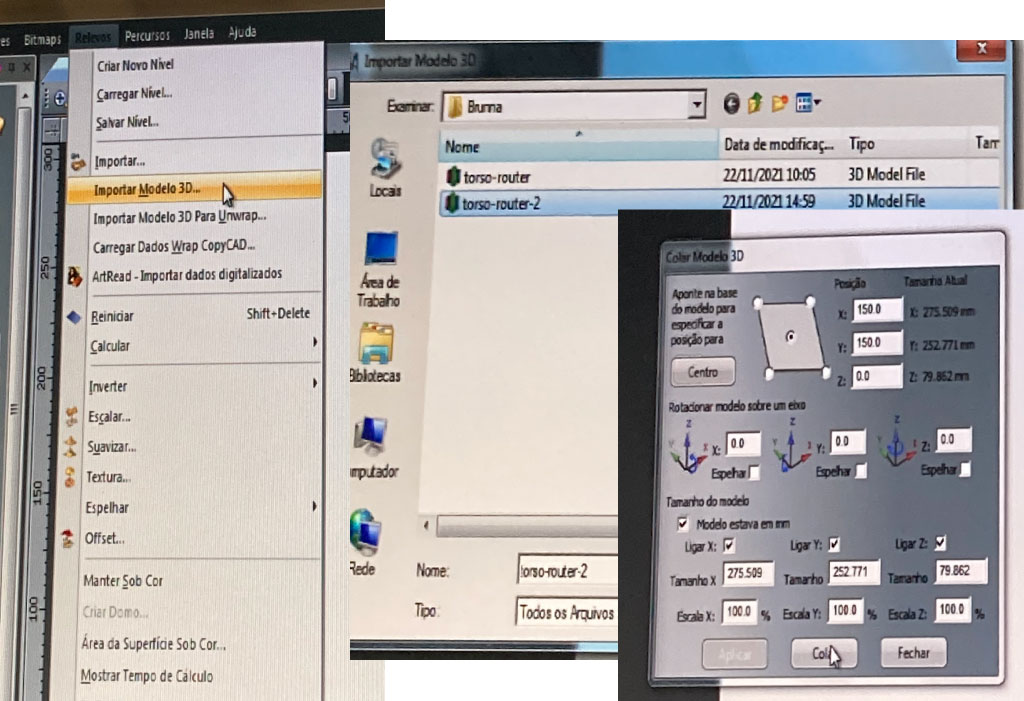
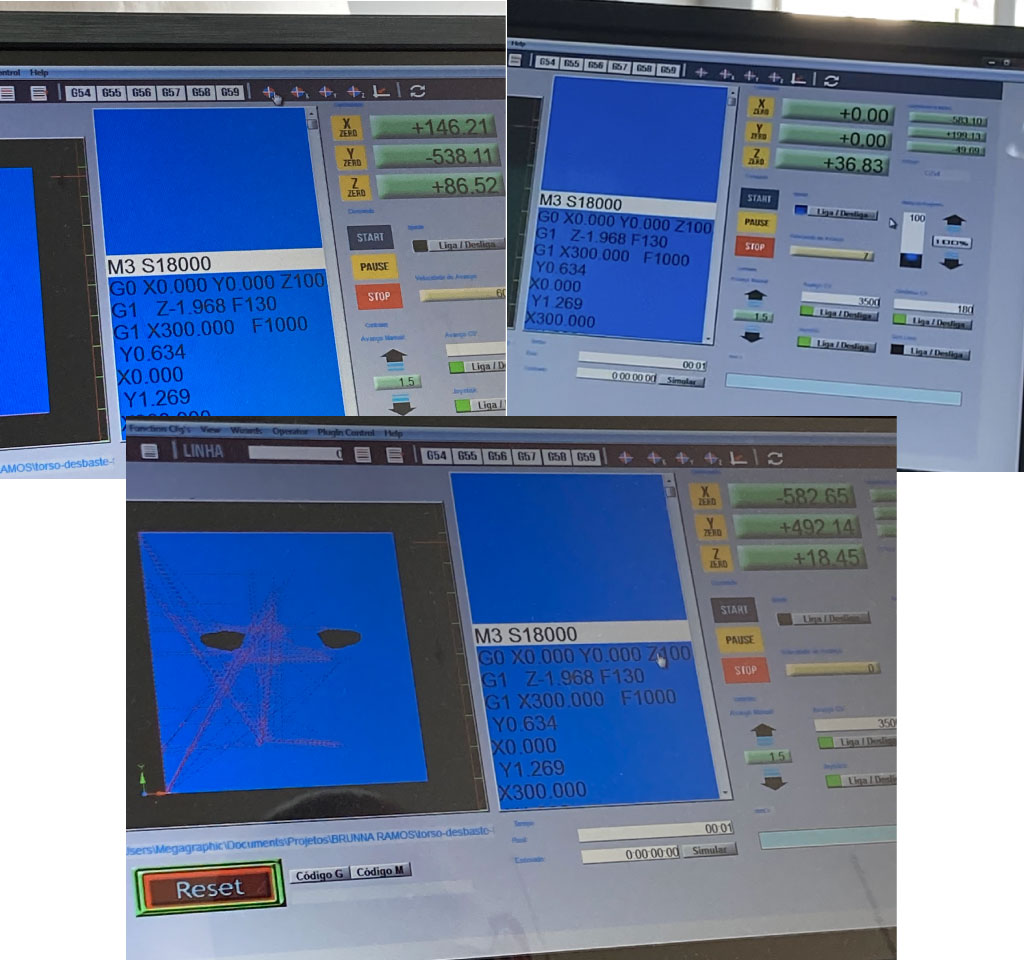
Secure bottons in the hardware:
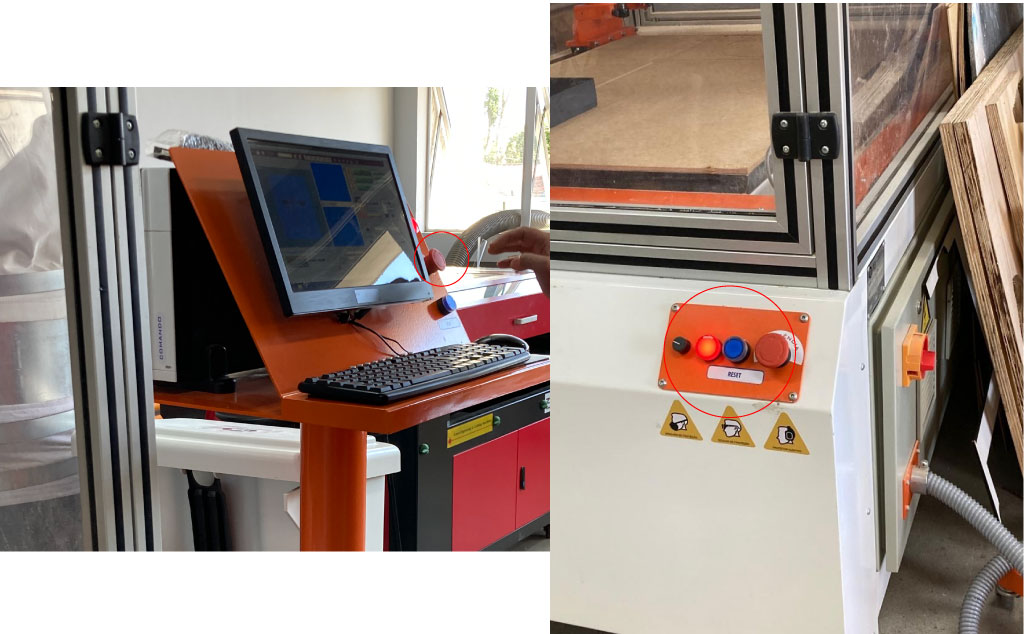
the material must be well attached to the base of the machine, so as not to walk and damage the model. It is also good to position the center of the material.
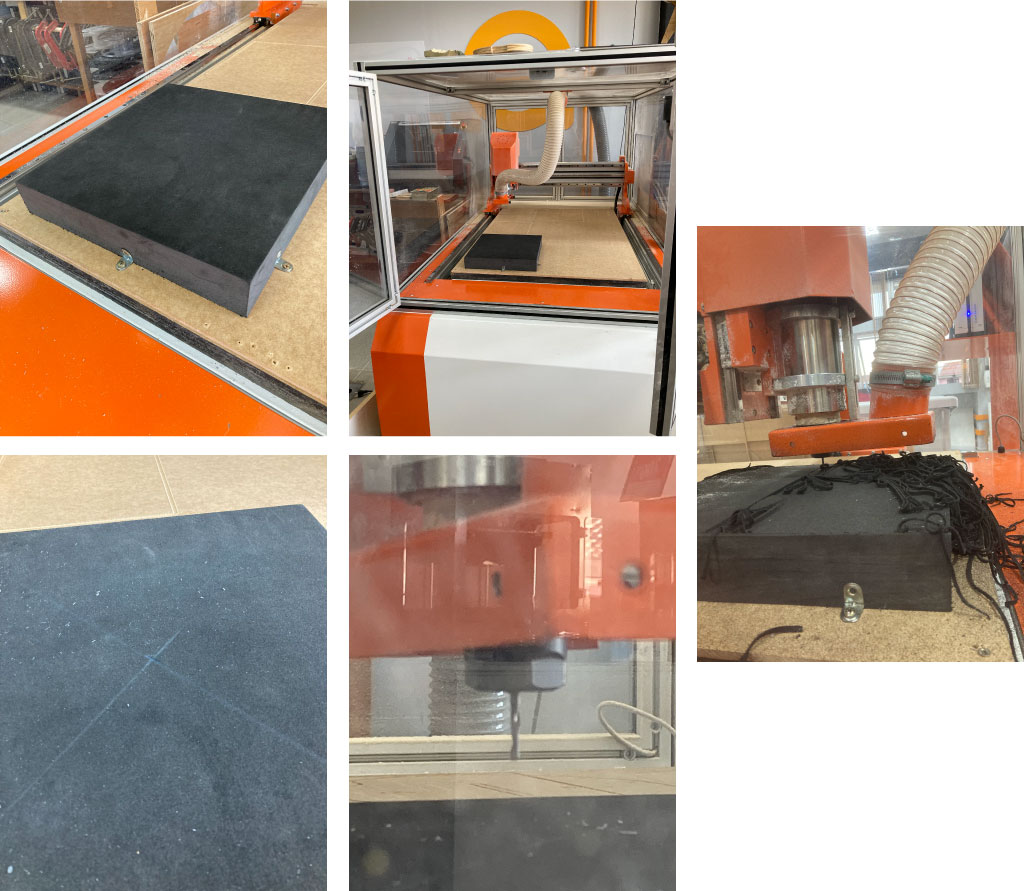
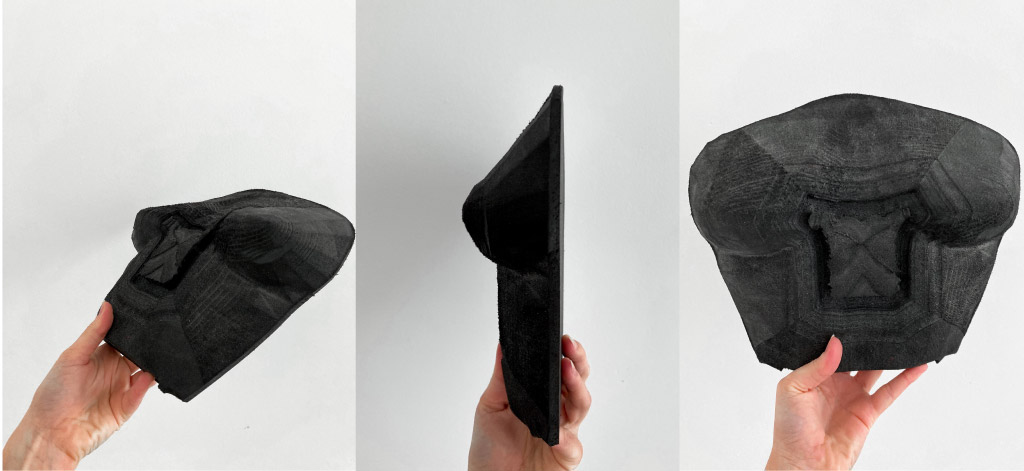
Final mold:
we had a problem during the finishing part of the part, the engine stopped and made this unplanned hole... but it didn't get in the way at all when depositing the material to make paper.
A short video of the router working...
Router - torso cnc from Brunna Ramos on Vimeo.
The file of the torso can be downloaded here.
paper making
I adapted Angela's recipe to work with textile waste:
| Cotton Textile Waste | Water | CMC Solution |
|---|---|---|
| 50g | 5L | 1/2 soup spoon in 500ml of water |
- The first thing we must do is cut the residue even more, so that it is very small;
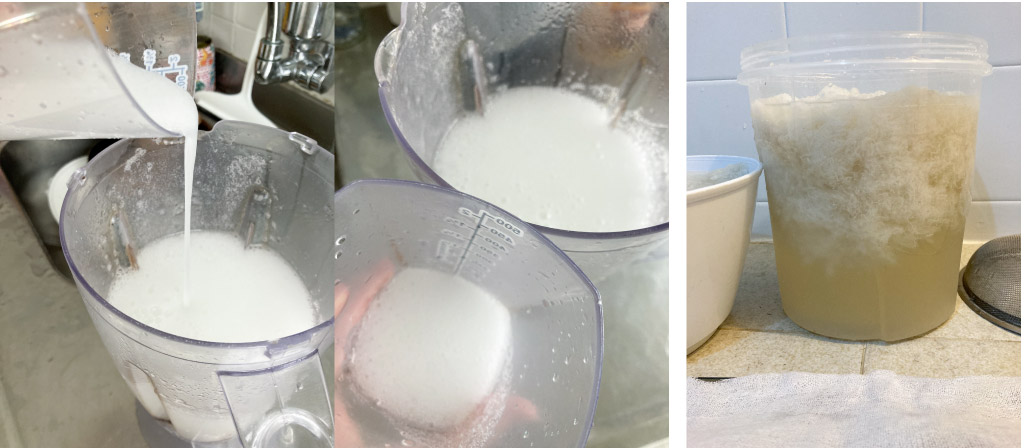
- Then, we pour the residue in 5 liters of water and hit the blender in small amounts;
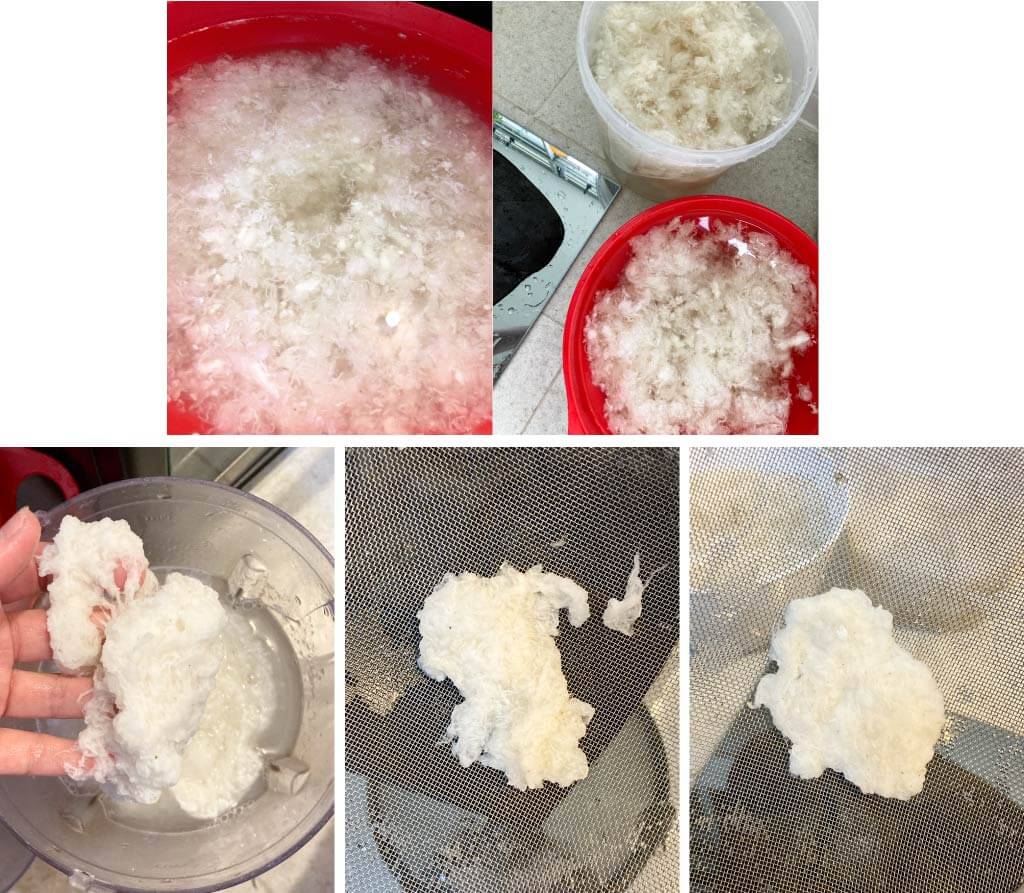
- When the textile is all blended, we add 50ml of the CMC solution to the mixture and let it become heterogeneous. All cotton wool must go up;
- We put a thin cotton fabric or other material in our mold so that the paper can be removed later;
- With the help of a sieve, we remove thin layers of the part of fabric that rose in the water and put it in the mold;
- When it's ready, just let it dry.

The video of the step 5:
Making textile waste papper from Brunna Ramos on Vimeo.
final result:
I made a small editorial with the help of my friend Giovana Moreira!
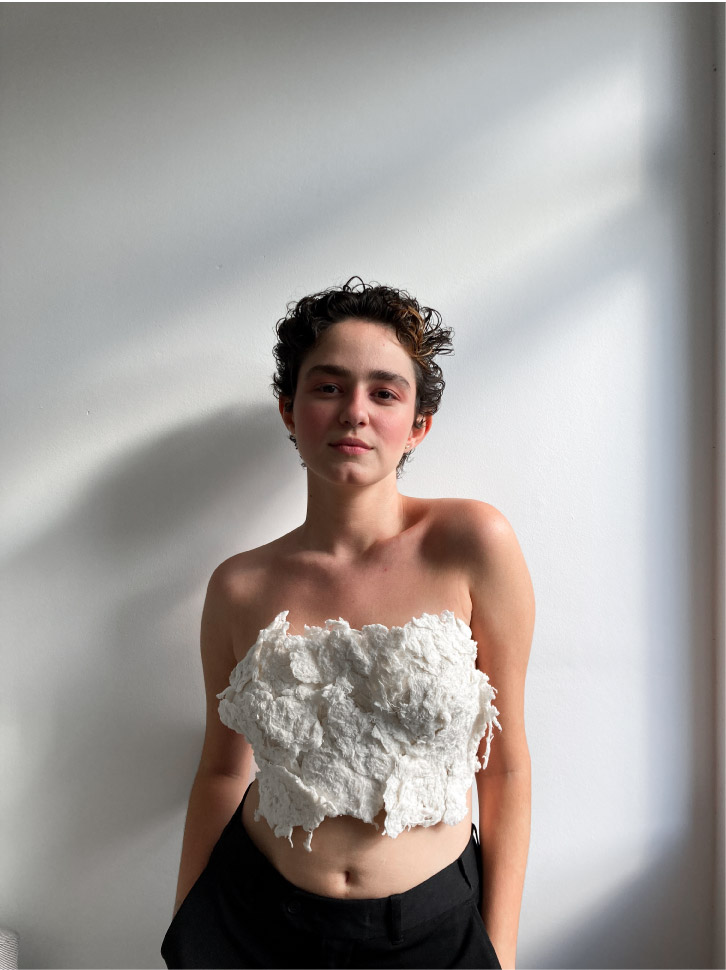

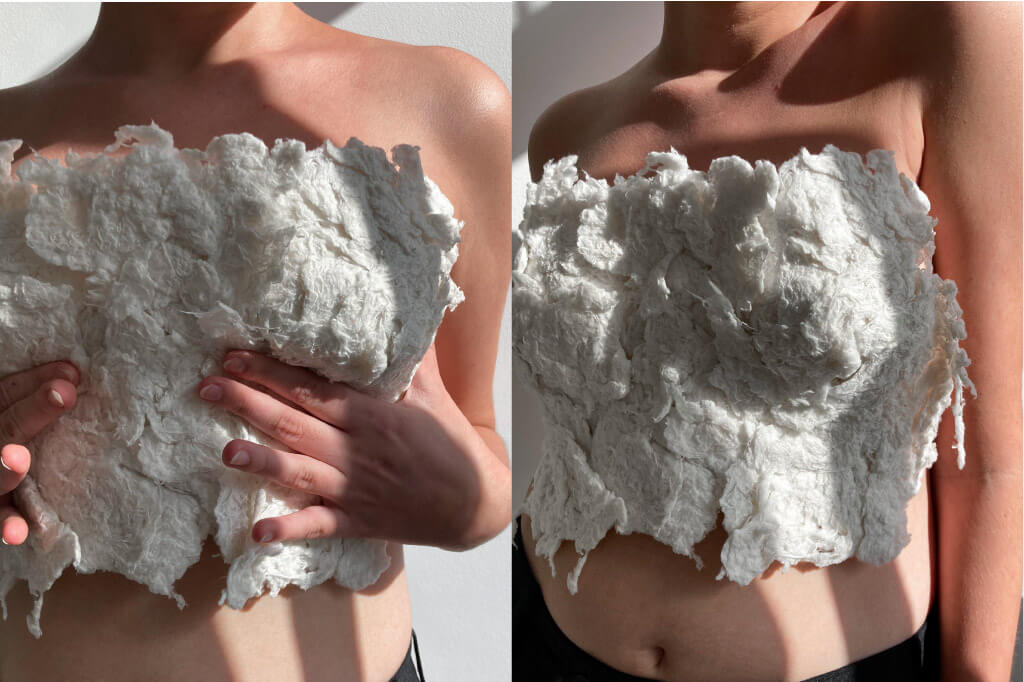
It is important to point out that the piece was very fragile, and when I took it off the body (I glued it with double-sided tape, it fell apart. I believe that for the next ones I will need to put more CMC.
REFERENCES
about textile scaffold - week 9 fabricademy
textile formwork
about textile forwork and how to
lecture - Fabric Formwork - Anne-Mette Manelius
lecture - Mariana Popescu // Block Research Group
crystallization
Annie Ferlatte's documentation
Lucrecia Strano's documentation
Paulina Martina's documentation
composites
paper making
Angela Barbour's documentation