5. E-textiles

For this week I am very excited, well like every week. But in this work we are going to start with electronics, which is a field in which I feel comfortable. After seeing today's class of the first steps to familiarize ourselves with Arduino and in addition to the operation of basic circuits and the discovery of materials and new ways to integrate them into the design, in a more appropriate and respectful way. They have explained to us the way in which ways electricity moves, different forms of making a basic circuit in addition to knowing how to detect possible errors in our circuits.

Electronic textiles (e-textiles) involves the combination of electronics and textiles to form "smart" textile products. With research compiled over 7 years, a database of over 200 companies in the sector, primary research on activities over 100 companies, coverage of each major product type, market and application that has been discussed and deployed, historic data back to 2010 and forecasts from 2020 to 2030, this is the most comprehensive study compiled on this technology area.
Making FASHION Sense from HEK on Vimeo.
We are in contact with textiles for up to 98% of our lives, and they are starting to become intelligent. Part of this revolution includes the integration of electronics and textiles. The ideas for e-textiles have been around for decades, but with increasing commercial focus in the last 30 years. Some e-textile products such as heated blankets and heated clothing have developed throughout this time to become significant commercial markets selling millions of products each year. However, the variety of products is extremely broad; from clothing to bandages, bed linen to industrial fabrics, new products are appearing throughout a variety of verticals as this technology area is increasingly explored.
Clara Daguin from Alexandre Bré on Vimeo.
Let start
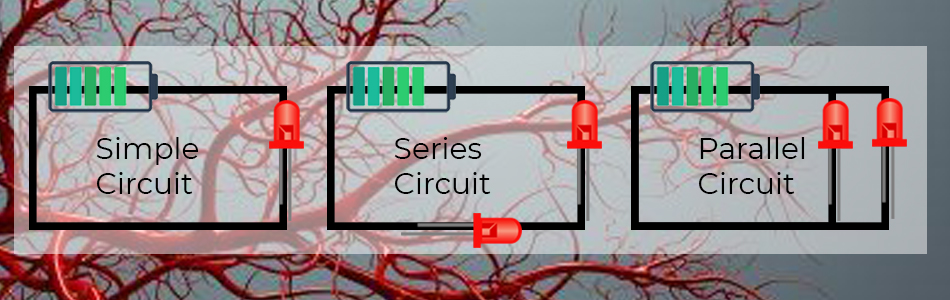
How it works As simple circuits we have to know that the leds have 3 v and to make the whole circuit it is important to know the volts of the led and to know if we put it in parallel or in series.
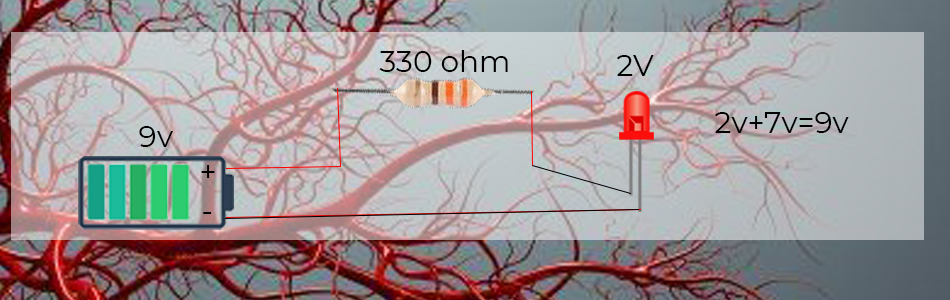
If we have a battery greater than the power of the leds, we must include a resistor that for a 2v bulb and a 9v battery, we must have a resistor that helps us contain those extra 7 volts that we are sending to the led, for this we can use a resistance between 220 ohms and 330 ohms
Circuits
For this assignment I have taken as inspiration the nervous system and veins, our circuits that keep us alive
First Circuit
For my first circuit I used a 3 volt red LED as Outputs, as an analog sensor I used the tull as a container and the conductive thread in which each time they were pressed together I could finish the circuit and also be able to change the intensity of the light since depending on it could join completely or partially which gave the output enough power to act

Sensor
In this circuit I used the conductive thread sewed on the tulle fabric to reduce the materials also to gives more softness to the circuit, because I was trying to experiment in this point the best way to make wearables
Conductive thread
A led of 3v
A batery of 3v
Black tulle
Second Circuit
For my second circuit, I used the optical fiber as output, which I integrated into the tulle and thus gave it a path where it could shine, once it was installed, I began to discover how the LED works better and thus be able to show its light better. I learned that it is better if the optical fiber is sanded, that generates more places where the light can escape.
Conductive thread
1 led diodo of 3v
3 bateries of 1v
Optic Fibers
Sensor
In this case I used once again just the thread into the tulle because the same thing, I wanted to express Organic shapes and softnest in this assigments.

The sensor I used was the embroidered tulle with the conductive thread since at the slightest movement it could activate the circuit and give it life.
8 Secuences Code
I have used 12 leds as output of which I put with resistors individually since I wanted to be able to have each led separate and thus place them more randomly and be able to achieve the desired effect on the fabric.
As a sensor I programmed the arduino with 8 different codes to those that I uploaded to the board and they could be seen in the leds so I checked that the circuit worked correctly and I was ready to create the following circuit with an ultrasonic sensor as input.
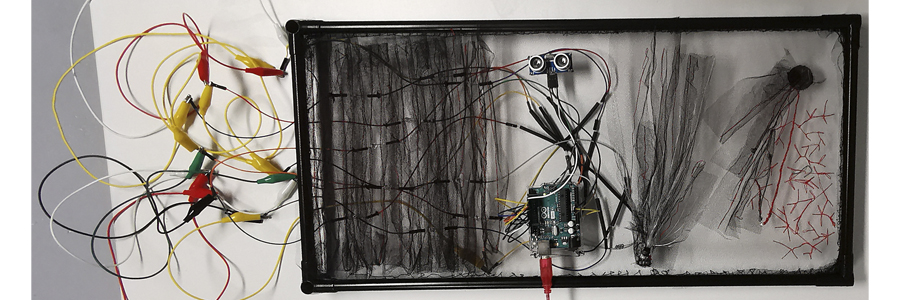
Third Circuit
For my third circuit I have used an Arduino uno, a great new experience for me, I have been playing with it a lot and playing the programming codes, something that still costs me but I am understanding them. I have created verioas sequences first an 8 different ones then I show you the code. After testing these 8 sequences, I already created the one of the heartbeat and then using an ultrasound sensor then I will continue writing the code so that depending on the proximity the intensity of the beats changes
            breadboard
            10 led diodo of 3v
            10 220 Ω resistors
            Arduino uno
            Ultrasonic sensor
Once I had the circuit up and running and I knew it worked, the funny thing was to upload the code that I wanted and it was the heartbeat code since I wanted to recreate the veins with the seams.
  ```
  int led1 = 2;
  int led2 = 3;
  int led3 = 4;
  int led4 = 5;
  int led5 = 6;
  int led6 = 7;
  int led7 = 8;
  int led8 = 9;
  int led9 = 10;
  int led10 = 11;
  int led11 = 12;
  int led12 = 13;

  void setup()
  {
  pinMode(led1, OUTPUT);
  pinMode(led2, OUTPUT);
  pinMode(led3, OUTPUT);
  pinMode(led4, OUTPUT);
  pinMode(led5, OUTPUT);
  pinMode(led6, OUTPUT);
  pinMode(led7, OUTPUT);
  pinMode(led8, OUTPUT);
  pinMode(led9, OUTPUT);
  pinMode(led10, OUTPUT);
  pinMode(led11, OUTPUT);
  pinMode(led12, OUTPUT);

  }

  void loop ()
  {
        digitalWrite(led1, HIGH);         // first heart beat
        digitalWrite(led2, HIGH);
        digitalWrite(led3, HIGH);
        digitalWrite(led4, HIGH);
        digitalWrite(led5, HIGH);
        digitalWrite(led6, HIGH);
        digitalWrite(led7, HIGH);
        digitalWrite(led8, HIGH);
        digitalWrite(led9, HIGH);
        digitalWrite(led10, HIGH);
        digitalWrite(led11, HIGH);
        digitalWrite(led12, HIGH);
        delay(100);
        digitalWrite(led1, LOW);
        digitalWrite(led2, LOW);
        digitalWrite(led3, LOW);
        digitalWrite(led4, LOW);
        digitalWrite(led5, LOW);
        digitalWrite(led6, LOW);
        digitalWrite(led7, LOW);
        digitalWrite(led8, LOW);
        digitalWrite(led9, LOW);
        digitalWrite(led10, LOW);
        digitalWrite(led11, LOW);
        digitalWrite(led12, LOW);
        delay(100);
        digitalWrite(led1, HIGH);         //  second heart beat
        digitalWrite(led2, HIGH);
        digitalWrite(led3, HIGH);
        digitalWrite(led4, HIGH);
        digitalWrite(led5, HIGH);
        digitalWrite(led6, HIGH);
        digitalWrite(led7, HIGH);
        digitalWrite(led8, HIGH);
        digitalWrite(led9, HIGH);
        digitalWrite(led10, HIGH);
        digitalWrite(led11, HIGH);
        digitalWrite(led12, HIGH);
        delay(100);
        digitalWrite(led1, LOW);
        digitalWrite(led2, LOW);
        digitalWrite(led3, LOW);
        digitalWrite(led4, LOW);
        digitalWrite(led5, LOW);
        digitalWrite(led6, LOW);
        digitalWrite(led7, LOW);
        digitalWrite(led8, LOW);
        digitalWrite(led9, LOW);
        digitalWrite(led10, LOW);
        digitalWrite(led11, LOW);
        digitalWrite(led12, LOW);
        delay(750);                        //space between heart beats
  }

  ```
Heart beat Code with Ultrasonic sensor
As input I have chosen a proximity sensor since I find it quite striking and surprising.
The HC-SR04 ultrasonic sensor uses SONAR to determine the distance of an object just like the bats do. It offers excellent non-contact range detection with high accuracy and stable readings in an easy-to-use package from 2 cm to 400 cm.
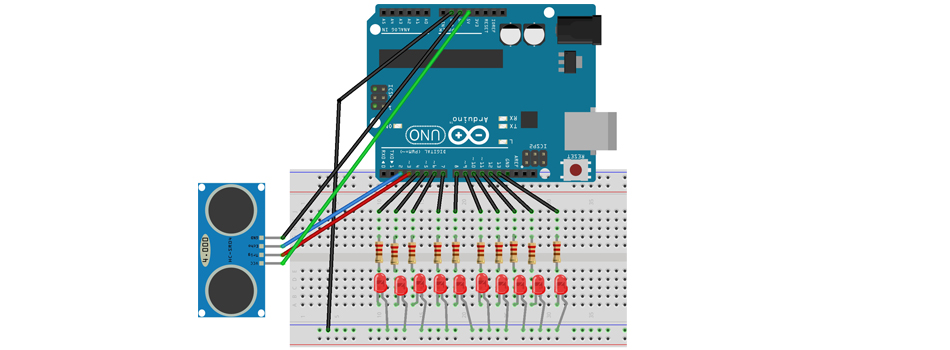 In this link you can have a totorial on how to conect the sensor with the arduino.
Here you can see a short video of how the sensor works and the LEDs already integrated in the fabric
//const int led1 = 2;
//const int led2 = 3;
const int led3 = 4;
const int led4 = 5;
const int led5 = 6;
const int led6 = 7;
const int led7 = 8;
const int led8 = 9;
const int led9 = 10;
const int led10 = 11;
const int led11 = 12;
const int led12 = 13;

const int trigPin = 2;
const int echoPin = 3;

void setup() {
  // pinMode(led1, OUTPUT);
   //pinMode(led2, OUTPUT);
    pinMode(led3, OUTPUT);
    pinMode(led4, OUTPUT);
    pinMode(led5, OUTPUT);
    pinMode(led6, OUTPUT);
    pinMode(led7, OUTPUT);
    pinMode(led8, OUTPUT);
    pinMode(led9, OUTPUT);
    pinMode(led10, OUTPUT);
    pinMode(led11, OUTPUT);
    pinMode(led12, OUTPUT);
   pinMode(trigPin, OUTPUT); // Sets the trigPin as an OUTPUT
  pinMode(echoPin, INPUT); // Sets the echoPin as an INPUT
  digitalWrite(trigPin, LOW);
  Serial.begin(9600);
}

void loop(){
  long t; //timepo que demora en llegar el eco
  long d; //distancia en centimetros

  digitalWrite(trigPin, HIGH);
  delayMicroseconds(10);          //Enviamos un pulso de 10us
  digitalWrite(trigPin, LOW);

  t = pulseIn(echoPin, HIGH); //obtenemos el ancho del pulso
  d = t/59;
  Serial.print("Distancia: ");
  Serial.print(d);      //Enviamos serialmente el valor de la distancia
  Serial.print("cm");
  Serial.println();

  if (d < 10){
     Serial.println("Motion detected!");

      //digitalWrite(led2, HIGH);    // first heart beat
      digitalWrite(led3, HIGH);
      digitalWrite(led4, HIGH);
      digitalWrite(led5, HIGH);
      digitalWrite(led6, HIGH);
      digitalWrite(led7, HIGH);
      digitalWrite(led8, HIGH);
      digitalWrite(led9, HIGH);
      digitalWrite(led10, HIGH);
      digitalWrite(led11, HIGH);
      digitalWrite(led12, HIGH);
      delay(100);
      //digitalWrite(led2, LOW);
      digitalWrite(led3, LOW);
      digitalWrite(led4, LOW);
      digitalWrite(led5, LOW);
      digitalWrite(led6, LOW);
      digitalWrite(led7, LOW);
      digitalWrite(led8, LOW);
      digitalWrite(led9, LOW);
      digitalWrite(led10, LOW);
      digitalWrite(led11, LOW);
      digitalWrite(led12, LOW);
      delay(500);
     // digitalWrite(led2, HIGH);             //  second heart beat
      digitalWrite(led3, HIGH);
      digitalWrite(led4, HIGH);
      digitalWrite(led5, HIGH);
      digitalWrite(led6, HIGH);
      digitalWrite(led7, HIGH);
      digitalWrite(led8, HIGH);
      digitalWrite(led9, HIGH);
      digitalWrite(led10, HIGH);
      digitalWrite(led11, HIGH);
      digitalWrite(led12, HIGH);
      delay(100);
     // digitalWrite(led2, LOW);
      digitalWrite(led3, LOW);
      digitalWrite(led4, LOW);
      digitalWrite(led5, LOW);
      digitalWrite(led6, LOW);
      digitalWrite(led7, LOW);
      digitalWrite(led8, LOW);
      digitalWrite(led9, LOW);
      digitalWrite(led10, LOW);
      digitalWrite(led11, LOW);
      digitalWrite(led12, LOW);
      delay(750);
  }
delay(100);
}