10. Wearables

I continue to be amazed at the work of Clara Daguin and Ying Yao, where they show wonderful techniques and how they integrate them into the different costumes
 claradaguin Oracle
Also the work of this design company called The Partisians who integrate the lights and mold them with methacrylate as if they were fabrics and give a very nice effect.
The MOSFET
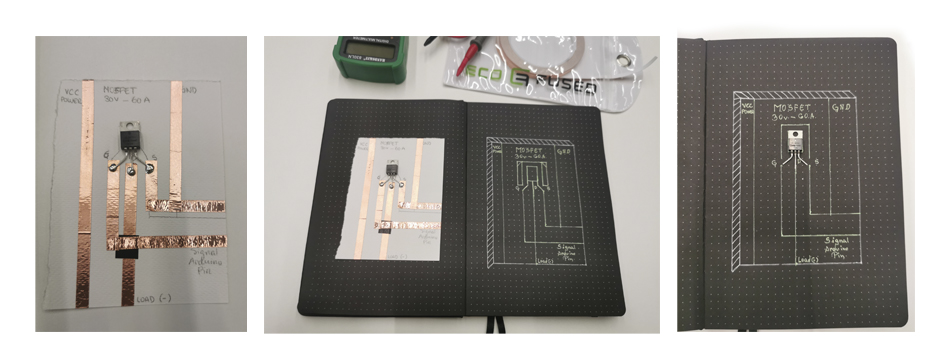
The first thing we did before we started making our speakers and thermochromic experiments was to create the MOSFET circuit. It is a transistor, that acts as a secondary power source for our projects WHY? Because we require a LOT MORE POWER than the pins of the Arduino to actuate something A mosfet transistor acts as an electrical switch which ALLOWS us to combine another power source with the Arduino by applying more voltage to the GATE using the Arduino which leads to more current flowing between the DRAIN and the SOURCE of the mosfet There a lot of different kinds of transistors (N channel and P channel) but we are using an N channel one for the projects below and particularly the IRF5410N
Sepeaker
This calculator was quite useful to know the number of turns that the copper wire should have, also the distance between them and measuring its diameter to know how much I need
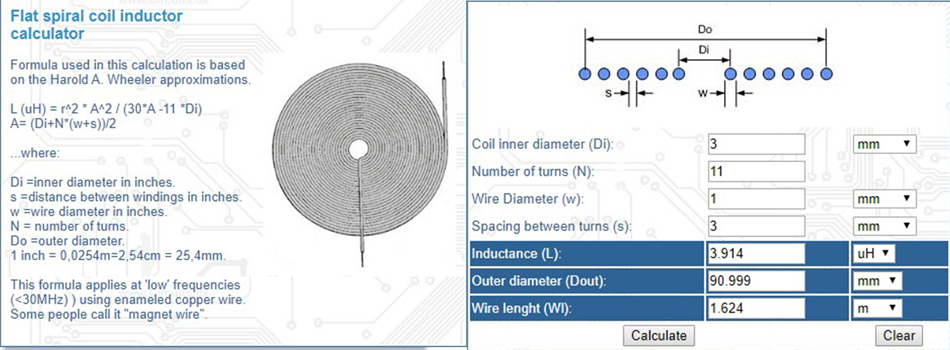
In HERE you can get the link to the calculator
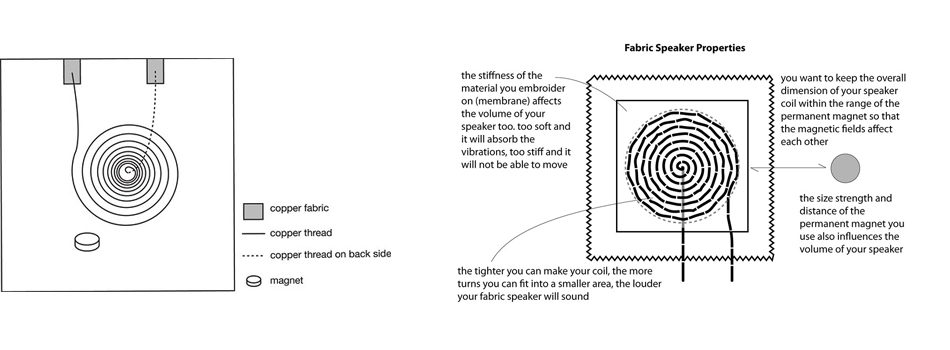
For the speaker I used copper wire which I sanded to that it had conductive properties and I sewed it on a cotton fabric stretched on a support to embroider.
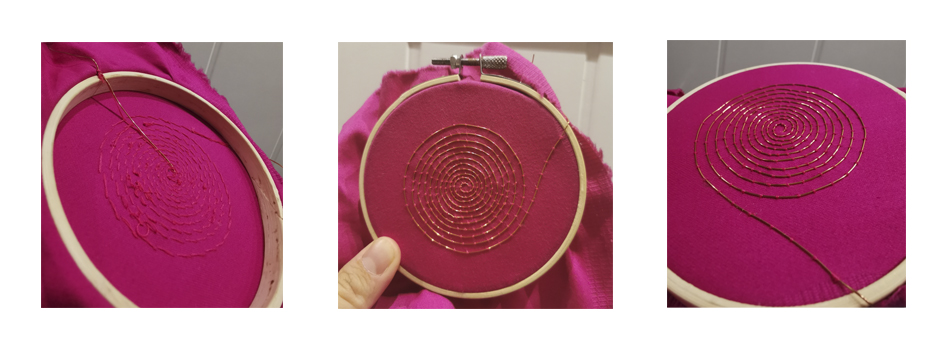
I had problems since the copper wire was coated and after sewing it to the fabric I realized it and I couldn't complete this experiment, because I focused more on the arduino and perfecting the sensor that I used in the e-textile week.
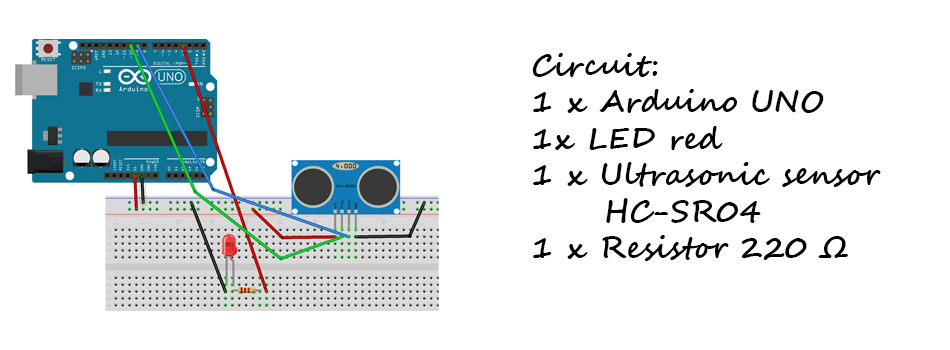
Programing the Arduino with the sensor
But this time I used a single led and an ultrasonic sensor, which I programmed with the Arduino UNO
*/

int TRIG = 10;          // trigger en pin 10
int ECO = 9;            // echo en pin 9
int LED = 3;            // LED en pin 3
int DURACION;
int DISTANCIA;

void setup()
{
  pinMode(TRIG, OUTPUT);    // trigger como salida
  pinMode(ECO, INPUT);      // echo como entrada
  pinMode(LED, OUTPUT);     // LED como salida
  Serial.begin(9600);       // inicializacion de comunicacion serial a 9600 bps

}

void loop()
{

  digitalWrite(TRIG, HIGH);         // generacion del pulso a enviar
  delay(1);             // al pin conectado al trigger
  digitalWrite(TRIG, LOW);      // del sensor

  DURACION = pulseIn(ECO, HIGH);    // con funcion pulseIn se espera un pulso
                    // alto en Echo
  DISTANCIA = DURACION / 58.2;      // distancia medida en centimetros
  Serial.println(DISTANCIA);        // envio de valor de distancia por monitor serial
  delay(200);               // demora entre datos


}
NeoPixel Stripe with flora adafruit
Then I programmed Neopixel with Flora Adafruit, that way I could do a project that I wanted to advance more than e-textiles. To be able to upload codes and work with the neopixels you must integrate them in the arduino library in this way.
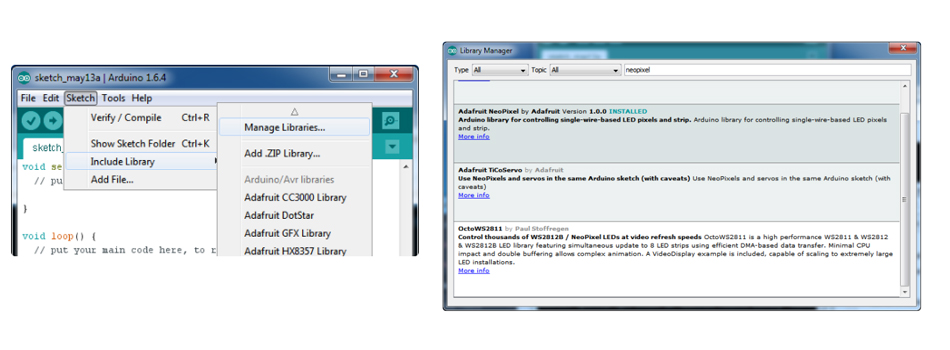
When it is included in the library you can see how it appears in the options and you select the port, the megahertz and you can upload the code. This is a sample code to control the 30 leds of the neopixel strip
// NeoPixel Ring simple sketch (c) 2013 Shae Erisson
// Released under the GPLv3 license to match the rest of the
// Adafruit NeoPixel library

#include <Adafruit_NeoPixel.h>
#ifdef __AVR__
 #include <avr/power.h> // Required for 16 MHz Adafruit Trinket
#endif

// Which pin on the Arduino is connected to the NeoPixels?
#define PIN        6 // On Trinket or Gemma, suggest changing this to 1

// How many NeoPixels are attached to the Arduino?
#define NUMPIXELS 16 // Popular NeoPixel ring size

// When setting up the NeoPixel library, we tell it how many pixels,
// and which pin to use to send signals. Note that for older NeoPixel
// strips you might need to change the third parameter -- see the
// strandtest example for more information on possible values.
Adafruit_NeoPixel pixels(NUMPIXELS, PIN, NEO_GRB + NEO_KHZ800);

#define DELAYVAL 500 // Time (in milliseconds) to pause between pixels

void setup() {
  // These lines are specifically to support the Adafruit Trinket 5V 16 MHz.
  // Any other board, you can remove this part (but no harm leaving it):
#if defined(__AVR_ATtiny85__) && (F_CPU == 16000000)
  clock_prescale_set(clock_div_1);
#endif
  // END of Trinket-specific code.

  pixels.begin(); // INITIALIZE NeoPixel strip object (REQUIRED)
}

void loop() {
  pixels.clear(); // Set all pixel colors to 'off'

  // The first NeoPixel in a strand is #0, second is 1, all the way up
  // to the count of pixels minus one.
  for(int i=0; i<NUMPIXELS; i++) { // For each pixel...

    // pixels.Color() takes RGB values, from 0,0,0 up to 255,255,255
    // Here we're using a moderately bright green color:
    pixels.setPixelColor(i, pixels.Color(0, 150, 0));

    pixels.show();   // Send the updated pixel colors to the hardware.

    delay(DELAYVAL); // Pause before next pass through loop
  }
}
Attiny
I tried uploading the code to the Attiny with the Arduino UNO but it gave me an error when uploading it.
So I tried with the programer

/*
  Blink

  Turns an LED on for one second, then off for one second, repeatedly.

  Most Arduinos have an on-board LED you can control. On the UNO, MEGA and ZERO
  it is attached to digital pin 13, on MKR1000 on pin 6. LED_BUILTIN is set to
  the correct LED pin independent of which board is used.
  If you want to know what pin the on-board LED is connected to on your Arduino
  model, check the Technical Specs of your board at:
  https://www.arduino.cc/en/Main/Products

  modified 8 May 2014
  by Scott Fitzgerald
  modified 2 Sep 2016
  by Arturo Guadalupi
  modified 8 Sep 2016
  by Colby Newman

  This example code is in the public domain.

  https://www.arduino.cc/en/Tutorial/BuiltInExamples/Blink
*/

// the setup function runs once when you press reset or power the board
void setup() {
  // initialize digital pin LED_BUILTIN as an output.
  pinMode(LED_BUILTIN, OUTPUT);
}

// the loop function runs over and over again forever
void loop() {
  digitalWrite(LED_BUILTIN, HIGH);   // turn the LED on (HIGH is the voltage level)
  delay(1000);                       // wait for a second
  digitalWrite(LED_BUILTIN, LOW);    // turn the LED off by making the voltage LOW
  delay(1000);                       // wait for a second
}
How do I integrate it into a project?

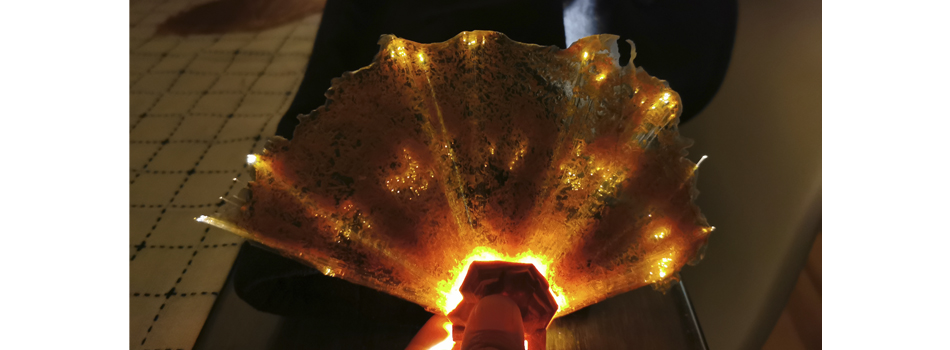
After programming the LED strip, I set out to use the fiber optic that I had previously used in e-textiles. I introduced it in a mixture of bioplastic to check its conductivity and it could be reflected. The best thing I got was sanding the fiber optic (it gave me a lot of creeps to do it because of the sound) after having sanded it, the light showed better through it. and as a hook I designed some bases that kept the bioplastic with the fiber, tied to the led strip, that way I could control it. the led strip has 30 lights which I only made one to experiment with, in the future I will be able to create a longer strip with the lights and make an even bigger project.
Downloadable file