Materials and Methods
The exploration of the project was based on 3 ingredients and the trip they could give me, to use them as different types of biofabrication since they can be used as a base in many products, product design, fashion design, interior design and cosmetics.
Previous experimentation
Thinking about the improvements that I want to achieve and the first thing I wanted to improve is the processing time of the biomass and that I do not have to dehydrate it to conserve it since large amounts of electricity and time are used. And I have devised a way that is to cook the carrot with water, then I liquefy it all together and so I can have it in the fridge, but at that moment I put a preservative that is used in the natural cosmetics industry and That helps it to last much longer in storage and then the chances of mold growing are much lower.
In the second point has been the time and doing it this way eliminated the dehydration time and the rehydration which helps to have a faster preparation time and also helps to save water, and electricity.
To improve the integration of the biomass with the rest of the products by having that kind of cream when adding the other ingredients is a clearer and more uniform way
To improve the smell, I have tried several amounts and have found the perfect balance in which you smell like carrots without interfering with the properties of the bioplastic.
Igredients:
200 ml Biomass Cream
40 gr of gelatin
18 ml glycerin
Process:
1. Put the carrots in a pot for each 100gr of biomass 200ml of water and cook until they soften, then let it cool and blend until it becomes a liquid cream.
2. Put the pot over low / medium heat and add the glycerin and the gelatin.
3. Stir constantly at a temperature of 70ºC or until it has a thick consistency (5 minutes approximately).
4. Pour the mixture into the mold.
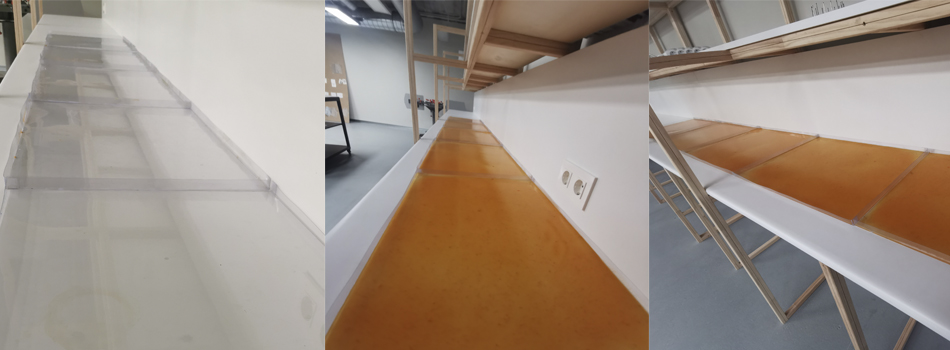
5 Let dry on a clean and level surface to achieve a sheet of the same thickness, at least 72 hours.
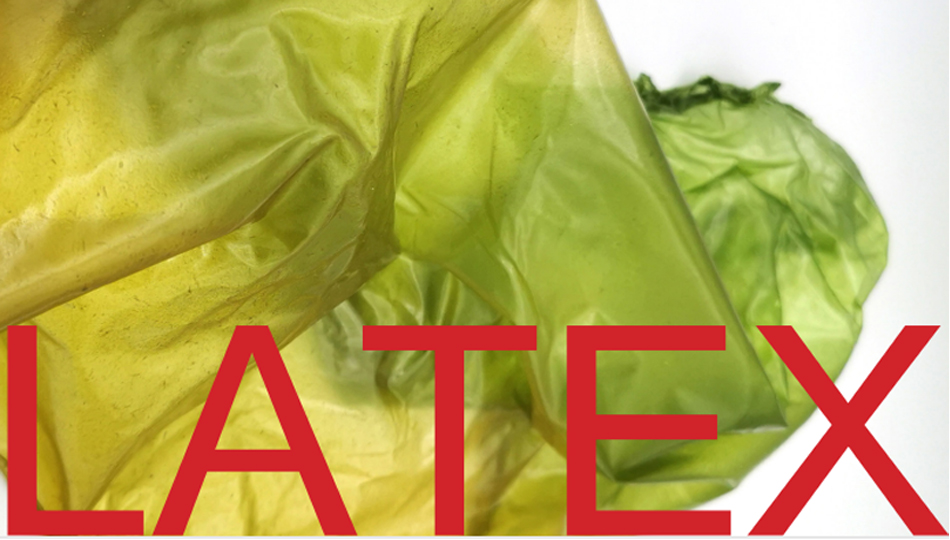
Properties:
Transparency: X X
Opacity: X X
Elasticity: X X
Smell: 0
Flexibility: X X
Stamina: X X X X X
Mustiness: 0
Pigments
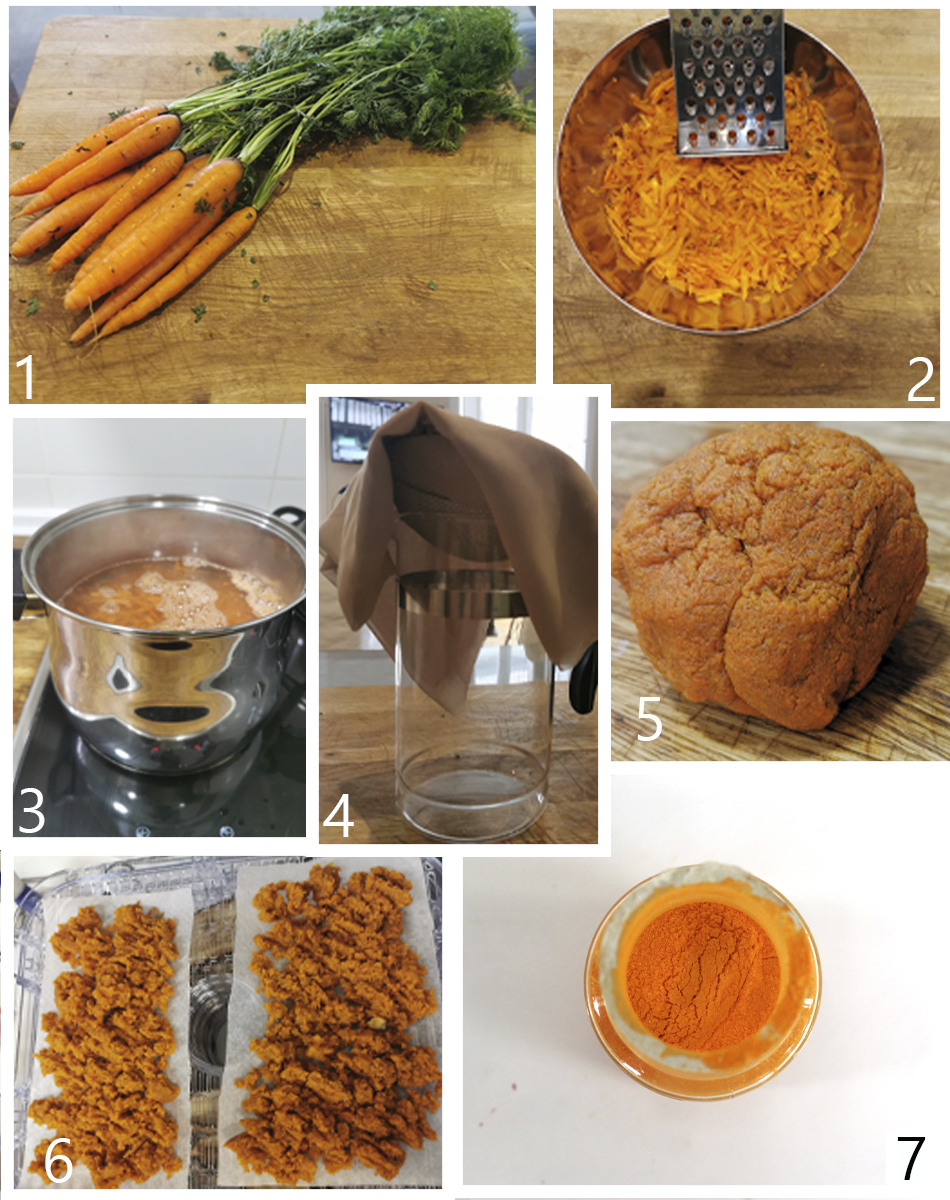
- A way that helps you have some pigments to take biomanufacturing to another level.Use some carrots from the garden and separate the carrots from the leaves.
- Use a grater to open the molecules of the carrot and that way more liquid will come out that will transform into pigment.
- Short-Time Boil the grated carrot in water. Then strain the carrot and reserve the water to biofabricate and make more products since it has many properties.
- Use a strainer with a cloth to squeeze as much as possible and separate the liquid from the mass.
-
- The resulting liquid is ready to use, it does not oxidize. The resulting biomass can now be dried, you can put it in the oven for 6 hours or place it in a dehydrator.
- The dehydrated biomass is placed in a mortar and ground until it is a fine powder.
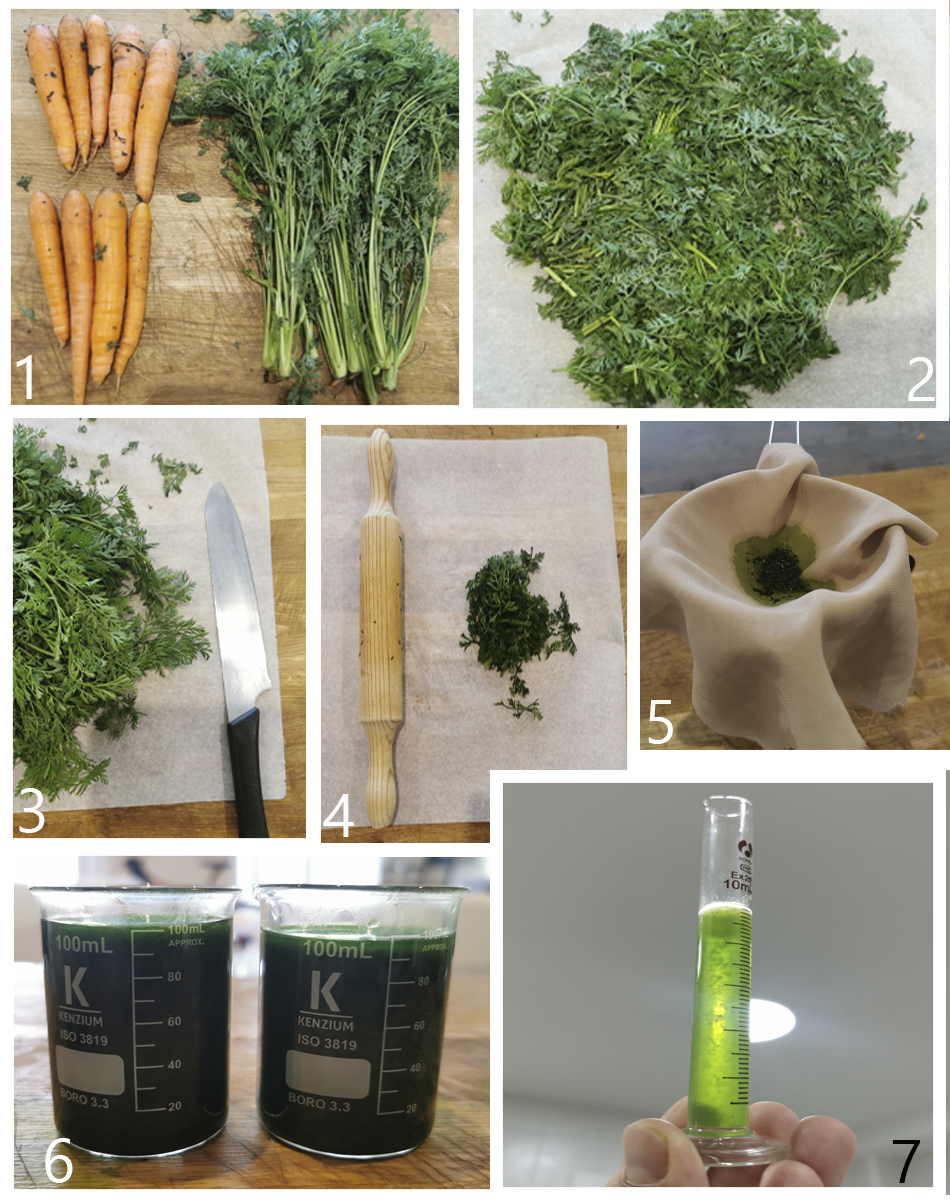
- To extract the pigment from the leaves is already a little more complicated since it is easy for it to oxidize and darken.
- The dehydrated biomass is placed in a mortar and ground until it is a fine powder.
- Cut the leaves very small including the stems as well.
- You can use a mortar or parchment paper and a roller to break the molecule of the leaves and be able to extract the liquid.
- Use a strainer with a cloth to squeeze as much as possible and separate the liquid from the mass.
- Usage of alternative solvents is preferential for extraction and concentration (acetone, DMF)
- Application of detergents (soap) and hypertonic solutions (more saline than cell cytoplasm) to maximise cell lysis (disruption)
Process
molds
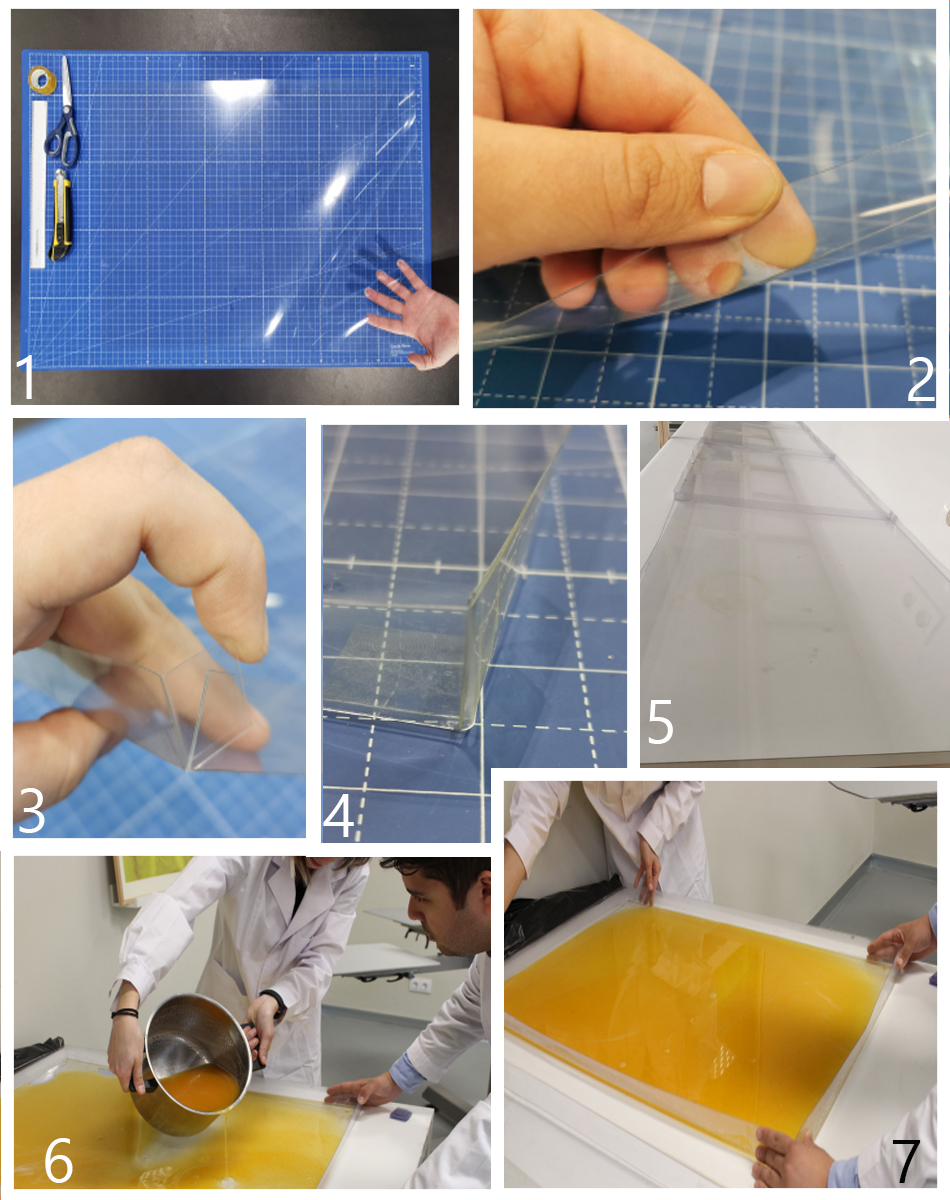
To create the modules, I first have to make sheets of matter big enough to have enough material to laser cut but manageable enough to be able to move and use them. So I thought of some 50 cm by 70 cm sheets of acetate since acetate is a fairly cheap and completely reusable mold and the biomaterial acquires its brightest texture and is very easy to unmold.
-
To make the molds you will need: -2mm thick acetate -Ruler -Cutter -Adhesive tapeter.
-
Make a 2cm guide and pass the cutter without reaching the bottom, just to create a trench and be able to fold the acetate in the opposite direction.
- Then cut 2cm x 2cm squares at the ends of each corner, reserve them for later.
- Use the adhesive tape, preferably transparent because that way you can see inside the mold. Glue the corner joints and reinforce all the sides where the acetate has been folded.
- Acetate costs around €1.50 (year 2022) so it is a fairly cheap and easily reproducible shape. To have large plates of bioplastics since the acetate prevents it from deforming when it dries.
- To calculate the amount of liquid that a mold can contain, I use this formula: 3 Volume= length x width x hight = Side
- For example, for the Bioplastic that I later want to cut with a laser, the best is 3 mm thick since it reduces 30% later.
That’s why I make the formula: 3 Volume= 70 x 50 x 0.3 = 1050 cm
Which means that I will need 1.050Liters
Biomaterial
In order to cut the modules into a biomaterial, I needed it to be strong but flexible. That is why I have chosen this recipe with a thickness of 2 mm so that it could be comfortable and strong enough to keep the module in place.
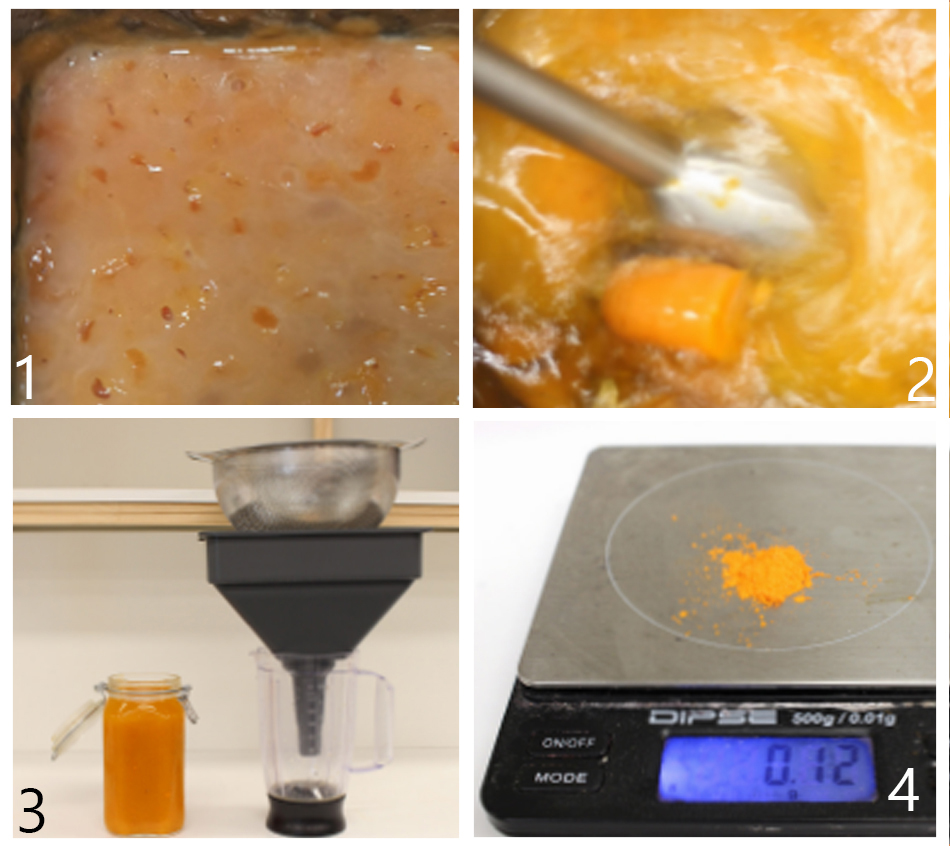
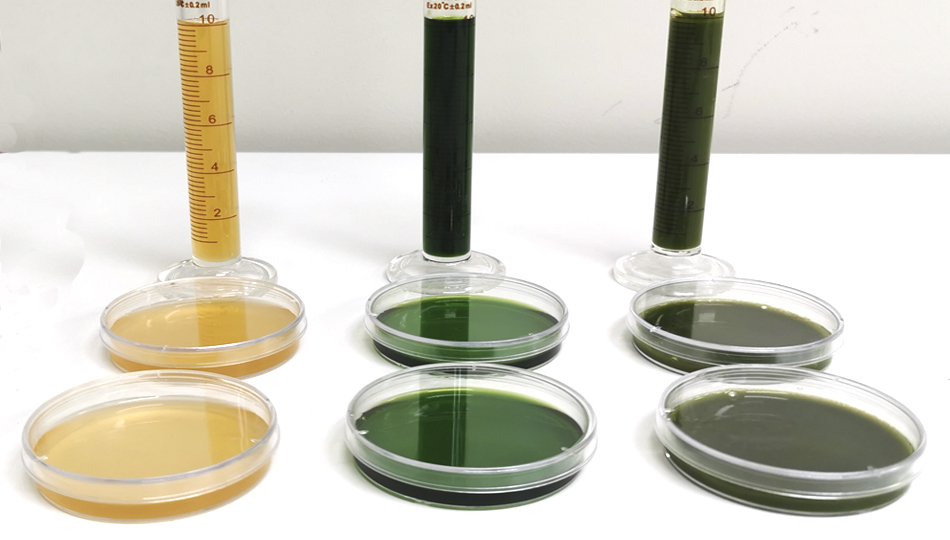
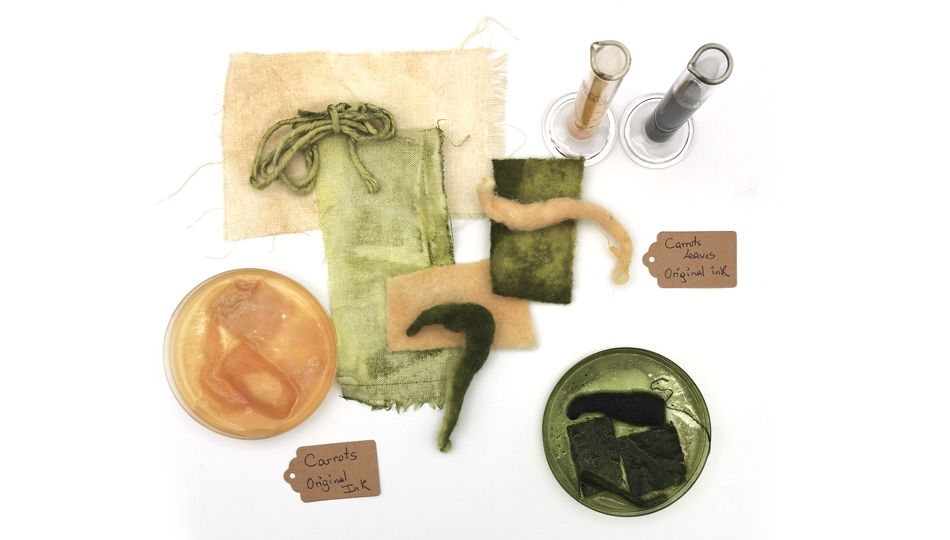
- After the phytoremediation process, we find a whitish mixture, to add color there are several options.
- You can add carrots that have not gone through this process and cook them until they are soft and pass them through the blender, with the water that you have cooked them.
- You can add food coloring. It is an easy way to get very bright colors and helps prevent mold from appearing.
- You can add pigment powder that is the result of the dehydration of the pigments.
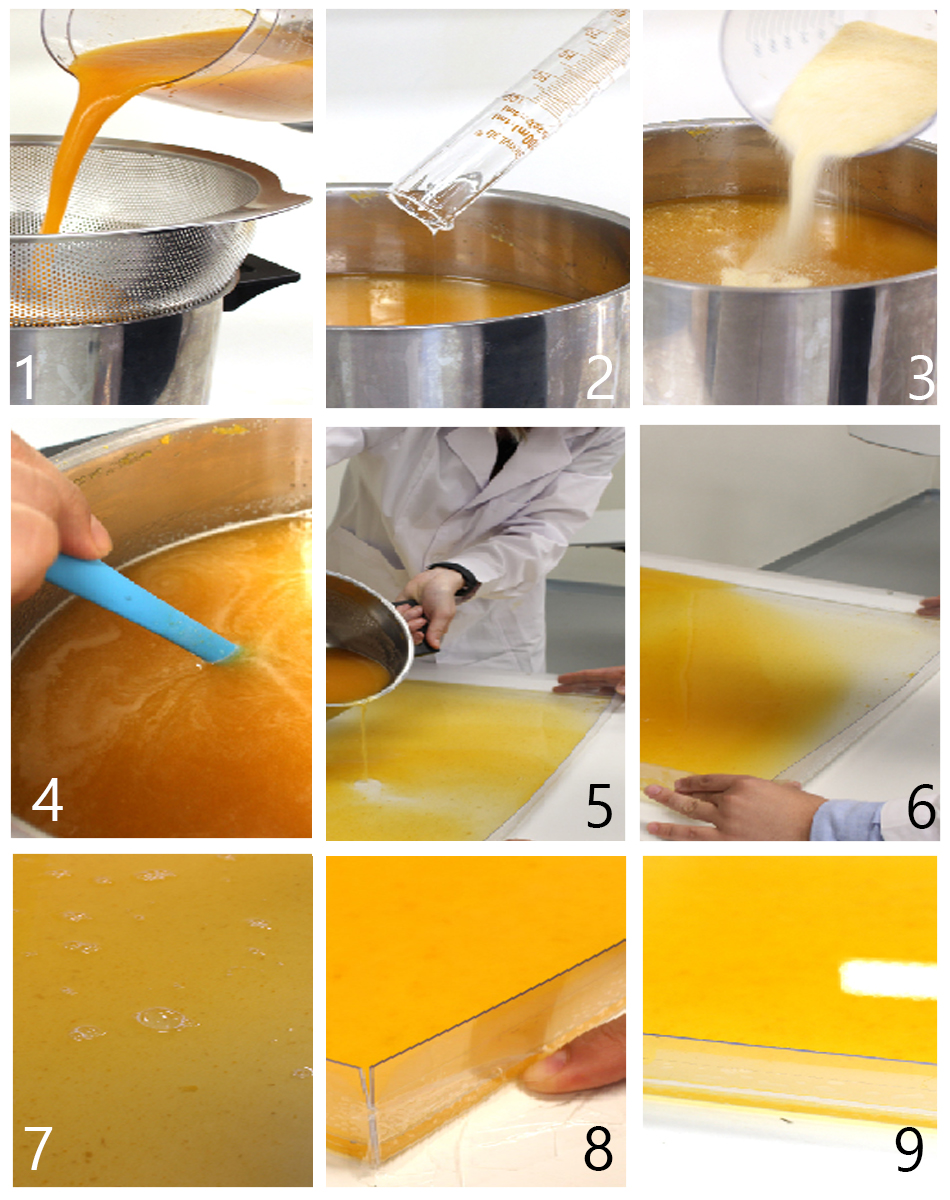
- Put the biomass in a pot over medium heat
- Then immediately after pour the glycerin and you are stirring them during that medium fire
- In the next step, raise the heat to medium high and pour the gelatin little by little, even if you get lumps, the heat will help you eliminate them.
- Then immediately after pour the glycerin and you are stirring them during that medium fire. Stir continuously until the gelatin has completely dissolved and has a liquid but full-bodied texture like that of juice.
- Probably the mold deforms a little with the heat, so it is best to move continuously until it begins to solidify
- When you pour the mixture into the mold I recommend that you do not make it too hot, but rather have it on the lowest heat for a while.
- There is a possibility that putting it on will create bubbles. remove them to have a surface as smooth as possible.
- To stabilize the ends of the mold that can be deformed by the heat, what I have found best is to put adhesive tape so that it reaches all sides evenly.
- Let it dry for 72 to 100 hours, depending on the thickness of the bioplastic.
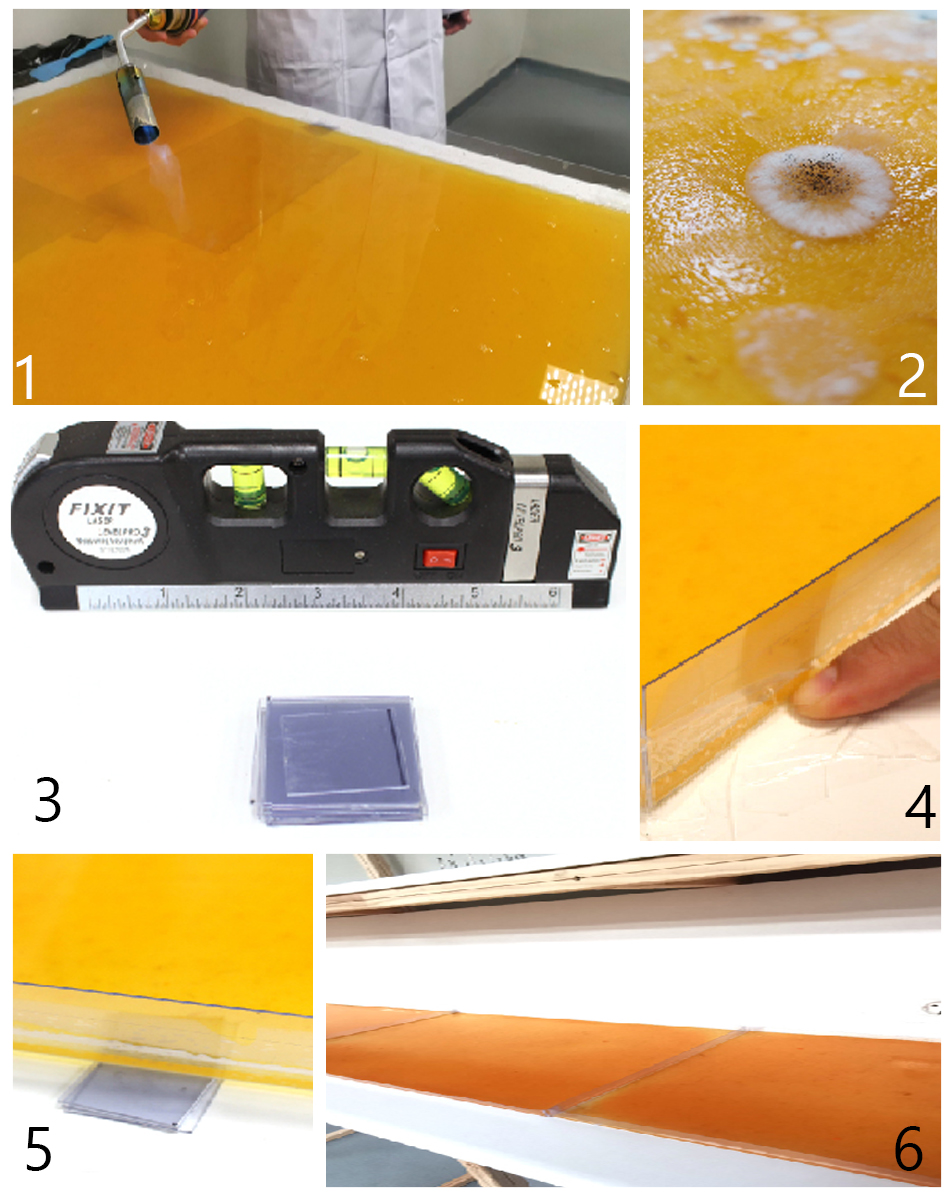
- To eliminate the bubbles you can use the fire so they all go away and there is a fairly stabilized and smooth surface.
- If fungi grows, don’t panic, with alcohol you can stop the growthe of the fungi, you can also use those fungi since it looks like a print. They are also pretty in their own way.
- One of the most important things is the stability and uniformity of the table.
- Use adhesive tape to fix it to the table
- I use a leveler and also the leftovers of the molds so that I can raise parts of the mold and thus have the greatest uniformity, since even having the table level, the heat makes it uneven.
- I know it’s very tempting, but don’t touch the bioplastic until it’s completely dry that way it doesn’t lose its shape and we don’t inject bacteria from our hands.
Recipes
Igredients:
100ml Biomass
30gr of Gelatin
50ml Glycerin
Process:
1. In a pot add the biomass with the glycerin and turn on the fire at minimun heat.
2. Then add the gelatine and up the fire to medium high level.
3. Stir constantly and when you see the all the is melted low the heat and wait around two minutes.
4. Pour the mixture into the mold.
5 Let dry and not touch the surface until is completly dry and is maybe around 72 hours.
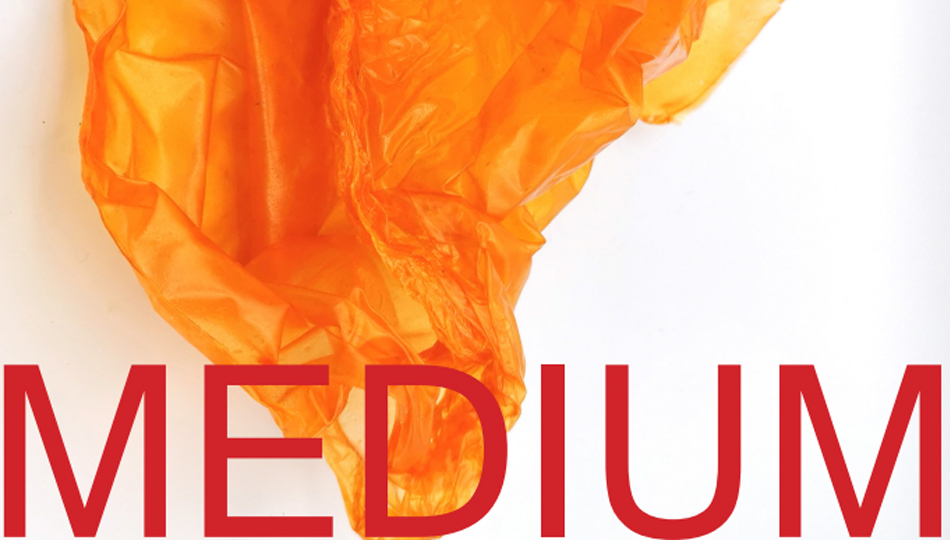
Properties:
Transparency: X X X X X
Opacity: X
Elasticity: XX
Smell: X
Flexibility: X X X X
Stamina: X X X
Mustiness: X
Igredients:
100ml Biomass
50gr of Gelatin
25ml Glycerin
Process:
1. In a pot add the biomass with the glycerin and turn on the fire at minimun heat.
2. Then add the gelatine and up the fire to medium high level.
3. Stir constantly and when you see the all the is melted low the heat and wait around two minutes.
4. Pour the mixture into the mold.
5 Let dry and not touch the surface until is completly dry and is maybe around 72 hours.
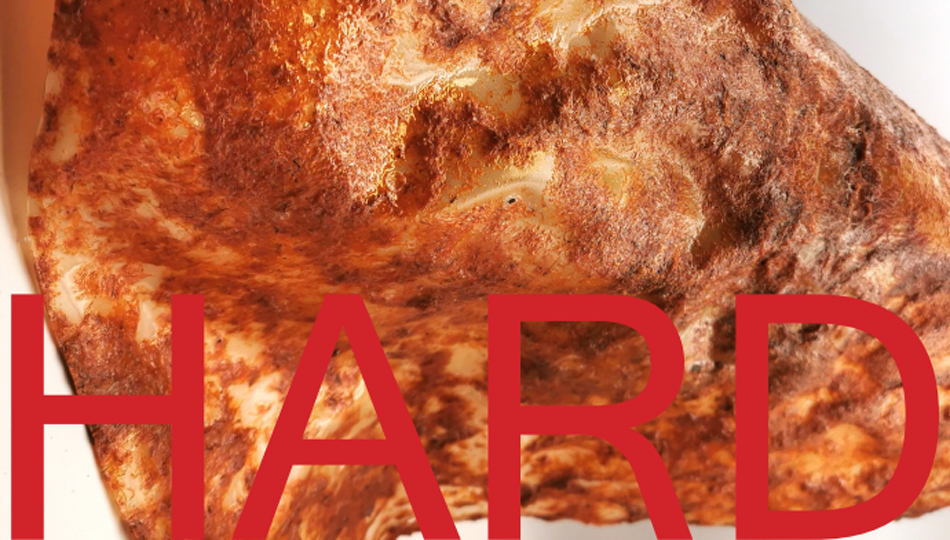
Properties:
Transparency: X X X X X
Opacity: X
Elasticity: X
Smell: X
Flexibility: X X
Stamina: X X X X
Mustiness: X
Igredients:

100ml Water
100ml Dryed Carrot Biomass
60gr of Gelatin
30ml Glycerin

Process:

1. In a pot add the biomass with the glycerin and turn on the fire at minimun heat.
2. Then add the gelatine and up the fire to medium high level.
3. Stir constantly and when you see the all the is melted low the heat and wait around two minutes.
4. Pour the mixture into the mold.
5 Let dry and not touch the surface until is completly dry and is maybe around 72 hours.

Properties:

Transparency: X X X X X
Opacity:      X
Elasticity:   X X X
Smell:        X
Flexibility:  X
Stamina:      X X X X X
Mustiness:    X
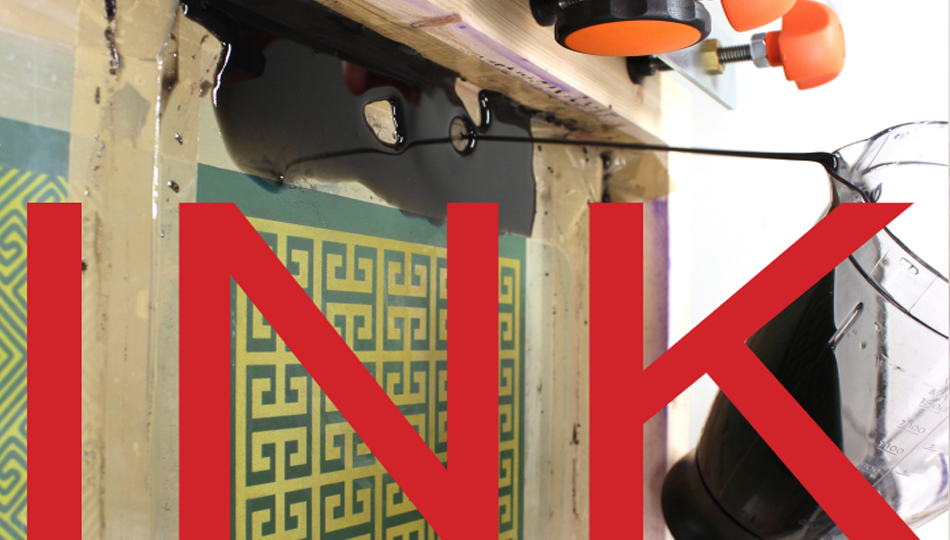
Igredients:

100ml Biomass
50gr of Gelatin
30ml Glycerin

Process:

1. The key of transforming the biomaterial as a ink is to eliminate the water on the biomass, in this case we used 75% squirt ink 25% water to prepare this biomass.
2.In a pot add the biomass with the glycerin and turn on the fire at minimun heat.
3. Then add the gelatine and up the fire to medium high level.
4. Stir constantly and when you see the all the is melted low the heat and wait around two minutes.
5. When you see the texture as a yogurt, you can use it in a screen print, with a pencil or a stencil, for example.
6. It dries very fast so be prepare to reheated again.

Properties:

Transparency: X X X X X
Opacity:      X X X X X
Elasticity:   X X X
Smell:        X
Flexibility:  X X X
Stamina:      X X X X X
Mustiness:    X
Igredients:

100ml Biomass
50gr of Gelatin
25ml Glycerin
5gr Alum
Process:

1. In a pot add the biomass with the glycerin and turn on the fire at minimun heat.
2. Then add the gelatine with the alum and up the fire to medium high level.
3. Stir constantly and when you see the all the is melted low the heat and wait around two minutes.
4. Pour the mixture into the mold.
5 Let dry and not touch the surface until is completly dry and is maybe around 72 hours.


Properties:

Transparency: X X X X X
Opacity:      X X X X X
Elasticity:   X X X
Smell:        X
Flexibility:  X X X
Stamina:      X X X X X
Mustiness:    X
Ingredients:

100ml Water
10gr of Gelatin
7ml Glycerin
5gr Agar
70gr dry biomass

Process:

1. In a pot add the water with the glycerin and turn on the fire at minimun heat.
2. Then add the biomass, gelatine and up the fire to medium high level.
3. Stir constantly and when you see the all the is melted low the heat and wait around two minutes.
4. Pour the mixture into the mold.
5 Let dry and not touch the surface until is completly dry and is maybe around 72 hours.
6. the agar it gives texture and erase the shine is a good thing to imitate the human skin


Properties:

Transparency: X X X X X
Opacity:      X X X X X
Elasticity:   X X X
Smell:        X
Flexibility:  X X X
Stamina:      X X X X X
Mustiness:    X
Ingredients:

100ml Biomass
100gr of Gelatin
100ml Glycerin

Process:

1. In a pot add the biomass with the glycerin
2. Then add the gelatine
3. Stir until you see is all mixed
4. Teked to the microwave for 30 sec to max level repeat from 30 sec to 30 sec until you see is completed melted as a viscous liquid.
5. Pour the mixture into the mold.
6. It drys very easy and fast so I add another layer in the mold and I could mix the colours and forms.

Properties:

Transparency: X X X X X
Opacity:      X X X X X
Elasticity:   X X X
Smell:        X
Flexibility:  X X X
Stamina:      X X X X
Mustiness:    X

Ingredients:

5 gr Shea Butter
3 gr de cocoa butter
5 ml Castor oil
2 ml Glycerin
2, 5 gr Dryed pigment
0,05 ml Sharomix 705

Process:

1. In a pot add the shea butter, cocoa butter, castor oil and glycerin.
2. Using bain-marie method for melting very well all the ingredients.
3. Stir until you see is all mixed
4. When is all mixed add the pigment and stir.
5. After everything is completely mixed and uniform, add the sharomix 705 and the alcohol
6. Pour everything into an container and let dry for 24 hours

Properties:

Transparency: X X X
Opacity:      X X
Elasticity:   X X X
Smell:        X
Flexibility:  X X X
Stamina:      X X X X
Mustiness:    X

Ingredients:

3 gr kaolin clay
0,50 gr zinc oxide
0,40 gr arrowroot powder
1 ml Alcohol
2, 5 gr Dryed pigment
0,05 ml Sharomix 705

Process:

1. In a mortar add the kaolin clay, zinc oxide, arrowroot powder with Dryed pigment
2. Grind everything carefully until you have a homogeneous color and everything looks united.
3. When the entire mixture is uniform in color add the alcohol and the sharomix 705.
6. Pour everything into an aluminum mold and use a parchment paper and press to make it quite compact. let it dry overnight before using

Properties:

Transparency: X
Opacity:      X
Elasticity:   X
Smell:        X
Flexibility:  X
Stamina:      X X X X
Mustiness:    X

Ingredients:

0,50 gr zinc oxide
1 ml Alcohol
2, 5 gr Dryed pigment
0,05 ml Sharomix 705

Process:

1. In a mortar add the zinc oxide with Dryed pigment
2. Grind everything carefully until you have a homogeneous color and everything looks united.
3. When the entire mixture is uniform in color add the alcohol and the sharomix 705.
6. Pour everything into an aluminum mold and use a parchment paper and press to make it quite compact. let it dry overnight before using


Properties:

Transparency: X
Opacity:      X
Elasticity:   X
Smell:        X
Flexibility:  X
Stamina:      X X X X
Mustiness:    X
Downloadable Presentation 3 igredients 40 explorations