FIRST FOOD EXPERIMENTATIONS
Working with ferments needs practice. Is as making a biomaterial from the beggining, it needs time to get to know it; and more it is based on living organisms. In this section you'll find the first experimentations around tempeh, kombucha and cashew cheeses, along with some cooking recipes.
TEMPEH
Tempeh is a traditional food from Indonesia based on the fermentation of soya beans with a fungus called Rhizopus Oligosporus and Aspergillus Oryzae.
It can be prepared with different legumes and cooked in many ways. It has high protein content (the % will vary from the ingredient used), vitamin B12 and promotes the gut microbiota. And how does it help our assimilation and gut health?? By the same growth of the tempeh. The mycelium degrades the proteins from the legumes while growing, and it is considered as a pre-digestion making it easier to digest for the human body.
By just introducing the fermentation methods to the local beans, we can improve the assimilations of their properties: this is how we localize the technique. However as the climate is different in the Western World, adding technological resources is necessary to create an adequate environment.
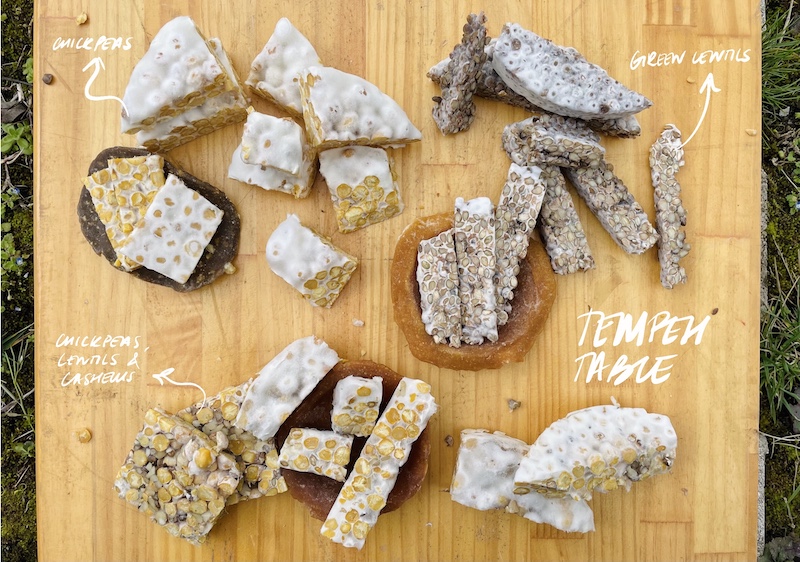
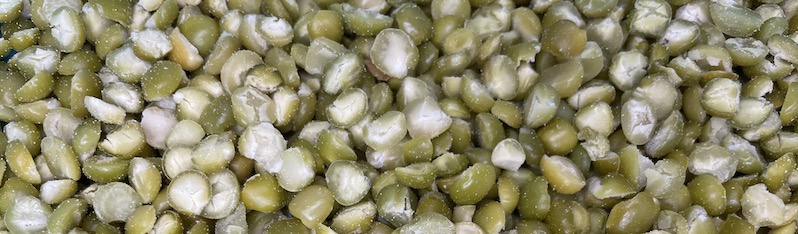
For this project Spanish beans were used: chickpeas, kidney beans, green peas, lentils...
FERMENTING WITH A DEHYDRATOR
Working with a dehydrator and biodegradable bags:
-
1° test: Chickpea and lentil tempeh. I placed the tempehs too close to the ventilator and it dried part of the surface. I needed to intervene me applying some water. I’ll left them fermenting around 30 hours so the internal mycelium could grow s little bit more to the surface. The results were totally edible.
-
2º test: Okara tempeh.
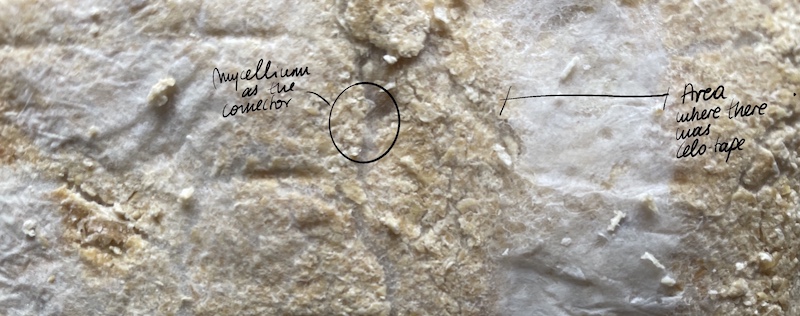
While making tofu a lot of food is rejected. Tofu is coagulated soya milk, this means that the fibers from the soya protein shells are discarded. This pulp is known as Okara: full in nutrients, protein and fiber. Tempeh spores need protein to eat from, si Okara is a great ingredient. I let the Okara dry overnight as it was very wet from making tofu. The time for incubation was almost 48 hours as Okara is very granulated and I needed the mycellium to be very compact so it didn’t break easily. The result amazed me as the texture and smell were so yummy. Taking out this tempeh I realized that the bags that I was using were very thin so the humidity from inside of the bag wasn’t starting properly. I realized this because the parts covered by the cello-tape (thus a second layer), presented more mycelium in the surface than others that not.
- 3º test: Chickpea and lentil tempeh wrapped in more layers.
This time I wrapped in more layers of the same bag in order to increase the humidity of the inside. The chickpeas after 30 hours looked amazing and delicious.
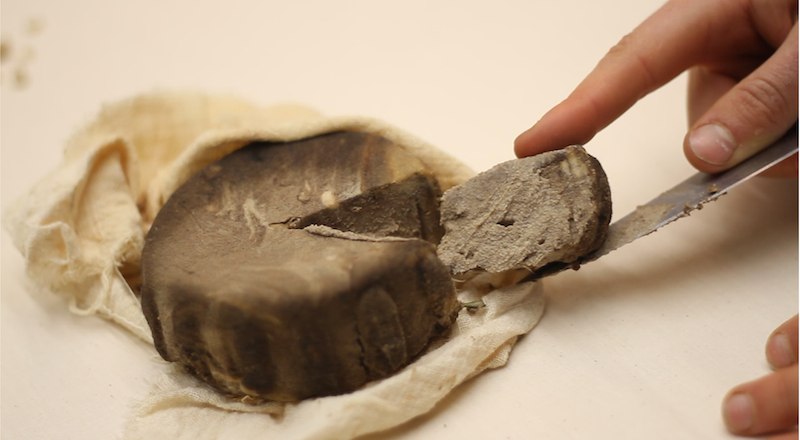
However the lentil tempeh failed. Lentils are very sensitive and it is very easy to overcook them and because they can be more compact they tend to overheat. In this case I overcooked the lentils by mistake (just one minute mistake :( ),and they were very humid and tender (Ryzopus doesn't like this), so I knew it wasn’t going to work well. However I still made it and… nope. If after 34 hours nothing white came, it is better to stop the fermentation process to prevent from creating other things... This test was used for creating biomaterials as nothing wrong appeared in it: it was just too acid to eat.
FERMENTING WITH AN INCUBATOR
After coming back to Bilbao I ordered the components for creating my own incubator. In the section Tools you can find all the details of how to build it, references and other alternatives.
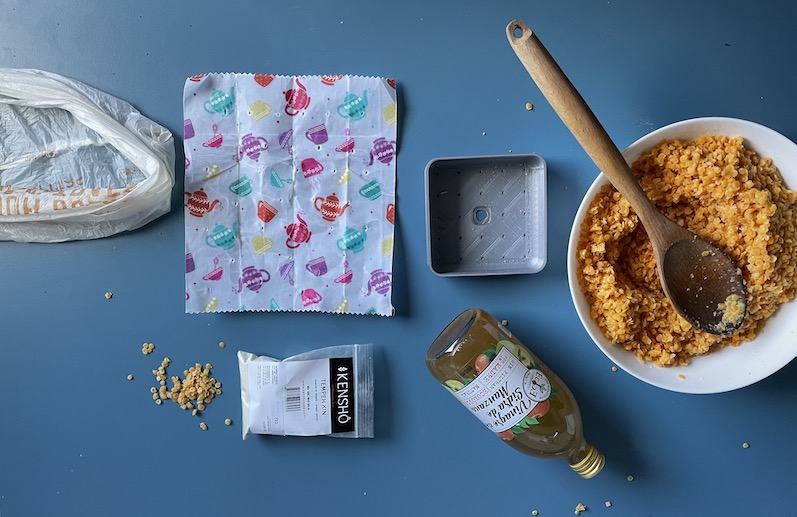
- 1° test: split red lentils in different molds
For this first experimentation I wanted to get to know how to work with the incubator and the tempeh, as I've always done it with the dehydrator. Ando also how the growing process interacts with different materials as molds. By this time I had ready the first 3D printed mold (you can find the info here), some wax paper that I appeared to have in Madrid and a biodegradable plastic bag (not the same one though as I used to use). I saw that Wendy tested the wax paper during her Final Project and I wanted to give it a go as I believe I can recycle this material. After cooking and sporing the lentils (this time making sure they were hard enough), I filled the three options:
The plastic bag: it didn't work and I'm not sure why. I believe it was because there was too many or because the bag was not suitable for it. Still figuring it out...
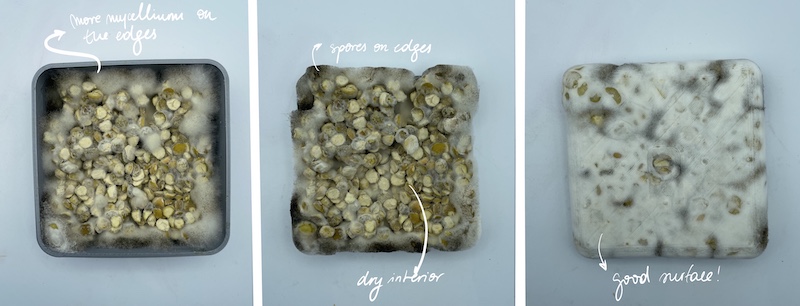
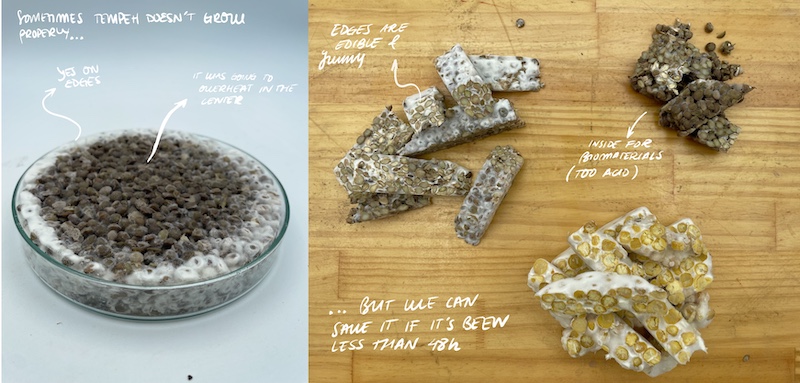
The 3D printed mold: it was very easy to fill and compact and after 24 hours the sides were growing as wanted. Nevertheless, as lentils are very small, the pressure that I applied for compactation was too high, creating an overheating in the middle. If the legumes are extremely tight, the mycellium can't pass through them. The overheating means that during the fermentation process, not enough air is entering and the heat generated by the own tempeh can't escape. This heat overcooks the legumes and make it impossible for the mycellium to grow in them as the temperature is way higher in those areas. The smell was very acid and strong.
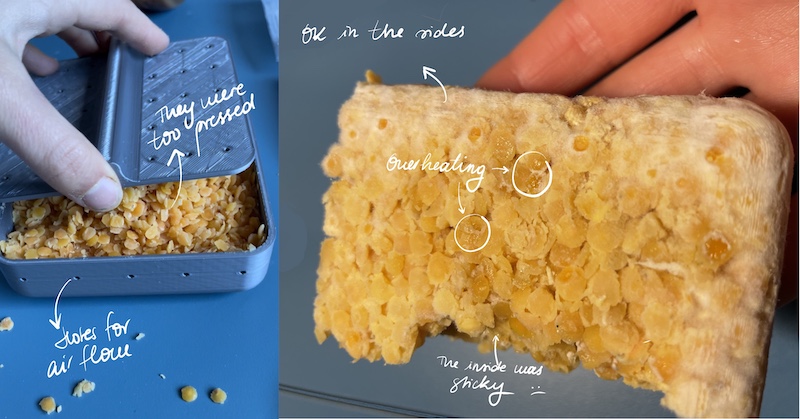
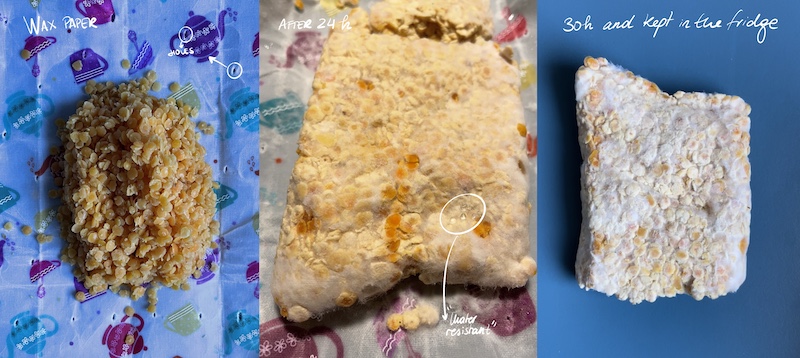
Wax paper: I had an small piece that I pierced mantaining the range of distance between the holes. I liked wrapping it as it remains of the original technique with banana leaves. However I struggled a little bit with the technique as the paper was very rigid (almost new), so the compactation wasn't optimal. After 24 hours, as the quatity was lower than the other tests, almost all the lentils were covered by the mycellium. So after 30 hours, it was ready to consume. The underside, the one withought the folders, resulted in a surface more homogeneus; the above one, not that smooth. The smell was very mushroomy and nutty, so good!
The next day I ate the wax paper tempeh test and...incredible hehe
- 2º test: green peas in the 3D printed mold
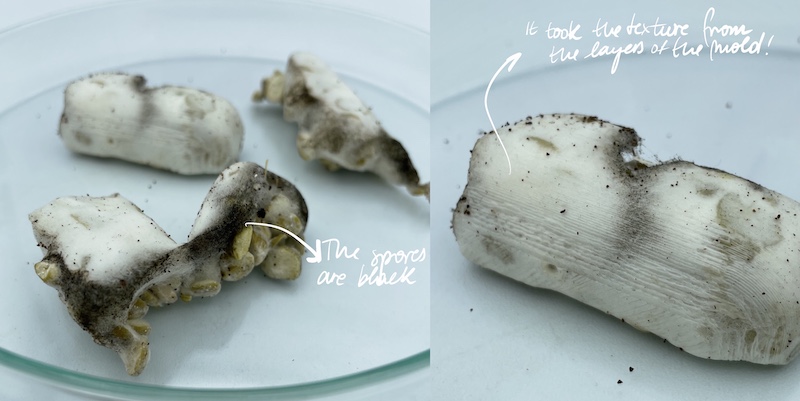
As a thick layer generated overheating in the lentils I filled half of the mold. After 24h I could see a lot of mycelium growing everywhere, even on the bottom part. This was a really good sign! But my impatience came and I was checking and touching it all the time…so in one of them I broke it. Breaking it is not the end of the world as the mycellium acts as the joiner, but the longer it takes to join the more acid is the tempeh. So I left the tempeh one night more, and because of a visit I couldn’t take it out until lunch time. When I opened the mold, there were many black parts. I was really frustrated until I read that they weren’t mold, they were spores!!!
Spores appear after X hours of fermentation. It is easier to create them when the layer of legumes is thin. After getting them, the whole tempeh can be dehydrated and be used in future batches :)
- 3° test azukis, cashews and buckwheat
I wanted to test with the legume as is very common in Spain, although it is original from the East. This batch has its complications as the “alubias” are very sensitive to temperature and their skin breaks very easy. It is important to keep the skin intact as it prevents the interior to be very humid (something that Ryzopius doesn’t like). But, of course, the majority of my batch broke. I could save some of them and as it was a small quantity I mixed them with some activated cashews and buckwheat that I had. Activated means that the nut, seed or grain was hydrated in water between 8-12 hourse in order to remove the antinutrients; and then they are dry (in my case with the dehydrator but it can be in the oven or at the sun if its summer).
The broken legumes were extremely humid in the inside, so I put them in the dehydrator too with the hope that they were going to dry. After 3-4 at 40° hours they dried so I prepared the batch, feeling like tough they were not going to work.
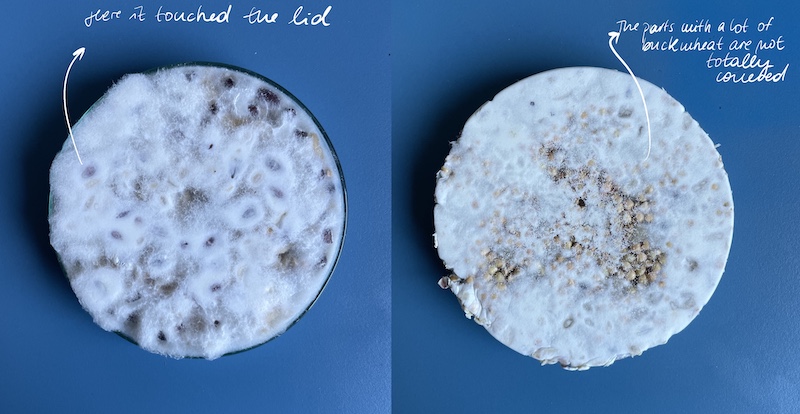
This whole azuki batch was placed in Petri dishes as I saw from Domingo Club that this works. I really like the idea of working with them as they are easy to find, reusable and give a cute appearance to tempeh.
After 24h of the unbroken ones, the mycellium was growing but just from the Azukis. Watching the process makes very clear which kind of nutrients does Ryzopius prefer. After 30 it kept growing around the cashews and buckwheat. After 48 h it was almost fully covered except from the areas where a lot of buckwheat was concentrated. The Petri dish worked as wanted and I was very happy with the functional result.
After 24 hours of the broken ones, there were some shy mycellium growing around the Azukis. After 48 h although it wasn’t everything covered, I took it out so it could be edible. What I'm not sure is that if the growth was smaller because there was a wrong proportions between legumes and nuts; or because the legumes were dried longer than needed: we'll try.
The texture of this whole batch was incredible: soft from the Azukis, nutty and tender because of the mycellium and cashews; and crunchy from the buckwheat. I tried cooking it as a savory recipe and a sweet one. For the savory I pan fried it with Tamari, agave syrup and paprika. For the sweet way I used the tempeh that wasn’t totally covered
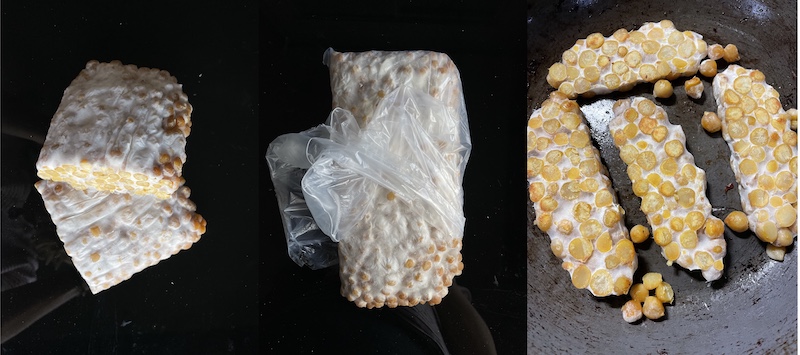
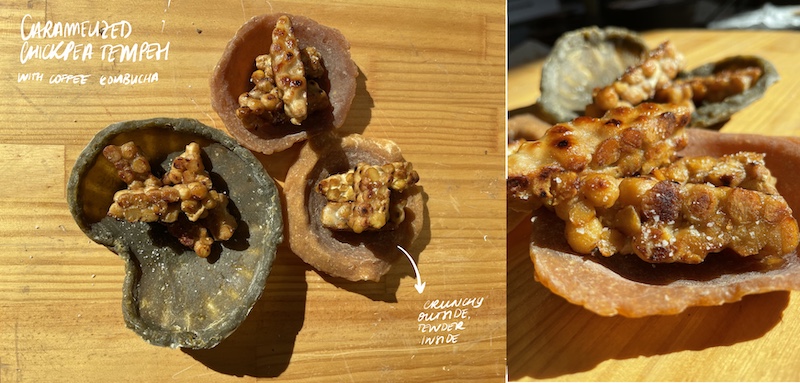
- 4º Test: chickpeas and chickpeas with cashews
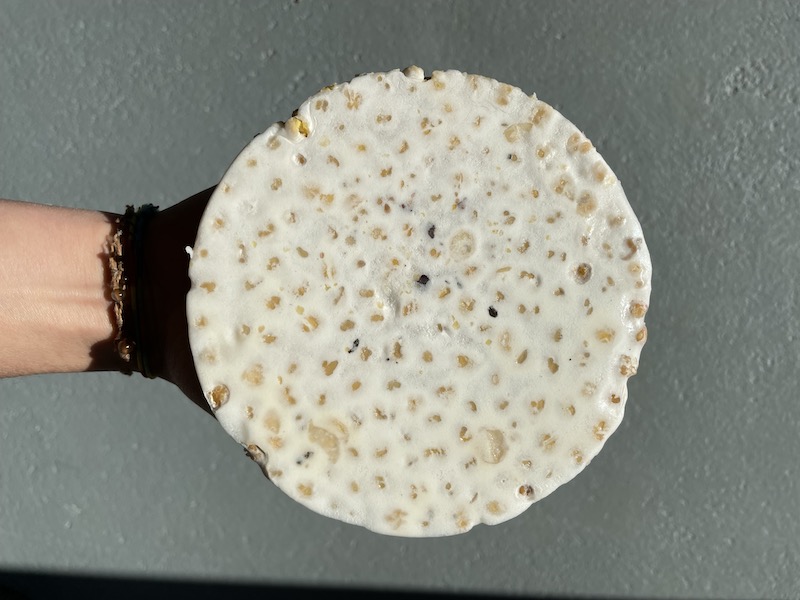
Chickpeas have been my great success while making tempeh. They are a very hard bean legume so it's easy to work with, as they don't tend to break. In this attempt I just worked with petri dishes as I wanted to make sure the tempeh grew for the BDC open days.
I tried different proportions with cashews as the mycellium doesn't eat them, they're just covered by it. One petri dish was just with chickpeas, other with some cashews and the last one with cashwes and cacao nibs. This last one after the 48 hours of fermentation was less covered than the other two, but it was great too!
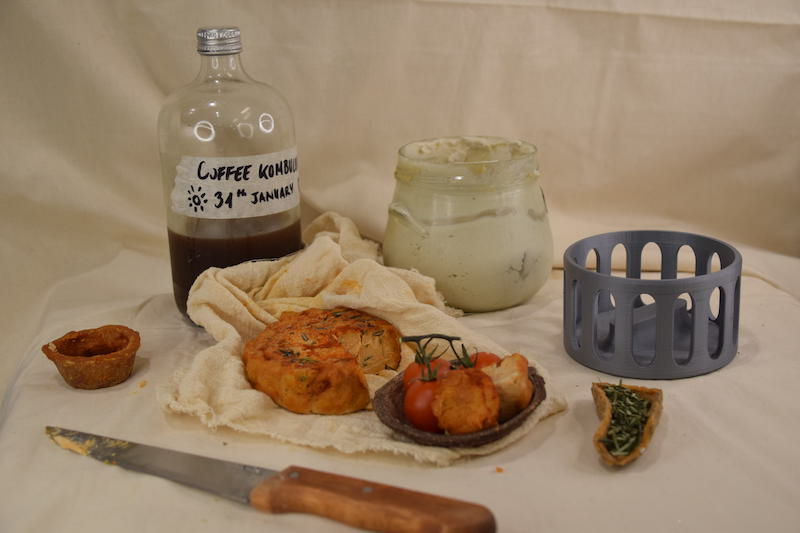
These tempehs were caramelized with the homemade kombuchas (explained later). Instead of using my useal combinitation of agave and tamari, I used the same kombuchas after reducing them. The tempeh caramelized with the coffee kombucha was described as smokey and with a good balance of sweetness and tart. The one caramelized with the maple syrup kombucha was sweeter.
chickpea_tempeh.mp4 from elsa tfg on Vimeo.
I’ve been cooking this tempeh in the BDC so I had the opportunity to give it to my friends to taste. All of them find it juicy, tender and remind them of a chicken texture and taste which I find very interesting as this association can be very helpful for welcoming this new type of food.
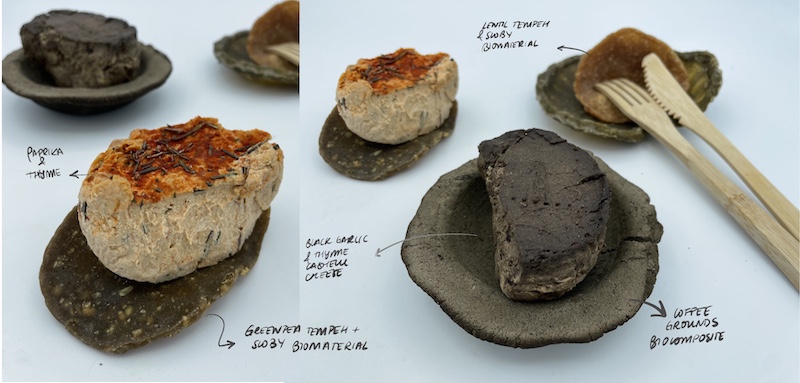
5º Test: green lentil tempeh
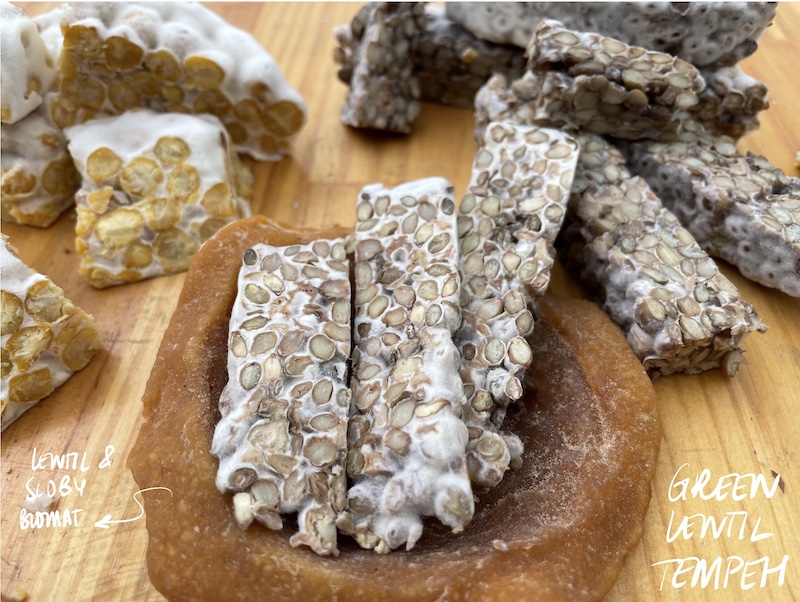
Green lentils are one of the hardest type of lentils along with the black ones. After soaking them overnight, I let them cook for 10 minutes in the pressure cooker so the skin didn’t break. They were fully cooked and the skin was intact!
However something happened during the fermentation process, I believe the air wasn’t flowing very much in the incubator as I found it several times at a temperature higher than 32ºC. “Hopefully” I took out the tempehs before they couldn’t be edible so I could save some parts. The edges were stored in the fridge to eat and the center for making biomaterials.
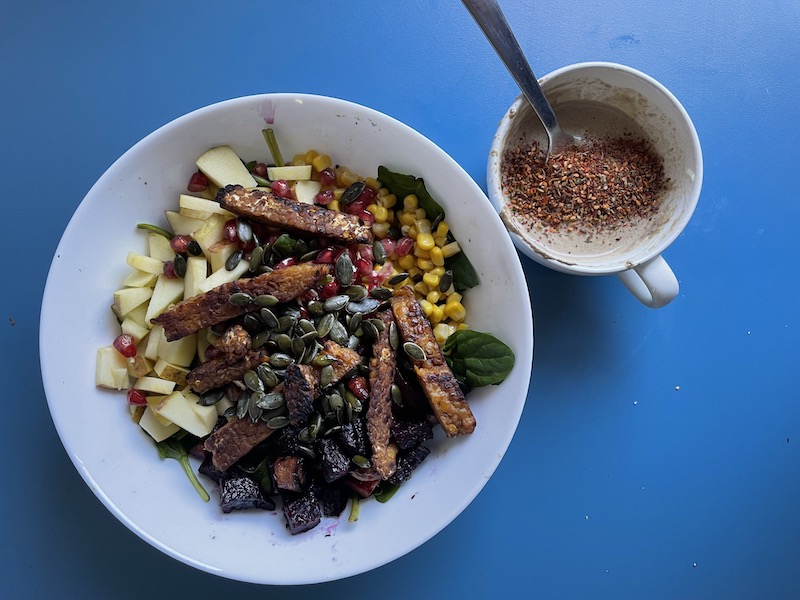
This tempeh was cooked in different ways: pan-fried until crispy on the surface with thyme and salt; caramelized with coffee kombucha and caramelized with agave syrup and tamari. I gave to try the first two versions in the BDC, and they found it very different from the chickpea tempeh but they liked it too! We found that the saltier version (thyme and salt) was more accurate with the flavor of the lentils and creates a good balance; however the caramelized version was still good and much more juicy as the kombucha entered inside the tempeh while cooking it.
Watch the full process of cooking tempeh here:
KOMBUCHA
Kombucha is a fermented drink with an acid flavor and can be carbonated. It is full of probiotics and the flavor alterations can be endless.
This fermentation is achieved by the collaborative work of microorganisms. They first transform the sugar into alcohol and then turn it into acetic acid. The same groups of microorganisms realize these two functions while creating a slimy bag known as “mother” or SCOBY (Symbiotic Culture of Bacteria and Yeast). The yeast is the one who turns the sugar from the liquid into alcohol; and then the bacterias oxidate the alcohol with the oxygen from the environment into acid. Kombucha just has around 0.5-1% of alcohol.
For The Mycelium House, there were two kinds of kombuchas fermented: from coffee grounds and from maple syrup. They were selected for this project because as an opportunity to revalue the waste as for the coffee; and to develop other recipes with the sweet and smoke flavor of it (maple syrup).
COFFEE KOMBUCHA
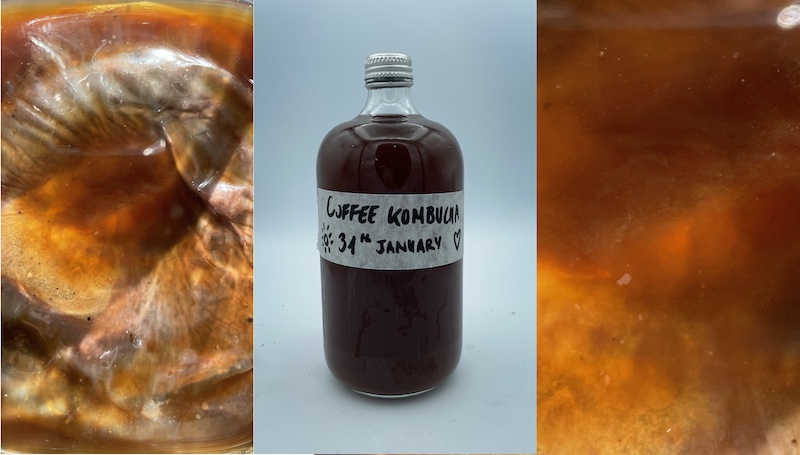
Coffee kombucha can be made with fresh coffee or with the grounds. I found that using the last ones can be very interesting in a circular perspective, making them useful in other ways. It just changes the quantity needed for creating the recipe.
The objective for this probitic beverage is to drink it (of course), cook it to obtain a coffee syrup to cook the tempeh in or other vegetables; and try to create a cheese from its probiotics in order to develop a sweet and bitter taste of it for desserts.
I got this recipe from the Fermentation book of Noma. However I decreased the quantities to try the batches quicker.
Recipe
- 200 gr of Coffee grounds
- 482 gr of water
- 65 gr of Sugar
- SCOBY
- Liquid of the SCOBY or an unpasteurized kombucha (from another batch will be ideal)
First of all I melt the sugar with a little bit of water (as the normal Kombucha Tea recipe). While it was melting, I placed the coffee grounds inside a container (the same glass jar that I'll be using for the fermentation in my case), where afterwards I poured the caramel in and the rest of the water. The recipe said to infuse the mix overnight but as it was Friday I left it the whole weekend in the fridge.
On Monday I introduced the selected SCOBY with its liquid. The kombucha was covered with a piece of fabric and placed in the incubator cabinet for a week. I checked the PH level in order to control wether the acidity was neutral, and it was ok: it was a 5. The acidity must be around this number because if it is higher it means that other organisms could live in the kombucha, and so contaminate it. The next Monday I tried the beverage and the was AMAZING, however I believed that some more acidity was necessary. So I filtered the liquid we didn't drink the soul, and left if for 2 days in the fridge closed. Closing the jar improves the carbonation of the kombucha.
TEST:
The coffee kombucha generates the same quantity of coffee grounds as waste. This was an opportunity to include them as an ingredient for a biomaterial in my menage collection Why Waste it
MAPLE SYRUP KOMBUCHA
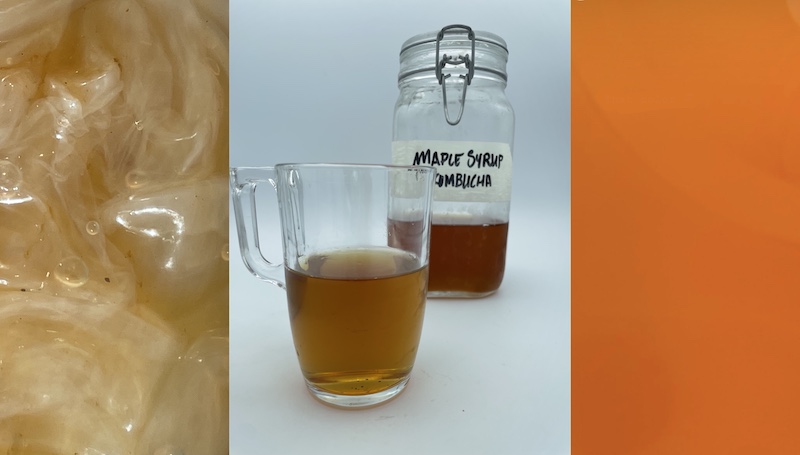
Selecting this Kombucha didn't have a circular perspective, it was because it sounded so delicious...hehe. But also because it can be used for caramelizing the tempeh, drik and I was sure since the beginning that the color of the SCOBY was going to be amazing (as much as the coffee one).
Making this recipe is quicker than the tea or coffee, as maple syrup is the sugar already liquid.
Recipe
- 180 gr of maple syrup. Don't put more or the sugar concentration will be too high that the funghi will >be saturated.
- 820 gr of water
- SCOBY
- Liquid of the SCOBY or an unpasteurized kombucha (from another batch will be ideal)
The process to follow was the same one as the coffee kombucha. However as the SCOBY that I introduced was way bigger than the coffee and smaller quantity, the time of fermentation decreased by almost 2 days. The ph level was 4,5 but what makes the final decision is the fermentor (so me), and for me the acidity was superb. I filtered the liquid and placed it closed in the fridge for 1,5 days.
Watch the full video of the kombucha process:
CASHEW CHEESES
One of the main problems that people find in turning their diet into plant-based is the cheese. That's why this bussiness has become one of the most important ones around the vegan market, improving the flavor to a level where people can't distinguish from a milk based one. That characteristic flavor from the cheese comes from the fermentation, not just becuase of the ingredients; so if we applied a fermentation to an ingredient that is similar in texture, we achieve that flavor.
Nuts are the best subsitute for making vegan cheeses as their raw flavor is subtle and the achieved texture is creamy and thick. In order to start the fermentation, we need a dosis of bacterias so we can mix the nuts with: probiotic pills or any fermented liquid such as rejuvelac, kombucha, kimchi liquid... Depending on which kind of probiotics we are using, the steps would change, but the process is the same one. As I had plenty of kombuchas I decided to use it as my bacterial input.
COFFEE KOMBUCHA CASHEW CHEESE
Ingredients
- X gr Raw cashews
- Water for soaking the nuts
- Coffee kombucha or any probiotic liquid
- A pinch of salt
Leave the cashews soaking in water overnight. Rinse them as the water is full of anti-nutrients. Place the hydrated cashews and the komucha in a food proccesor. You'll need to be patient until achieving a good texture as the mixture tends to go up. Try not to add more liquid as the result might be too fluid. Once you have the desired creaminess, place it in a big glass container (enough to give it space to grow less than its half) to see how th fermentation is going; and cover with a piece of fabric. Leave it in a warm space for one day, or if you have an incubator at 24-26ºC for around 12 hours. You'll know when the fermentation has happened as the mix will have grown and you will be able to see bubbles.

Once the fermentation is done, you can eat it direclty as I did for the BDC open days. The flavor and smell must be a little acid, but also creamy (and delicious). This is the most mild and creamy version, although from my point of view it is better to convine it with other spices and continue with the fermentation, as I thought it was going to have more coffee flavor (but it din’t, so at the end it was a little bland).
So if you want to have a stronger flavor and a harder texture, place the mixture in a mold covered with oven paper and place it in the fridge uncovered for at least 1 week. The longer it spends on the fridge the harder it gets.
After making the first batch of this coffee komucha cashew cheese and gave it to try to the people who come to the BDC, I realized that I needed to continue with the next steps in order to improve its flavor and value. I divided and mixed the cashew cream with black garlic and rosemary; and the other part with paprika and rosemary. I mold the cheeses and left them for 1 week in the fridge. It was easy to resist the temptation as I went to London that week.
When I got home I went straight forwards to the fridge to taste the cheeses. THE TASTE WAS INCREDIBLE. I could see that the uncovered face was harder than the rest, as no air could go through the the others. The flavors were homogeneous and stronger than the “raw” one (all of them could be described as raw). The black garlic one had the sweetness of it but the rosemary gave it that touch of salty, making the whole cheese earthy and fresh. The paprika cheeses perfect for including to any salad, bowl or toast. I love the smoking taste of paprika and I could put it everywhere so I guess I’m not and objective opinion. However my parents loved them: my mom preferred the paprika as the balance with the rosemary makes it very tasty and it is easier to combine; my father liked both but he was more impressed about the flavor of the black garlic as he didn’t eat it before and described it as very pleasant and fresh from the beginning while the paprika one leaves more flavor at the end.
After some problems with the humidity of my refrigerator, I designed a personalized mold and container in order to let the cheese breathe and improve my process. You can see al the information in Tools and Ingredients. The mold worked pleasantly and the result were so much optimal as it allows the cheese to curate correctly and deliciously hehe.
Watch the video of the full process to create the cashew cheese:
cheeze from elsa tfg on Vimeo.
RESEARCH & REFERENCES
Tempeh:
- Tempeh movement
- Tempeh_o_clock
- Tempehof
- My Vegan Fam
- Book: Miso, tempeh, natto & other tasty ferments
- Book: Fermentaciones asiáticas (Nerea Zorokiain)
Kombucha:
- Lov ferments
- Kombucha Kamp
- Makery
- Book: NOMA a fermentation guide
Gut, food-design & system design movements: