TOOLS AND INGREDIENTS
In this section you can find the tools designed and used throught the process, a personalized way of working. From molds for tempeh to molds for biomaterials: open source items that you could find in this folder. The parameters for the CNC can be found in the Aspire folder, although you'll need to have this program in order to open it.
INCUBATOR
For the production of tempeh (and other ferments too, like Koji), we need an incubator in order to create an appropiate environment for the fungus. Many of them requires a heat and humidity income, as the environments of their original countries are much warmer and humid. For example, for making tempeh we just need to control externaly the temperature, as it needs to be between 28-32ºC. The humidity in this case is generated by the mold, so there's no need of controlling it more. However, while growing Koji we need a humidifier. It is important to be aware that we can't grow different fungi in the same place (incubator) as there are spores that disable others, making fermentation impossible.
There are many ways of building a simple incubator, by joining the different components needed. Nevertheless you need to take in mind that if you are building a big incubator you would probably need a ventilator too. The following examples for incubator are for growing tempeh and in case you want to grow koji, you'll need to add a humidifier and a hygrometer.
-
Blanket:
- 2-3 blankets
- Thermic blanket
- Thermostat
This is the most rudimentary technique, but it can work if you just want to try one time. If you're going to grow more, or other ferments, I recommend you to invest a little bit in your tools as the process would be more controlled. Place 1 blanket on a surface, then the thermic blanket, then other blanket, food to ferment and other blanket.
-
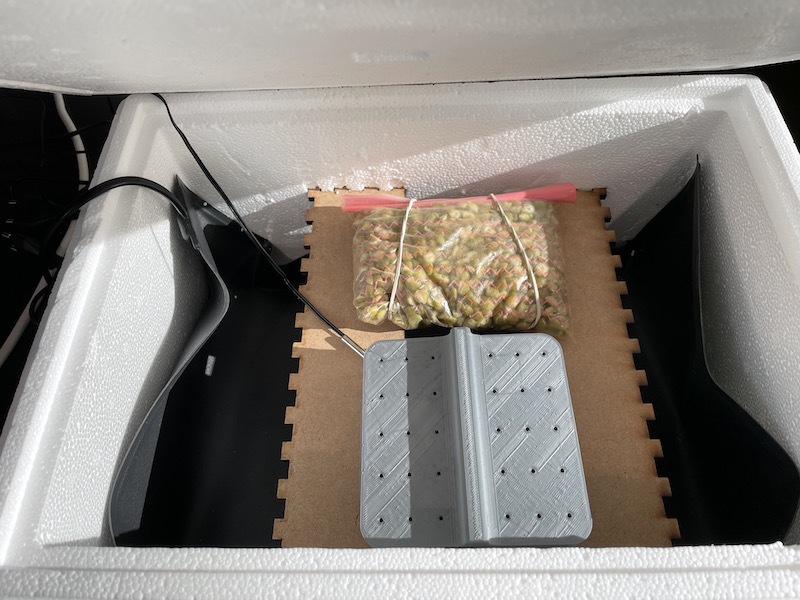
Polyestirene box:
- Polyestirene box
- Thermic blanket
- Thermostat
- piece of wood
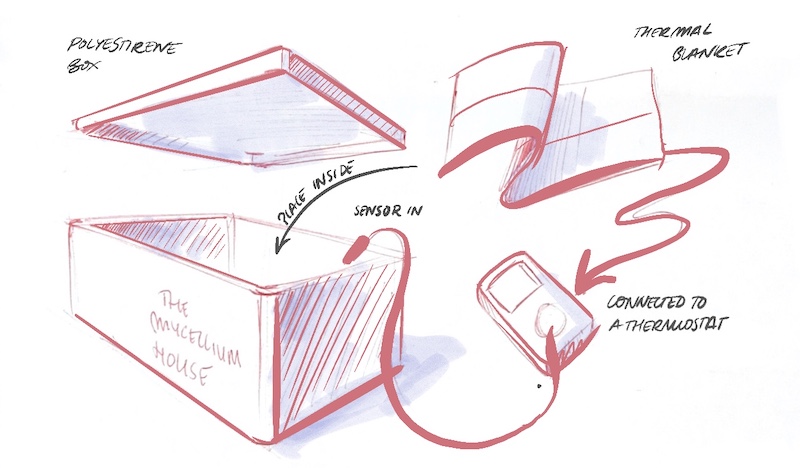
This is the one that I made for the first test of tempeh, as it is very simple an reliable. Just place together all the components and add some shelves so the tempeh is not in touch with the thermic blanket. The probe from the thermostast should be placed at this height. When growing, don't close the box: we want air flow to go inside to aviod an overheating.
-
Kitchen trolley, or if you have by any chance an old refrigerator:
- Kitchen trolley
- Cover for the trolley
- thermostat
- small heater with ventilator
- ventilator (if not included above)
As the same as for the box, place the components together. The heater must be placed below with the ventilator on, or next to it in case is not included in it. You can place the probe at medium height. The cover will be the one retaining the heat but it should be open somewhere so there's some airflow. This option is very convenient if you're willing to grow a lot of quantities, althought they are very expensive.
- Domingo Club open source incubator:
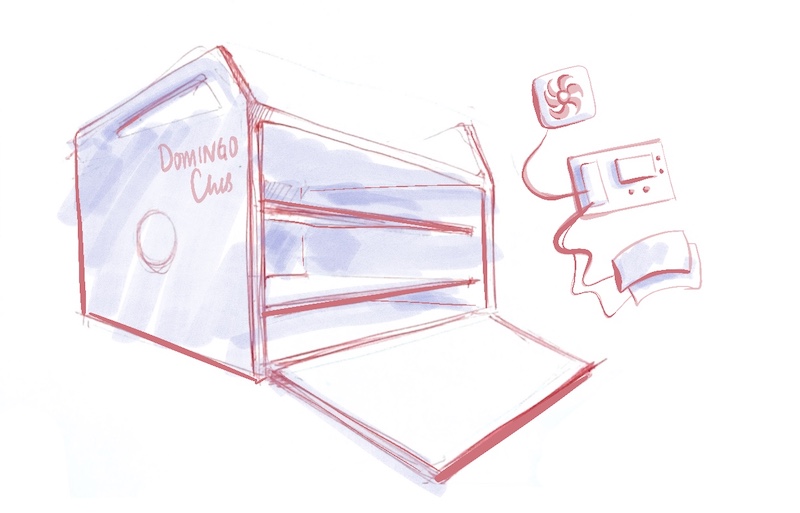
If you have the option of building your own incubator and have the resources needed for it, I will encourage you to make Domingo Club's incubator. It was specially designed for tempeh grow and the overall is cheap. After the first experiments in the polyestirene box I decided to make it and test some extensions.
My objective for the future is to create a better and bigger incubator where mycelium is used as an insulator. In the polyestirene box, I can place around 5 tempehs ( which I could optimize lowering the height of the shelves. So if I wanted to scale my production I’d need a bigger one or a second one.
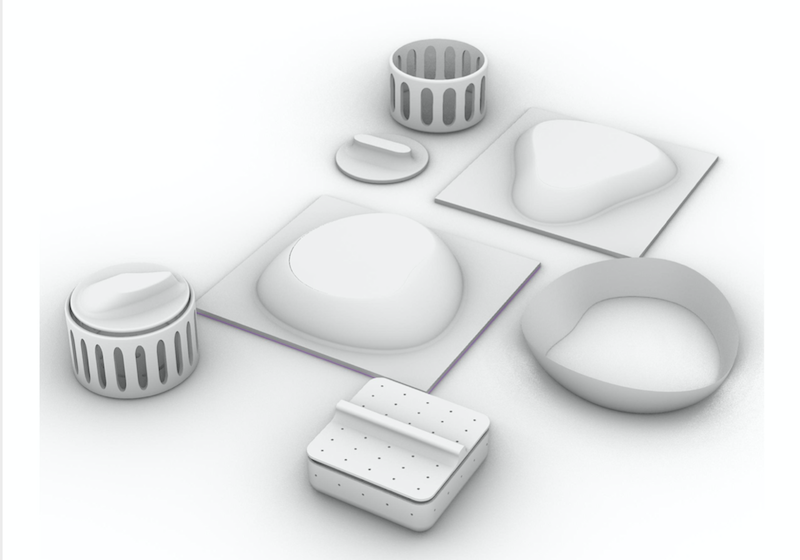
TEMPEH MOLDS
One of the main problems that I find in creating tempeh in the Western Culture is the use of plastic. Originally tempeh is grown with a banana leaf as its wrapper (I'm not sure though if it is recyclable). Moreover it is sold with more plastics, which makes this incredible food in one with a lot of carbon footprint attached. Doing it at home reduces by half this plastic consume, and you can use biodegradable bags by default.
3D PRINTED MOLDS
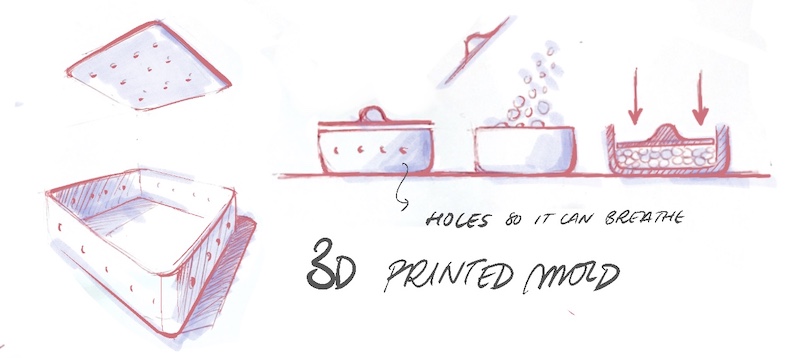
So plastic is the reason that I decided to do my own molds, as they are reusable, easy to clean and in the BDC we have PLA filaments (biodegradable). I started modeling in Rhino a simple mold for the first tries. I realized afterwards that 3D printing a mold, or a few, is ok; but for the restaurant perspective I'll need to optimize the creation of the molds as in other process (faster and replicable) or adapting to other existing type of containers such as glass. However this mold will help me to experiment with the material, shape and different tempeh recipes without wasting a lot of food.
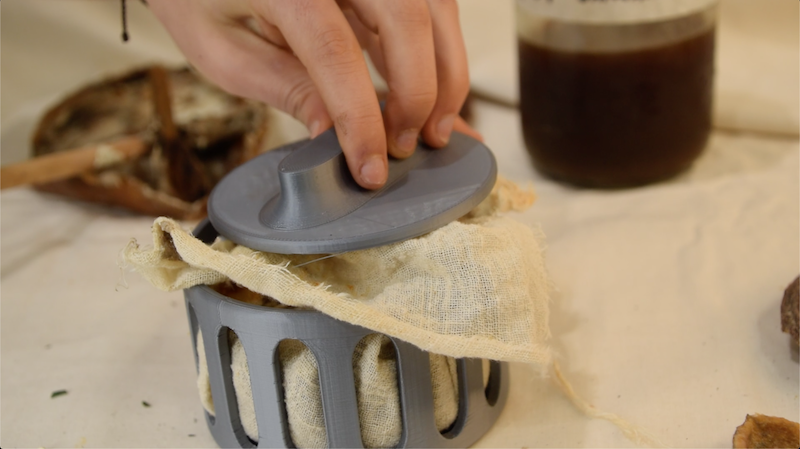
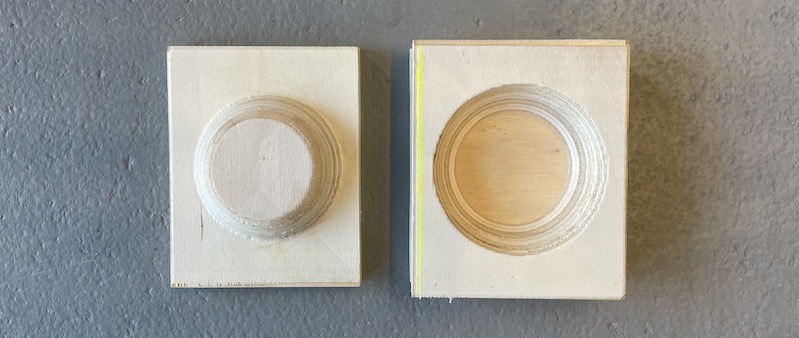
I followed the basic steps of making tempeh for creating the mold. These are: a thin layer of the container in order to not promote overheating; making holes every 2-3 cm in both faces and if it's thick, in the edges too. Domingo Club made some interesting molds, one 3D printed ant the other one made in silicone. I analyzed why they applied different elements to them as I know they've been working quite a while with them. There were two elements that I implemented in my design as I found them to be very helpful: the bottom button that you press in order to take out the grown tempeh; and the protrusion of the lid that allows you to press the legumes and to open it easily.
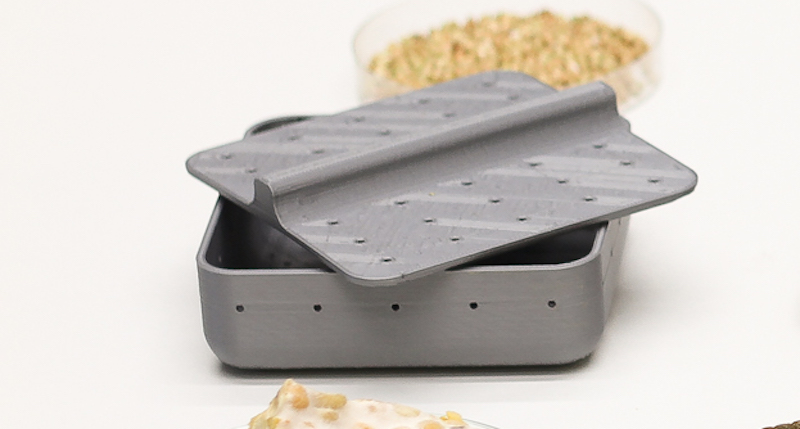
The printing session was splitted, and it took a total of 7 hours. The lid and the main part fit perfectly but the button was very small and the offsets weren't enough. The fits and the radius of the corner are something to improve, as the second one required from supports. After the first test I noticed more that the button was too small to be trully functional as the tempeh didn't come out just with it, I needed to separate the edged from the walls. Nevertheless that first test wasn't with the most optimal legumes as I pressed it too much. The next test will be with a bigger legumes and see if the overheating was an effect from the mold or from that external pressure.
I tried with green peas and the growth was ok, there's still some problem in the inside of the tempeh as it doesn't grow as much of the rest of it. The best results are on the edges being incredibly white. Maybe it needs more airflow in the middle.
WAX PAPER
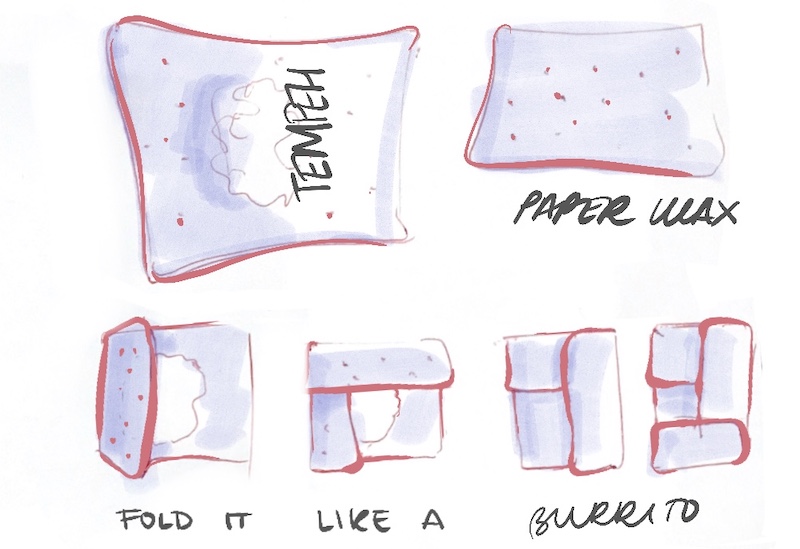
Wax paper can be the wrapping alternative more similar to the method of the banana leaves. I tried three times with a piece that I appeared to have back at home. I made some holes in order to raspect the range of oxygen that can go through. However just one of the times worked, but I believe it was because of a cooking problem than from the wax paper.
PETRI DISH (as my favorite one)
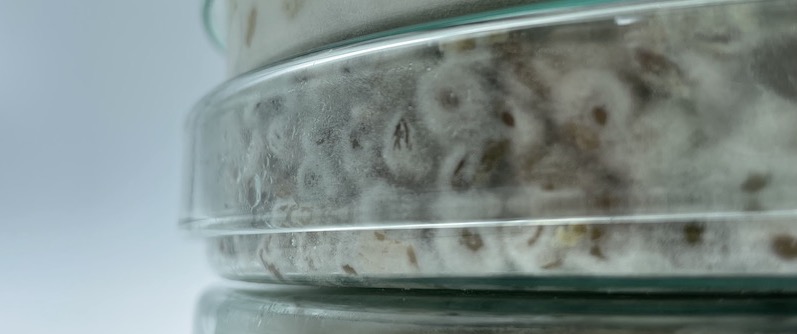
One of the times that I was stalking Domingo Club on instagram (I want to be them when I get older hehe), I saw that they use petri dishes as their main container. Glass petri dishes are perfects because they are designed to let enough air in, with a good thickness, a material that has good thermal conduction, prevents overheating and easy to clean for re-use.
As we had many of them at the BDC I gave them a chance with a great hope. After the Azuki's test I fall in love with them. The results are the best ones I had during this experimentation of molds (apart from the plastic bags which I want to stop using). Moreover they allow to see the growing process of the mycellium: how it stars with the most easy nutrients for it to degrade; and continues expanding and settling down in an homogeneus white web.
MOLDS FOR CASHEW CHEESES
This molds were designed after an error, as many designs. The first cheeses that I made were done with a regular mold and then kept in the firdge covered in kitchen paper. However, my residence kitchen generates a lot of humidity and water in the surfaces, so some mold grew on these cheeses. Here is where I knew I needed to do something about it: develop a breathable mold that allowed the cheese to curate and prevent it also from condensation.
These molds allow to curate the cheese there has holes to have some airflow and then the surface can get harder.
There was a first mold designed, very simple:
And after it was tested, I redesigned it, improving the functionality and being more coherent with the organic appareance. The holes from the perimeter were reduced in width but the number was increased. Moreover some holes were made in the bottom surface. Adding them means that all the surfaces harden up almost at the same time.
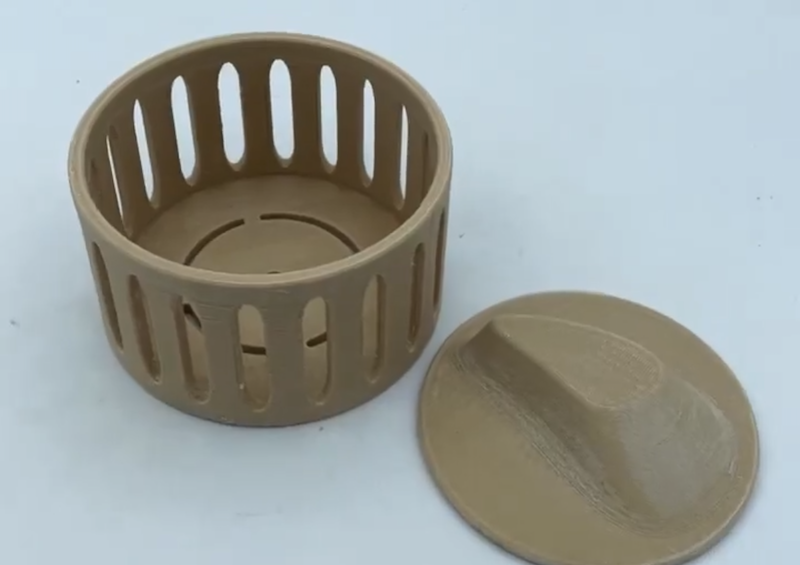
The 2 pieces mold was 3D printed at the same time in wood filament, made from PLA and wood particules.
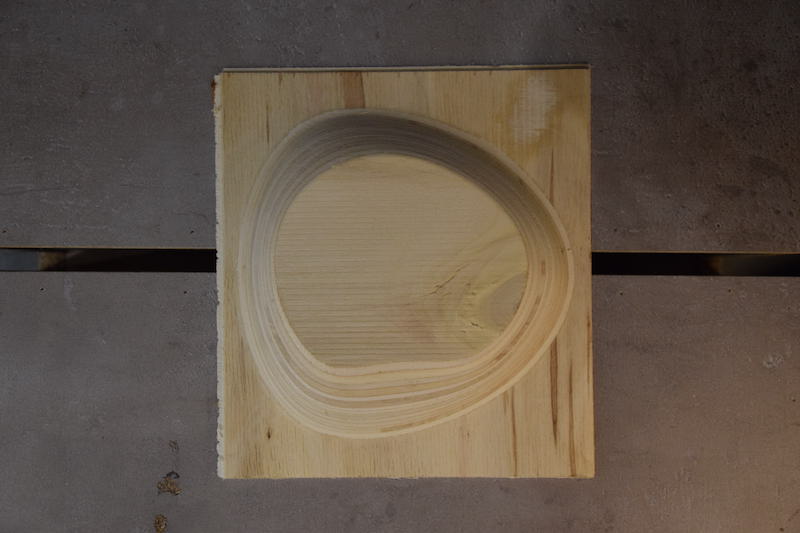
MOLD FOR BIOMATERIAL
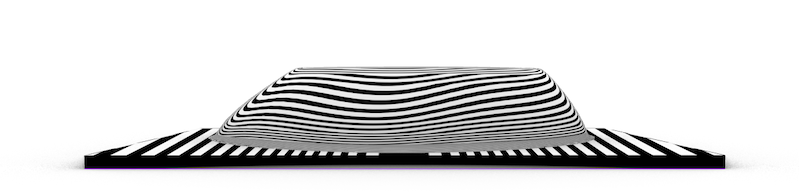
The molds were designed in Rhino. First of all I draw them in paper and following my curves, I modelled them digitally. The main tool used was "sweep2". This tool needs 3 curves: two that are the paths and a third one that joins them and will be the final "wall" along the two others.
But designing the menage is not the same as designing the mold. The mold needs to addapt to the fabrication process avaiable, that in my case was the CNC. In Rhino you can model the final piece as wanted and make a render from it; but for making the mold you need to simplify the surfaces as much as you can to make it easier for the tool.
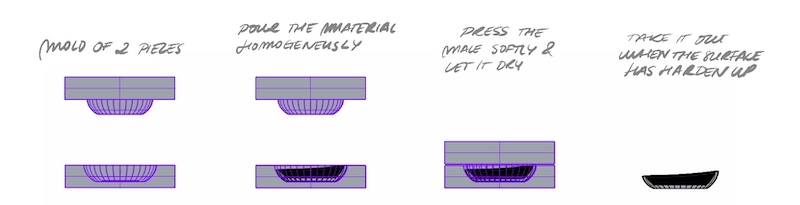
This molds were created for the biomaterial of tempeh and komucha so I needed to use a material that absorbs water: I tested in plaster and wood. Working with a plaster mold was very pleasant, as the water absorbtion % was very high. However for making a mold I needed to cut a "+" in order to make the "-" and I believe there's a lot of material wasted. So I decided to work with wood as there's one lees step of production.
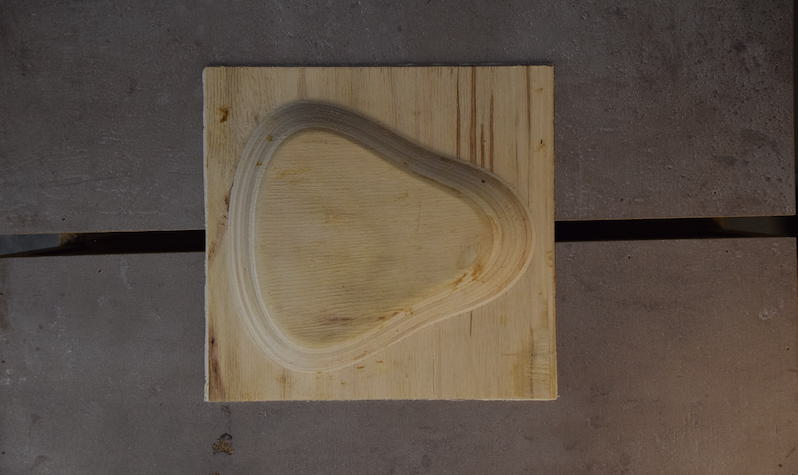
I designed one simple little mold based on a male and a female.
The first test where the material was dried between both broke. I realized it wasn't necessary to have the female after some tests, because the material could contract homogeneously with just the male. However trying just with the female caused the material to shrink in a planar way instead of sticking to the material and staying curved.
So after these test with the wood molds, I decided to go for it and cut another one bigger and more complex in shape.
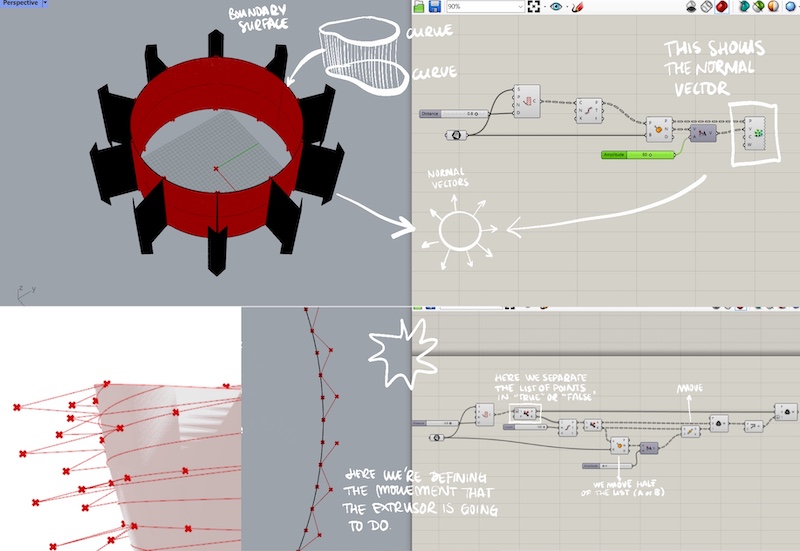
GRASSHOPPER CODE FOR COFFEE COMPOSITE
This part of the collection was designed in Grasshopper, a plugin of Rhinoceros, in order to control all the points, curves, direction...
Half of the steps were done following the book “Advanced 3D printing with Grasshoper” from Diego García Cuevas and Gianluca Pugliense, The GitCode was given by the FabLab Manager of the BDC, Jullian Trotman. l.


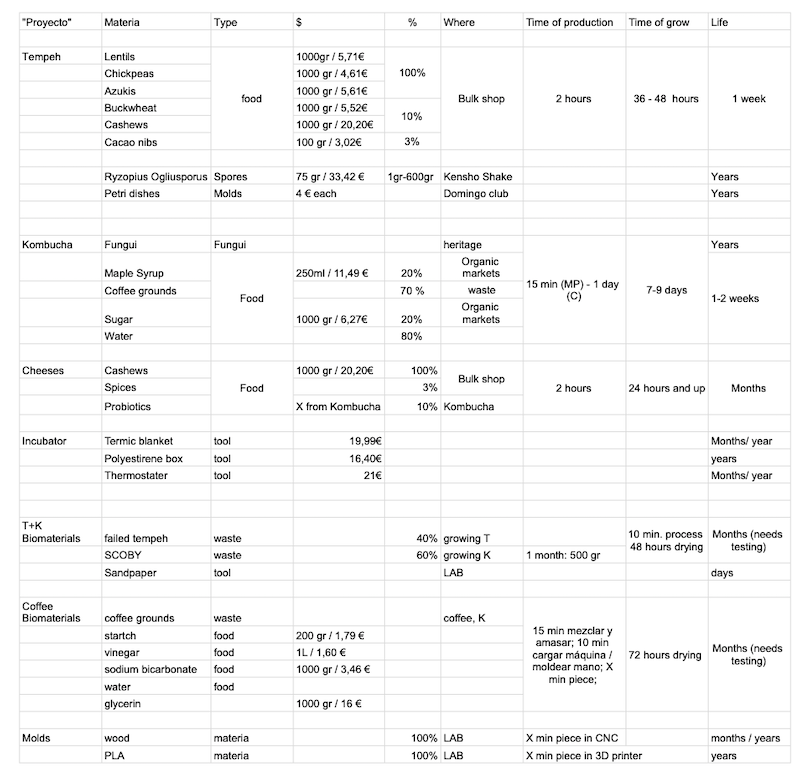
COST TABLE
REFERENCES
- Domingo Club
- Book: NOMA a fermentation guide
- Book: Fermentaciones asíaticas
- Workshop: Fermentaciones asáiticas
- Book: Advanced 3D printing with Grasshoper from Diego García Cuevas and Gianluca Pugliense