03.Open Source Circular Fashion
CIRCULAR FASHION
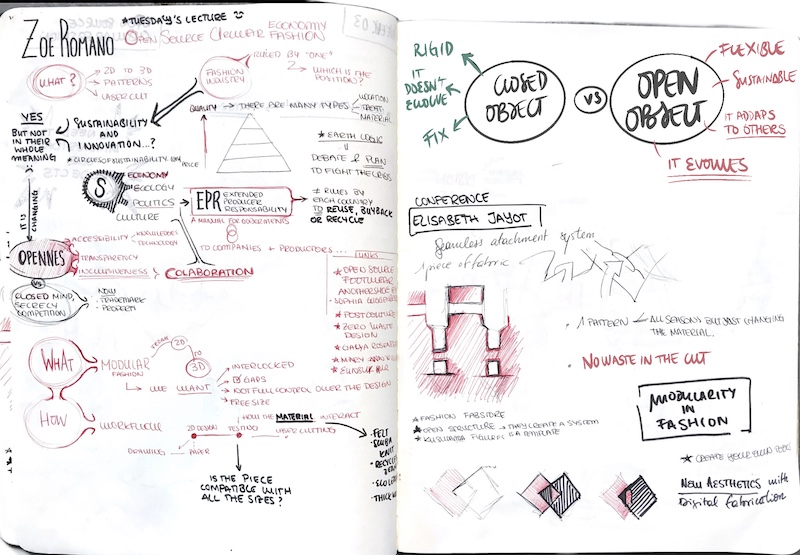
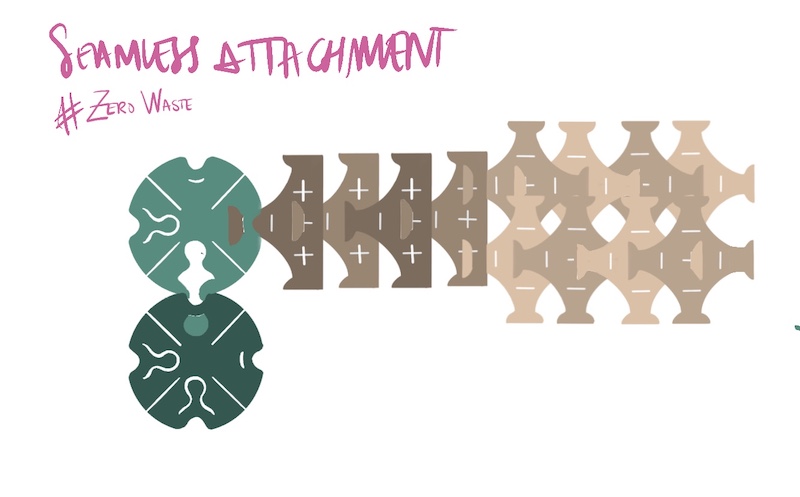
On the third week we were asked to create a module in order to create a textile that doesn’t need any added attachments (or at least as little as possible. This is called Seamless attachment system, that brings the terms “zero waste” and sustainability to fashion, as we can create an optimize pattern and not depend on other items. Modularity in fashion is a great example of an “open object”.
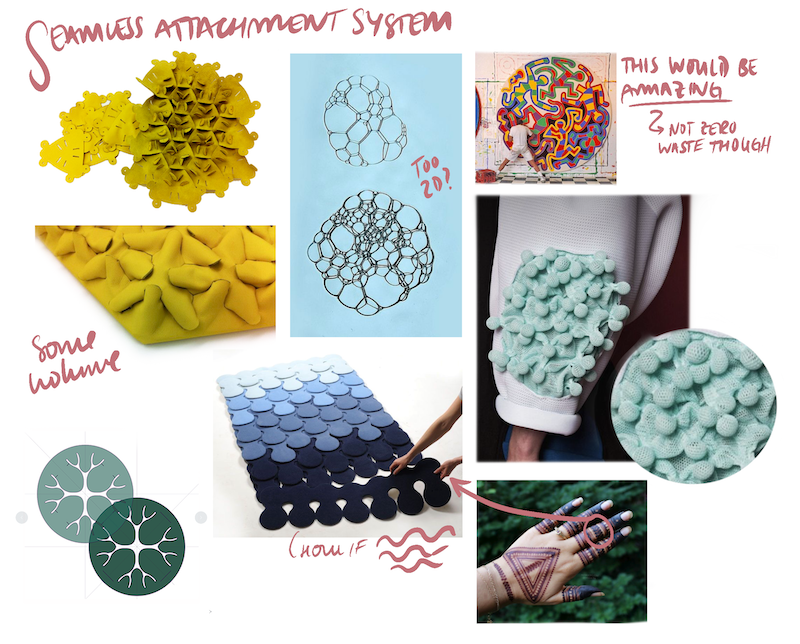
The lecture from Elisabeth Jayot showed us how this can be applied from the form, sustainability, materials and service. The tips that she gave for the selection of the materials were:
- Laser cut compatible so the edges burnt while cutting. This is a really good point as after that there’s >no need of sewing them. Moreover, if the material is not compatible maybe it can burn during the process >and can be toxic.
- The material mustn’t be slippery; it should be enough hard and have texture so the attachments don’t >slide between them.
- Strechy materials don’t work well with this techniques as the inner attachments don’t answer well to > > >traction
This lecture was followed by the advice of knowing how to measure our projects.
On Tuesday’s lecture we had Zoe Romano talking about Open Source Circular Fashion. She Talked about how the industry of fashion has been led by big brands and how it’s evolving by the Open Source paradigm. It allows to be more accesible to knowledge; sustainable, transparent and inclusive. It also brings the word collaboration changing it from competition. Open Source is the representation of Opennes and it is fighting against the closed business among with the secrecy and closed minds.
Here’s my little mind map to sum up the two lectures:
At the end of the lecture we were given some instructions for the week’s assigment at what we need to create and how to develop the project.
MODULAR WEDNESDAY & THURSDAY
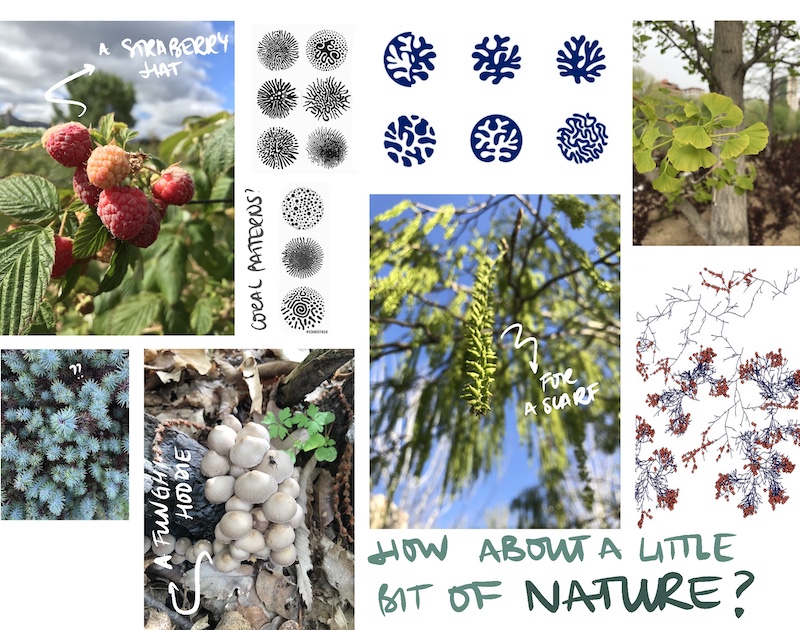
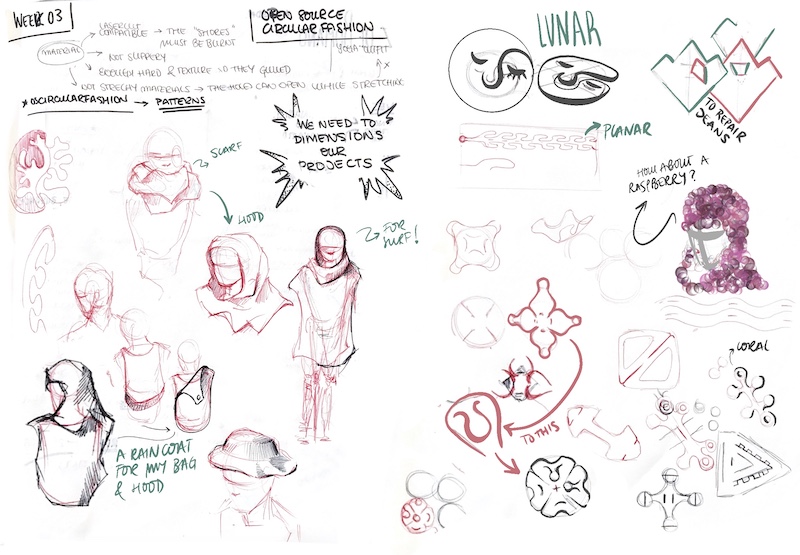
Wednesday was used to find inspiration in nature; to explore the recommendations that the two speakers gave us; to see what is been already done by our past classmates. I found a lot of things and this kind of blocked me of knowing what to do. So I started thinking what the final object could be in order to adapt the shape of the pattern to it.
My inspiration was moving in to Bilbao and creating a scarf-hoodie. I’ve always heard that Bilbao was very cold and rainy, all day everyday. But the first two week that I’ve been here are so sunny! Nevertheless we had a few days that I didn’t expect that they were going to rain that immediately, so the weather it’s kind of bipolar. That’s why I thought of creating a scarf, because the cold is coming, that can converts into a preventive hood made from a waterproof material just in case you are not prepare for the rain. And I say preventive because using the seamless attachment techniques there are some holes.
My first conceptual sketches were:
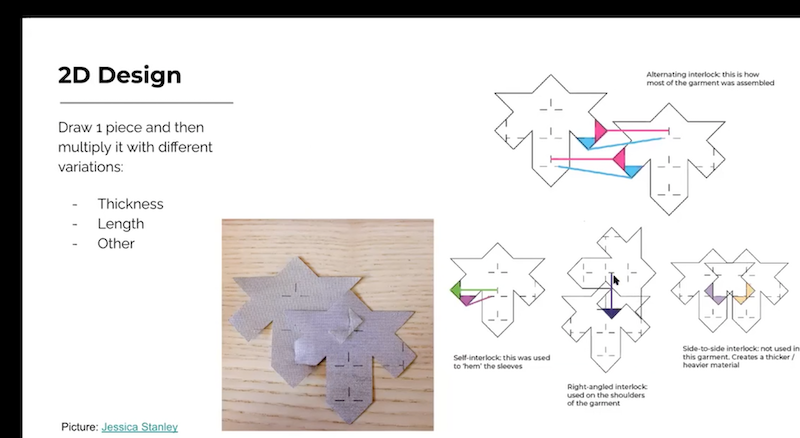
Later I tried different modules to see how they work because my brain wasn’t working. Prototyping in these cases is very useful as it helps you to understand how the cuts and digital design works, so you can think on your future pattern. This example from Jessica Stanley helped me to understand how it works :
After trying different existent patterns I did some brainstorming of different modules inspired in the natural moodboard from above. Nature was perfect for my objective as I wanted a pattern that it had more volume not just 2d.
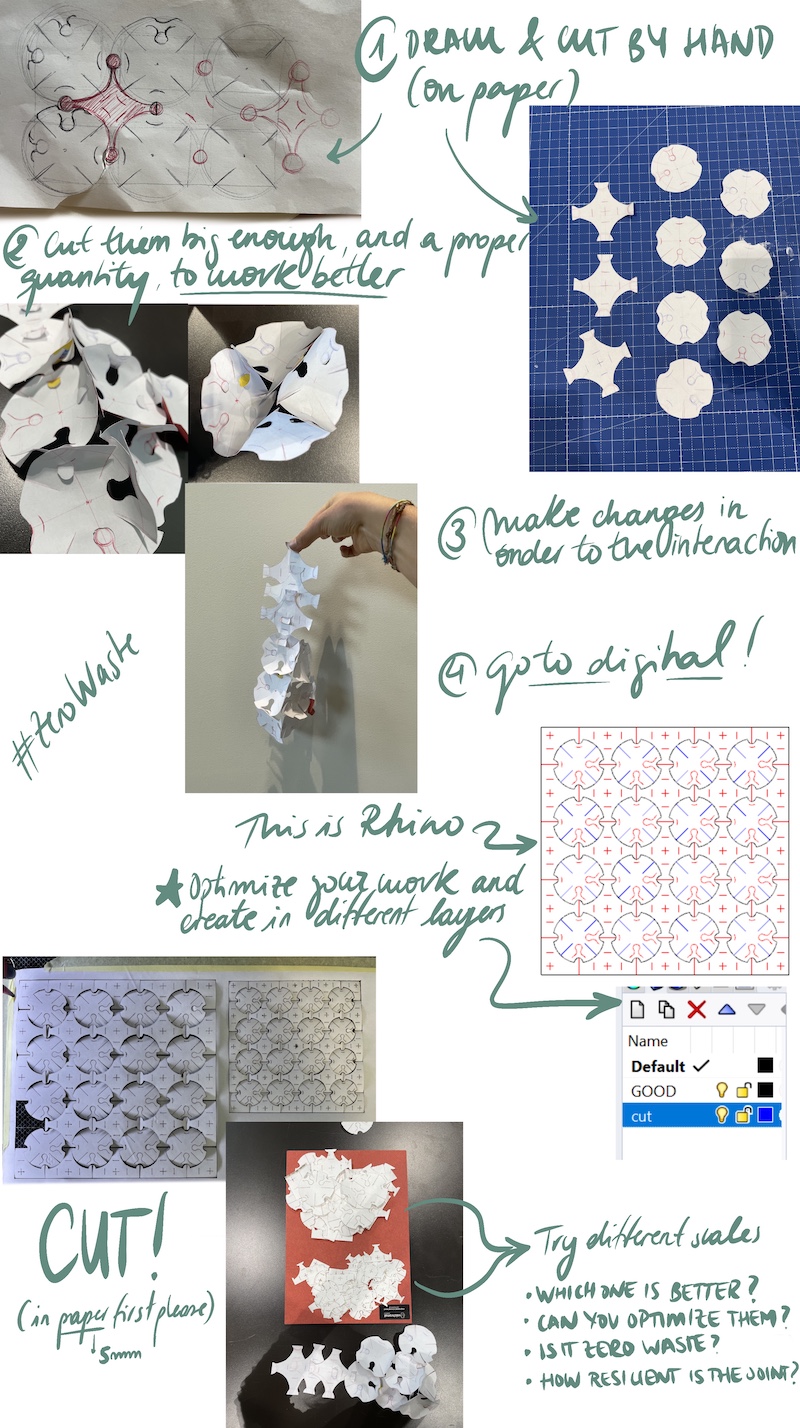
I saw some examples on how they achieve more volumetric patterns but they didn’t show how is a single module and where the cuts are. So I started drawing some natural patterns and let the lines flow.
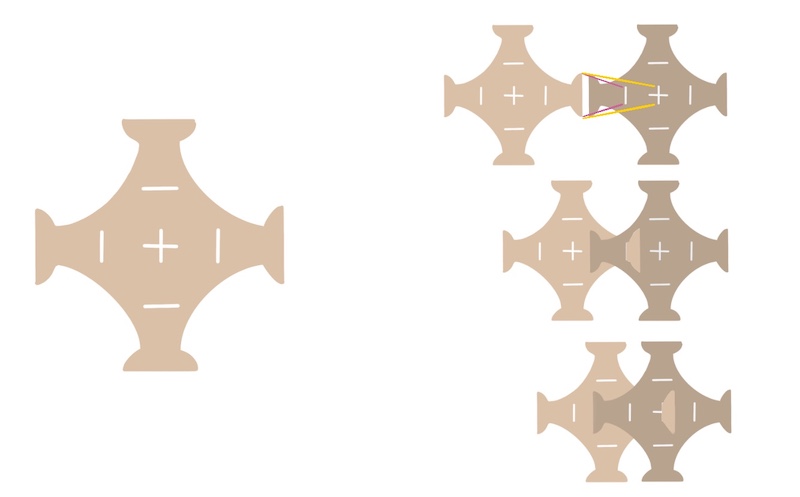
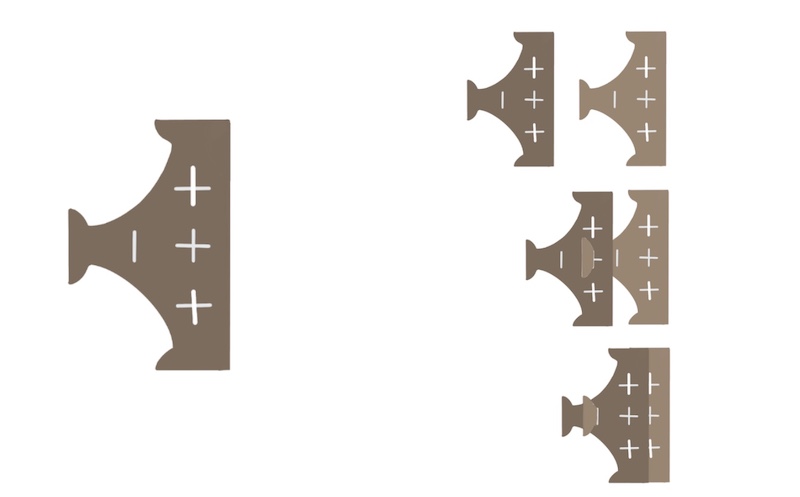
The module that I liked the most was this one and I realized that even it was circular it could be combined with another module so there wouldn’t be waste. Instead of doing the projections that allow the attachment outside the shape, you can do it inside them. This is an optimization of the material.
After drawing by hand how the pattern would look like, I cut it with scissors to test the attachment. But it was too small so it was a mess with scissors. I realized that for this first testing the size needed to be much bigger and a little more precise. This last point was achieved by cutting with a cutter (and much better). The zero waste pattern worked so I started creating the digital file in Rhino. It was more “challenging” than i thought but just because you need to give measures to the draw.
FRIDAY'S EVOLUTION
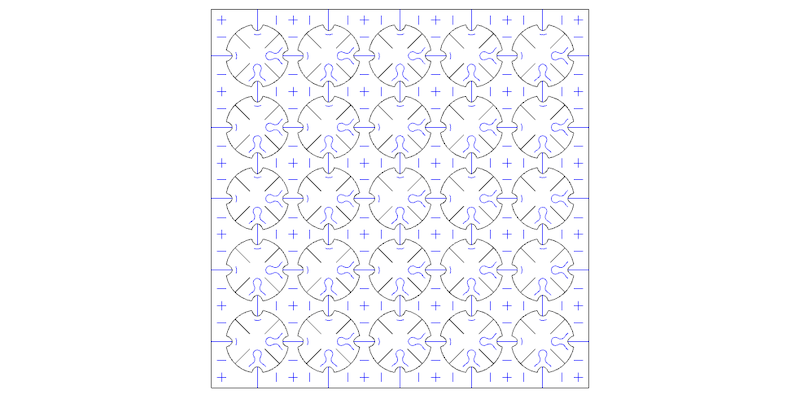
In order to test in the Laser cut I scaled the sample that I wanted so I could test which size would work better. I also include the necessary number of pieces to give me an idea on how they interact with each other.
For the “dxf” file it is really useful if you separate from the beggining (Rhino) the different layers, as it is quicker and easier than in the Laser Cut software. As we saw in the week before: first the holes, little cuts or engraves; and then the perimeter. The samples were cut in a 5mm paper in XXX speed and XXX power. This is a great material to test modular patterns laser cutted.
The result was that the big sample is harder, more resilient and easier to manipulate. I tried different ways to assemble them, specially the cross ones. These were the pieces that could have been considered waste so I wanted to give more attention on how the could work in the same object instead of doing another different one. So my first idea of doing a scarf-hood evolved to a bag, as I saw the opportunity of using the cross ones as the bag’s belt.
Here is the process and the sum up of the tips:
SPECIFICATION ON HOW THE PIECES INTERLOCK

The selected fabric from the Center was neoprene in order to test it in laser cut and develop the waterproof pattern so one day I could do the scarf-hood (I will need it in winter). I test the seamless attachment in this material first by hand. It worked!!
So the next step was creating a sample of this material laser cut to our material library to specify the speed and power. The results were:
I gave some thought about how many pieces I would need to create a small bag, but the good thing about this is that if you don’t have enough or too much, your design is flexible and can be adapted to the conditions.
MONDAY
Neoprene samples: 3 samples with different numbers. It still burnt I didin't like the result. Decision: change materials I tried with felt, but the one by hand it was synthetic I didn't want to cut more. You could see the petroleum :(
I'll wait for another one or for when I'll make my own biomaterial. I'll create it in order to achieve this seamless attachment system.
Here's a little video of the process of prototyping in paper:
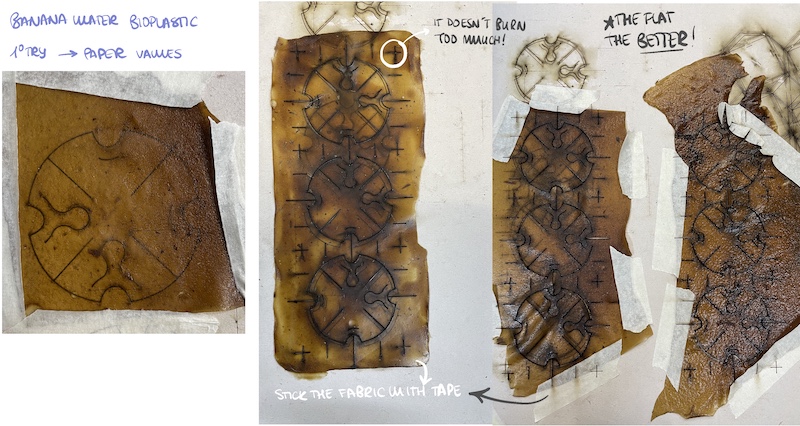
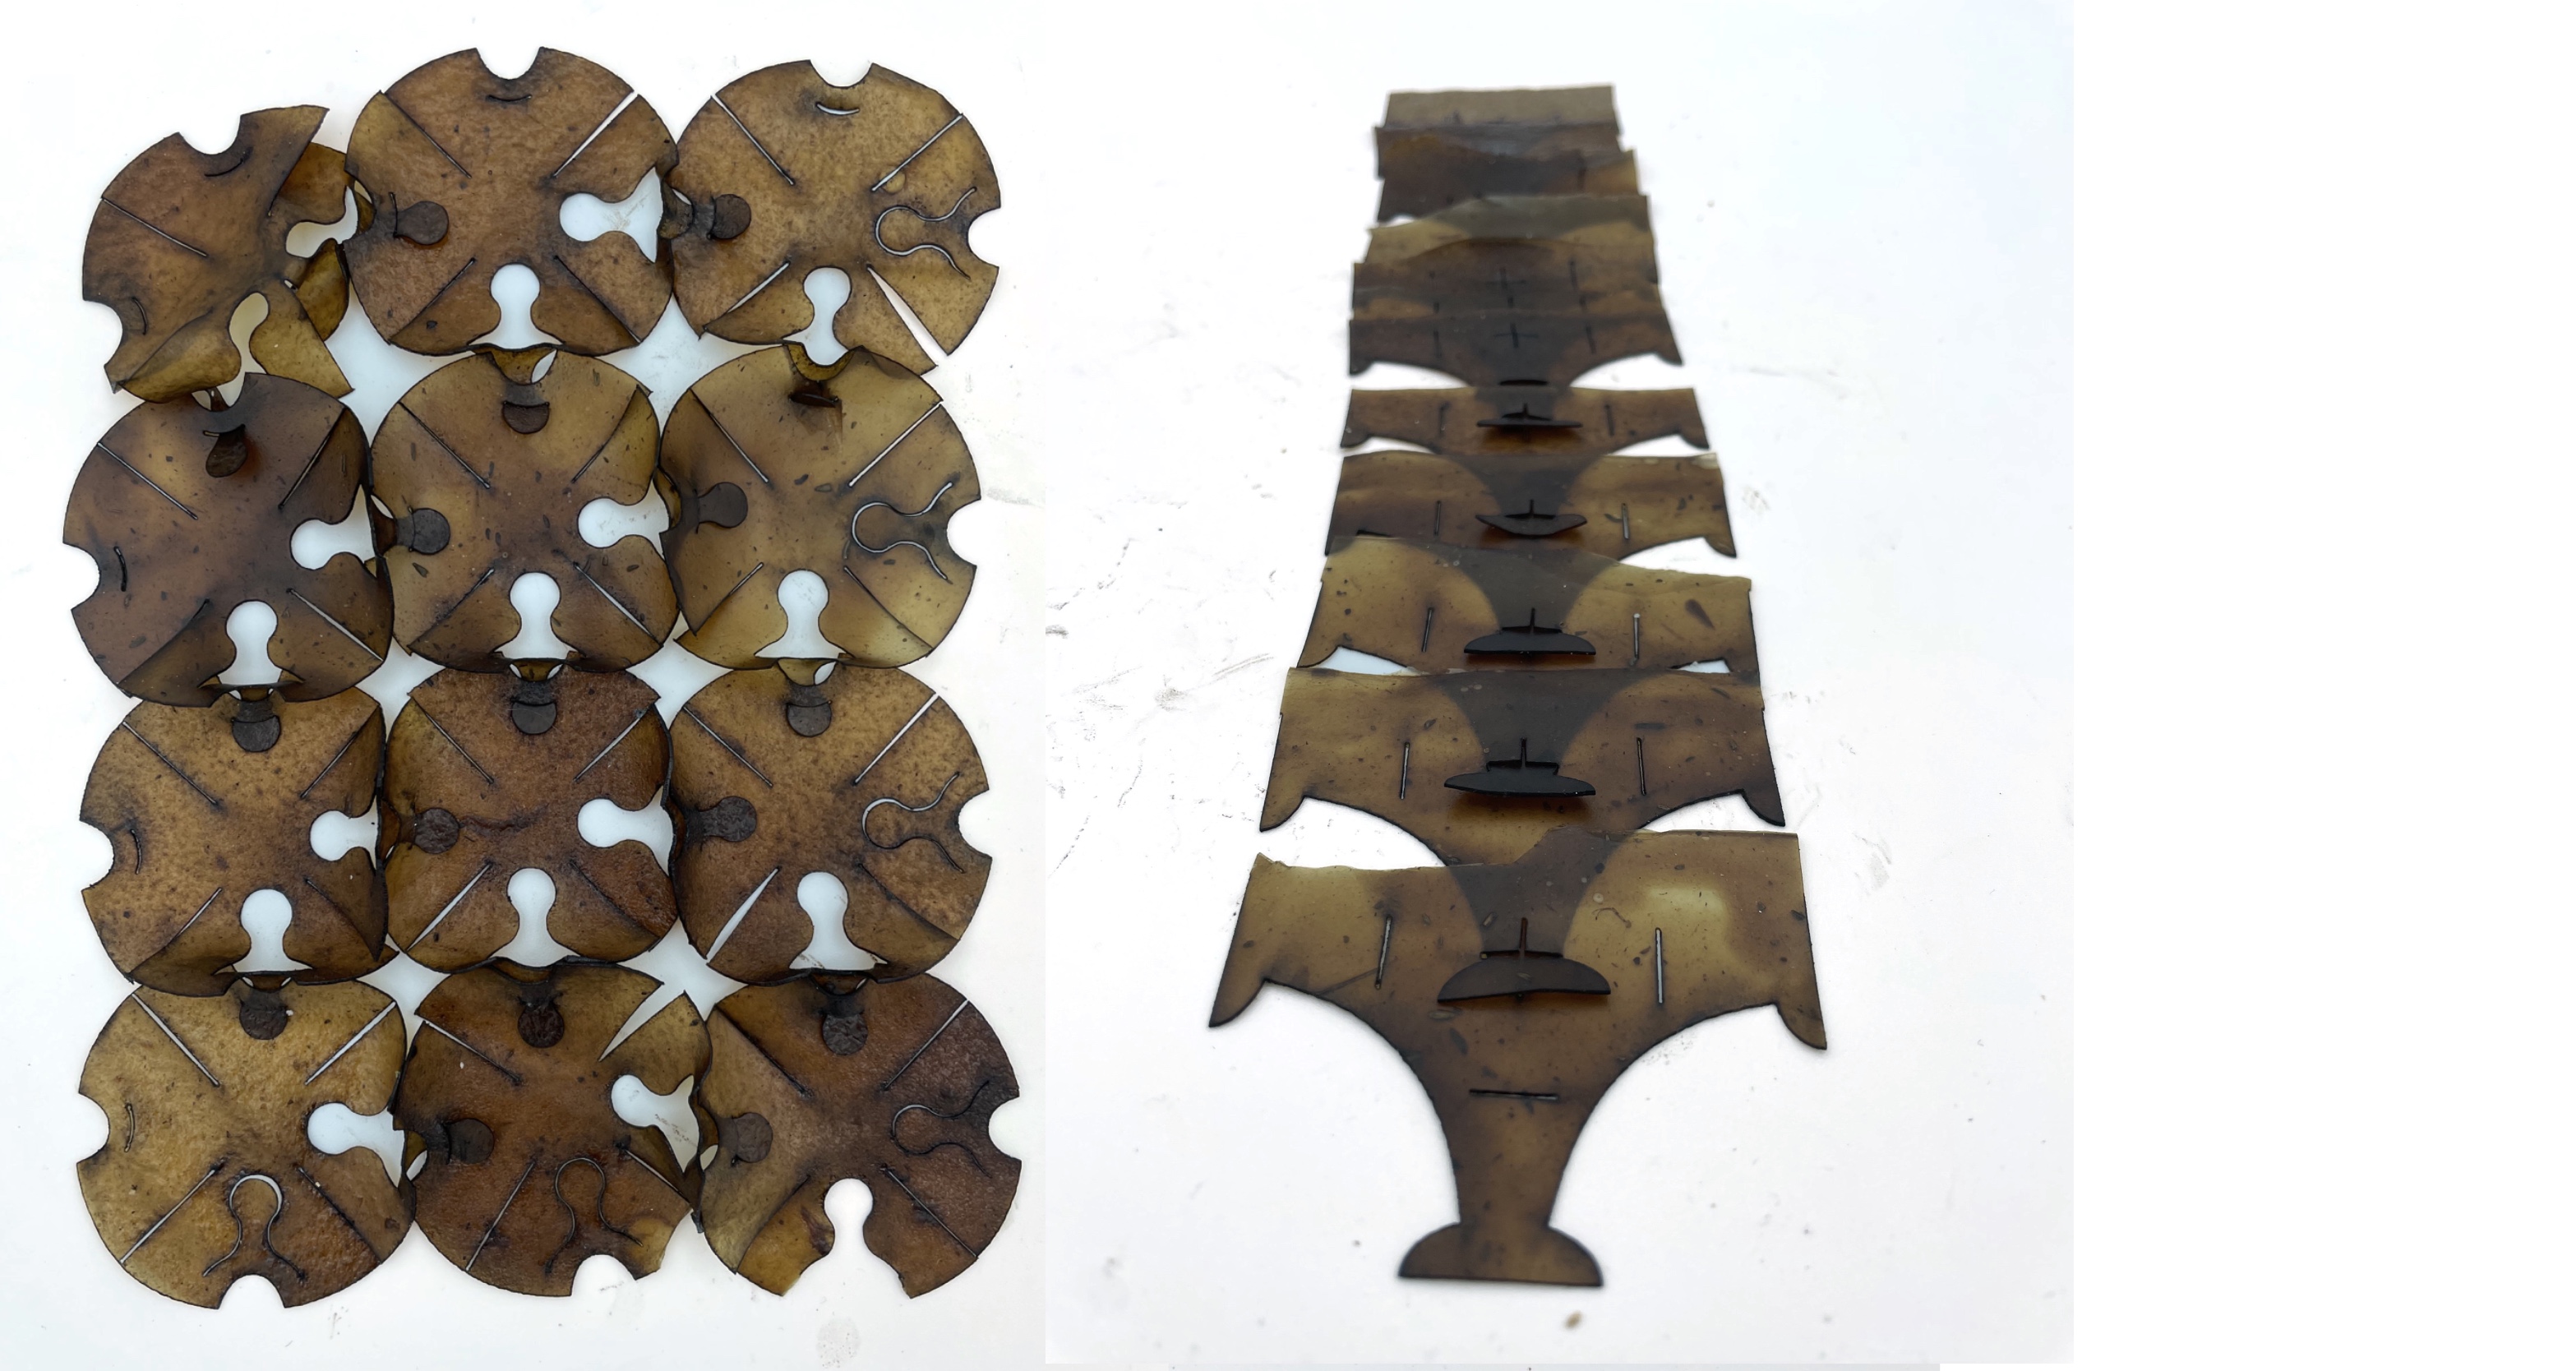
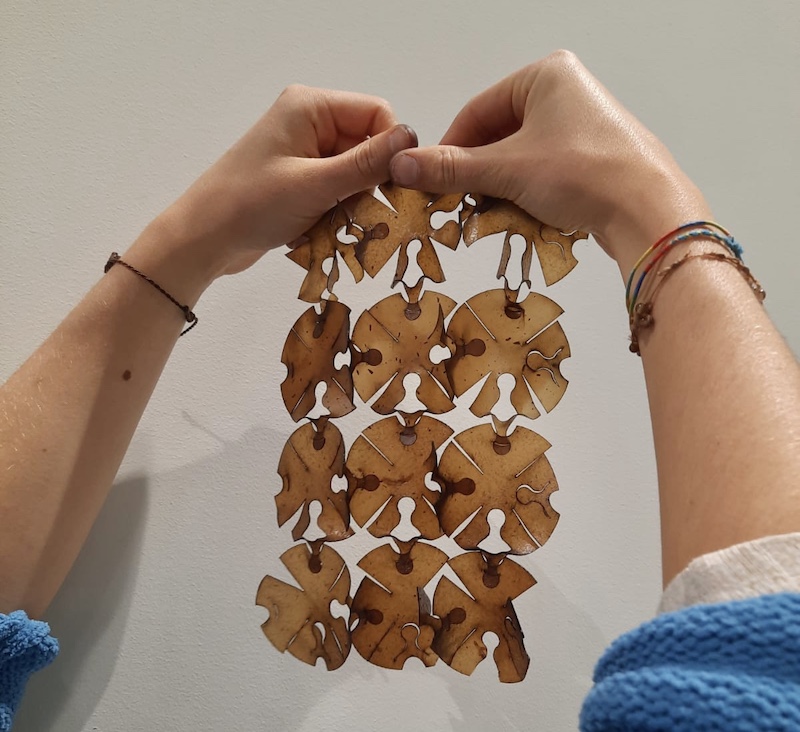
FINAL MODULE IN BANANA BIOPLASTIC
During Biofabricating materials week, I developed a Banana peels leather and Banana water bioplastic with the objective of laser cutting it so I could fabricate this zero waste pattern. I cooked 500 gr of banana peels and banana powder in order to have a 760x100 mm banana leather piece. The leftover water was used to the Banana Water Agar-Agar bioplastic in a 400x200 mm trade. This was my first try with a big batch of the fabrics, so the leather didn't go as planned as it was very thin and it broke with little manipulation. So we decided to cut the bioplastics because we though it was going to work even better.
We did a first try with the main shape in order to test the laser cut parameters in the material. We used the same ones as paper and worked perfectly! There were medium pieces as I was kind of impatient while taking the bioplastic out, so they broke. Nevertheless, they were at least rectangular and made the "waste" modules even pretier with its imperfections.
After cutting all the material avaiable, I assembled them and the seamless atachment system worked really well in the material. It is easy to assemble and hard enough to manage some interaction.
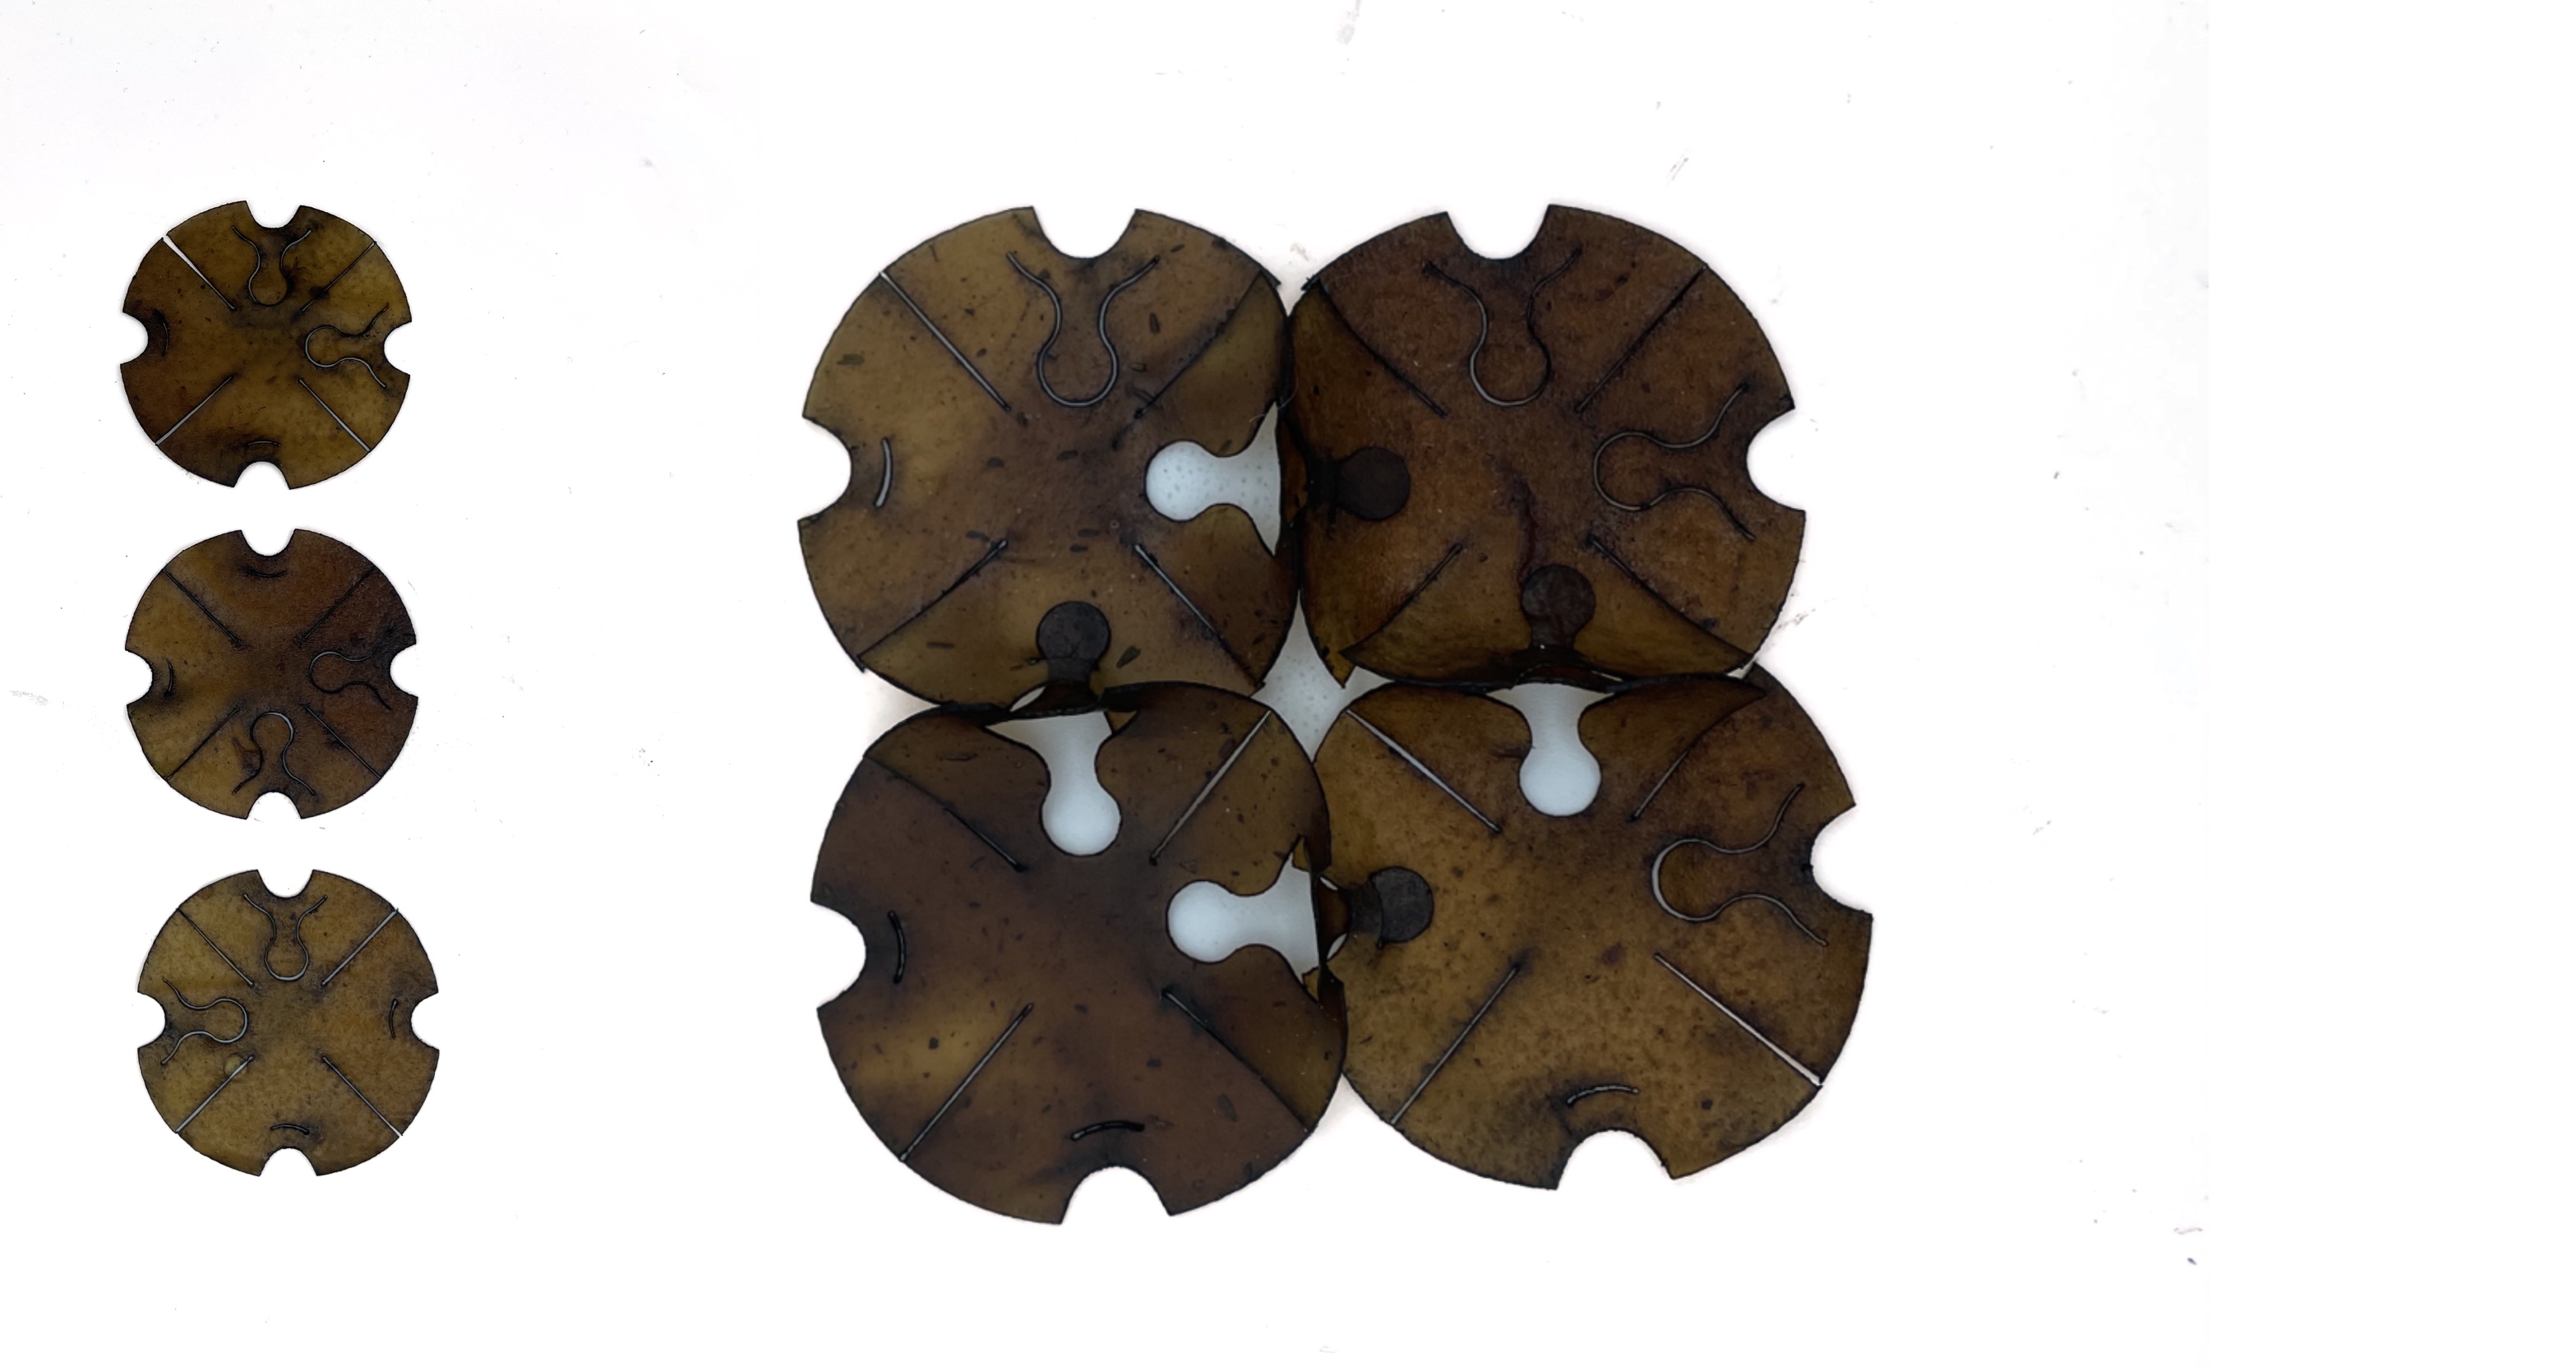
This swatch was exhibited in the Remake Textil in La Casa Encendida, Madrid. Showing different approaches to the circular economy through innovation in textile production. The programme features different proposals that showcase new trends in design and circular production in the fashion sector.
Students review. They inspired me:
- Kion webpage as a fashion designer
- Carolina Delgado because of her sustainable and nature inspiration.
- Betiana Pavon
Useful links
- Open source circular fashion from Fabricademy
- Clo 3D Here you can find a one month trial for free
- Official Clo3D youtube channel