09. Textile as scaffold
SEEING EVERYTHING CLEAR AND MOLDED
During this week I let myself be surprised and amazed by all the possibilities that we had to experiment with. We went from cast molding, hardening fibers to crystalization. EVERYTHING IS SO INTERESTING.
After some of the tutorials my brain started to work so quickly that I needed to stop doing whatever I was into that moment, so I could think properly. My brain started to link different assignments and organizing all the ideas. I even woke up in the middle of the night thinking how many things I could do with the new theroy. But that night...that night was my moment of creativity in all its power: I knew what I wanted to do for my final project!!!!!
After that night I knew I wanted to experiment further in the possibilities with mycelium and other biomaterials.
CRYSTALLIZATION
After Anastasia's lecture I was so intrigued to experiment with crystals as I've never done it before. I knew that I wanted to crystalize something useful or re-use some of the swatches that we've made.
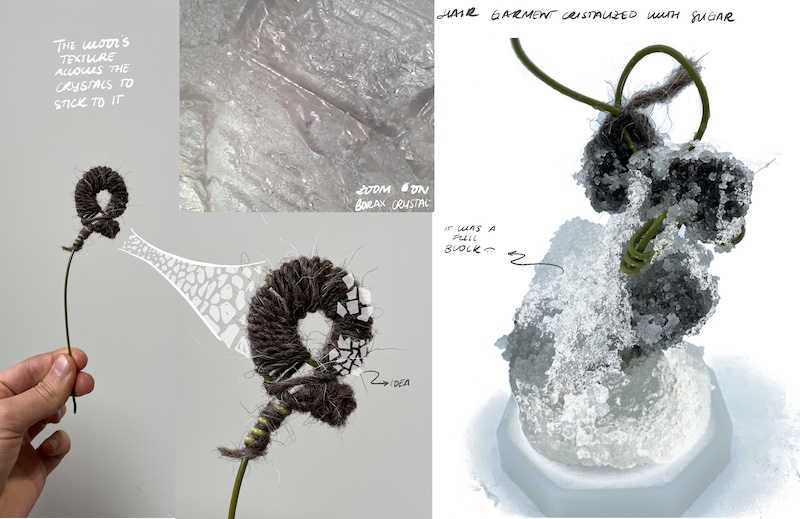
I started by doing some hair accesories with a wire and then, as its texture is very slippery for the crystals (they need some roughness to attach properly), I covered them with wool. I made two of them, with a size and shape variations.
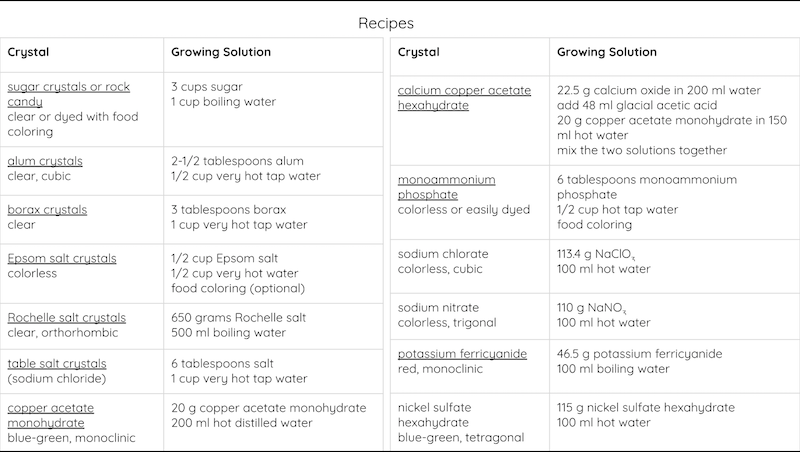
The first try on crystallizing was with Alum, as it is one of the easiest one to prepare. I follow Anastasia's recipe and also some alumni work as Paulina Martina, Carolina Delgado and Catherin Euale
Alum Crystals:
- Choose ideally a glass jar and check if your object fits
- Calculate the amount of water you need.
- Clean your working surface and jar.
- Start to simmer your water in a non-reactive cooking pot
- Add alum powder slowly and stir until fuly disolved. You can recycle alum crystals from past experiments.
- Keep adding alum until it no longer dissolves. There should be little crystals at the bottom. This is >the over-saturated solution that allows to grow crystals.
- Filter the solution with a coffee filter. Be careful as it is hot.
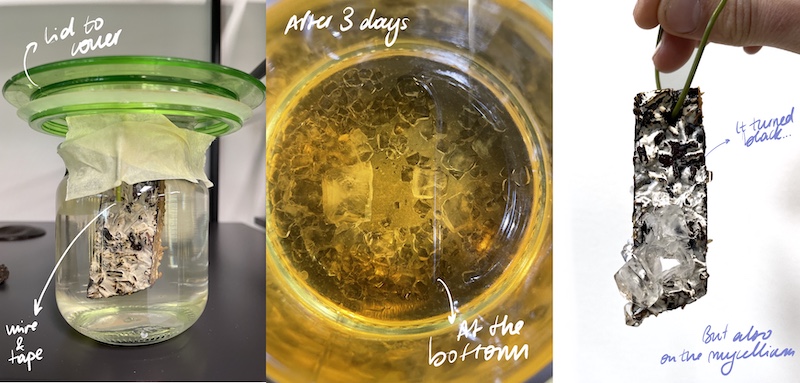
- Put inside the objet that you want to crystalize. You can hung it from the lid or create a disc with > >holes. If the object floats, you can use a wire to hung the object from.
- Cover the jar and wait for about 2 days.
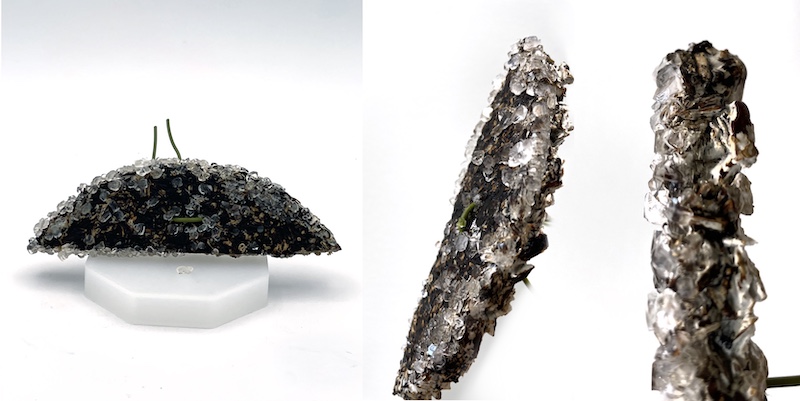
 In the picture you can see the final result of the sugar crystallization (explained below). The result on the little one weren't succesful because the solution wasn't filtered.
CRYSTALLIZATING MYCELLIUM
I really wanted to do some calcium/fosfate crystals as the Bio reClaim project, because I don't like shiny things hehe. So when I saw the calcification structures I was amazed. However we didn't have any of the ingredients at the center so I moved the idea of calcificating mycelium for a future experimentation. But how cool would it be?!
My idea of crystalizing mycelium was very solid, so I moved on by choosing Borax for a first test. I chase this crystal as it is one of the quickiest in crystalizing: 8 hours minimum. This value is very relevant as once the mycellium is dried, if it gets very wet for a long period it can start either to degrade or contaminate. That's why I needed a quick crystal growth.
Borax Crystals:
Proportions: 9 tbsp for 2 L of water ( we used distilled water)
- Choose ideally a glass jar and check if your object fits
- Calculate the amount of water you need.
- Clean your working surface and jar.
- Start to simmer your water in a non-reactive cooking pot
- Add borax powder slowly and stir until fuly disolved. You can borax alum crystals from past experiments.
- Keep adding borax if you see the water is not saturated. There should be little crystals at the bottom. > This is the over-saturated solution that allows to grow crystals.
- Filter the solution with a coffee filter. Be careful as it is hot.
- Put inside the objet that you want to crystalize. You can hung it from the lid or create a disc with > >holes. If the object floats, you can use a wire to hung the object from.
- Cover the jar and you will see crystals in a minimun of 8 hours. One of the main conditions that I took in mind was that myco-materials have low-density, so they float. But this can be solved very easily, by hanging the piece with a thick wire. I experimented with two dispostions: one in a flat surface so just one of the faces could crystalize; and another one submerged in the Borax solution.
After leaving them overnight, the flat test "exploted" and we had the surface crystalized. This was because I manipulated the container too much and I guess I made a hole. However it was easy to fix: just clean the surface with warm water and the crystals will dissolve again. The bottom of the container was crystalize too, so I heated-up again the solution so I could recycle it. Once it was dissolved again I filtered and poured the solution again into a container, this time in a more reliable one.

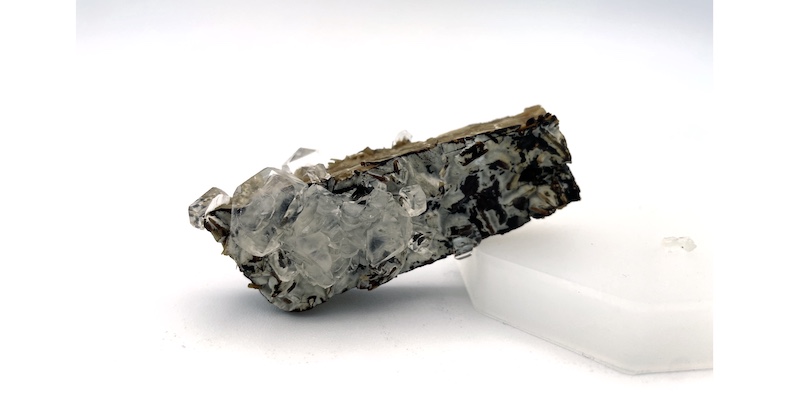
The second test was a succes!
The piece that was totally submerged was growing crystals succesfully!!! I left the pieces for the weekend and the result was amazing.
As my workmates where cooking their solutions I started putting in them some more mycellium pieces. Olatz made a Sugar crystals recipe, and I benefit from the fact that she cooked a lot I put also ine of my hair accesories (photo above). The solution was extremely dense so I had no trouble with the flotability.
Marisa made a EPSOM solution and I asked her (too) if I could put inside some bacterial cellulose hung by a conductive thread... I didn't what to expect but I needed to try it. And of course I put in there another piece of mycellium.
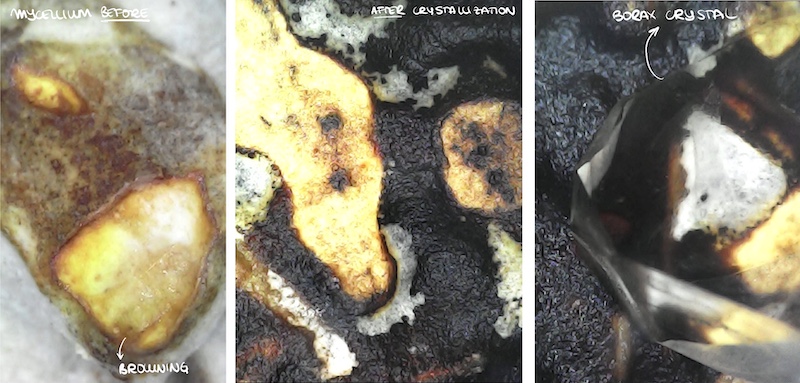
After the weekend we could see the results and I was so happy to see that it worked as planned and also (and very important) that the mycellium didn't get contaminated :) Not even after drying.
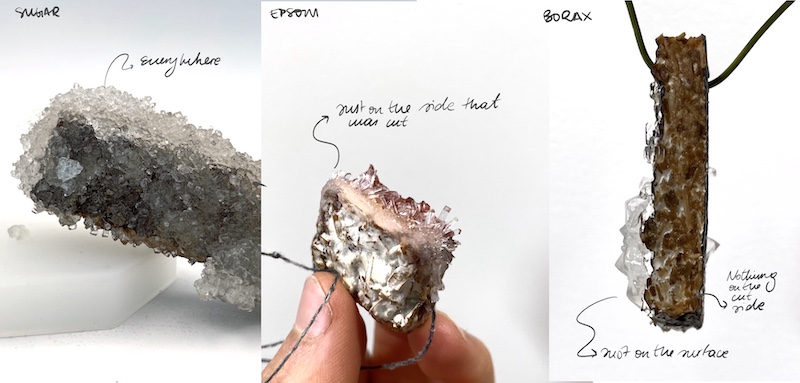
I could appreciate difference between the crystals as for example the Borax just attached to the white surface and created a reaction with it, turning it black. But EPSOM attached to the edge (this is the cut) and they were really small compared with the ones Marisa grew appart. And the sugar crystals covered the whole piece, maybe a little bit more on the white surface.
After driying I saw some of the Borax mycellium under the microscope.
OTHER WAYS OF MOULDING MYCELLIUM: fabric sandwhich and fabric mold
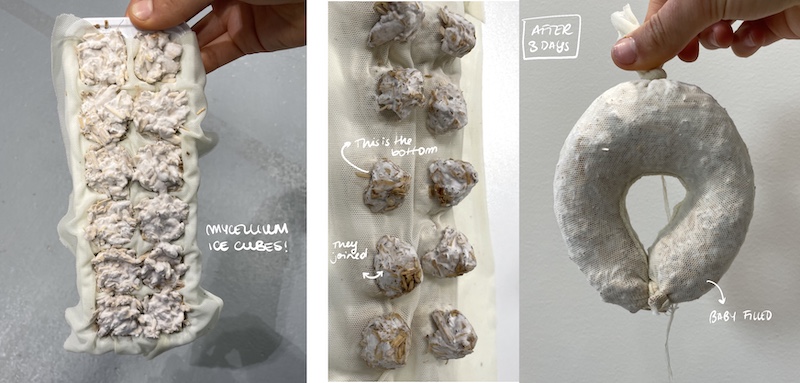
Sometimes there's no need of fabricate your own mold because we have a lot of things in our environment that can be used as that. I saw this ice cubes maker and I had a revelation: mycellium ice cubes! And to integrate a fabric I was inspired by Computational Couture week for doing a sandwich with the fabric. This would create volume and weight to the fabric as same as the 3d printting. I also tried to sew my own mold with micro tul. This technique allows to have really organic forms but if you want to re-use it...I don't recommend it.
The process of working with mycellium can be found in BioFabricating materials week.
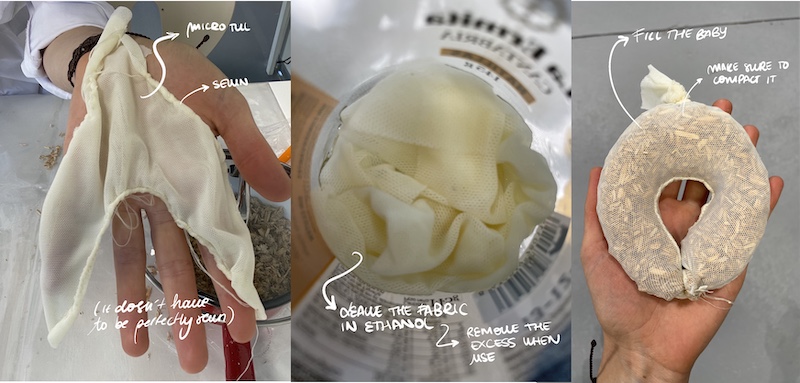
After 3 days I took out the molds to start with the Out-In process. The sandwhich test didn't work because the fabric was very thick, so next time I'll use a tul with bigger holes so the mycellium can go through it and assembly to the other piece.
Here is a video of a previous experience. I used a broken stocking to fill the mycellium in it.
MOLDS AND CNC
Our new partner in crime, Julian, explained us how the CNC works and how we need to program our files in order to fabricate them.
The CNC that we have in the center is XXX and it is so much easiers than other ones as this don't need the CAM software and its vacuumm performance is really good that there is no need to screw the material.
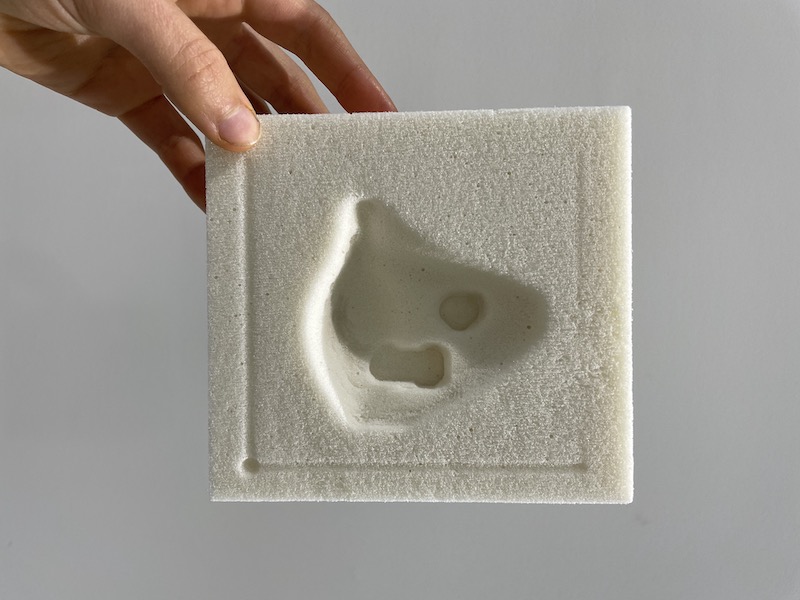
I designed in Rhino a mini organic mold inspired in one of my ceramic lamps. This is the first aproach to my final project. I also used grasshopper to have a more smooth surface based on curves drawn in Rhino. We decided to fabricate the negative one as it was going to be simplier for the machine. My objective was to fill them with a bio-composite made by cellulose waste or my chestnut shells biomaterial.
First of all we programmed the cut in the "Aspire" software. This allows to select the different steps, power, cut direction, tools and more. After defining everuthing, the programm generetas de needed G-code for the CNC lecture.
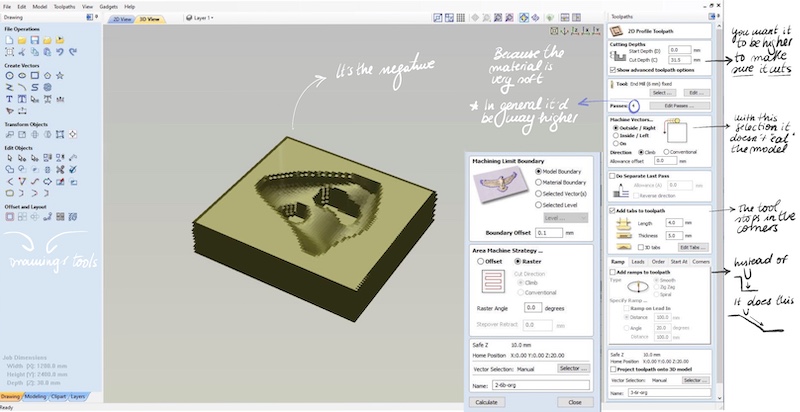
We cut the mold separately in low-density foam. This allows a quick prototype. The main parameter that needs to be calibrated is "Z" direction. The machine is controlled by a remote with a little screen. Our Fablab manager adviced us to just have one file in the pendrive so the workflow is easier, as you go direclty to the cutting file.
We used a parameter to separate the cutting process in two, in order to make it quicker and more efficient. The first cut is made in layers with an "Endmill", so the model looks like the slicer. The second cut is more precissed and with a "Bold nose". One that has a rounded tip so the accuracy is higher to organic shapes. It was less than 30 minutes the whole cutting process (my model was very little).
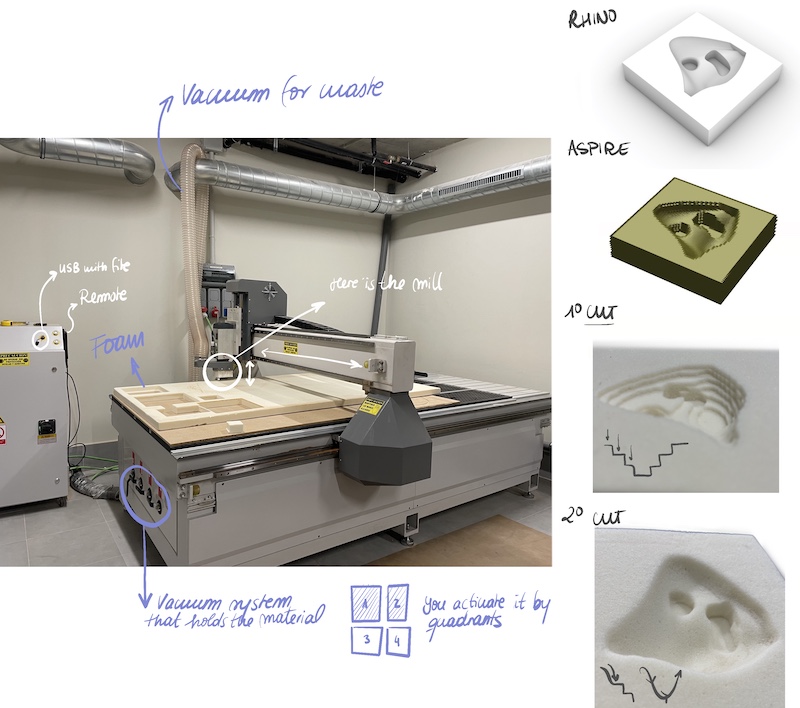
Here you can file the molds in 3D. One is the positive and the other, the negative. I just cut the negative.
Downloadable files
Here you can see attached a link to Textile as scaffold Drive folder