8. Wearables
So, after exploring with e-textiles before, it’s time to translate the knowledge and dive into wearables. A wearable simply translates into an electronic device you can wear. Think about your heart sensor, your smart watch but you can take it a lot further and implant chips you can use to make payments or hop on the underground.
Research and inspiration
If we look at wearables, we cannot miss Steve Mann who performed groundbreaking work when it comes to technology. I also admire him for not updating his website to a more fancy looking thing 🙂 However, he does make awesome wearables.
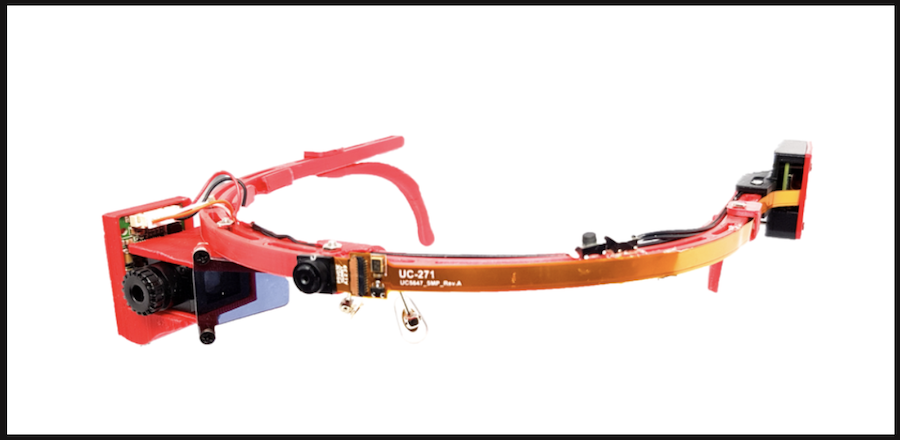
EyeTap is a DIY AR eyeglass with a raspberry pi at heart. The even better news: you can make it yourself Take that, google ;-)
If it comes to wearables, you cannot go around mentioning the Electric Dress by Tanaka Atsuko. She was a Japanese artist who was most known for her experimental work. The dress, created in 1956, was her version of a kimono and an immediate response to the Japanese government who expected the Japanese to dress in a certain way.
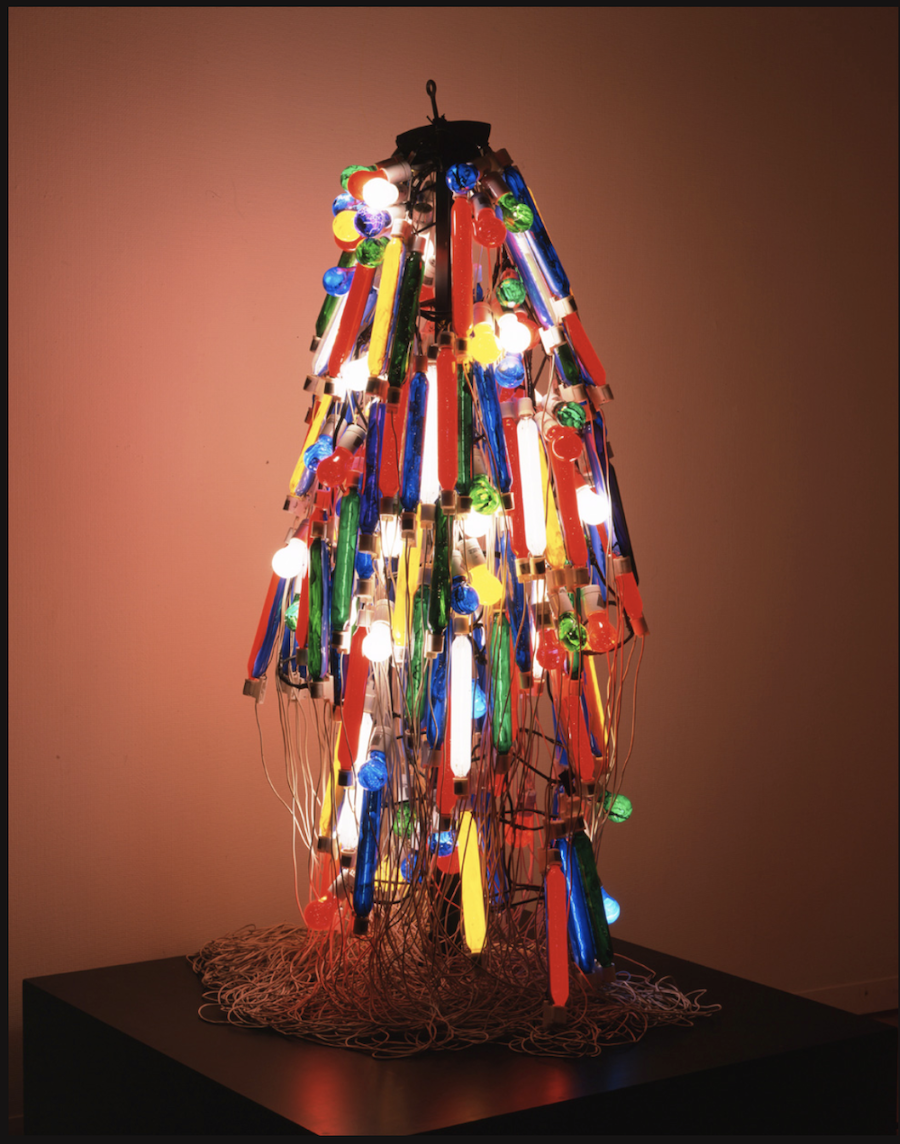
The dress consists of somewhere around 200 painted lightbulbs that blink on and off every two and a half minutes. Beautiful, no?
But taking it closer to heart, I have to mention some of my favourite Marvel heroes. I mean, Iron Man has some impressive wearables, no? The suit comes in a case that expands and wraps itself around you. Imagine you can take such a suit, and the only thing you could do is fly because we don’t want to hurt anyone, where would you go?
Oh, and I want a Jarvis too!
But Marvel is more than Iron Man, of course. The fictional metal Vibranium can absord, store and release huge amounts of kinetic energy. Ideal for wearables! But maybe a bit too much for this assignment 🙂
Actuwhat?
An actuator is a device that converts a signal into a mechanical motion. Say what?
Think about the world around you: you press a button and something else bends, rotates, moves back and forth, … Sounds familiar? You open the fridge and the light goes on and the buzzer makes a sound when you leave it open for a bit too long. Or automatic doors: a sensor senses you (hopefully) and the doors slide open (again, hopefully).
Or not.. Maybe it just means you know you’re one with the force… Just saying…
Now make all of that smaller and easily transportable. Take a bike light that goes on when it becomes too dark, or your fitbit that informs you you’ve reached your step goal by vibrating or buzzing. All great examples that use an input to generate an output that does something. Easy peasy, right?
Act on it
Putting information into action: let’s create something that does something because something else is triggered. I will use two things: a light sensor and neopixels. The goal is to create a little monsters that comes to life when it gets dark.
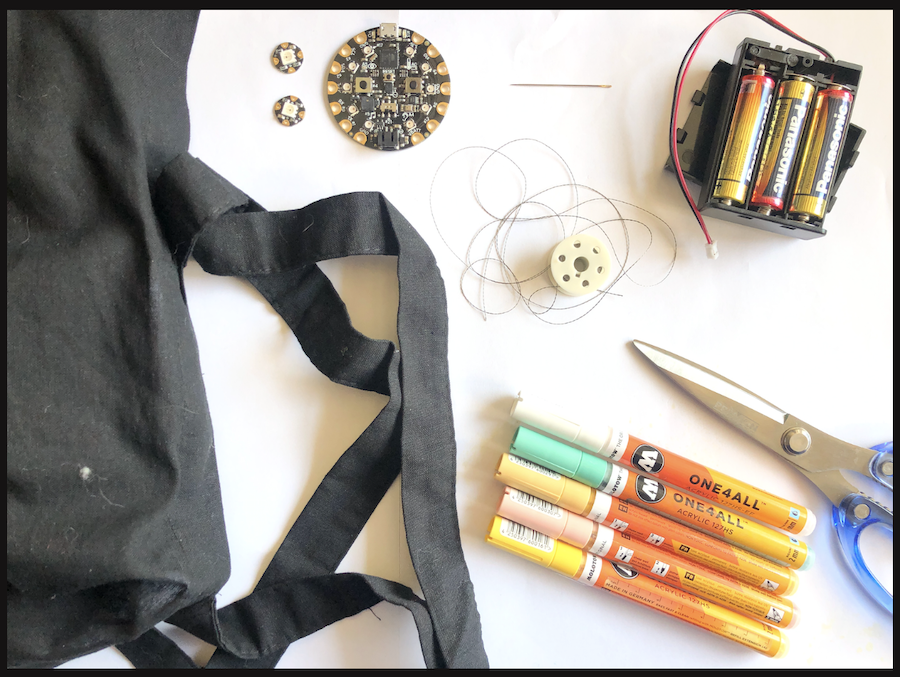
To create the monster, I need a few things:
- a tote bag
- neopixels
- conductive thread
- needle
- scissors
- programmable microcontroller, I’m using the circuit playground
- a battery pack with 3 AA batteries
- optional: acrylic markers if you want to make a drawing on your bag 🙂
Project Toad bag
Whenever I’m out and about during autumn or winter, I forget a little light to put on the bike or make me a bit more visible when on foot. A light-up tote bag would be a good thing to solve this as I tend to always have one with me. I’m not really a purse type of woman 🙂
And I like toad. Simple as that. I mean, what’s not to like about this happy fellow?

For this project I'm not working with an Arduino but with a Circuit playground microcontroller by Adafruit. The circuit playground is sewable as well which makes it perfect for wearables!
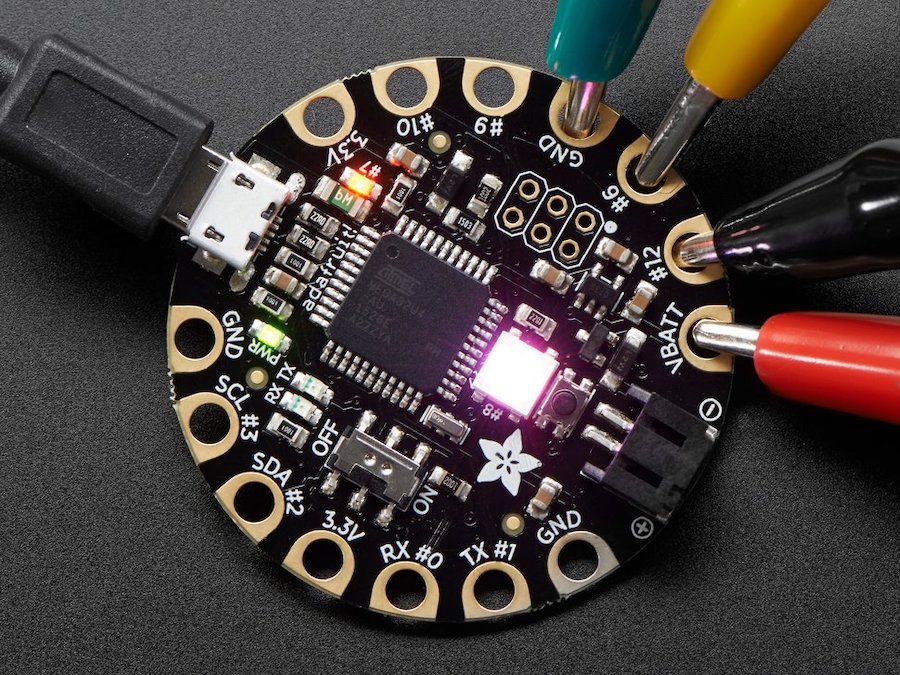
With it's Atmega32U4-chip, it acts like an Arduino and you can code it in the similar way as Arduino. Make sure to install the correct library in the software, select the board and port. Follow the Adafruit tutorial and you're all set!
Once connected, a little green diode should light up next to the usb connector. Great!
It’s always a good idea to have the pinout at hand as well. I look them up for every board I’m using as it gives you all the information about the different things you can or cannot attach to specific pins. And I have to admit, I kinda like these schematics too…
The pinout for the circuit playground looks like this:
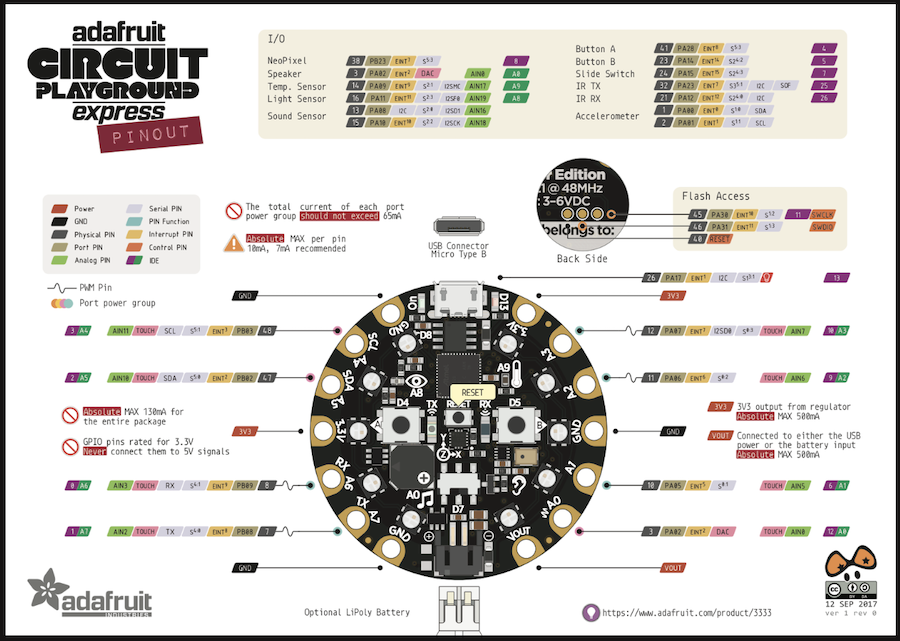
If this is Chinese, you can find the whole explanation here in written. Good luck translating!
Let’s get sewing
I don’t need much, so two neopixels will do great! This is the schematic I will follow for this project, very straightforward. But no need to make things more complicated than they have be.
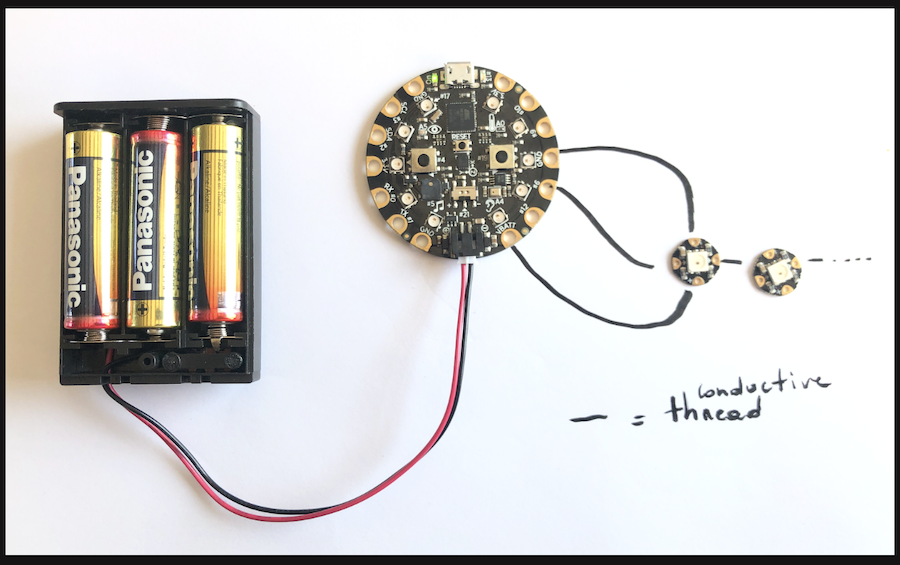
First I sew them in the right order. Each NeoPixel has two arrows, one going in and one going out. This is the way the code flows. The first in the row will be the one connected to the microcontroller, the second to the first NeoPixel and so one.
Of course, you need power. Both for the microcontroller as well as for the neopixels. When using a battery, connect the + side of the neopixels to the VBATT pin on the bottom of the board and the - pin to the ground.
Once on your tote bag, make sure you secure all wires so none touch directly! I use nail polish or pieces of tape to secure them on the back. Once you know everything is ok, you might use some iron-on patches as well, they work great to keep everything in place too.
Code your bag
For now you don’t need the battery as we have yet to code the microcontroller. Once that’s done, the whole setup should work with the battery. While coding the microcontroller gets its power from your USB-port. Handy, no?
What I want to do is use the build in light sensor on the board to sense how bright it is. Once it drops under a certain value, I want the neopixels to light up.
Testing the neopixels

But first, let’s make sure the neopixels are sewed on properly and light up when I ask them to.
Using this piece of code, the first neopixel will light up blue, the second one red.
#include <Adafruit_CircuitPlayground.h>

#define NEOPIX_PIN 9 //the pin you connect your pixels to
#define NUM_PIXELS 2 //number of pins

Adafruit_CPlay_NeoPixel strip = Adafruit_CPlay_NeoPixel(NUM_PIXELS, NEOPIX_PIN, NEO_GRB + NEO_KHZ800);

int value;

  void setup() {
    CircuitPlayground.begin();

    strip.begin();

  }


  void loop() {

    strip.clear(); // Set all pixel colors to 'off'

    delay(500);

    strip.setPixelColor(0, 1,   10,   35); //change these values to change the colour
    strip.setPixelColor(1, 230, 0,   0); //change these values to change the colour

    strip.show();

    delay(500);

  }
If you want a different colour, go ahead and change the value. Once uploaded, the colours will adapt.
Input: the light sensor
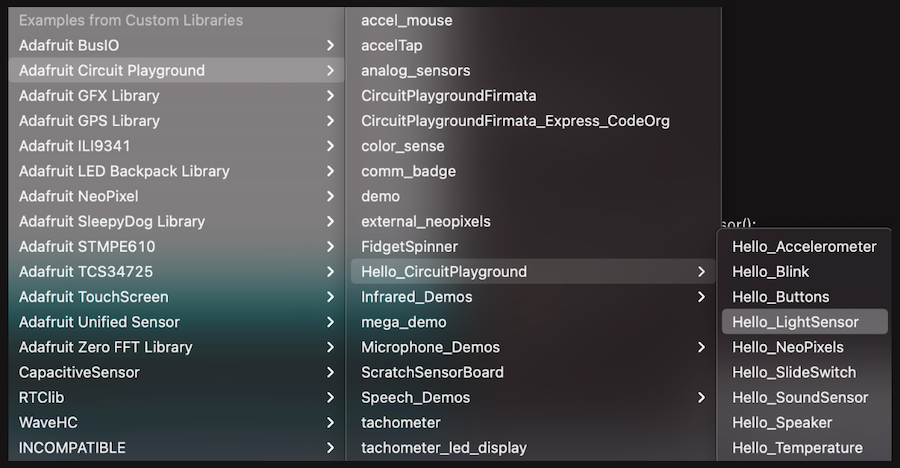
Now we know the pixels work, let’s test the second actuator we need: the light sensor. The light sensor is build in on the circuit playground, so no need to add one externally. Great!
Testing the light sensor can be done by using one of the example “hello”-codes in arduino. The one for the light sensor is, surprisingly, called “Hello_LightSensor”.
You can find it under File > Examples > Adafruit Circuit Playground
Once you open the code, upload it to your board. If all goes well, you should receive data in return and it will be printed in your serial monitor.
That’s actually what these two lines of code do:
Serial.print("Light Sensor: ");
Serial.println(value);
The first line gives a name to the value, the second one prints the value.
Your serial monitor can be found under the Tools tab. Simply click it and it will magically open on your screen.
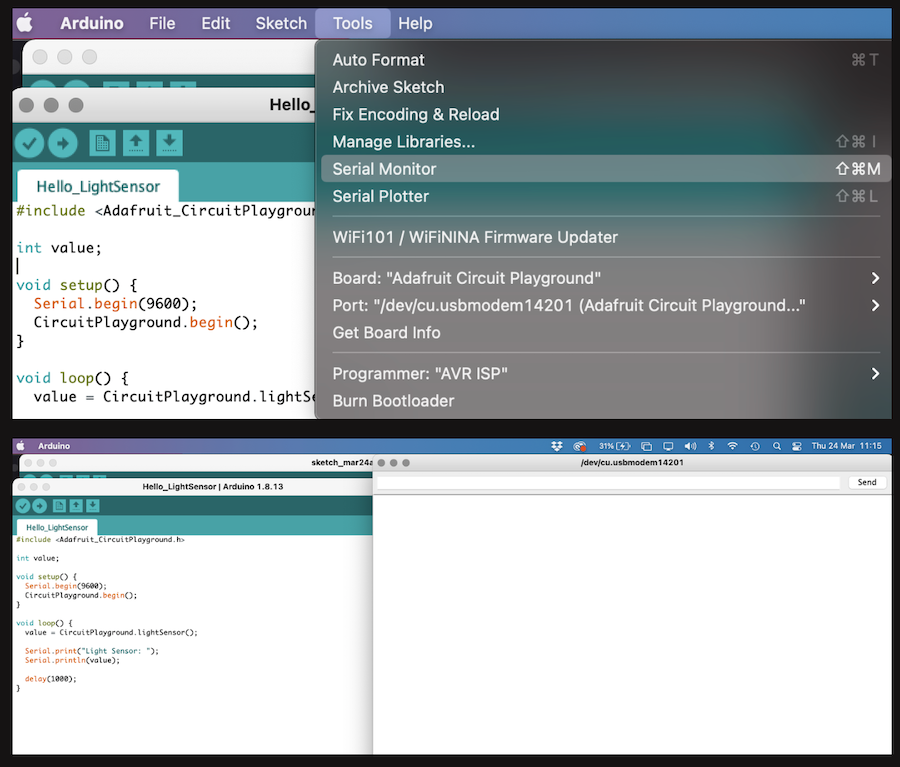
In the monitor you will be able to read the data gathered from the sensor. It will keep coming ;-)
Toad bag 1.0: Bringing it all together
So, now we know how to code neopixels and read the input of the sensor, it’s time to hook them up and make them a nice couple.
With the sewing already in place, this is the easy part. Combining the two pieces of code we wrote before however, is not enough. We need to tell the board that the neopixel should only light up once the sensor value drops below a certain value. The higher the readout from the sensor, the brighter it is. Unless you want to have a bag that lights up when it’s time for ice cream, we need the lower value :-)
To achieve this, we need an If - else structure in our code. Basically we tell the board If it gets dark: light up. Else: stay dark.
The piece of code we would need for this, would look like this: The value we’re referring to, is the same one as we used before to print in the serial monitor.
if( value < 120)
  {
    strip.setPixelColor(0, 0,   0,   255);
    strip.setPixelColor(1, 255, 255,   255);
    strip.show();
  }

else{
    strip.clear(); // Set all pixel colors to 'off'
    strip.show();
  }
Putting this in the void loop() will tell the microcontroller what to do. Let’s test (again…).
With everything in place, disconnect the microcontroller from your laptop, hook up the battery and go for a stroll in the dark.
But first, I drew a toad on my bag, of course :-)
Enjoy!
Code your own bag
#include <Adafruit_CircuitPlayground.h>

#define NEOPIX_PIN 9 //the pin you connect your pixels to
#define NUM_PIXELS 2 //number of pins

Adafruit_CPlay_NeoPixel strip = Adafruit_CPlay_NeoPixel(NUM_PIXELS, NEOPIX_PIN, NEO_GRB + NEO_KHZ800);

int value;

void setup() {
  Serial.begin(9600);
  CircuitPlayground.begin();
  strip.begin();
}


void loop() {

  value = CircuitPlayground.lightSensor();

  Serial.print("Light Sensor: ");
  Serial.println(value);


  if( value < 120)
  {
    strip.setPixelColor(0, 0,   0,   255);
    strip.setPixelColor(1, 255, 255,   255);
    strip.show();
  }

  else{
    strip.clear(); // Set all pixel colors to 'off'
    strip.show();
  }

  delay(500);

}
Toad bag 2.0: Captive touch assembly
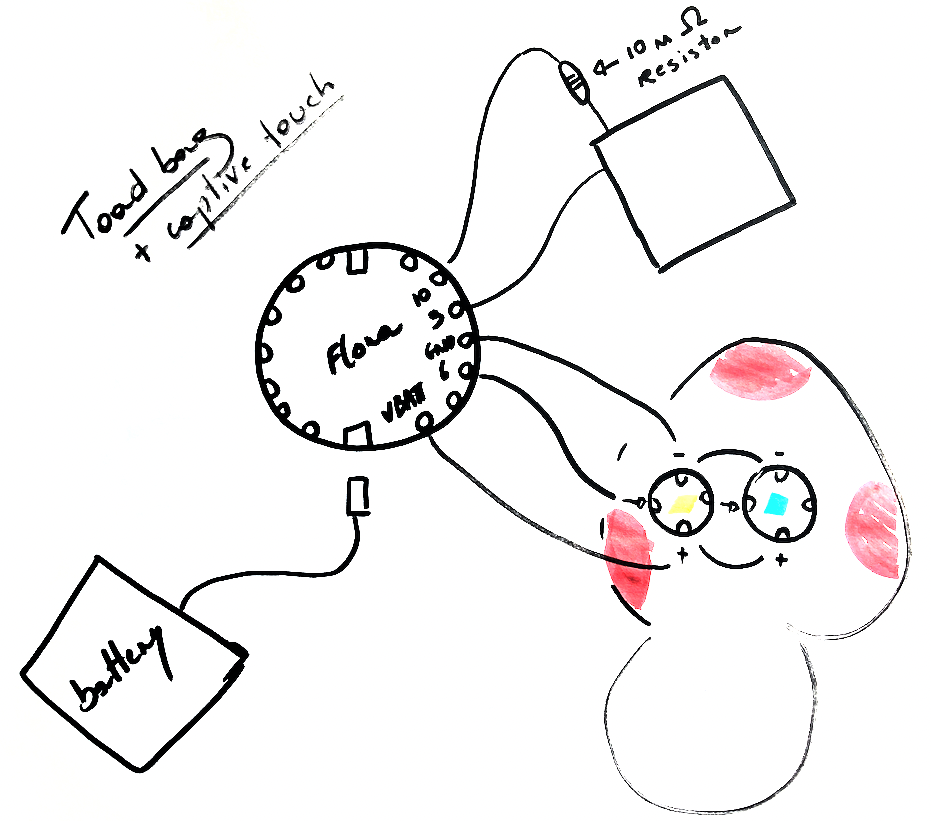
With the code working with the light sensor on the board, it's time to see if I can hook up my own sensor from the E-textiles assignment and use it as an input. To hook up the sensor to Toad, simply follow the schematics.
We have to use the code for the captive touch sensor here and combine it with the neopixel library. Let's see how we can make that happen.
First include your libraries and define your pins so you can refer to them further on in the code. Instead of using pin 9 for coding the Neopixels, we will now use pin 6. Simply as it makes it easier to connect the captive touch sensor.
I had to attach the crocodile clips to the front of the bag for this test as my thread came loose somewhere in the back. I will fix this though later on. But for now: it works like a charm.
Once the code has been uploaded, you should have a Toad bag responding to the sensor :-)
Good luck!
Code your own bag 2.0
#include <CapacitiveSensor.h>
#include <Adafruit_NeoPixel.h>

CapacitiveSensor   cs_9_10 = CapacitiveSensor(10, 9);

#define LED_PIN    6
#define LED_COUNT 2

Adafruit_NeoPixel strip(LED_COUNT, LED_PIN, NEO_GRB + NEO_KHZ800);

  void setup()
    {
      cs_9_10.set_CS_AutocaL_Millis(0xFFFFFFFF);     // turn off autocalibrate on channel 1 - just as an example
      Serial.begin(9600);

      strip.begin();           // INITIALIZE NeoPixel strip object (REQUIRED)
      strip.show();            // Turn OFF all pixels ASAP
      strip.setBrightness(75); // Set BRIGHTNESS to about 1/5 (max = 255)
    }

  void loop()
  {
    long start = millis();
    long sensor1 =  cs_9_10.capacitiveSensor(30);

    strip.begin();           // INITIALIZE NeoPixel strip object (REQUIRED)
    strip.show();            // Turn OFF all pixels ASAP
    strip.setBrightness(75); // Set BRIGHTNESS to about 1/5 (max = 255)
  }

    Serial.print(millis() - start);        // check on performance in milliseconds
    Serial.print("\t");                    // tab character for debug windown spacing

    Serial.print(sensor1);                  // print sensor output 1
    Serial.print("\t");

    strip.setPixelColor(0, strip.Color(0, 0, sensor1));
    strip.setPixelColor(1, strip.Color(sensor1, 255, sensor1));

    strip.show();

    strip.setPixelColor(0, strip.Color(0, 0, sensor1));
    strip.setPixelColor(1, strip.Color(sensor1, 255, sensor1));

    strip.show();
  }