13. Skin electronics
Research and inspiration
During the wearables week I already mentioned vibranium as a great power source in the Marvel universe. Imagine what wearables we could make if it really existed?
Wakanda is the place to be for research about skin electronics. Taking it as close to the skin as possible, I simply have to mention the Kimoyo beads.

These bracelets give citizens the opportunity to fly miniature drones, communicate with one another, transfer data and even heal!
And then, there’s the suit. I find suits fascinating. One day I want to build a suit of my own, simply to understand the underlaying technology. One day, some day, maybe 🙂
In Black Panther, there is Shuri. She is Black Panther’s sister and a true tech wizard! She owns a lab filled with crazy technology. At a certain point in the movie, she says: “Just because something works doesn’t mean it can’t be improved.” This line stayed with me and it’s the essence of creating and continue to explore.
But, back to the suit. It’s starts from a necklace and covers the whole skin in no time.
I don’t care about the fighting power, but the way it grows. That’s pretty impressive!
Or Iron Man, who takes the tech literally close to heart as he implants a miniaturised electromagnet to keep him alive. Isn’t the arc reactor a thing of beauty?
Of course I know this is science fiction, but I do believe there’s a lot of inspiration for makers here. Even though I’m not a cosplayer myself, I’ve seen friends and makers all over the world make very impressive technology based on these movies. For me the whole Marvel universe is a source of inspiration, so what better way to finish the academy by mentioning them one more time 🙂
But, back to the assignment before I start watching all movies again…
Arc reactor 2.0
I have no clue as to why, but I’ve always loved two things: blue light and glow in the dark. For the skin electronics I wil work with blue leds. The goal is to design an arc reactor that will light up once it senses closeness to your skin.
During the wearables week, I wanted to make a simple reactor, without a sensor or a board. But I ended up making something else 🙂 But, a project on hold is meant to be finished at some point, so here we are again! (And excited too!)
My basic idea was pretty simple, it will act as the base but I want to add a sensor that responds to your skin.
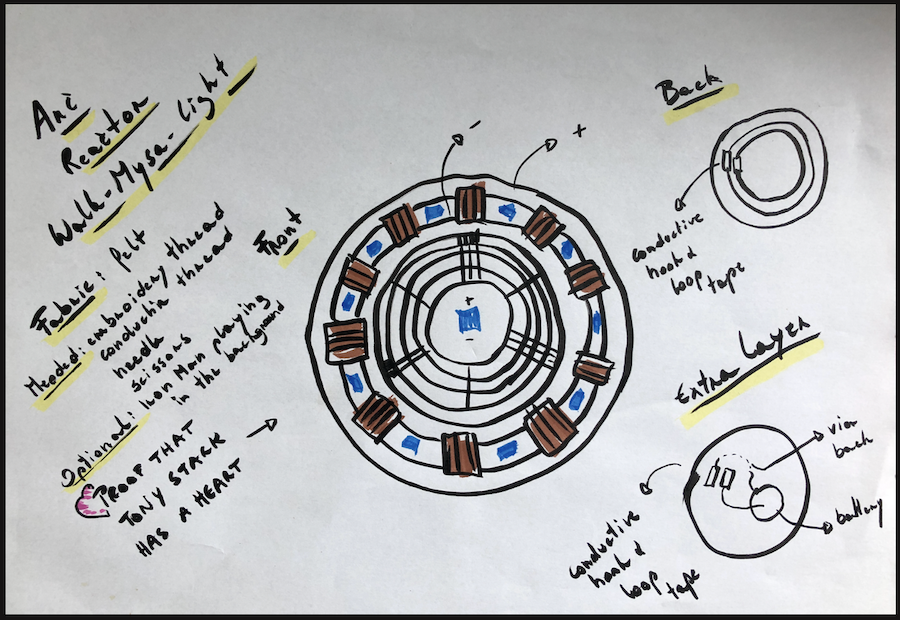
So, time to design arc reactor 2.0. With Mysa, of course.
For the arc reactor 2.0, we don’t need a lot of components.
What do you need to make this work:
- arc reactor pieces in felt and acrylic (see files below)
- light sensor (I used this one or a temperature sensor that reacts to the heath of your body (I didn’t have one at hand for the moment)
- 10 sewable blue led diodes
- coin cell battery (CR3032, 3V)
- sewable battery holder
- conductive thread
Toolwise you will need a needle (or more if you keep losing them between the floorboards), scissors, glue gun (to isolate the wires) and glue that can glue acrylic (Chloroform works best if you happen to have some around) or some good double sided tape.
Let’s design
As always, I prefer Illustrator for my vector drawings. It grew on me over the past 17 years so I think it’s a keeper 😉
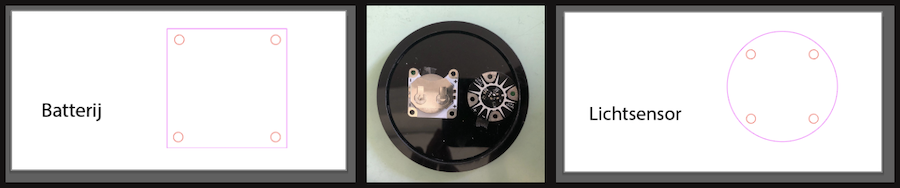
To make sure I had the right size and form for the sensor and the battery, I made a footprint of both of them. They act in the same way as a footprint would in KiCad. They are kept on separate art boards and don’t need to be cut out with the laser.
To ease into the cutting I always use the same lines and colours. Black is for engraving, red is for cutting. Any other colour can be ignored and just acts as a guide to make the design. In this case the pink is to make sure there’s enough space for the sensor and the battery. I only need two holes, one to connect the + and one to connect the - of the components.
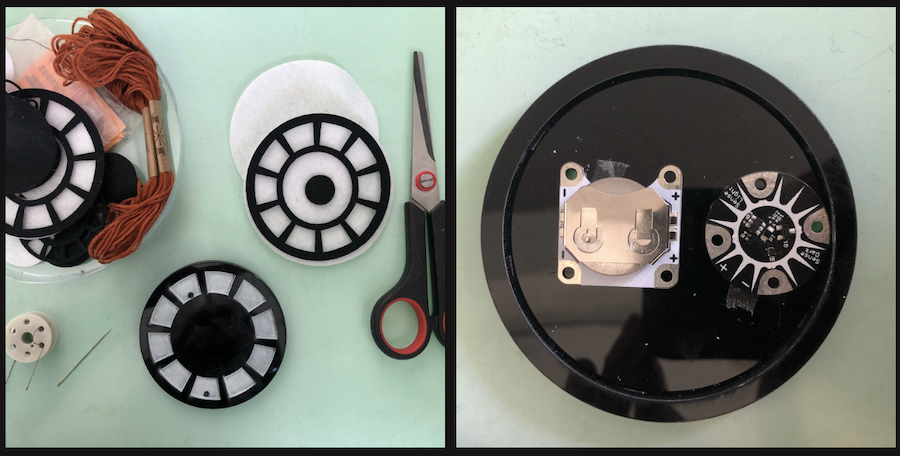
I designed the circle for the reactor in a couple of layers, four in total. The two on the left are the felt layers, the top one black and the bottom one in white. The white one will act as a diffuser for the diodes. These two are layer one and two (really!).
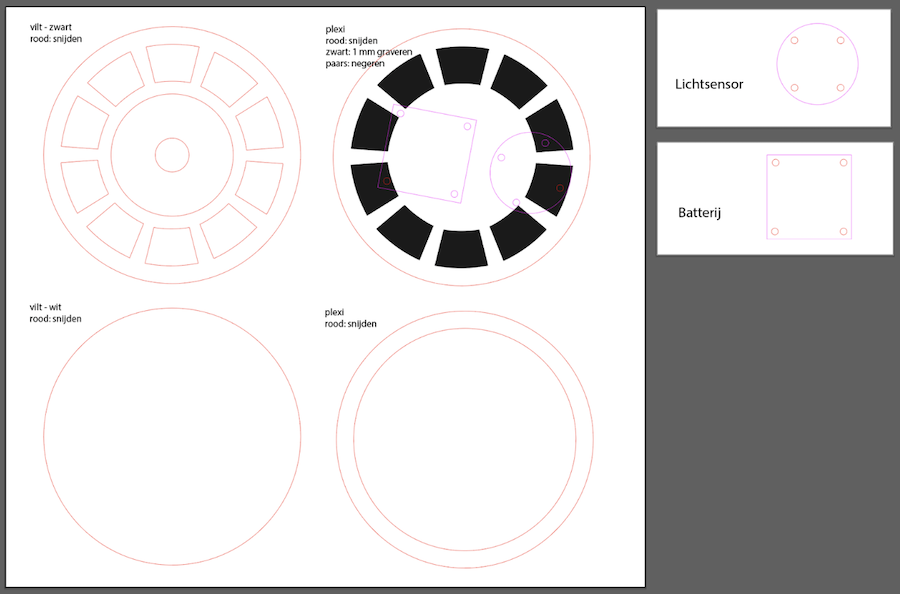
The other two drawings are to be cut in acrylic, I took some black acrylic but you can make it any colour as long as it’s not transparant. Transparant acrylic would allow the light to go through the acrylic instead of through the holes of the reactor.
The top one is the third layer and has the holes all around where the diodes will shine through. On this layer I added the footprints of the components, they will be attached to the back side of the layer but I need to cut out two holes for the wires to go through and that can be done in one go. The tiny holes in red are the ones to be cut out, the pink can be ignored.
The one on the bottom in the fourth layer, leaving room for the light sensor and the battery holder (and enough space to easily exchange the battery once it runs out).
Fire up the laser
With all the pieces drawn, it’s time to cut them out.
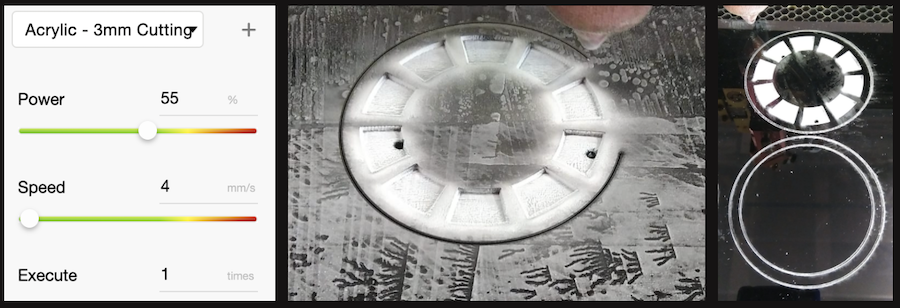
I used Beamo from Flux, a small laser cutter with enough power for a lot of your projects. We received one for Fyxxi and it been a blast working with it. It’s a 30W laser, so it has enough power to cut through most materials, some might need a second run, but most of them are cut through at once. Needless to say I’m in love with the machine!
Cutting through felt is easy peasy, I used the following settings:

The laser cut through as if it was butter, wonderful!
For the plexi tests I used the standard settings for acrylic provided in the software. Again: smooth and quick. (Did I mention this machine truly is amazing?)
With all the pieces in place it’s time to…
Stitch me up
But we have a little bit of work left before we can shine. I took two needles with a long piece of conductive thread to sew the diodes together. One for the positive sides and one for the negative. Using two needles allows you to work without the hassle of changing the needle in between your stitches.
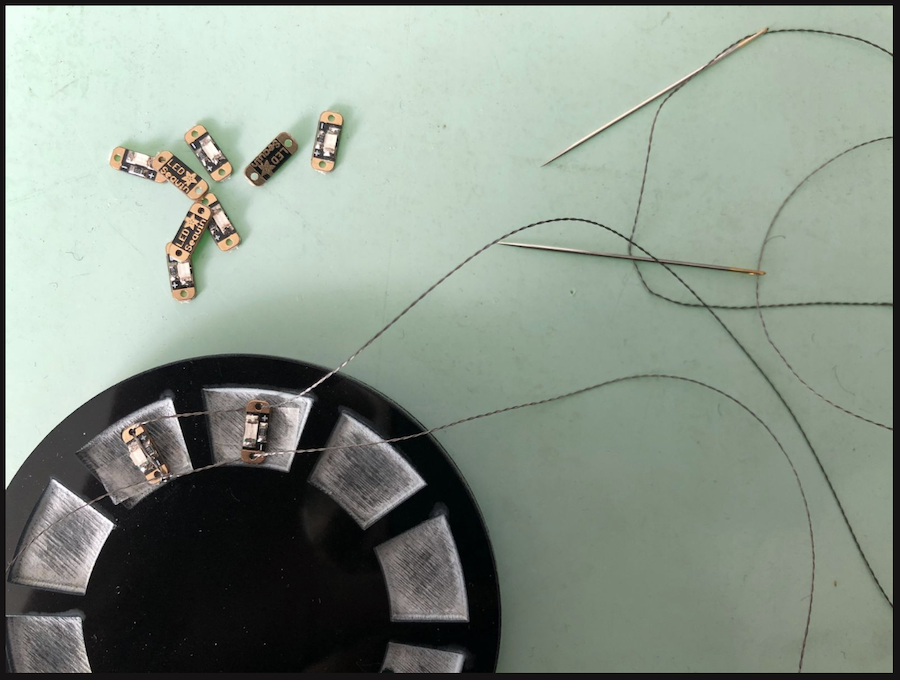
I put a piece of double sided tape in each pocket, this ensured that the diodes stayed in place while sewing the next on in line. There are ten diodes in total, so it took me some time and patience to sew them all. But it was worth it 🙂 Before you reach a full circle, stop sewing. The last diode shouldn’t be connected to the first one, the last one is the end of the line :-)
It should look something like this:
(At this point I didn’t want to cut the wires too short, so I secured them with some tape until I knew everything was working.)
With the diodes in place, it’s time to connect them to the back side.
To make it easier, I drew a schematic of the circuit. With the following explained below, hooking up the sensor and battery will be a piece of cake (njam!).
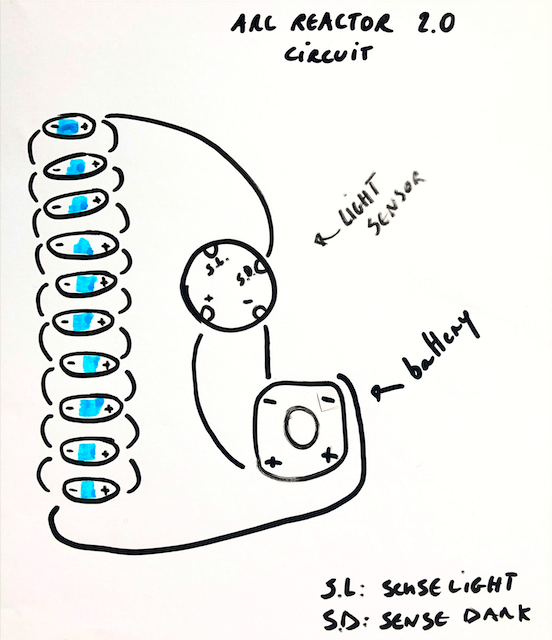
As previously explained in the design process, I created two additional holes to make sure I could connect the negative and positive sides of the diodes to the back side of the reactor and hook them up with the sensor and the battery.
I cut the wire and connected them one by one. It’s a pretty simple circuit.
The diodes’ positive side should be connected to the sensor, in this case I want the arc reactor to light up once it’s dark so I connected it to the “sense dark” side. But if you want it to work the other way around, you could go for “sense light” as well. After this connection is secure, connect the positive side of the battery to the positive side of the sensor.
The diodes’ negative side should be connected to the negative side of the battery. After this connection is secure, connect the negative side of the battery to the negative side of the sensor.
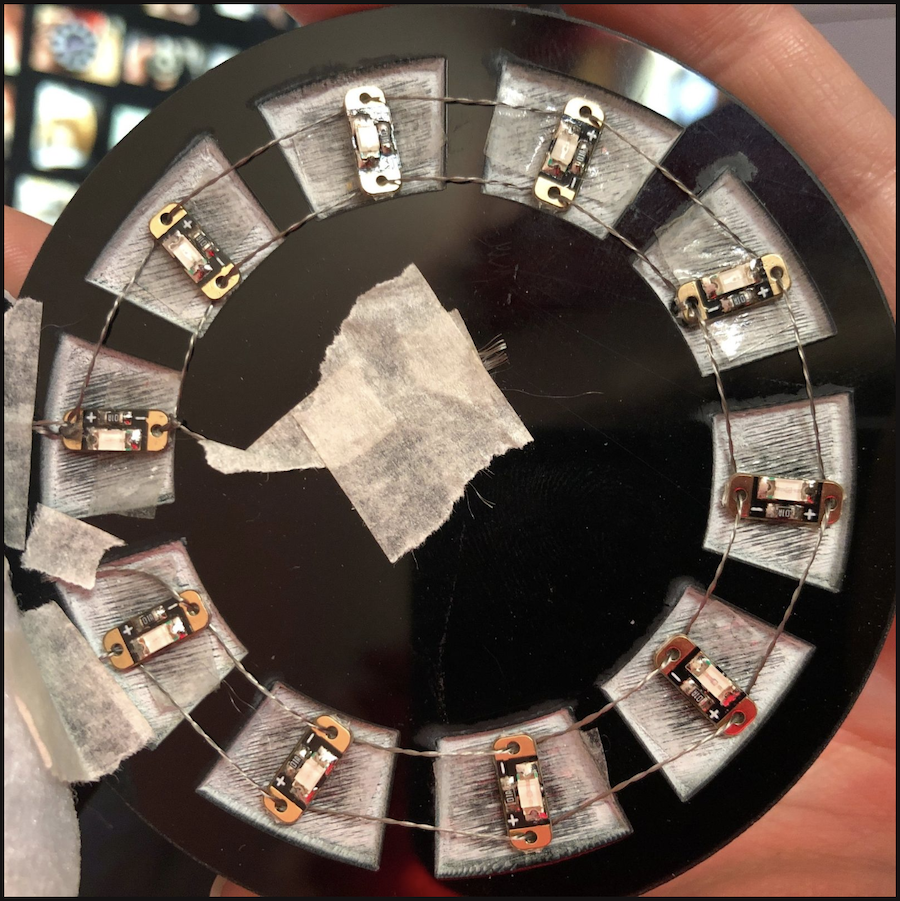
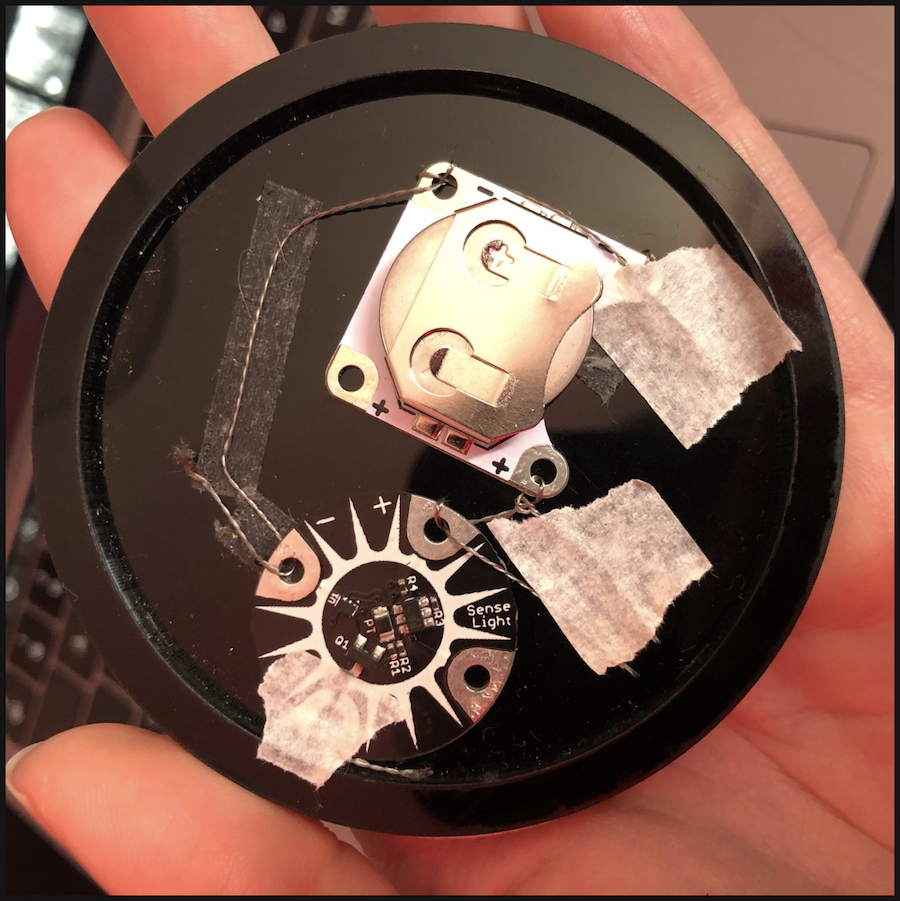
After you’re done, it should look like this:
Time to test whether all works as it should on a Chinese volunteer.
Yes! 🥳
Suit up!
With everything in place, it’s time to add the top layer. Beautiful, no?
But it’s not a suit without mask, right? So some true suiting up!
Make your own
To make your own, you only need this file with the drawings. Good luck!
(And always curious to see your makes!!)