07 | COMPUTATIONAL COUTURE
WEEK 07 | COMPUTATIONAL COUTURE This week was about exploring 3D printing and parametric design with GrassHopper. It was a whole new world to me but I found it very exciting !
INSPIRATION
3D printed glass
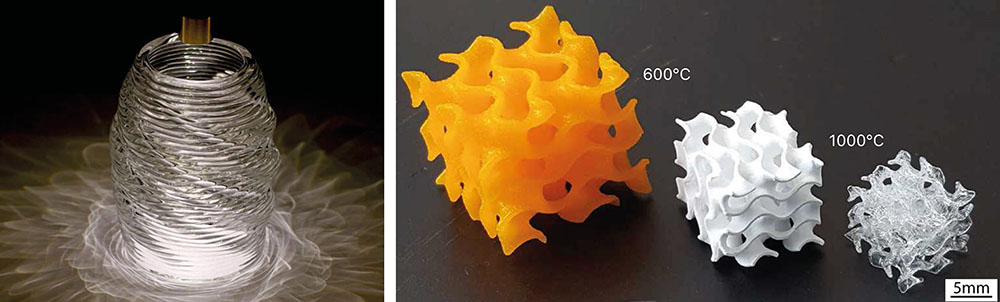 3D printed glass by MIT researchers M. Stern, C. Inamura, P. Houk, D. Lizardo, and N. Oxman | 3D printing process by ETH Zurich researchers D. Moore, L. Barbera, and K. Masania and A. Studart
I never thought 3D printing with glass was possible until this class. Its manufacture is so complex I didn't think there already were technologies able to print it without facing thermal shocks. So it was a great surprise to see the glass vases from the MIT and obviously the light effects which are a direct consequence to the way it is manufactured. Even if it is still at an experimental stage, it is quite fascinating to see the results of 3D printed glass. After reading a bit about it, it seems that the problem is in the control of the microstructure and being able to print in a small scale. I'll keep an eye on this :)
Parametric Design and Textile
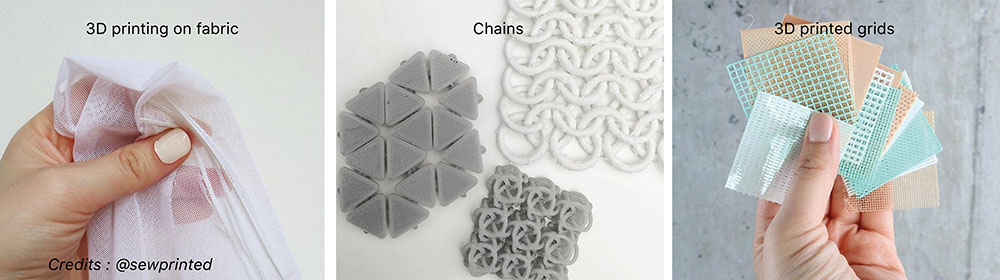 Krizia from Sew Printed made a short video to sum up the different possibilities that 3D printing offers to make fabric (you can see some examples above). You can have a look here
![]() Chromo-Morpho Collection, Stratasys, ThreeASFOUR and Travis Fitch | Illusory Material by Jiani Zeng and Honghao Deng
Chromo-Morpho Collection, Stratasys, ThreeASFOUR and Travis Fitch | Illusory Material by Jiani Zeng and Honghao Deng
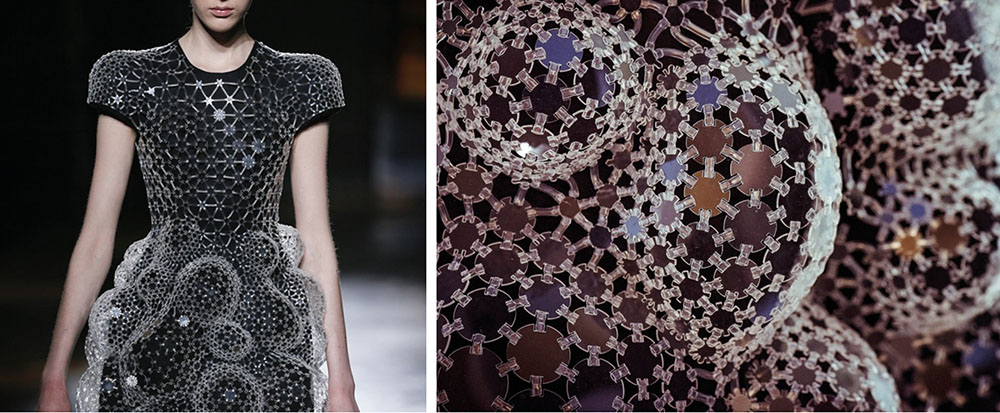 Lucid Collection by Iris Van Herpen
More explanations here :Bistable Auxetic Surface Structures (Short Summary for SIGGRAPH 2021) | Link for researchers' work (and papers to read...)
Bistable auxetic pattern Generator
GRASSHOPPER x RHINO : How to use them
Basics
Basics steps | Right clic
- Preview ON/OFF to see/hide what you're doing on Rhino
- Disable/Enable good when working with several big algorithms (control how your computer processes them)
- Zoom to zoom on your point in Rhino from your algorithm
- To add several wires to on slot Press and hold shift while doing the connection
- BAKE Note for myself you'll always forget to bake
Functions
- Move
- Scale
- Panel to obtain the informations of a function OR do build up data > Multiline data
- Point List and Point order
- Shatter to cut the curves in segments on a 0 to 1 scale
- Brep|Curve and Curve|Curve to have the intersection between
- Range to chose a specific domain for series
- Bounds to have the min and max from a list of numbers
- Remap numbers
- Boundary surface to make a surface with a polyline
- Scribble to write down words
- Fillet to smooth the angles
- Merge to group two sets of points for example
- Loft to make a surface between two non-linked curves
- Extrude to extrude from a planar surface
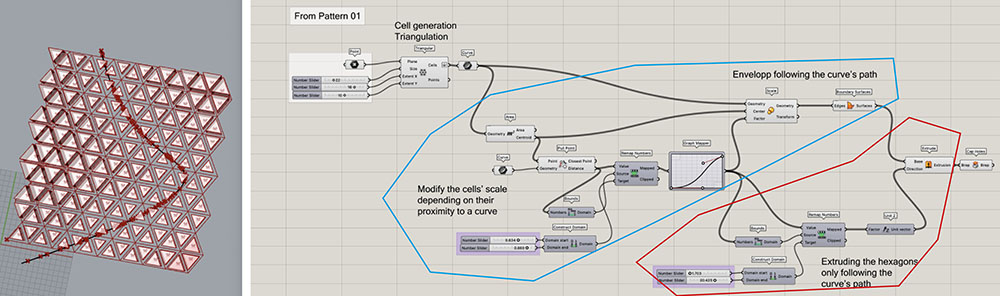
There are different ways to extrude (Extrude Point,Extrude Along) as below :
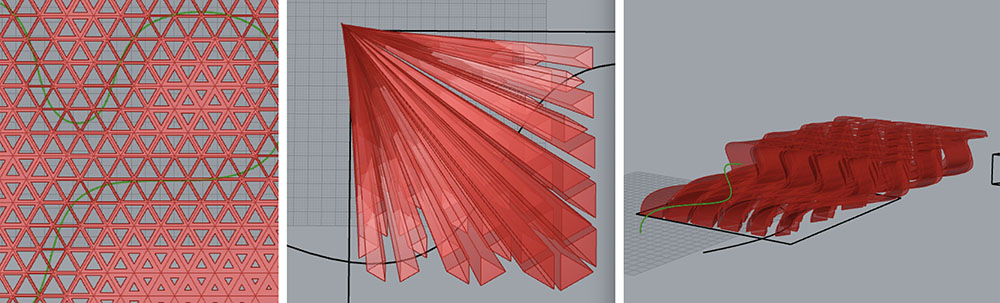 Also you can extrude the cells depending on their proximity to a curve
Lists & Data Trees
- List Length to know how many elements there are in a list
- List Item to extract one part of the list vs Cull Index
- Partition List to cut the original list in different ones : from one list to data tree
- Tree branch to select (a) specific list(s) in the data tree
- Flip matrix to connect the 0 of different lists
- Tween Curves to build up curves between two original curves (synthesis)
Mesh
- Deconstruct Mesh to obtain the different parts (Vertices/Faces/ /Normals) vs Construct Mesh
- Mesh Explode to disconnect the faces
- Deconstruct Domain to break the domain and obtain the min & max separatly
Plugins : Kangaroo, Weaverbird, MeshEdit, BowerBird, Horster
Kangaroo
- Anchor to set points/corners as anchor and choose target position for each of them
- Edge Lengths to convert mesh to soft mesh : from edges to springs
- Solver Reset : Button | ON : Toggle TRUE
- Length Line to grow the lines
- Sphere Collide spheres can not intersect
- BB Offset to create a surface from one line
Others
- Perlin Noise to add random reliefs to a surface
- Weaverbird's Catmull-Clark Subdivision to smooth the square edges
Smoothing the edges
On Rhino with the bevel funtion as pictured below.
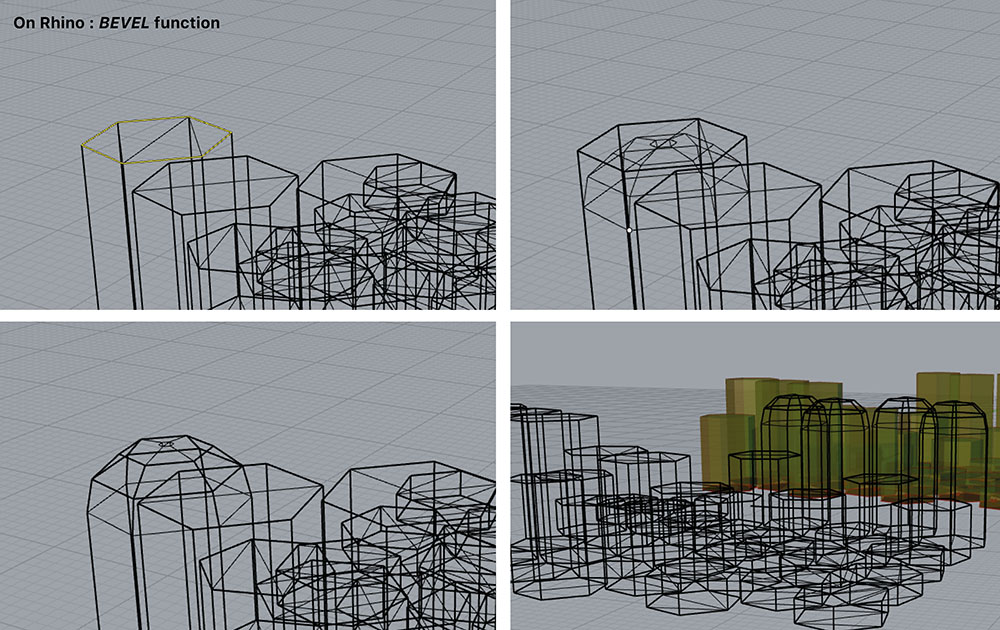
On Grasshopper with the Fillet Edge function ? Found this tutorial to help me on YT : Grasshopper Tutorial (Fillet Edge) but the problem is to apply it to the right edges and on all the volumes...
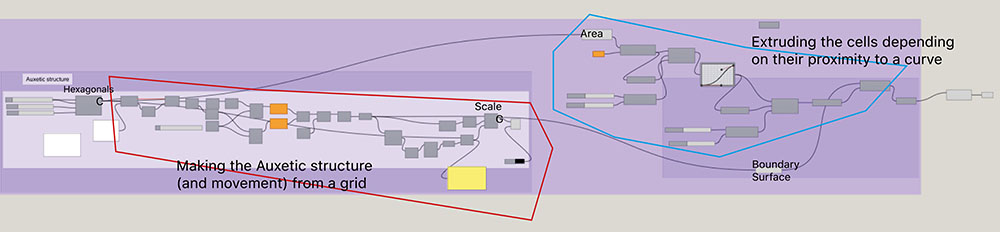
Auxetic Structures
Trying Different Auxetic Structures
Changing the cells in the Auxetic Structure Definition from the tutorial gives you different patterns.
| Auxetic Hexagonal | Auxetic Rectangles |
|---|---|
What about an Auxetic Hexagonal Structure where the elements' height depends on their proximity to a curve ? What I need : "Auxetic Hexagonal Structure" Definition + "Extrusion depending on a curve" definition + right connections
Inflatable Auxetic Structure
Inflatable mesh : Grasshopper definition from [ Kangaroo2 ] Basic #03 : Load MeshSurface 1
3D PRINTING EXPERIMENTATIONS
3D printing filaments
Diameter 1.75mm/2.85mm
| Name | Names | 3D printing temp | Heated bed | Heated chamber | Glass transition temp | Others |
|---|---|---|---|---|---|---|
| PLA | Polylactic Acid | 190-220°C | (optional) 40-60°C | (not required) | 60-65°C | Biodegradable, Can be acetone-smoothed |
| ABS | Acrylonitrile Butadiene Styrene | 220-250°C | 95-110°C | (highly advised) | 105°C | - |
| PETG | Polyethylene Terephthalate with added Glycol | 230-250°C | (optional) 75-90°C | - | 80°C | - |
| TPU | Thermoplastic polyeruthane | 220-250°C | 50°C | - | 80°C | Not required |
Steps by steps
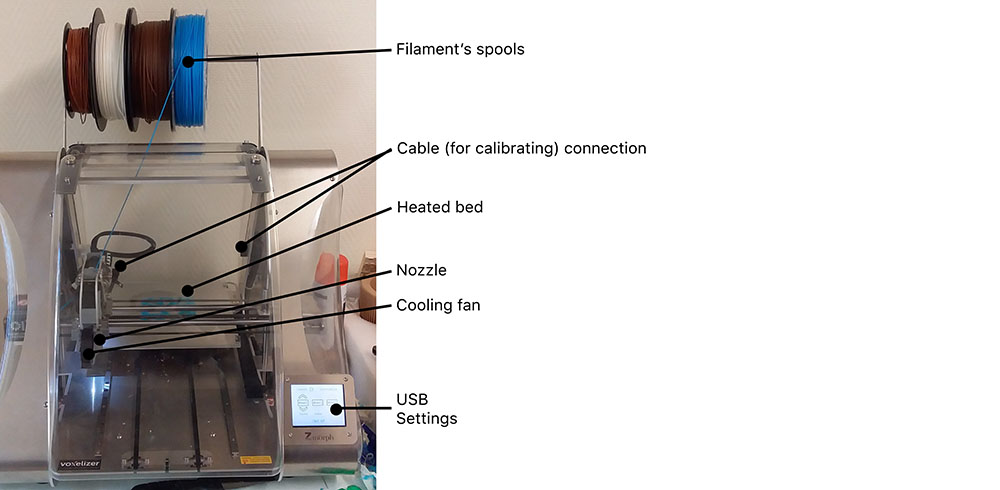
To 3D print an object, you need the 3D model of it. It can be done on Rhino or CAD for example and the exported file can be an OBJ or STL file. Then, the process consists into slicing the 3D model into the desired height of filament extruded and add features if needed. For example, I can add a pause if I want to print on a textile. After slicing, I obtain a Gcode file which is basically a long list of coordinates (X,Y,Z) for the extruder to go to and extrude the filament. This is this file that you give to the 3D printer to read. Here is the 3D printer we had :
File (.obj or .stl format)
Slicing the 3D model with the Voxelizer software for 3D printing
- Import the OBJ/STL file
- Scene : Rotate | Scale it as wanted | Center it
- Settings : Power raft OFF | Infill (light to strong)
- Save it to Gcode on a USB
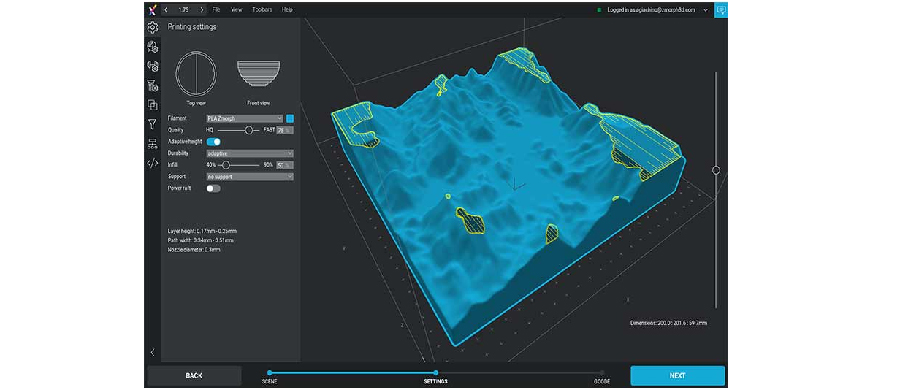 Image credits ©MakerShop
On the 3D printer
- Load the thread : Maintenance > Calibrate > Load the filament OR during the 3D printing process : Settings > Change the filament
- Calibrate (add specific cable on the right of the nozzle to calibrate) | Calibrate auto > Enter the right temperatures of the nozzle and heating bed (On the filament's spool) > will print 5 lines > Choose the best one
- Remove the cable after calibrating
- Preheat the printer > Custom temperatures > Enter right temperatures (Left)
- Prepare the bed | Add fabric if wanted | Add glue Spray
- Put the fan on the nozzle
- Open your file
Experimentations
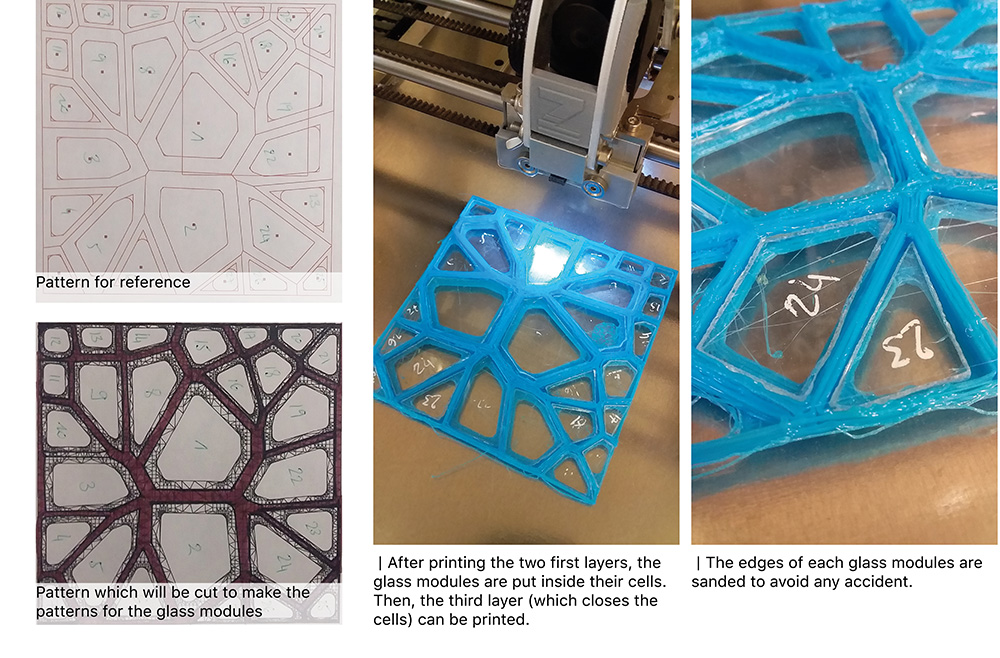
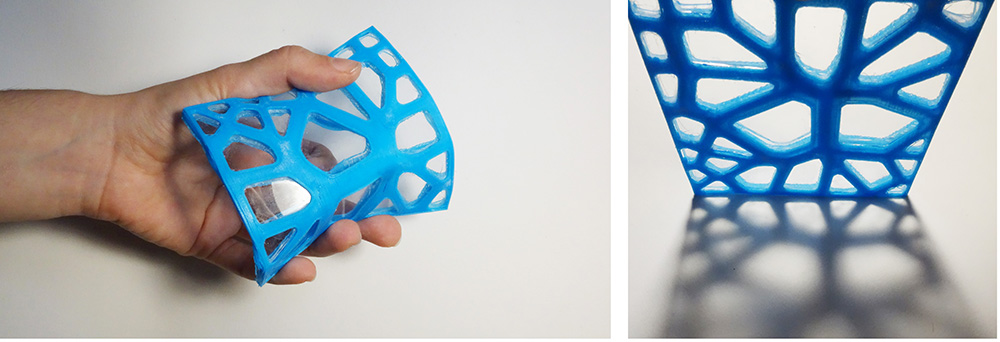
I wanted to print a surface where I could put glass modules in. For that I decided to use the Voronoi pattern. I needed to have one front (front), one grid of Voronoi cells, one back (front and back are the same). I made separated files using Rhino and Grasshopper : Front(Back) and Grid. I printed the pattern on paper (scale 100%) to be able to cut my glass modules as explain in Week 02
In Voxelizer I imported the Face/back first (z=0 and e=0.4) and then the cells Grid. I set the last one at z=0.4 so that it is just on top of the Front. We used TPU to print but we were having some troubles with it because it kept coming out of the nozzle during the 3D printing process.
GRASSHOPPER FILE | GRID FILE (stl) | FRONT FILE (stl)
- research Gcode how to pause the 3D printer during process
REFERENCES
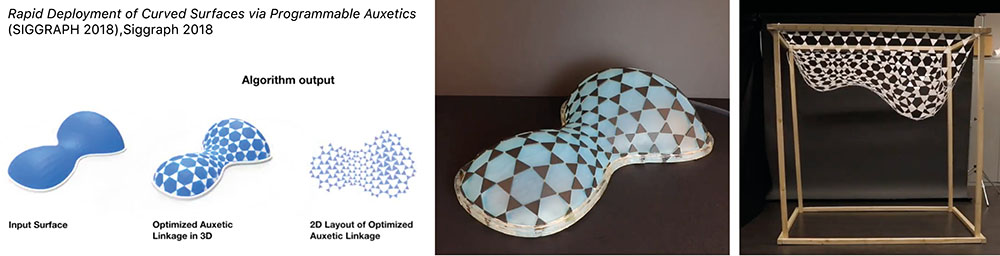
- Rapid Deployment of Curved Surfaces via Programmable Auxetics (SIGGRAPH 2018),Siggraph 2018 Technical Paper by Mina Konakovic-Lukovic, Julian Panetta, Keenan Crane, Mark Pauly
- Auxetic Structures
- Bistable Auxetic Surface Structures (Short Summary for SIGGRAPH 2021)
- Researchers' work on Auxetics (and papers to read :D) : https://lgg.epfl.ch/research_auxetics.php
- Bistable auxetic pattern Generator
- 5 Ways to 3D Print Fabric by Sew Printed, KRIZIA
- Triangle mesh fabric
- SMP(Shape Memory Polymer) Fillament for 3D Printer (might not be biodegradable)
- 3D printing with 2 fabrics
- 3D printing process by ETH Zurich researchers D. Moore, L. Barbera, and K. Masania and A. Studart
- 3D printed glass by MIT researchers M. Stern, C. Inamura, P. Houk, D. Lizardo, and N. Oxman
- Grasshopper Tutorial (Fillet Edge)
| Videos | Class, Review 07, Tutorial Grasshopper Part 1, Tutorial Grasshopper Part 2, Tutorial Grasshopper Part 3, Tutorial Grasshopper Part 4, Tutorial Grasshopper Part 5, Tutorial Grasshopper Part 6 |
|---|---|
| Softwares | Rhinoceros 7, Grasshopper, Voxelizer |
| Tools | 3D printer |