7. Computational Couture
INDEX IMAGE ~ Honeycomb repeating hexagonal structure
Research & Lecture
This week we are diving into computational design for textiles and exploring how data and algorithms can be translated in tactile and artistic ways. We are working with the 3d printers in the lab and practicing Rhino and Grasshopper software. We learned that modification is very important in this kind of design - variety is the essence of computational thinking.
I am specifically interested in the role of biomimicry in paramentric design for optimization, efficiancy, beauty and functionaily. I've learned a lot from the book Biomimetics for Designers. Some notes on the most important componants of biomimetic design:

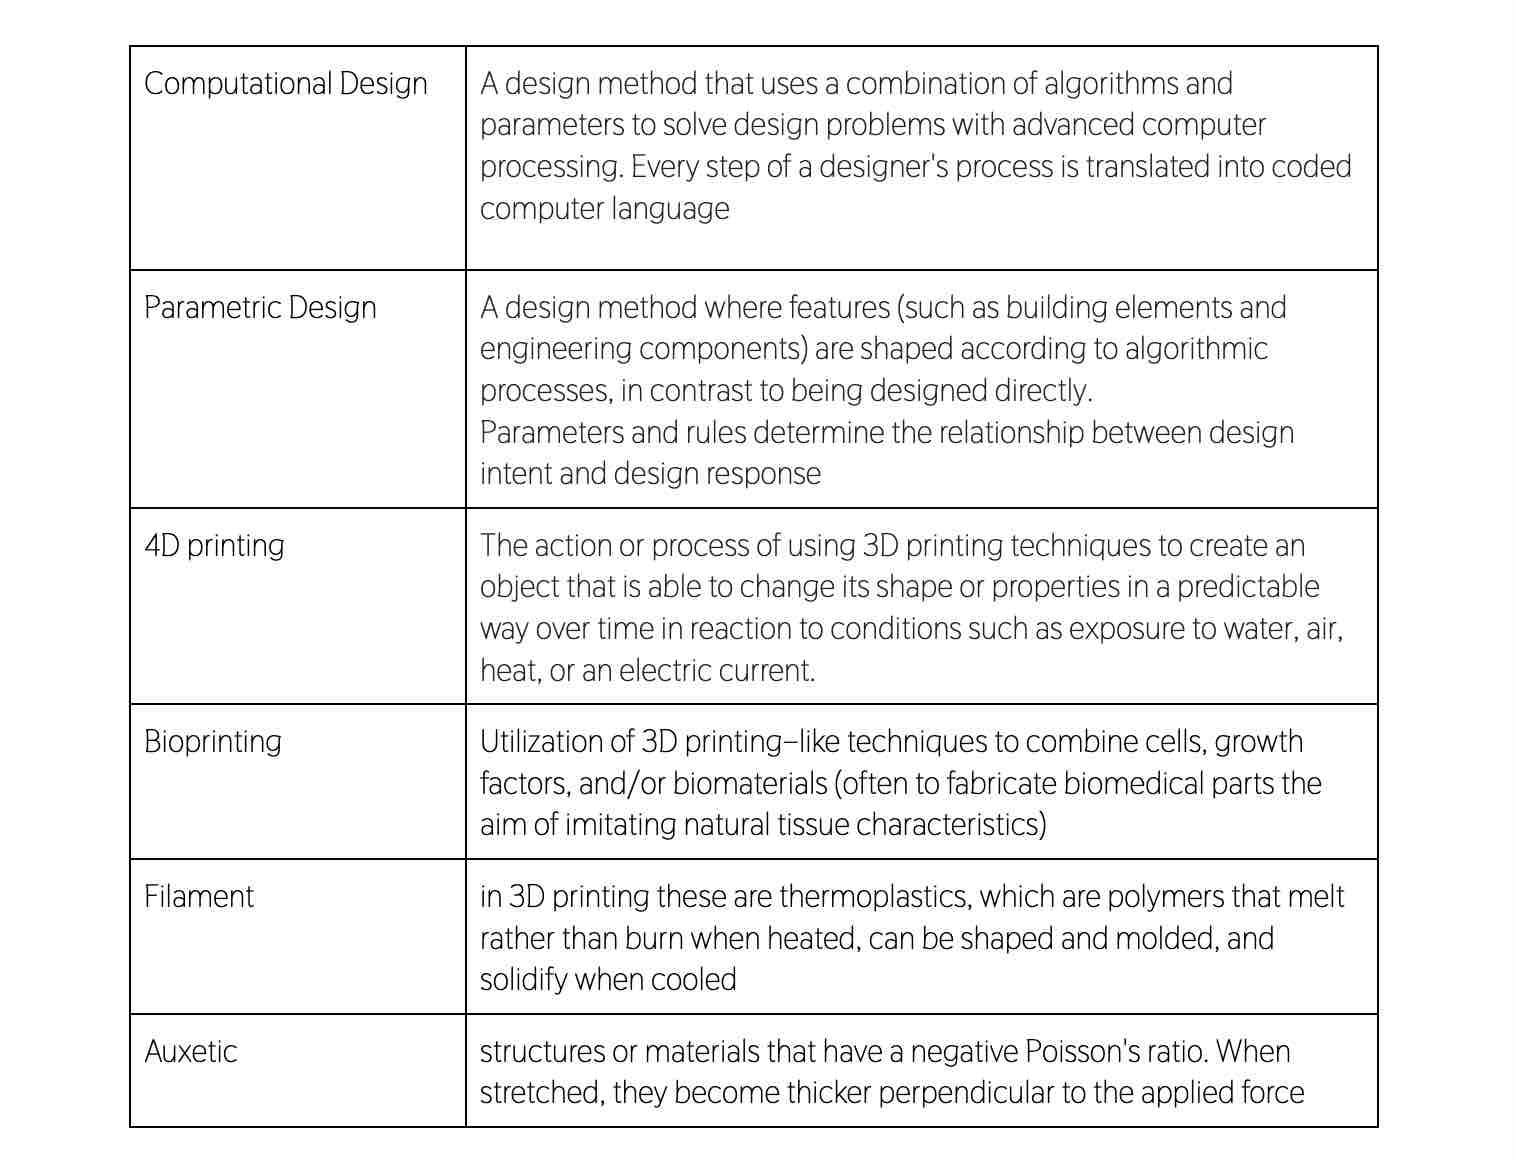
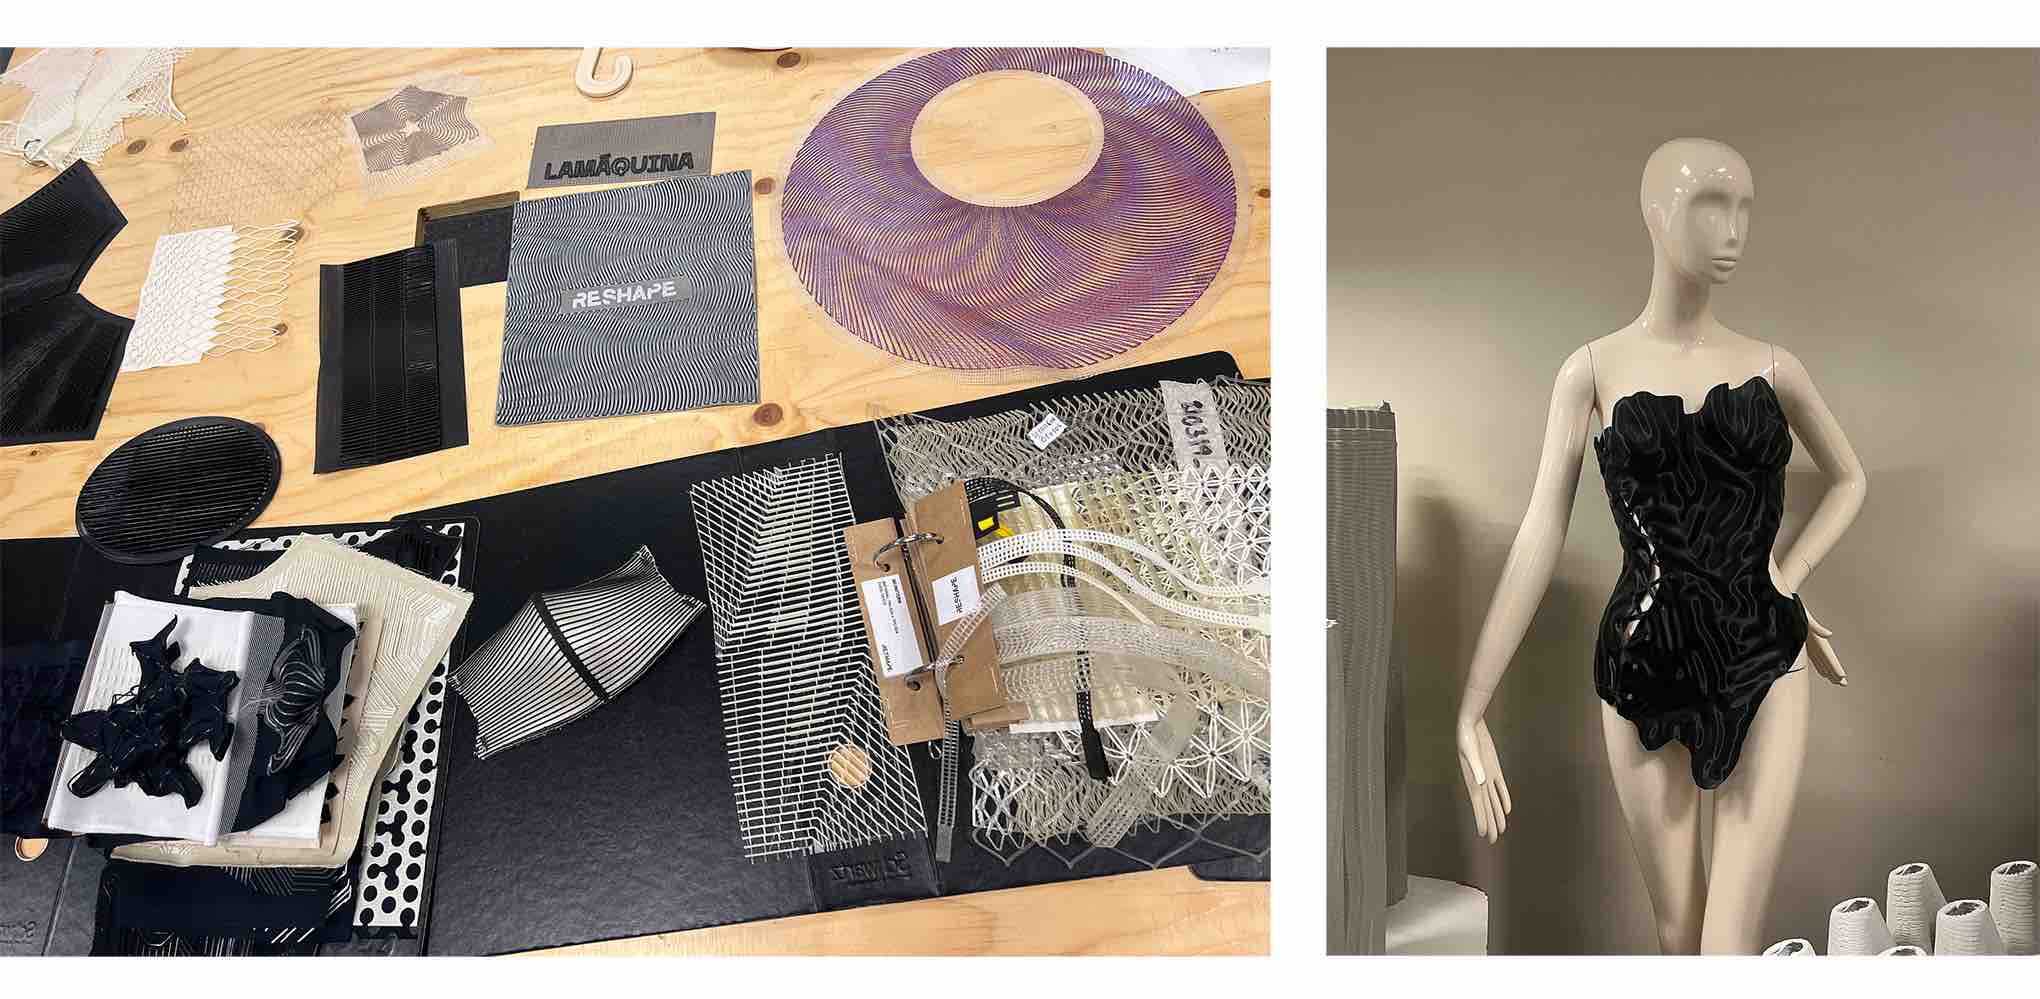
We started the week by visiting the Reshape and Noumena office and the La Maquina 3d printing warehouse. It was great to talk to professionals about the most recent innovations in 3d printed fashion. I was expecially interested in Puretech a powder that can be applied many different materials, to make the object absorb carbon and purify the air. Our clothing, walls, floors, furniture and more could reduce the amount of CO2 in the environment.
References & Inspiration
One of the most amazing pieces to see was this project sintering desert sand using solar power. Such a creative use of materials.
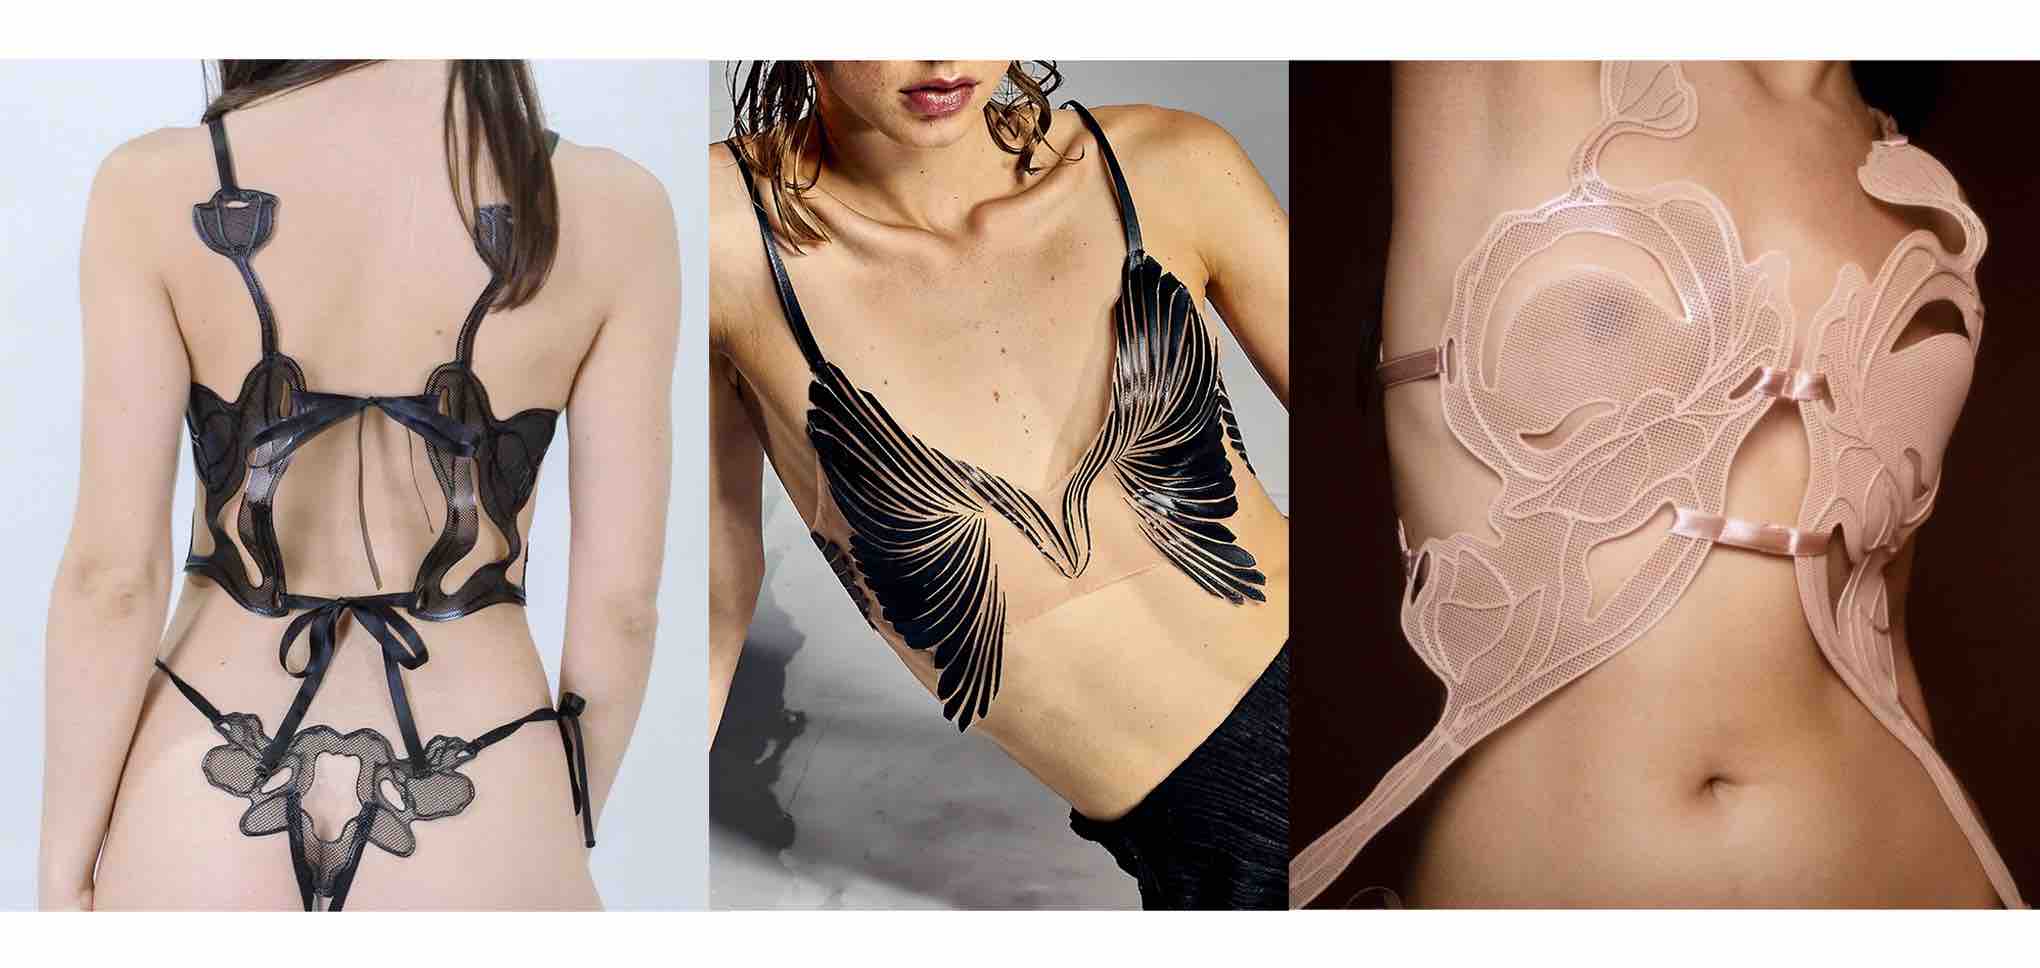
I also love these 3d printed lingerie collections by Stephanie Santos. It's a great example showing how 3d printing has evolved and improved from strictly ridgid objects to potentially very flexible and soft forms, even something you can wear intimatly on the skin.
Tools
- Grasshopper
- Rhino3D
- Cura
- 3d printer
Resources
3d Printing
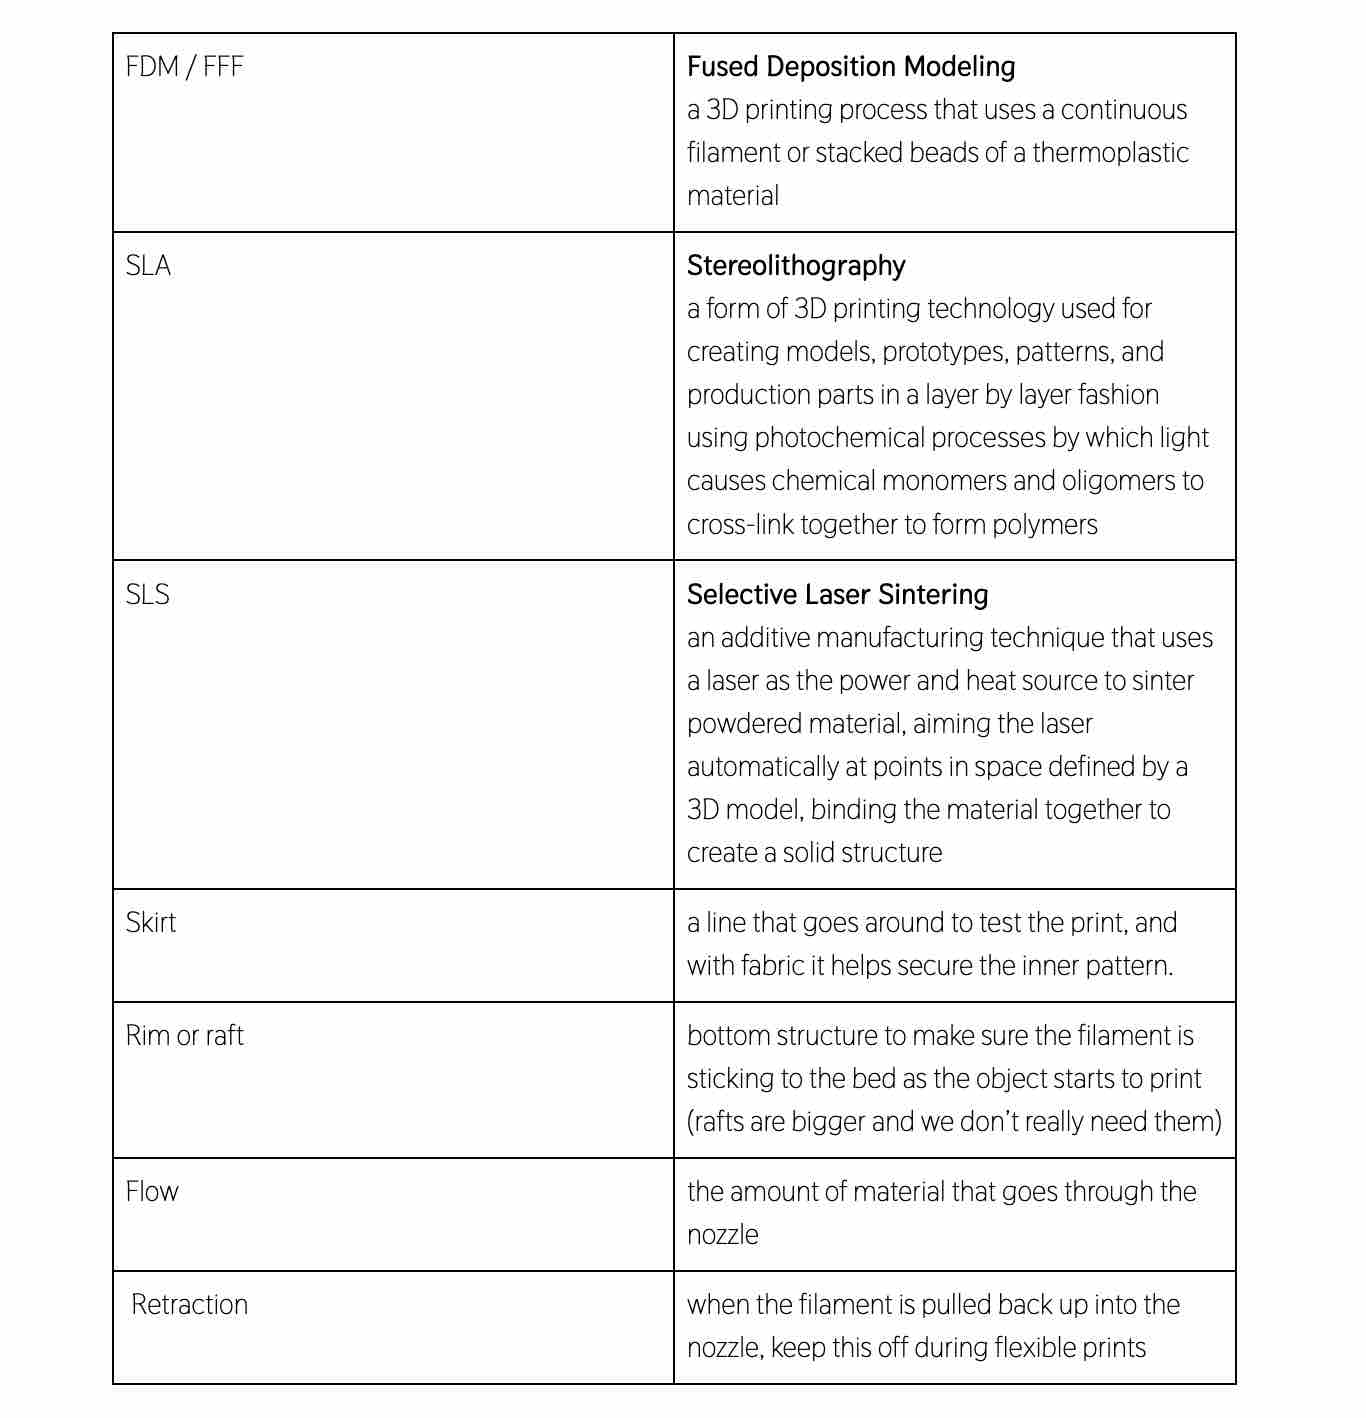
3d printing is a form of additive manufacturing to make a physical object from a three-dimensional digital model, typically by laying down many thin layers of a material in succession (there are a few other different methods named here).
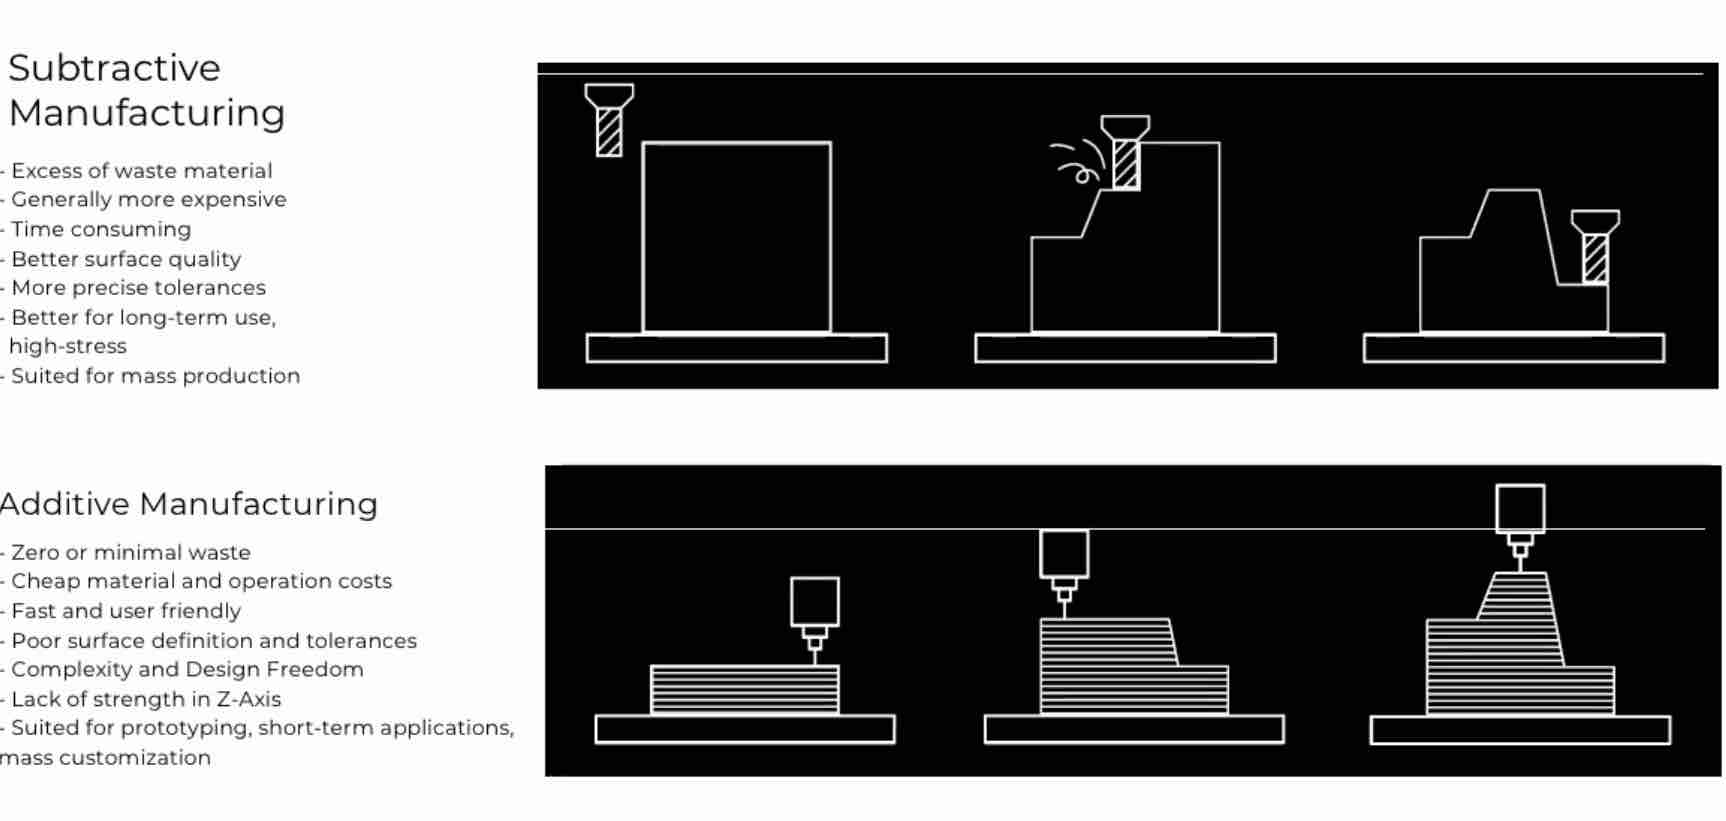
 The pros and cons of additive and subtractive manufacturing:
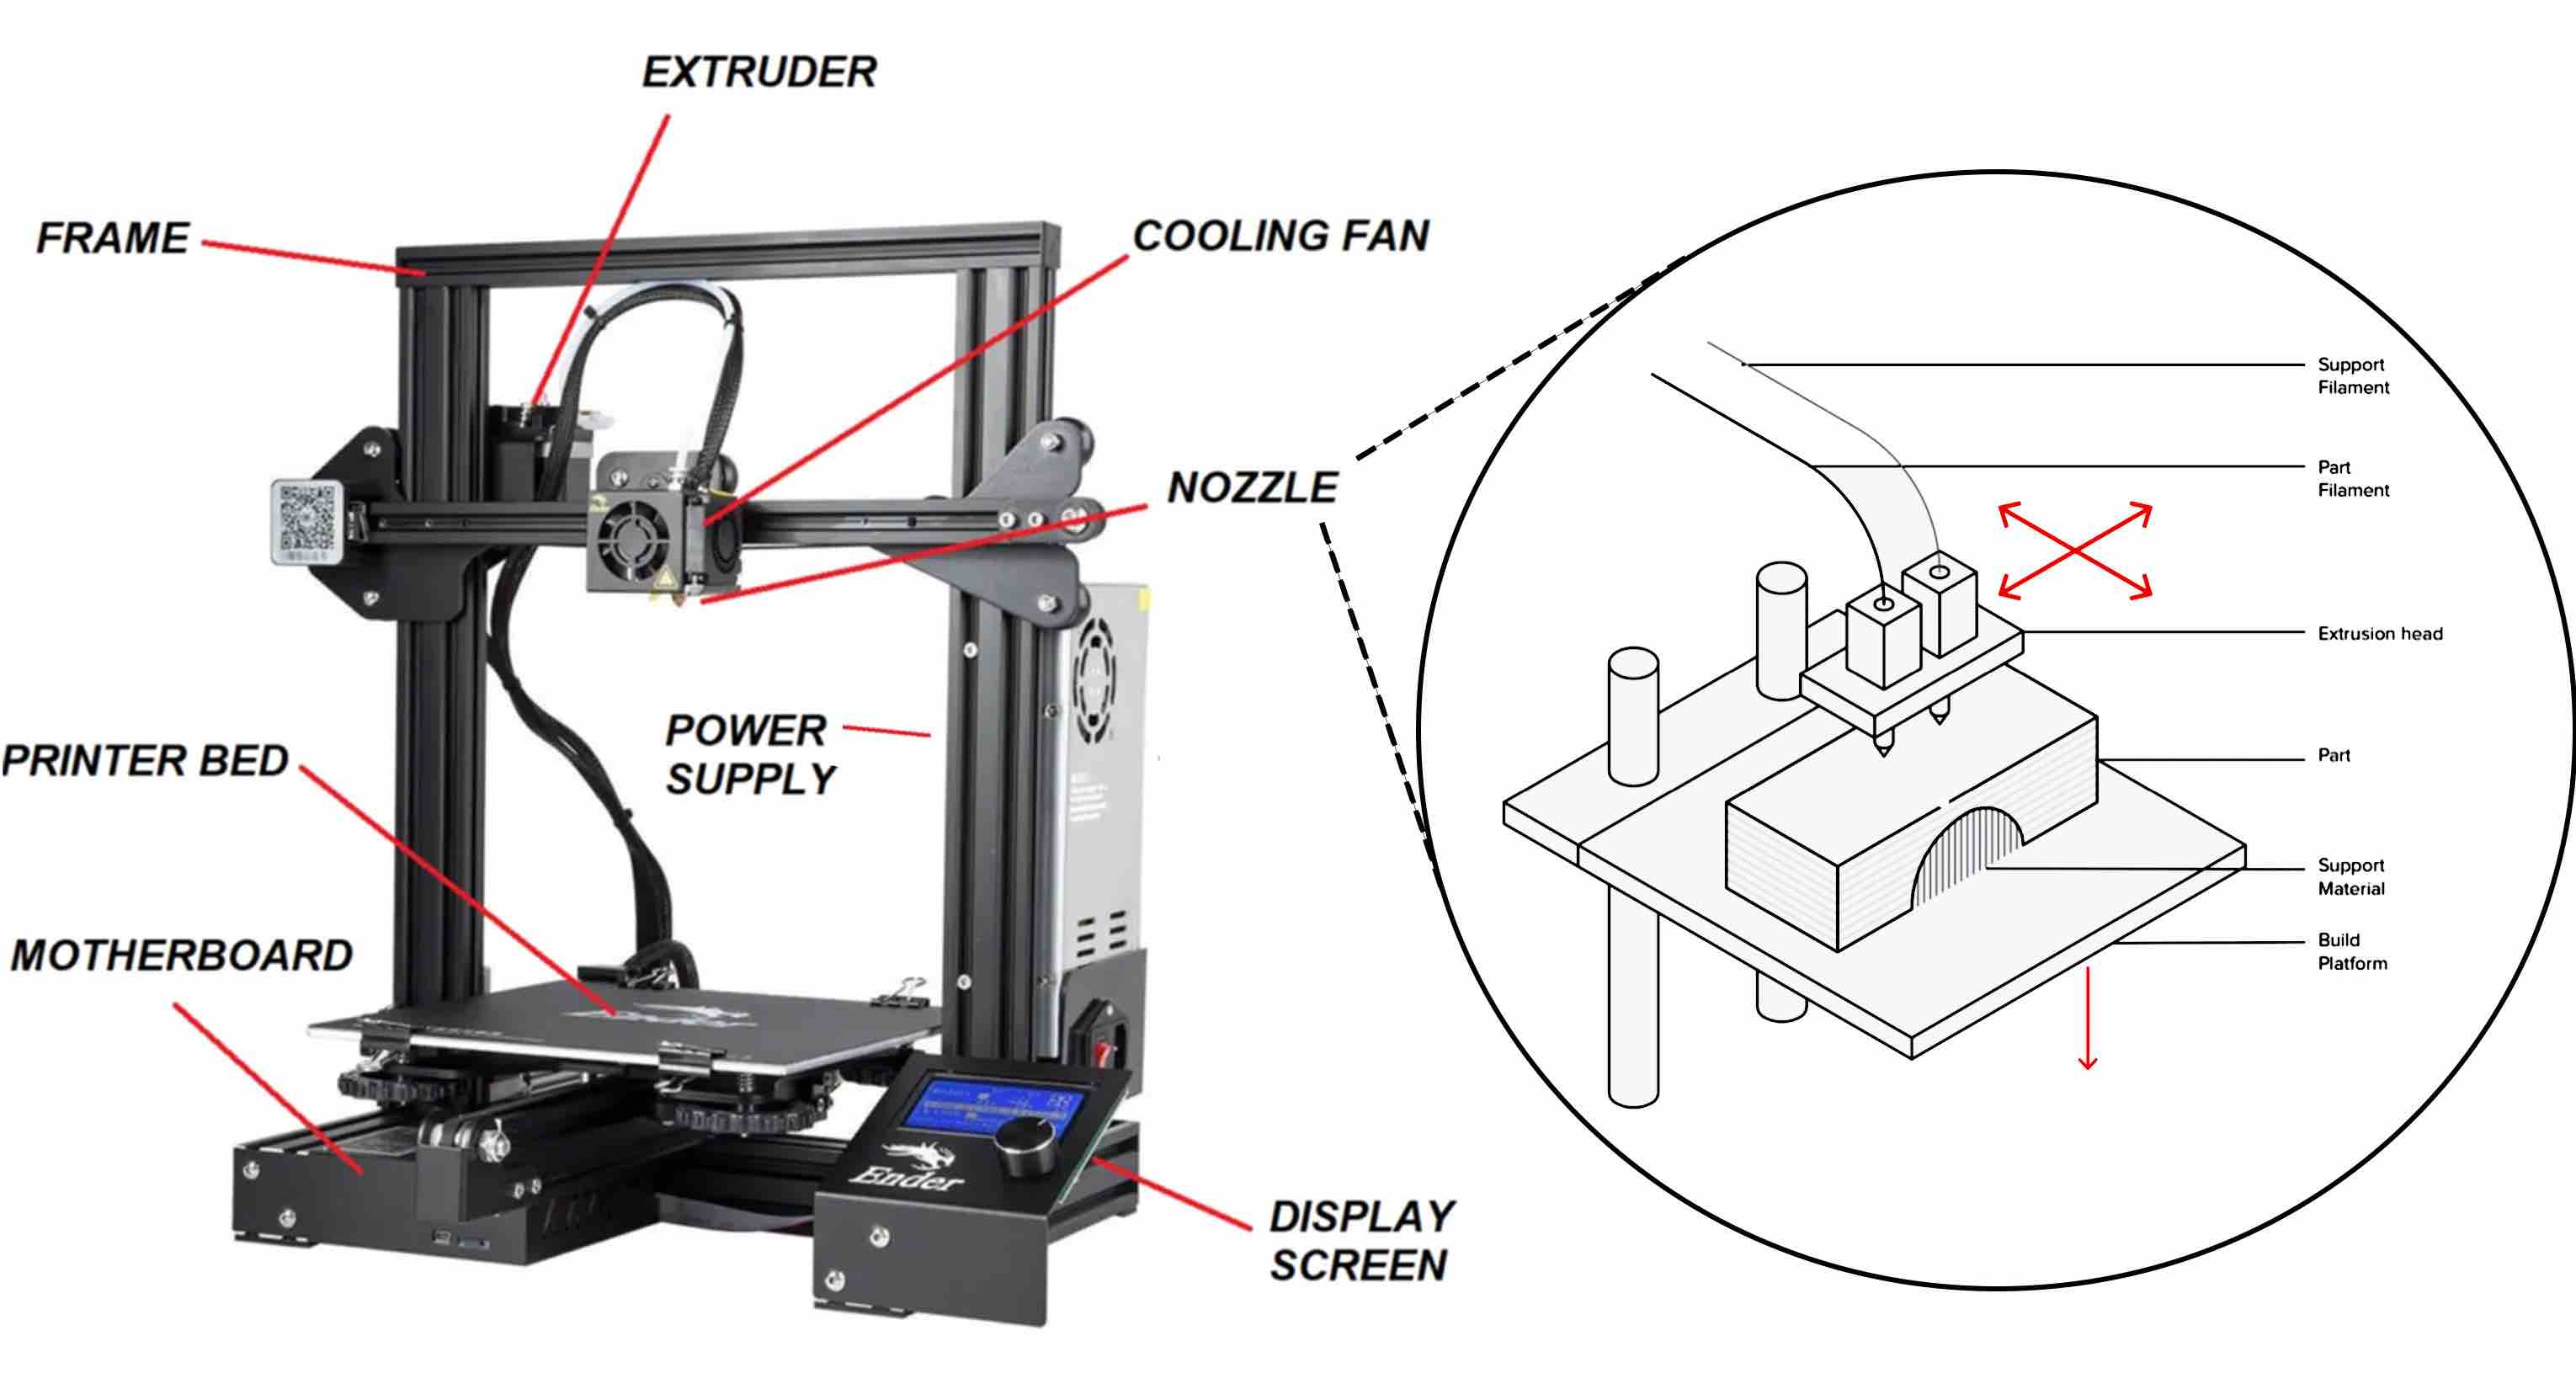
 The printers we will be using at the lab are Creality Ender pro. Here is a diagram explaining the main important parts.
 There are different elements to think about when making a standard 3d print including:
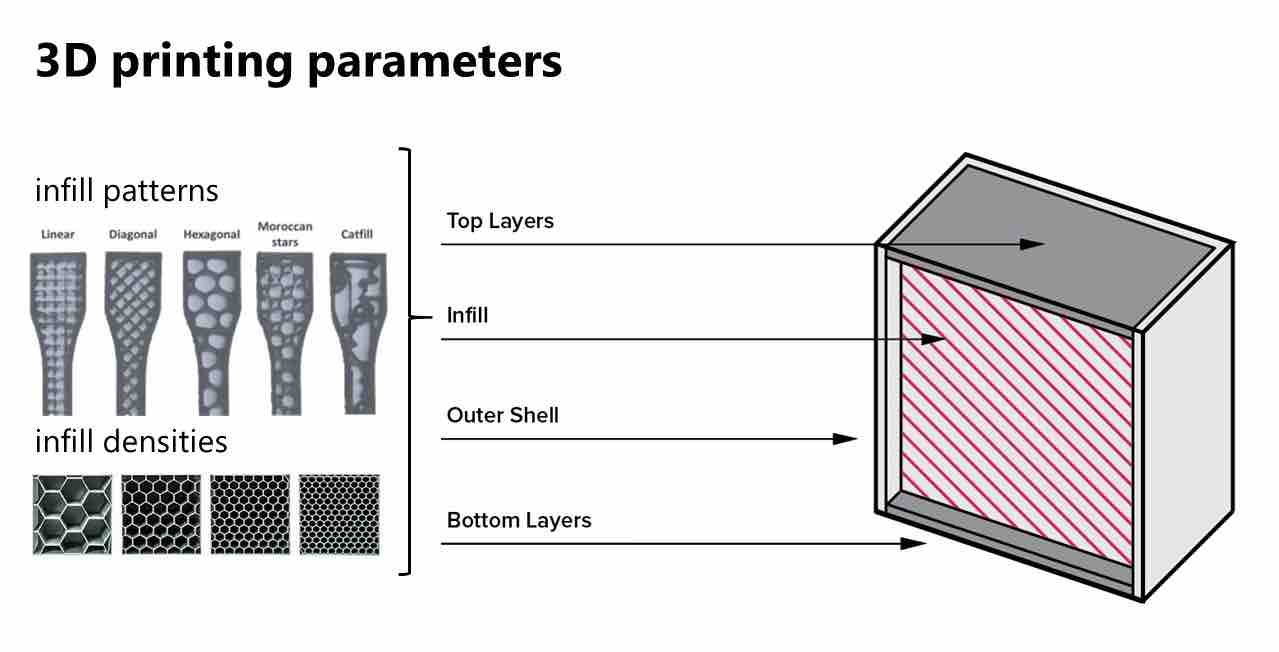
- Kind of filament (affects strength and flexibility)
- Layer height (thickness of the layer height determines the resolution - lower layer height = more detailed and smooth resolution)
- Shell thickness (affects strength)
- Infill (affects strength)
- Orientation (affects construction time, strength, surface quality)
- Directionality (affects construction time, strength, surface quality)
 Our lecture with Ana helped us understand the potential of 3d printing to create and modify textiles. We learned more about how some of the smaples we saw at Reshape can be made.
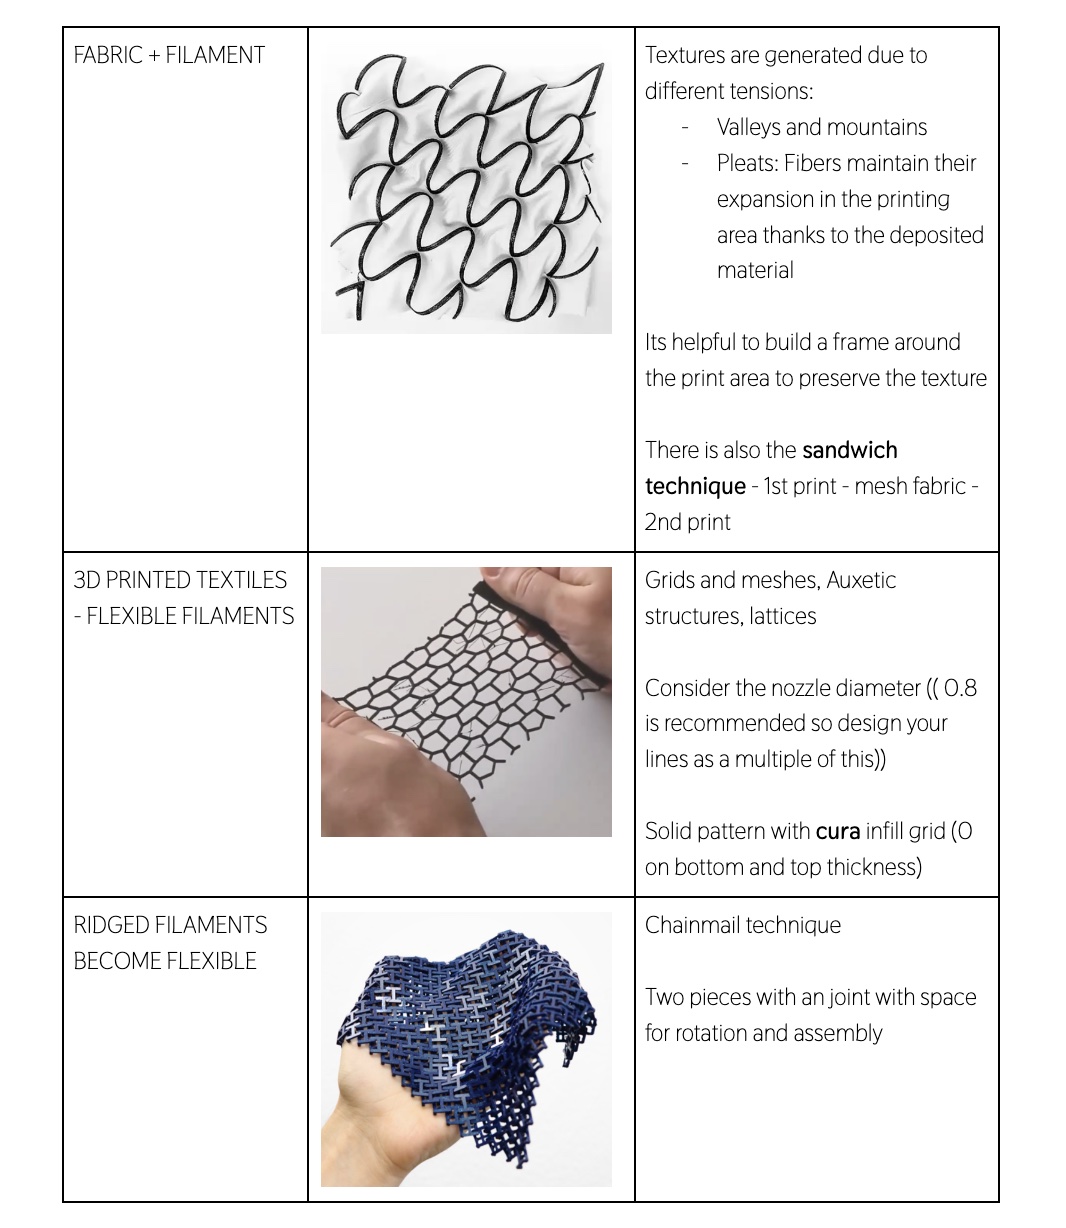
Fabrics like these with composition of polyamides facilitate filament adhesion:
Synthetic:
- Polyester
- Nylon
- Elastane
- Spandex
- Tulle
- Mesh tricot
Natural:
- Viscose
- Rayon
- Lyocell
- Tencel
- Modal
- Organza
- Muslin
And stretchy fabrics are helpful for creating dynamic textures with the filament lines.
Here is an interesting video on auxetic structures:
TIPS
- If the first line works out the rest of the print probably will too
- Better to make all adjustments on the file rather than on the printer screen
- Use hairspray on the bed to increase sticking
- Clip fabric on the machine bed to make it flat and stable
- To create flexible patterns it is best to work with a single line design
- Make sure the warp and weft is horizontal and vertical in line with the bed
- Move the bed after laying the fabric to make sure it doesn’t get stuck in any places
- Too high of printer temperature can create bubbles - aim low on the temp
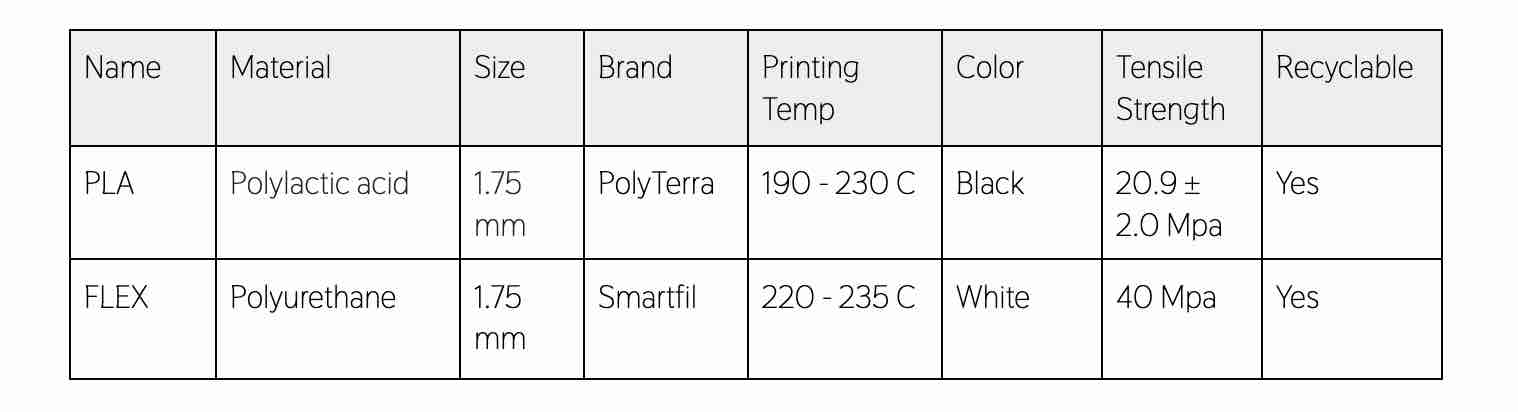
Materials
Here are some popular materials for 3D printing. Although developments are made every day to stray away from plastic and work with materials like wood, glass, hydrogels, advanced polymers, nanoparticles, ceramics, graphene composites, and other biomaterials.
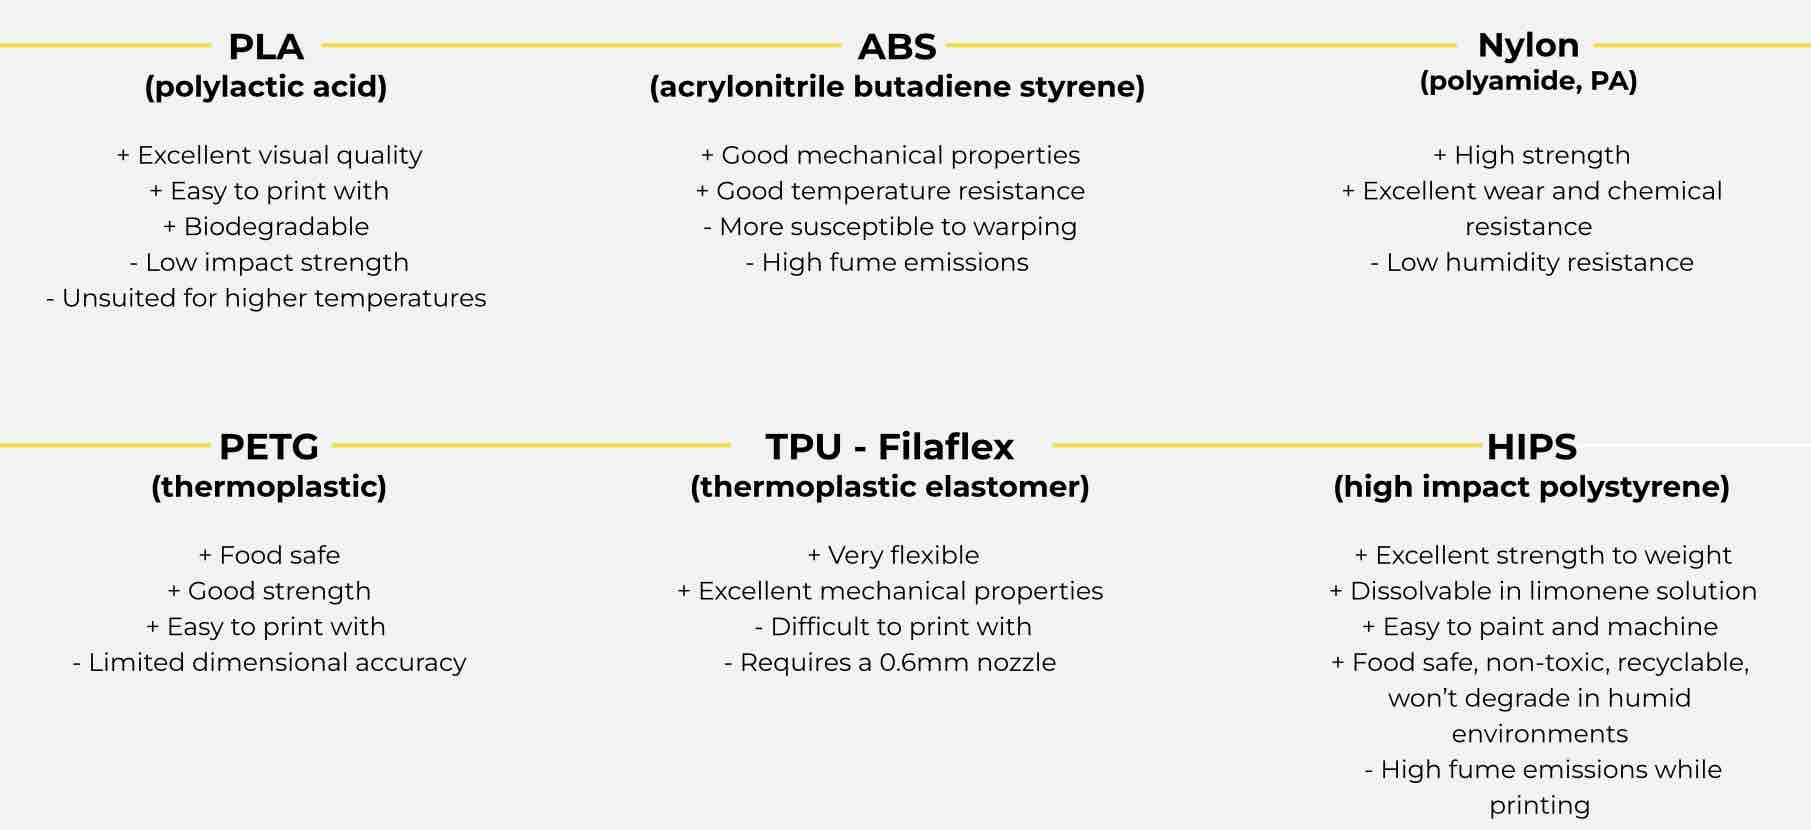
We have two materials available here at Fab Lab BCN: Smartfil Flex and PolyTerra PLA
Learning Grasshopper
Grasshopper is a visual programming language and environment that runs within Rhino. It is a tool for algorithmic modeling, specifically used for designing and editing complex shapes through certain parameters. In a way I understand: it's a program with little boxes that represent shapes in Rhino, changes for the shapes, and numerical data. You can sort the boxes into pathways and then set parameters to control the shapes and changes. It is great for making repeating patterns and initiating some kind of rule for the shape(s) with just a simple toggle rather then a ton of modeling work in Rhino. Each box has an input side on the left and an output side on the right.
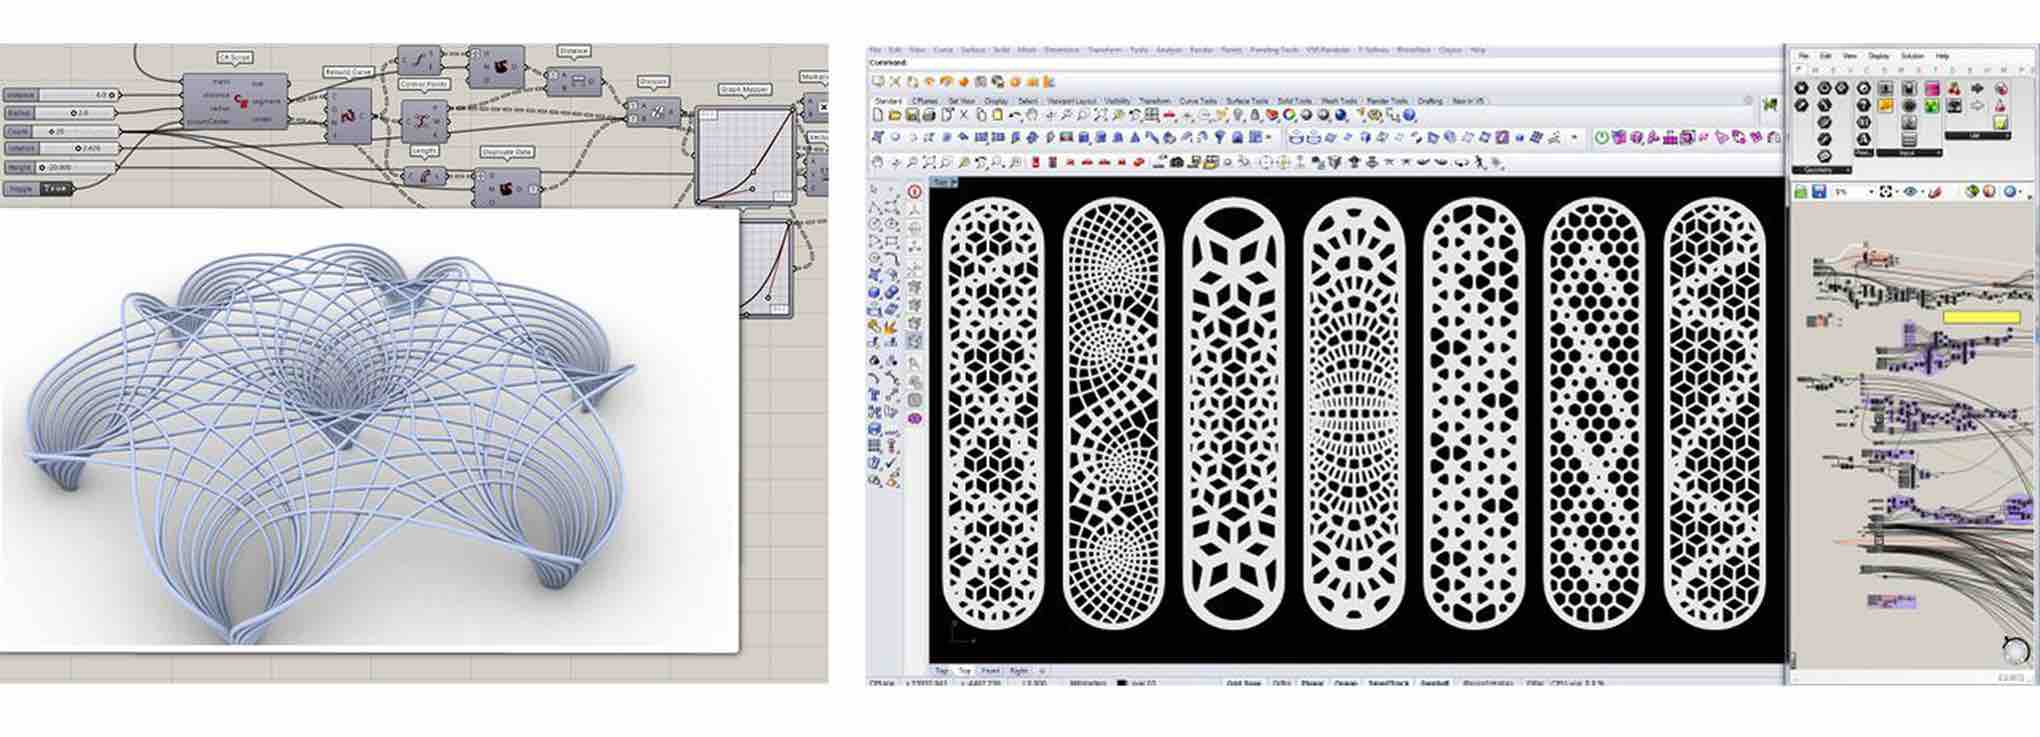 Examples of modeling with grasshopper (source left) and (source right).
Grasshopper Plugins
Process and Workflow
Step 1 - Concept and Sketches
Chandini plates are named from the German physicist and musician Ernst Chladni's work with sound wave - imageryin the late 18th century. He explored how sand would settle into patterns on a metal plate depending on the frequencies of the sound waves produced by his violin bow. In the 1960s, a Swiss physician named Hans Jenny further studied Chladni’s experiments and named the research “cymatics.” (source)
He wrote:
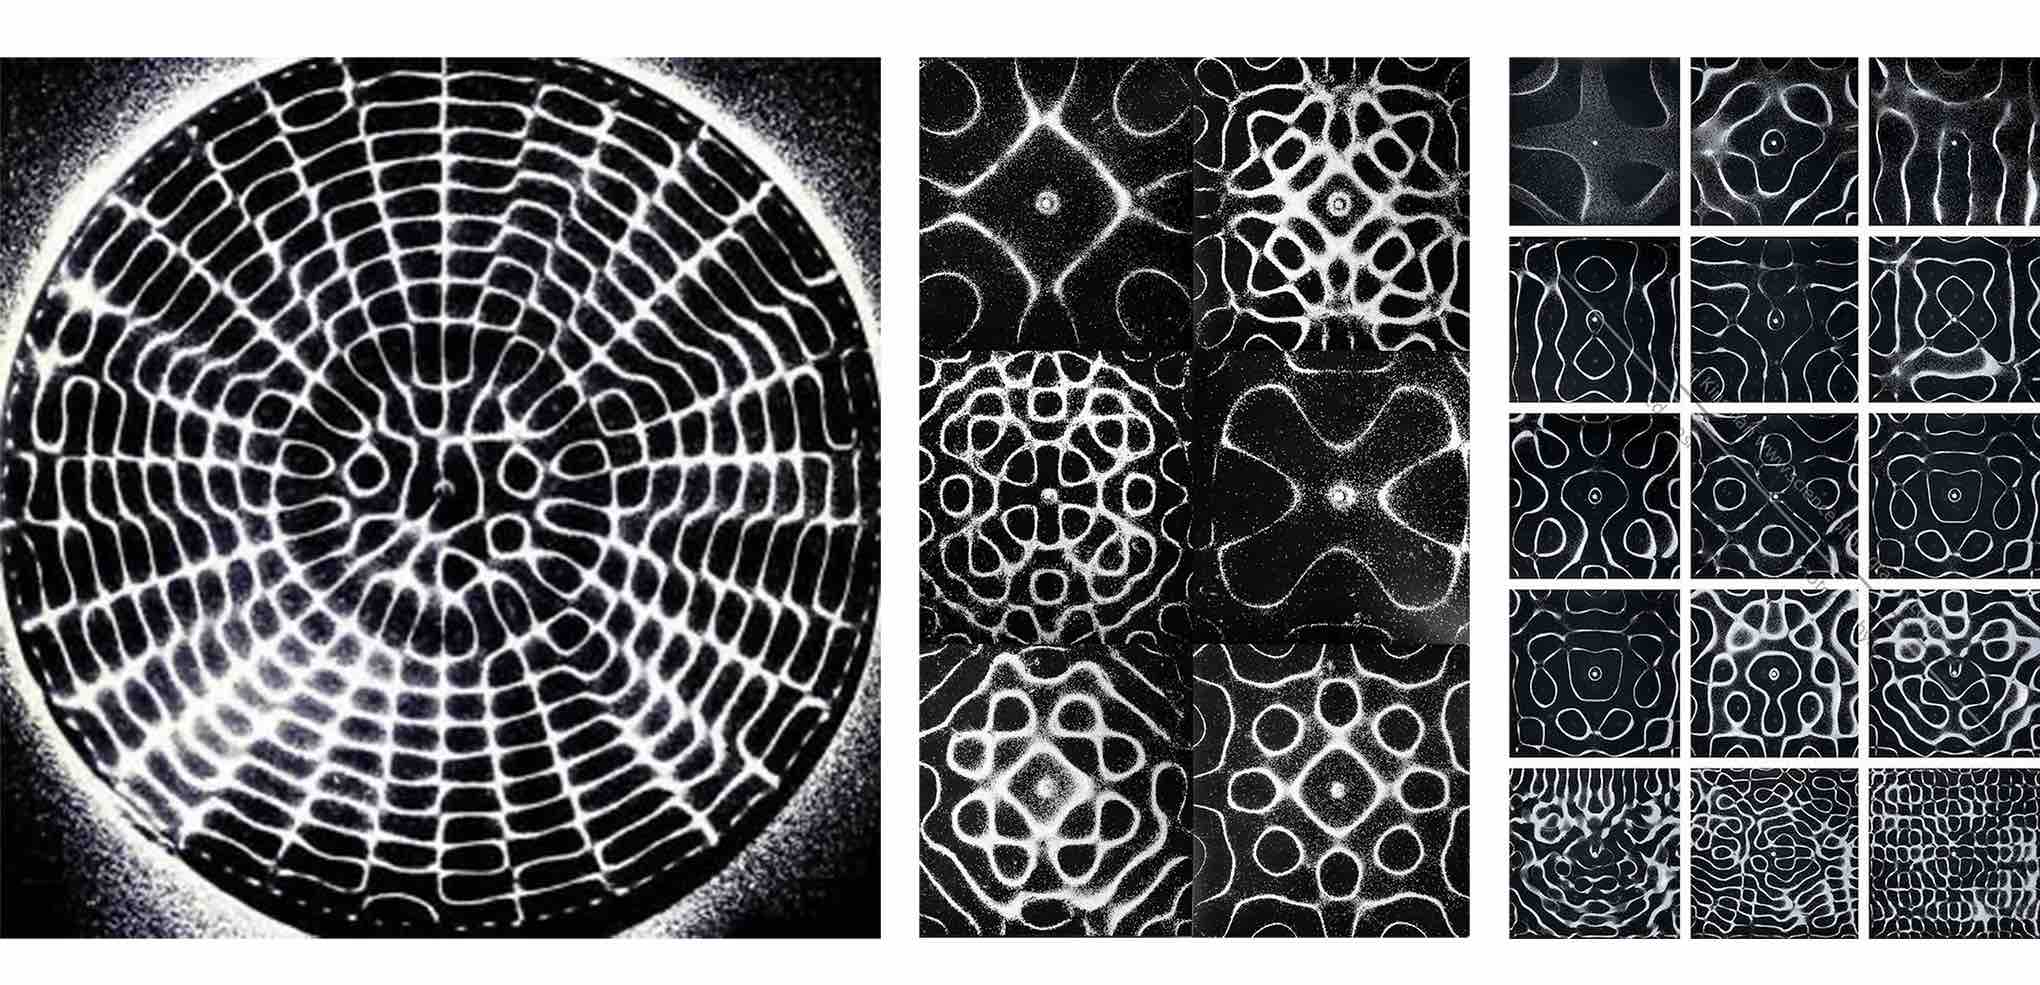
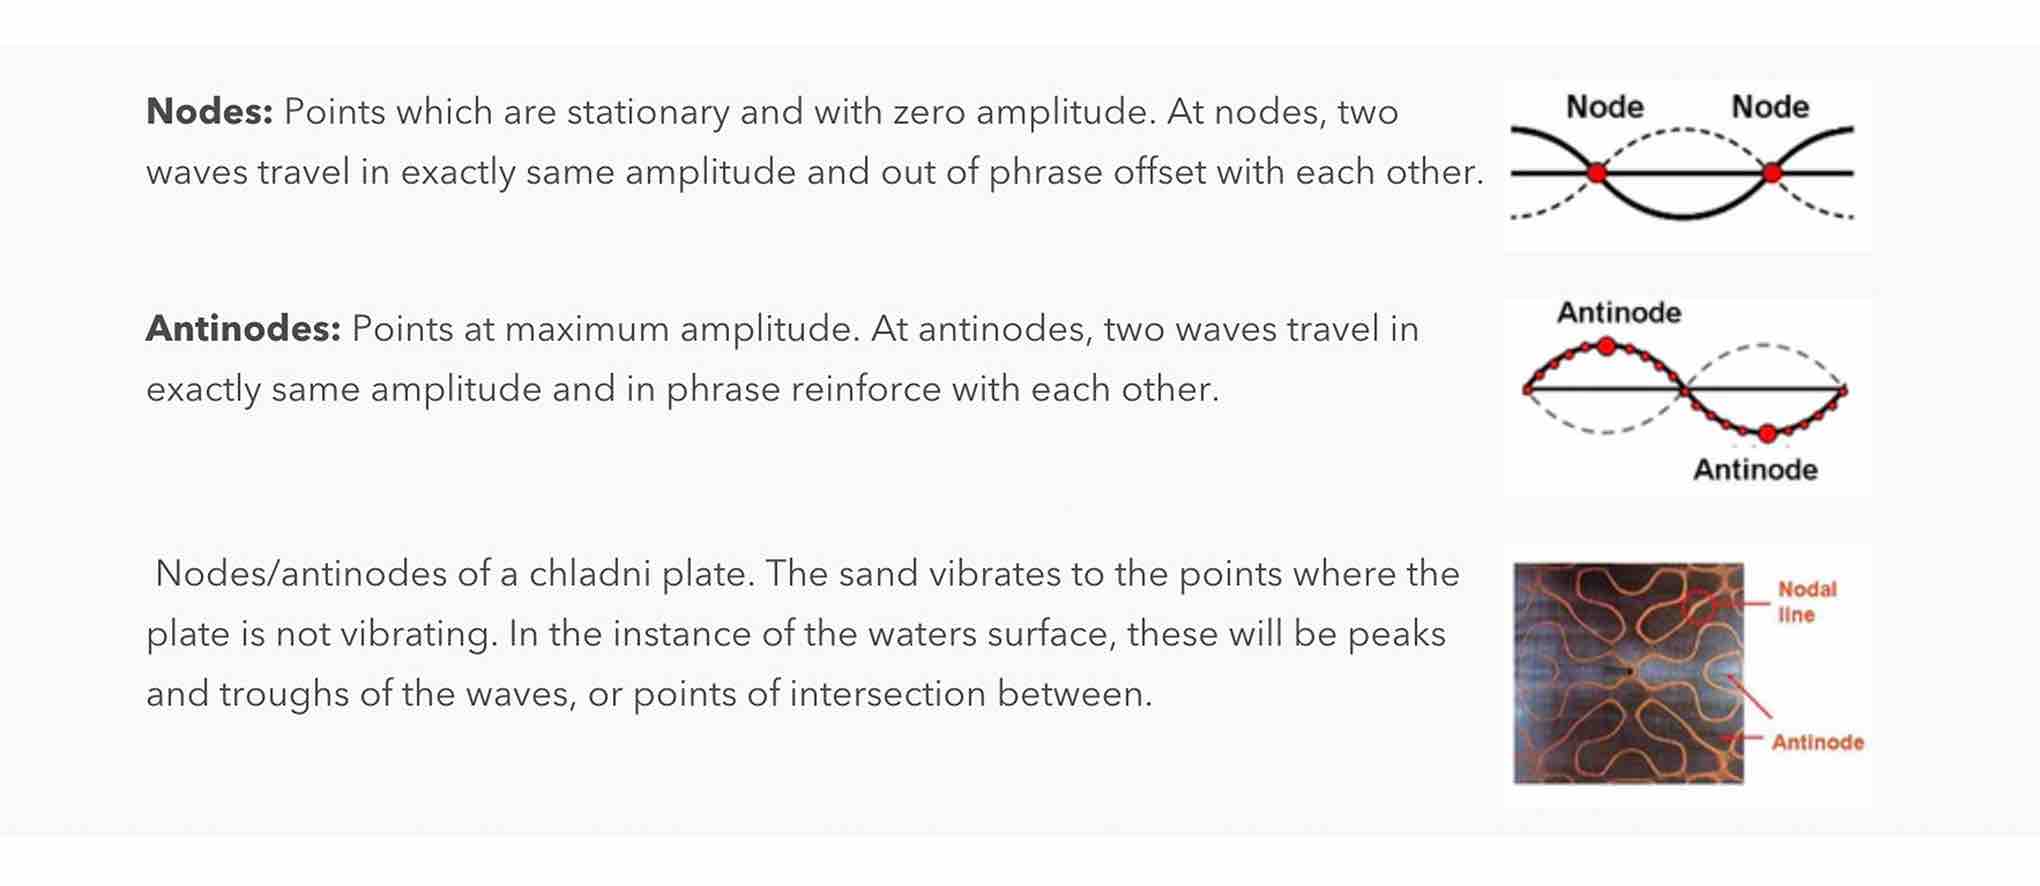
The shapes are results of transverse waves. The ends of the dish become like reflectors as the wave radiates from the center of the surface as a surface wave. This creates nodes and antinodes (behaviour of the waves at the points of minimum and maximum vibrations) (source)
 (image source)
Similar example by Stanford using heart cells:
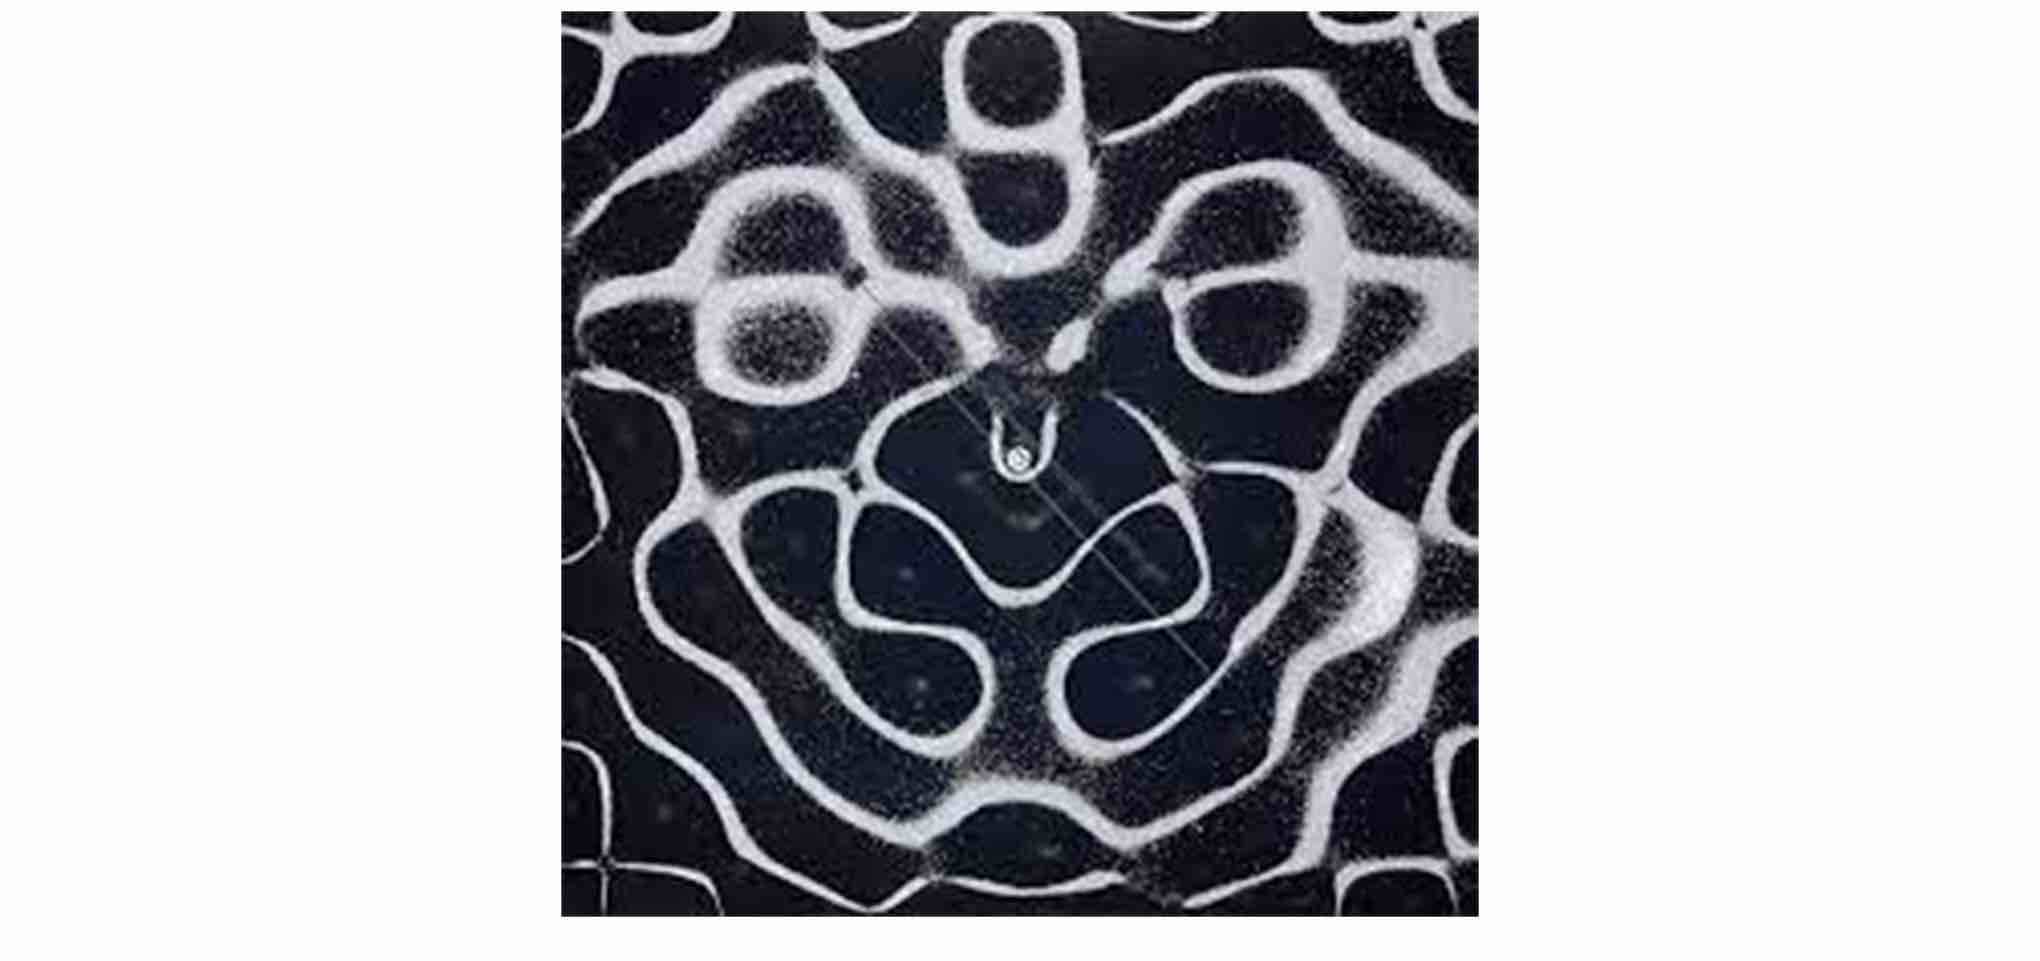
The study interests me because it is a beautiful intersection of art and sceince. It helped us better understand about how matter reacts with sound and the overall vibrational nature of our universe. I settled on this design to use for my sketch inspiration because I was interested in the horizontal asymetry and the trinity of circular shapes in the top half.
Step 2 - Modeling in Rhino and Grasshopper
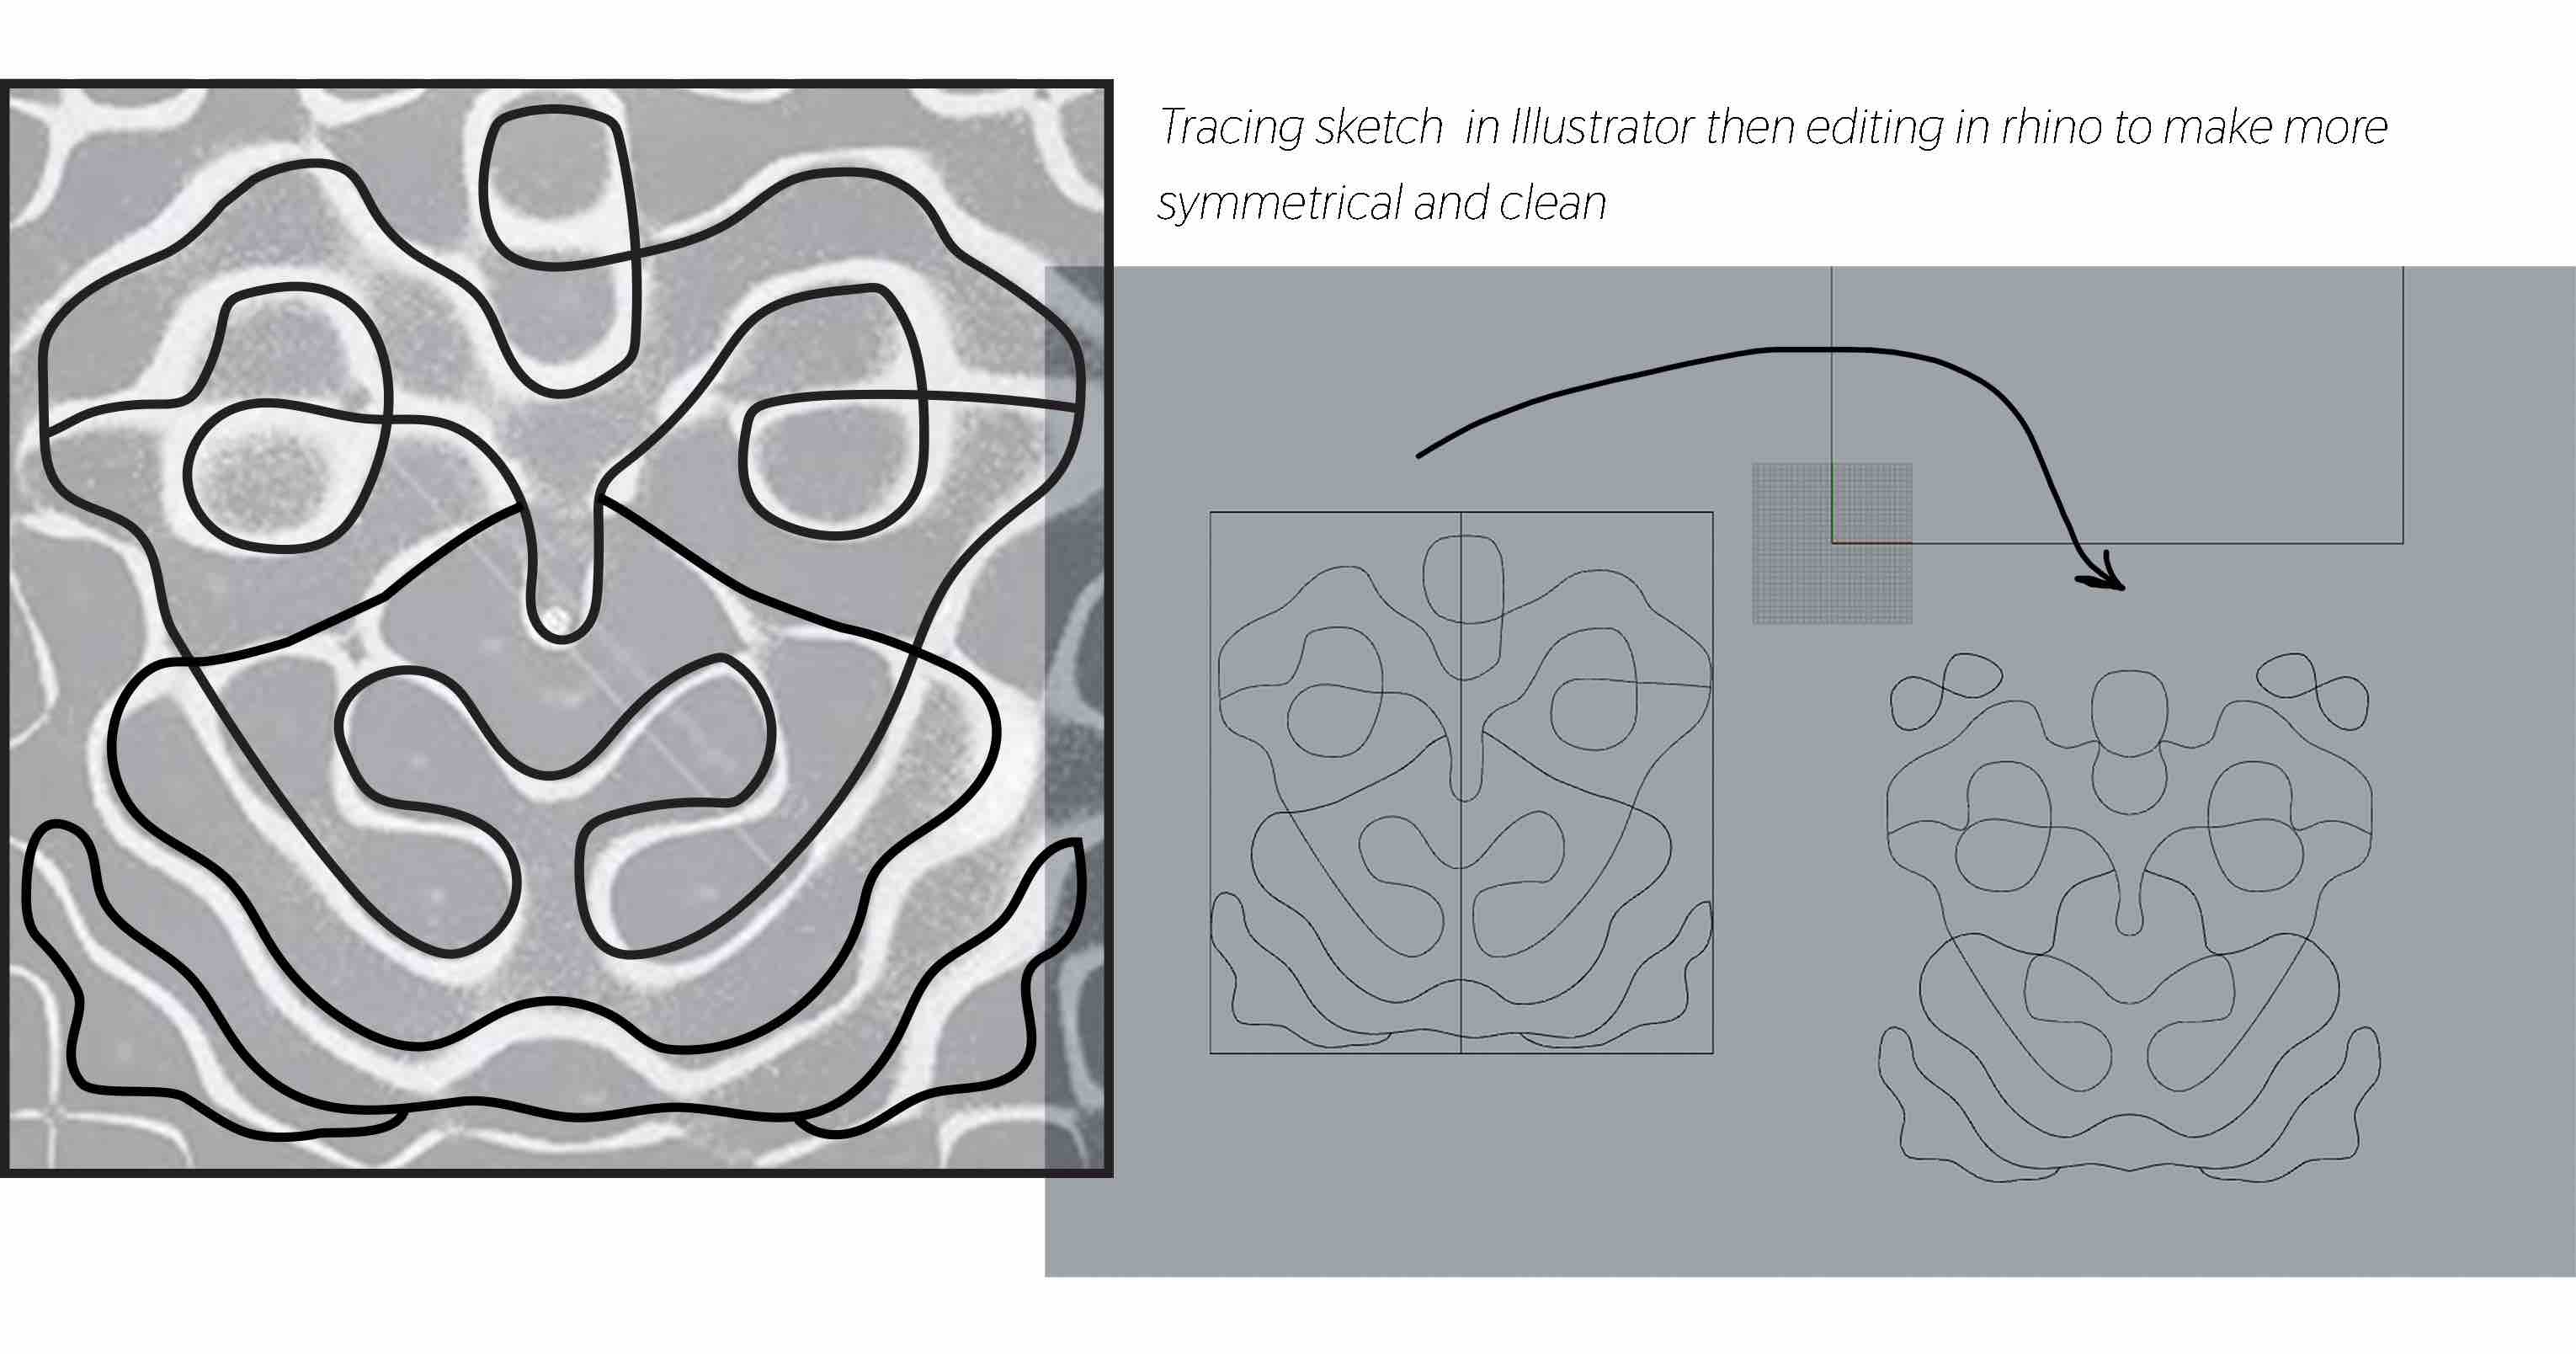
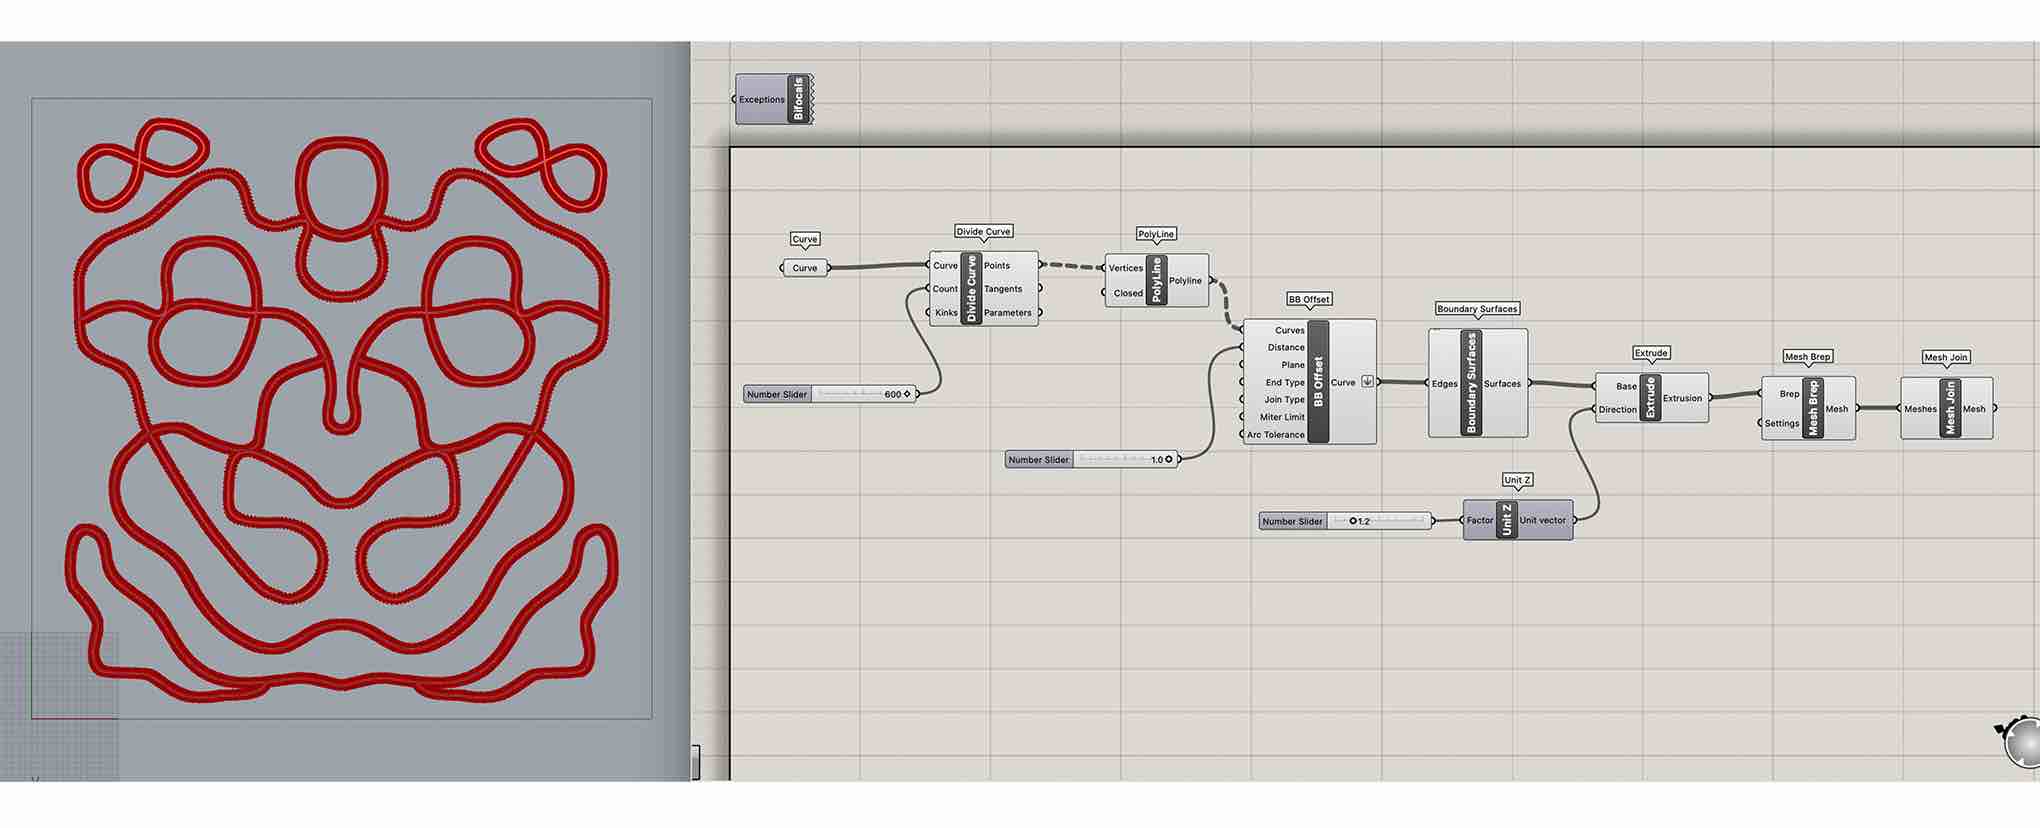
Using grasshopper I needed to make the curve thicker and extruded and then turn it into a mesh. These were the steps:
- Divide the curve and turn it into a Polyline - because of the organic looping shape it is hard to offset it in one direction
- Use BB Offset to offset the Polyline
- Use Boundary Surface to fill the space between the offset and line
- Extrude it in the z direction, on a multiple of 0.2
- Turn it into a mesh using Mesh Brep
- Use the Panel box connected to the extrusion output to make sure the mesh is closed and ready to export
- Bake to realize the shape in Rhino
- Select just the mesh in Rhino and export as an STL
And this is what I came away with at first:
Troubleshooting
I was struggling with a problem of making a closed Polyline from one curve because it kept leaving an open space between points.
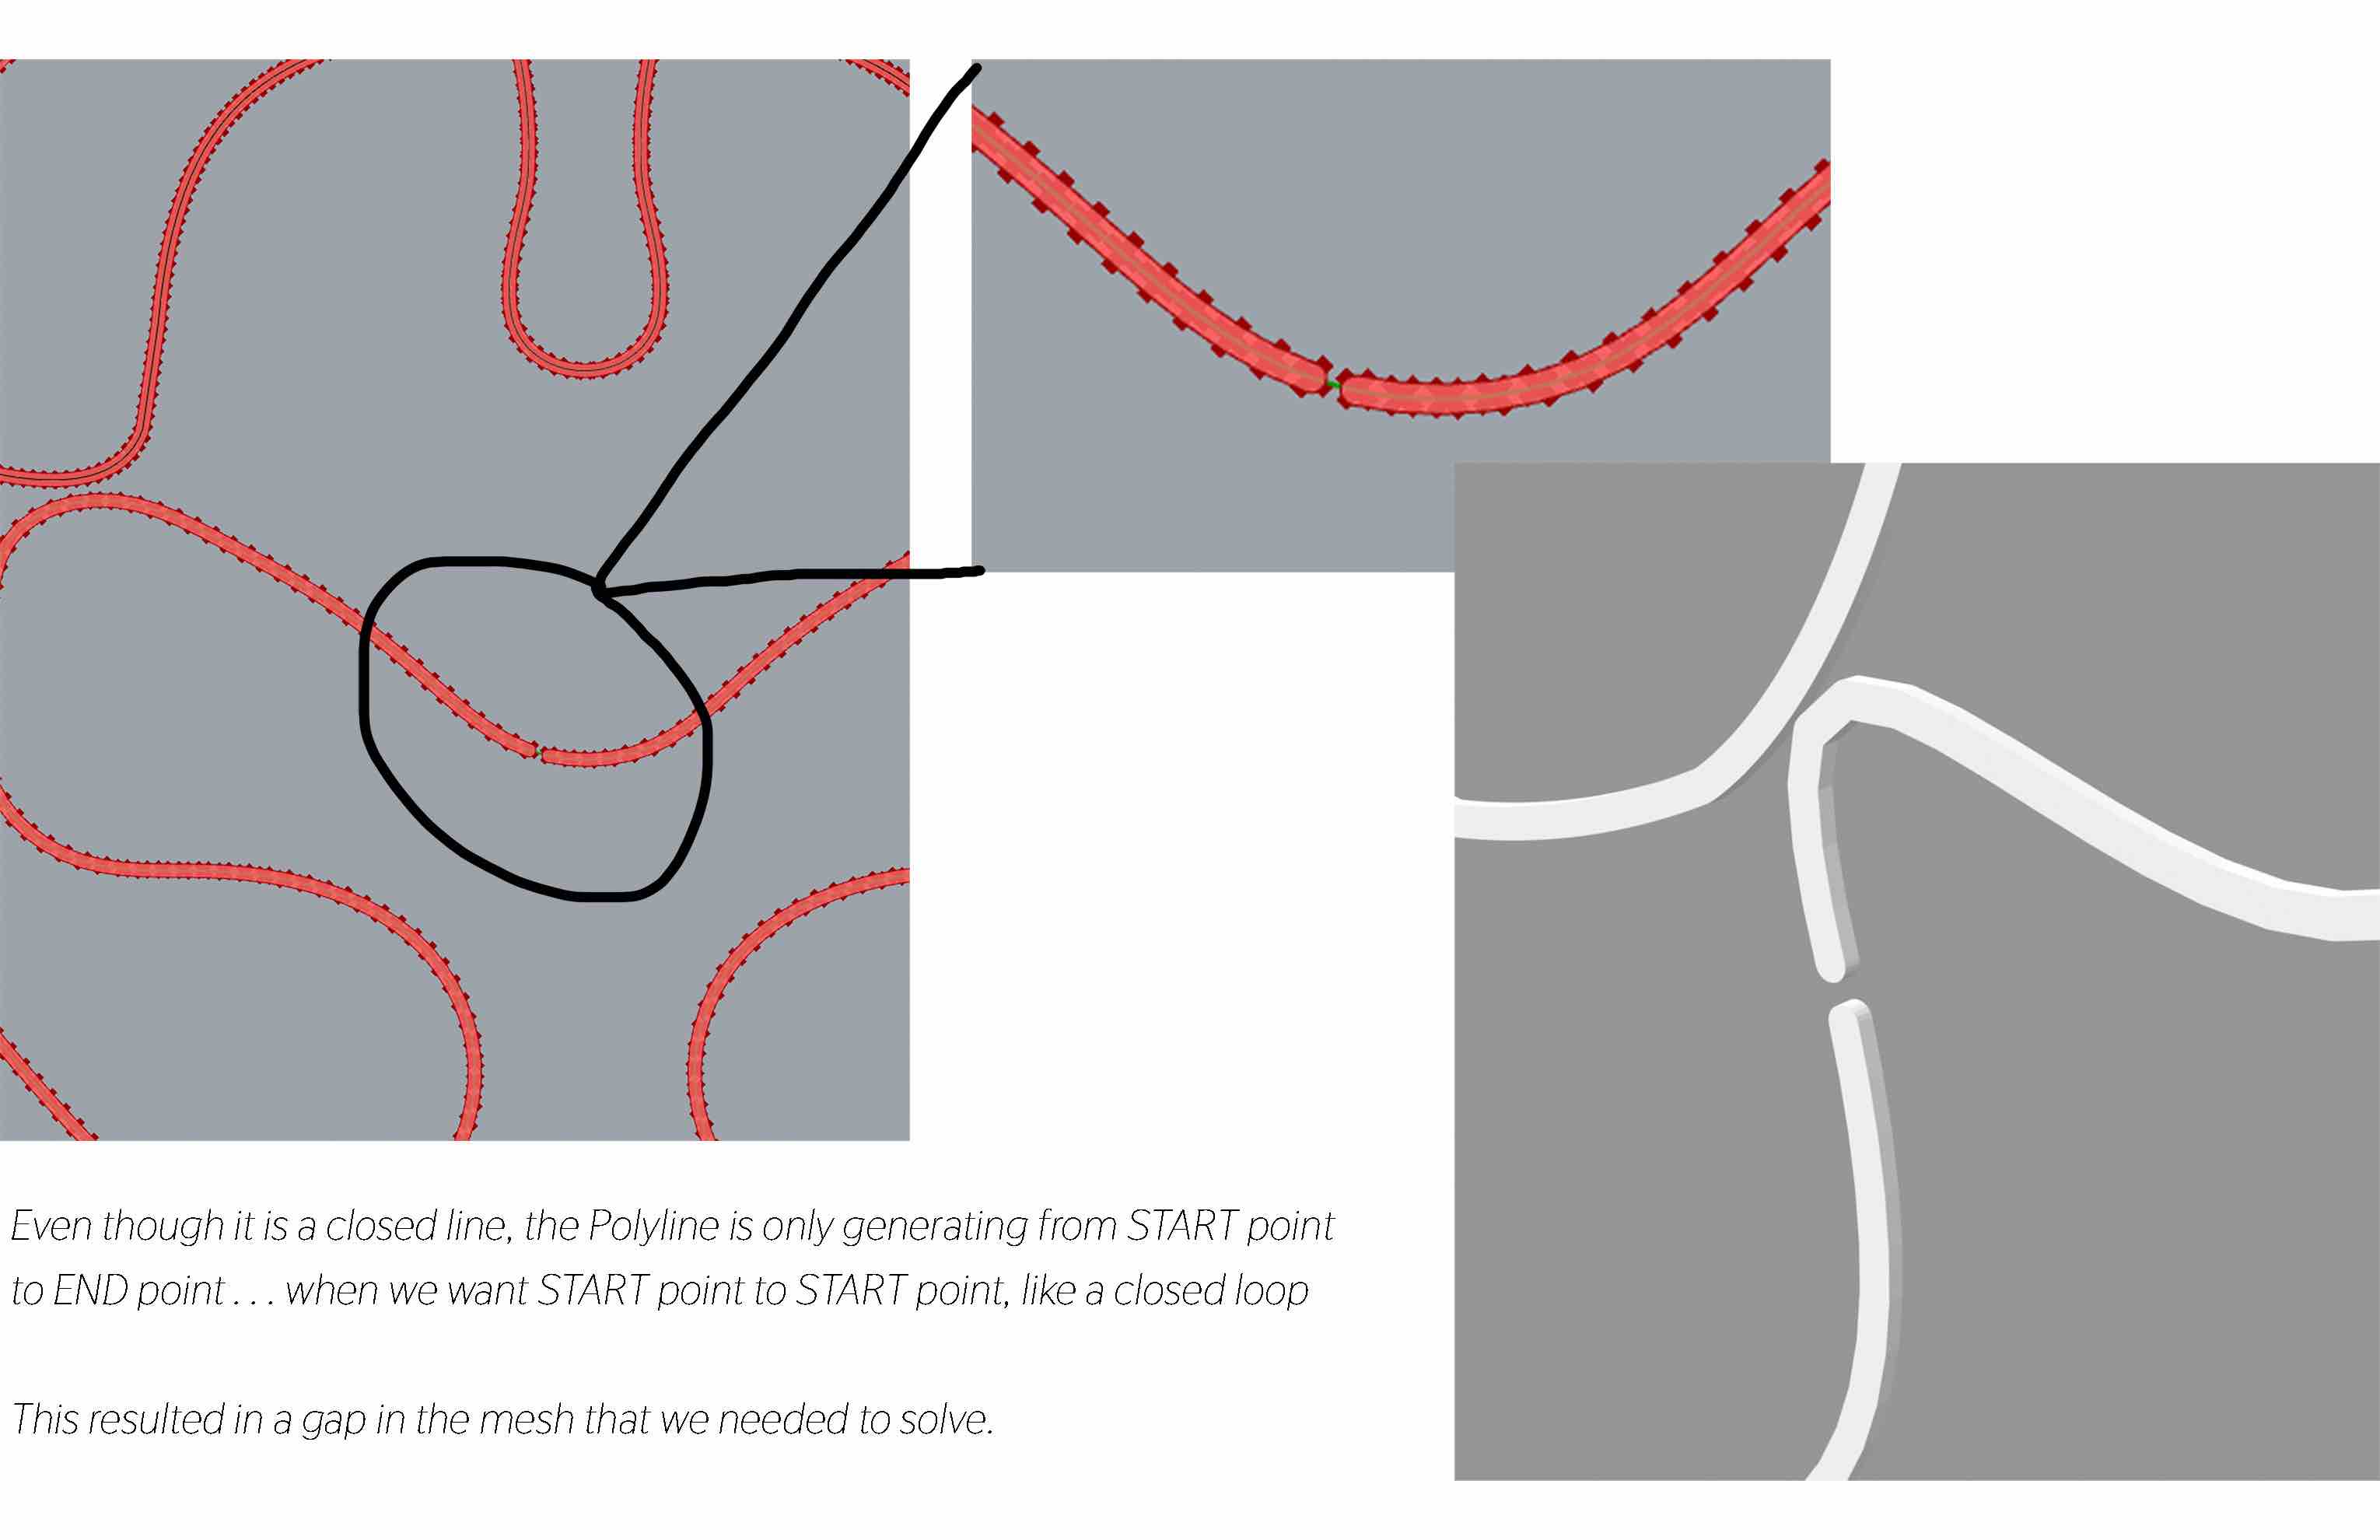 After many tests, we solved the issue by using Shift list instead of the Polyline because it creates a line from "start" point to "start" point instead of "start point" to "end" point.
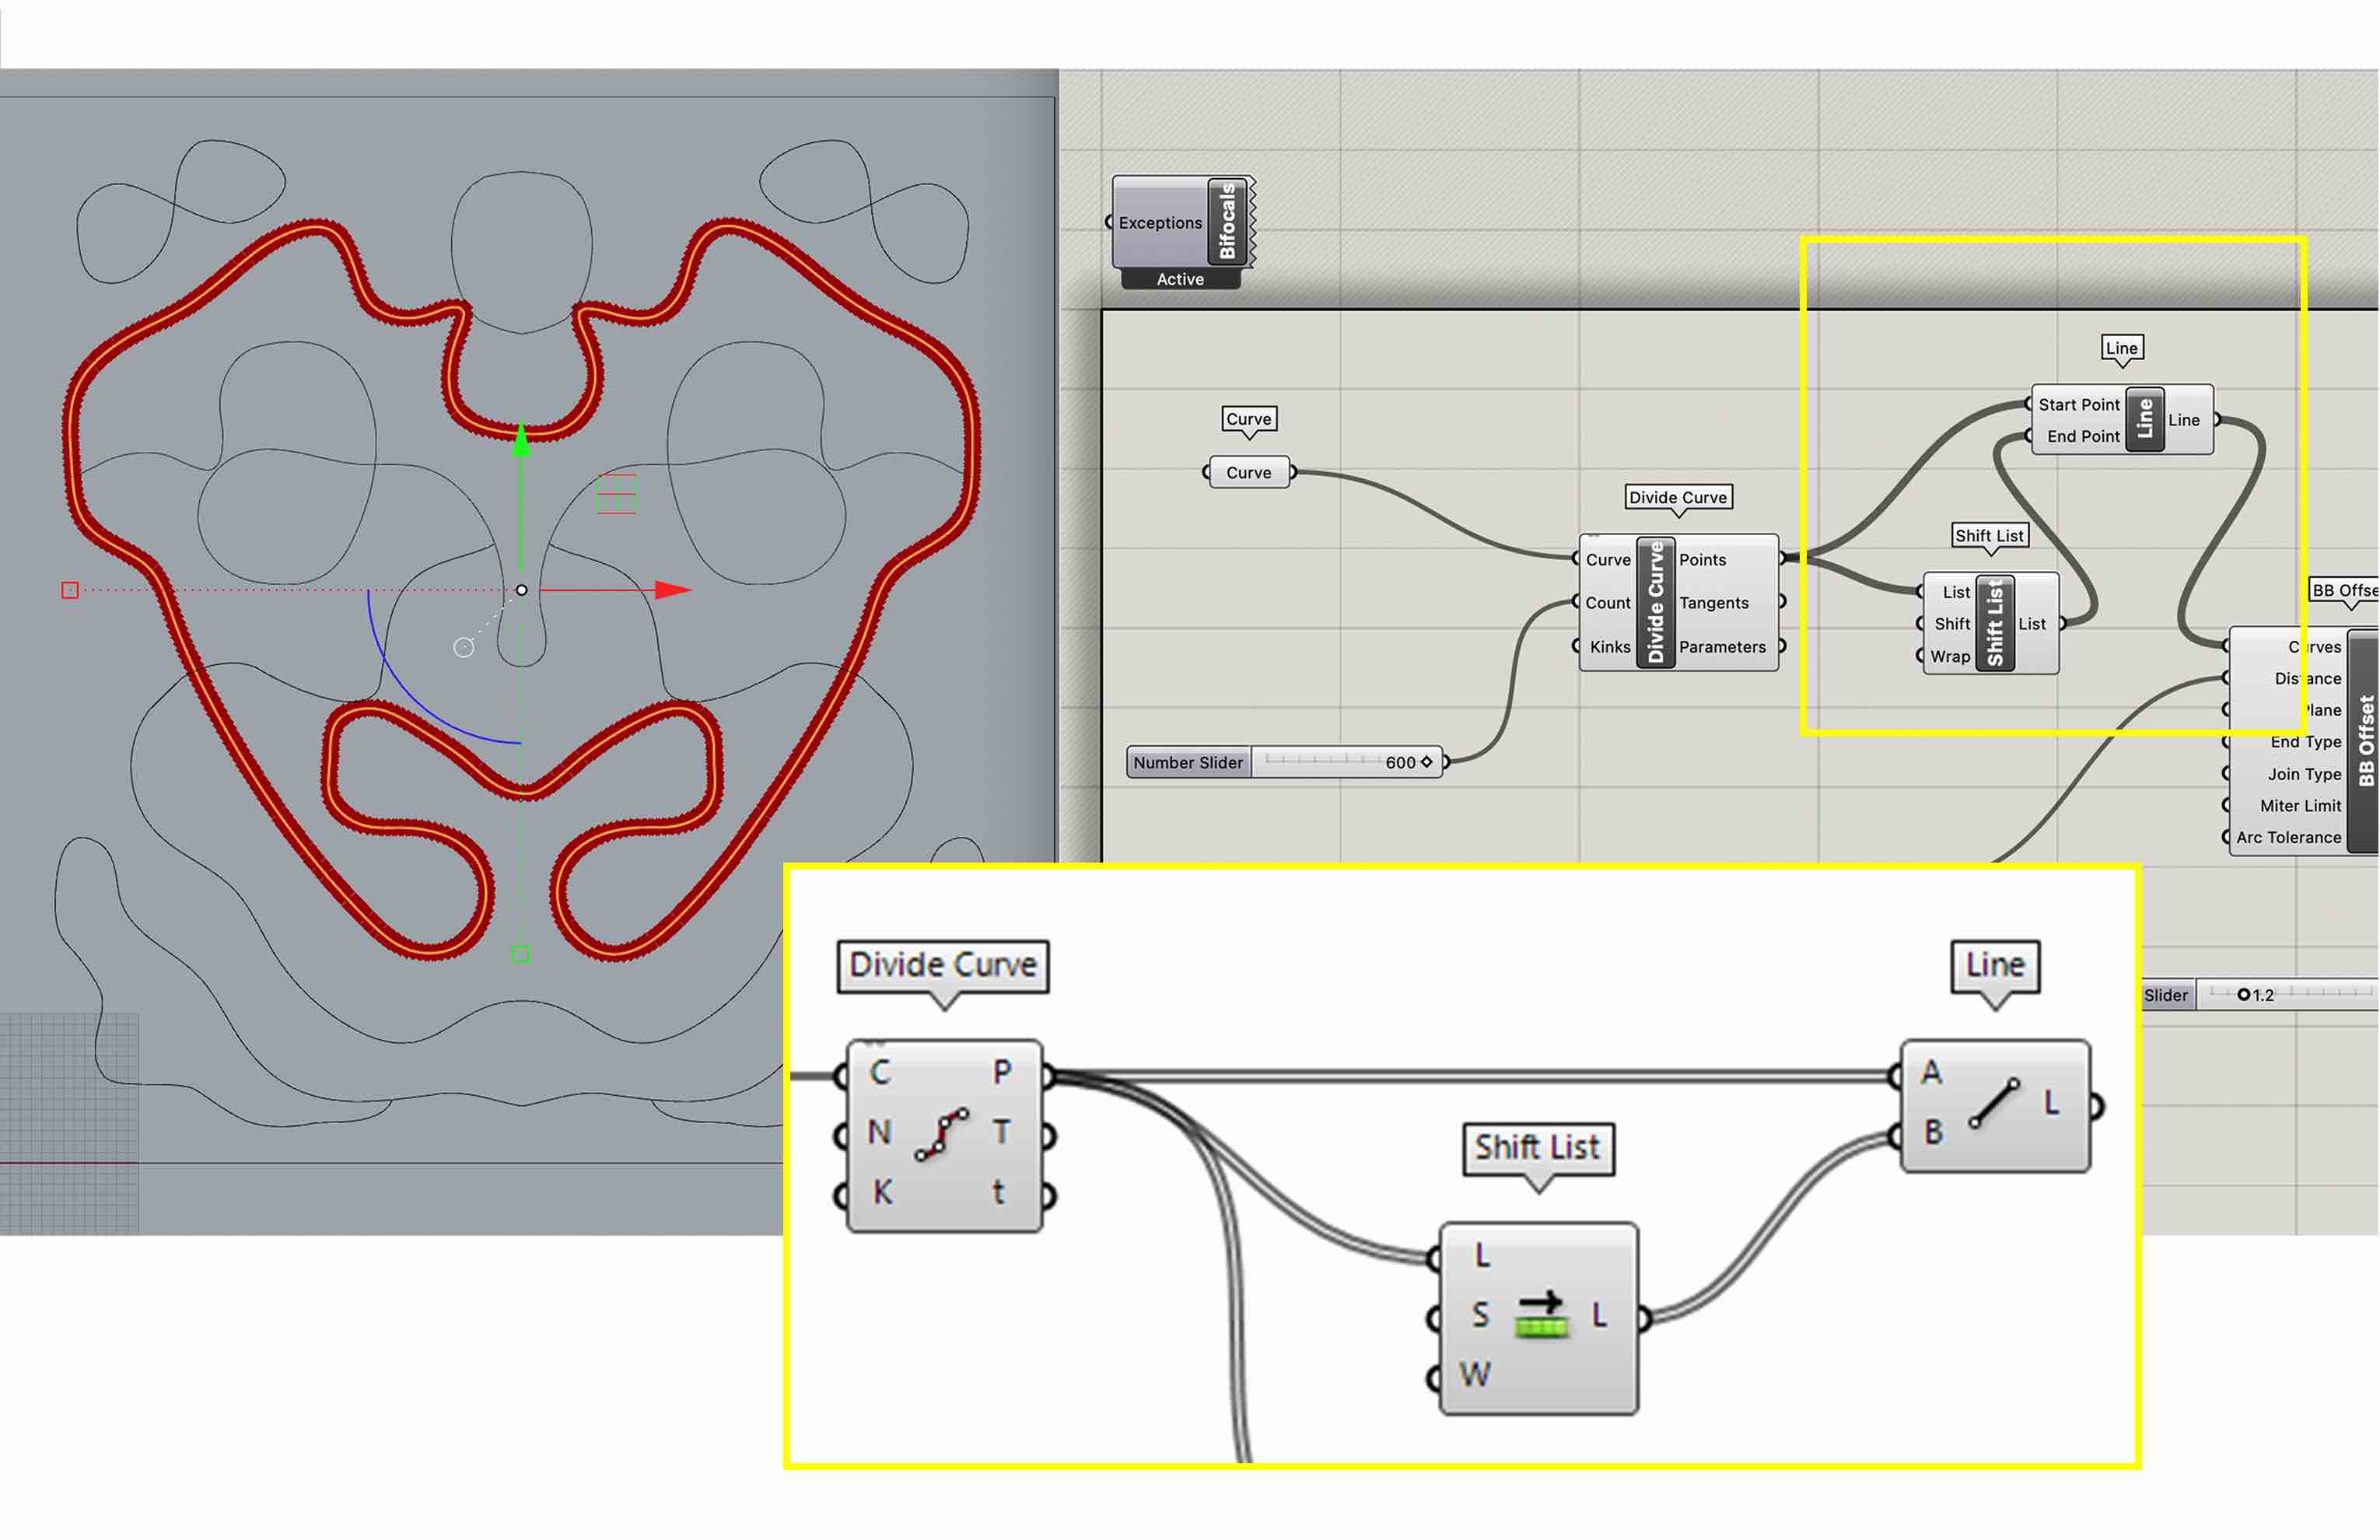
For the rest of the cuves I could use Polyline just fine so the final grasshopper model looks like this: 2
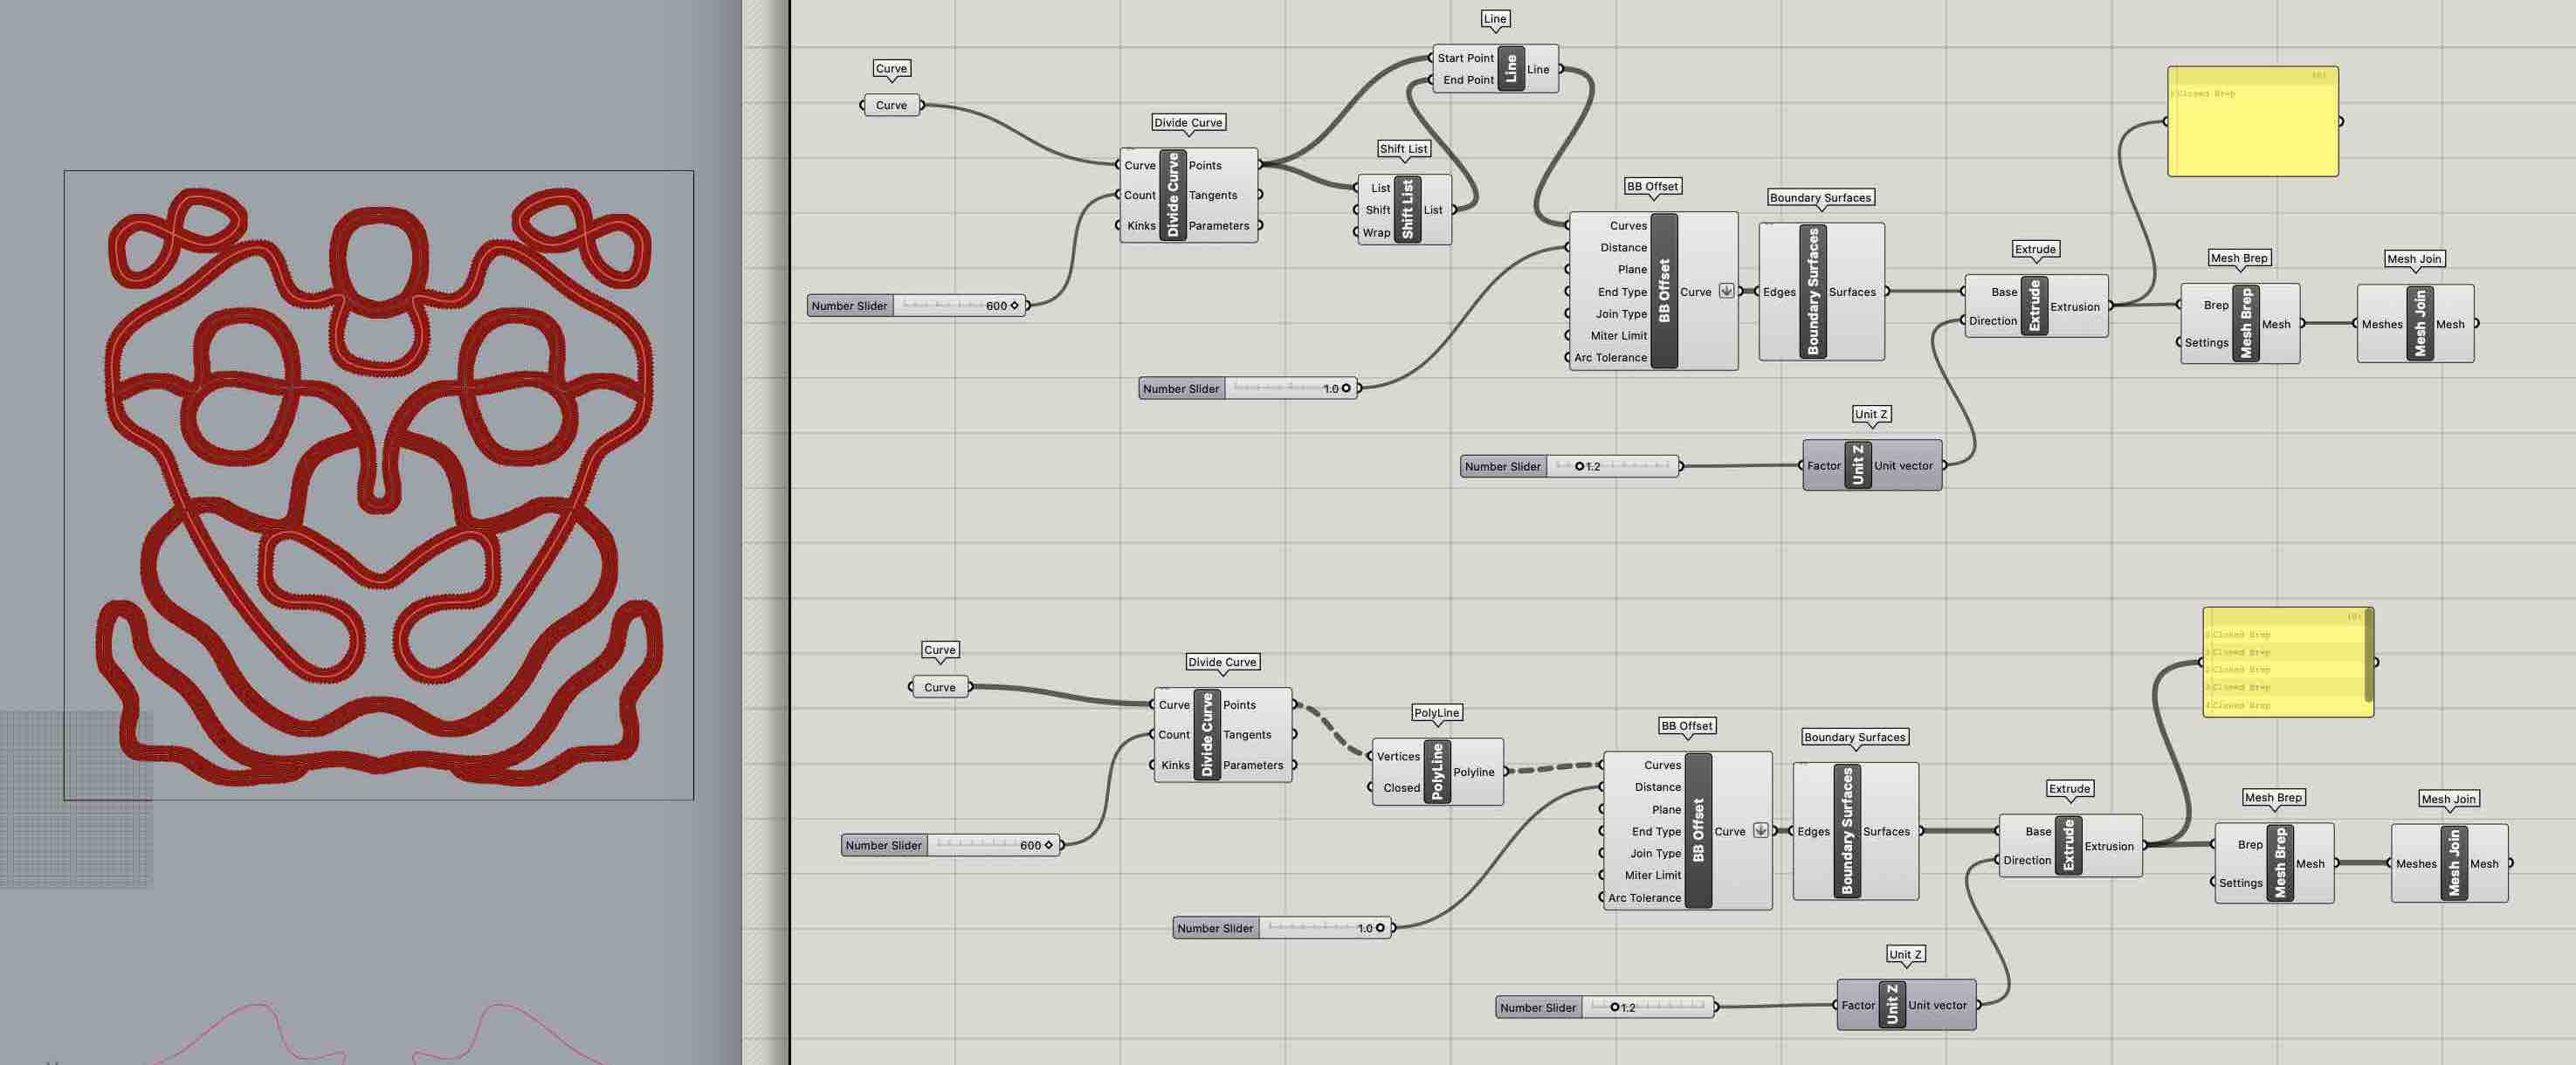
And the final mesh looks like this 1
Step 3 - 3D Printing
Troubleshooting
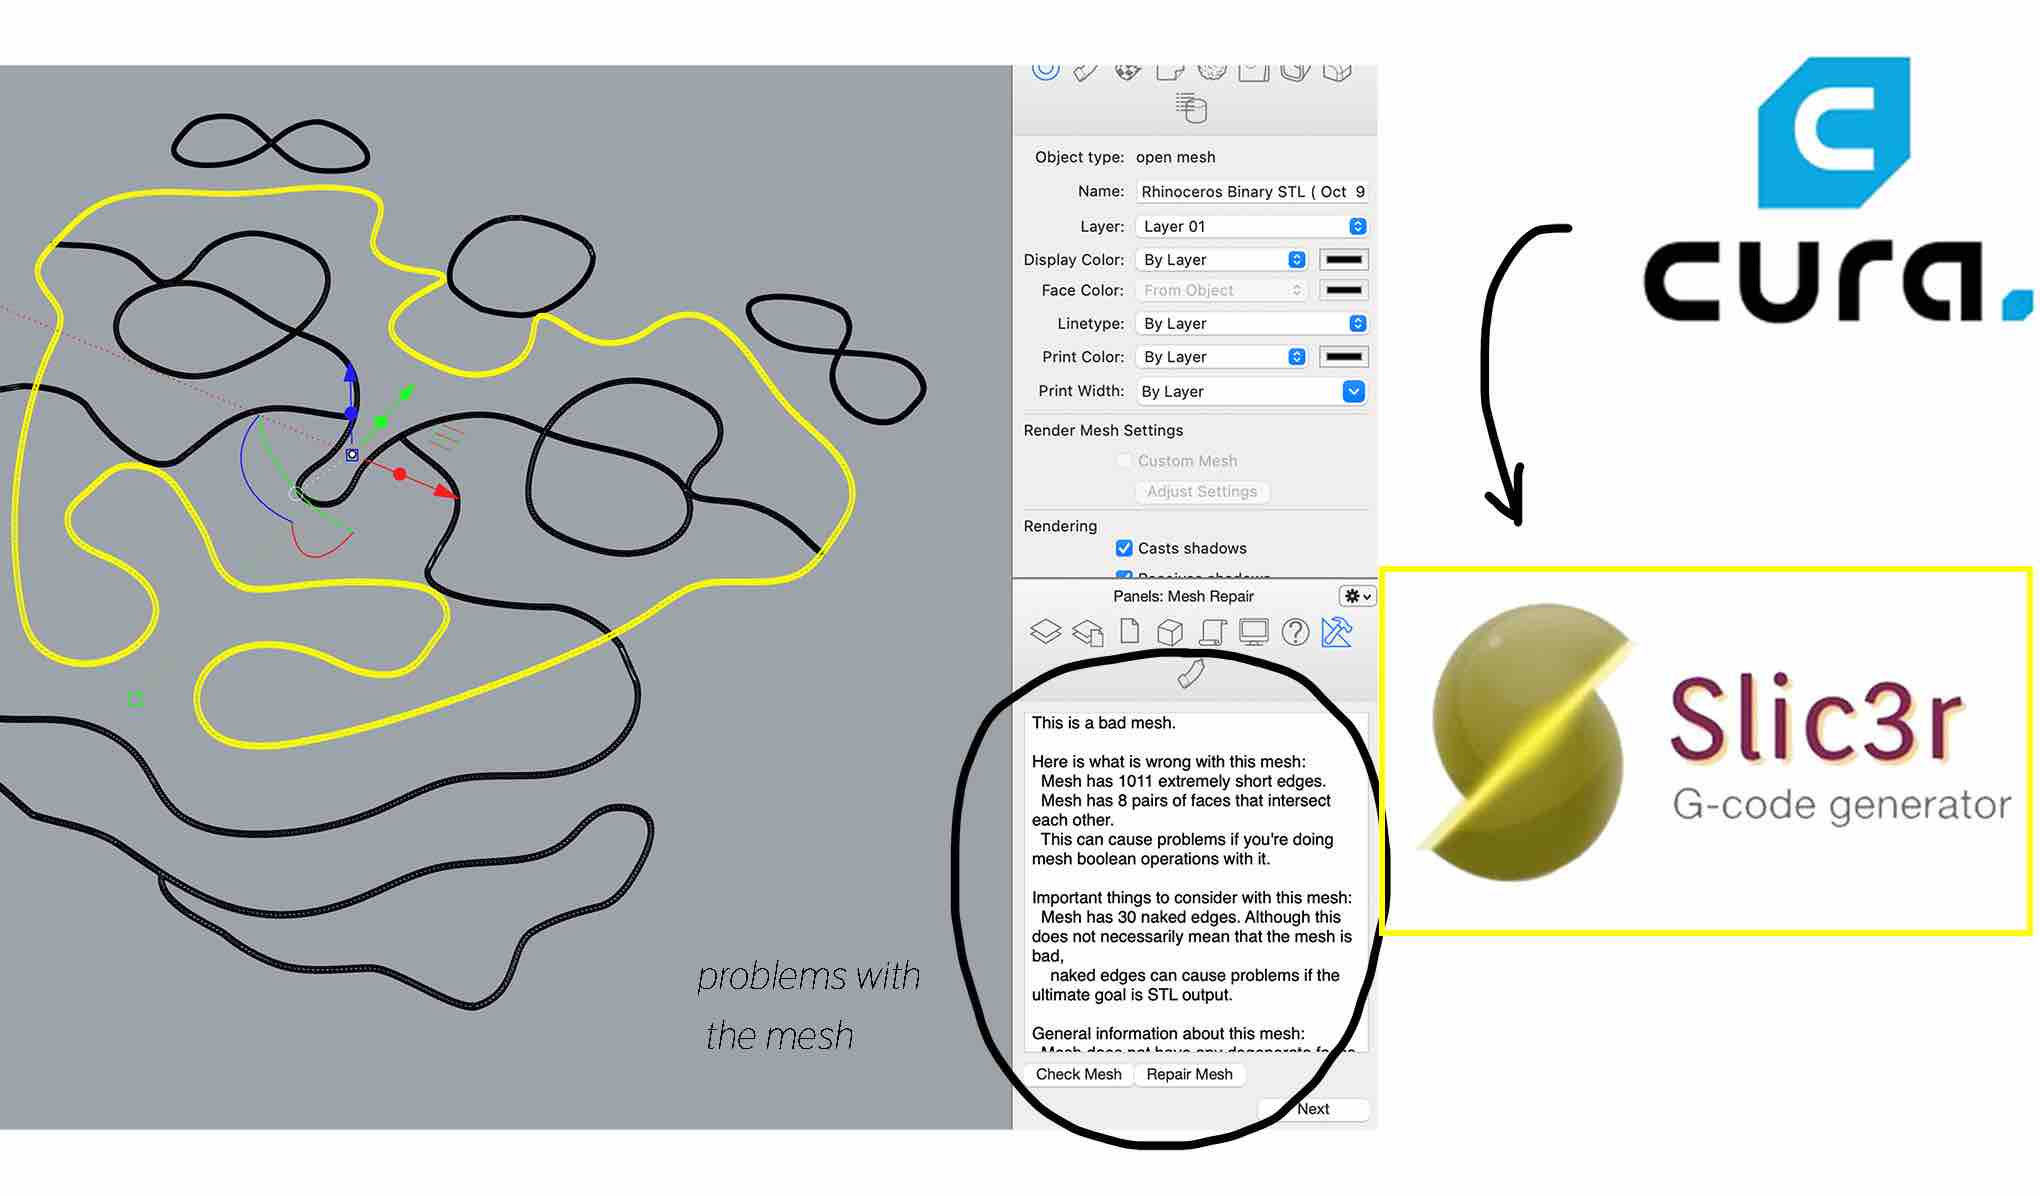
We were having issues with slicing my file with Cura and we found out there was an issue with the mesh. Even after fixing the issue in Rhino (or so it seemed) Cura still refused to slice. We tried using Slicer instead and it worked out fine.
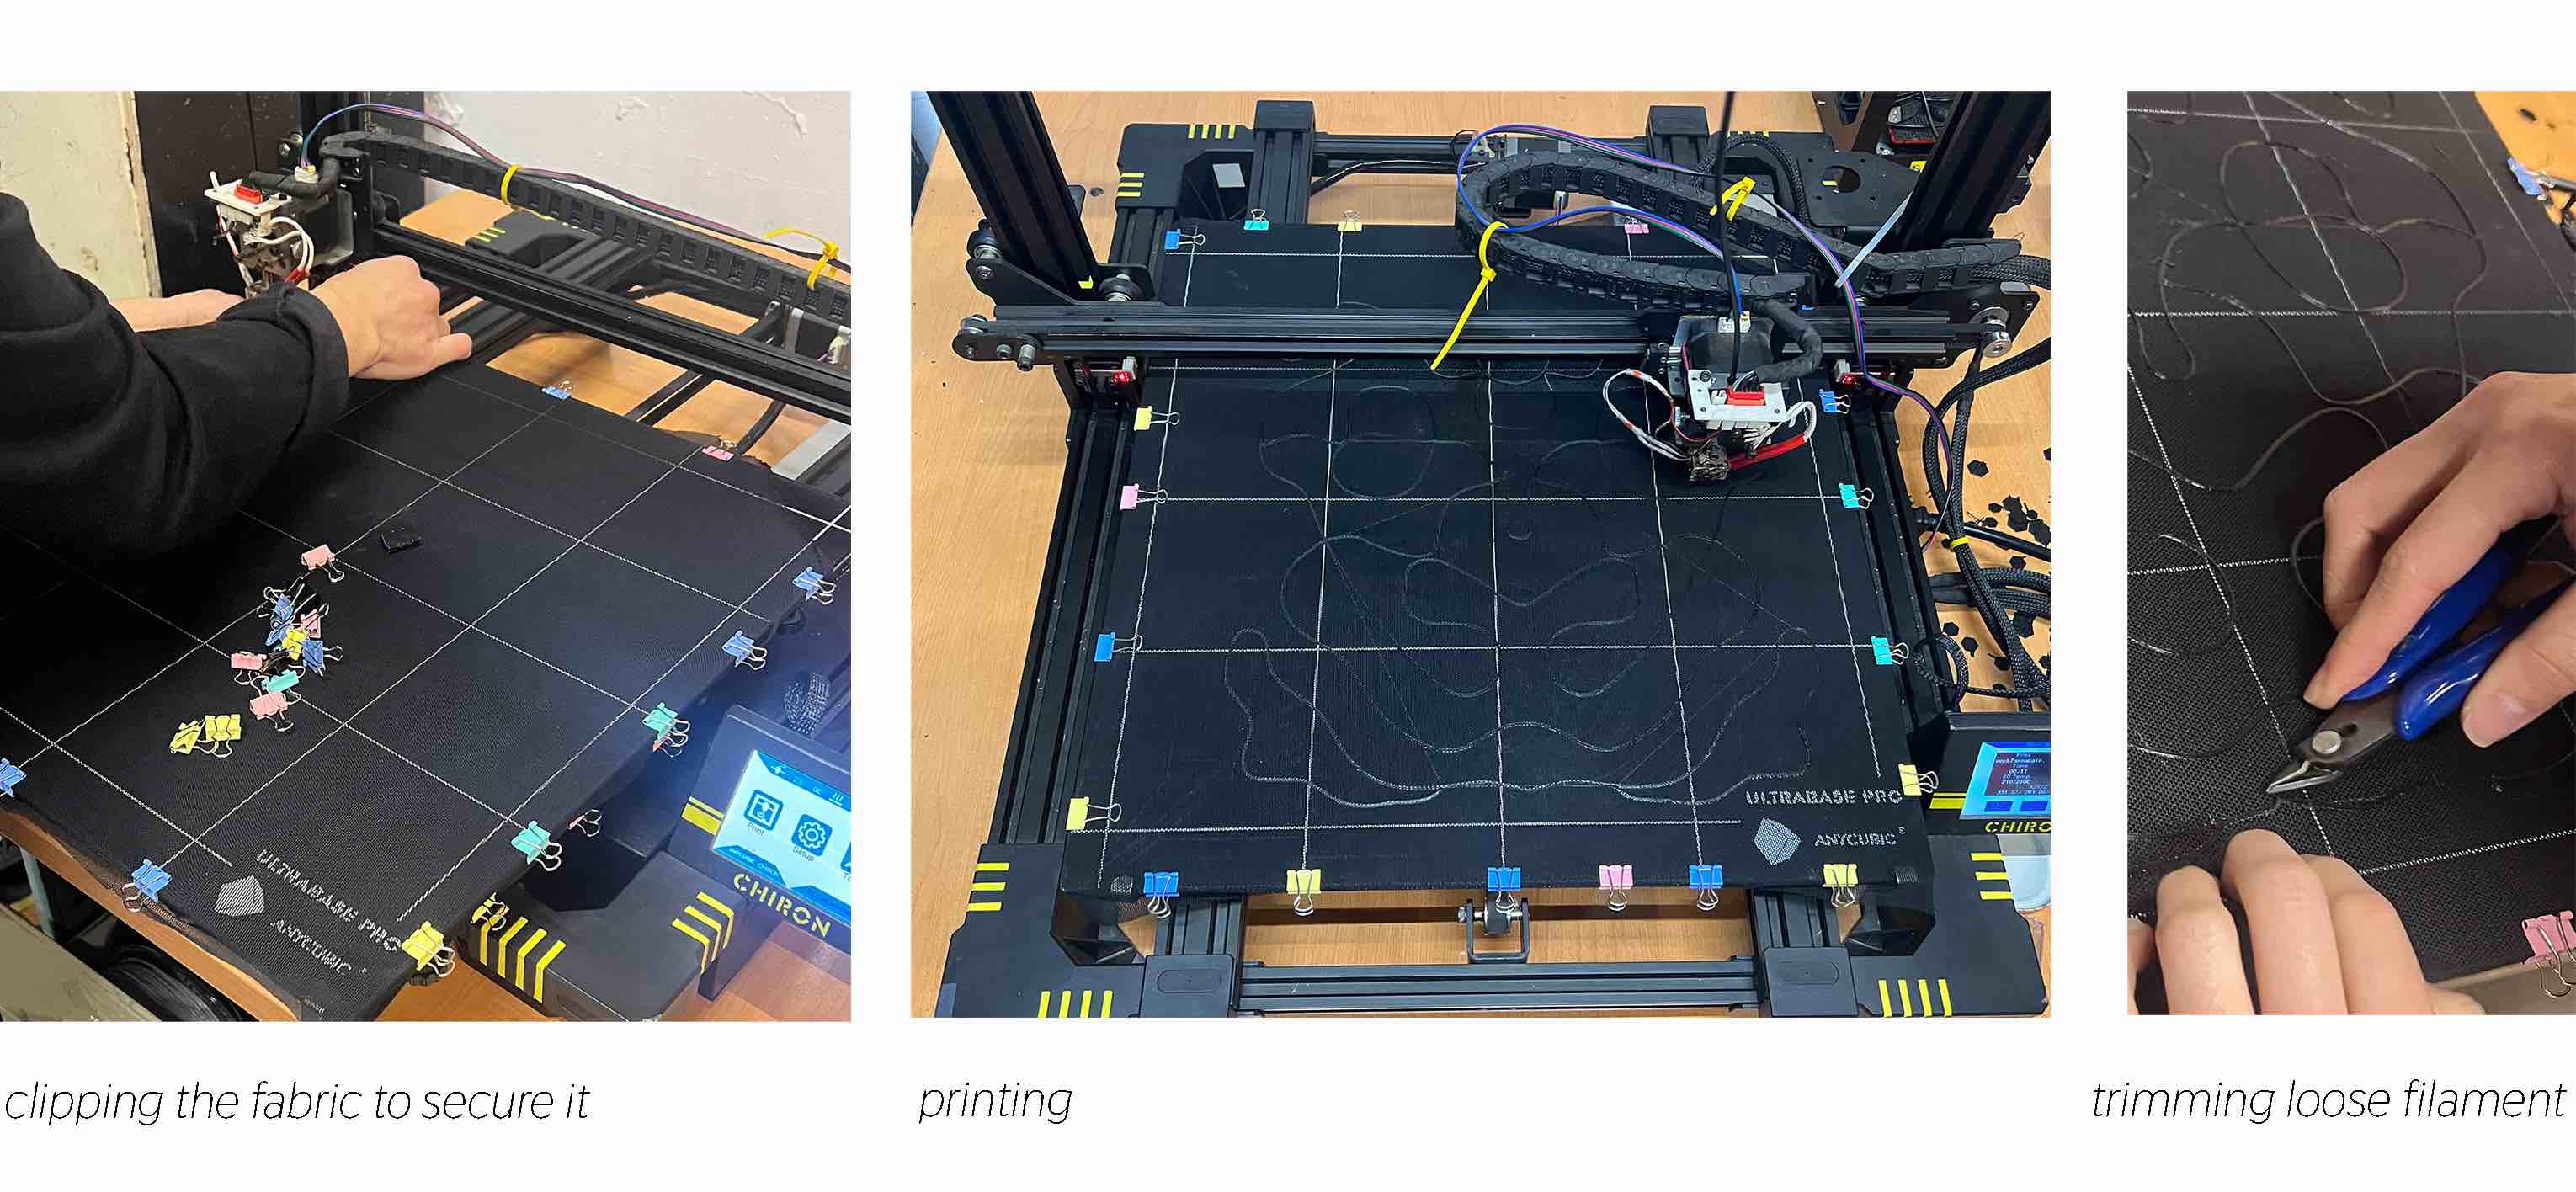
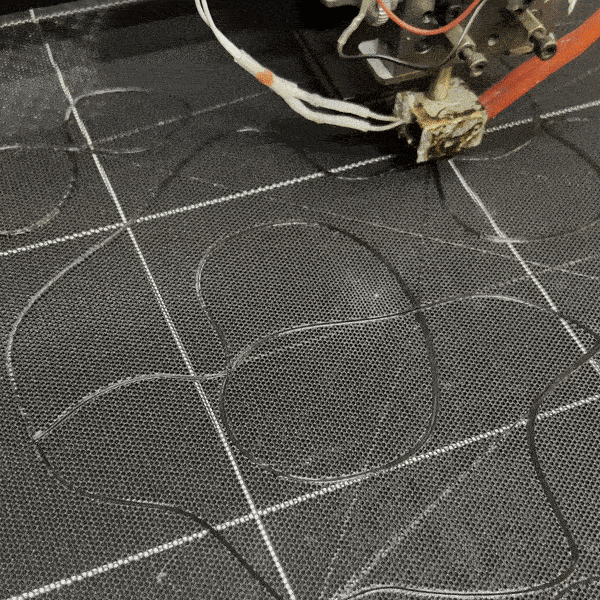
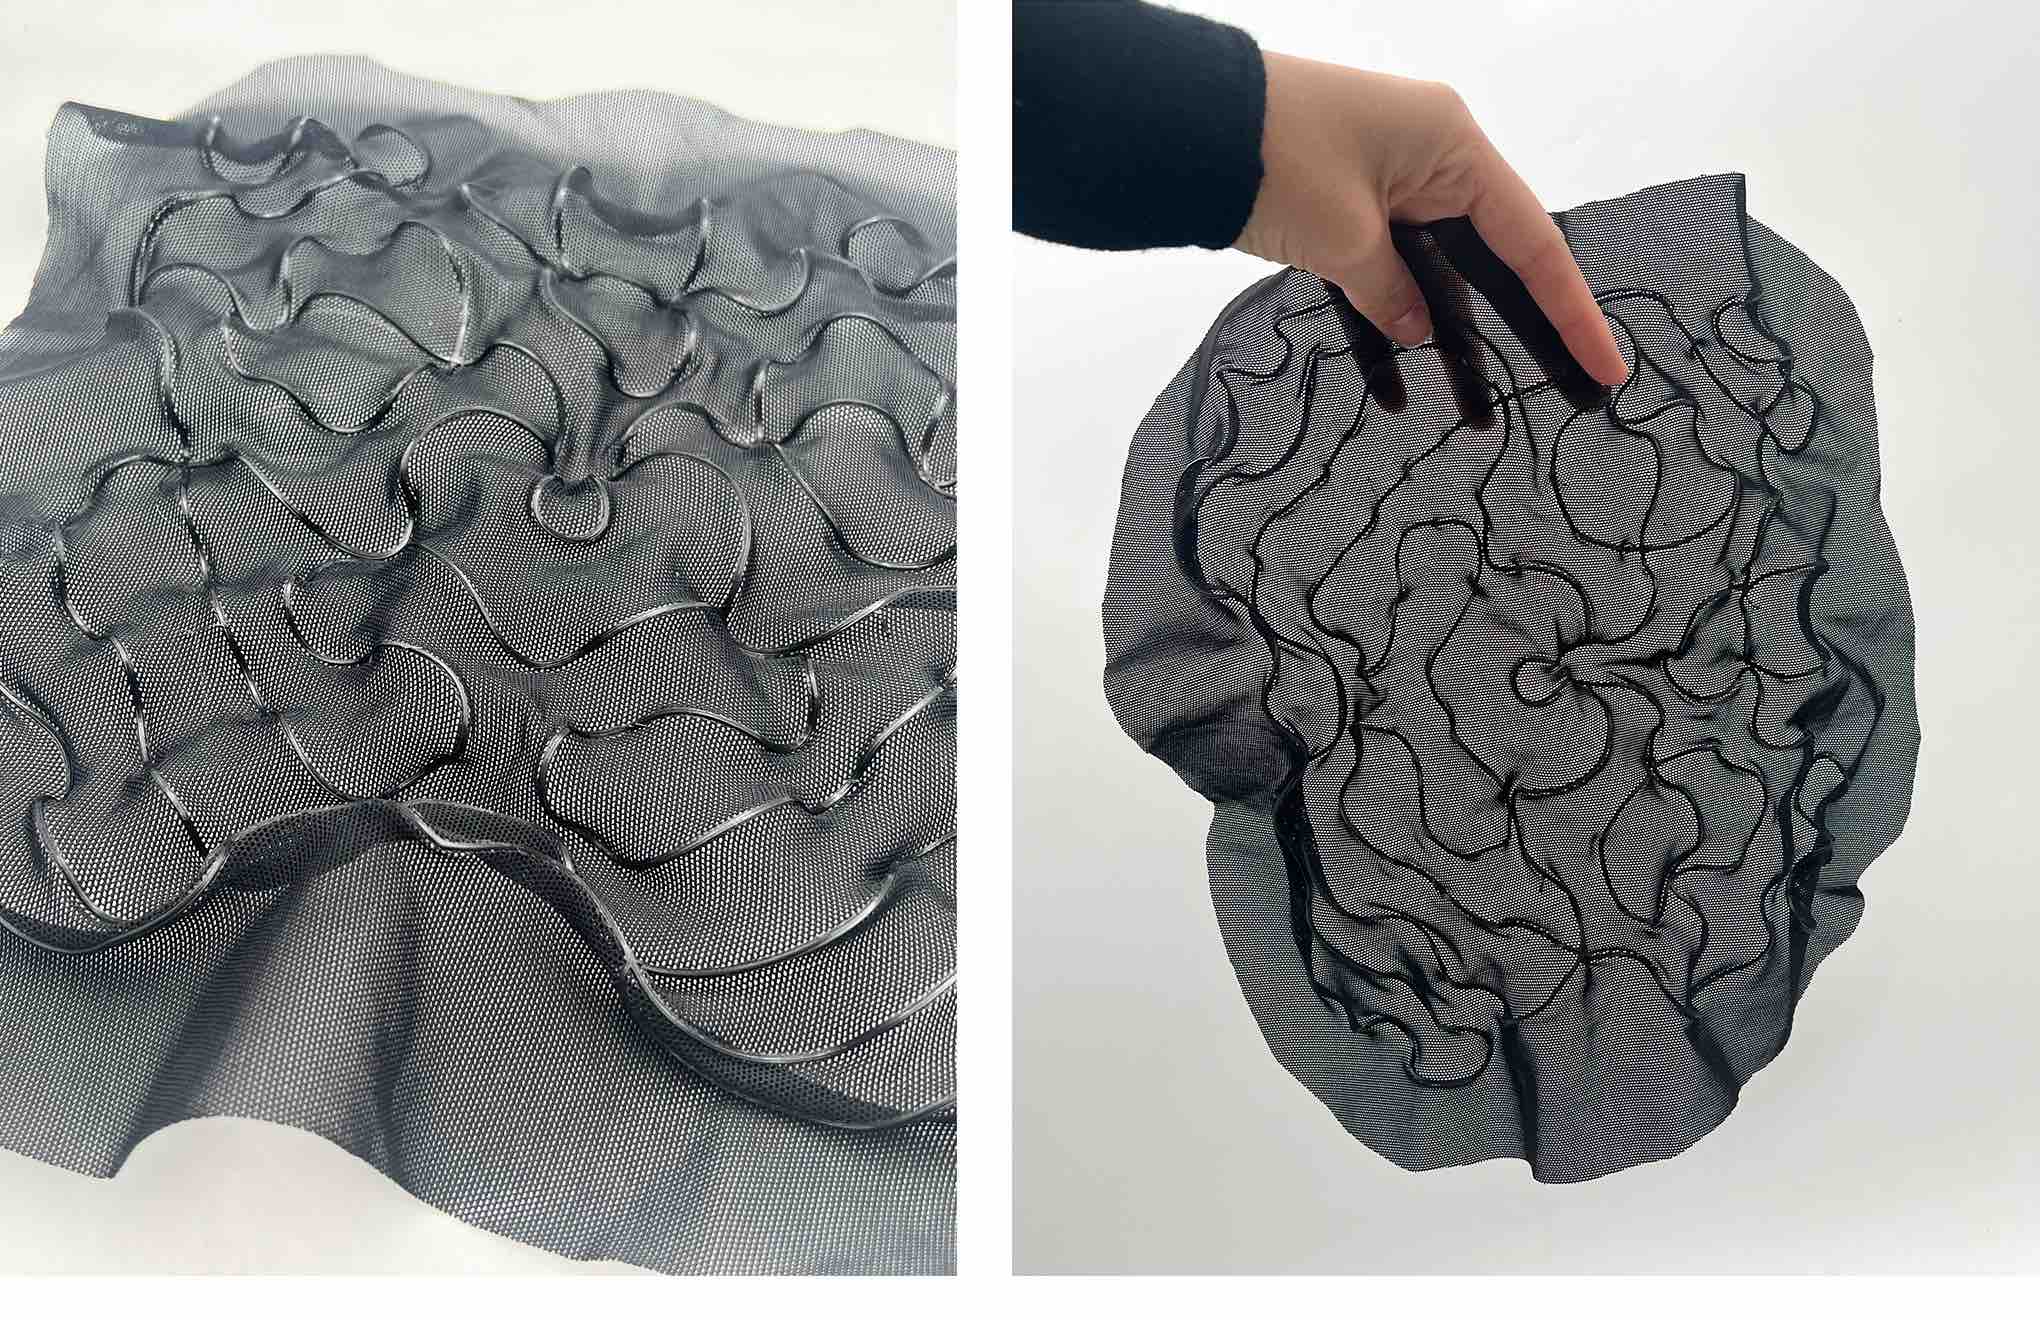
Then we went to set up the machine. I chose a black synthetic stretchy mesh fabric and clipped it on to the machine. We stretched it a lot to create the most dynamic texture possible (high mountains and low valleys).
Printer Set Up
- Test the filament and clean out the nozzle
- Calibrate the bed (the nozzle must not drag the fabric, only briefly touch)
- Move the nozzle to home
- Put sd card in slot
- Save file to drive
- Eject the card and put it in the printer
- Print from TF
- Wait for bed to heat
That is the standard process for the Ender printers at Fab Lab BCN but I had to work with a Chiron printer at Ana's office because we ran out of time at the lab. Here are the print settings I used:

Final Gcode file 3.
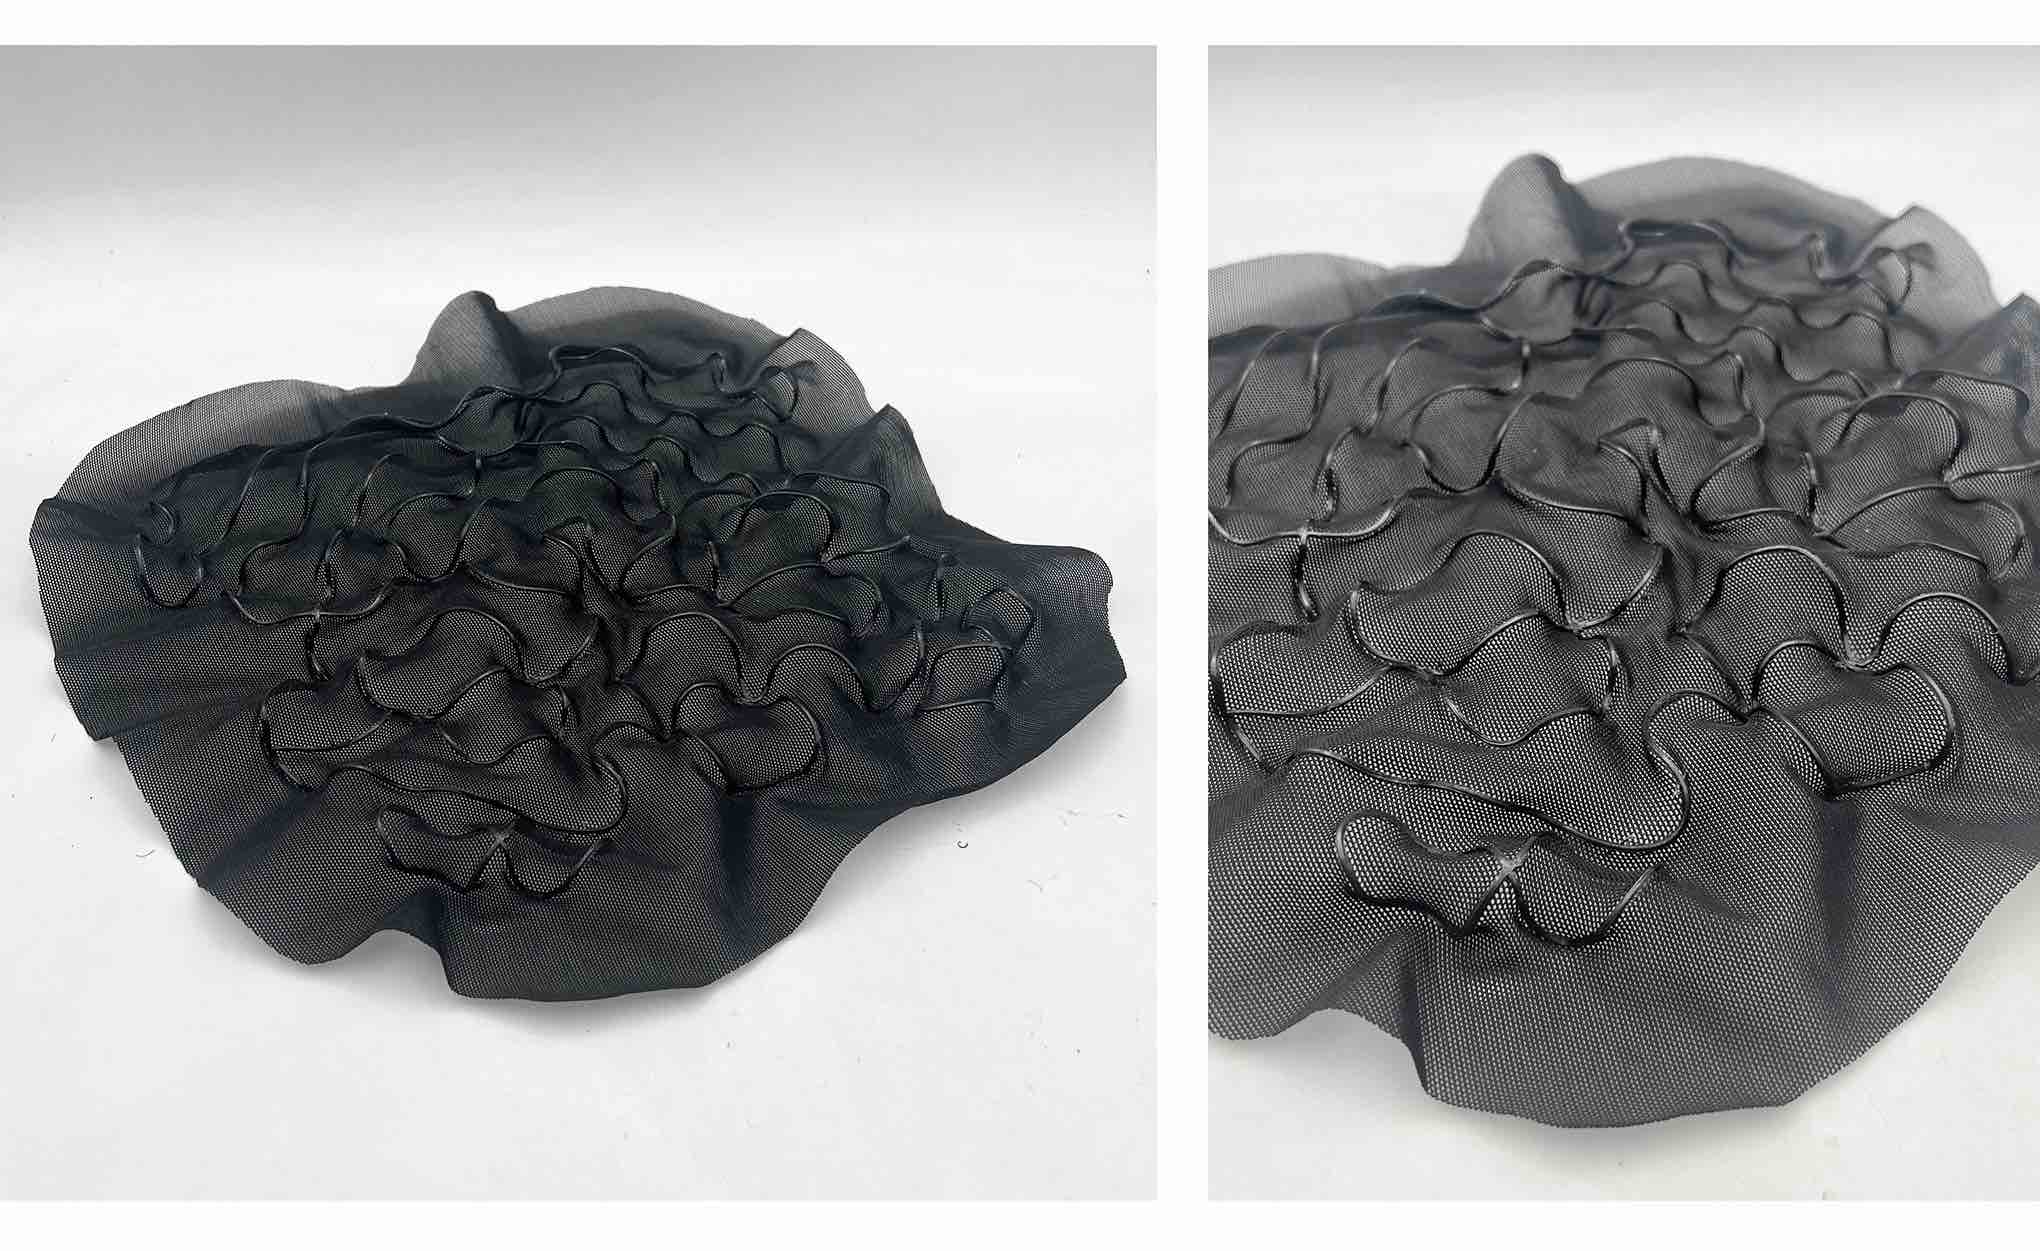
When the print is over it is best to carefully pick up the excess pathway filament lines using plyers and take them off the fabric. Then I removed the clips and watched the material shrink into an interesting texture!
Final Results
Future Prototype
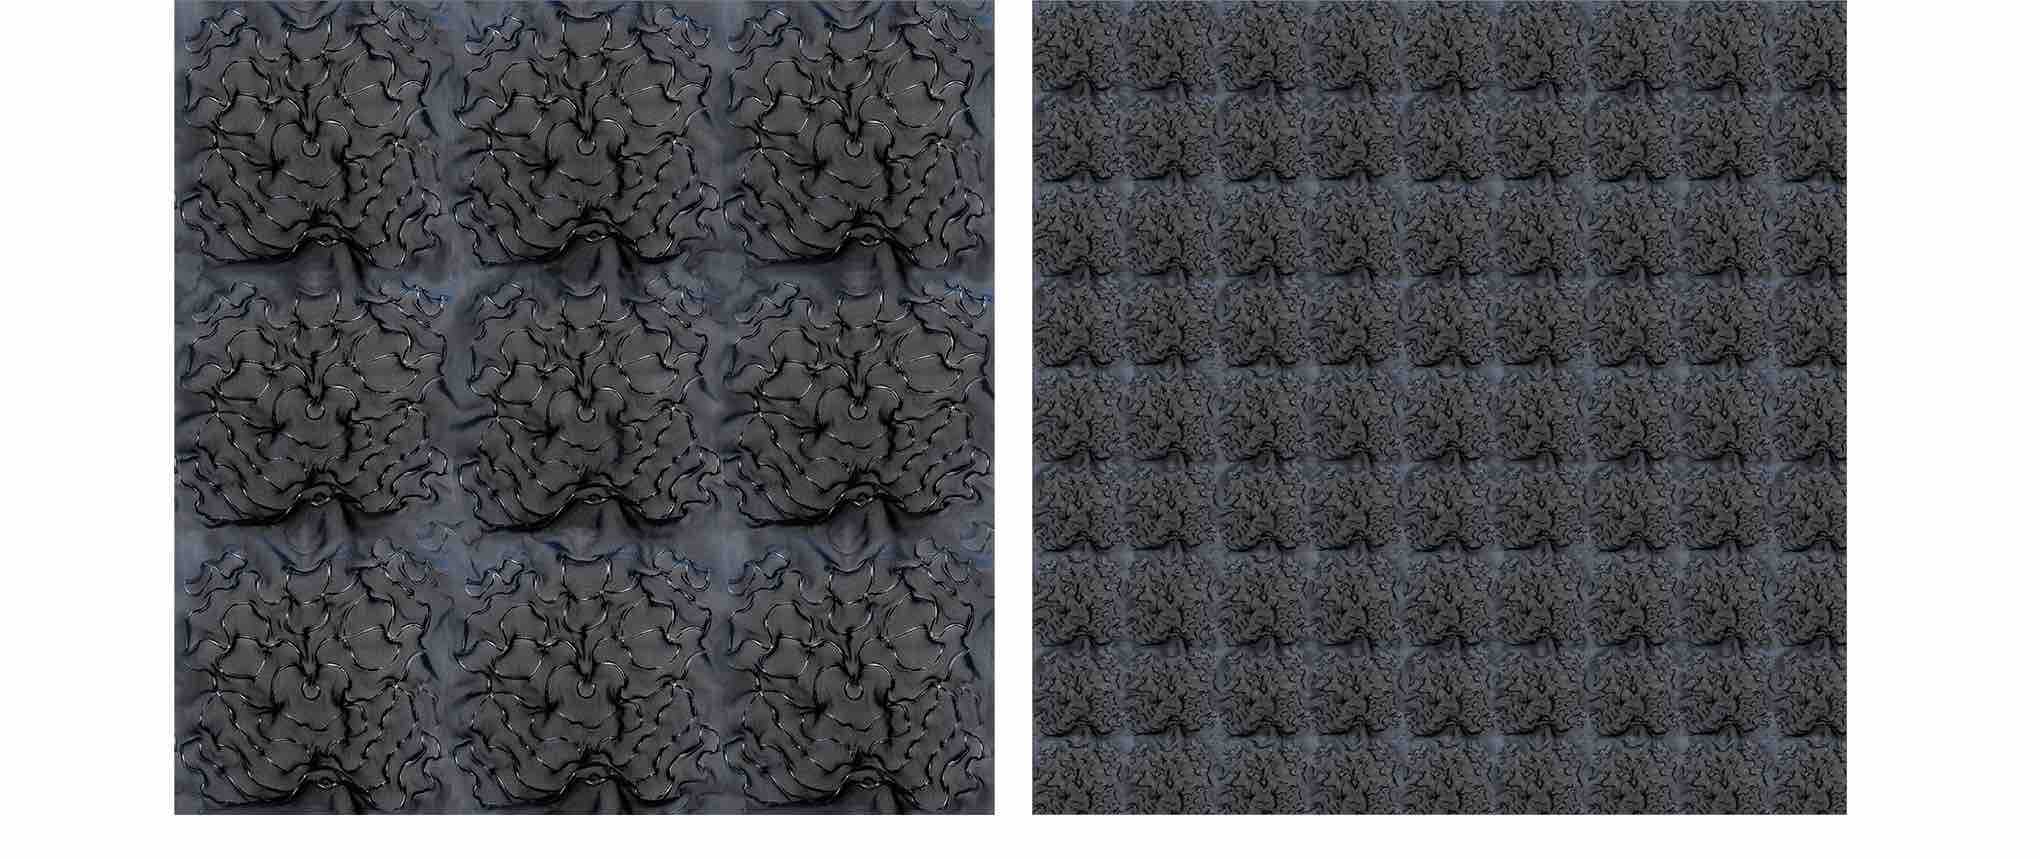
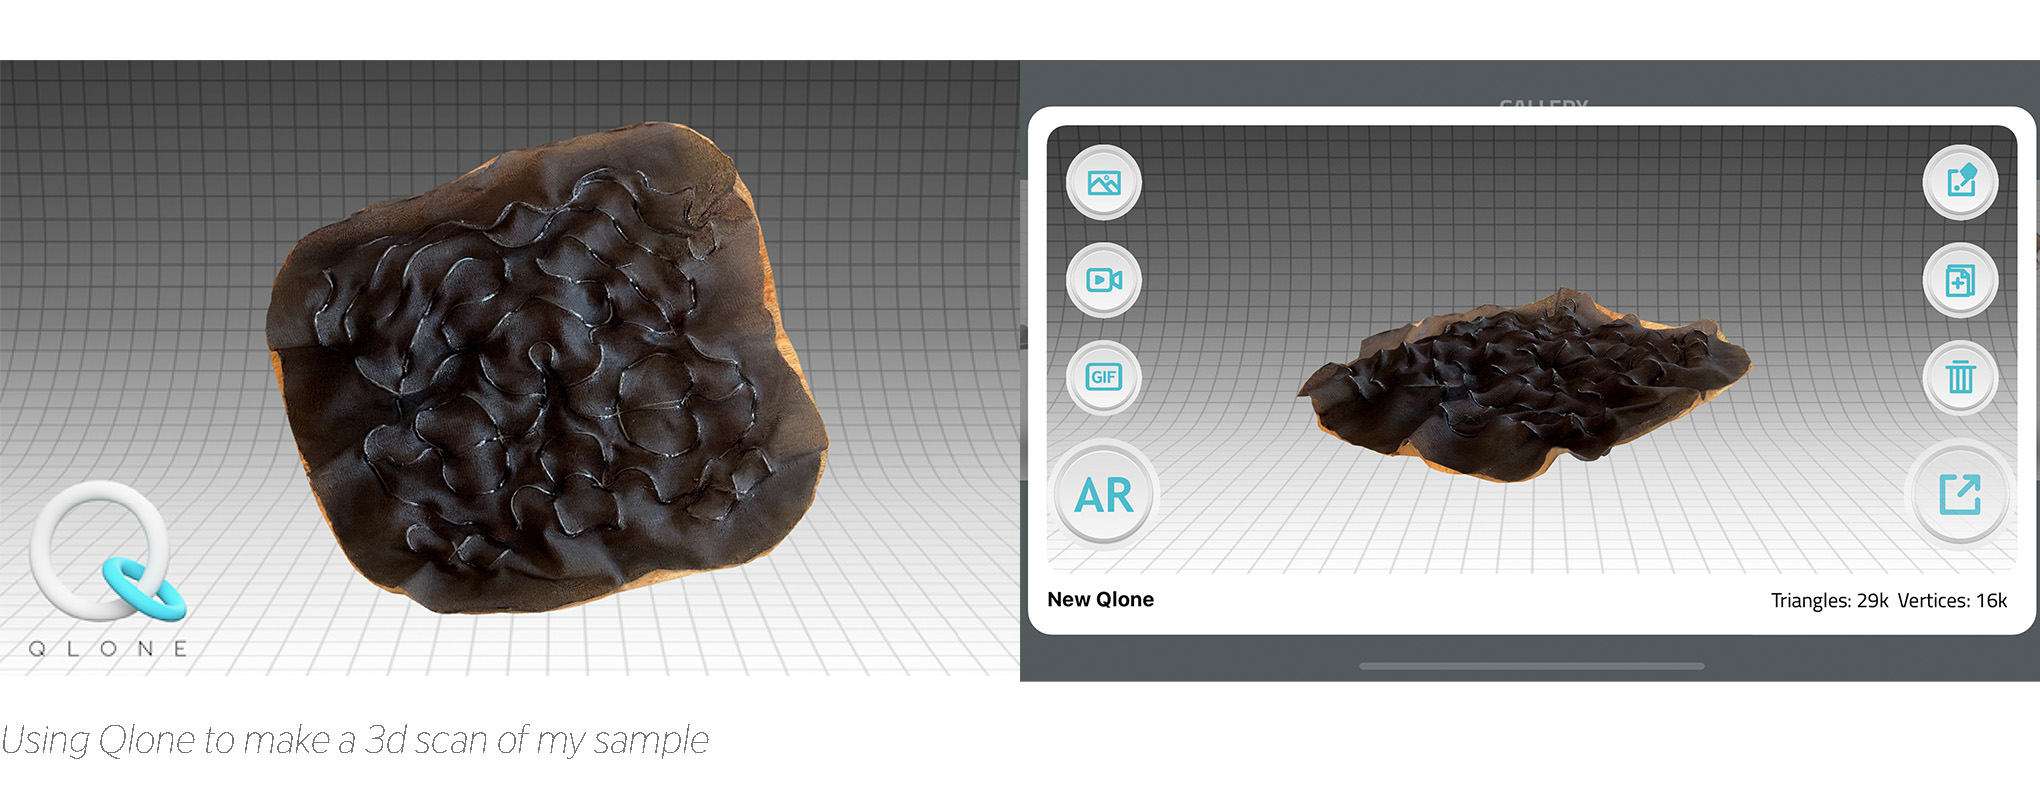
First I set out to make a repeating pattern to import into Clo 3d for my Clo assignment. I used the clone and paintbrush tool in phtooshop to make a smooth pattern but it still looks like a bunch of squares pasted together because of the shape of the sample. I did not love this look so I also started working in 3d by making a Qlone scan and importing the STL to Rhino.

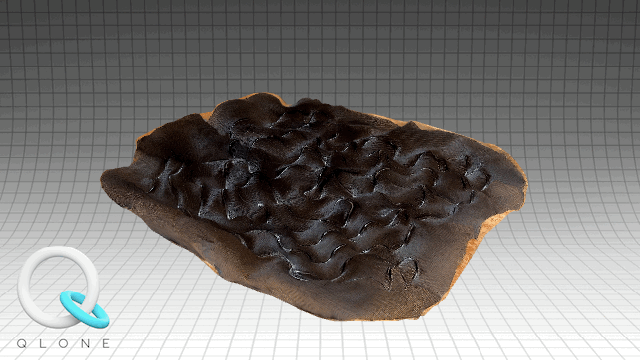
 Here is the Qlone scan

Further Grasshopper Explorations
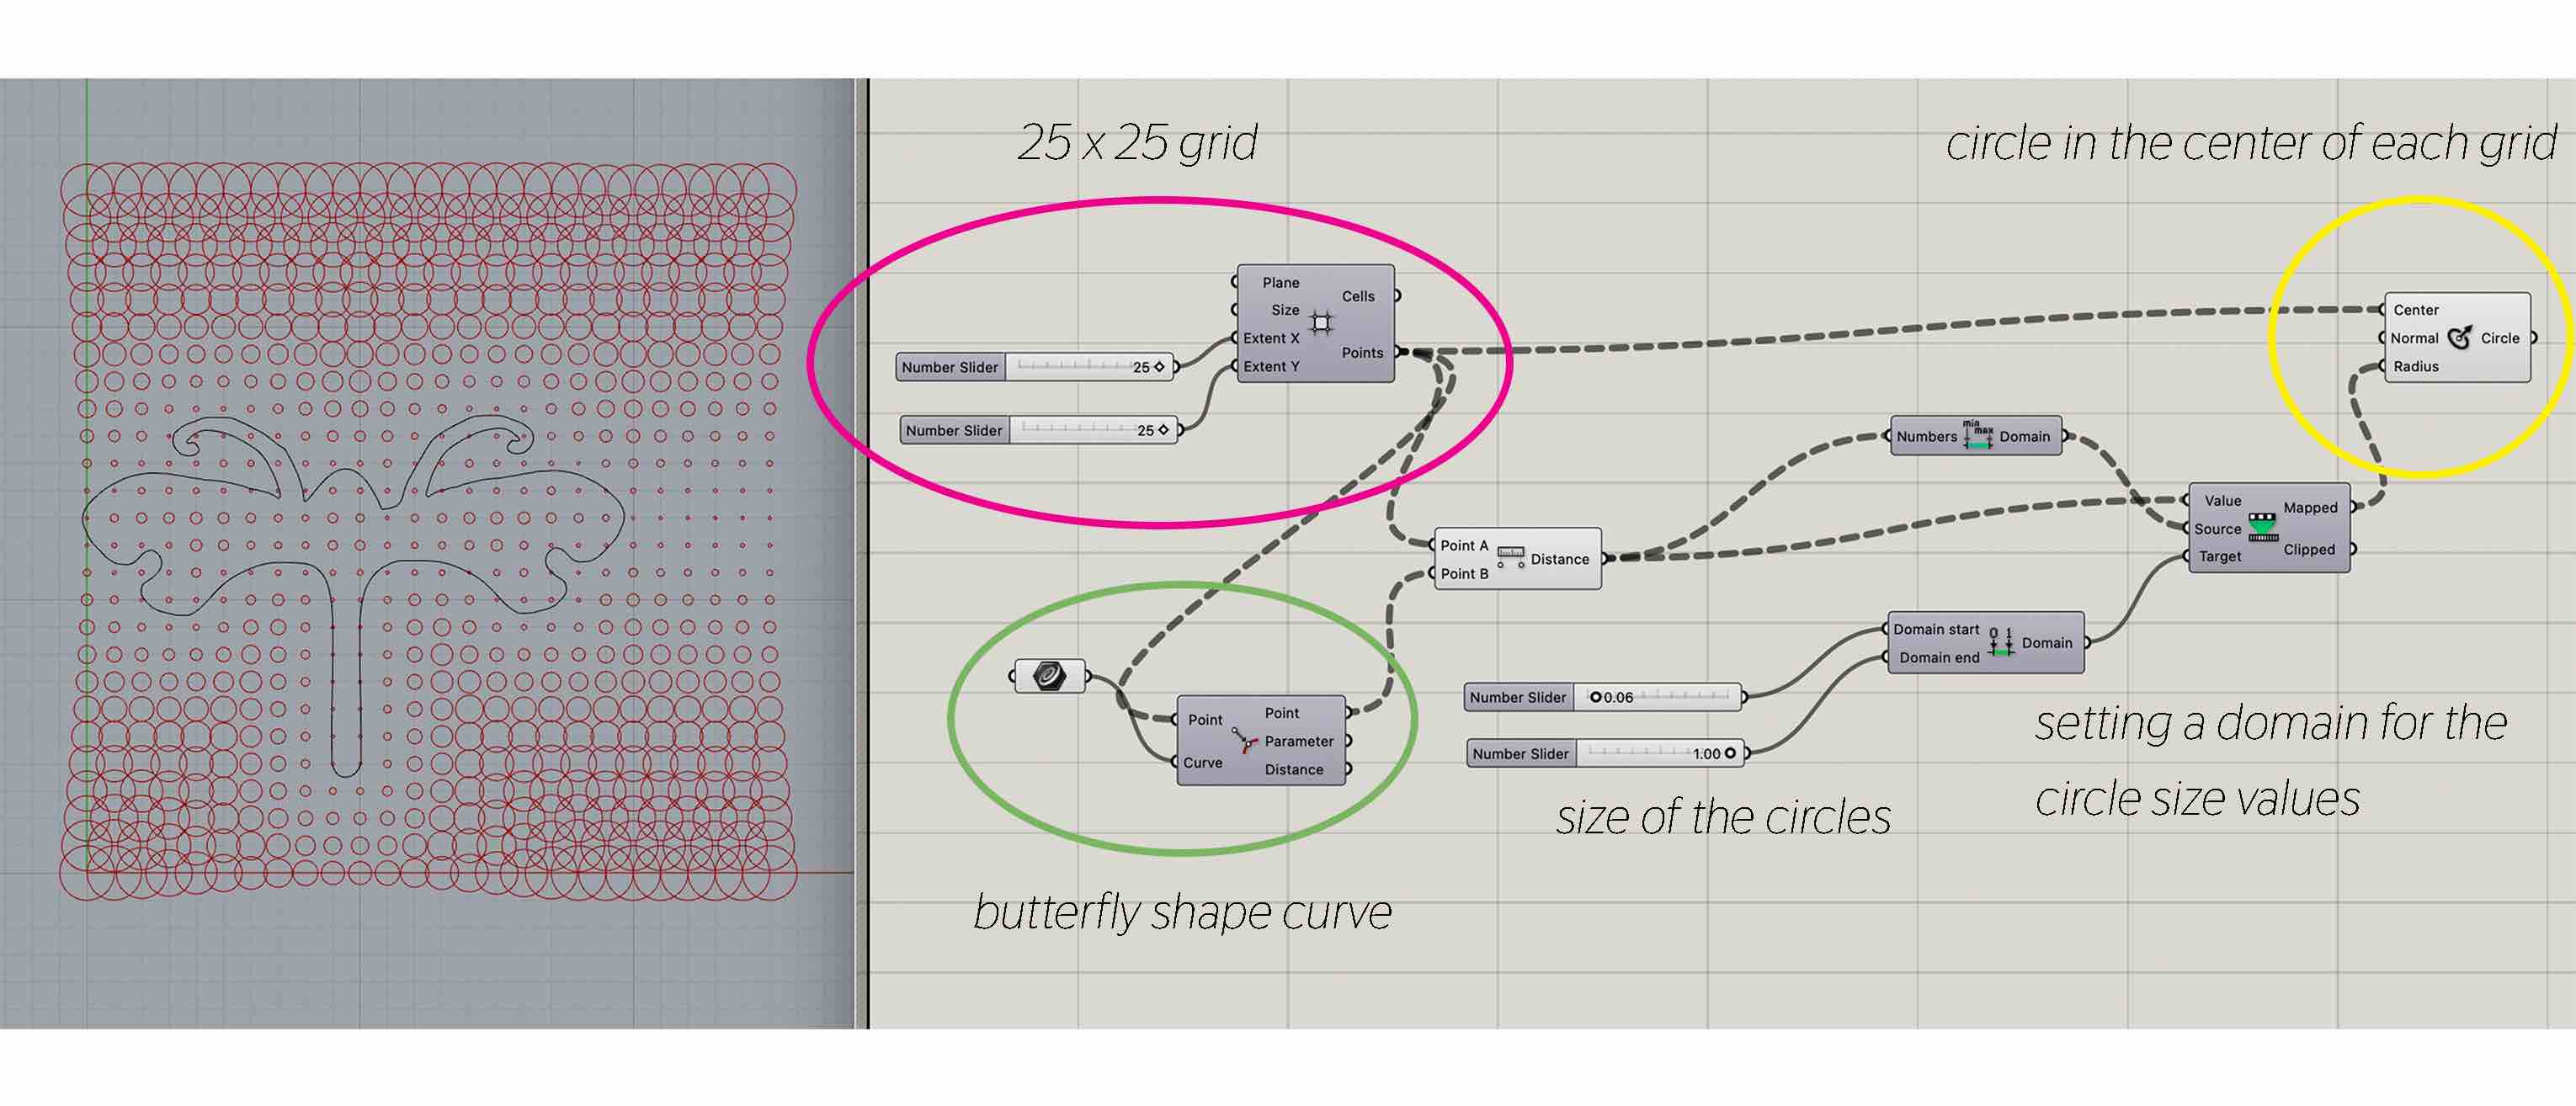
I wanted to explore more parametric patterns in grasshopper and incoorperate my own style so I made this piece using the butterfly design from circular fashion week. It is surounded by circles on a grid that react by shrinking in proximity to the butterfly. I used this tutorial Grasshopper Intro because I am still such a beginner and learning the functions of each componant.
- Plant a grid under Vector > Grid > Square.
- Input number sliders to control the number of grid boxes on the x and y
- Under Curve > Primative choose Circle CNR to place a circle in the center of each grid box
- Connect the Square points output to point A in Distance and also to Curve closest point.
- Make any curve in rhino over the grid and set it in grasshopper, then connect that curve to curve input in Curve closest point and the curve output to point B in Distance This creates a relationship between the proximity of the curve and each circle.
- We want to connect the Distance to the radius in Circle CNR (so the radius size is affected by distance to the curve) but fist we need to set a domain.
- Use Construct domain with number slider inputs that correspond to the meaurements of your grid.
- Connect distance to the numbers input of Bounds to set this domain as minimums and maximums for the circle sizes.
- In Remap domain Bounds connects to source input, Distance to the value input and Construct domain to target input. Finally this can be connected to the radius in Circle CNR with the mapped output.
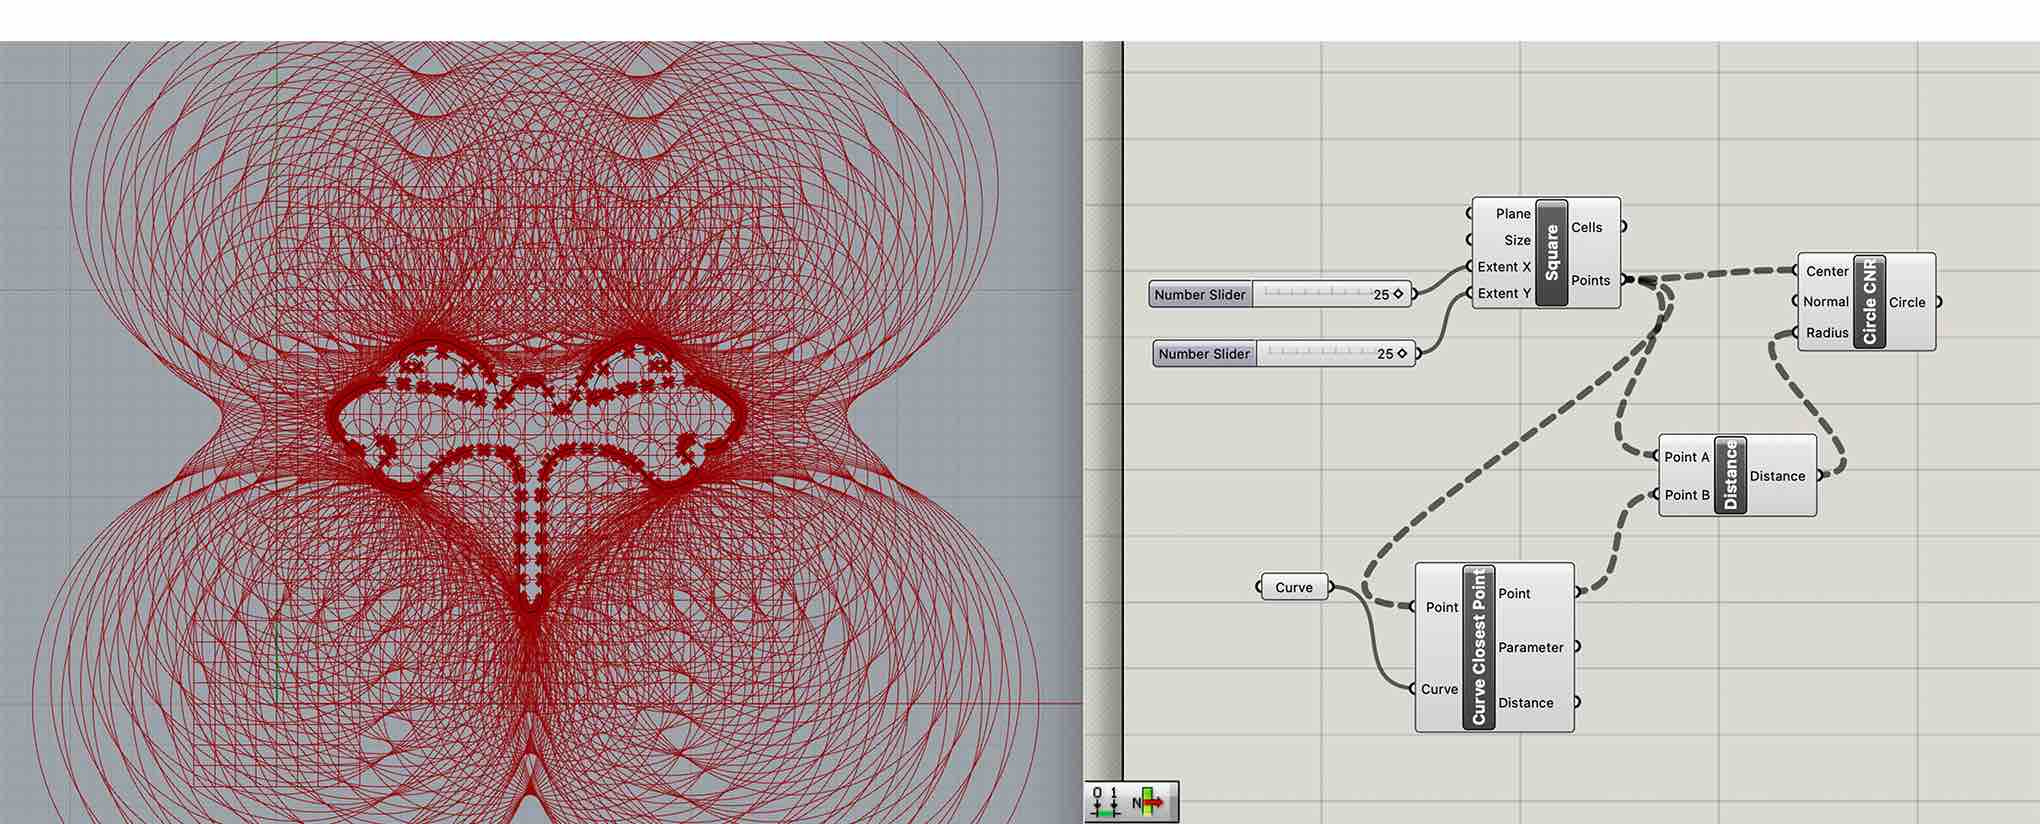
Without the domain, the result would look something like this. Which can be cool to play around with, but may not be functional for a printed design.
Here is the design explained:
The final Butterfly Grasshoper File 4
Reflection
I am so fascinated with the possibilities that 3d printing and computational design can bring! I was originally shut off to 3d printing because I had seen mostly examples of ridgid, plastic shapes. Now I understand that there is a lot more to explore with materiality and flexible designs. I am feeling more comfortable with Rhino and Grasshoper and am excited to keep exploring. While additive manufacturing can be a great method for lower - waste designs, 3d printers can be finicky and there have been a lot of issues with our printers that result in needing to retry and use more material, so this is something to consider. I've learned to triple check all files and settings so there are no mistakes.