01. PROJECT MANAGEMENT
As I have documented this chapter late, I will take this opportunity to share the mistakes that caused the delay. These are the comments primarily to myself :) So here are some important self-notes from past to future:
- Try to stay in the flow and document during the process. It may seem complicated, but in the end, it is very rewarding.
- Don't hesitate to ask if you don't understand something. The course is very intense and fast-paced, with no time for hesitation.
- Keep it simple. The goal is to learn and absorb the knowledge and share the gained experience.
- Keep writing. I realized that it's best to write directly in GitLab if possible.
- Make your site clean. You can hide the text by commenting it with these lines:
<!--- "hidden text" --->. Leave the default code untouched, you will need it later. - Make screenshots because you will run further with a flow and some moments of the process might be lost. “Windows icon” + “PrtSc” tabs at once if you have Windows. You can find images under Your PC: Pictures: Screenshots.
- Not to forget: Commit always needs to be done to the main branch.
- Compress images nicely, in one assignment images can't exceed 10 mg.
PROJECT MANAGEMENT and DOCUMENTATION
Tools
online classes
- Zoom
- something to take the notes
- environment to focus
- coffee
documentation
- GitLab
- Google Docs for text correction with "LanguageTool"
- Paper and pencils
images
I have been using the Milanote online platform for some time, which is similar to Miro but with fewer features, however, this time I stayed with Milanote because it is more familiar to me.
MARKDOWN
In GitLab, you can create your repository page so you can plan, organize, and visualize a workflow for documentation and sharing.
Markdown 1 is a lightweight markup language that lets you add formatting elements to plaintext text documents.
Here I put some GitLab markdowns to remember and practice.
Text
bold: **bold**, italic: _italic_, bold and italic: ***bold and italic***
brake: <br/>
link: [link](http:)
H2O: H<sub>2</sub>O
blockquotes:
> blockquotes

:rabbit: 2
Tables
| Header A | Header B |
|---|---|
| row 1 col 1 | row 1 col 2 |
| row 2 column 1 | row 2 column 2 |
| Header A       | Header B       |
| -------------- | -------------- |
| row 1 col 1    | row 1 col 2    |
| row 2 column 1 | row 2 column 2 |
Images
Image capture with reference link
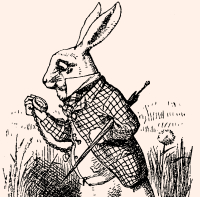
<figure markdown>
{ width=200 align=center}
<figcaption>[The White Rabbit](https://en.wikipedia.org/wiki/White_Rabbit), "Alice's Adventures in Wonderland" caracter created by [Lewis Carroll.](https://en.wikipedia.org/wiki/Lewis_Carroll)</figcaption>
</figure>
Images table
|
|
|
|
|
|
||||
| :-------------- | :-------------- | :-------------- |
| {width=100} | {width=100} | {width=100} |
| {width=100} | {width=100} | {width=100} |
I tried to make the image gallery not nested into the table, but in this case, the markdown preview shows it very nicely but the browser doesn't show the images. After some research found that this code is not supported in GitLab markdown. Still, something to look for 

<p float="left">
  <img src="../images/week01/rabbit.jpg" width="100" />
  <img src="../images/week01/rabbit.jpg" width="100" />
  <img src="../images/week01/rabbit.jpg" width="100" />
  <img src="../images/week01/rabbit.jpg" width="100" />
  <img src="../images/week01/rabbit.jpg" width="100" />
  <img src="../images/week01/rabbit.jpg" width="100" />
</p>
In the section about “Images table”, the images are not displayed on the second one because it is not in Markdown, but in HTML. When writing in HTML directly, you need to add one more level of “…/” to get to the pictures, so it has to be like this:
<img src="../../images/week01/rabbit.jpg" width="100" />
CSS
This allows playing with the appearance of the website. Below is an example of how the image capture style was changed to a smaller, thinner, italic, and grey colour.
The following code 3 was added to CSS file:
.md-typeset figcaption {
    font-size: 13px;
    font-weight: 300;
    font-style: italic;
    color: grey
}
Create css file
You can create css file in stylesheets directory:
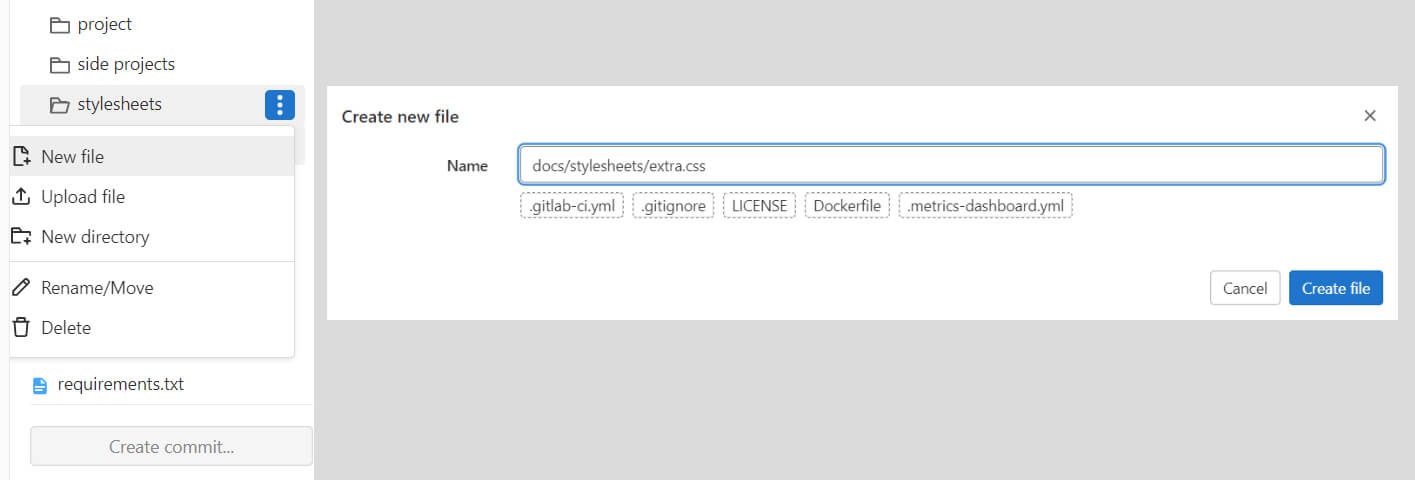
or add specific command in the mkdocs.yml:
├─ docs/
│  └─ stylesheets/
│     └─ extra.css
└─ mkdocs.yml
Add this command to mkdocs.yml
extra_css:
  - stylesheets/extra.css
USEFUL LINKS
Documentation for installing Mkdocs
Looking forward
- additional JavaScript
- alter the HTML source
- change the logo