06. BIOFABRICATING MATERIALS
REFERENCES & INSPIRATIONS
This week we made bio plastic. I was inspired by these projects: Lionne van Deursen - Unfold, Elizabeth Atzberger - Chitosan Bioplastic and Design Hotels article Will Biomaterials Build Our Future?
Guided by the inspiring works of these Fabricademy students: Lukrecia Strano, Diane Wakim, Louise Massacrier and Loes Bogers.
The hardest part for me was waiting for the materials to dry, purely due to lack of patience. I learned that you can never have too many moulds and only alginate needs to be cured. When I found myself in total confusion, Anastasia sent short and clear audio instructions on WhatsApp, and it helped me to complete the tasks. Sharing here what I learned this week.
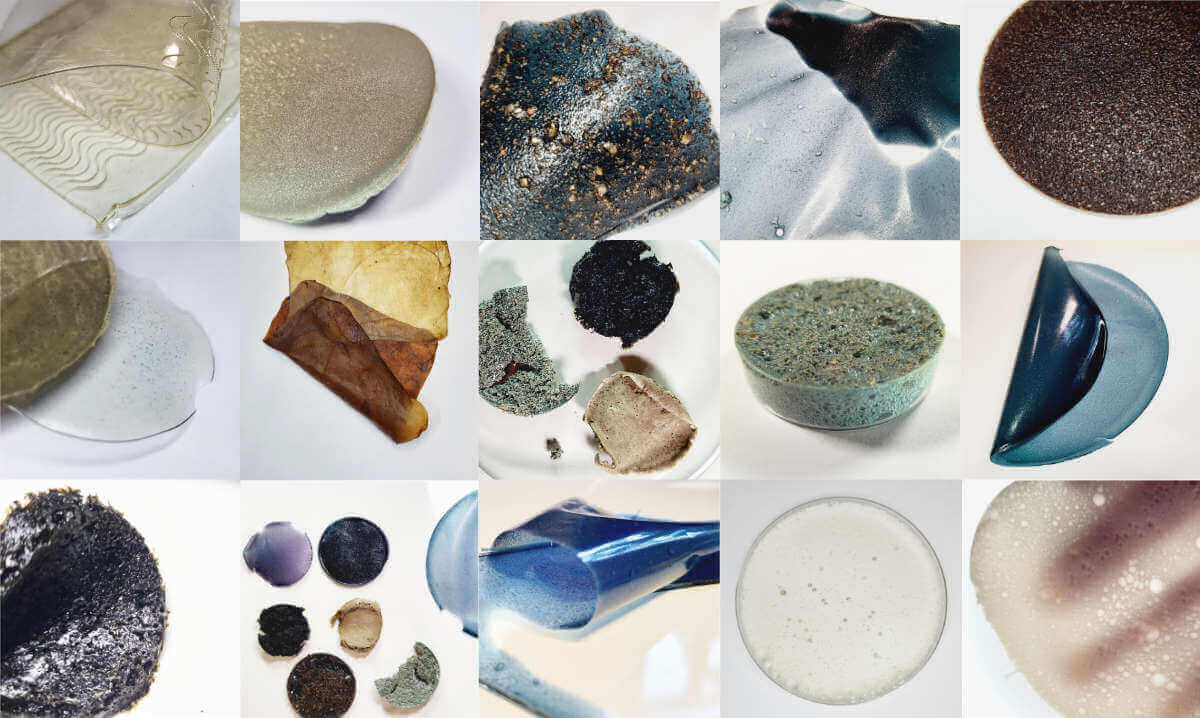
Materials properties
- POLYMERS - base of plastic (agar, alginate, gelatin, starch...)
- PLASTICIZERS - for flexibility (glycerin)
- FILLERS - to avoid shrinkage (eggshells, chalk, fibers, oils...)
- STIFFENERS - to structure and reinforce (fibers, natural debris)
- EXPANDING AGENTS - to create foams (green soaps, emulsifiers)
- COLORS/PIGMENTS - to modify color (natural inks and pigments)
Also prepared all the necessary tools to make it. As with biochromes week, organization and labeling of materials is important.
TOOLS
- cooker/stove/hotplate
- scale
- stainless steel cooking pot
- thermometer
- stirring spoon
- dishes for mixing with fillers
- flat surface
- moulds
- food dryer for drying some materials
GELATIN
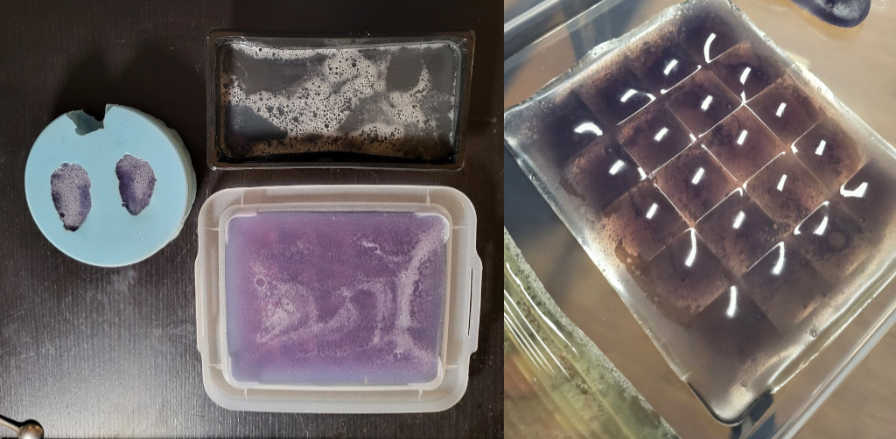
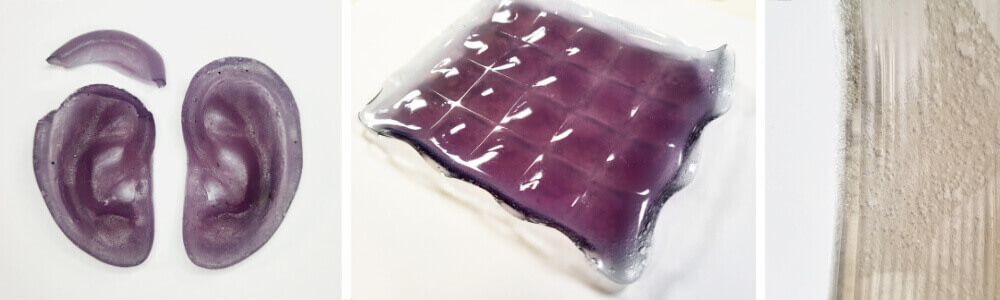
As I was advised by Anastasia, I started with the simpler material gelatin. Different amounts of glycerin were tested, and several productions have been made. However, the first attempt was crude and not so successful. Gelatin was heated on to high temperature and for too long. So I decided to halve the recipes and move slowly. In the first test, moulds found on hand were used: ears mold, the lid of a plastic box, a plastic food box, which bent from the heat. While simmer, stir slowly to avoid the formation of bubbles, of which there were many in my first attempt.
GELATIN BIORESIN
Basic recipe
- cold water - 120 ml
- gelatin powder - 24 g
- glycerol - 4 g
- few drops of clove essential oil
Process
- in the pot, stir gelatin powder and cold water till mixture turns into a granular paste
- start heating while stirring slowly so that there are no lumps
- add a few drops of clove essential oil into glycerol
- once the gelatin substance has become liquid and homogeneous, add the glycerin into the mixture
- stir gently to avoid bubbles
- simmer for 5-10 min. at 35 °C, continuously stirring
- pour the mixture in to the moulds
- leave to dry for 7 days minimum
Additives
- aronia berries dye - 120 ml (instead of water)
- grounded acorn caps
- coffee
- green clay powder
GELATIN BIOSILICONE
Followed Basic biosilicone recipe found on Loes Bogers repository.
Basic recipe
- cold water - 120 ml
- gelatin powder - 24 g
- glycerol - 12 g
- few drops of clove essential oil
Process
- in the pot, stir gelatin powder and cold water till mixture turns into a granular paste
- start heating while stirring slowly so that there are no lumps
- add a few drops of clove essential oil into glycerol
- once the gelatin substance has become liquid and homogeneous, add the glycerin into the mixture
- stir gently to avoid bubbles
- simmer for 5-10 min. at 35 °C, continuously stirring
- pour the mixture in to the moulds
- leave to dry for 7 days or put into the food dryer for 6 hours and after let it dry fully
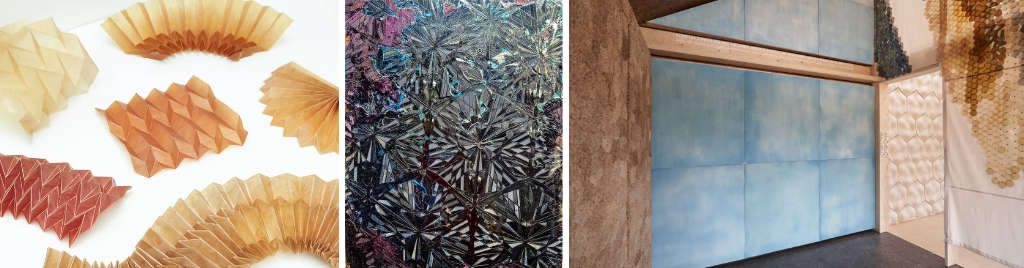
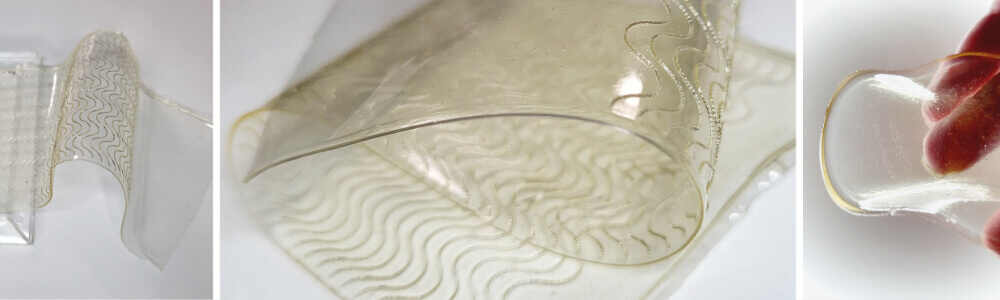
I got interesting results from a plexiglass casting mould 1 in which the ornament was cut. This texture gave a kind of glow and reminded me of embroidered fabric.
Cutting settings for Full Spectrum 45W laser cutter | 3 mm Acrylic
- PINK | texture - 100 speed, 70 power, 1 pass
- BLACK | form - 70 speed, 100 power, 3 passes

Results after 3 weeks of drying.
Gelatin biosilicone Additives
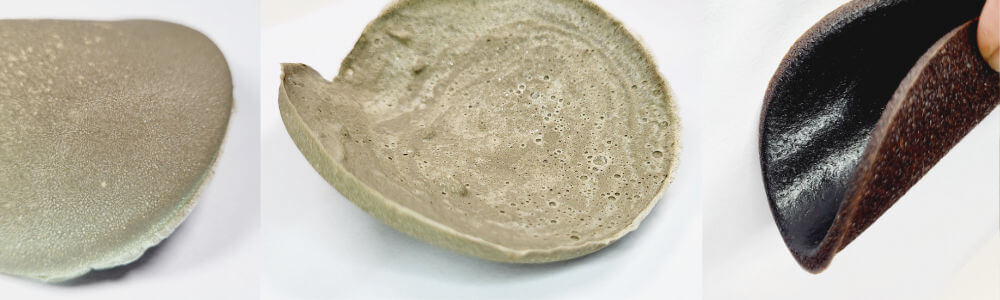
That was very interesting part, when I noticed that the green clay powder had foamed up a bit while mixed with the gelatin biosilicone substance and when dries give to it a bit of fluffy structure. The material looks like a mushroom and feels to touch like velvet, bends easily and goes back. However, the material is not yet fully dry, and it is unclear how it will change. I would love to try a thinner version of this one. Coffee was also a good match, but the material was stiffer and thinner in this case.
Additives
- coffee
- green clay powder
Results after 3 weeks of drying.
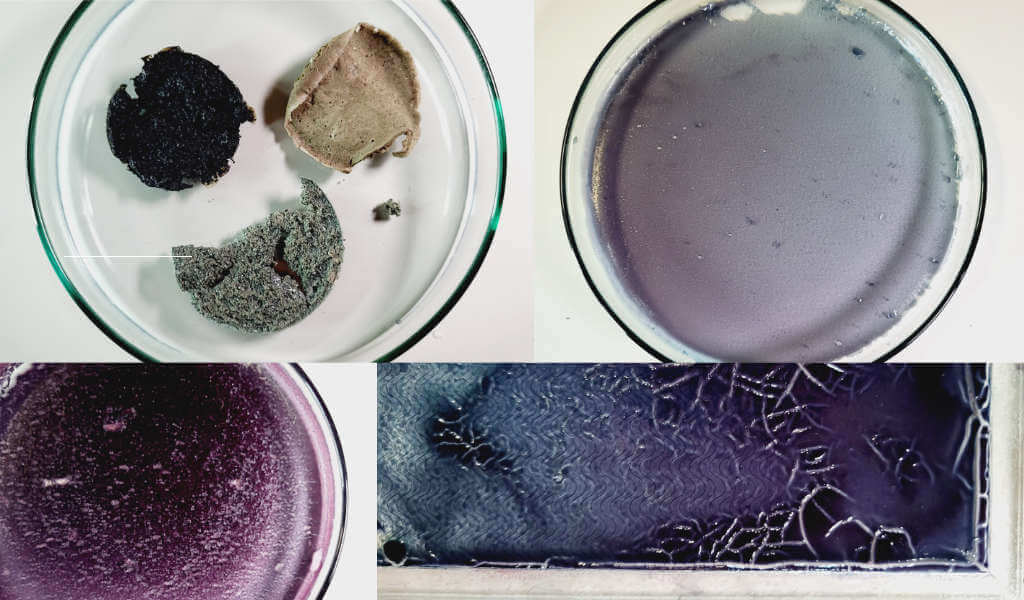
Gelatin biosilicone foam
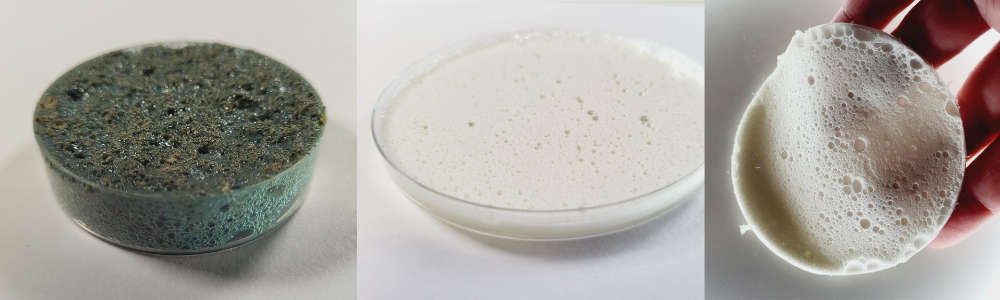
I also tried to make some foamy textures. I left some of the gelatin biosilicone mixtures to experiment. Foamed them with soda and vinegar and made different thickness layers. In the picture above, you can see also foamed mixture with clay additive which was not successful as after an hour just collapsed and after drying brake in to peaces. The amount of soda and vinegar in this case is very abstract, because of the lack of time, as the mixture hardens pretty fast. So, abstract amount for the three 120 mm petri dishes is a quarter tb. spoon of soda and quarter tb. spoon of vinegar.
Results after 3 weeks of drying.
AGAR | GELATIN BIOPLASTIC
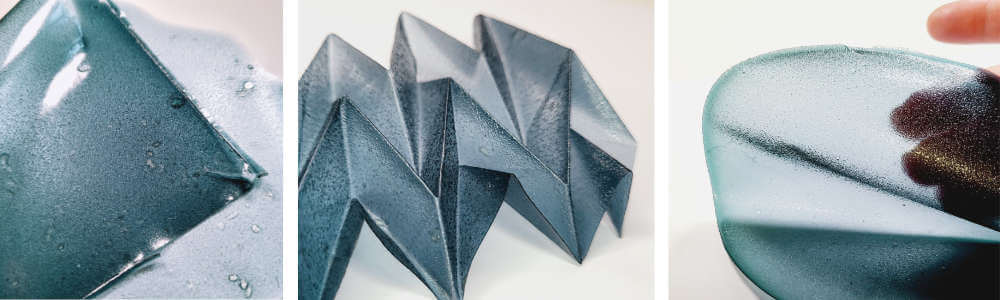
This recipe is created by Margarita Talep Follertat and can be found at materiom.
Used this online converter to have everything in grams.
The first time, I took the pot off the heat too early and noticed the gelatin lumps when pouring the content into the mould. Later used this failed moulding for origami folding and the rest substance completely melted and poured into a mould. I played around with origami folding in paper years ago and used Origami Simulator for inspiration and knowledge. This time folding was made in the middle of drying.
Also used half of the amount indicated because wanted to experiment more. In this way, the course of the recipe was changed.
Recipe
- gelatin powder - 10 g
- agar powder - 3 g
- glycerol - 14 g
- cold buckthorn berries dye - 250 ml
- few drops of clove essential oil
Additives
- grounded acorn caps
- coffee
- green clay powder
Process
- add the gelatin and agar to a pot with buckthorn dye and stir until combined.
- put on stove and stir until the agar and gelatin dissolve completely. Add glycerol and stir all the time. At the end, add clove essential oil.
- once the mixture is warm, pour into your mould.
- leave to dry for 7 days or put into the food dryer for 6 hours and after let it dry fully
Results after 3 weeks of drying.
KOMBUCHA
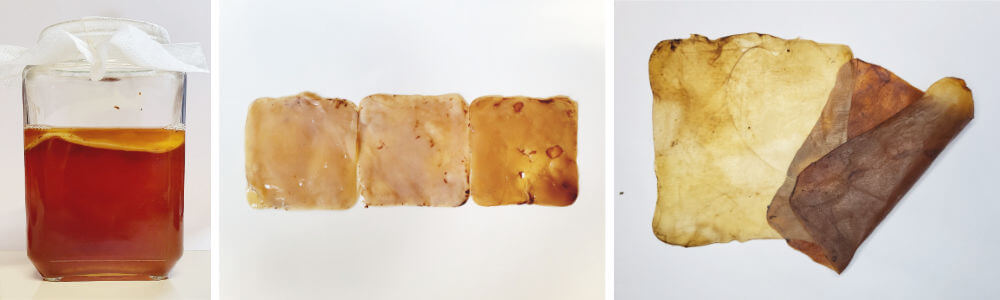
Kombucha scoby was given to me and within two weeks I already saw the first layer. In the cold season, the scoby grows more slowly, so in the summer it would grow from 1 to 2 mm thick in about a week.
Growing Kombucha scoby
Started from making tea mixture for Kombucha scoby growing. Next time I will try green tea as it gives less coloring to scoby, but I like the brown shade from the black tea as well. If you got a scoby baby, below is the recipe for growing it.
Step 1: mixture preparation
Recipe
- tea - 4 tb.spoons
- sugar - 4 tb.spoons
- water - 1.5 L
Process
- Boil the water and add the tea, let it steep.
- Add sugar and stirr to desolve.
- Cool the mixture to room temperature. Do not use hot tea as it can kill the bacterial culture.
- Pour cooled mixture into a sterilized glass jar.
Step 2: adding the scoby
- Wash your hands. Do not use soap as this can kill the kombucha culture. Use baking soda instead. Containers you use should be glass or stainless steel.
- Take the scoby (from the container you received it in) and put in to the tea mixture.
- Add the liquid you got with the kombucha scoby.
Step 3: storing and taking care
- Cover the jar with cloth or paper towel, dense enough to avoid contamination.
- Store at room temperature and away from sunlight.
- In the cold season, the procedure of the adding new tea can be repeated every two weeks, in the summer every week.
The first layers may be uneven, but after several times the surface of the scoby will become smooth. This is how the scoby gets used to the new recipe, environmental conditions and host. Kombucha scoby is alive! When growing a new scoby, the liquid may be too strong and acidic to drink, but it can be used as vinegar.
Kombucha leather
I didn't have enough time to grow the layer thick enough and smooth, so I decided to give it a try and removed one layer of scoby. Followed the method found at Lucrecia Strano repository. What I noticed later, that soda killed Kombucha's specific smell.
Harvested the scoby from the jar and washed it under tap water thoroughly eliminating the yeast (brown strands). Spreaded by hand pinch of the baking soda on scoby and repeated the same on the other side. One layer immediately separated, so I decided to rinse the scoby under running water and put it on plywood to dry.

Lessons learned and future challenges
I tried to cure the agar biomaterial with calcium chloride (curing agent) which is written to cure alginate :) The result was bubbled agar biofoil. Also, I didn't put the alginate biofoil in the food dryer, so it did not dry even after 3 weeks.
Some of the foamed materials just collapsed or brake after completely drying.
Want to try the alginate, agar and many more.
USEFUL LINKS
Making Bioplastics from Avocado Dye and Agar