13. SKIN ELECTRONICS
Inspirations
The Hybrid Body Lab "DuoSkin" project is about the fabrication process that enables anyone to create customized functional devices that can be attached directly on their skin. Sensory tattoos created using gold leaf.

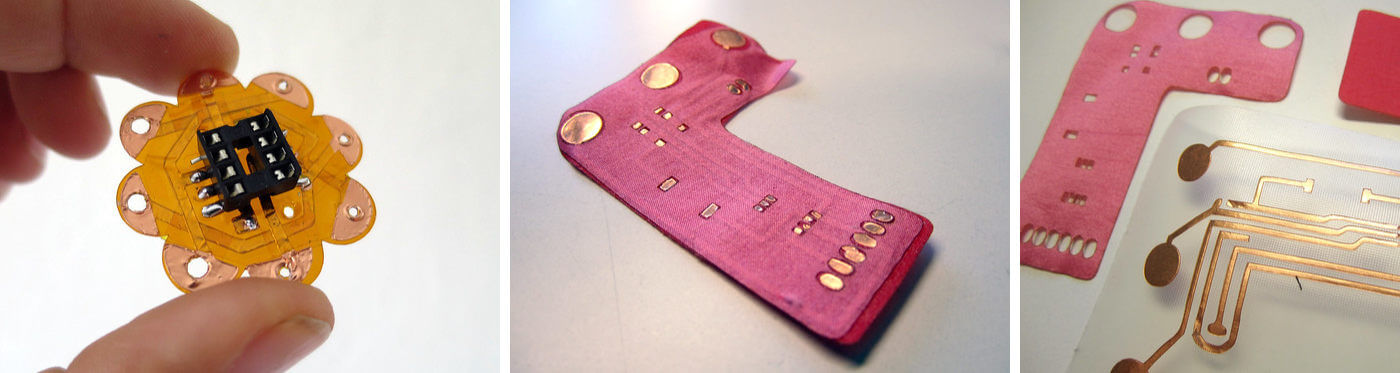
Kobakant or "How to get what you want" capasitive fabric slider/wheels with instructions.
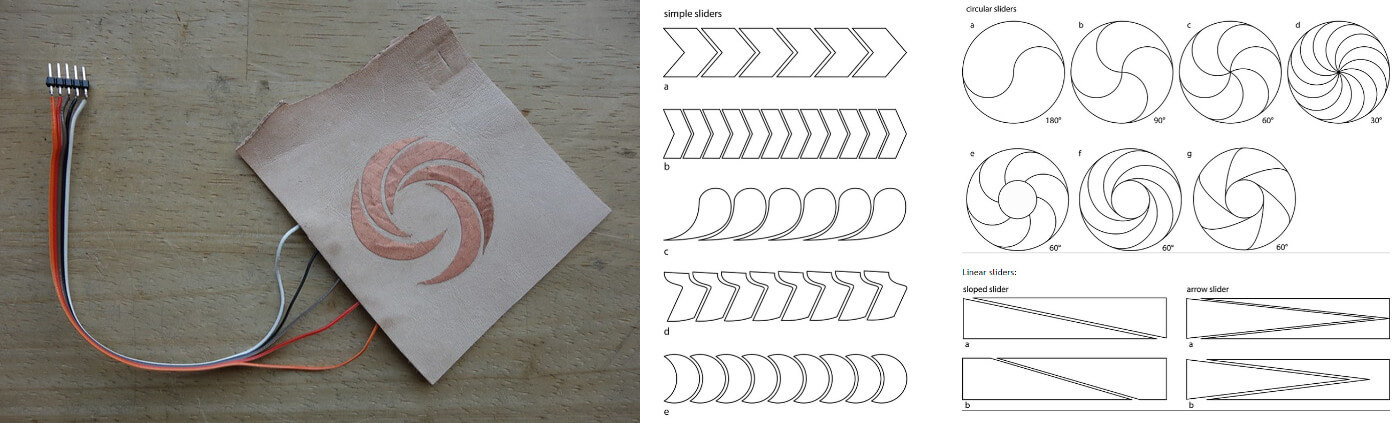
Kobakant plotted flex PCB and vinylcut copper & fabric PCB. The circuit base material is Kapton, a material that can withstand the high heat of soldering.
And these articles about water-responsive, gelatine-based human skin model and smart contact lenses makes me think about where future technology can take humanity.
This week I followed Jessica Stanley Fabricademy documentation about skin touch sensor with conductive paint.
This assignment started with Emma's lessons, as always very interesting and valuable.
Flexi PCB
This week I tried to replicate golden tatoo with sticky copper tape. My goal was to make as small sensor as possible. And this is where the gaming with plotter journey began because the copper tape and plotter tandem didn't like the idea of fine details.
machines and software
- Cricut Explore Air 2 plotter
- Cricut Design space software
- Full Spectrum laser cutter
- Retina Engrave software for laser cutter
- Inkscape
tools
- small scissors
- tweezers
- blade knife
materials
- sticky copper tape 50 mm
- transfer film (same that we use for vinyl transfer)
- baking paper
- paper tape
Sensor No1
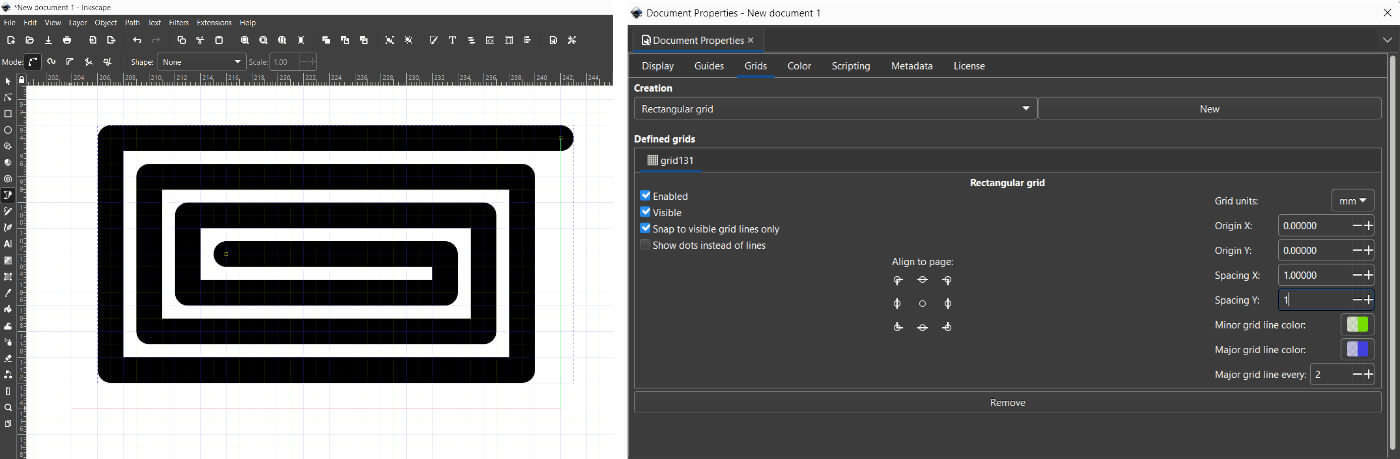
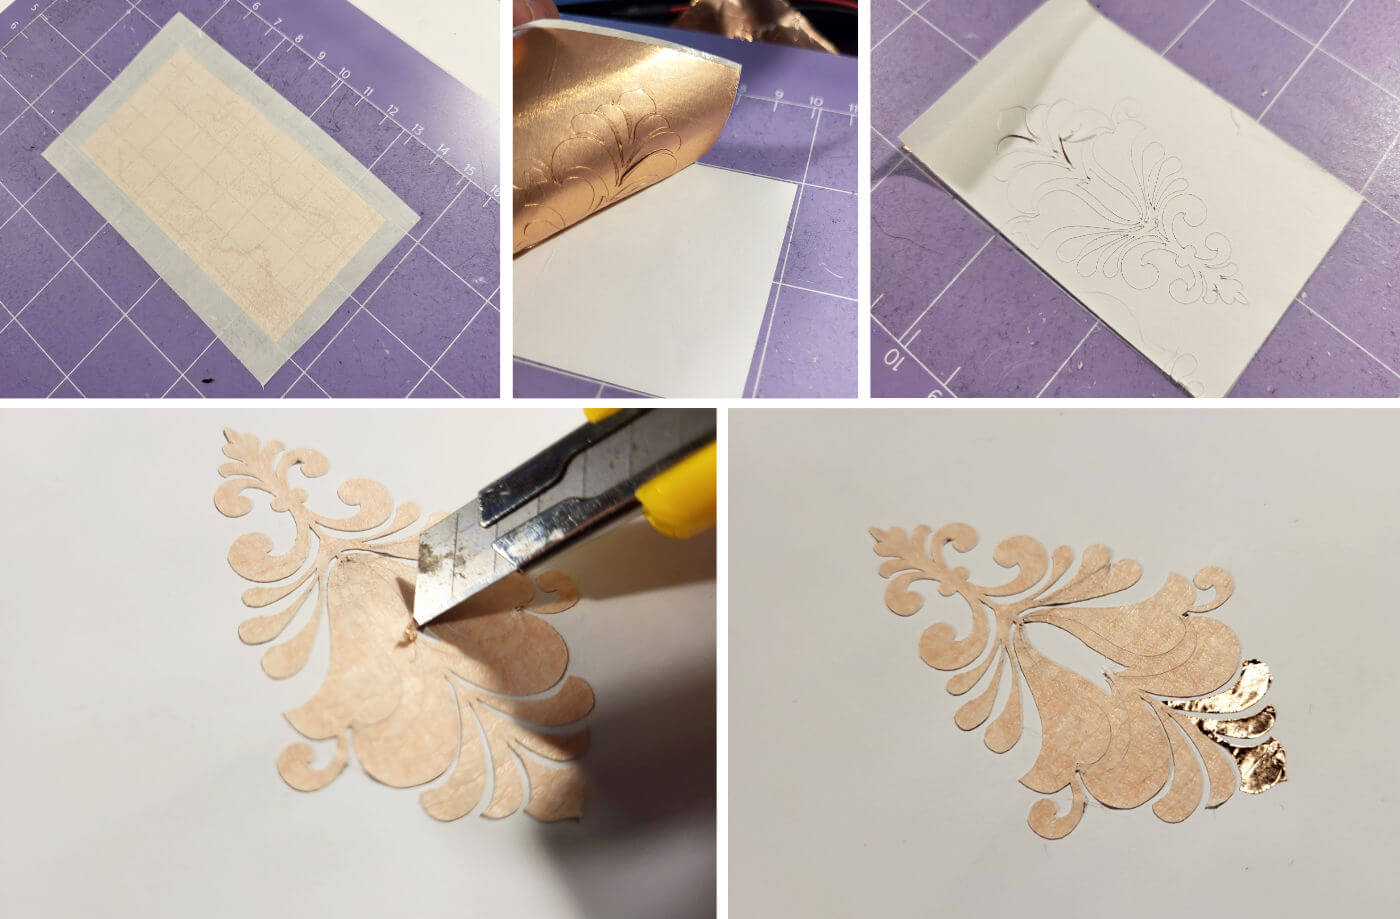
Following "DuoSkin" project the design were created in Inkscape. In order to make the process easier, the grid is set to a ratio of 2 and 1 mm and snap to grid is enabled. The thickness of the line is set to 2 mm, because the goal was to have traces of this thickness and gaps between them 1 mm. It is better to start drawing from the middle of the object.
Plottering copper
Cricut Design space software is very easy to use. The program accepts SVG files, I just noticed it likes a few things about SVG. First, to keep the entire object to be cut in one clean color, a similar rule applies when cutting with a laser cutter. Second, if the union function is applied.
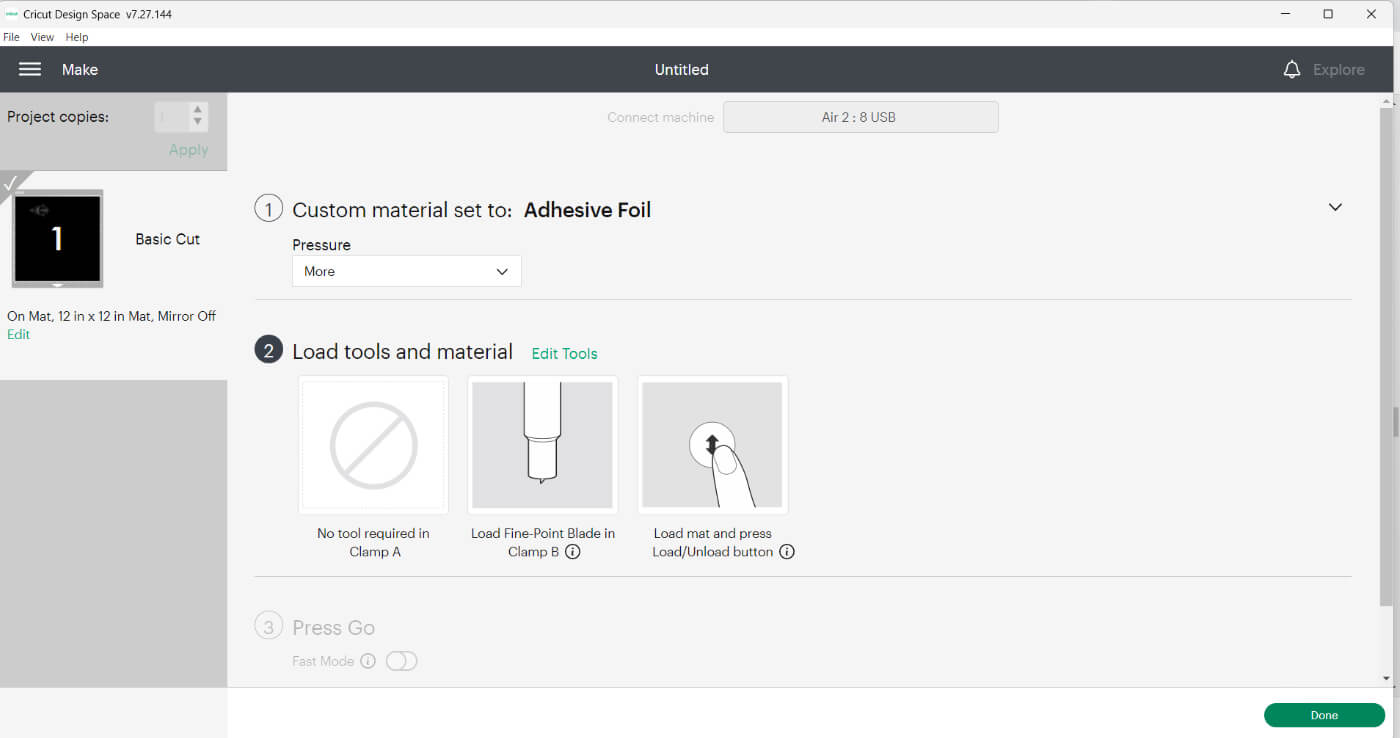
The following settings emerged in the tests: custom material set to Adhesive Foil / Defolt preasure.
I was able to cut out this design straight away with no problems, I guess because the lines are basically straight.
The transfer film was used for the purpose of transferring the cleaned object to another surface.
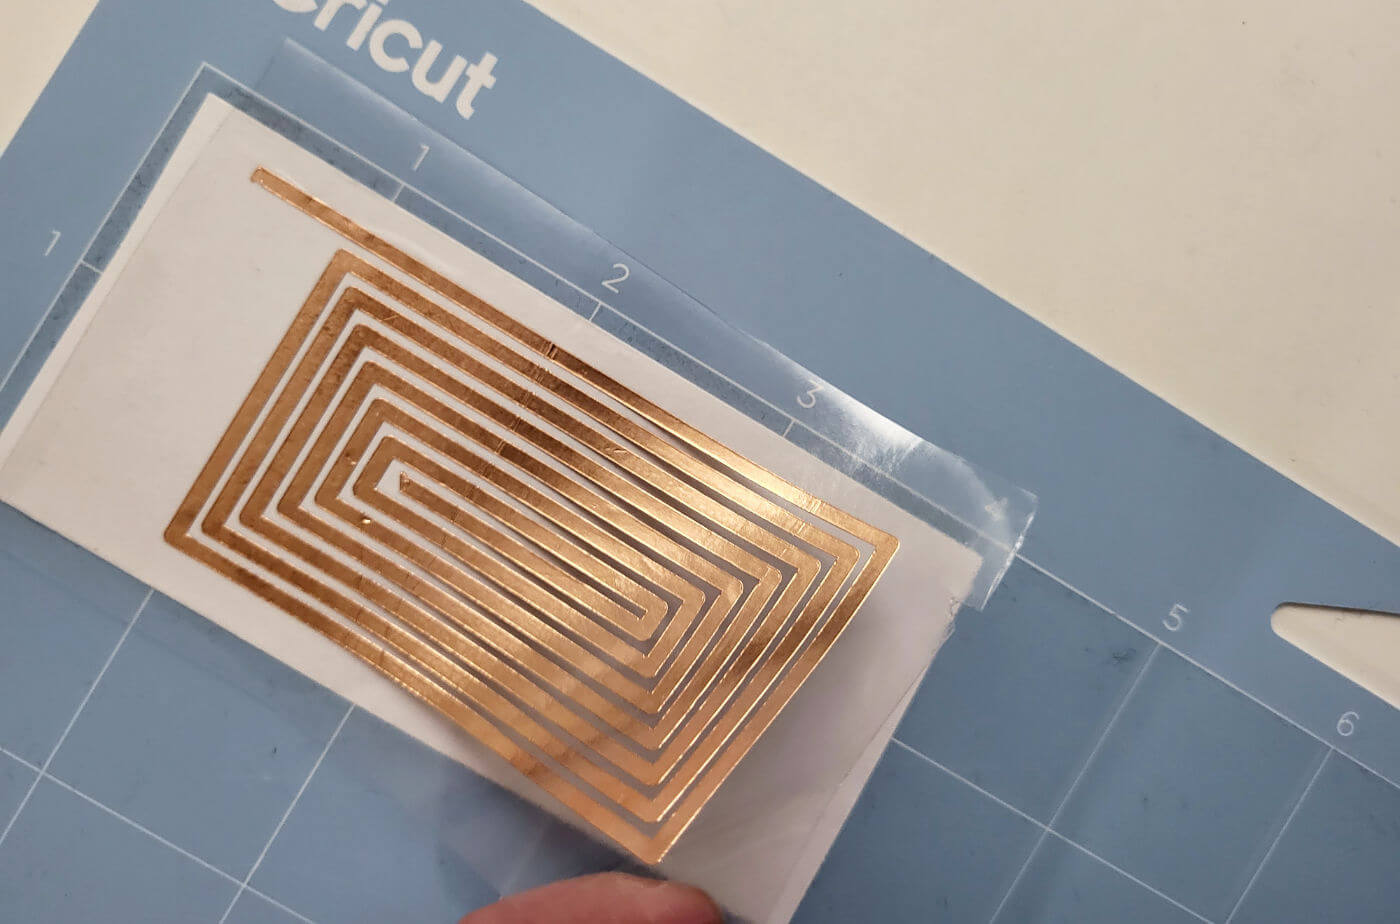
Plottering copper sheet whith Cricut Explore Air 2 plotter.
Sensor No2
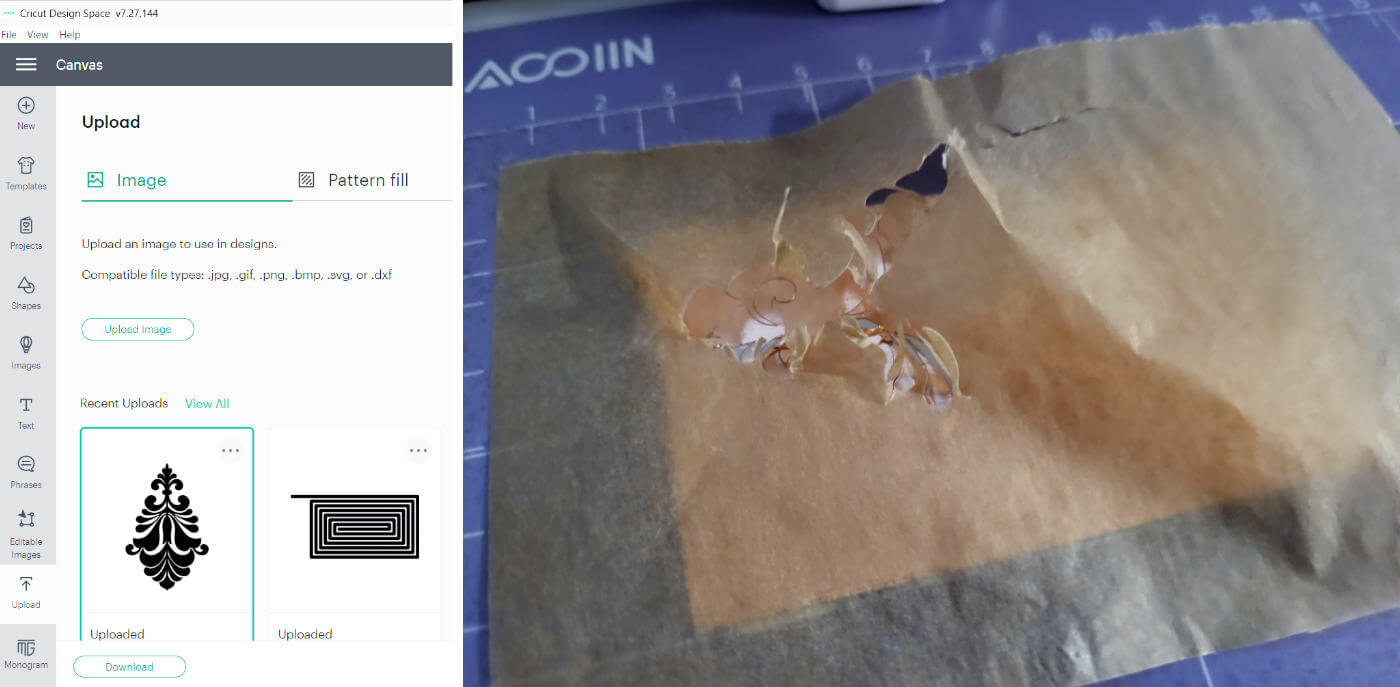
The idea was to create a jewelry sensor with a minimum distance of 0.5 mm. This time the plotter said NO. Then I found information that it is possible to use baking paper on the top layer, thus preventing the copper strip from peeling and tangling on the plotter blade. Unfortunately, this method did not work in this case.
test No1
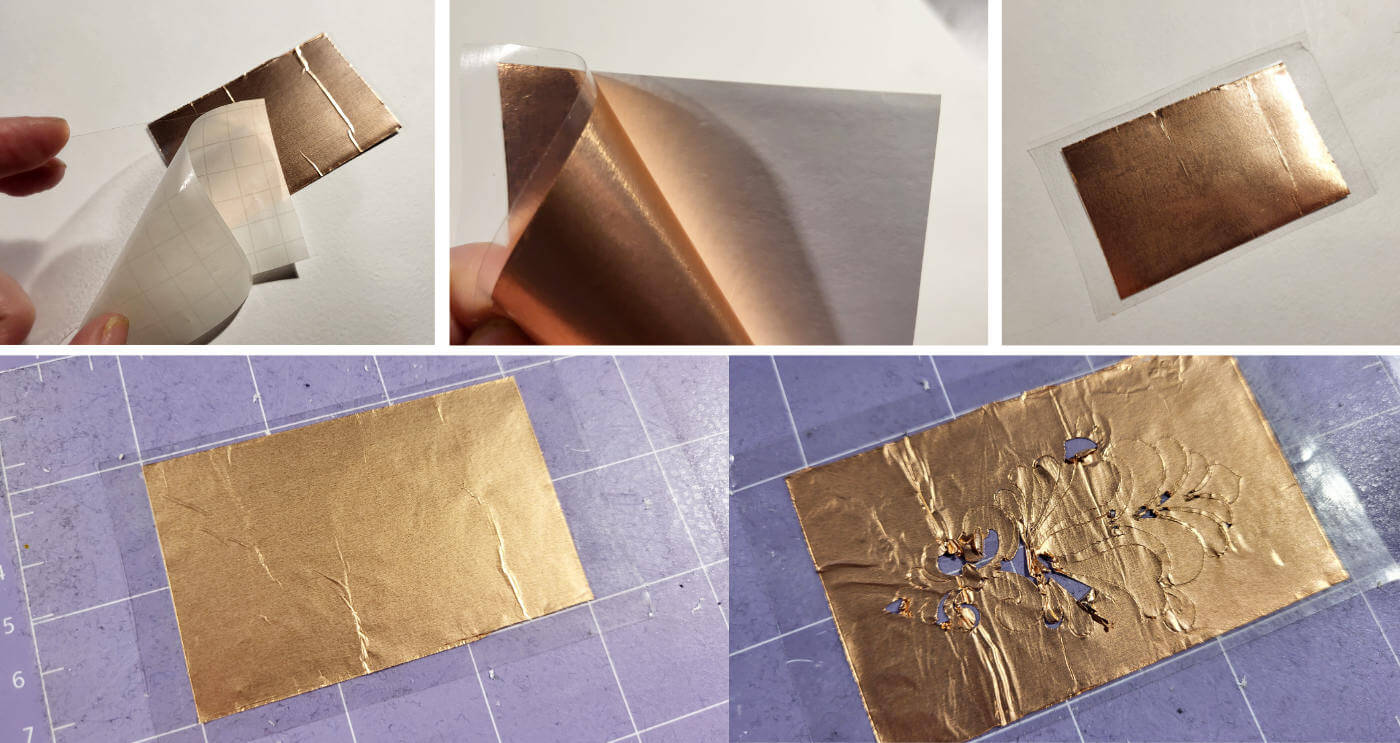
Then there was a second attempt to stick the transparent and sticky part of the transfer film on the top layer, the copper tape on the second sticky side down and the third layer to put what was left after peeling off the transfer film.
transfer film transparent and sticky part of the (sticky side down)
⤵
copper tape (sticky side down)
⤵
transfer film backing
Plottering settings: custom material set to Adhesive Foil / Defolt preasure.
Unfortunately, this method did not work either.
test No2
The next test was to stick paper tape on top of the copper tape. The cutting took place, but it was impossible to peel off the paper tape.
test No3
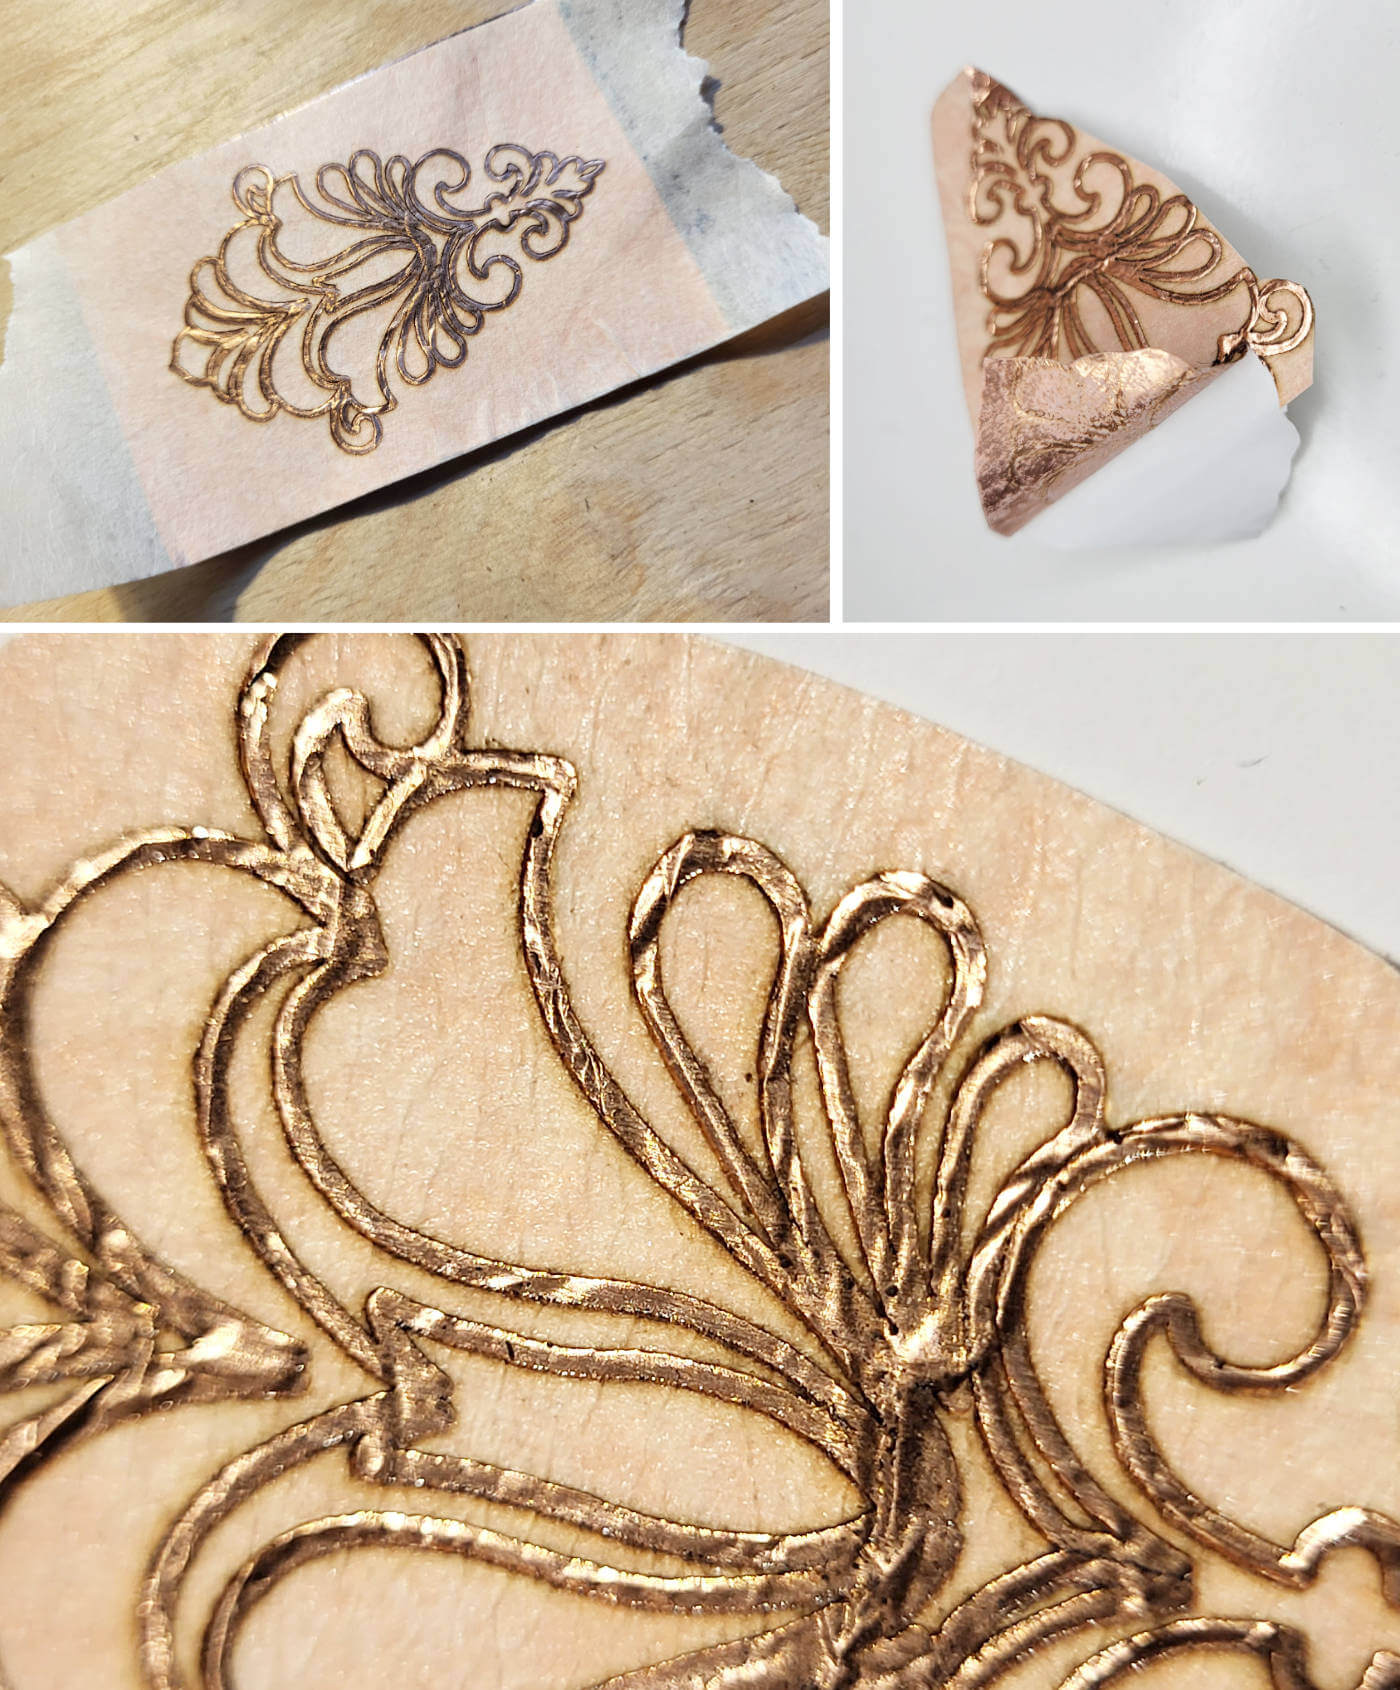
Then the idea of using a laser cutter came up, even though I knew that the metal we had wouldn't be cut by the machine we had.
But the result surprised me! If that would be the traces of the flex PCB (in this case the outline) they would be conductive and precise. Our laser cutter pretty rusty, so I guess it is possible to achieve even more precise results. In the next tests, I want to try textile materials in the top layer.
Cutting settings for Full Spectrum 45W laser cutter
- 60 speed, 40 power, 1 pass

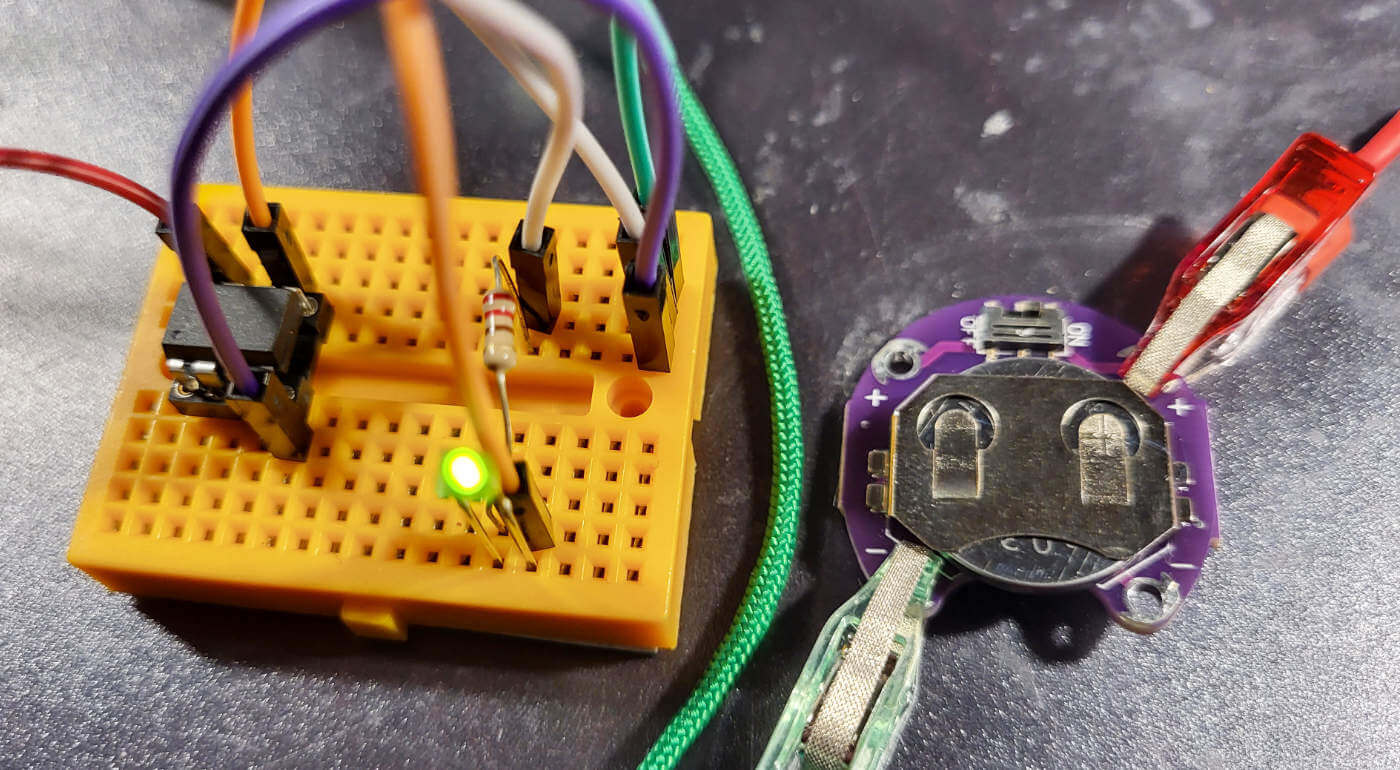
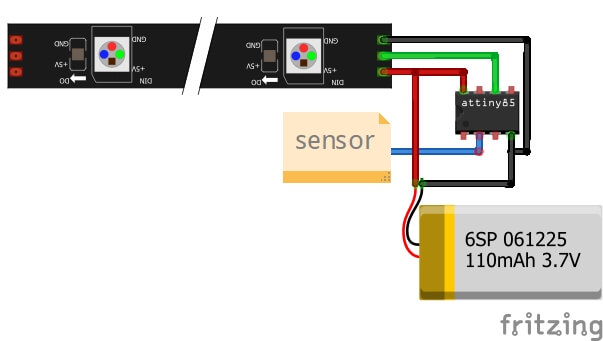
Sensor and ATtiny
Used the code from repository of Jessica Stanley, just applied it to ATtiny85.
I tried to stick the sensor on the fake skin that tattoo artists use, but the copper strip didn't stick to it very well. On the left corner you can see the attempt to tatoo fake skin with conductive paint which needed to be diluted to use it with tattoo machine. Unfortunately, diluted paint has lost its conductivity.
//This sketch includes parts from:
//Jessica Stanley touch sensor for Adafruit Gemma http://class.textile-academy.org/2019/jessica.stanley/assignments/week12/
// - Dave Melis's touch sensor code for ATtiny http://highlowtech.org/?p=1653
// - Adafruit example sketches for controlling Neopixels

#include <Adafruit_NeoPixel.h>
#define PIN 1

Adafruit_NeoPixel strip = Adafruit_NeoPixel(2, PIN, NEO_GRB + NEO_KHZ800);

int calibration = 0;
int previous;
int togglestate = LOW;

void setup()
{
  //Calibrate the touch sensor!
  for (int i = 0; i < 8; i++) {
    calibration += chargeTime(PB2);
    delay(20);
  }
  calibration = (calibration + 4) / 8;

  strip.begin();
  strip.show(); // Initialize all pixels to 'off'
}

void loop()
{
  int n = chargeTime(PB2);

// check if the state of the touch sensor has changed
  if (previous <= calibration && n > calibration) {
    if (togglestate == LOW) togglestate = HIGH;
    else togglestate = LOW;

    if(togglestate==LOW) {
      strip.setPixelColor(0,0,0,0); //if touch sensor not being touched, turn Neopixels off
      strip.setPixelColor(1,0,0,0);
    }

    else { // but if they are being touched...
      strip.setPixelColor(0,255,0,255); //Make the first one this colour
      strip.setPixelColor(1,100,0,255); //And the second one this colour
    }
   }

  previous = n; //record the state of the LED - is it on or off
  strip.show(); //Turn the Neopixels on or off!
  delayMicroseconds(500);
}

//This function detects when the touch sensor is being touched
byte chargeTime(byte pin)
{
  byte mask = (1 << pin);
  byte i;

  DDRB &= ~mask; // input
  PORTB |= mask; // pull-up on

  for (i = 0; i < 16; i++) {
    if (PINB & mask) break;
  }

  PORTB &= ~mask; // pull-up off
  DDRB |= mask; // discharge

  return i;
}
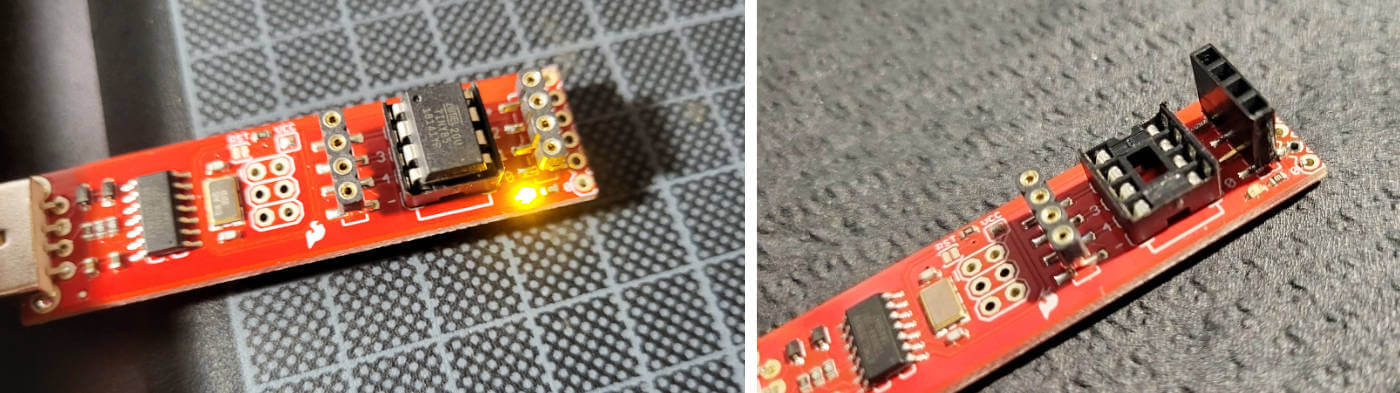
I was lucky to have the Sparkfun Tiny AVR Programmer, it is very easy and fast to work with. But as they say, you plan and god laughs. I broke the programmer pins and guess I broke it in my rush to fix it. The pins on this programmer are not suitable for typical wires for prototyping electronics on a breadboard.
LOOKING FORWARD
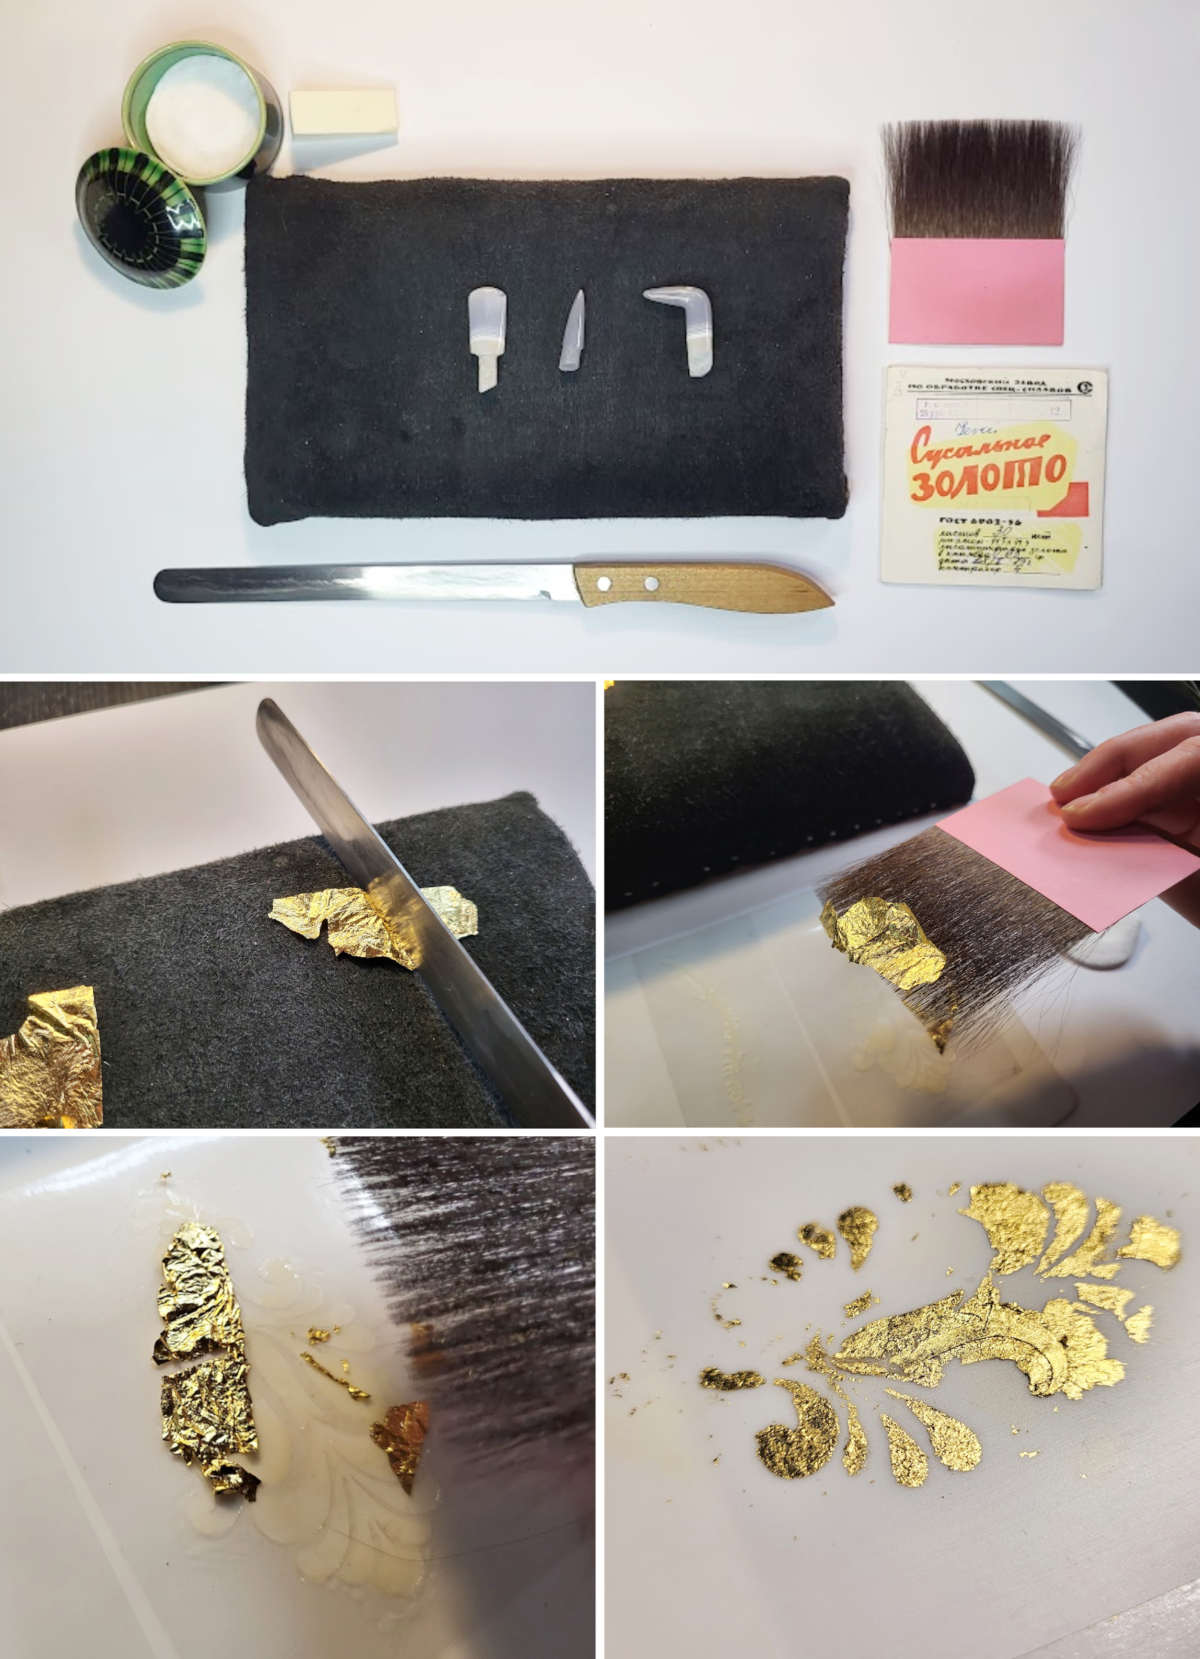
My parents worked as goldsmiths for many years, so I really wanted to try the option with gold. I borrowed from my mother the tools they used for gilding. The set of tools consists of a special knife-blade, a leather pillow-pad, a whisk made of squirrel tail hair and an agate stone tool for gold polishing.
Unfortunately, I didn't have time to dive deep in to this experiment this time, but I will definitely try it in the future. I tried to put the gold on the the tattoo-skin, but in a hurry I put the gold on too early and it didn't fully stick. I really need more parental guidance to continue this experiment.
FABRICATION FILES
-
Sensor No1 SVG file: touchsensor.svg ↩
-
Sensor No2 SVG file: goldenleaf.svg ↩