5. E-textiles
Overview
This week was all about electronic textiles (e-textiles), sometimes called soft-circuitry -- basically an introduction into incorporating circuits into textiles, clothing, and fashion. We learned about current and the flow of electricity, we made soft-buttons (on/off switches) and soft- sensors (switches with variable states), and we experimented with Arduino, a micro-controller and software platform that allows us to code and communicate with our circuits. I actually have done a few e-textile projects in the past so this week was more of a review. But it was really good to have the referesher, it challenged me to remember what I had learned in the past and actually helped me understand it better.
Key Terms
Some key terms to get oriented:
- Current: flow of electricity (measured in Amps)
- Voltage: the relationship between the energy/ force applied and the electric charge (measured in Voltz)
- Resistance: a force that counter-acts the flow of current (measured in Ohms)
- Digital Input aka a Switch:
- Analog Input aka a Sensor:
- Schematic Diagram: a picture that represents the components of a process, device, or other object using abstract, often standardized symbols and lines.
Tools
Tools to know:
- Arduino: hardware microcontroller and software coding platform that allows communiation between the computer and circuits.
- Multimeter: A device that combines several measurement functions in one single unit, measuring Voltage, Resistance and Current. It also serves as a debugging tool to check for continuity between points in the circuit.
- Breadboard
- Velosat
Past Projects
Before I dive into what I worked on this week I want to share some of my past e-textile projects. When I was in grad school I gravitated toward hardware and soft circuitry. Here are some of the projects I work on during that time:
The Assistive Mat
This project was designed for my 92-year-old grandfather who had just transitioned from living completely independently to moving in with my family because he needed a little help now and then. He liked to sit for long hours and read his newspaper all day, but when he got up to use the restroom or make food he would get lightheaded and faint, which was really scary for everyone. To prevent this from happening my family would hover and ask him many times if he needed to get up but he hated that. To resolve this situation I created The Assistive Mat and placed it at my grandpa’s feet – , when he stepped on it, it would send a text message to someone in the house letting them know that he was “on the move” and could come to his assistance.

The project was built as a simple switch (on/off) when pressure was applied. It was connected to an Arduino, radio receiver microcontrollers, and used a GSM text messaging module to send the text. This was my very first physical computing project so I didn’t totally understand the hardware needed. The first prototype was a bit finicky and if I were to develop it further, I would make it a sensor allowing the text to only be sent when a certain amount of pressure was applied.
My grandpa testing the first prototype and my cousin (his caretaker) receiving the text message
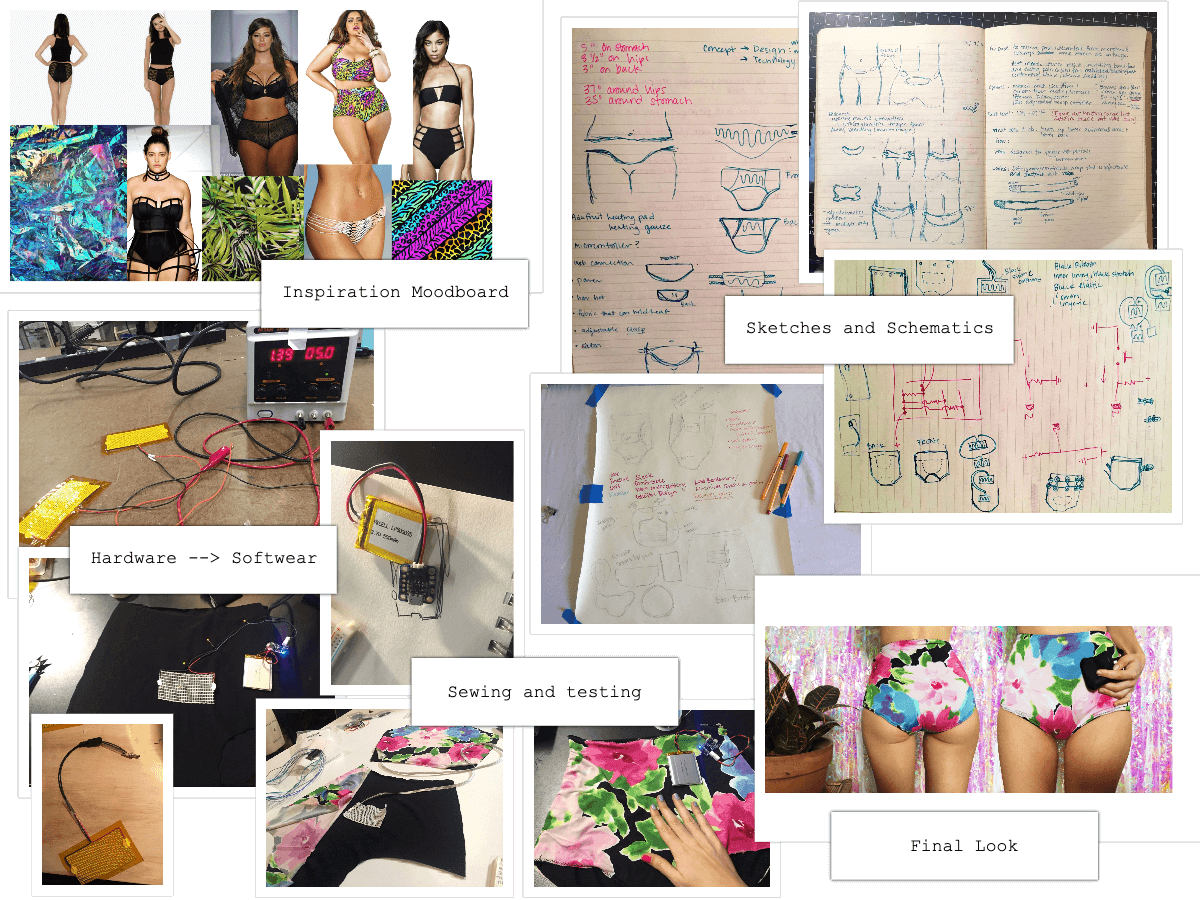
Hot Pantz

Hot Pantz was my first wearable project, designed to soothe my terrible menstrual pain that I was getting during my period. It was sleek, high-waisted underwear with built in heating pads at the abdomen area and lower back to soothe pain for women on the go. Both heating pads were wired with soft silicone wires to a header connector that plugged into a small microcontroller with usb charging capabilities and a lipo battery. The hardware was encased in soft neoprene and was completely removable so I could wash the garment. If I were to develop the project further I would build in an on/off switch (the first prototype started heating up when you connected to power) and a temperature control so you could adjust the heat level. I’ve actually had people reach out to see if this product actually exists and have requested to order it. There have been a lot of period-related tech projects since I made this in 2016 and so I haven’t really thought about really building this out, like, maybe it’s not as efficient as what is already out there?
Costumes as Game Controllers
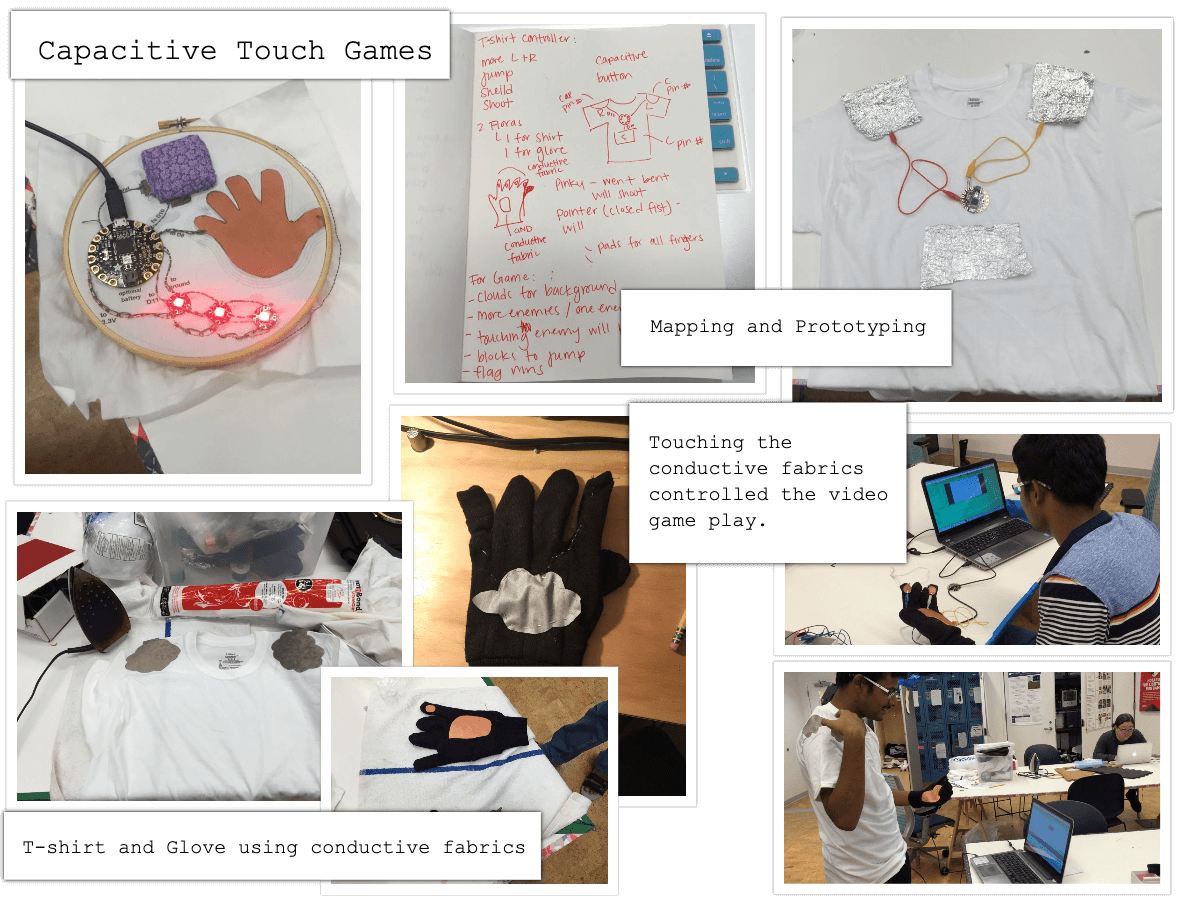
I took this amazing class where we got to create costumes that controlled video games that we built. I was so bad at documenting this and I hate that for me now, but I managed to find a few photos saved on an external harddrive and old tumblr posts.
One of the projects was called Make It Grow and it was a glove that used an accelerometer to make virtual bamboo grow in a Processing sketch (the sketch was inspired by Miyazaki’s film Totoro, where the young girl makes trees grow). The glove was decorated with fresh bamboo on top with the sensors and hardware embedded in the palm of the glove.
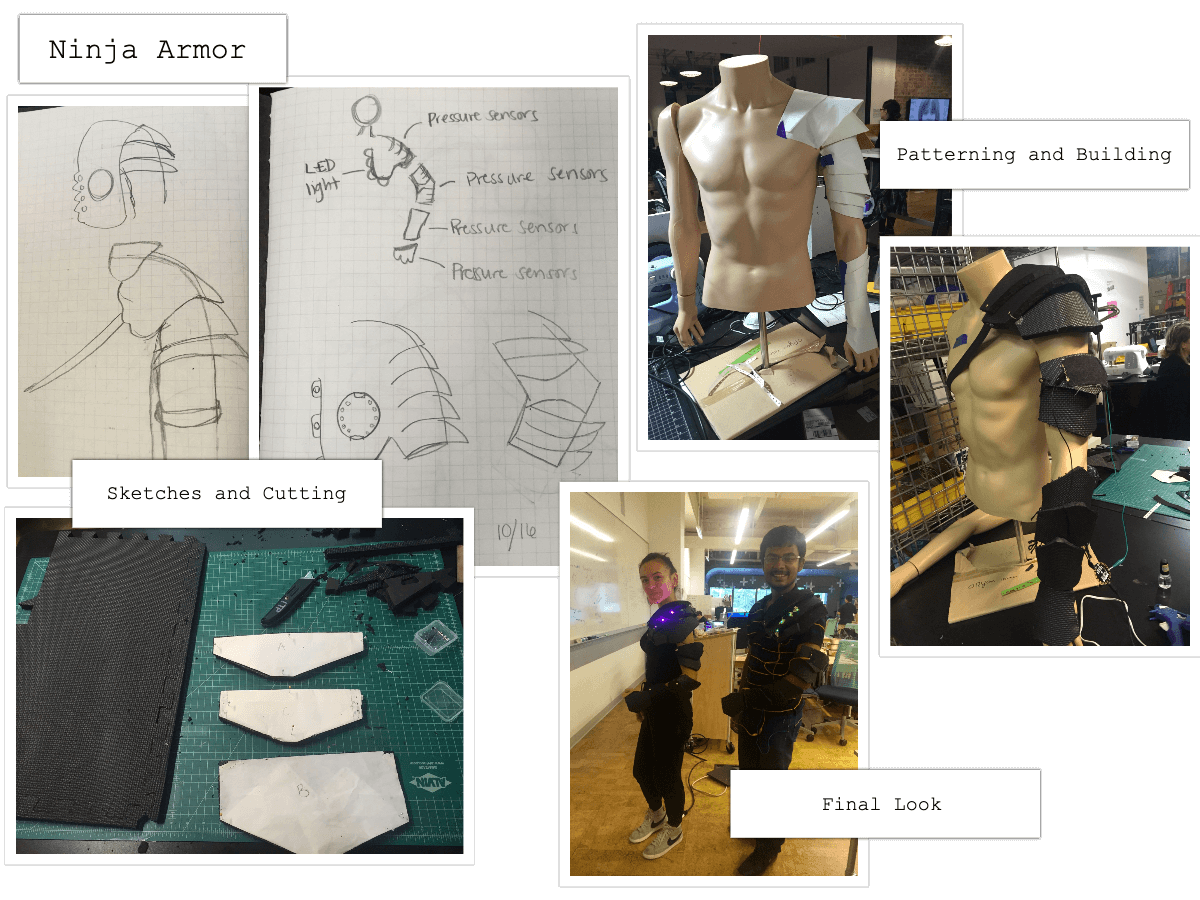
I also designed a game called Ninja Armor where two people put on an “armor” sleeve (made of black EVA mat) embedded with velostat and copper tape and LEDs. The object of the game was to attack your opponent with a swift hand attack to the armor and if you hit correctly, an LED would go off on the opponents armor giving the attacker a point. You played until all 4 LEDs were turned off.
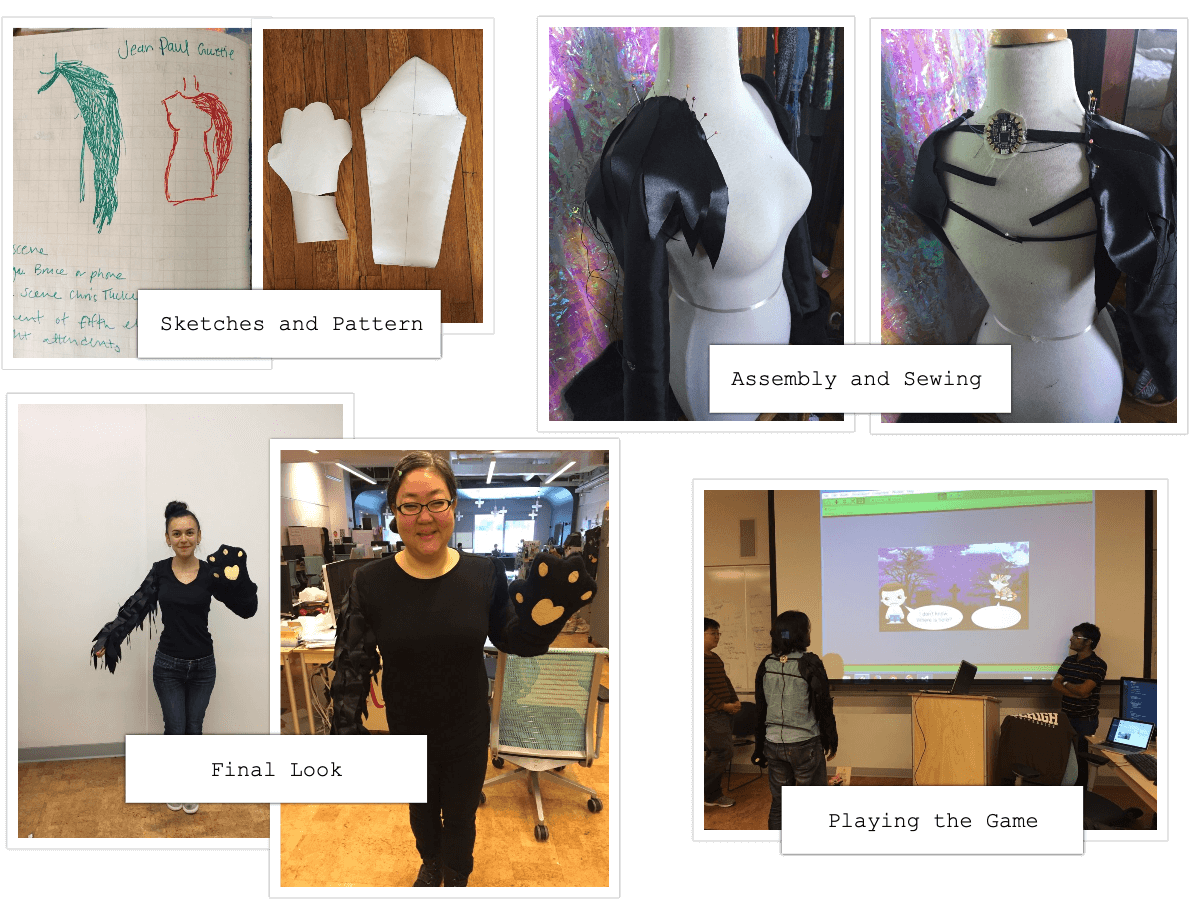
The last project in this class was called Graveyard Escape. I sewed and designed a “feather” sleeve and a cat sleeve that the player wore when playing the corresponding video game. In the video game you turn from a cat to a bird at different levels of the game. The cat sleeve had pressure sensors in the fingers so when you did a clawing/scratching motion in the air, you could navigate through this level of the game. The feather/bird arm had an accelerometer in it so when you flapped your arm as if flying you could navigate this level of the game. I don’t have any saved documentation of the game in action but here are some still process photos.
References & Inspiration
Since I have already made soft-buttons and senors before I wanted to make something I would hold onto after, not just toss out. Here's a link to my mood board to see some initial thoughts and inspiration. I found some tutorials for making circuit felt sugar skulls and I thought that it would be a nice project to try since Dia de Los Muertos and Halloween are approaching. I also have never emboirdered before so I thought this would be a good project to try it out.
I followed this tutorial for my digital button sugar skull: E-Textile Felt Skull Broach
I followed this tutorial to make my analog sensor: SheMakes E-Monster
For both of these tutorials I modified the instructions to get an outcome that I was looking for.
Analog Sensor
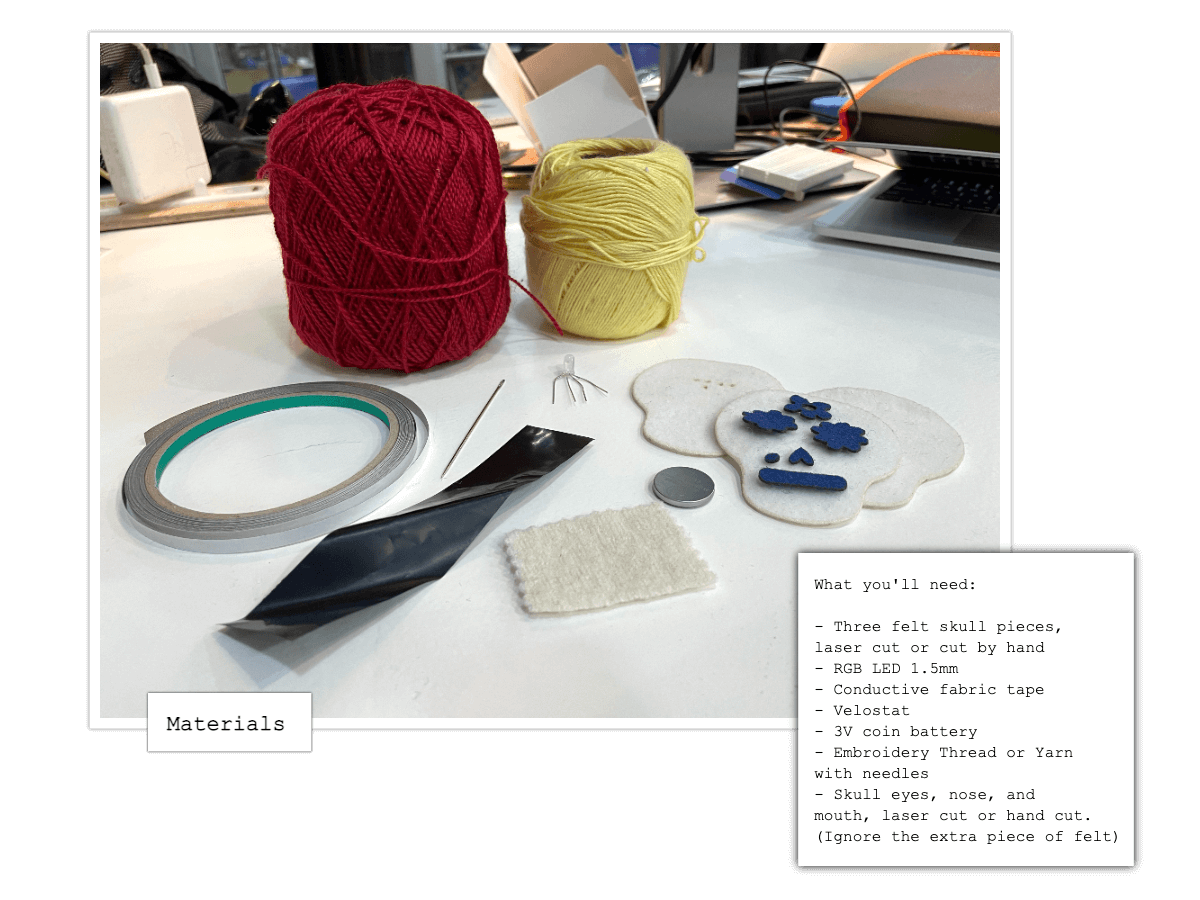
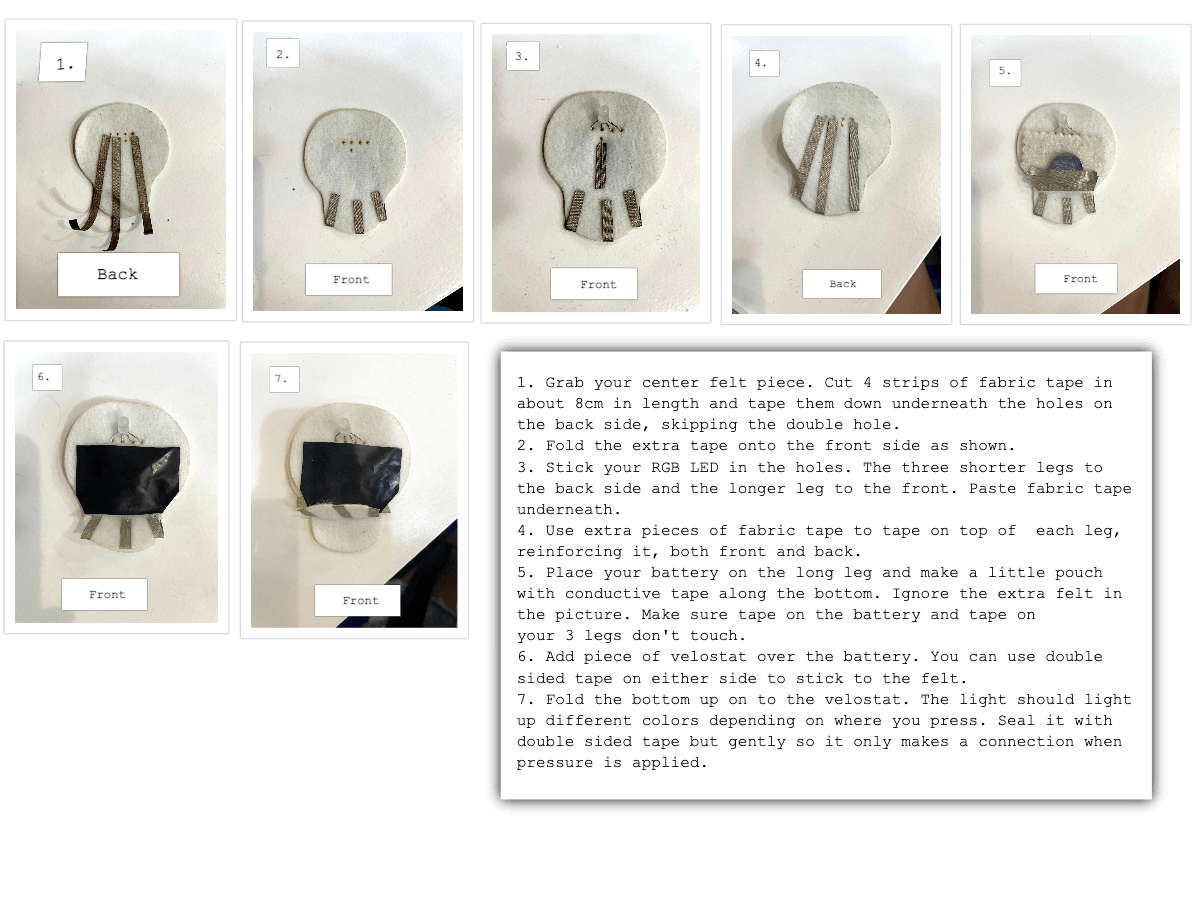
For this project I modified the SheMakes E-Monster tutorial.
Here is the laser cut file I created if you'd like to use it: Sugar Skull Laser Cut File
I pretty much followed the tutorial step-by-step but instead created a felt sugar skull instead of a monster. I did modify one step in the tutorial because the tutorial calls for an extra piece of EVA foam over the battery but my connections didn't work when i had this in place so I didn't use this piece.
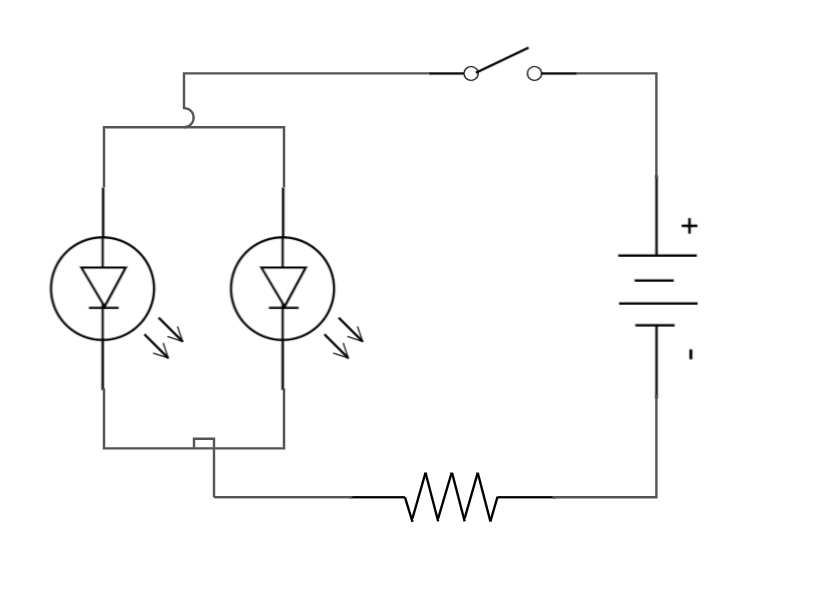
Schematic Diagram
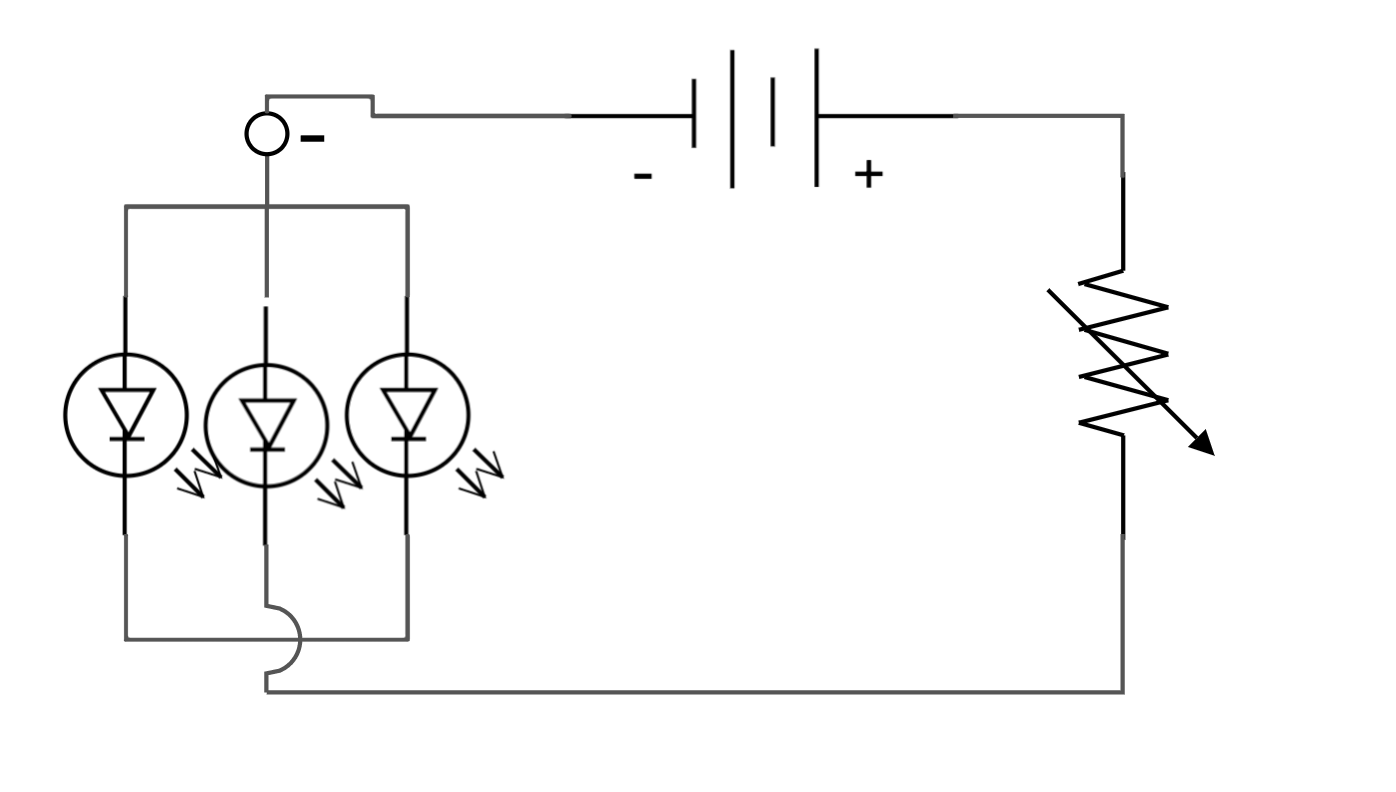

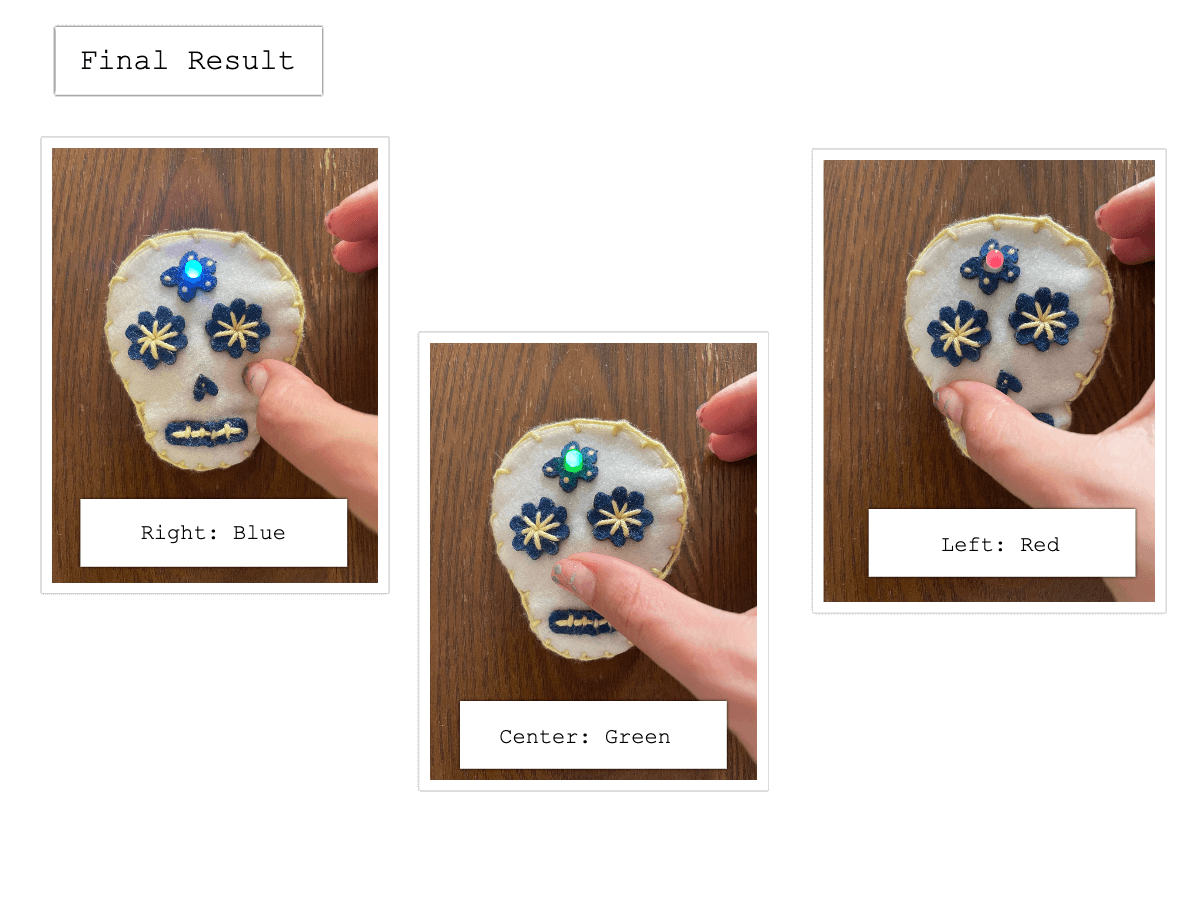
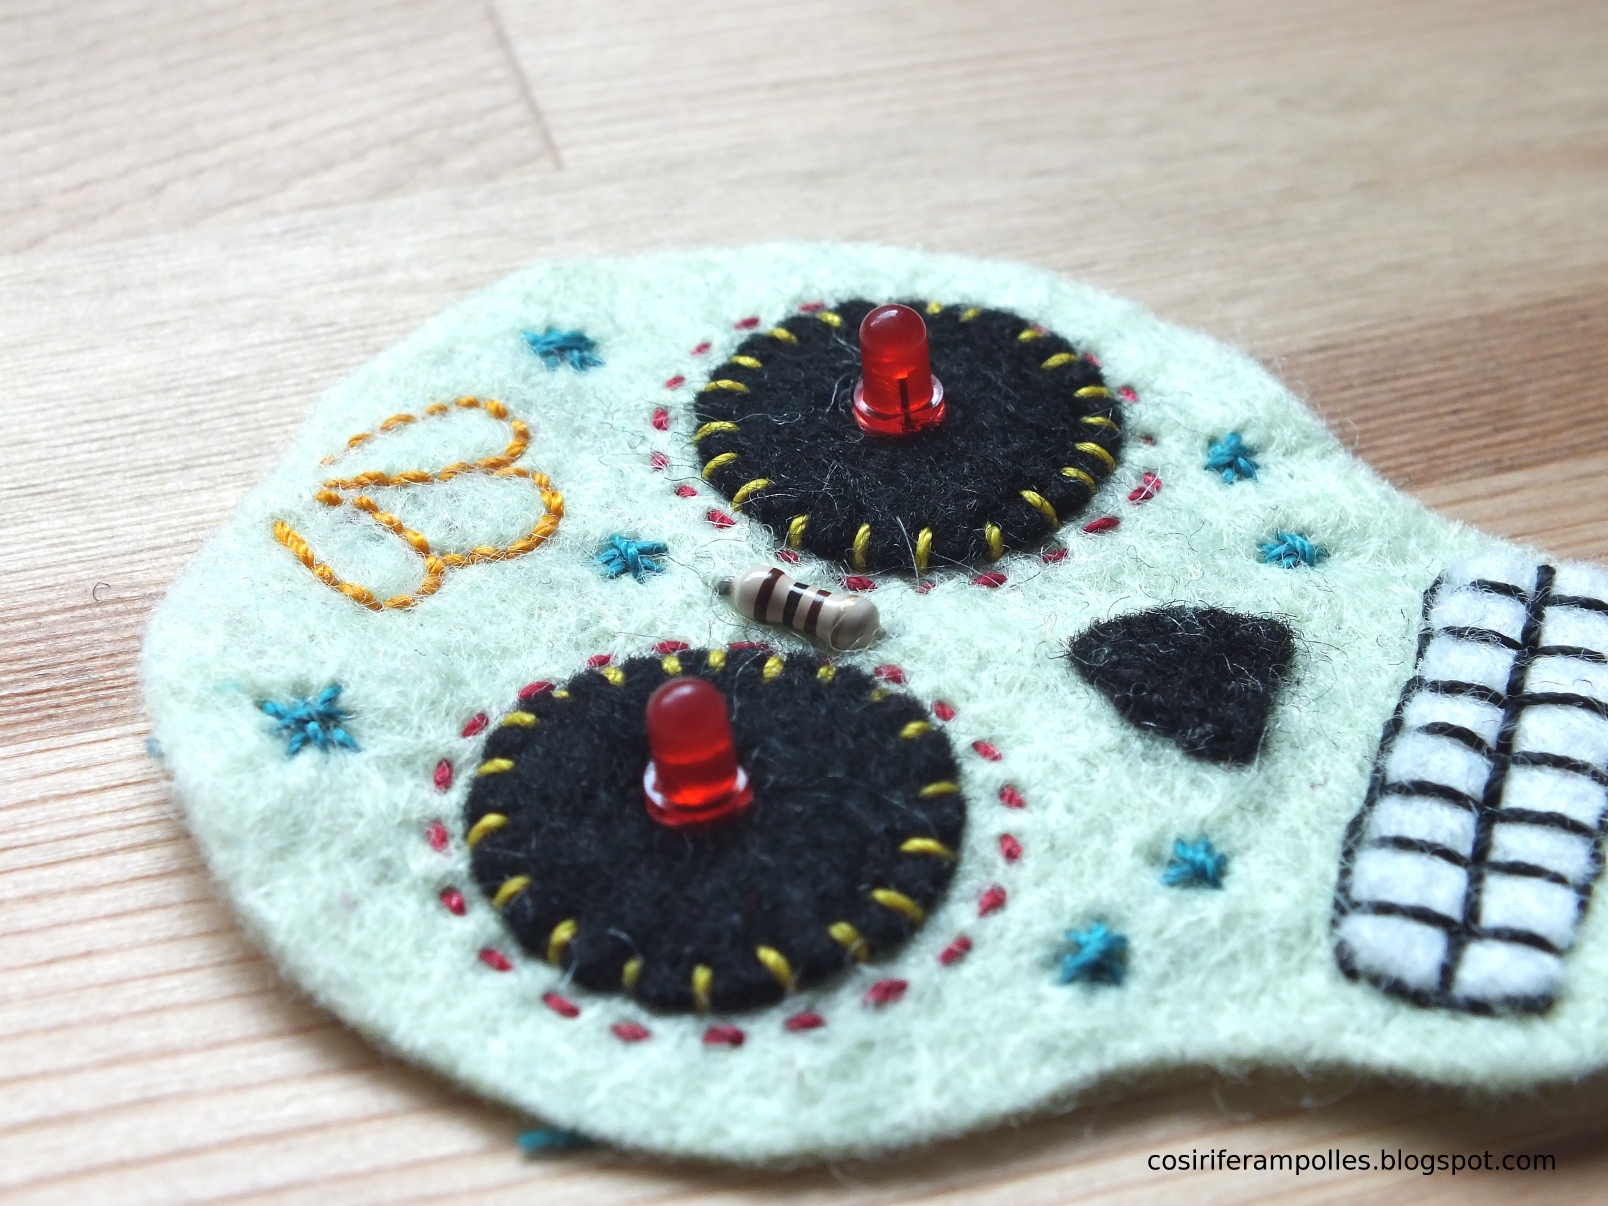
Final Result
Digital Switch
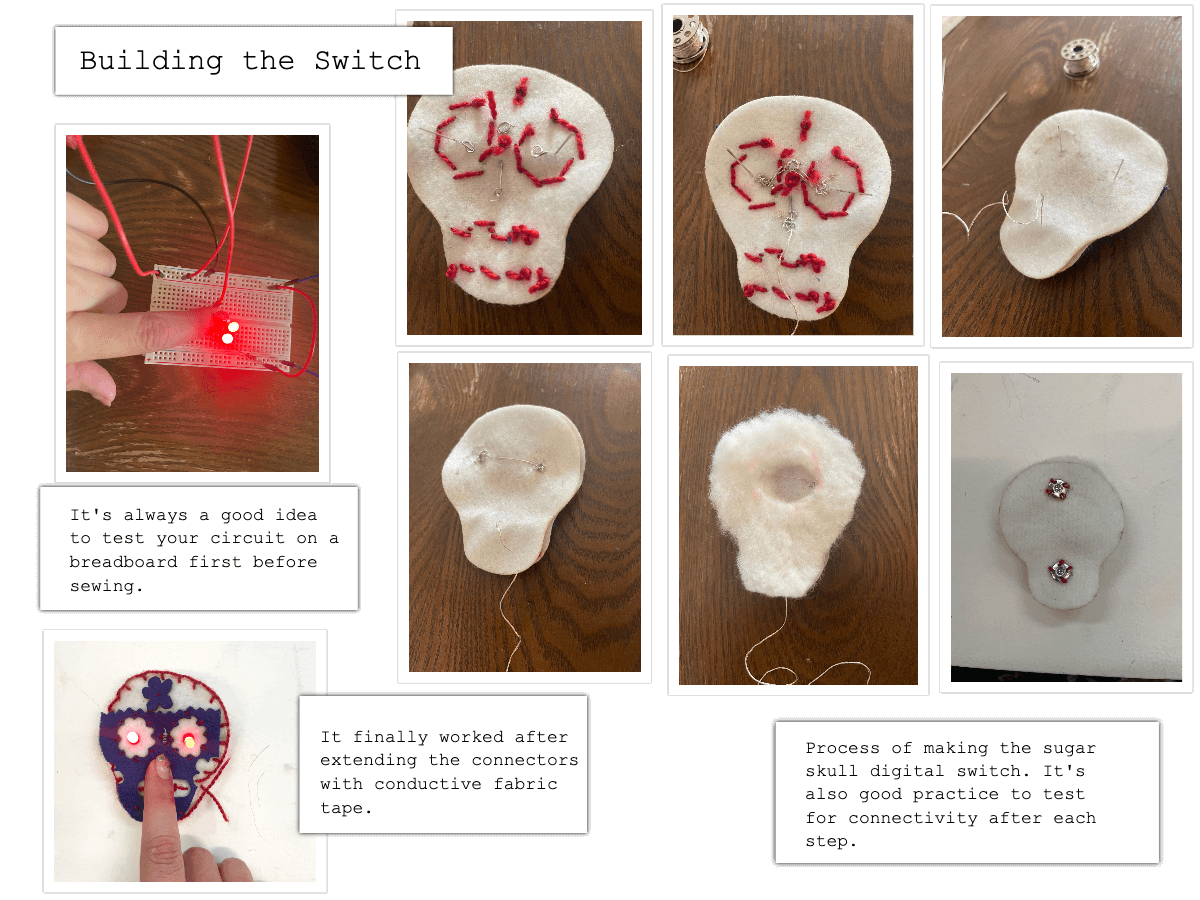
For this project I followed step-by-step this Instructables Tutorial: E-Textile Felt Skull Broach. I had the issue where it was working up until it was all sewn together and then it didn't. So I had to unsew it and check the connections. I ended up reinforcing and extending some of my connections with fabric tape which solved the issue. Here's a bit of a process collage:
Schematic Diagram
Arduino
We began working with Arduino software this week using the ESP32 Adafruit Feather Board. Here is an example of Arduino code reading anolog values.
int Sensor = A5;
int LED = 12;

void setup() {
  // put your setup code here, to run once:
  pinMode(Sensor, INPUT);
  pinMode(LED, OUTPUT);
  Serial.begin(9600);

}
void loop() {
  // put your main code here, to run repeatedly:
  int SensorReading = analogRead (Sensor);
  Serial.println(SensorReading);
  int mapValue = map (SensorReading, 200, 400, 255,0);
  Serial.print ("Map value   ");
  Serial.println(mapValue);
  analogWrite(LED, mapValue);
  delay(500);
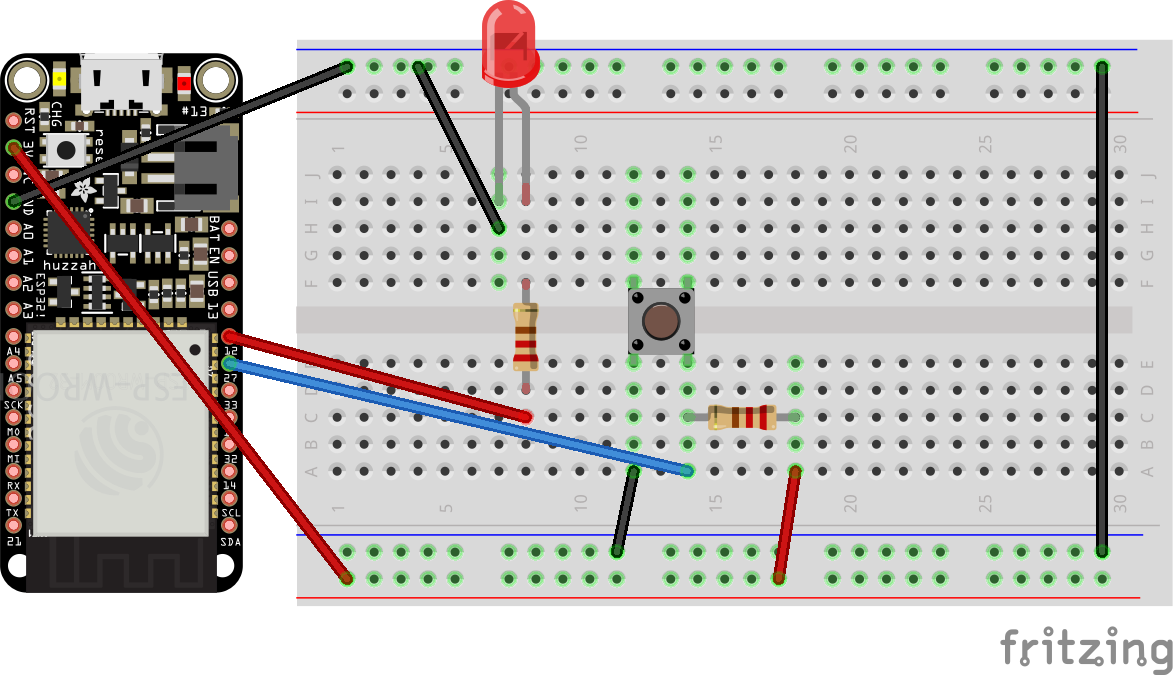
An example of the ESP32 wired up to a button.
Examples we learned this weeek
Tools
Fabrication files
-
File: Sugar Skull Laser Cut File ↩