6. BioFabricating Materials
Overview
This week we dove into creating bio materials! The subject that I’ve been so excited to explore! It was an amazing week, creating so many kinds of bio plastics, leathers, and other materials to play with. I’m really excited about this subject because I’m thinking about making a sneaker completely made from bio materials and this week allowed me to begin that exploration.
The assignment for this week was to produce at least one crafted material (examples include: bio plastics, silicones, foams, algae yarns, fish leather, etc.) and at least one grown material (mycelium materials, kombucha leather, etc). We explored bio 3D printing, mycelium molding, kombucha leather, and bio plastics, silicones, foams, yarn, and resin made from gelatin, agar, and sodium alginate.
I got really excited about experimenting with bio plastics, textures, and COLORS. If you’re familiar with my work prior to fabricademy, I love making clothes out of translucent plastic, so I was really excited to jump into making bioplastic alternatives dyed with biochromes
Research
We started the week with a great lecture from Cecilia Raspanti, breaking down bio materials, why we need them, and all the various forms they can take.

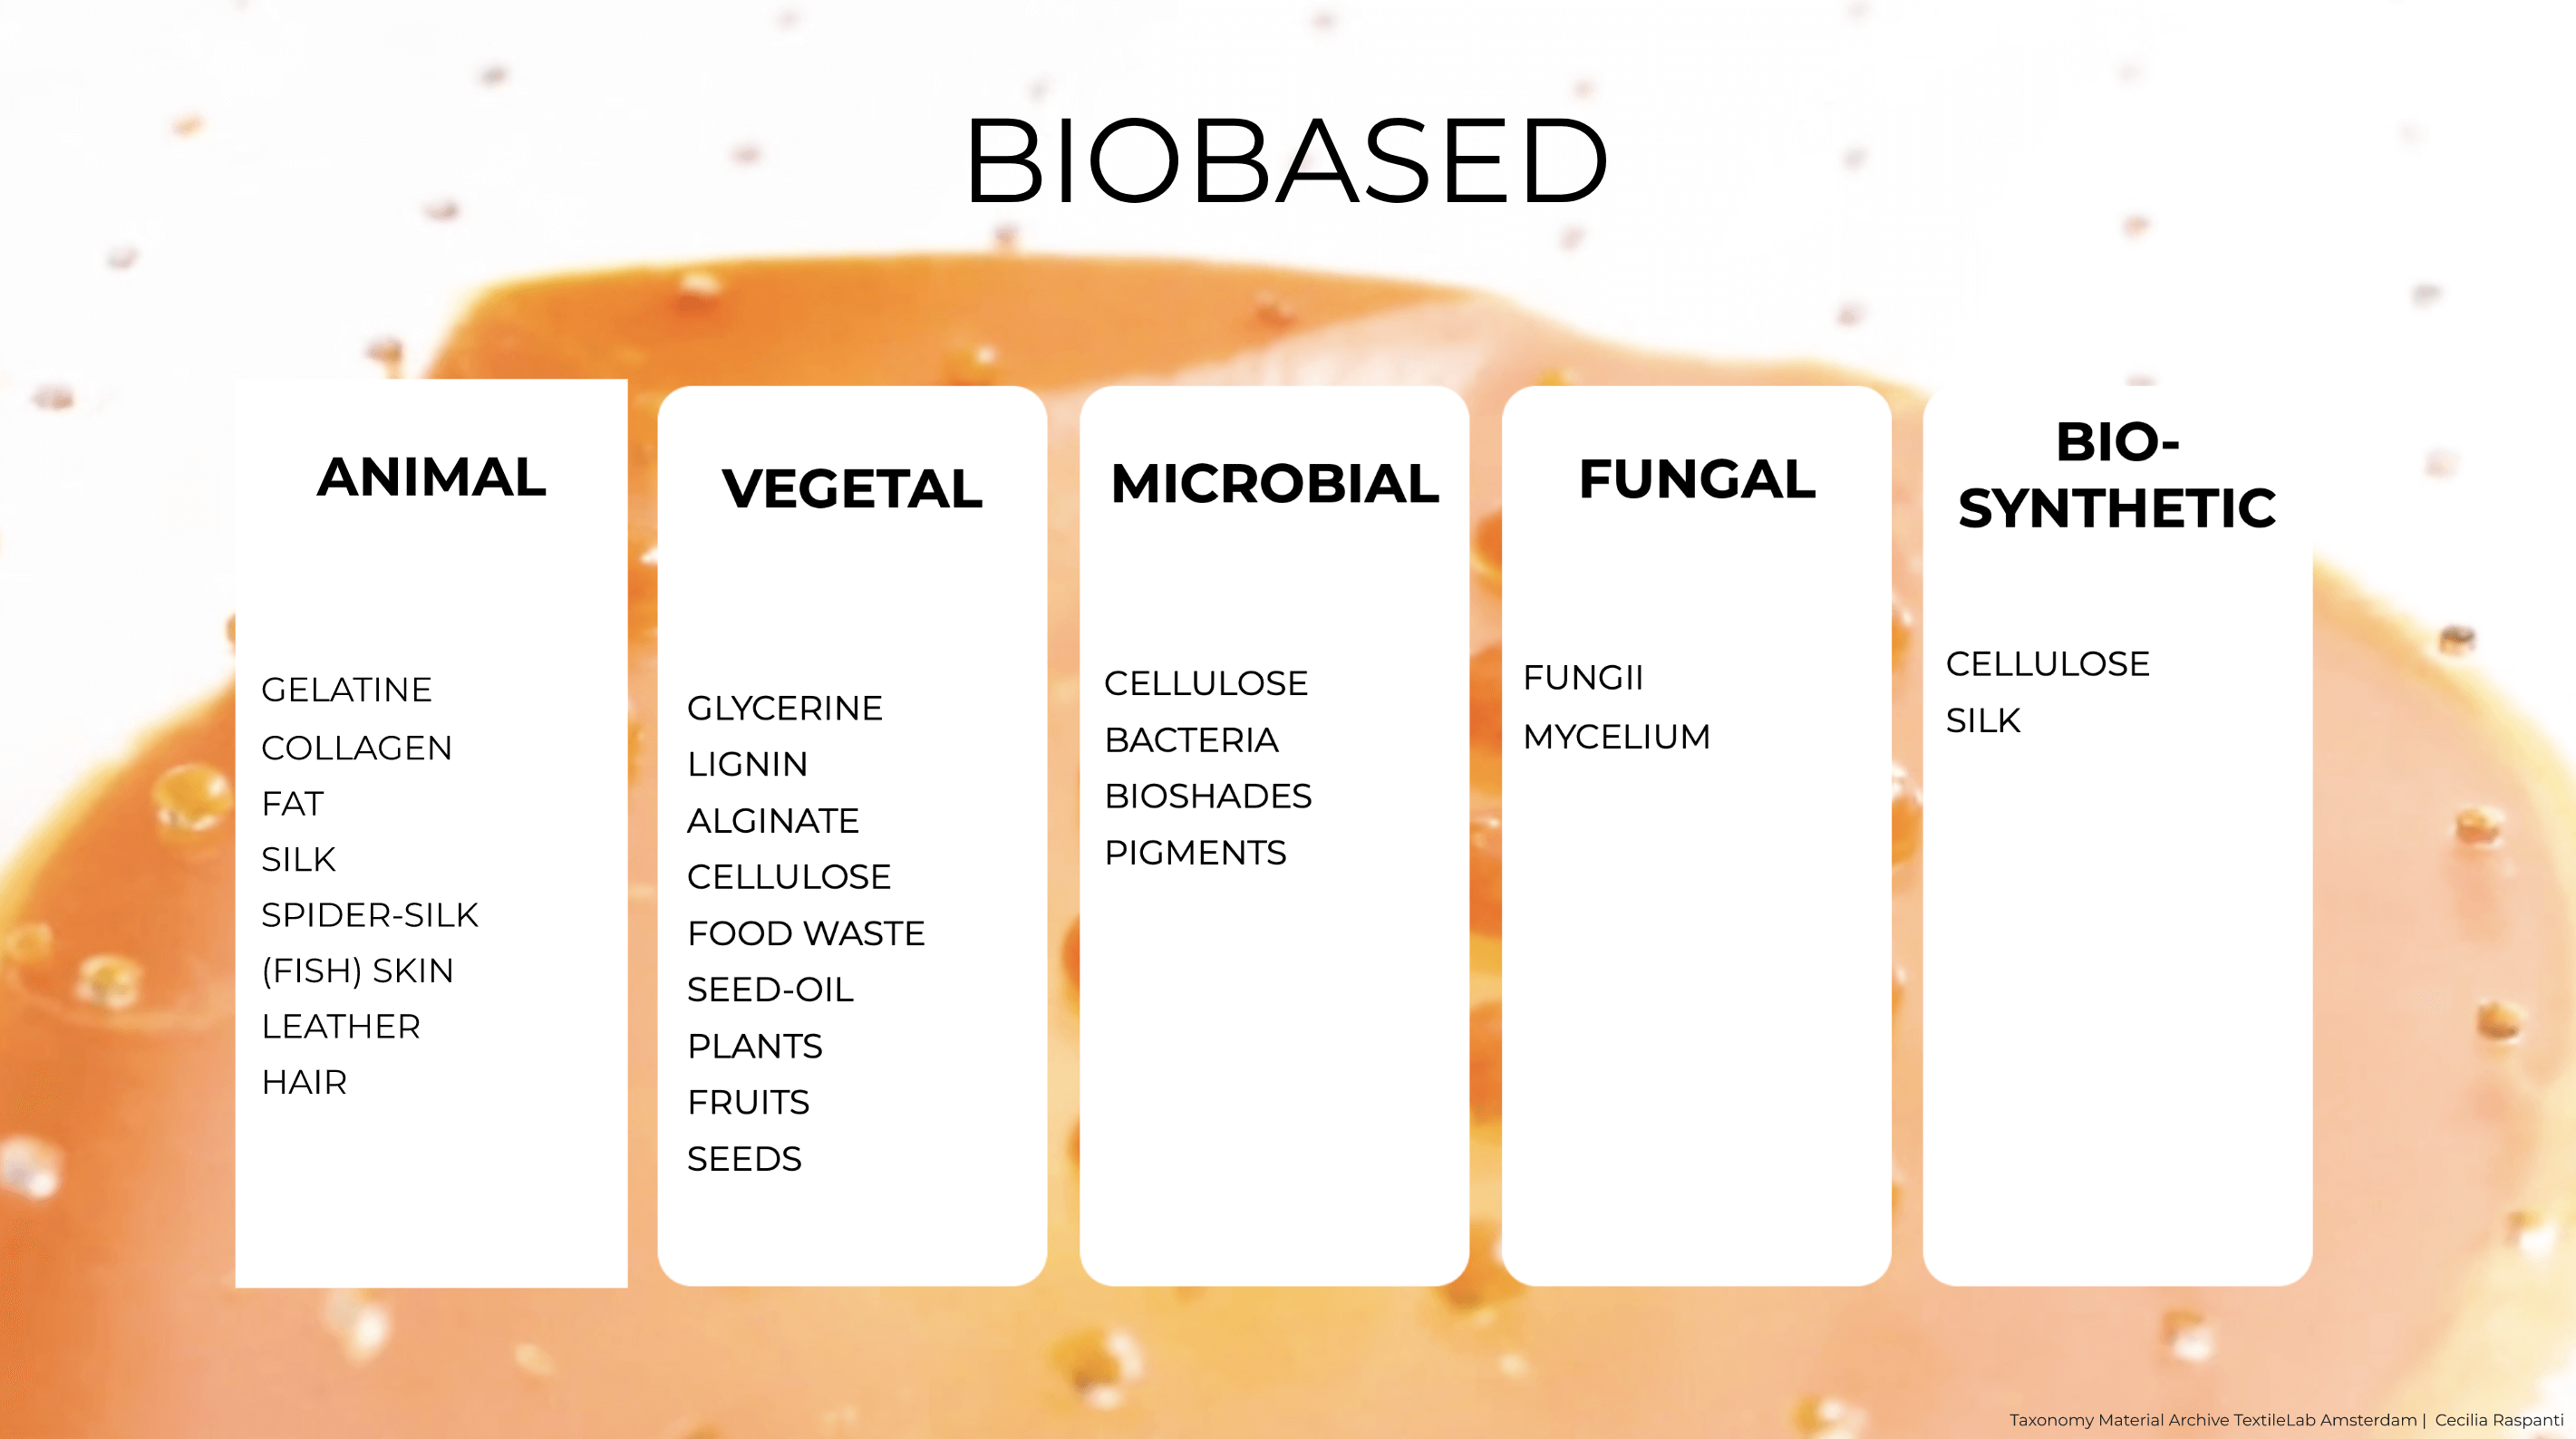
Images taken from slides created by Cecilia Raspanti. You can find the slides and more here.
What’s wrong with plastic? Plastic is literally the cancer of our world. It’s a substance that never goes away, it poisons groundwater, affects the health of humans and animals, poisons our food chains, clogs up the environment, and costs billions to abate. It’s a bi product of oil, super cheap to create, but super expensive to recycle / breakdown and reuse. For more insight and history behind this I highly suggest checking out SlowFactory's History of Plastics Class.
References & Inspiration
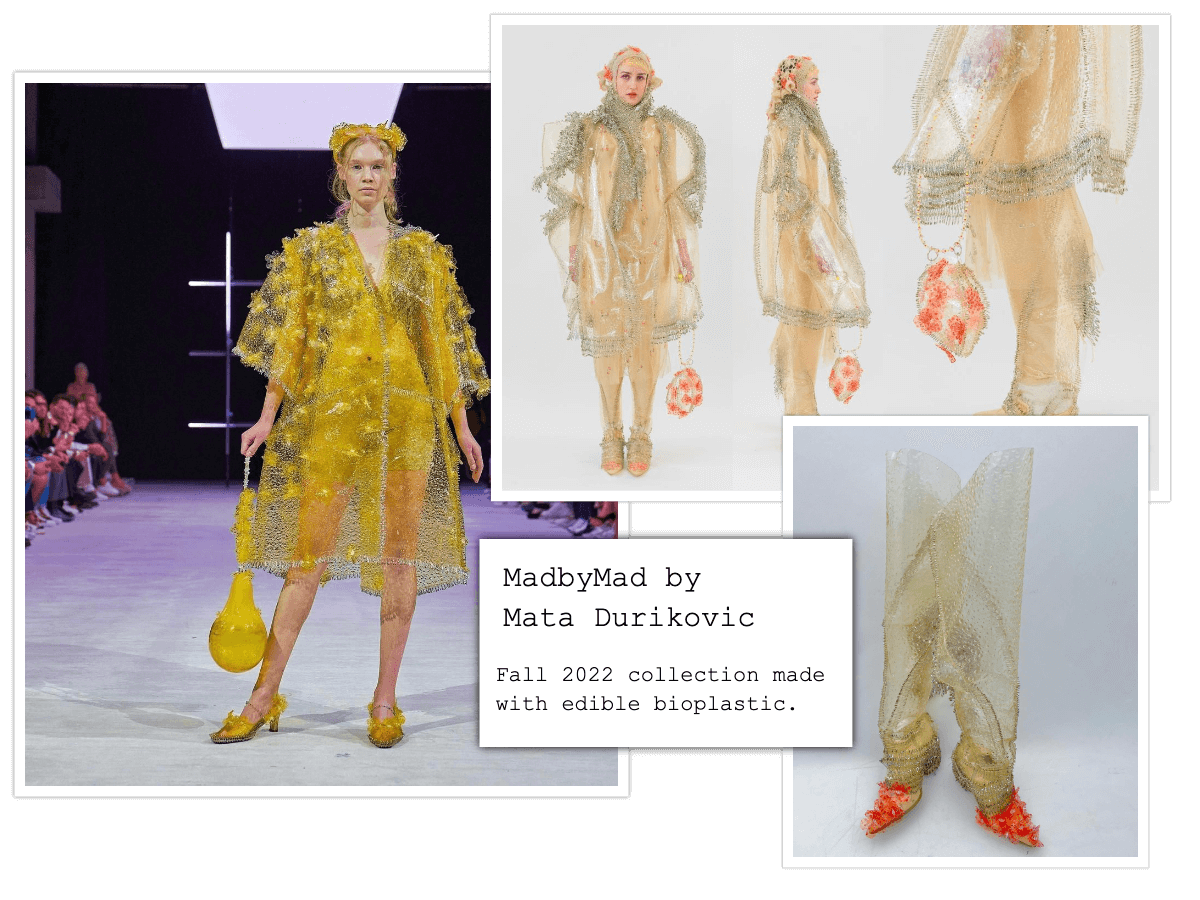
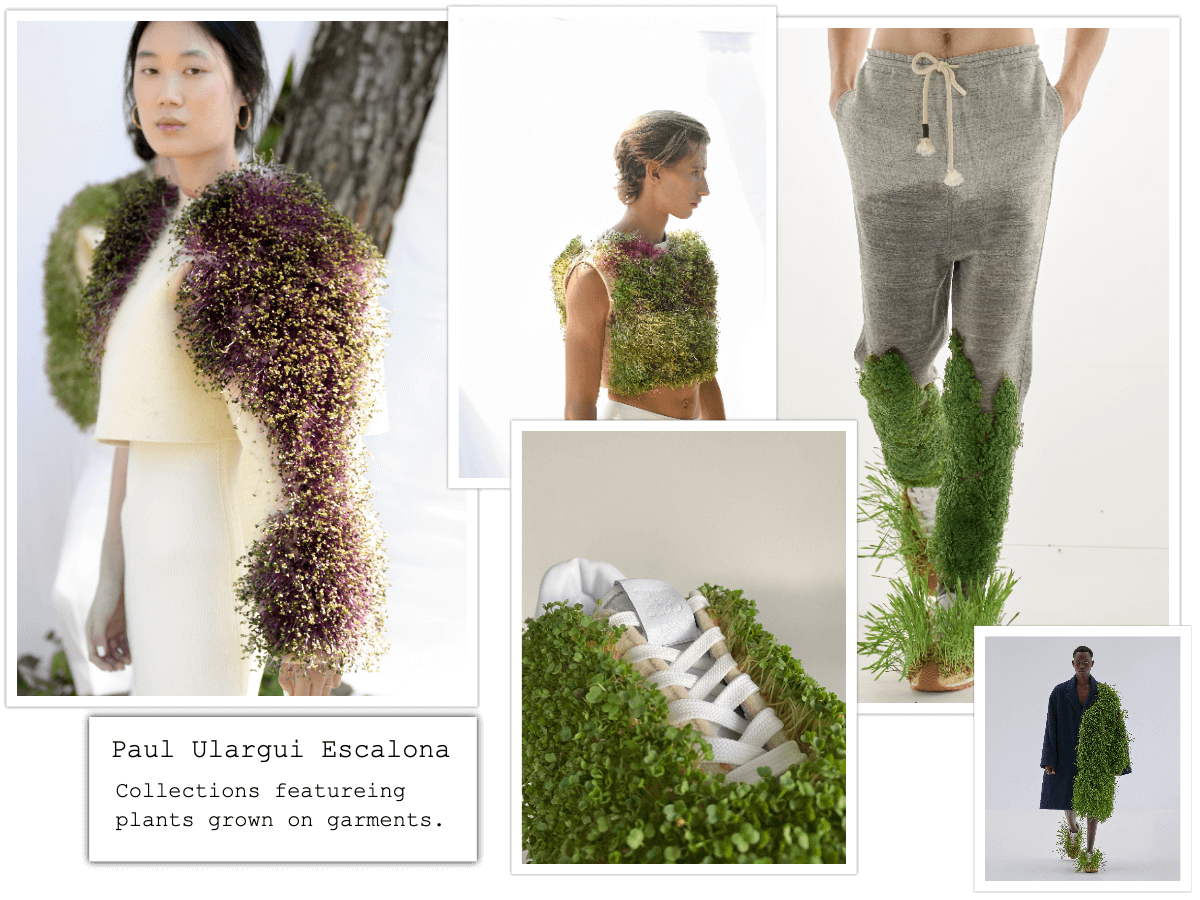
I’m super inspired by the work of MadbyMad by Mata Durikovic who creates couture, edible bio plastics, Paula Ulargui Escalona, who imbeds seeds into her clothing to create living garments, and Suzanne Lee who has been working for years with kombucha to make beautiful garments.

Process and workflow
3D Printing Biomaterials
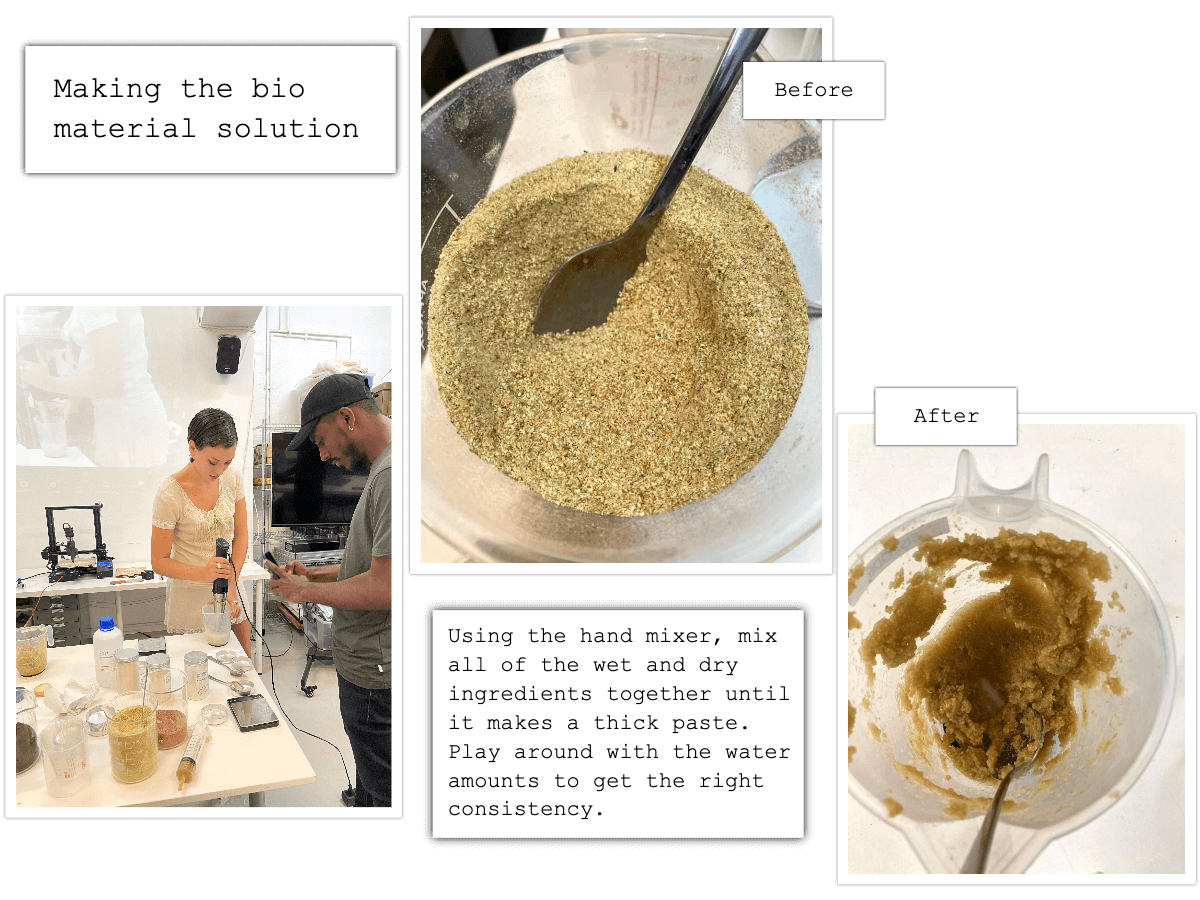
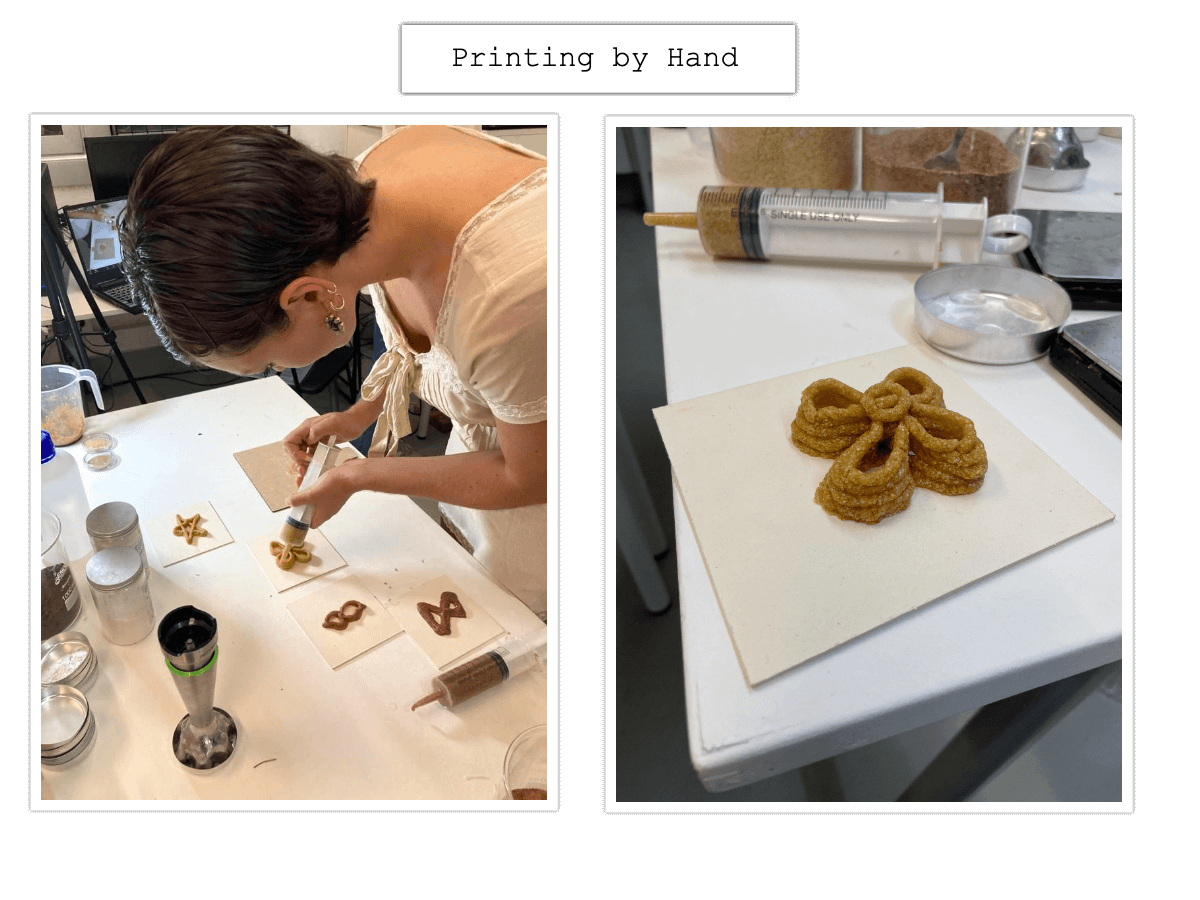
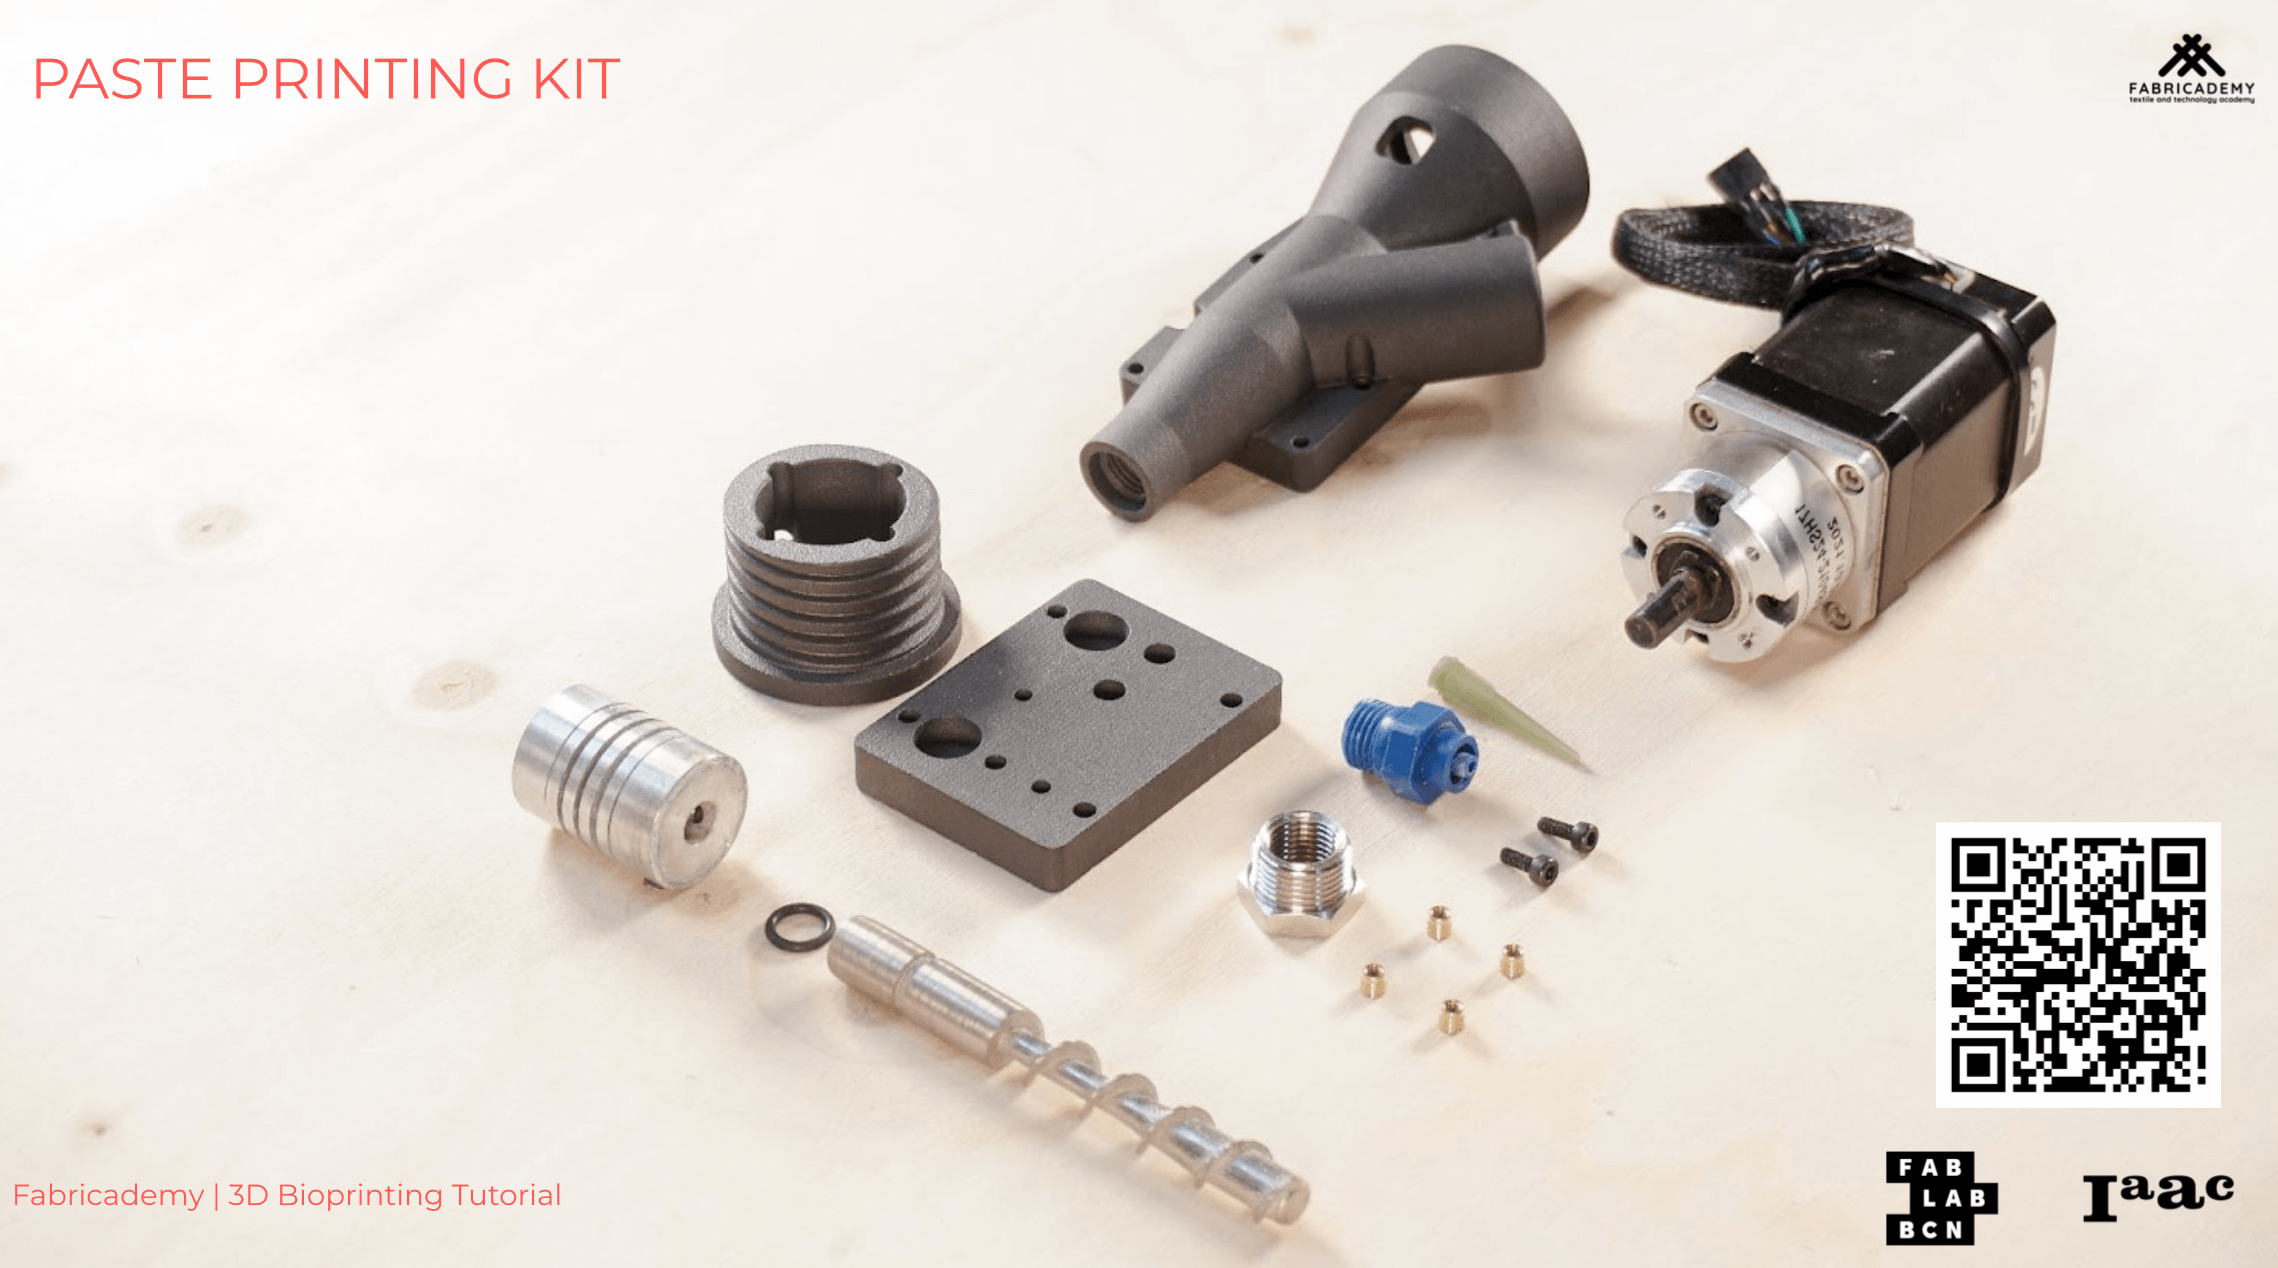
We began the week jumping into bio 3D printing which uses a bio paste solution instead of normal 3D printing filament. To begin, it's always good to test the consistency of your solution by hand printing with a syringe or squeeze bottle before using the 3D printer. What’s cool about this process is that any 3D printer can be configured with a customized extrusion nozzle that allows for this type of bio solution to be printed. Below I’ve included the steps as well as a QR code to the 3D printing files and instructions for creating your custom extrusion nozzle.
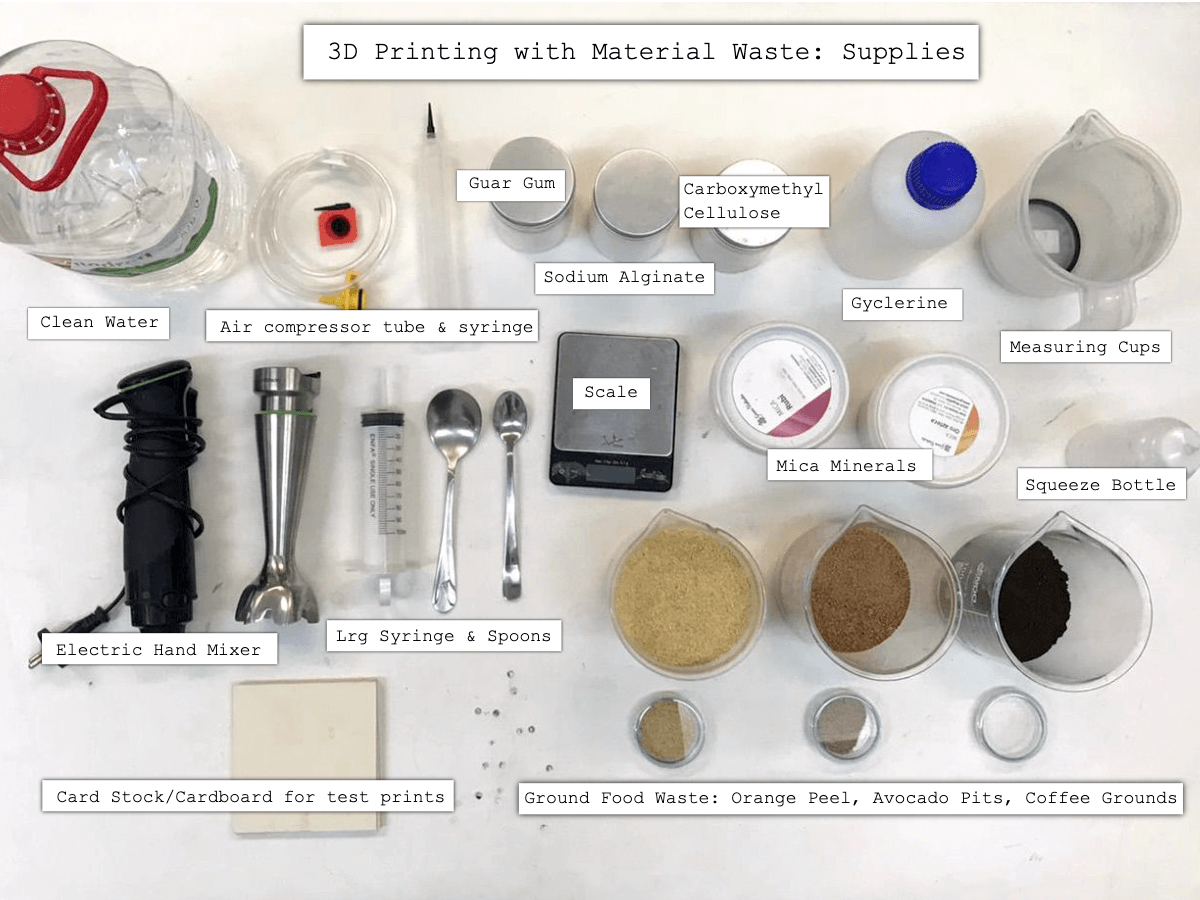
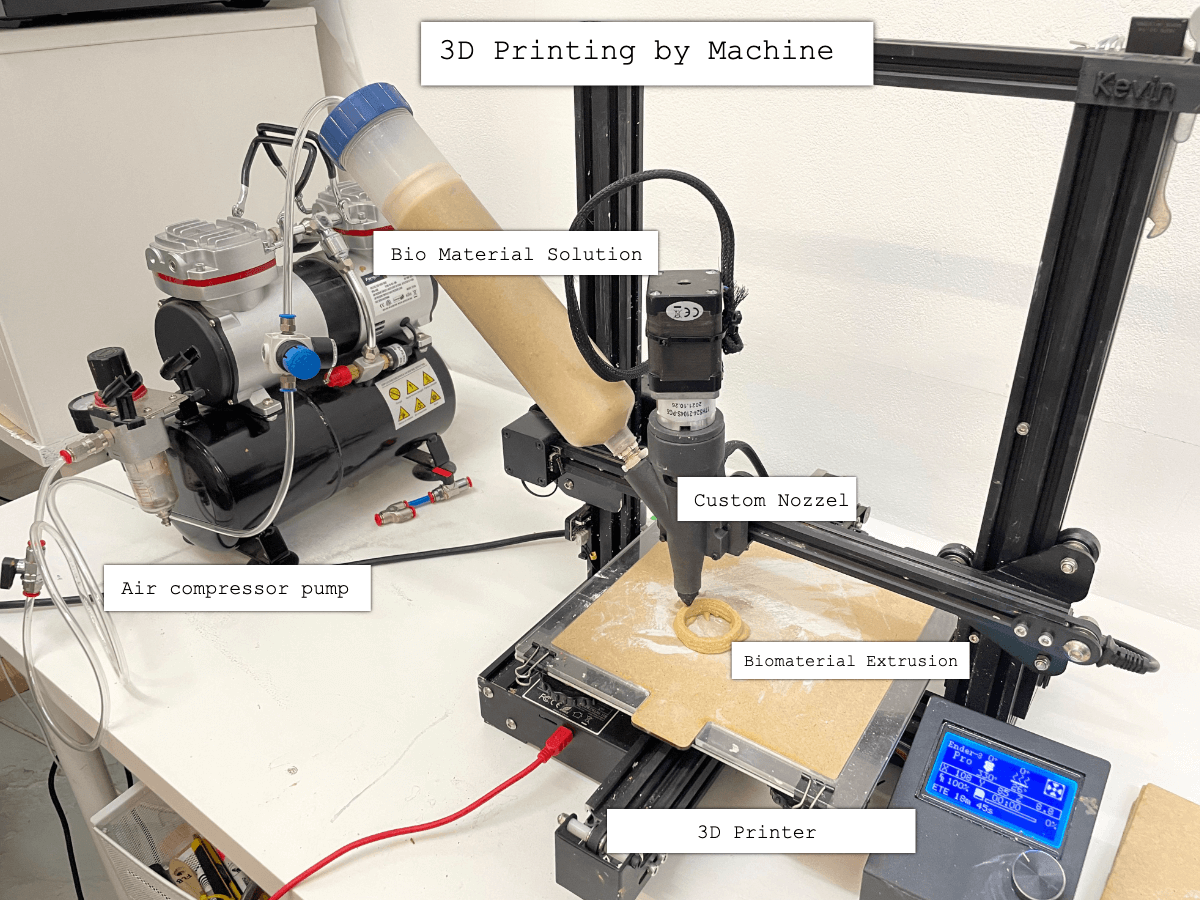
Scan the QR Code for to access the 3D printing files and instructions for creating a custom 3D printer nozzel that can can extrude bio materials. You can also find more inforamtions in these slides here
Recipe: Sodium Alginate Bio Material Paste 1
* 4g sodium alginate
* 5g carboxymethyl cellulose (CMC)
* 200ml water
* 1 tbsp glycerin
* 5 spoons of filler (adjustable)
* hand held blender
* syringe, squeeze bottle, air pump or 3D printer
* electric scale
* measuring cups
* spoons
* cardstock/carboard for hand printing
* Measure out ingredients
* Mix the CMC and sodium alginate together in a cup with the mixer
* Add the filler and adjust amount to create a printable viscosity
* Put the paste in a syringe or whatever device you are using to print
* Tap on the table to avoid air bubbles
* Press out the paste into whatever geometry you want
* Leave to dry
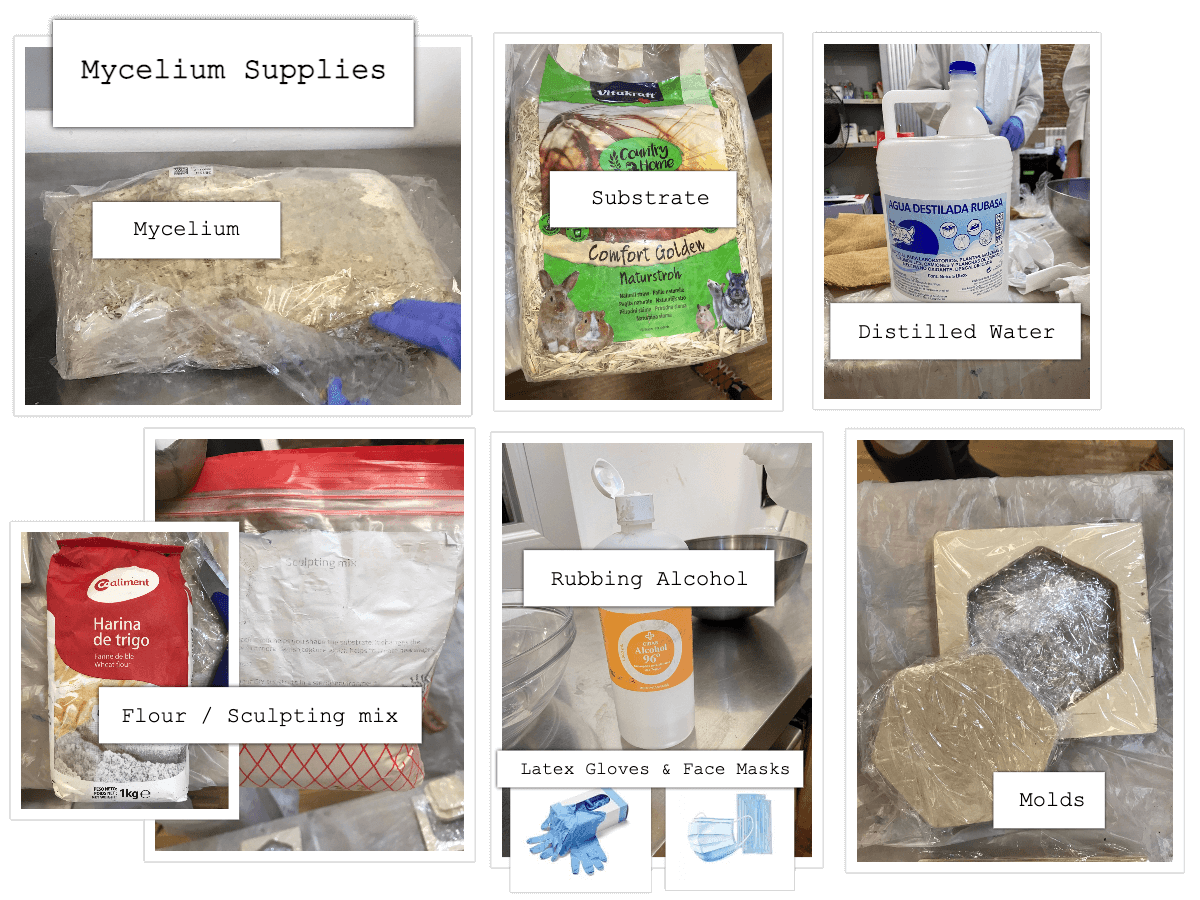
Mycelium Molds
I’ve worked with Mycelium in grad school so I was familiar with this process. This time we worked with the mycelium from yellow oyster mushrooms. The most important thing here is that you have to work in the cleanest, most sterile environment that you can create for yourself. Rubbing alcohol is your best friend, and latex gloves and mask should be worn to protect the mycelium from getting contaminated. This growth process takes a few weeks so we will report back with the results.
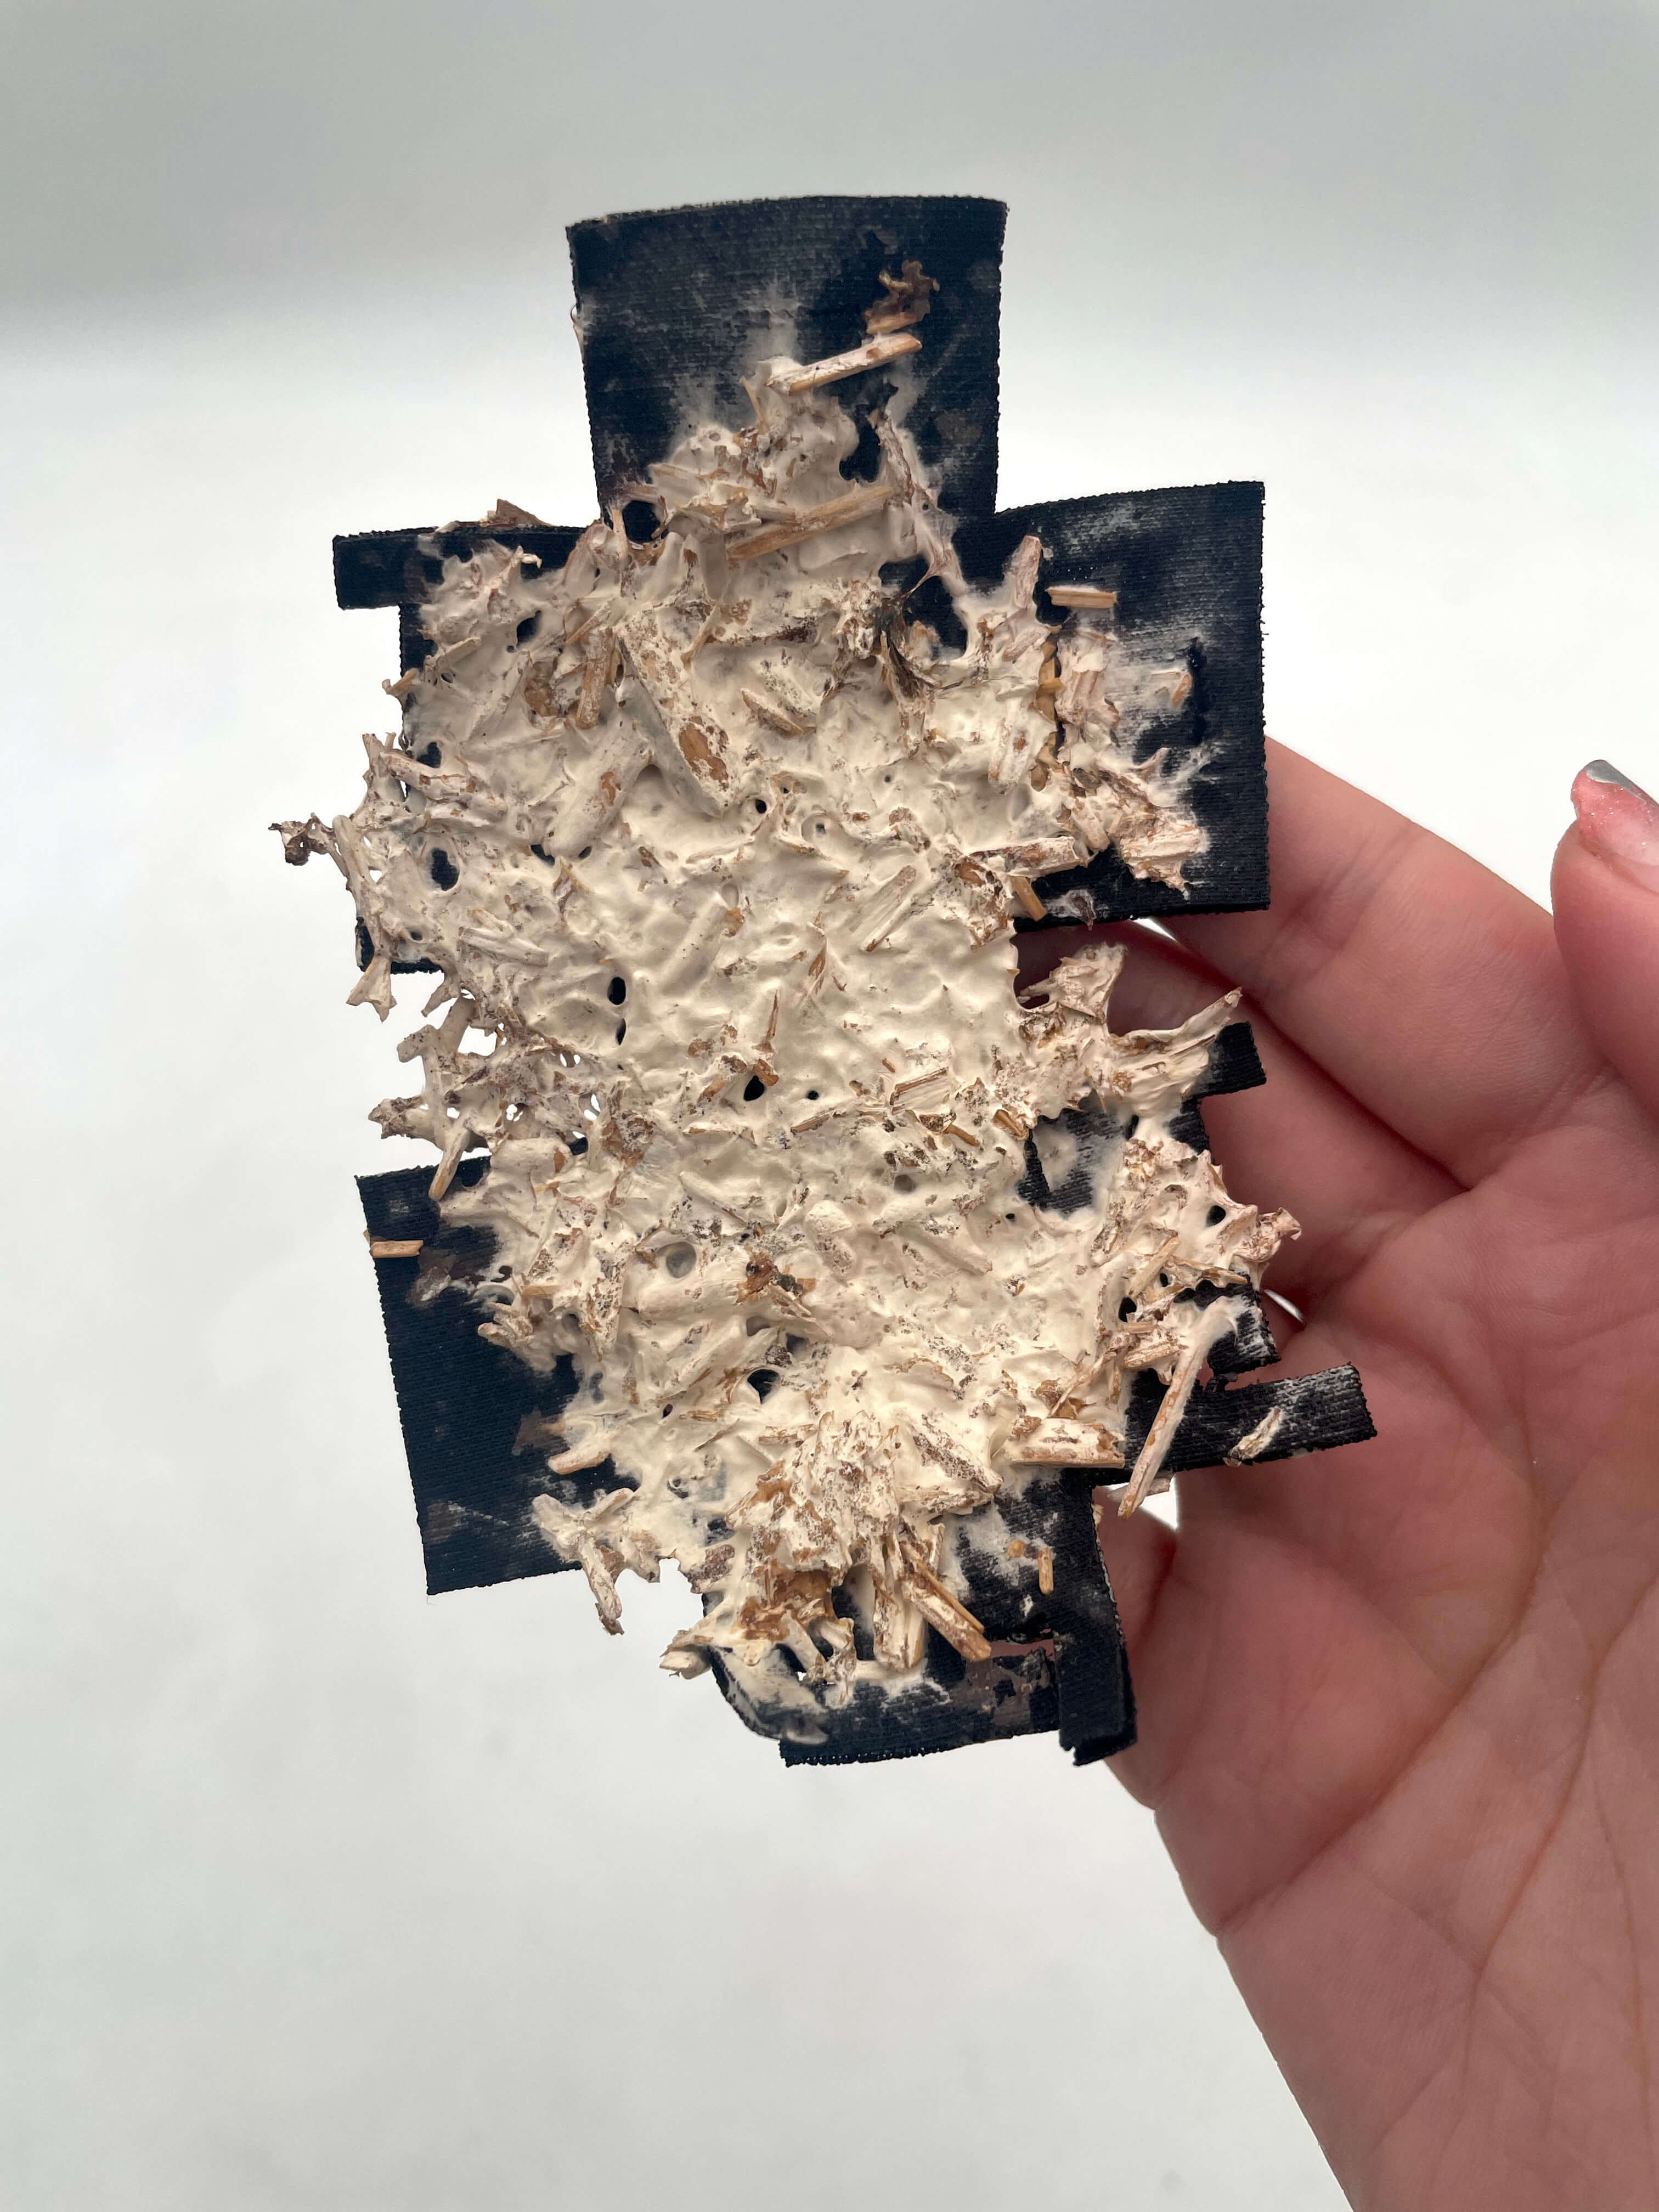
I got excited about seeing if the mycelium could grow on top of / eat my leftover neoprene scraps from Week 2’s Circular Fashion assignment.
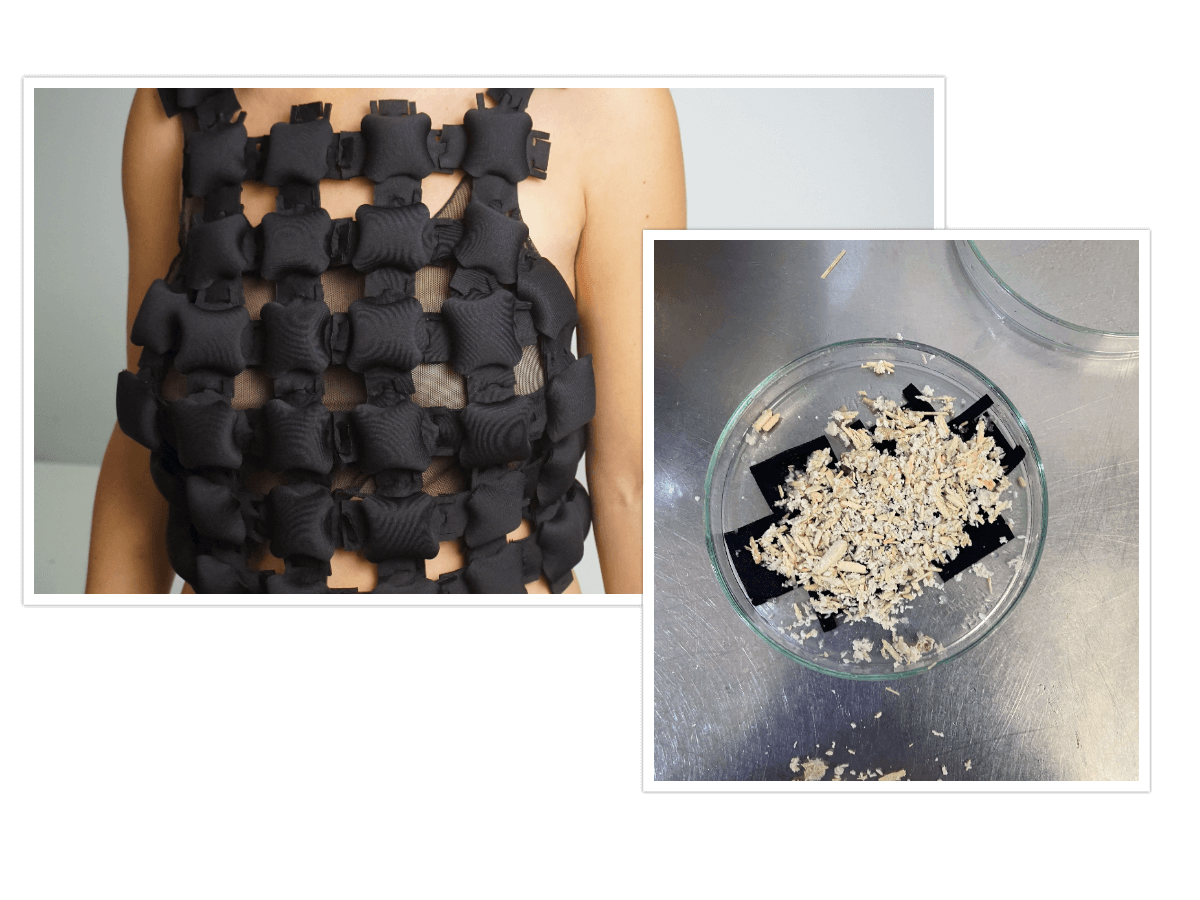
The results 2 weeks later:
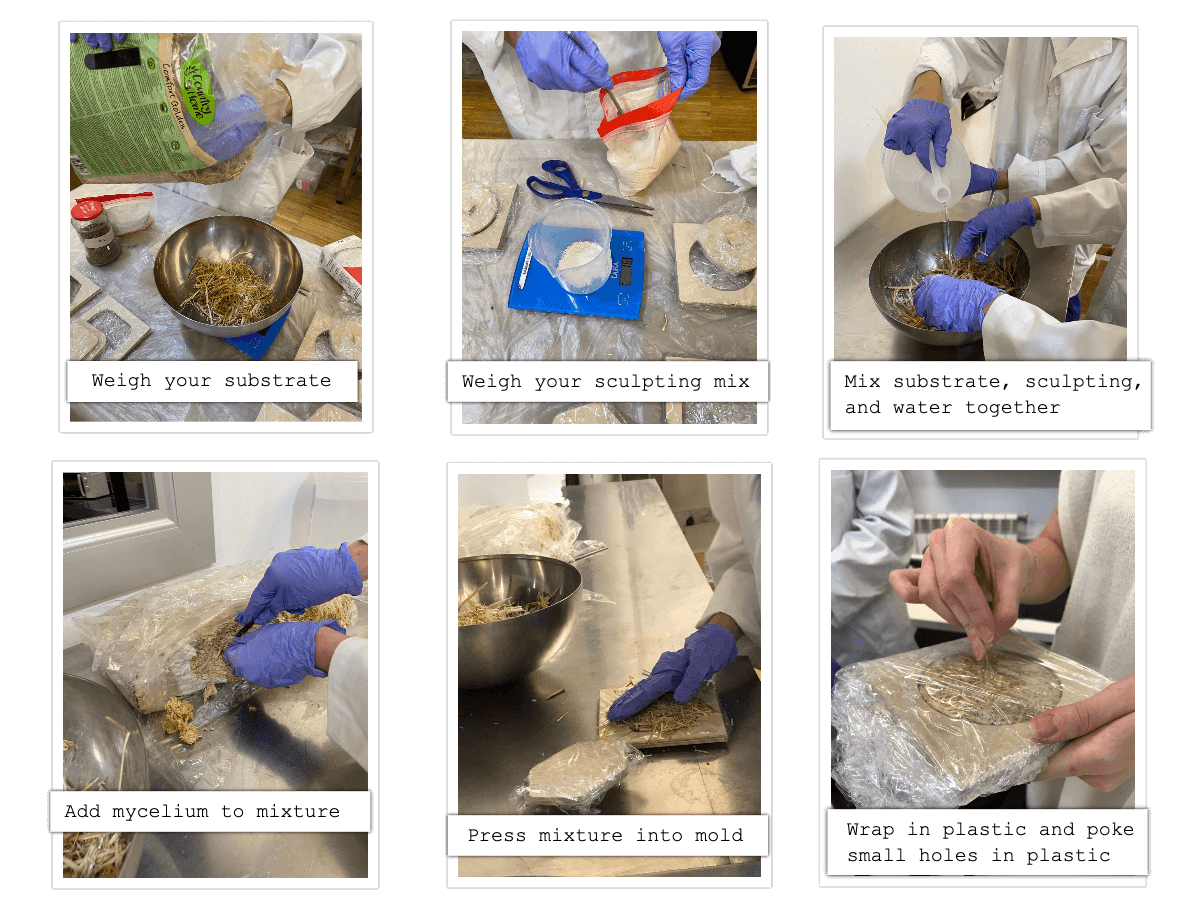
Recipe: Mycelium Molding 2
* Substrate amount dependent on size of your piece
* 60% WOS (weight of substrate) of sculpting mix
* Water
* Mother mycelium block
* Bowl
* Plastic wrap
* Alcohol, gloves, mask
* Mold
* Measure out your substrate in grams - measure 60% of that amount of sculpting mix
* Add those two toegther with some water and mix untl it is chunky and pasty
* In a sterile environment, take a piece from your "mother" mycelium block and add it to the mix
* Prep your mold by covering it in sterile plastic wrap or sterilizing it well
* Press your mix into the mold and cover the entire thing with plastic wrap
* Poke some holes with a needle to allow some air flow
* Leave it in a clean place and wait for it to grow
Kombucha Leather
The last time I made kombucha was about 10 years ago in my kitchen in Brooklyn, NY. In that case, we saved the liquid to bottle and drink and probably discarded the mother scoby after a few batches. In this process our focus was the growth of the scoby into a shape that will resemble leather once it is grown, washed, and dried. To get the shape you want, use a container that has your desired shape, the scoby will grow as if in a mold. The whole process takes a few months.
I focused on color for this process, wanting to make a hot pink leather. Hibiscus is known to dye things pink so I used the only tea that I could find with hibiscus in it, a mixture of hibiscus and blueberry. We also made a batch with green tea and beer. Below I detail the process for how to make it with hibiscus and blueberry tea.
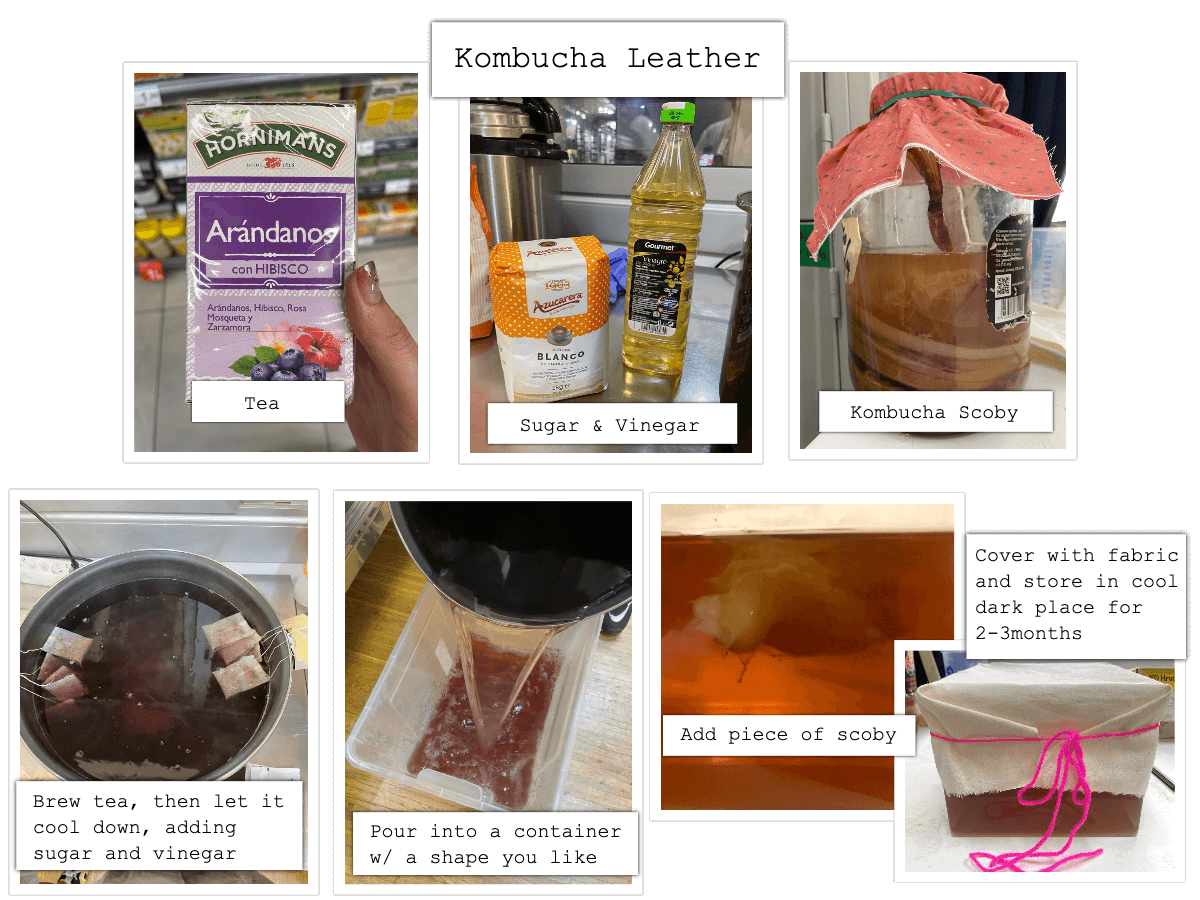
Recipe: Kombucha Leather 3
* 10L water
* 10 blueberry & hibiscus tea bags
* 1kg sugar
* 1L vinegar
* Piece of scoby mother
* Pot and stovetop
* Alcohol and gloves
* Container big enough to hold your liquid
* Fabric
* Bring your water amount to a boil in a sanitized pot and add tea bags
* Dissolve the sugar in the tea and add the vinegar
* Let the liquid cool
* Prepare your contaner by sanitizing with alcohol
* Pour the liquid into container
* wearing gloves, add a piece of the mother scoby into the bath
* cover the container with fabric and wait for it to grow!
* remove scoby when ready and clean with soap
* lay on a mat to dry and choose a post treatment if you want
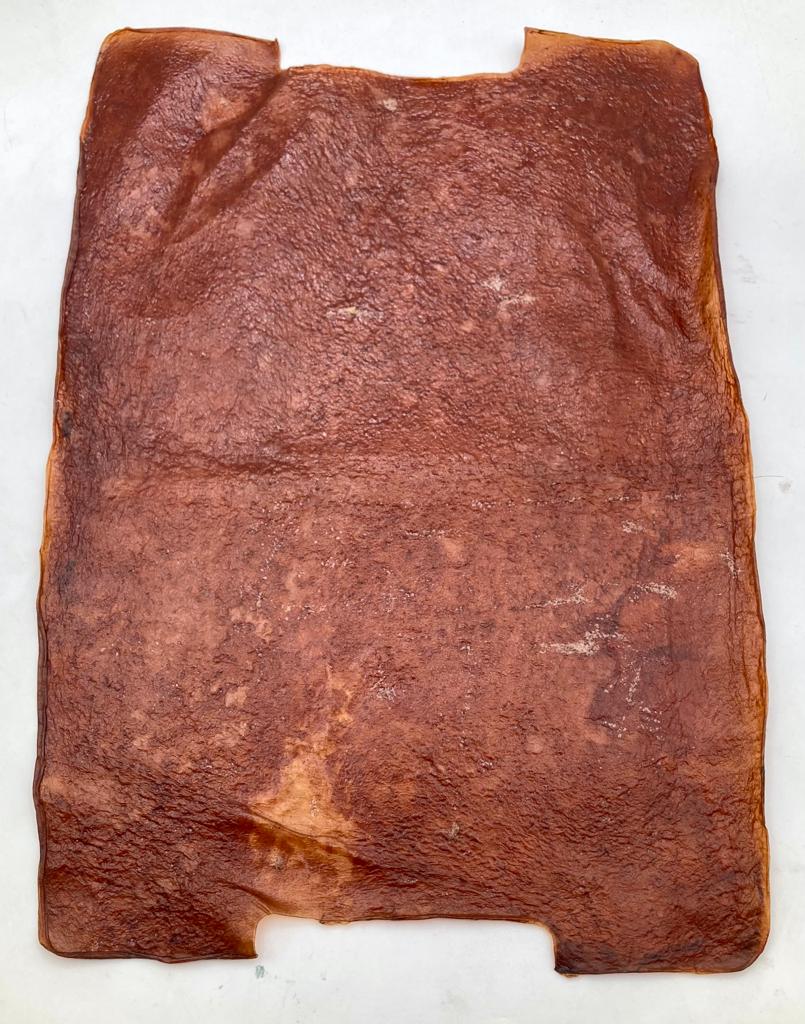
Results: We will get our results in a couple months but here is what kombucha leather grown in black tea looks like once it is done.
Bio Plastics
Gelatin
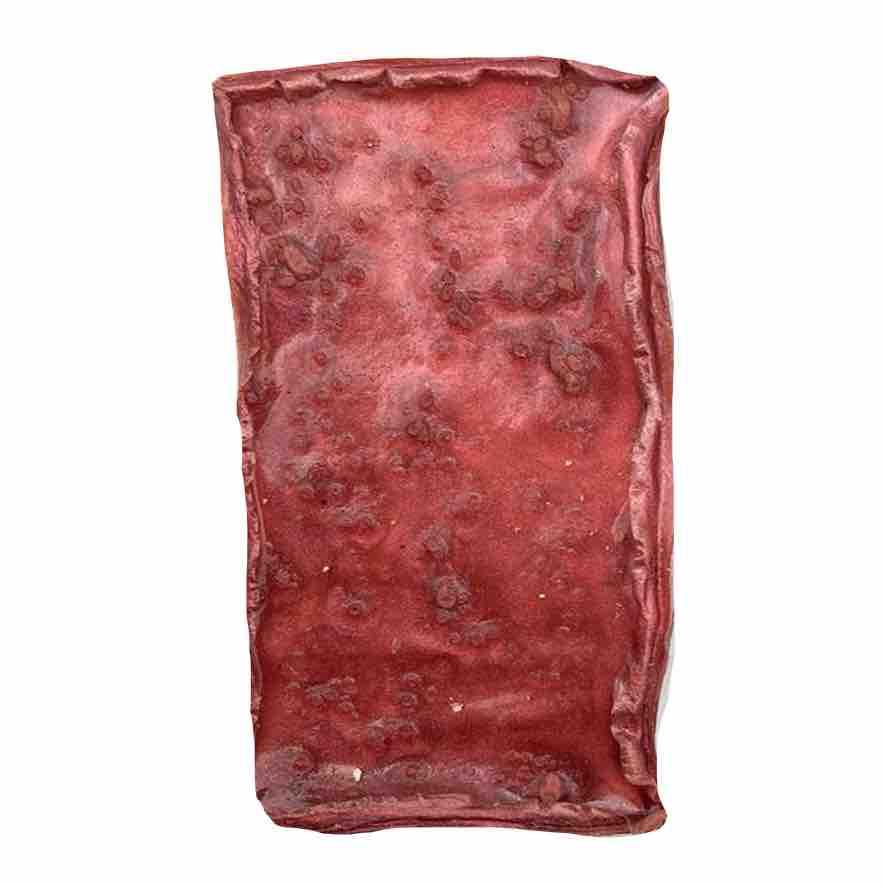
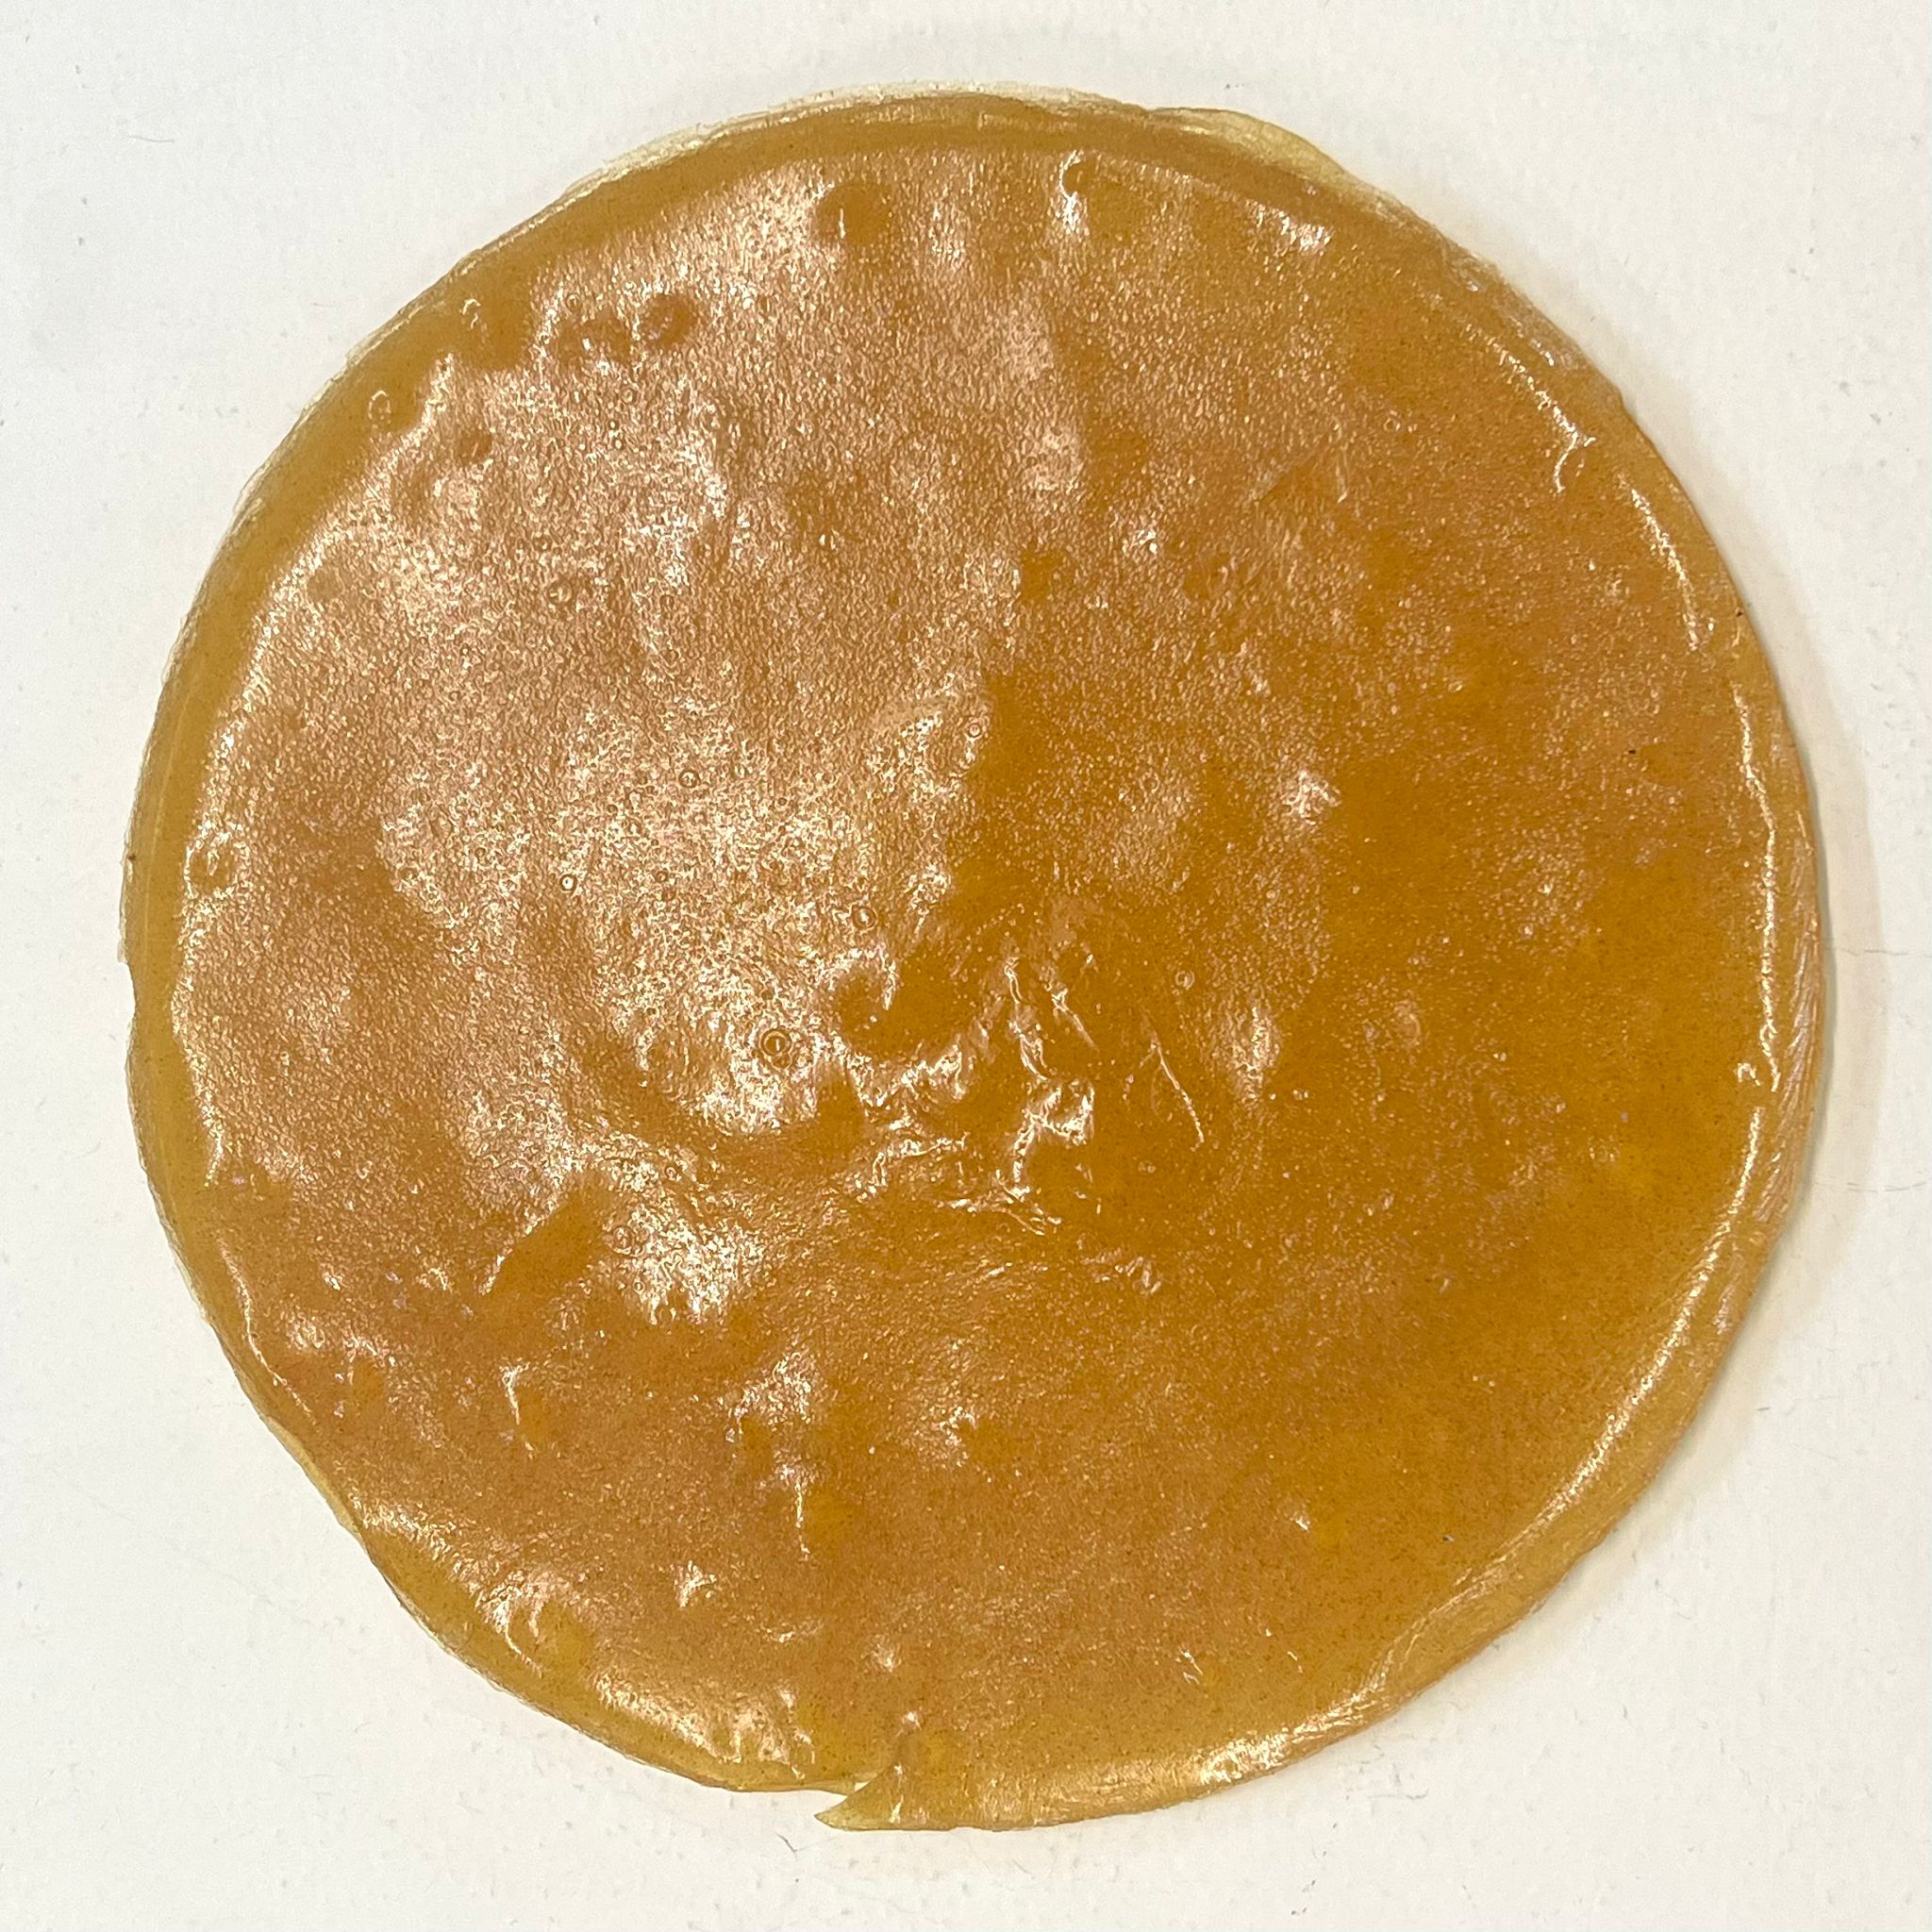
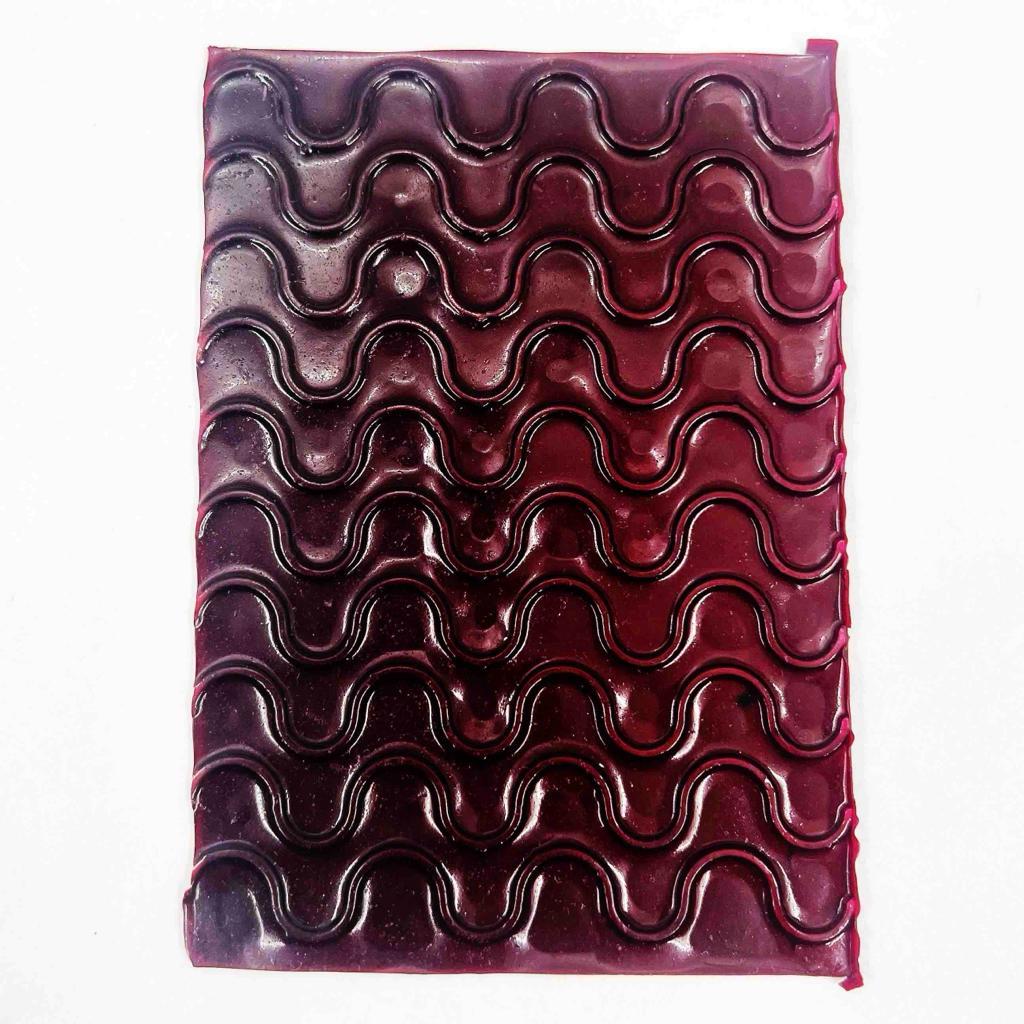
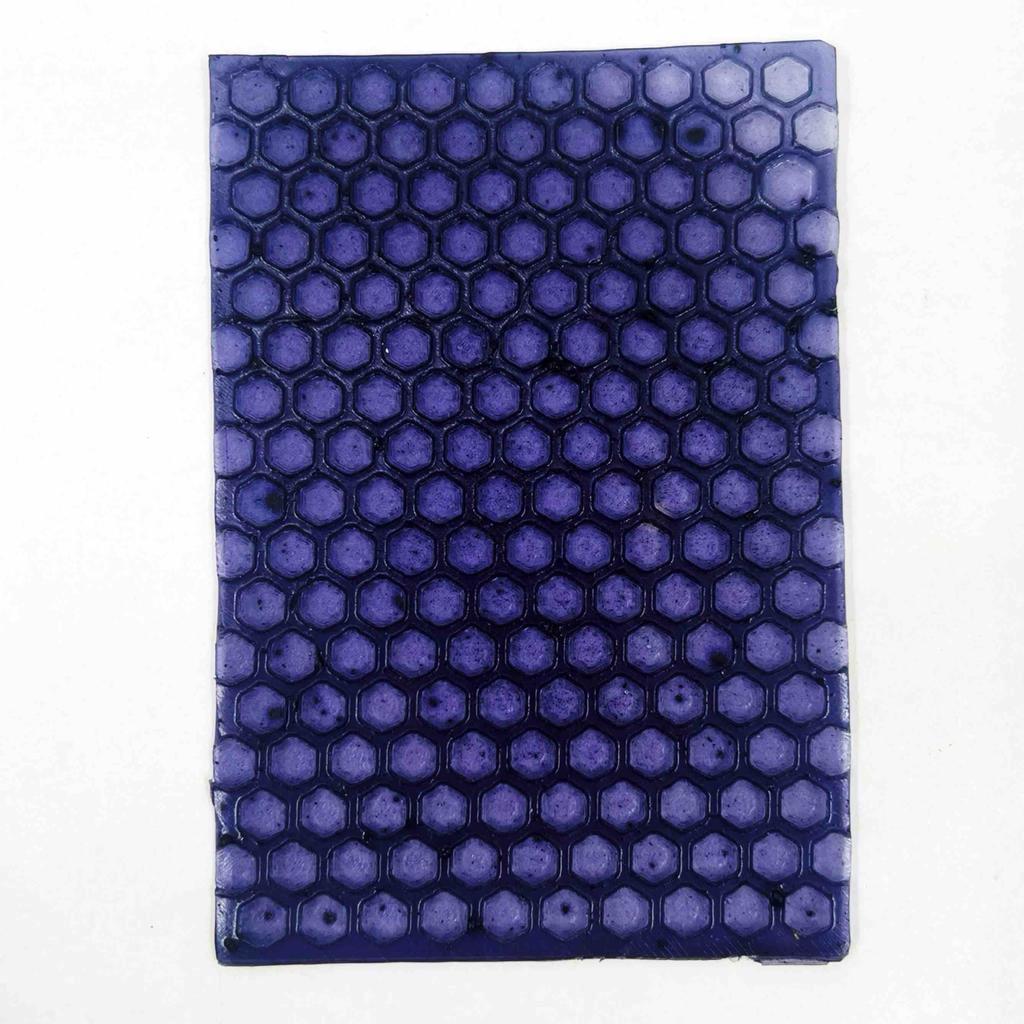
Okay so here is where the fun really started for me! My goal was to create translucent bioplastics with different consistencies, textures, and colors! I wanted to make the colors natural as well, using leftover biochromes from our dye baths and pigments we created in Week 4.

I referenced the bioplastic sample library we have here in Barcelona Fab Lab to find bio plastic consistencies I liked and modeled my recipes after them. Below you will find the recipes for each gelatin-based material I created. I didn’t have time to make foam so I reference here what my colleague Alve created.
Gelatin Based Bio Plastics by olivia cueva
Gelatin can dissolve when submerged in room temperature water within a couple hours. It dissolves immediately in hot water above 60C. So I wanted to test this myself.
Watch Gelatin-Bio Plastic Dissolve in Water by olivia cueva
Recipe: Gelatin Based 4
* 48g Gelatine
* 240ml water
* 0g, 24g, 48g glycerin (0g=rigid/film; 24g=flexible/plastic, 48g=jelly/silicone)
* 10ml dish soap for foam
* Molds (embroidery hoops, textured paper, 3D printed molds)
* Pots and stovetop
* Measuring cups and spoons
* Rubber spatula
* Box Cutter/Exacto Knife
* Measure out your ingredients
* Add the water and gelatin together in the pot and mix well
* Add the glycerin and heat mixture until it starts bubbling, stirring constantly
* Remove from heat and let cool until temperature reaches ~40C.
* Pour mixture into a mold.
* Let the material dry in the mold for a 1-2 days. Use box cutter to cut around edges if difficult to remove.
Sodium Alginate Extrusions
I used the leftover Sodium Alginate and Calcium Chloride solutions my colleagues Dinesh and Alve experimented with to make Sodium Alginate Yarn. I was still looking to make really cool colors. This time I experimented with synthetic colors instead of natural colors. It is important to note that when the “yarn” extrusions dry they may lose their round shape and darken in color.
Sodium Alginate Extrusions by olivia cueva
Here is a resource put together by my colleage Alve Lagercrantz.
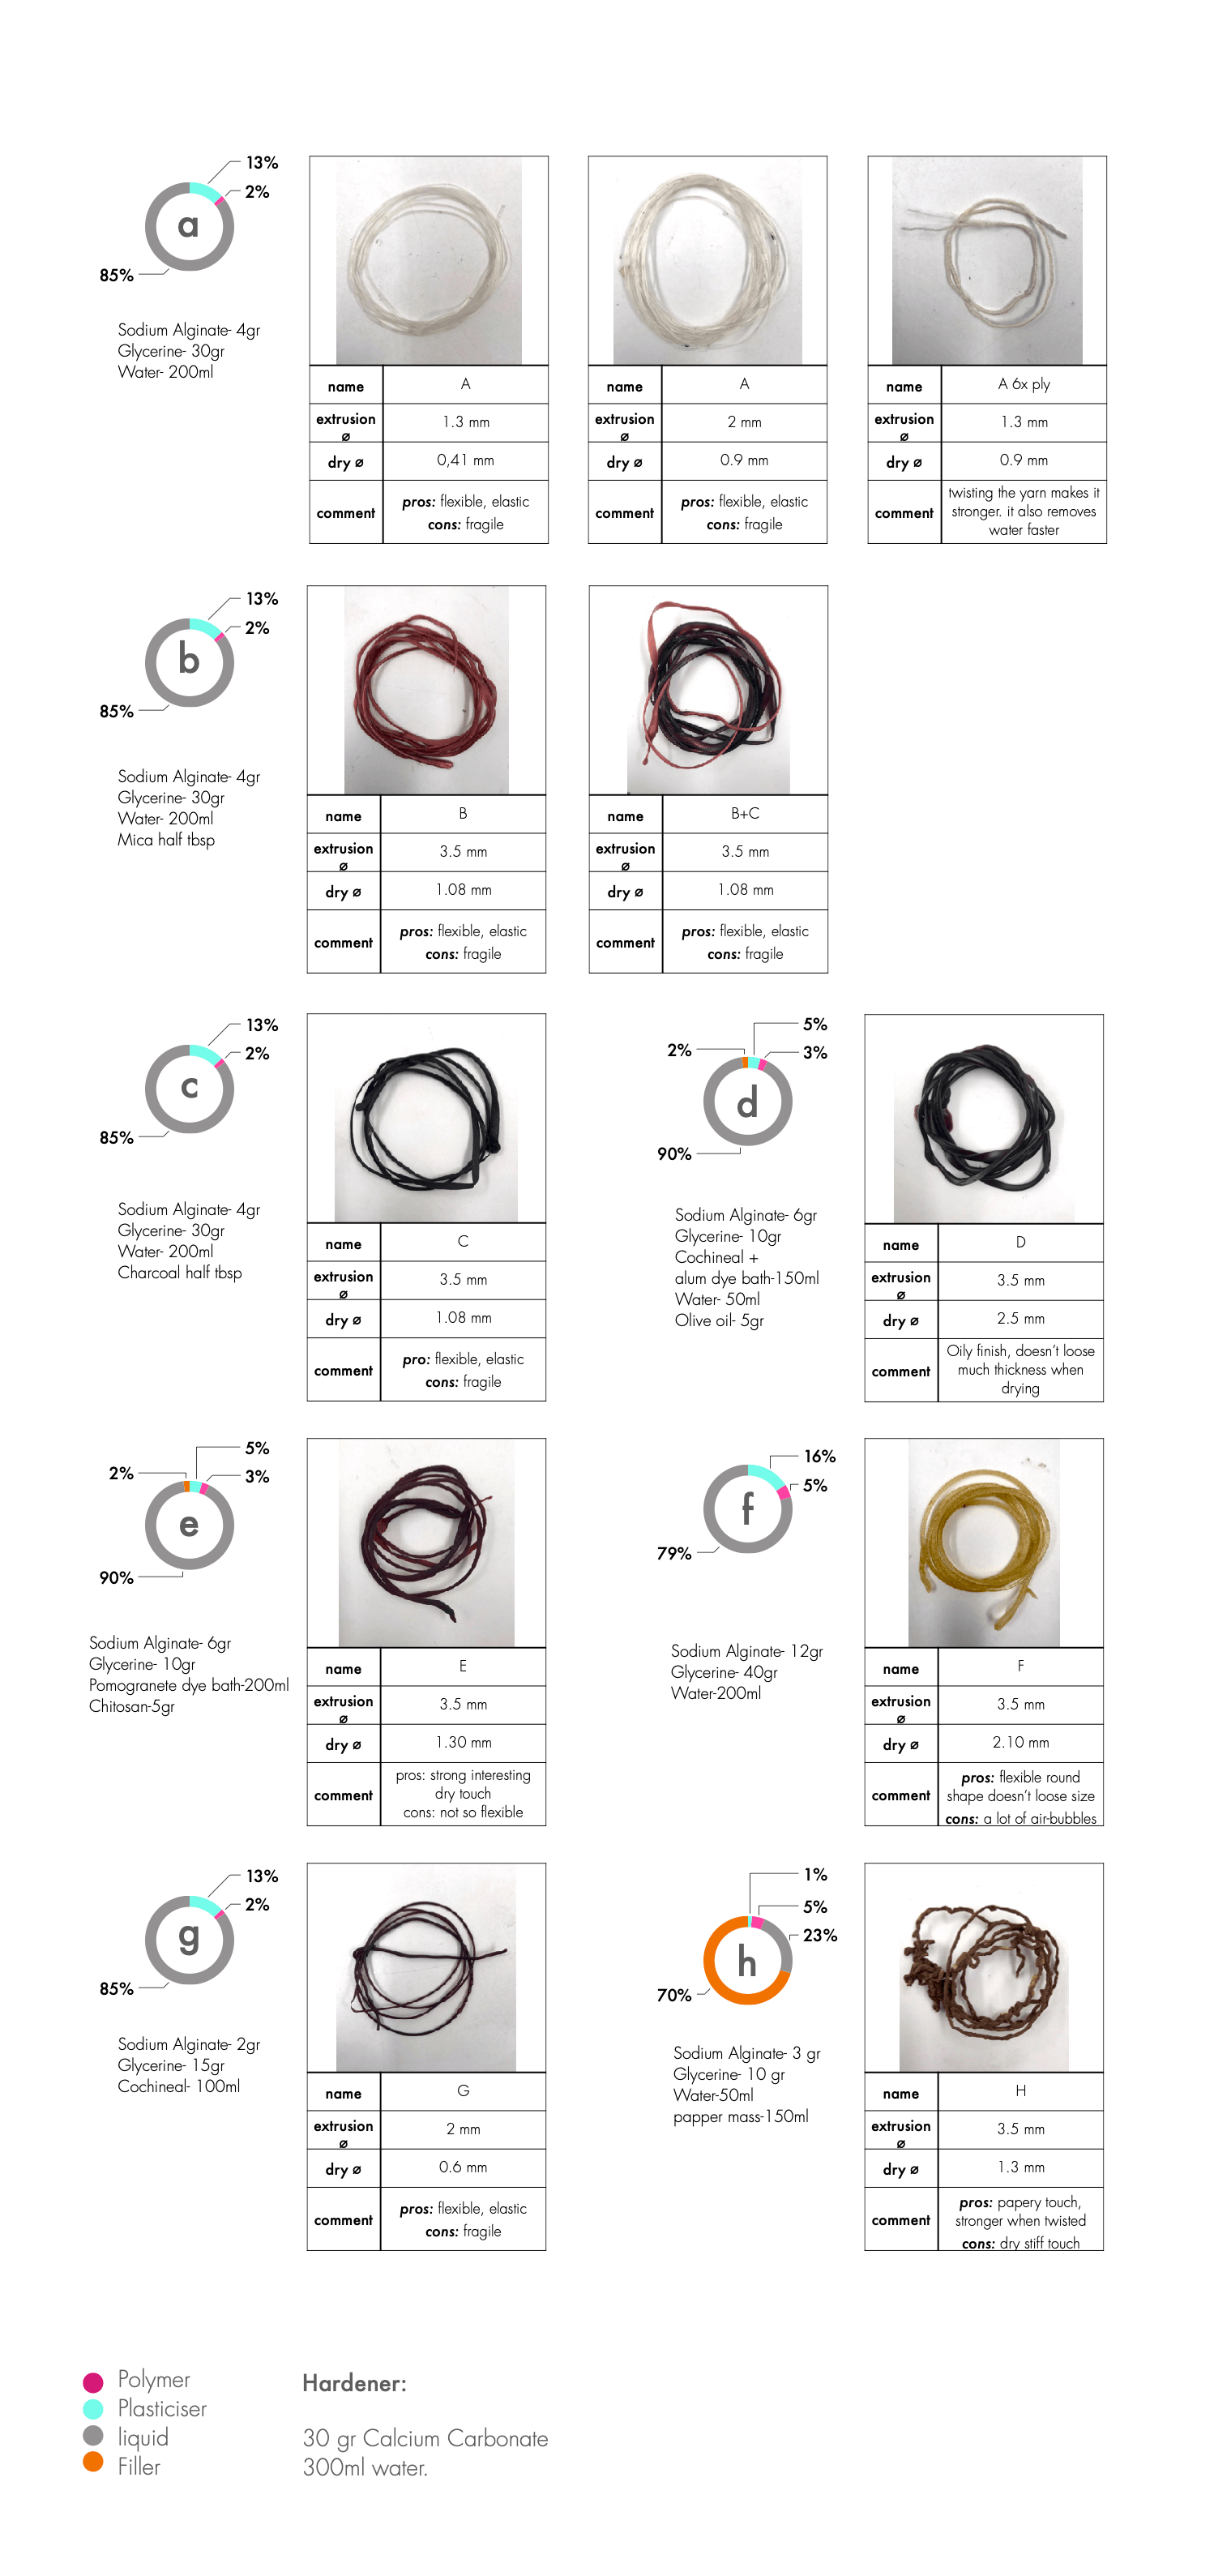
Recipe: Sodium Alginate Based (Extrusions) 5
* 4g Sodium alginate
* 200 ml Water
* 10g - 30g glycerin (depending on rigidity/flexibility)
* 30g Calcium chloride
* 300ml water
* Another container of water
* Colorants
* Syringe, spoon, etc.
* Cups
* Mixing tools
* Measure the Sodium alginate and water and mix (add colorant as well)
* Measure the Calcium chloride and water and mix
* Pour water into a cup
* Put the Sodium alginate mix into a syringe or another extruding tool
* Press it into the Calcium chloride solution and then move it into the cup of water to rinse
* Dry in a way that it touches the most air as possible, like hanging
Other Ingredients & Recipes
Pine Resin with Egg shells 6
* 45g Pine resin
* 5g Carnauba wax
* 20 ml Alcochol
* 40g Filler (Eggs shells)
* Digital scale
* Electric stove
* Pot/Vessel
* Wood mold
* Spoon
* Silicon spatulas
* Backing paper
* Towel to pick up hot pots
* Lab coat
* Prepepare the materials and ingredients
* Place baking paper on the bottom part of the mold. Press with the top part to fit the shape. Reserve a piece of           baking paper for the top.
* Melt the pine resin.
* When the pine resie are melted, mix with the Carnauba wax. Melt them.
* Add the alchocol and mix. Do not breathe the vapours.
* Add the filler (waste material) and mixed.
* Take the mix and pour **quickly** into the molf using the spatula.
* Cover the top with the baking paper.
* Press with your hands to distribute the mix. Then with the top mold. Compact down.
* Let the mix cold down. Aprox. 15'.
* Remove the baking paper and the mold.
For more details about this bio-material visit Emma Picanyol's documentation.
Sodium Alginate Bio Plastic Cast 7
* * 4g Sodium alginate
* 200 ml Water
* 10g - 30g glycerin (depending on rigidity/flexibility)
* 30g Calcium chloride
* 300ml water
* Mold that is breathable (wood, fabric, etc.)
* Syringe, spoon, etc.
* Cups
* Mixing tools
* Measure the Sodium alginate and water and mix
* Measure the Calcium chloride and water and mix and put in a spray bottle
* Put the Sodium alginate into your mold and press into the shape you desire
* Spray with CaCl2 solution and wait for it to dry
* After a day, flip and spray the other side, repeat this process until it hardens
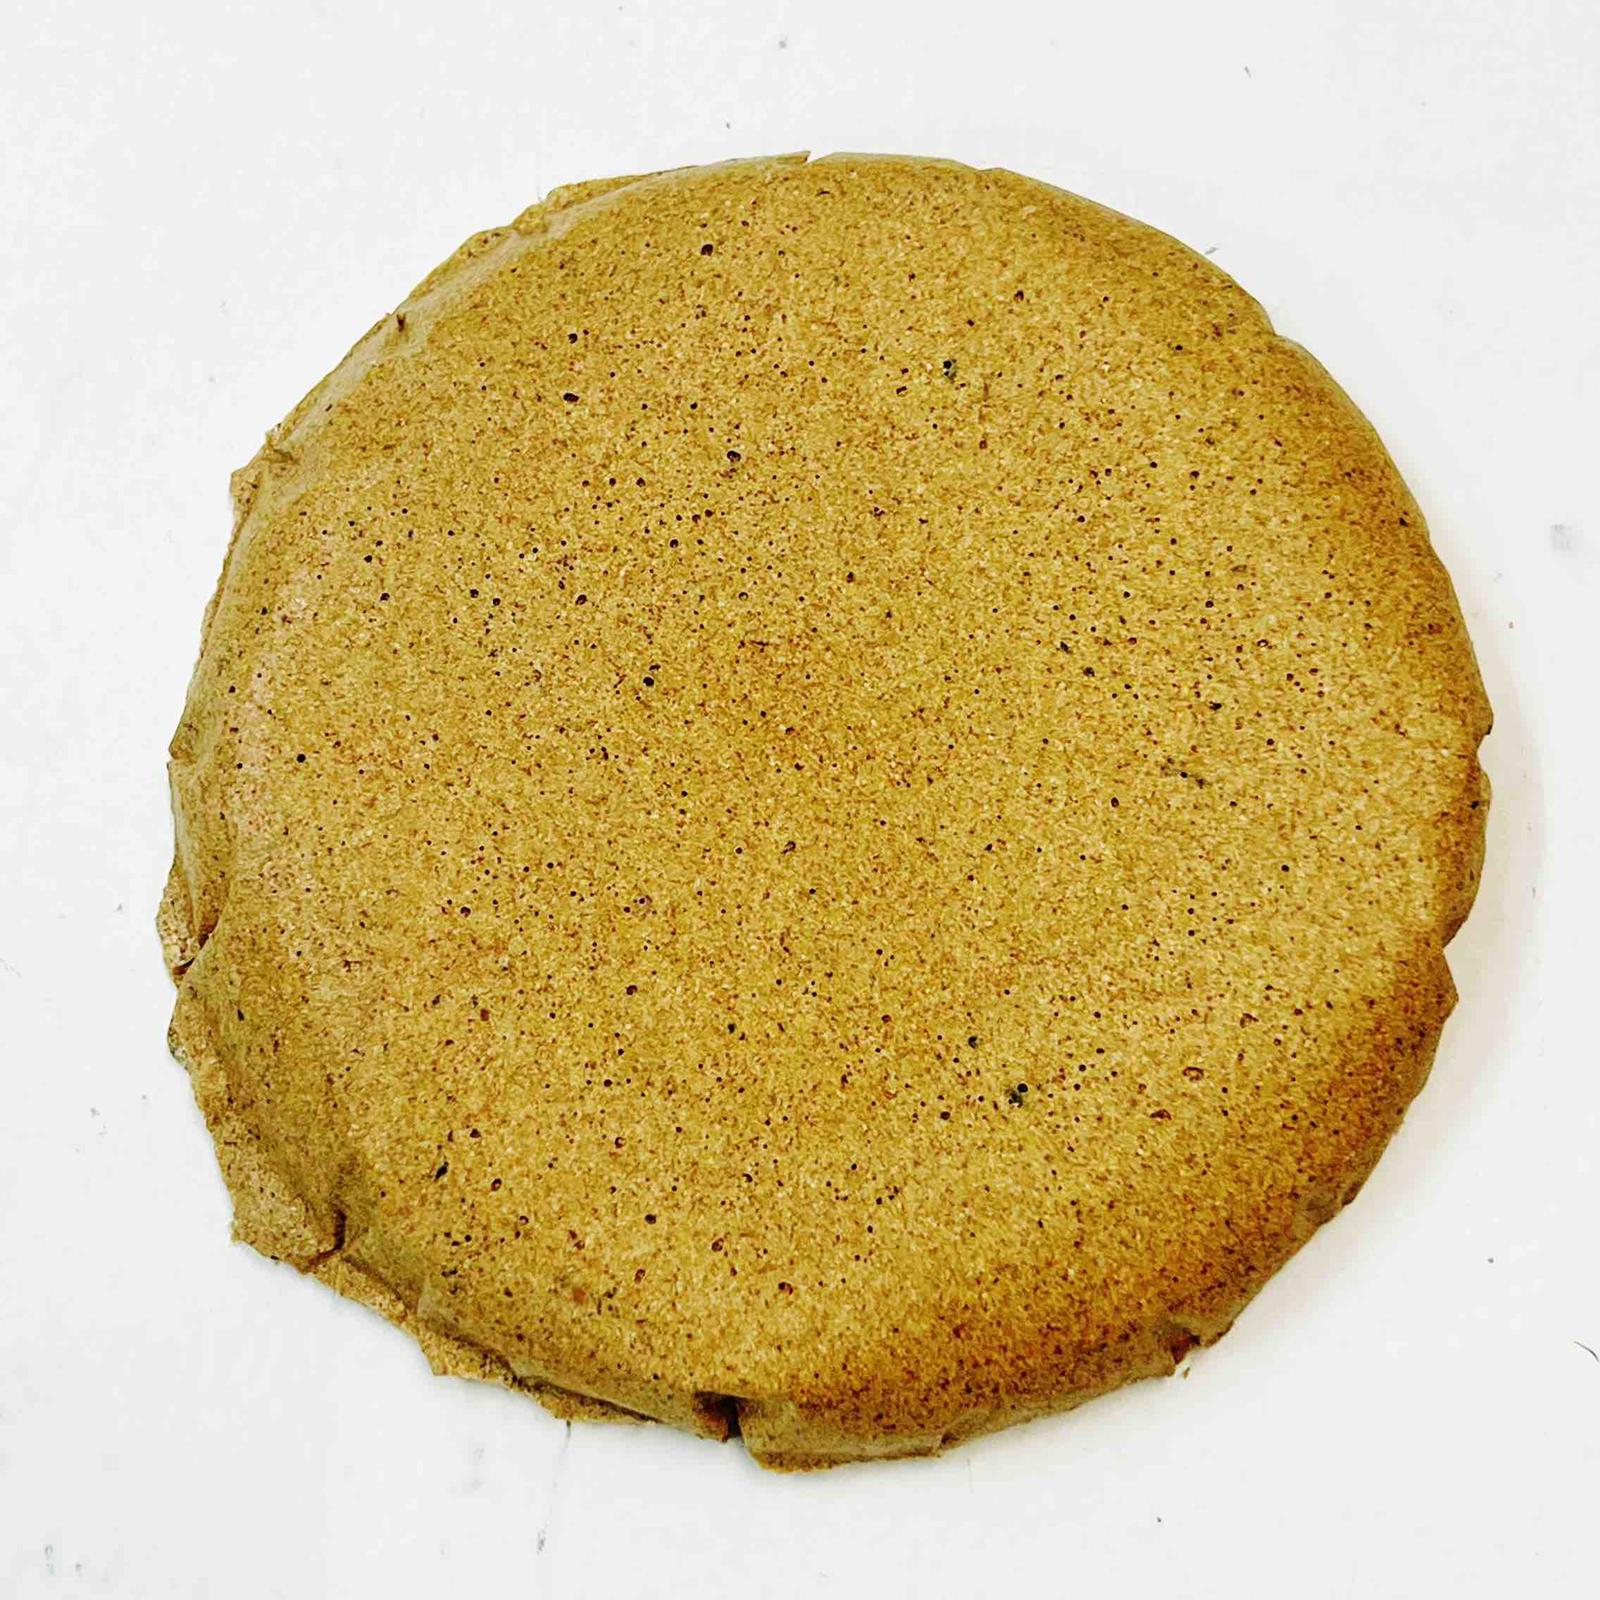
Agar-based Bio Plastic Cast 8
* 10g agar
* 300ml water
* 4g, 16g, 32g glycerin (depending on rigidity/flexibility)
* Molds (embroidery hoops, textured paper, 3D printed molds)
* Pots and stovetop
* Mixing tools
* Spatula or squeegee
* Measure out your ingredients
* Add all in a pot and mix well
* Heat mixture until it starts bubbling, stirring constantly
* Pour mixture into a mold (let it cool for a bit if the mold is not heat resistant)
* Let the material dry in the mold for a few days
Documenting and comparing experiments
TEST SERIE BIO-PLASTIC
| Material pic | Material name | polymer | plastifier | filler | properties |
|---|---|---|---|---|---|
 |
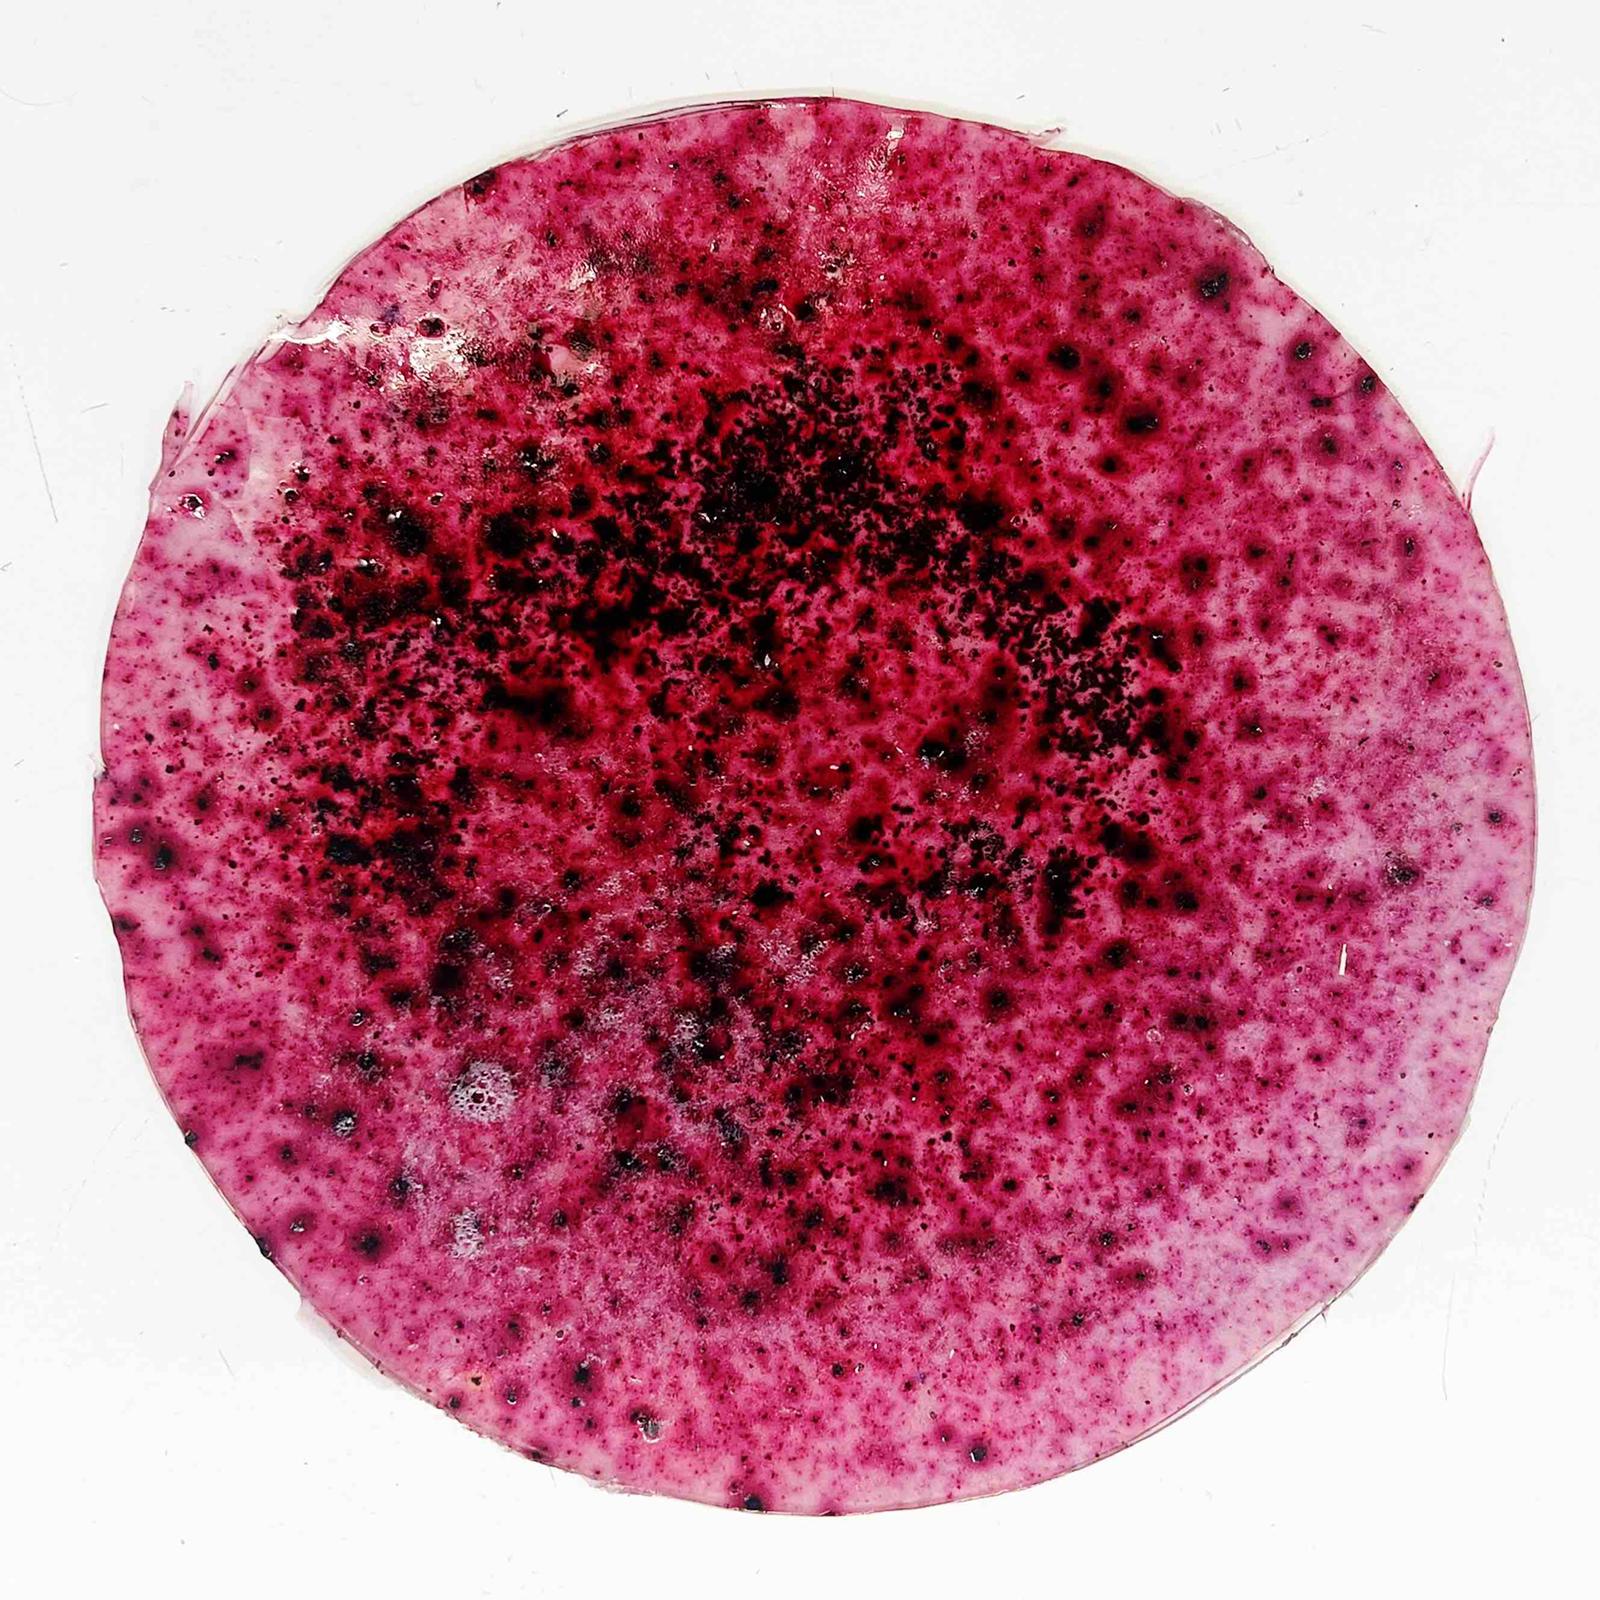
Bio Platic | Gelatin | Glycerine | Cochineal Dye Bath | flexible |
 |
Bio Plastic | Gelatin | Glycerine | Cabbage pigment | flexible |
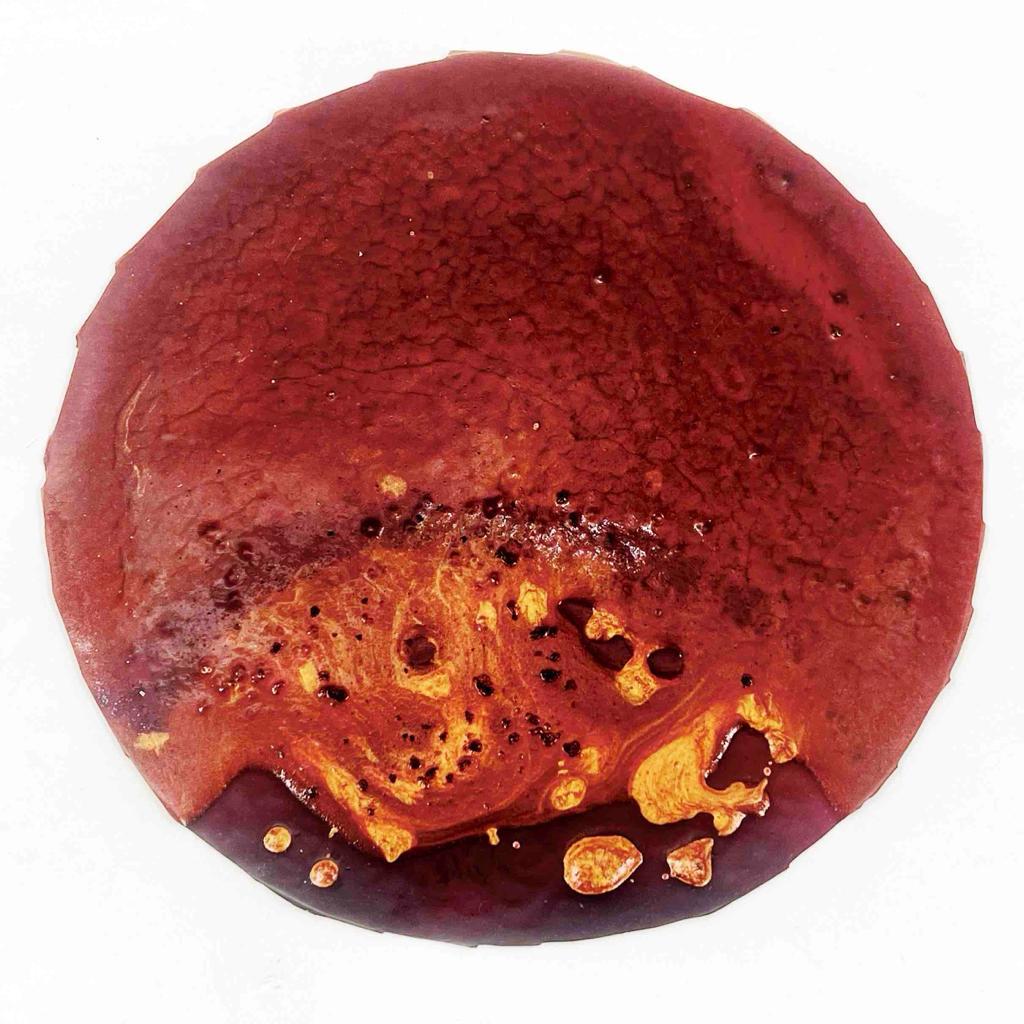 |
Bio Plastic | Gelatin | Glycerine | Cochineal dy bath & pigment, turmeric powder, gold mica | flexible |
 |
Bio Silicone | Gelatin | Glycerine | Cochineal pigment | flexible jelly |
 |
Bio Silicone | Gelatin | Glycerine | Gold Mica | flexible jelly |
 |
Bio Silicone | Gelatin | Glycerine | Spirulina | flexible jelly |
 |
Bio Silicone | Gelatin | Glycerine | Cochineal pigment & Eucalyptus pigment | flexible jelly |
 |
Bio Silicone | Gelatin | Glycerine | rainbow dust 1 kg | thin flexible jelly |
 |
Bio Film | Gelatin | Glycerine | Cabbage pigment & logwood dyebath drops | thin flexible with rigid top |
 |
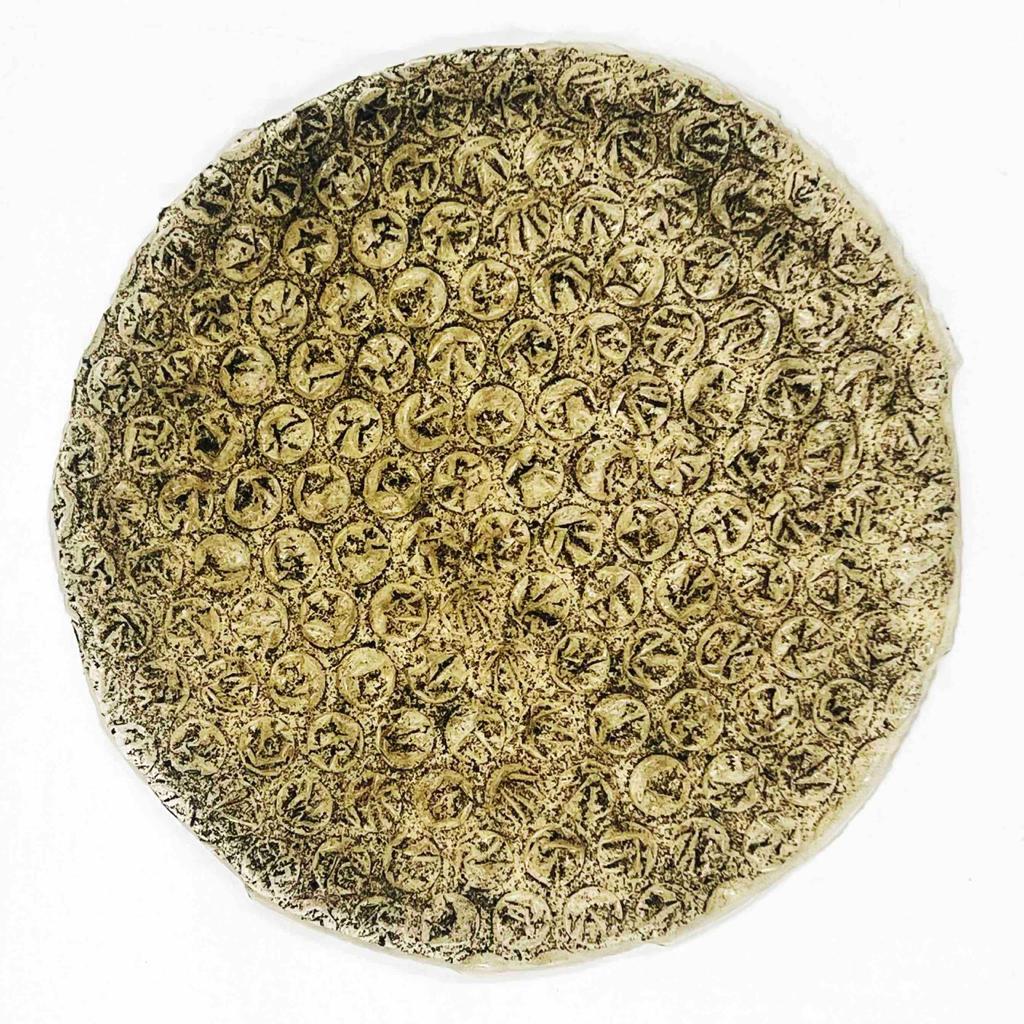
Bio Foam | Gelatin | Glycerine | Charcoal & Mussel Shells | firm spongy |
 |
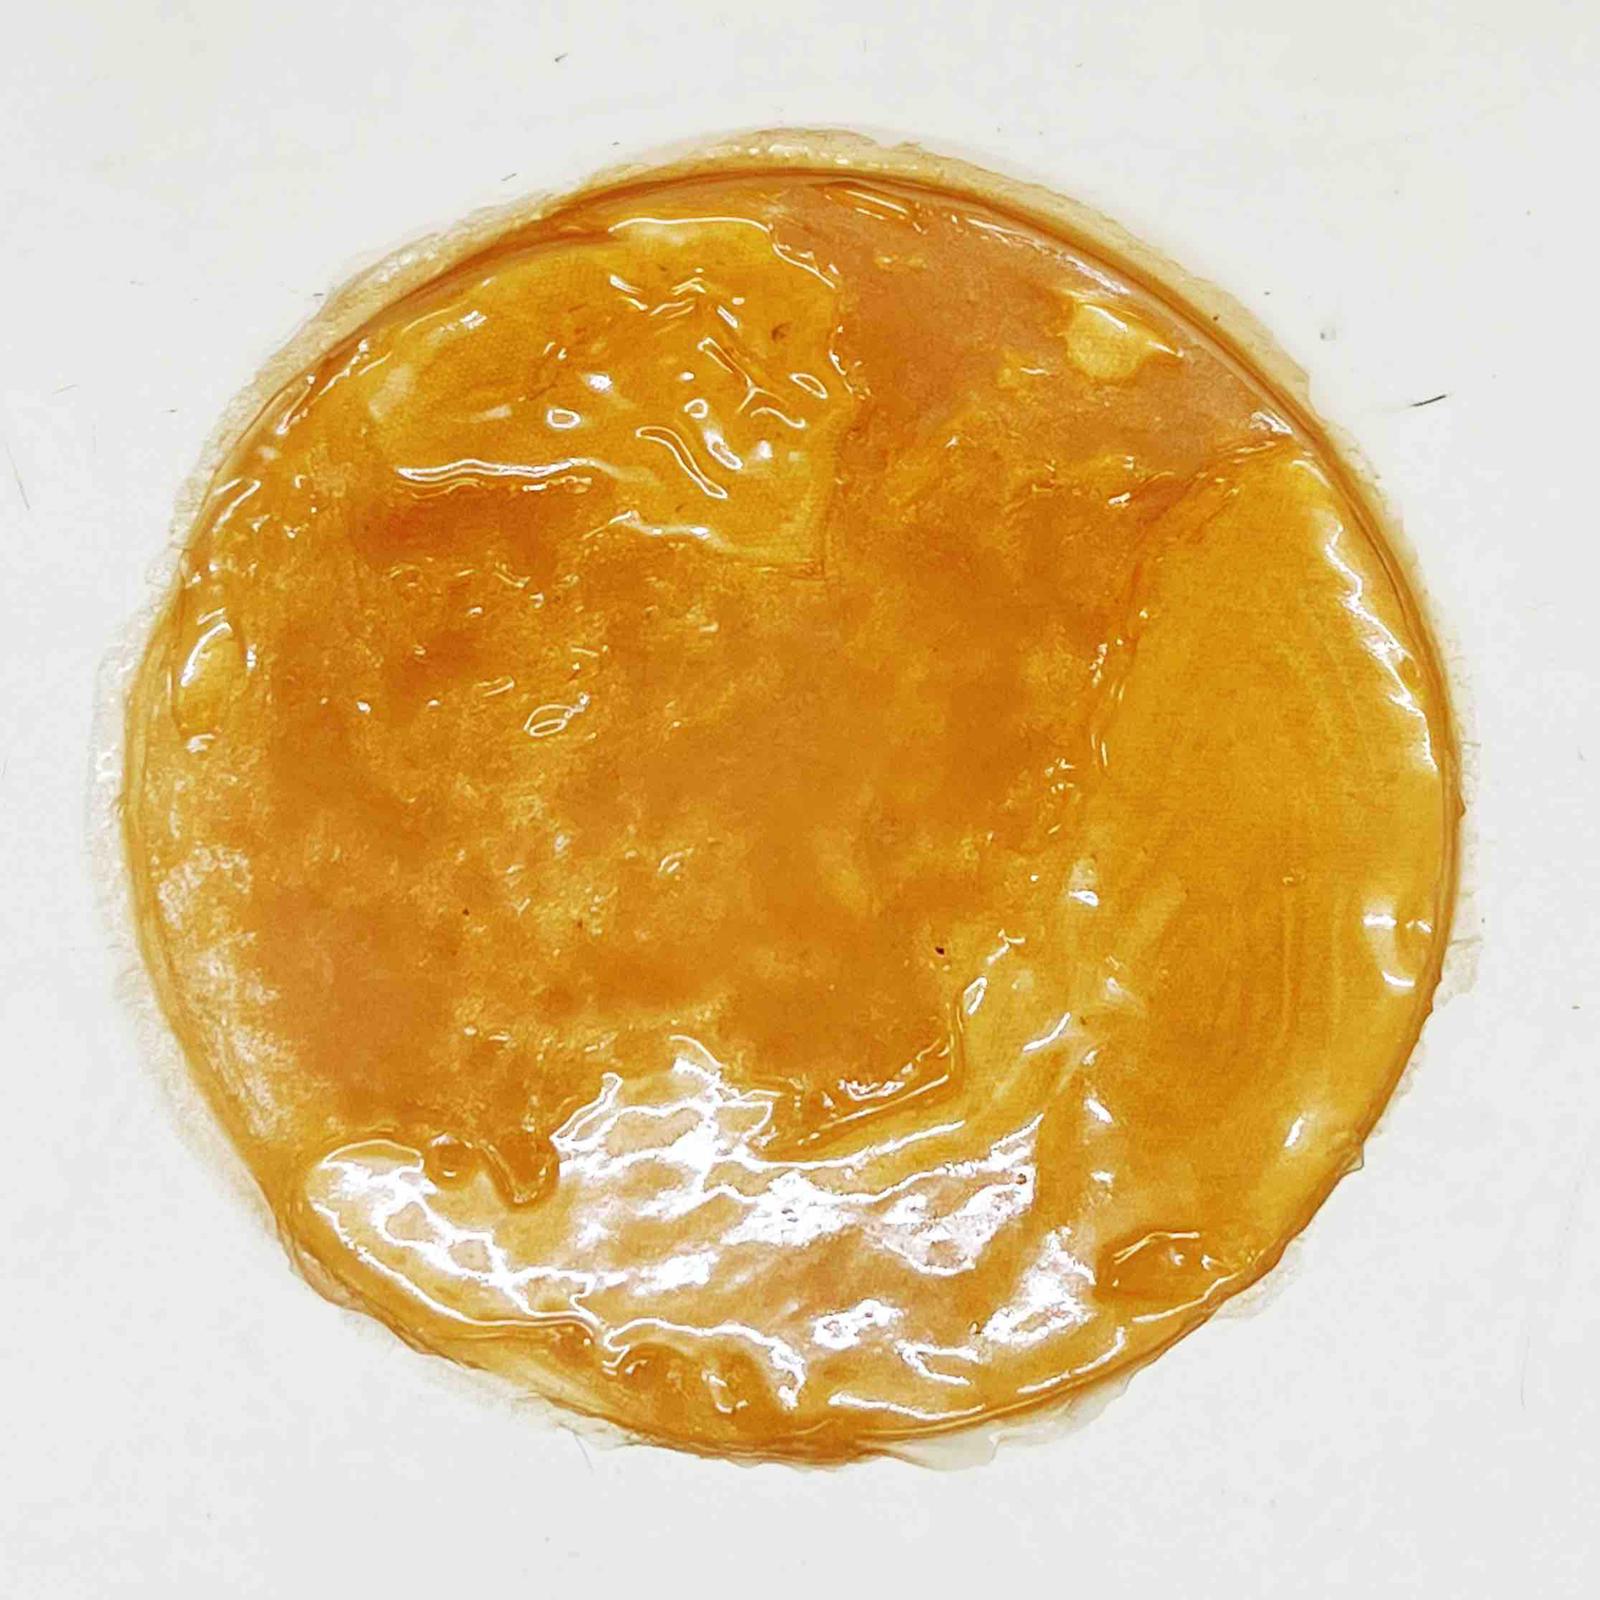
Bio Plastic | Sodium Alginate | Glycerine | Cochineal | soft, flexible |
|
Bio Plastic | Sodium Alginate | Glycerine | Copper mica | soft, flexible |
|
Bio Plastic | Agar | Glycerine | Turmeric Powder | flexible, jelly |
|
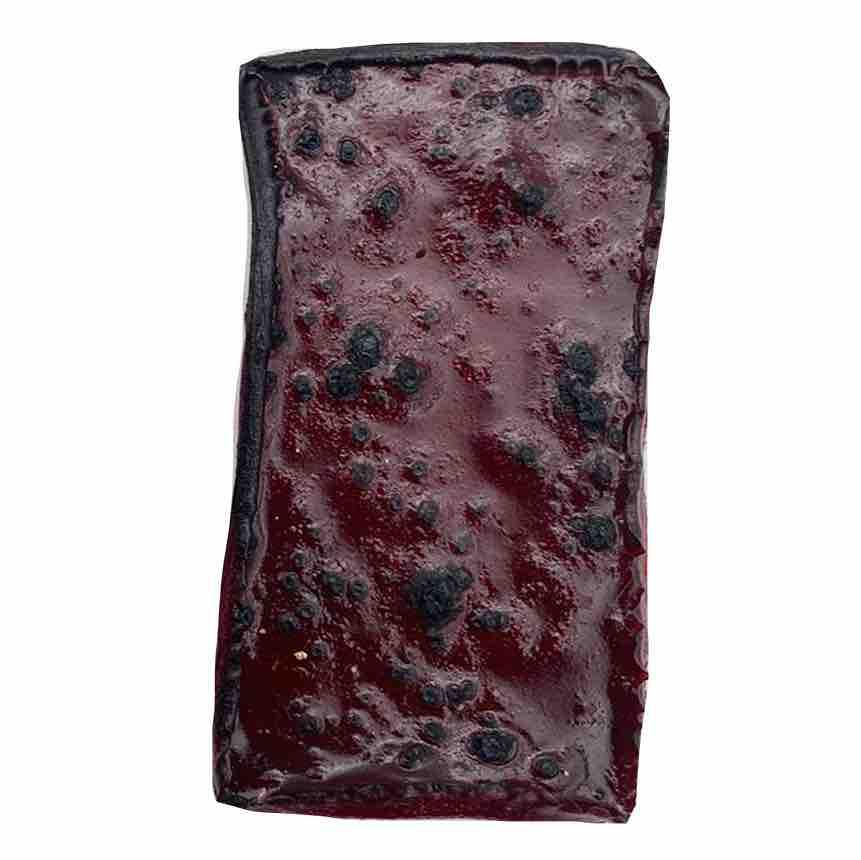
Bio Resin | Pine Resin | x | Egg Shells | hard, rigid block |
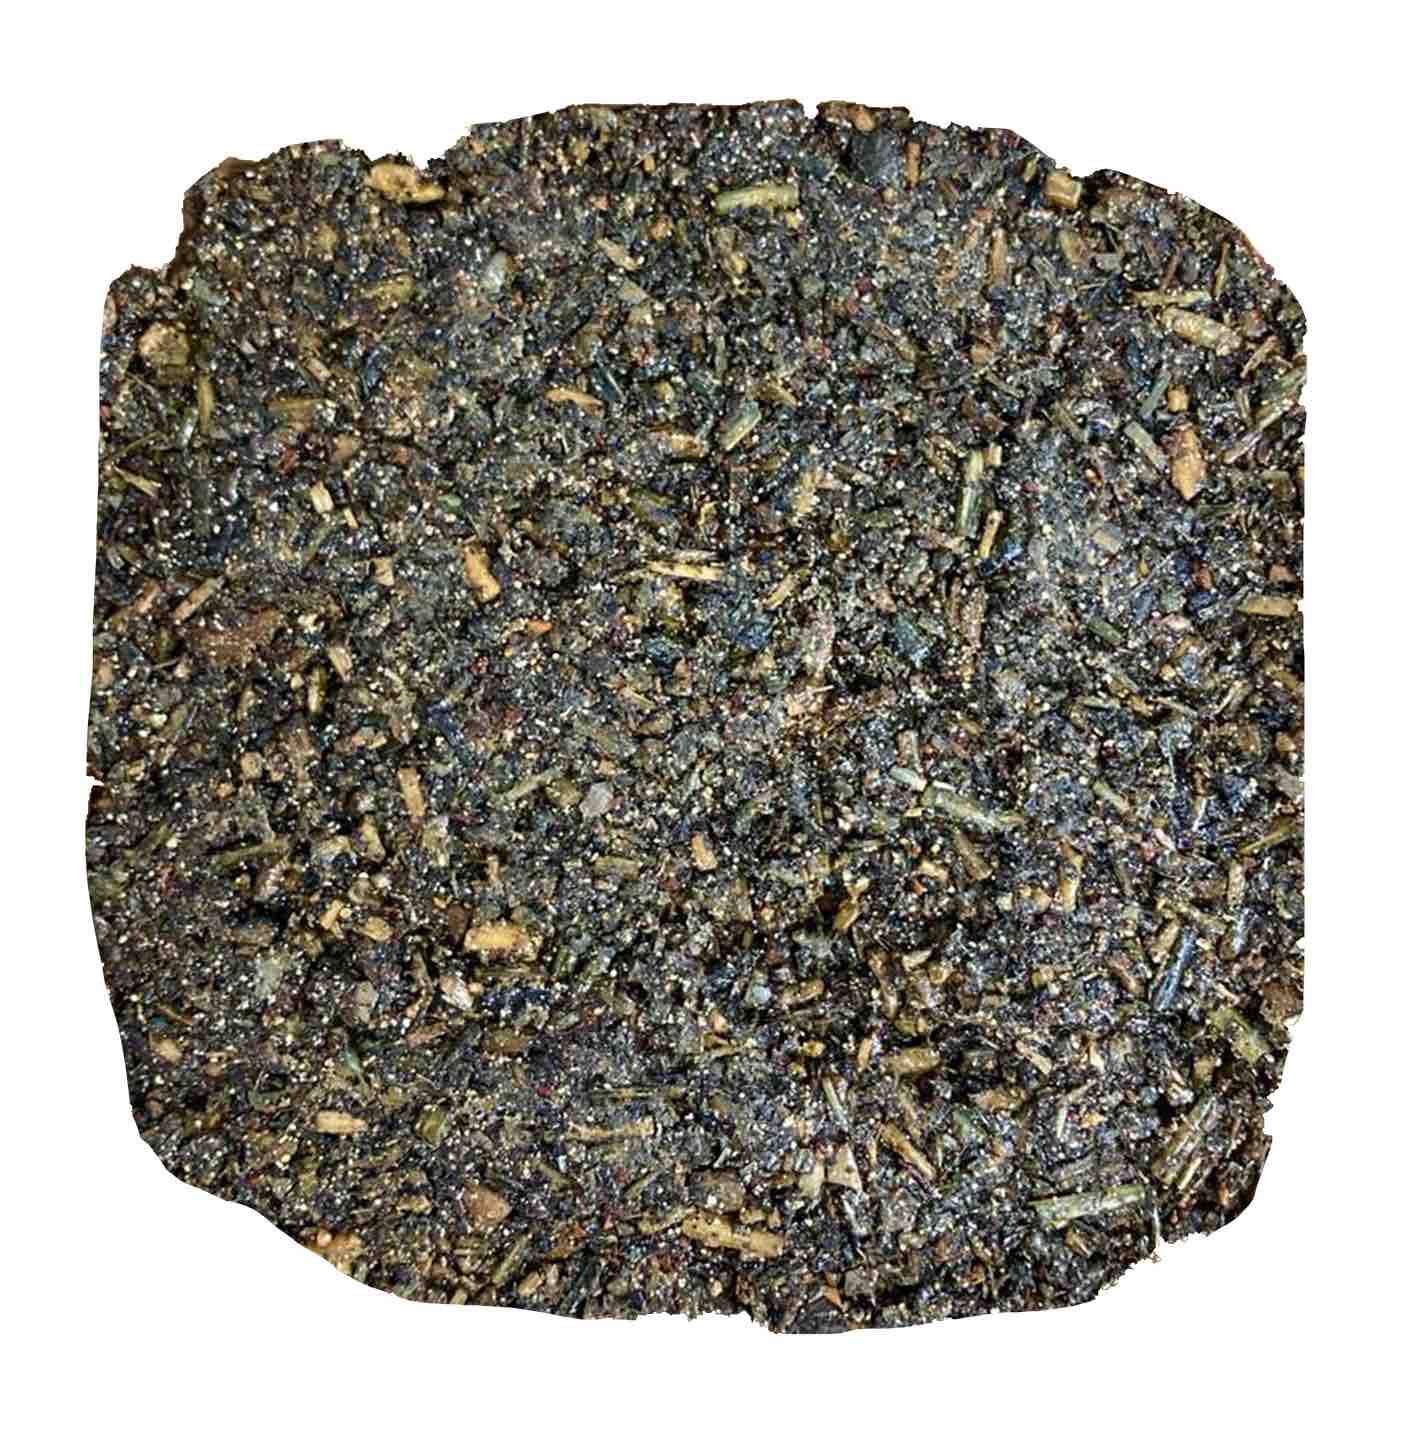 |
Bio Resin | Pine Resin | x | Tea Leaves | hard, rigid block |
---
Recipes
-
recipe: 3D printing with food waste ↩
-
recipe: mycelium molding ↩
-
recipe: kombucha leather w/ blueberry hibiscus tea ↩
-
recipe: gelatin-based bio-plastic ↩
-
recipe: sodium alginate-based extrusions ↩
-
recipe: pine resin with egg shells ↩
-
recipe: sodium alginate-based bio plastic cast ↩
-
recipe: agar-based bio plastic ↩