8. Wearables
Overview
This week we dove back into the world of wearable electronics. Because I am familiar with making wearables (see my e-textiles week for past documentation of my projects) I wanted to test out some things that I had never tried before. We were introduced to a range of tools we could experiment with this week includingthermochromatic ink, soft speakers, magnets, and flexinol. I decided to experiment with creating thermochromatic pigment and mixing it with the pigments we made in our biochromes week to see different color variations and test how it affected the thermochromatic properites. In the end I created a silk screen print which used thermochromtic ink of an image that I've worked with before.
Research
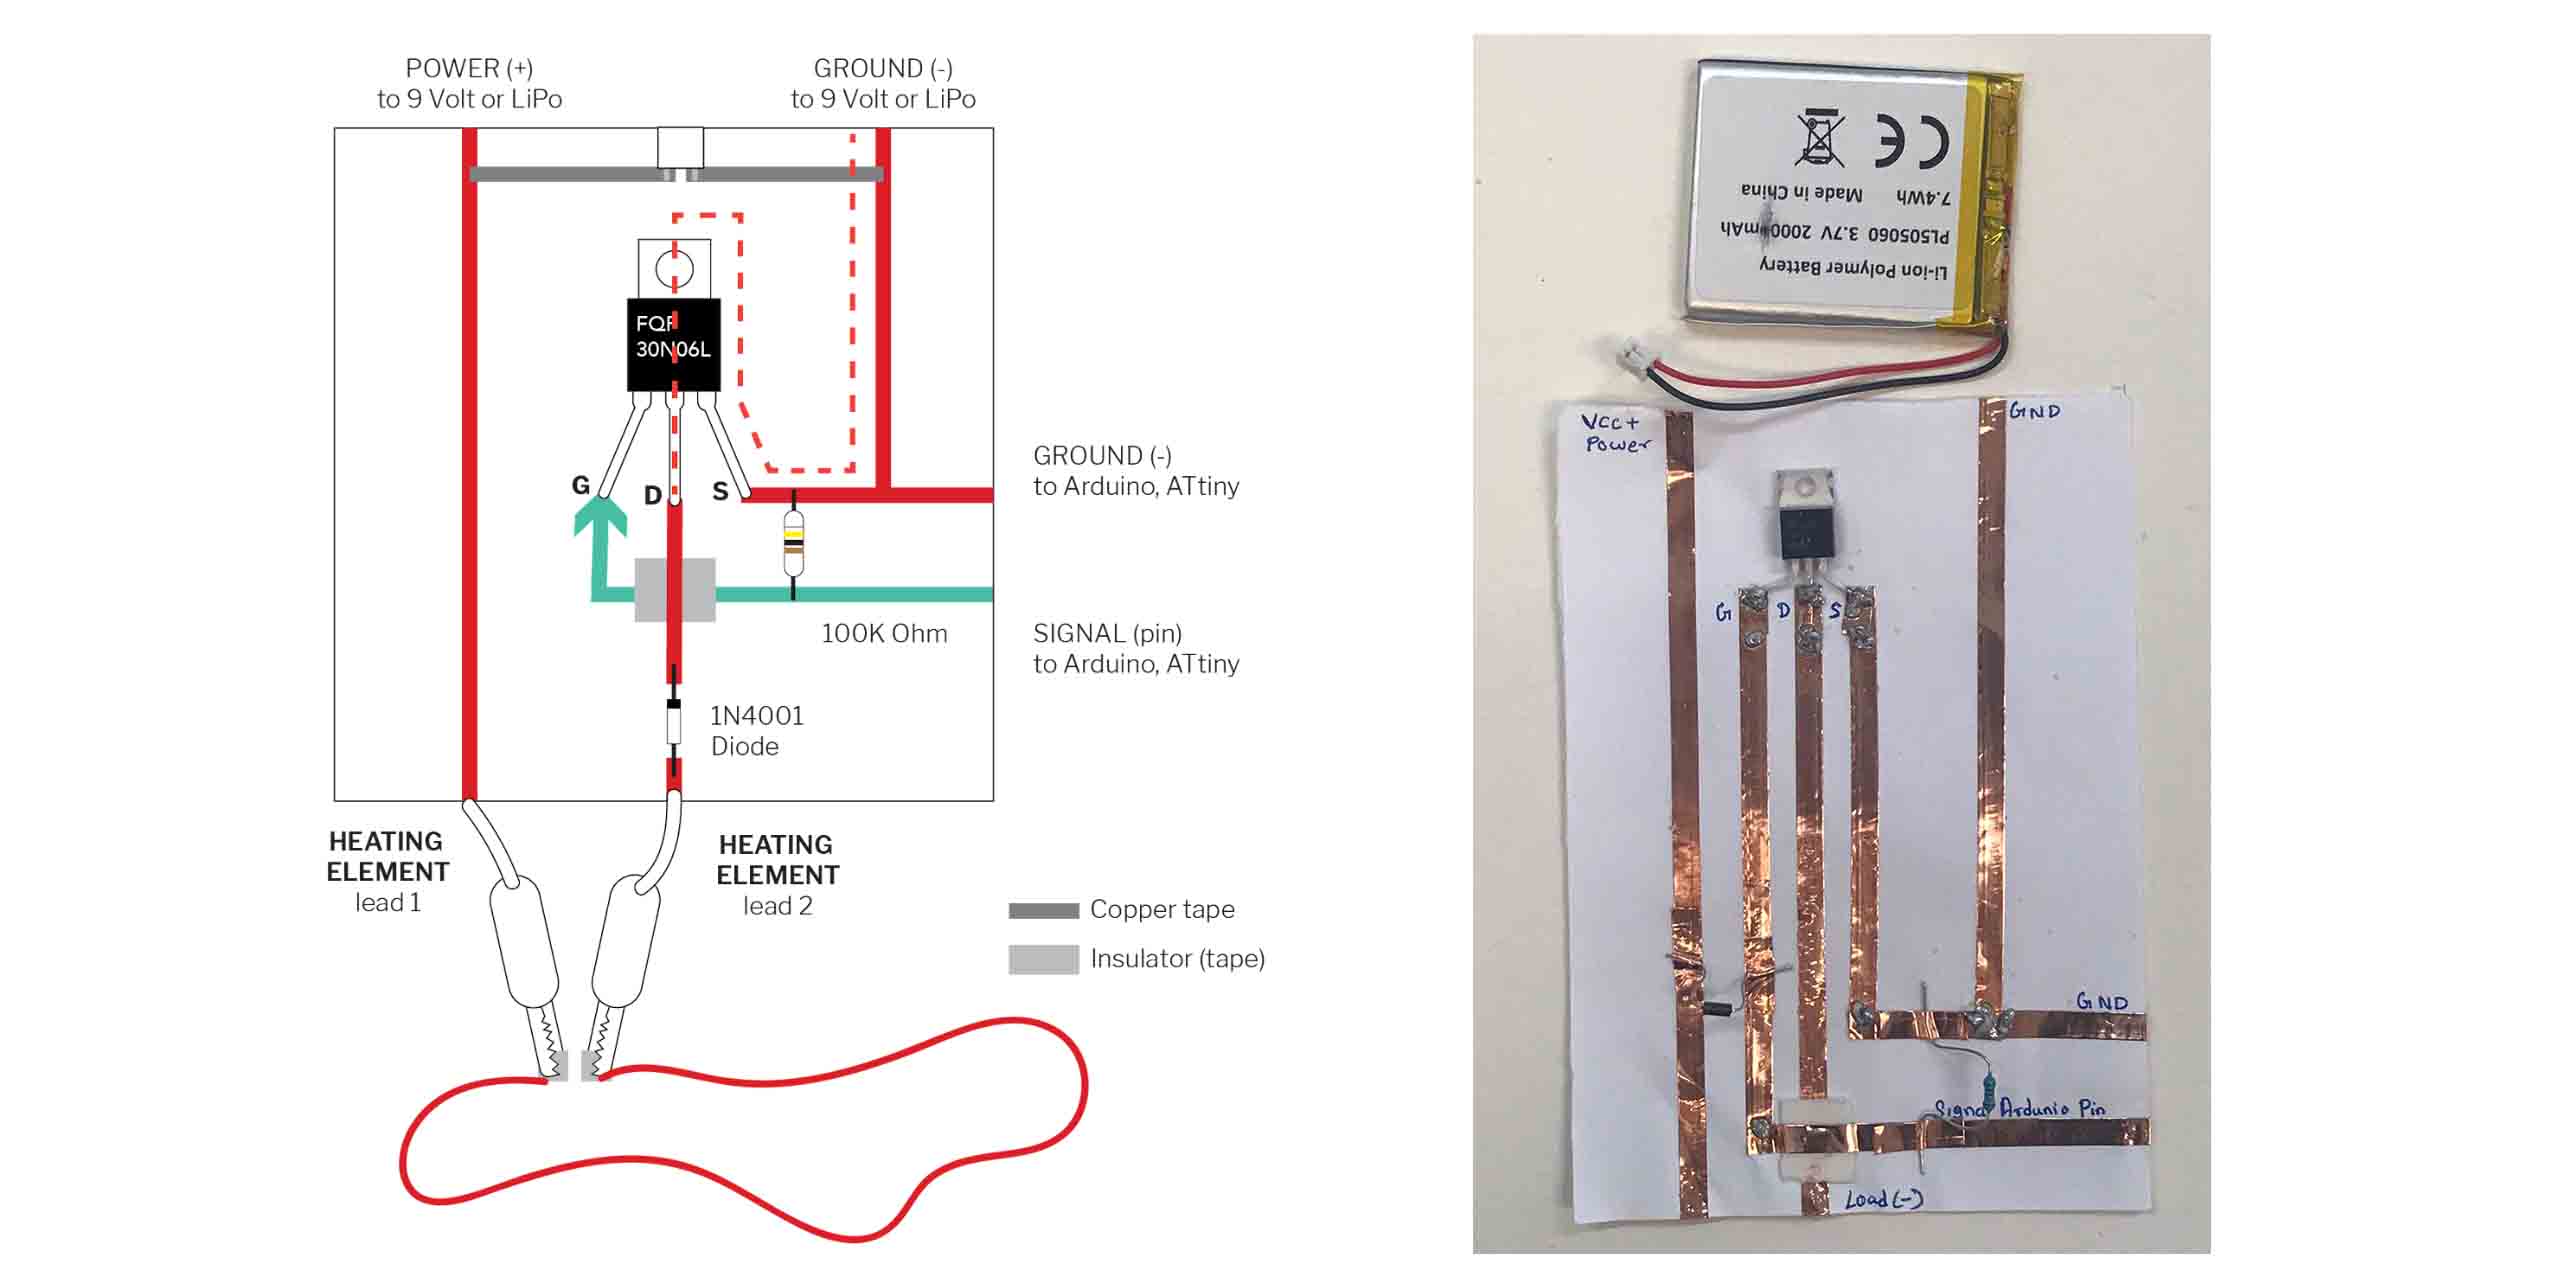
Our assignment this week was to create two actuators swatches designed for the body and once swatch using the ATtiny or other microcontroller with both an input and output designed to be worn on the body.
Check out the weekly assignment here.
Some key terms to get oriented:
- Actuator: Output; a component of a circuit that moves or controls another part based on input.
- Neopixels: RGB LEDs with drivers embedded in the chip. This allows them to be addressable; you can control individual LEDs on a longer strip.
- Thermochromatic Ink: Pigments that change state in the presence of ink. Once they reach a temperature, the inks become colorless. Pigments can be miced with different substrates like paint, glue, polymorph.
- Transistors: Electrical switch or amplification piece.
- N MOSFET: a switch/transistor that can amplify the input voltage
- AT TINY: A byte sized arduino
- Shape Memory Alloys (SMAs): metals that change shape when they are heated to a certain temp.
- Flexinol: A SMA that is either untrained or trained to change shape when heat is applied.
- Fiberoptics: flexible fibers of glass use to transmit light signals.
References & Inspiration
This week I really wanted to experiment with flexinol after seeing how cool it looks changing shape when "sewn" into fabric. I found this example by Afrdt using flexinol to change the shape of leather so you can get an idea of the ways flexinol can work with soft materials.
Unfortunately we didn't have flexinol in the lab 😩.
When I decided to just experiment with thermochromatic ink, I decided to reference my past work of Jamika from the 1993 animated film Bebe's Kids. Below is the original sketch I made using p5.js, an open source creative coding editor that uses javascript. Watch the effect when you hover your mouse over her hair.
Process and workflow
Experiments with thermochromatic pigments X natural pigments
In preparing to screen print, I wanted to first test how adding our natural pigments would change the color and/or thermochromatic properites of the thermochromatic ink.
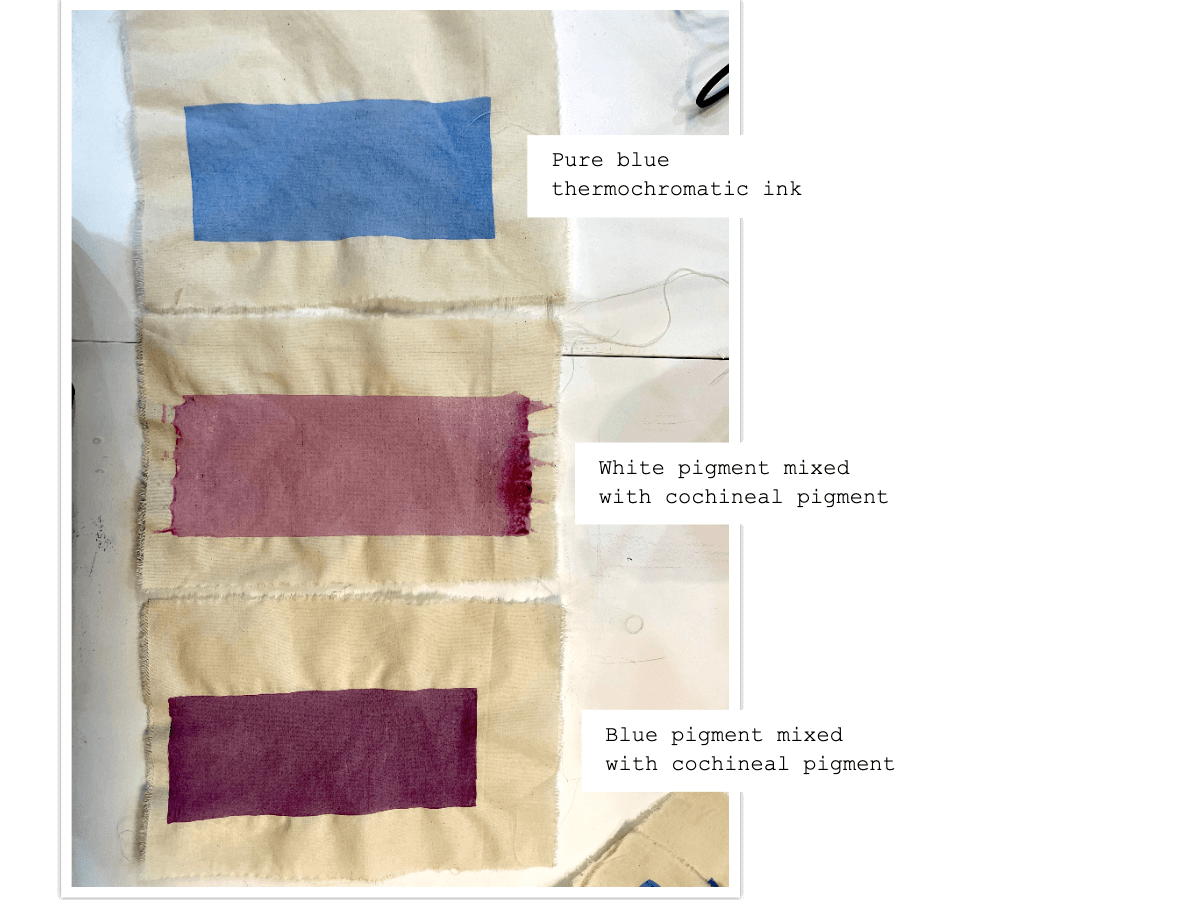
We had two thermochromatic powders, white and blue. I used our left over cochineal pigment from biochromes week to try and achieve pinks and purples and test the thermochromatic properties.

Tools used for creating the inks: Acaramina Base, thermocromatic colored powders, natural pigments, spoons, and mixers.
First I mixed the base into a cup, added the thermochromatic ink and then a little cochineal. The mixture of white powder with the cochineal created a very light pink/purple resembling blueberry yogurt. With the blue thermochromatic powder mixed with the cochineal, I created a nice purple.
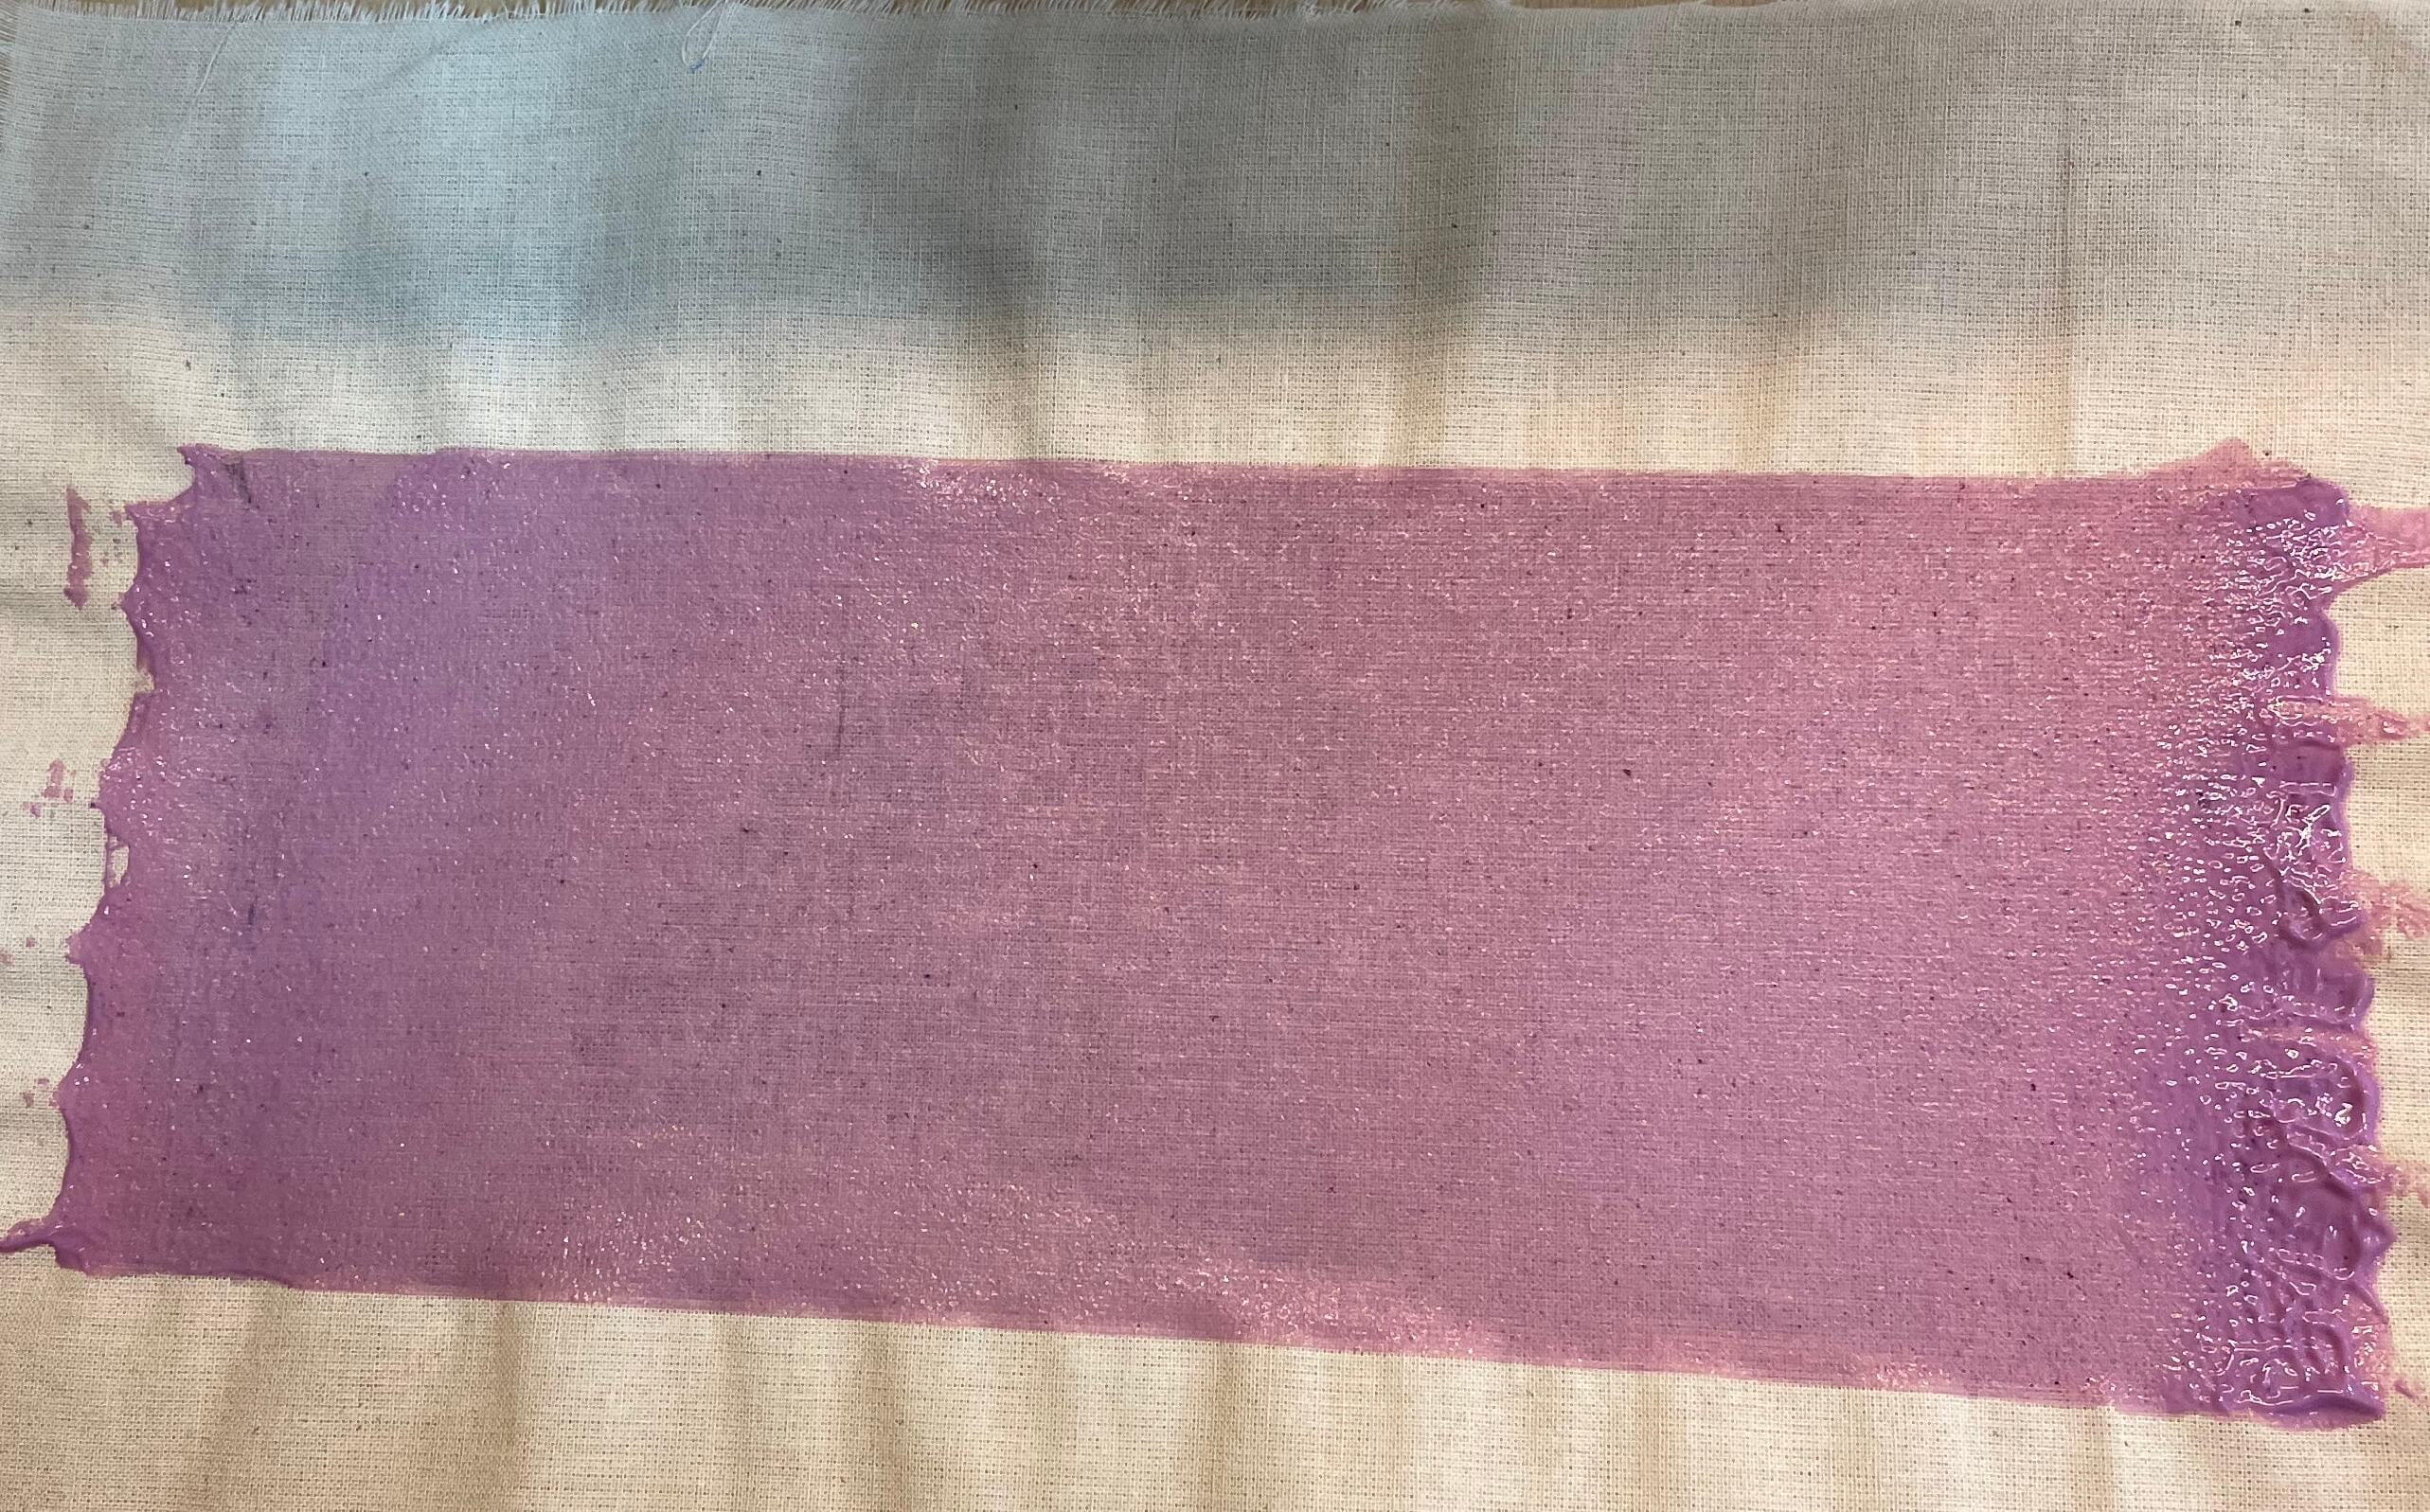
I made three screen printing tests, one with just the blue powder, one with the purple pigment I created, and one with the pink pigment I created to test the difference in temperature changing properties. All prints were made on unfinished cotton fabric, similar to muslin.
Pink Ink [^1]
* 50g Acramina Base
* 2g white scented pigment
* < 0.0g Cochineal Pigment
* Digital scale
* Spoon
* mixing cup
* silk screen
* squeegy for paint
* textile to print onto
* Mix all ingredients into mixing cup with spoon until pigment has disolved and texture is smooth.
* Tape of skilk screen so you have the desired shape you want to screen print.
* Place textile under silk screen
* Lift silk screen at 45 degree angle and apply pain to the top with a spoon.
* Still lifting screen slightly above the textile, gently run the squeegy from the top of the screen to the bottom, without apply pressure.
* Place screen flat on top of textile.
* Holding the squeegy at a 45 degree angle toward you, apply pressure and run the squeegy from the top of the skilk screen to the bottom. Repeat bottom to top a couple more times.
* Lift silk screen from textile to see result.
* Rinse the silk screen and squeegy immediately with water so paint doesn't dry.
* Hang screen print to try or put in the dehydrator for 20 mins, at 35 degrees celcius.
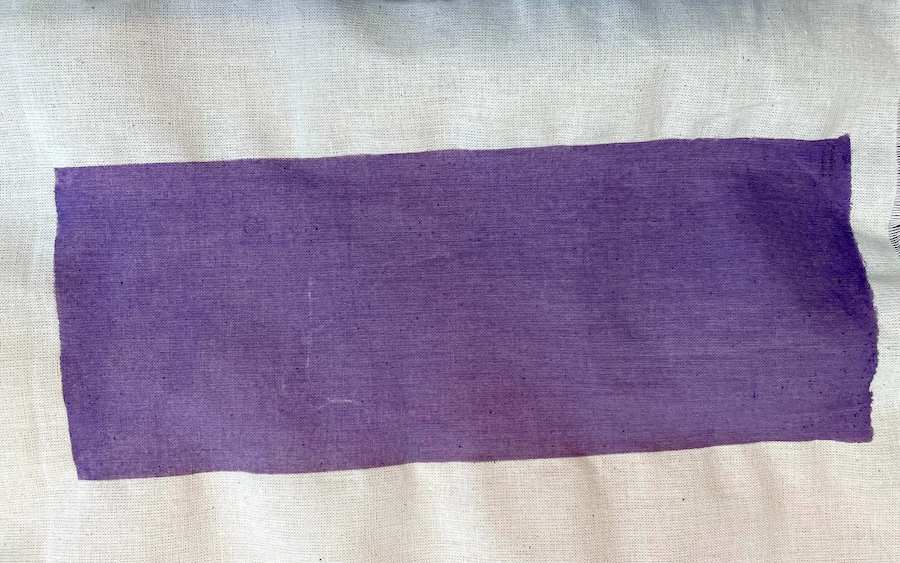
Purple Thermochromatic Ink [^2]
* 58.5g Acramina Base
* 0.8g blue pigment
* 0.8g Cochineal Pigment
* Digital scale
* Spoon
* mixing cup
* silk screen
* squeegy for paint
* textile to print onto
* Mix all ingredients into mixing cup with spoon until pigment has disolved and texture is smooth.
* Tape of skilk screen so you have the desired shape you want to screen print.
* Place textile under silk screen
* Lift silk screen at 45 degree angle and apply pain to the top with a spoon.
* Still lifting screen slightly above the textile, gently run the squeegy from the top of the screen to the bottom, without apply pressure.
* Place screen flat on top of textile.
* Holding the squeegy at a 45 degree angle toward you, apply pressure and run the squeegy from the top of the skilk screen to the bottom. Repeat bottom to top a couple more times.
* Lift silk screen from textile to see result.
* Rinse the silk screen and squeegy immediately with water so paint doesn't dry.
* Hang screen print to try or put in the dehydrator for 20 mins, at 35 degrees celcius.
Results
What I discovered when applying heat to each swatch was that the white color powder was not thermochromatic so the pink ink had no change at all, while the blue ink reacted to heat with the best result and the purple only slightly. Here are the results when the thermocromatic ink was heated with conductive thread:
Thermochromatic Ink Test with Heat by olivia cueva
- Blue Ink: Changed color fast with heat
- Purple Ink (Blue Thermo Ink + Cochineal Pigment): Changed color slowly with heat
- Pink Ink (Non Conductive): Color did not change when heat was applied.
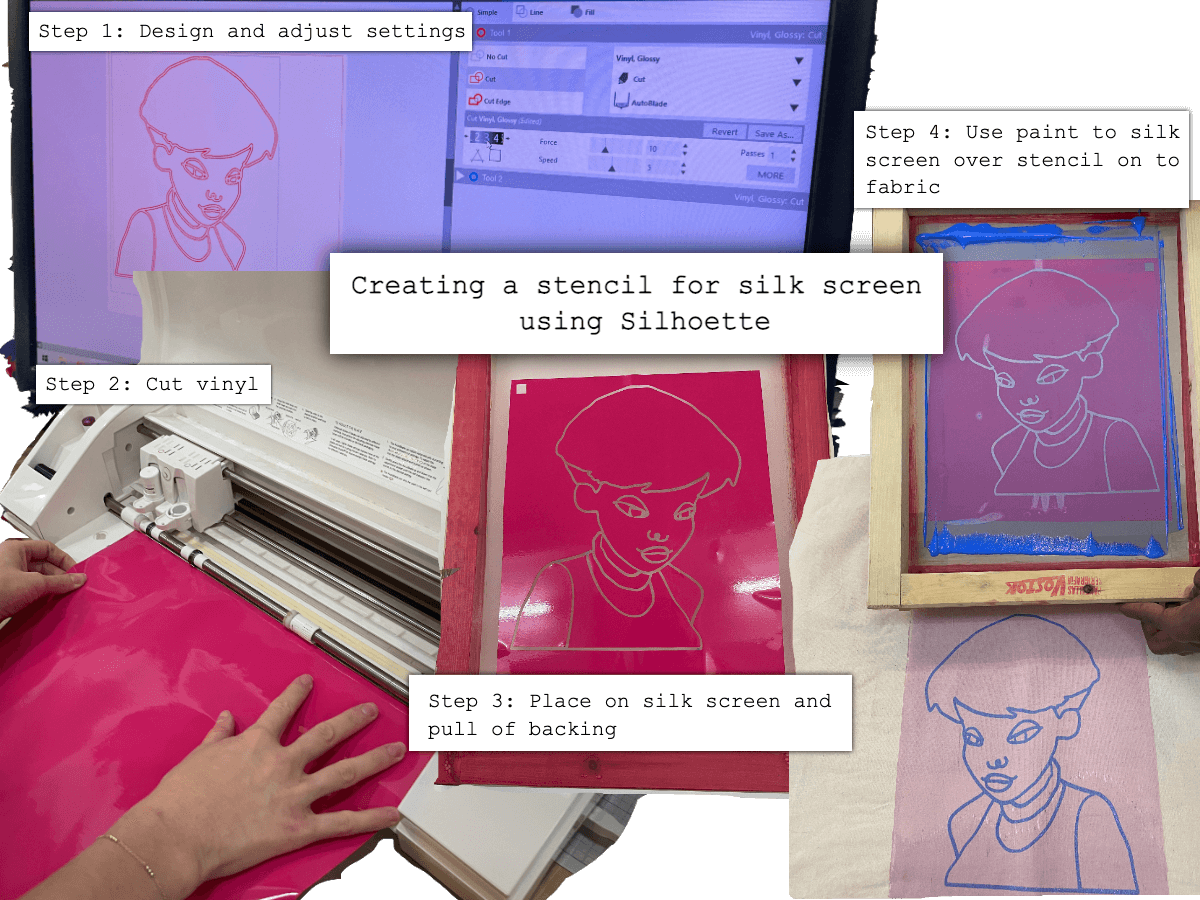
Creating a Screen Print
After I tested out the pigments I created my screen print of Jamika. The goal was to screen print the image of Jamika using the thermocromatic ink and watch the effect when it was connected to power.
- Step 1. Design your print. I used Rhino to trace the image of Jamika, then I brought into Illustrator or Ink Scape to create the image into the stencil.
- Step 2. Cut your stencil on vinyl stickers.
- Step 3. Place your stencil on the silk screen and remove sticker backing.
- Step 4. Flip the screen over so that the top with the sticker is face to face with the right side of your fabric. Apply your paint at the top of the screen. Before pressing down on your fabric, lift the stencil at an angle and gently squeegy one pass of paint on to the screen. Then press the screen down on the fabric and squeegy from the top to the bottom of the screen. Do a couple of passes. See the result. Adjust if needed.
Making the Thermochromatic Fabric
Once the screen printing was done it was time to see the effect when heat was applied. I screen printed on another piece of fabric -- this piece would go underneath the print in the picture above. I sewed it with conductive thread around the image and connected this to a power supple with aligator clips to see the effect. When heat is applied the image disappears.
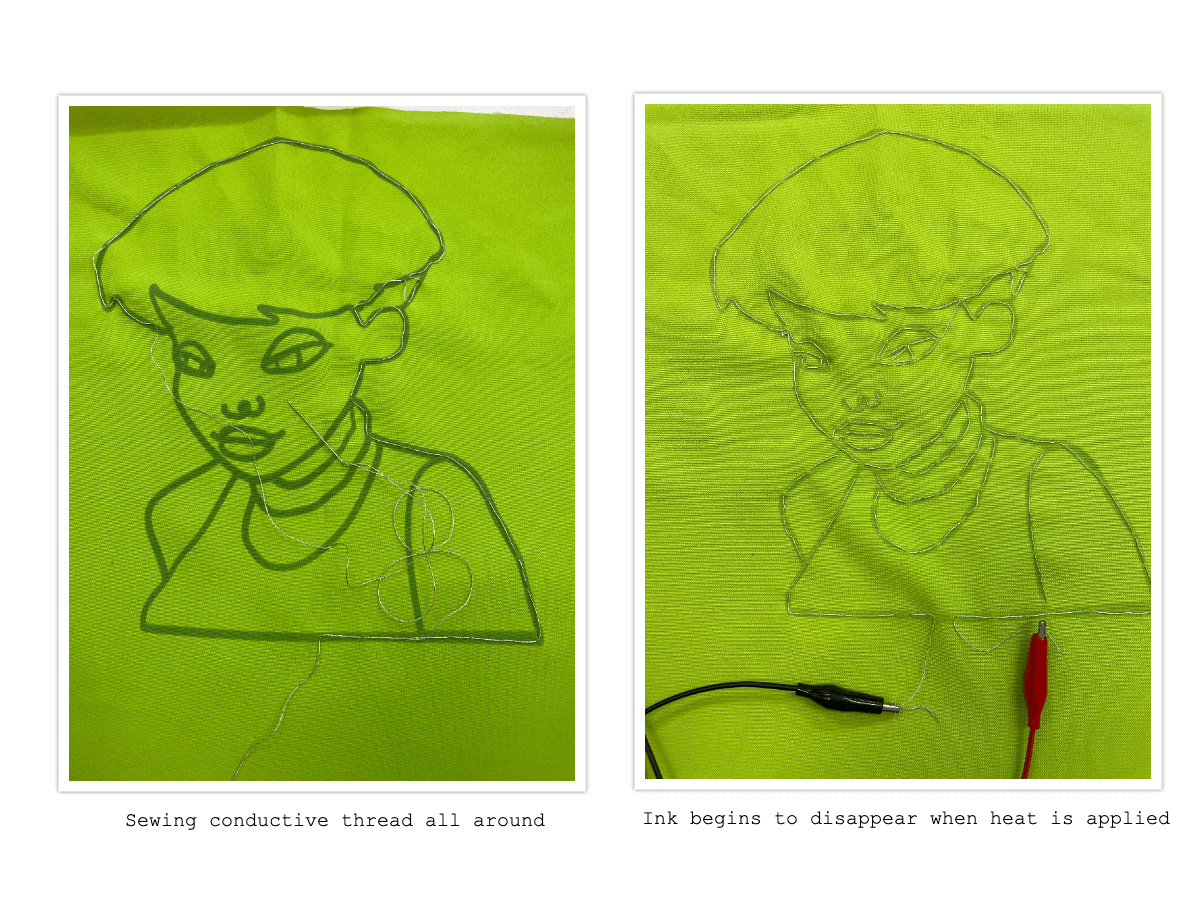
And here's a time lapse of it when placed on my jacket. Watch it here in 13secs. In reality if took about 5 minutes to disappear. When placed in the cold of the refrigerator, the image only took a minute to reappear.
Jamika with thermochromatic ink by olivia cueva