9. Textile Scaffold
Overview
This week we were introduced to molding with leather and mycelium, crystallization, composites, and how to use the CNC mill, a manufacturing process that uses a cutting tool mounted on a rotating spindle to selectively remove material from a block of raw substrate. Our assignment this week was to make one mold using the CNC mill and experiment with two different types of the techniques mentioned above. I chose to focus on crystilazation, molding with mycelum, and leather molding.
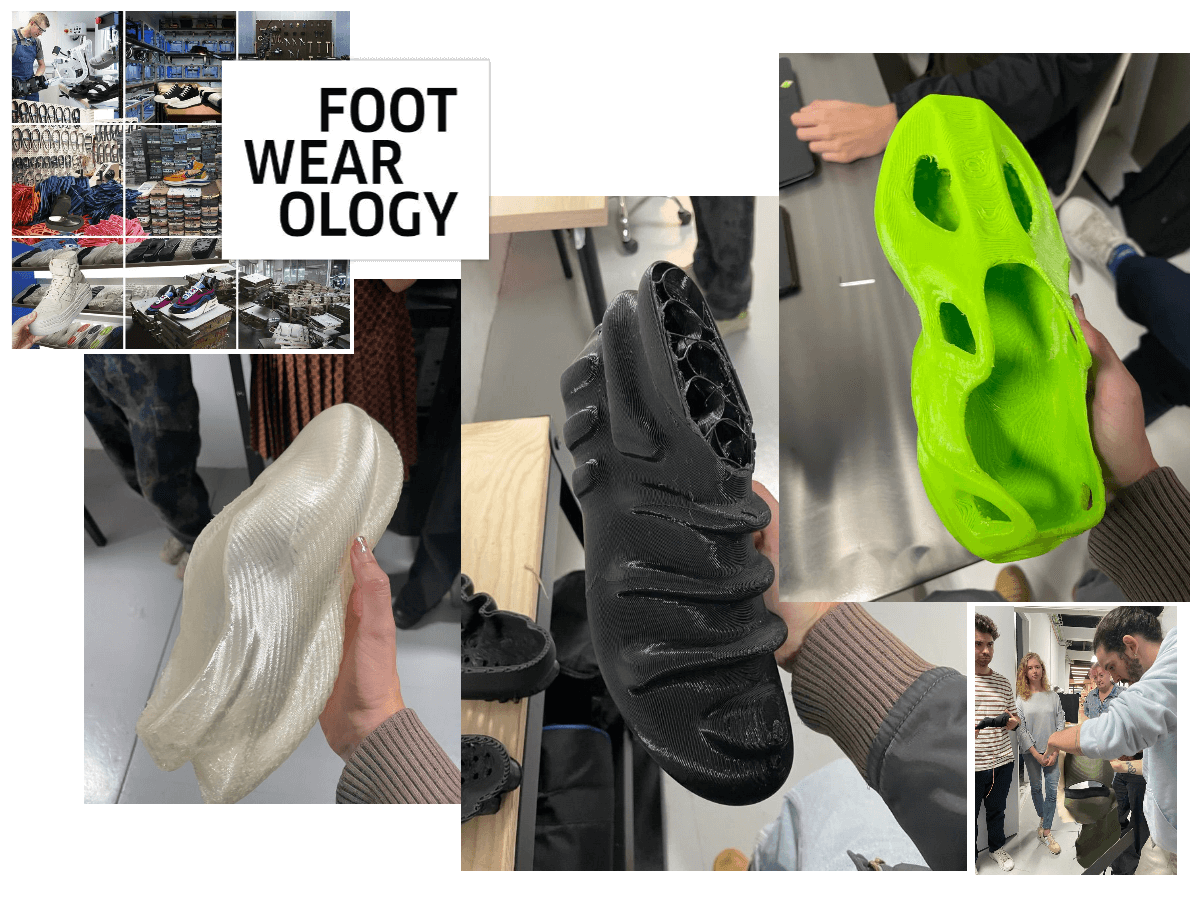 We got to look at 3D printed shoes and shoe lasts all designed and created in house at Footwearology. (Images captured and compiled by Olivia Cueva).
We started the week with a visit to Footwearology, a research and educational lab that focuses on how to best design footwear with the end of life at the beginning of the design phase. We got to see some of the shoes they design for 3D printing and their footwear created by an industrial knitting machine. Next we when to Atelier Madre -- Manuel Dreesmann, a small leather accessory shop that designs limitted edition, modular, leather goods. Then we went to visit Norman Vilalta, a bespoke men's dress shoe maker and talked with him about his history and process.
On Tuesday we visited Jessica Dias's mycelium lab and learned all about mycelium molding and other projects created with bio materials.
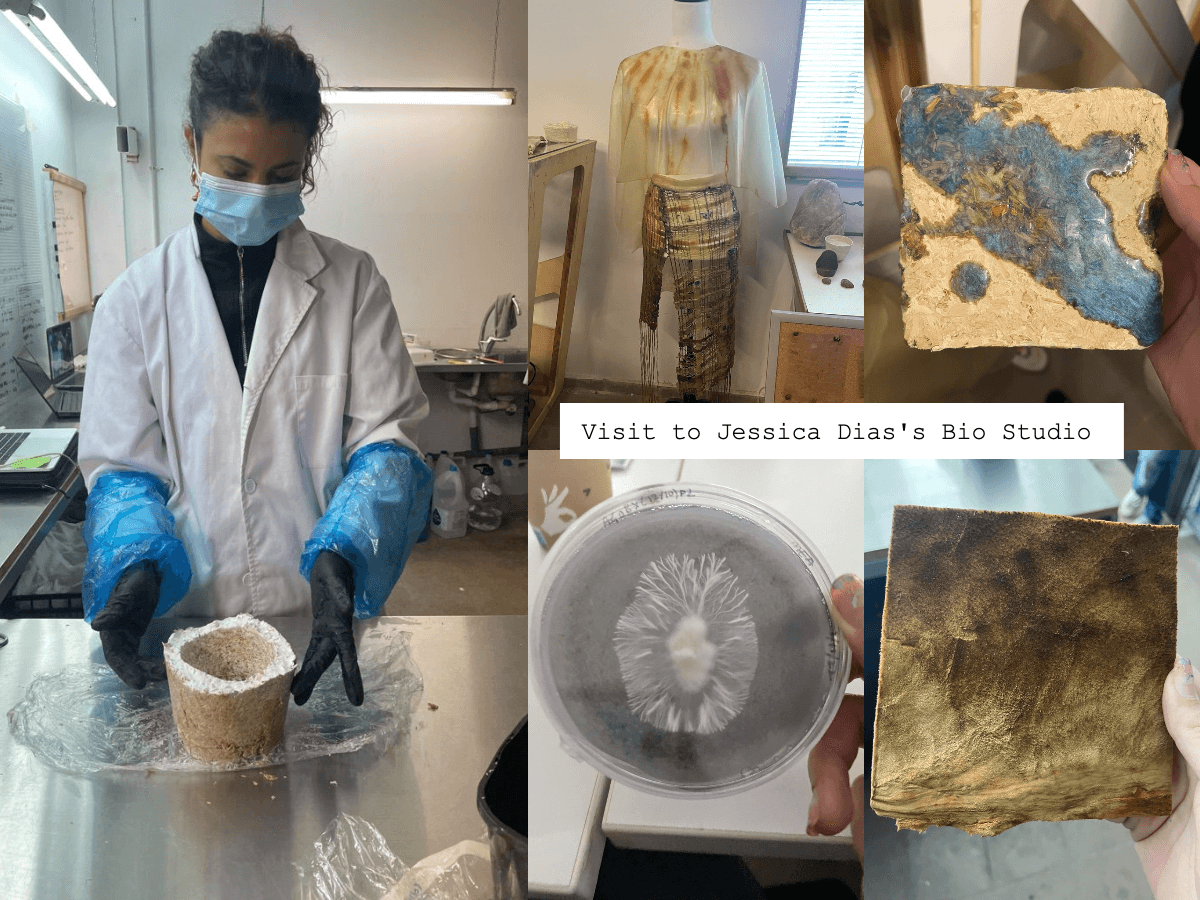 Jessica Dias in her lab showing us a mycelium plant pot she sculpted. Top left to bottom right: garment made entirely of bio materials, bio resin tile, mycelium growing in petri dish, mycelium sponge/felt.(All photos taken and compiled by Olivia Cueva.)
Research
In our weekly lecture we went through the following techniques:
- Composites: A composite is a material formed by combing two or more constituent materials.
- Molding Techniques (Composites): there are several types but the ones we were introducted to are:
- Compression Molding, Thermoforming w/ Vacuum, and FRP Moulding w/ vacuum bag.
- Leather molding: process of molding leather by wetting it and stretching and sculpting it to an object or mold of your choice, using different hardeners to achieve a hard brittle effect.
- Fabric Formwork: the use of structural membranes as the main material for molds.
- Crystilazation: Crystalizing fabrics and other objects
- Wood and Textiles: adhereing wood to textiles to create different material or creating garments and soft structures out of wood.
- Digital and Biological Fabrication: growing as a textile application such as chia seeds or silk from silk worms.
- CNC Miling: milling is the process of using rotatry cutters to remove material by advancing a cutter into a work piece. CNC Miling stants for Computer Numerical Control Milling.
References & Inspiration
Below are some work I was inspired by for this week:
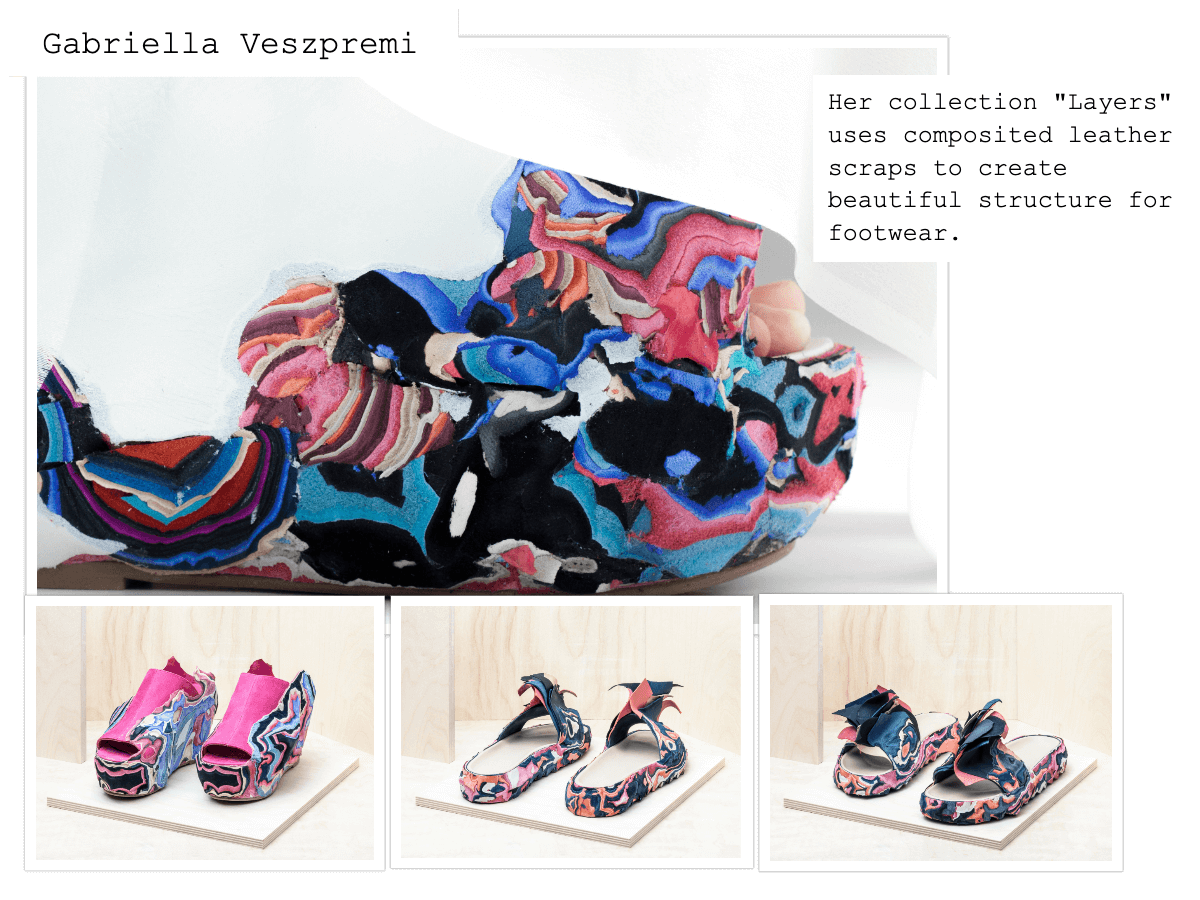
Composites
Wet Leather Molding
@rubenisaza I don’t know 😅🖤 #fashion #wetmolding #leathermolding #corset #leather #leatherwork #tiktokfashion #fashionhack #diy #fashiondiy #howthisbecomethis ♬ original sound - Kira Kosarin
Projects Created this Week: Outcomes
| Project pic | Project name | Material Used | Link to Process |
|---|---|---|---|
 |
Venus Mold | Foam with CNC Mill | Process |
 |
Crystal Panties | Borax Crystals | Process |
 |
Wet Leather Molding | Leather | Process |
 |
Mycelium Venus | Mycelium w/ Straw Substrate | Process |
Process and workflow
CNC Milling
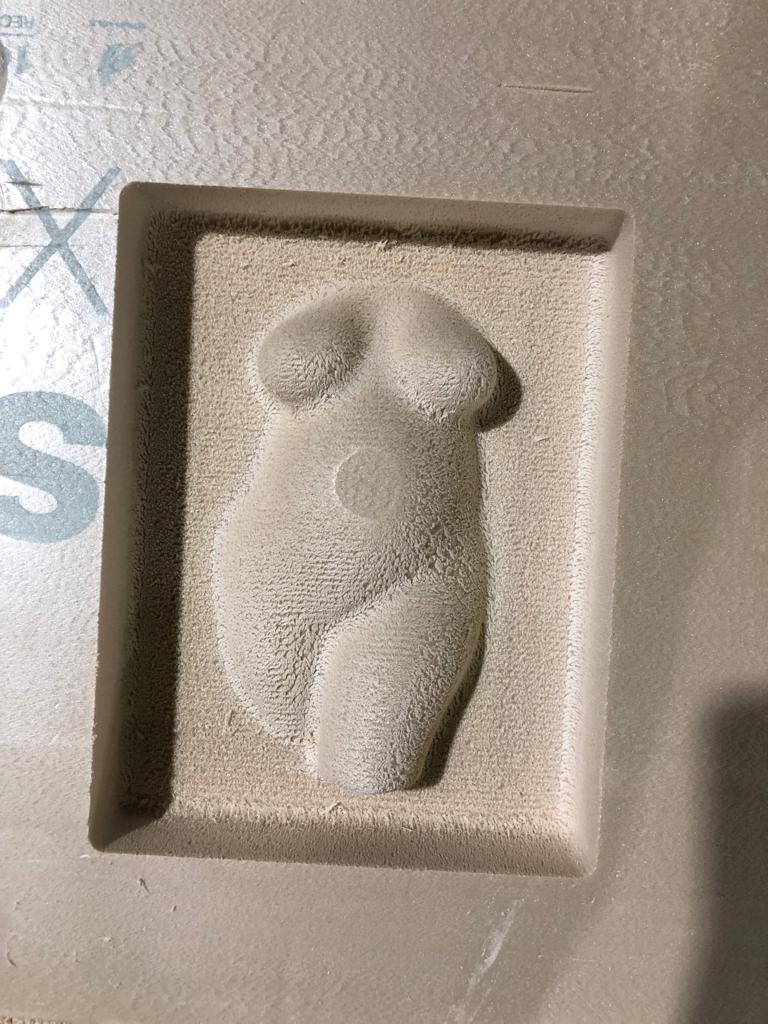
To begin this process, I started in Rhino3D, designing my model to be later cut by the CNC. In all honesty I wasn't too excited about using the CNC (It's a big machine and a little intimidating and I hurt myself in our test run when just trying to secure the material to the CNC bed with screws 😂) but I know it is an important machine to learn.
To make things a bit less complicated, I recycled my model from our Digital Bodies week. Then to practice a little more, I created a model of Jamika, the image I used in our Wearables week.
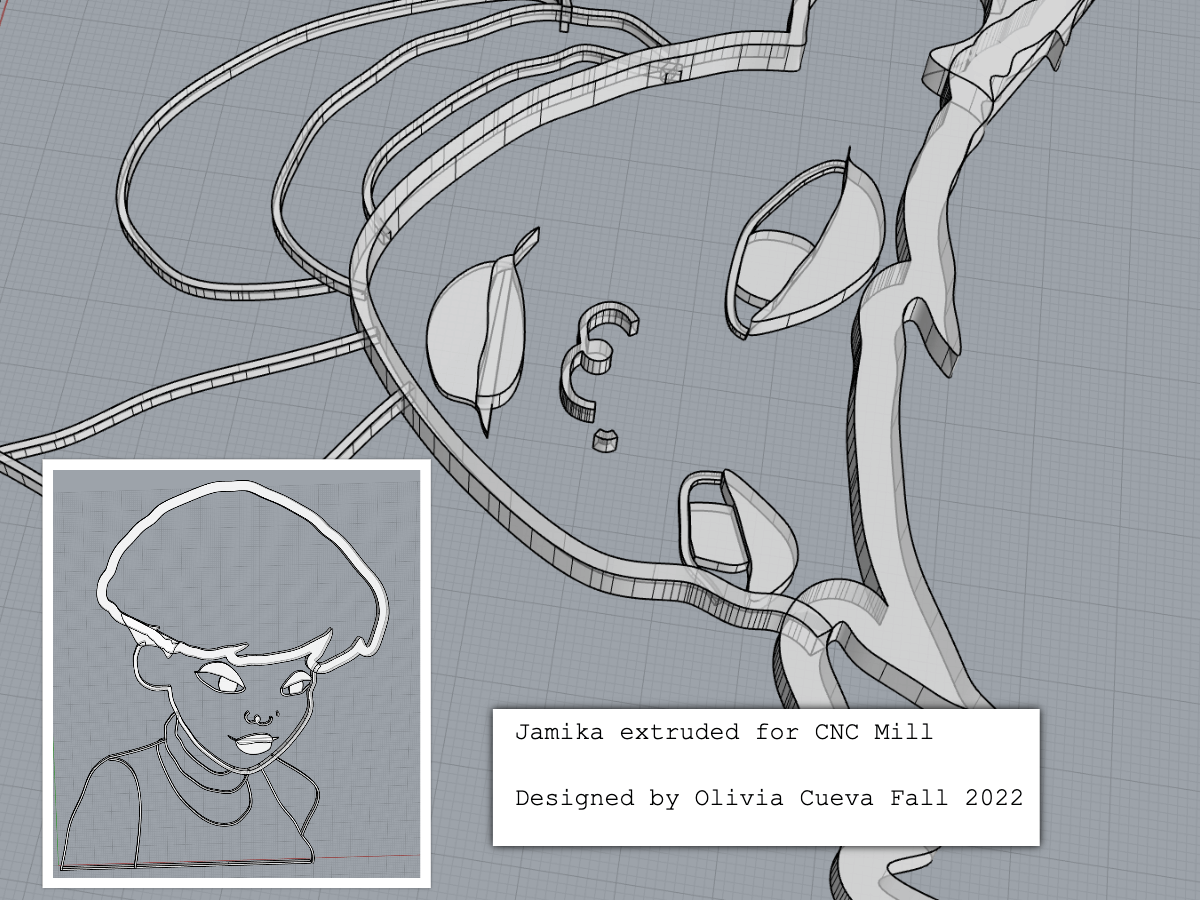
In the end, the Jamika file had lines too small to cut on the CNC so we went with the Venus mold.
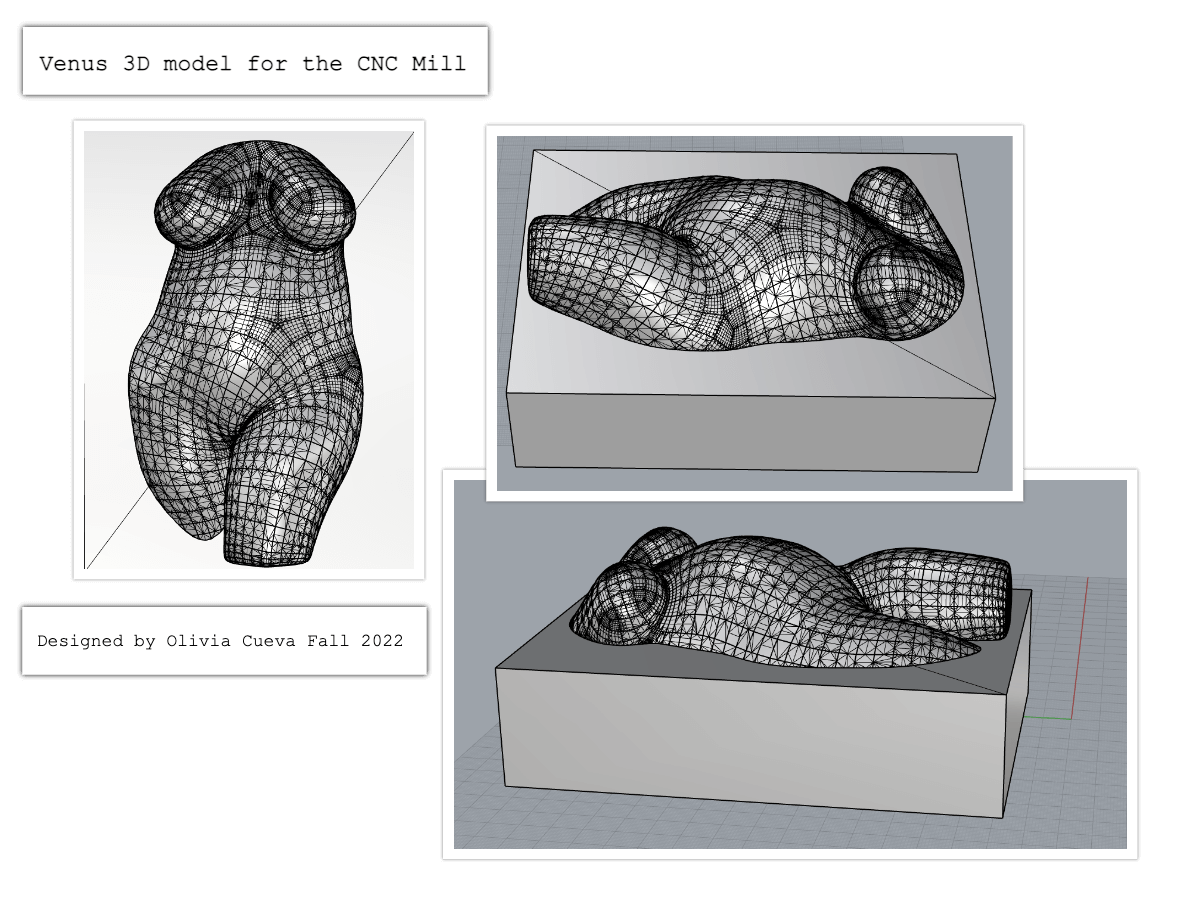
To get the file ready for RhinoCAM, the extension used in Rhino to design for the CNC, here are the parameters I used:
- Made a Bounding box on the mesh and then make a rectangle of the top plane of the box to represent the surface of the material.
- Offset 1cm on all sides to make more space around the model
- Extruded this rectangle into a box and move it lower in z direction
Once the file is ready in RhinoCAM,
- Set the stock to 0
- Set the step over distance to 25
- Set speed to 18000
- Designed for use of a 12mm tool bit for both Roughing and Finishing process.
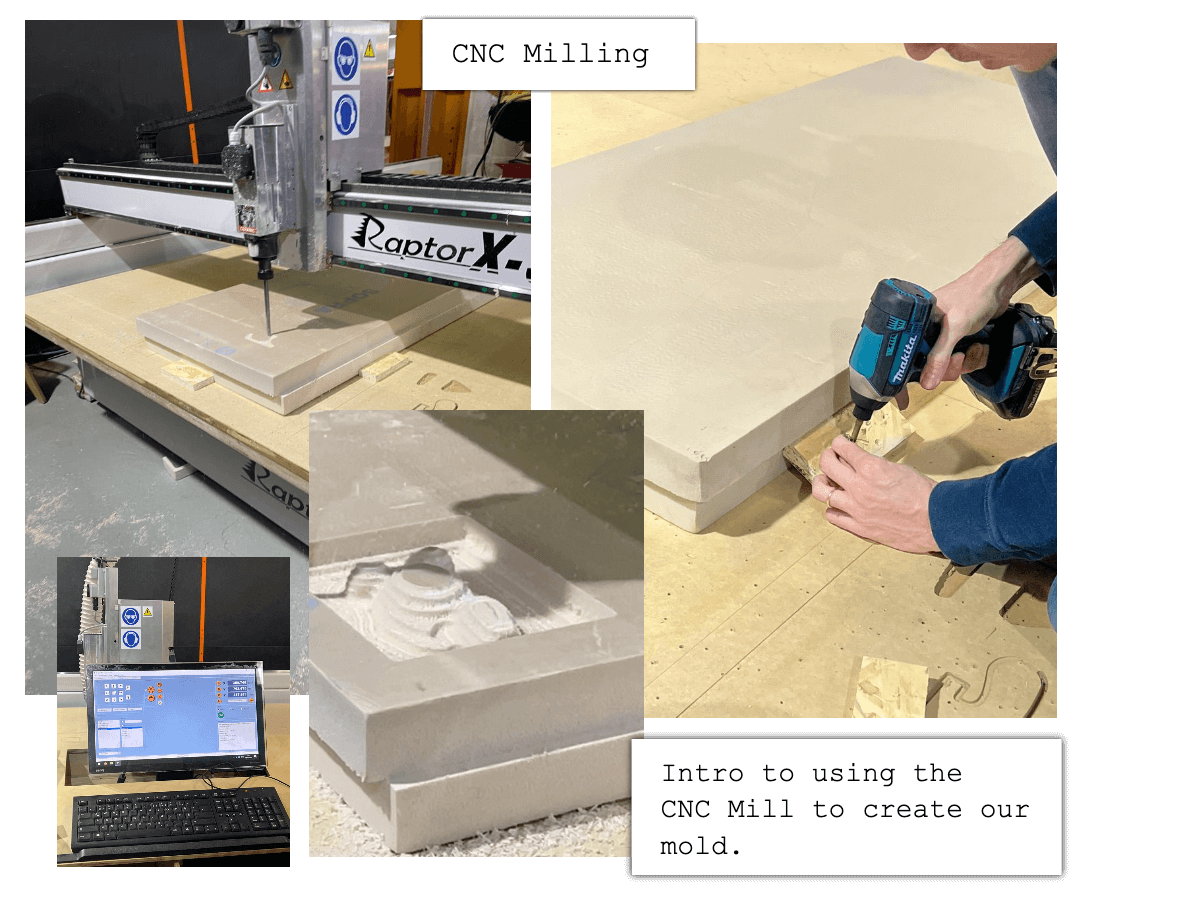
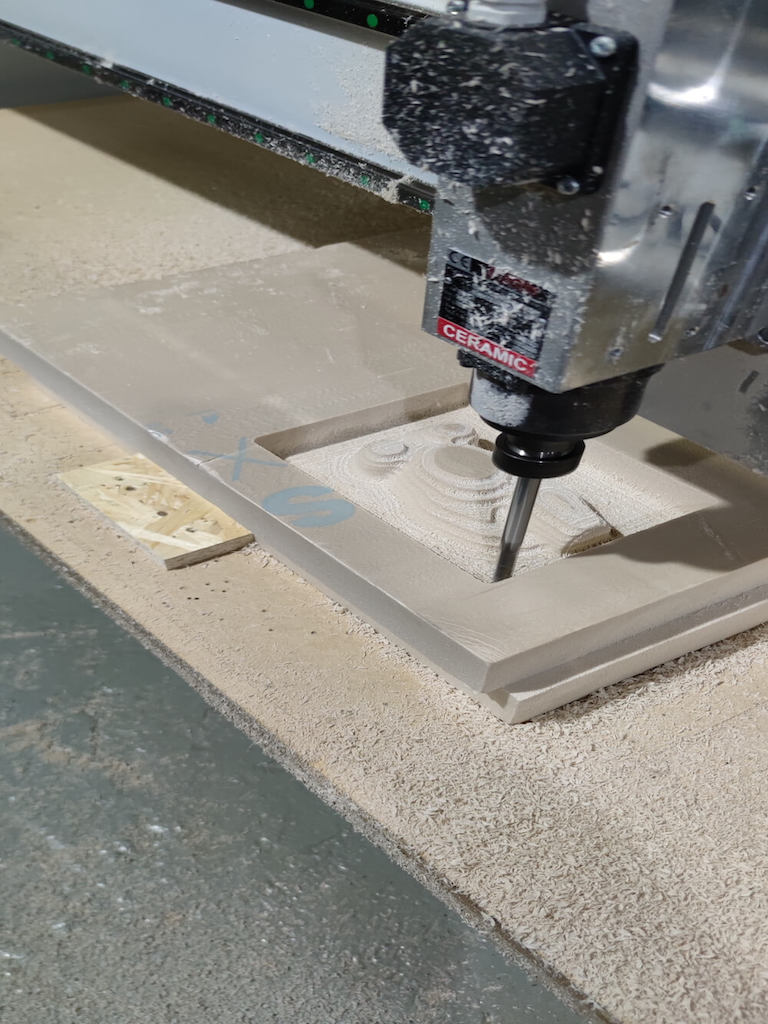
To get ready to use the CNC mill you must:
- get your material secured to the CNC bed with wood pieces and screws.
- change the tool bit to the size you need, using two wrenches to loosen and remove the opening that the bit goes into and using the wrenches again to tighten it back up.
- set your x, y, z, points on the software.
- put on your saftey glasses.
- After milling is done remove your cut piece and clean the bed and area using a vacuum.
Here is the model after the roughing process versus the finished model:
For more detailed pictures and instructions on setting up the CNC mill, visit Dinesh Kumar's documentation.
Crystalization
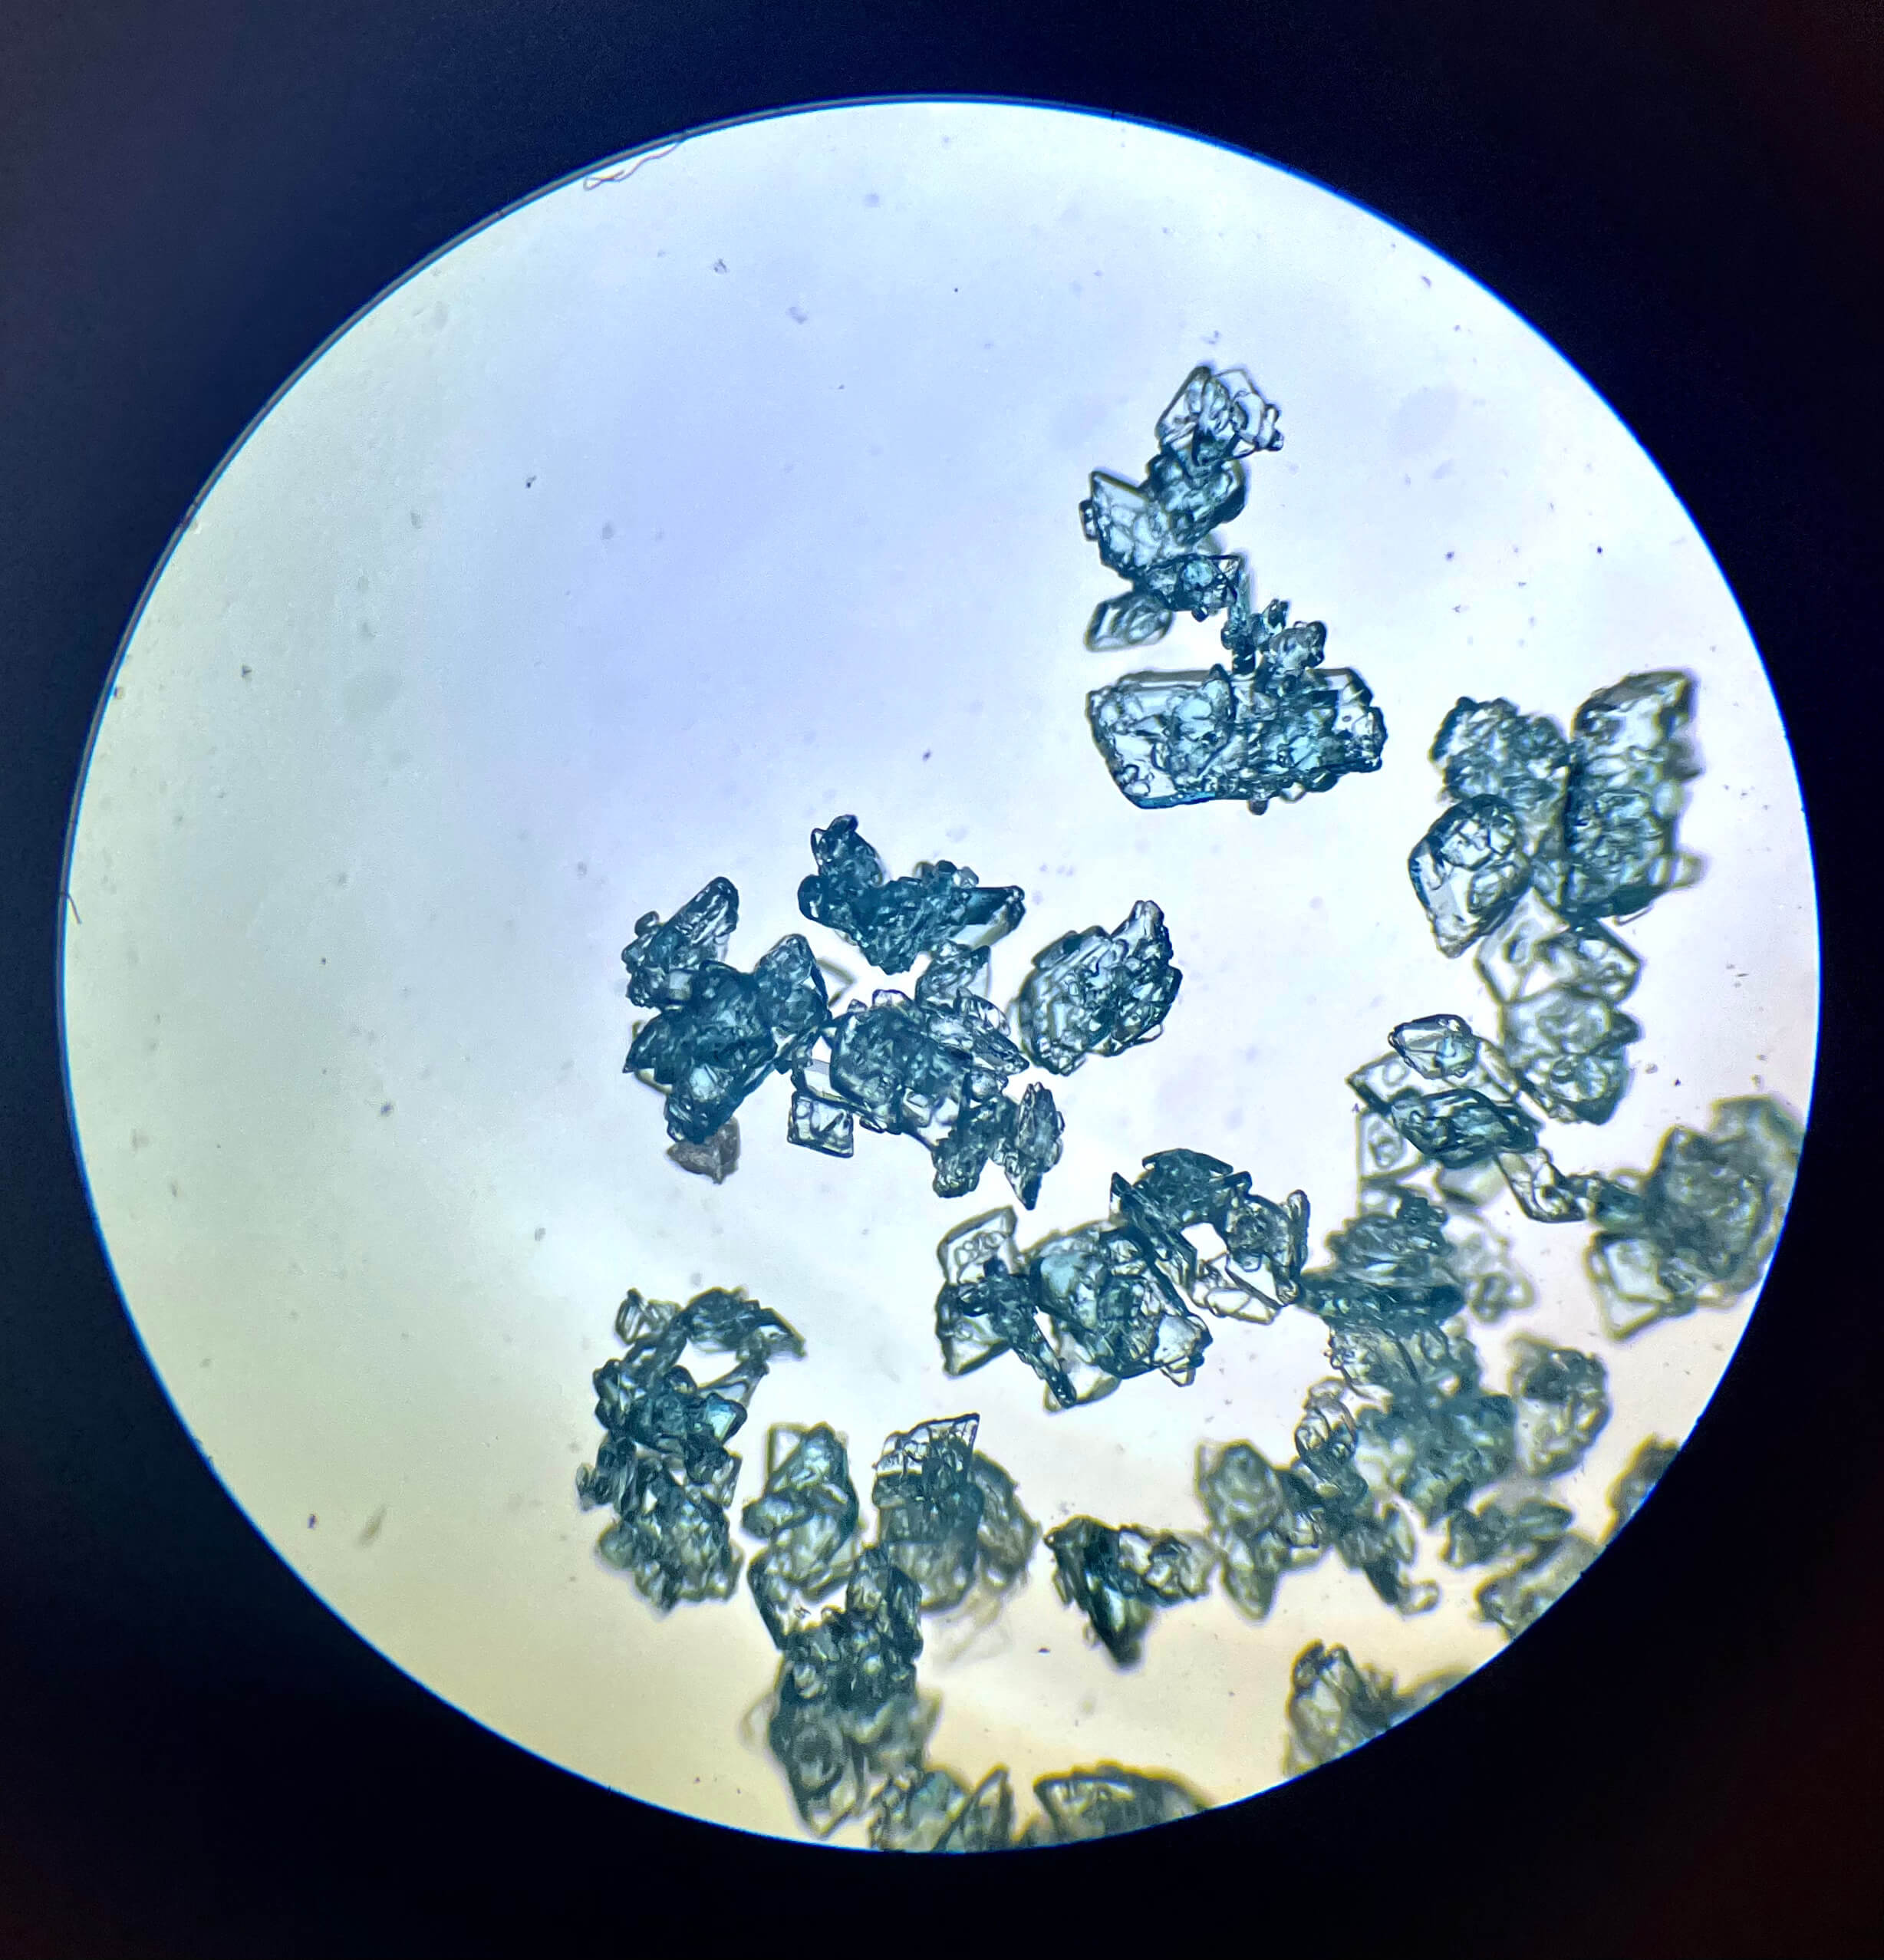 Left: Cobalt crystals under the microscope. Picture taken by Olivia Cueva.
There are many minerals that can can create crystals but this week we learned how to crystalize with Alum, Borax, and Cobalt. But you can even crystalize with salt and sugar. In general Alum with create larger crystals while Borax creates smaller ones. Cobalt will create beautiful blue crystals but you have to be very careful and protective when working with this material becasue it can be toxic.
In my first experiement I tried to crystalize left over Lichen we had from our bio materials week using Alum, but unfortunately the crystals did not take. I'm curious to see if using a different minineral like Borax would allow the crystals to grow and adhere.
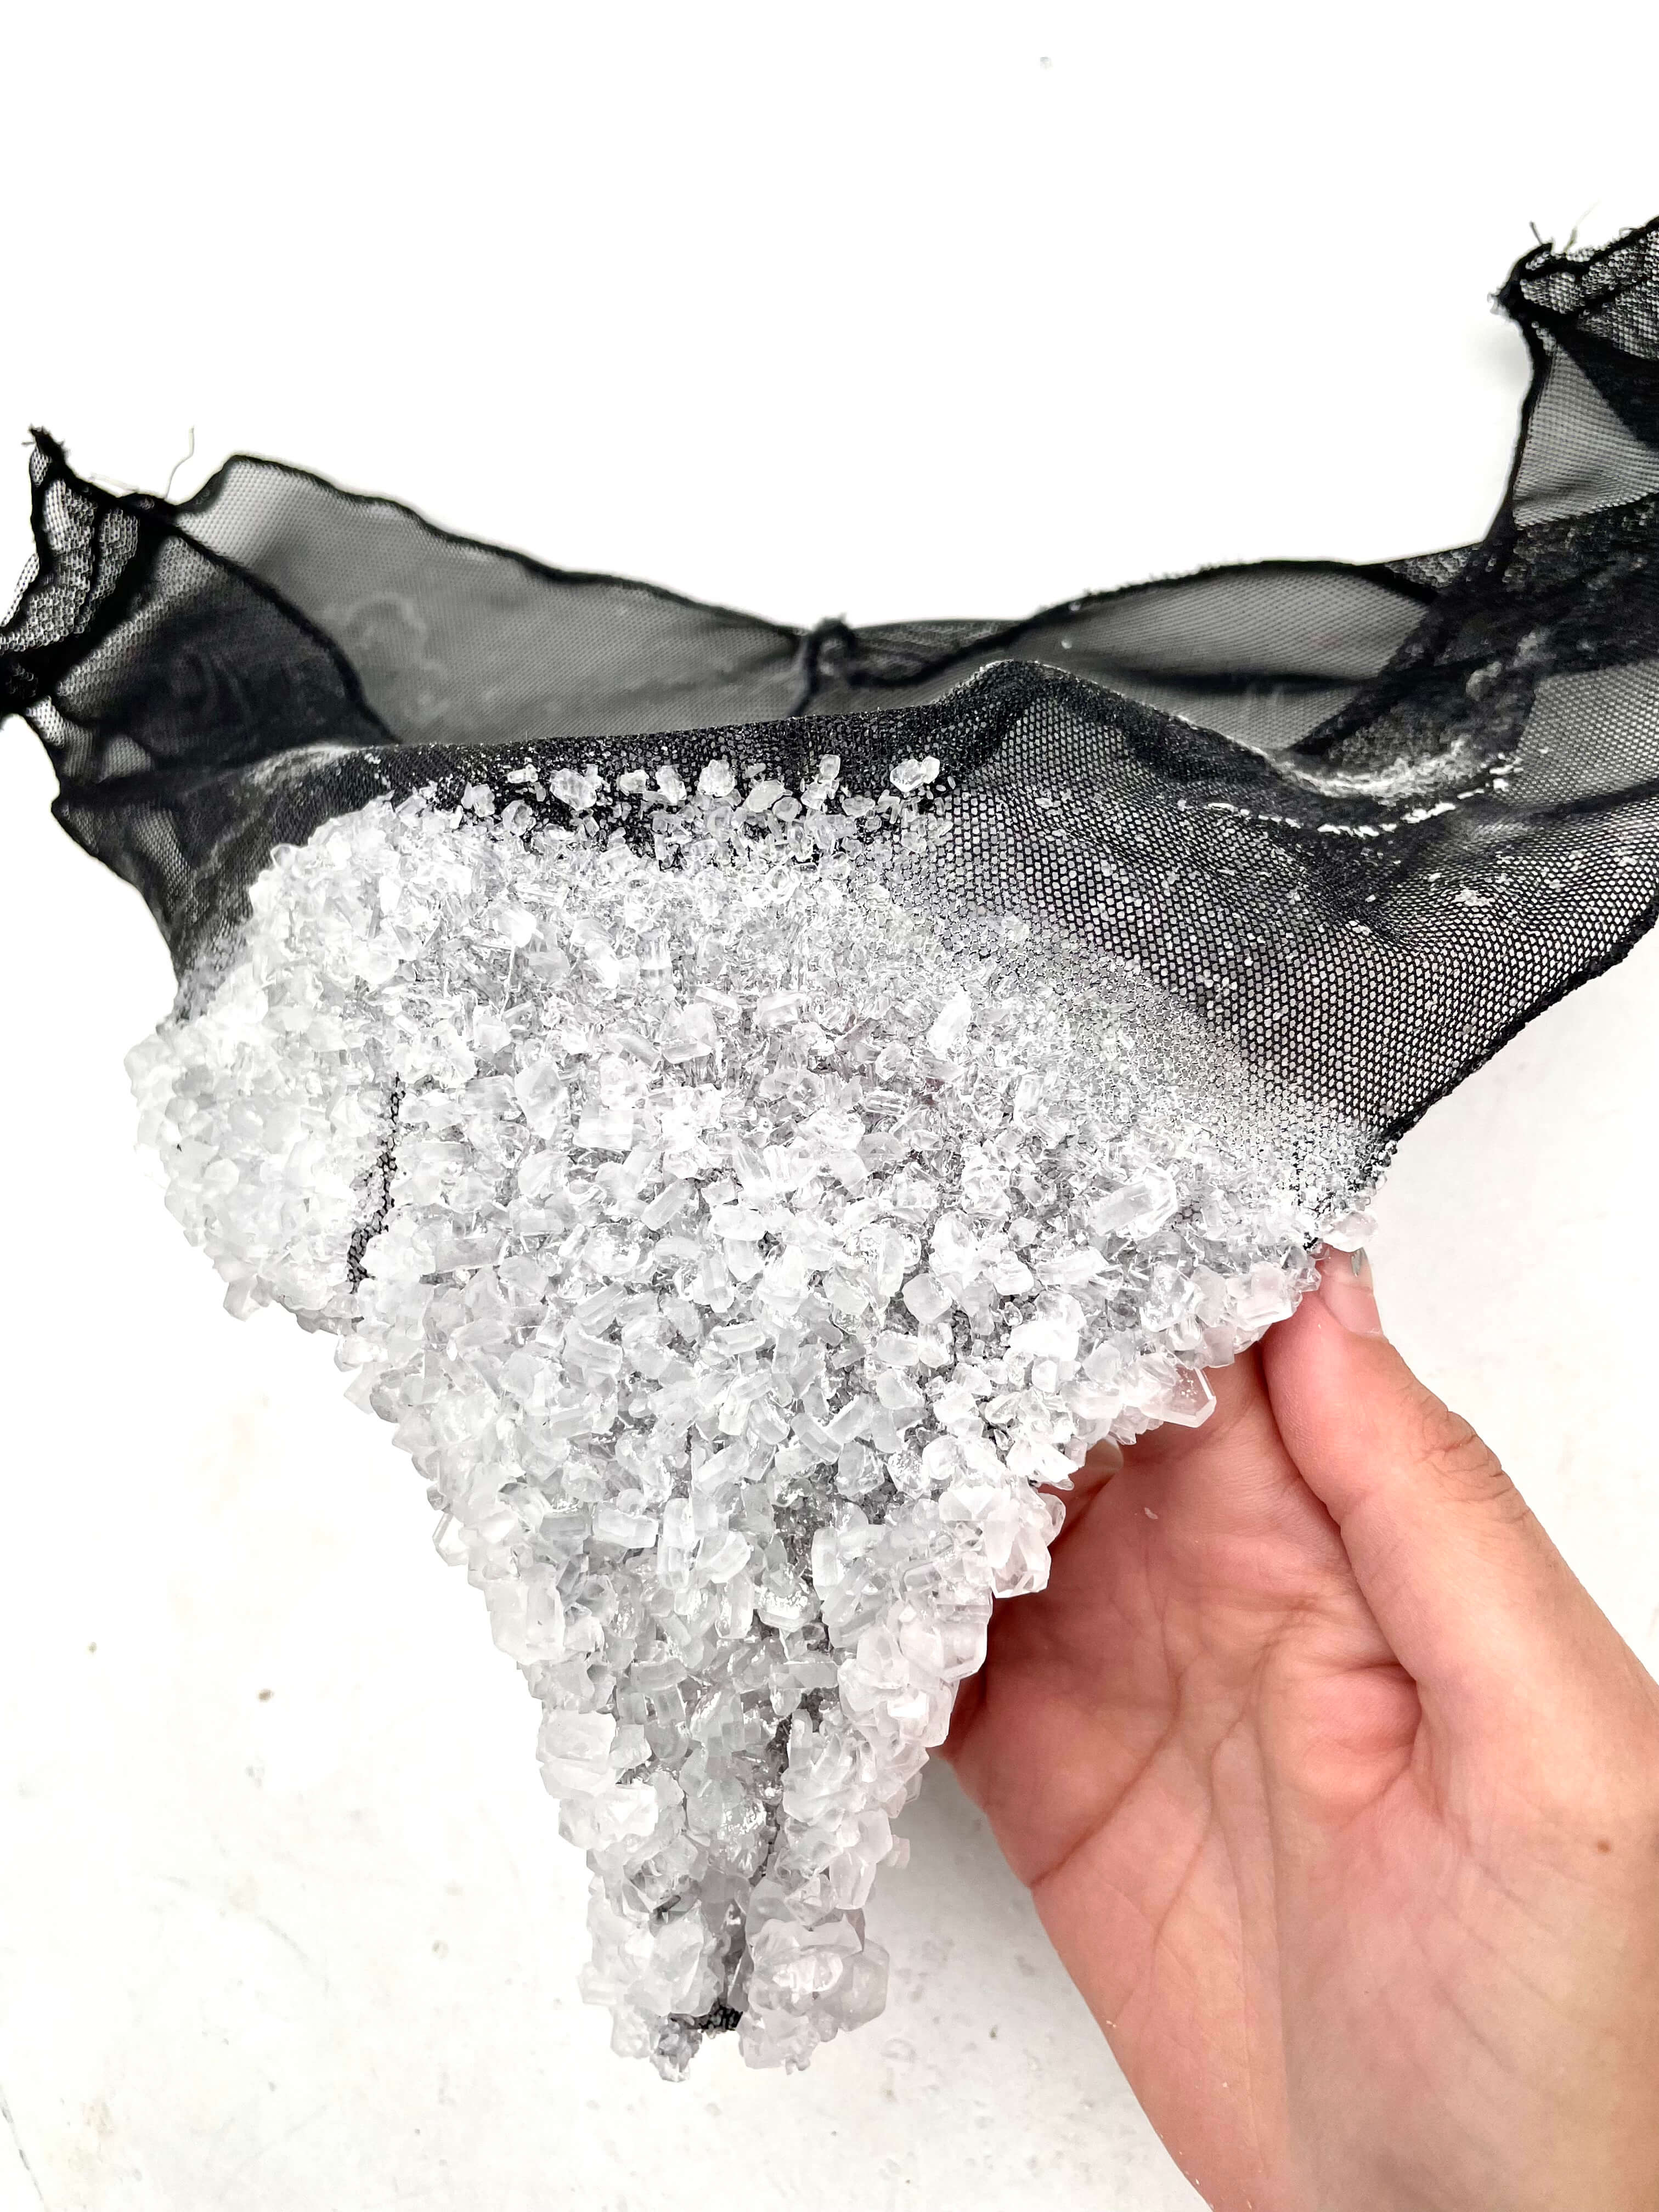
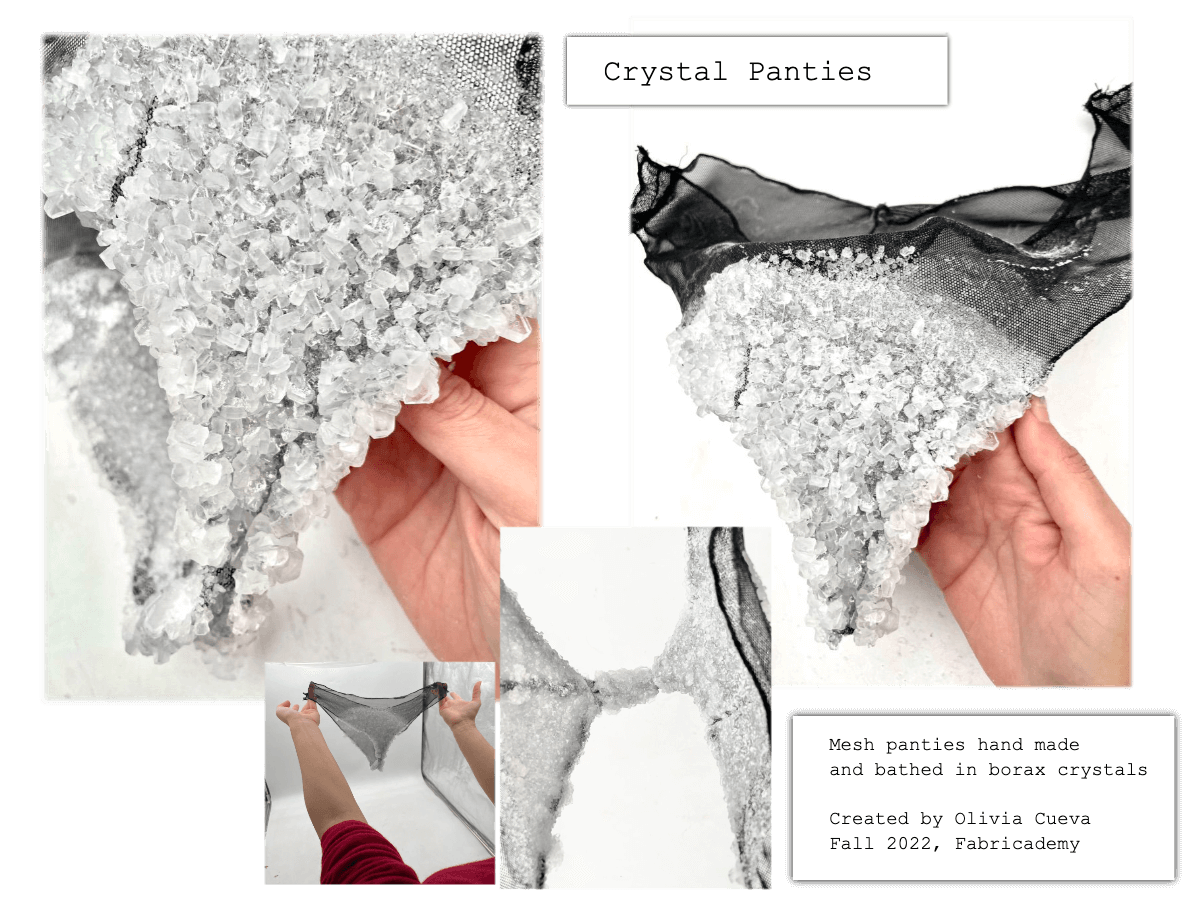
The materials that you crystalize matter. In general pourous textiles like meshes tend to crystalize better and hold the crystals. I decided to crystalize a pair of black mesh underwear that I made to see the effect, more for the look than wearing it.
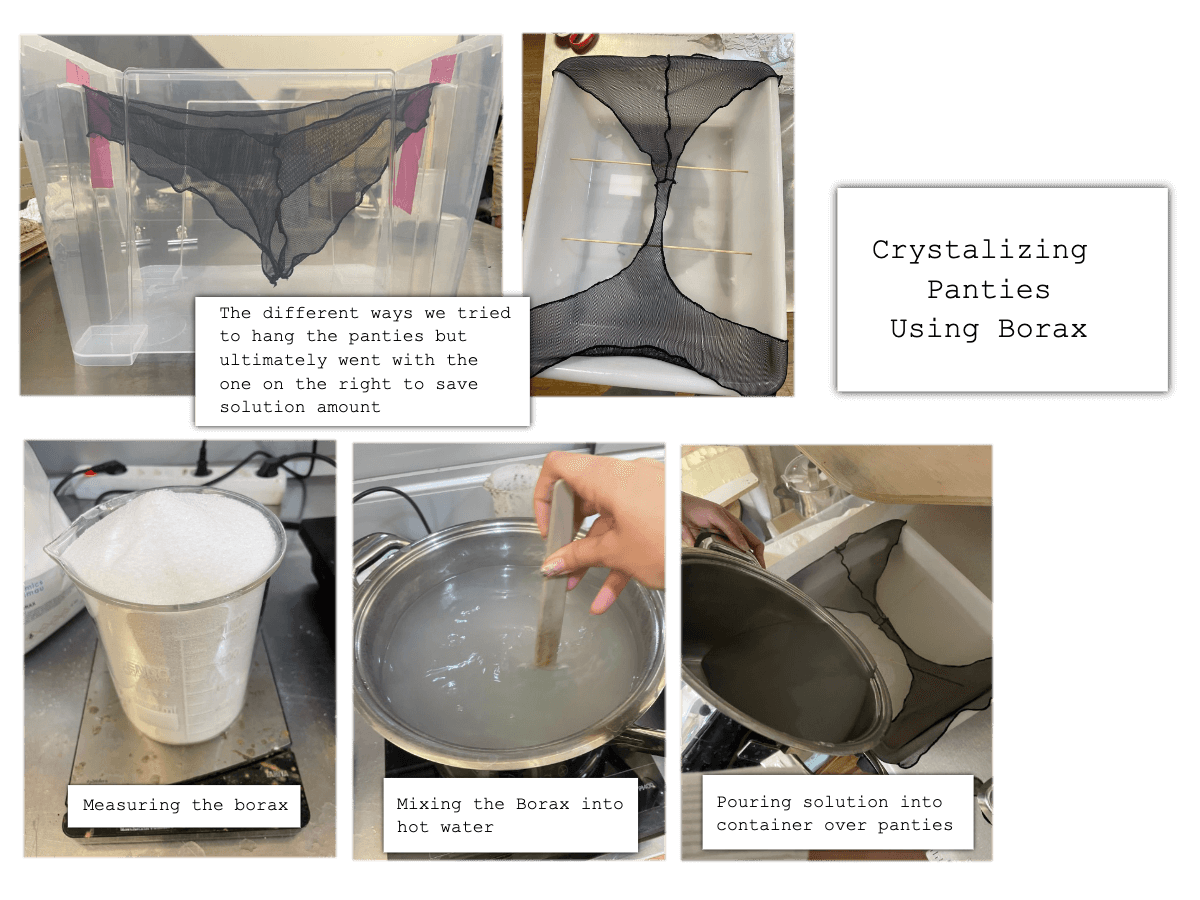
We had to rearange the panties several times before finding a good way to submerge them in the crystal solution with out using too much solution (we had limited amounts of borax to use). In the end we ended up cutting the panties at the side seams so that we could lay them flat accross the plastic container. Normally it is better to crystalize in glass because you use very hot water that could potentially melt plastic, but we didn't have glass large enough and it turned out fine.
Here is the final result:
Crystallizing Mesh Panties using Borax Recipe 1:
=== "ingredients"

    * 4000ml water
    * 1500g borax
    * Mesh panty / or other mesh textile


=== "tools"

    * measuring cups
    * kitchen scale
    * wooden spoons or silicon spatuala
    * large pot
    * stove or electric burners
    * large container to crystalize in, preferably glass
    * something small and weighted to keep panties submerged
    * aluminum foil/or fabric and plastic sheet

=== "steps"

    * Layout out panties/textile and arrange in container for optimal use of solution. You may need to cut panties at seams.
    * Ensure that textile is hanging close to but not touching the bottom of the container
    * Heat water on stove/burners until it reaches 80C, just before boiling
    * While water is heating, measure out borax
    * When water reaches 80C, turn off burner and stir in borax.
    * Once is it all disolved, mixed in, turn the burner back on to keep the heat but don't let it boil.
    * Strain through coffee filter for optimal results, but with larger amounts of solution it is okay to skip this step.
    * Pour water in to container with textile
    * Ensure textile is weighted down in solution and not floating at the serface.
    * Cover with aluminum foil OR textile with plastic sheet over it.
    * Let it sit undisturbed for 48hrs.
Leather Molding
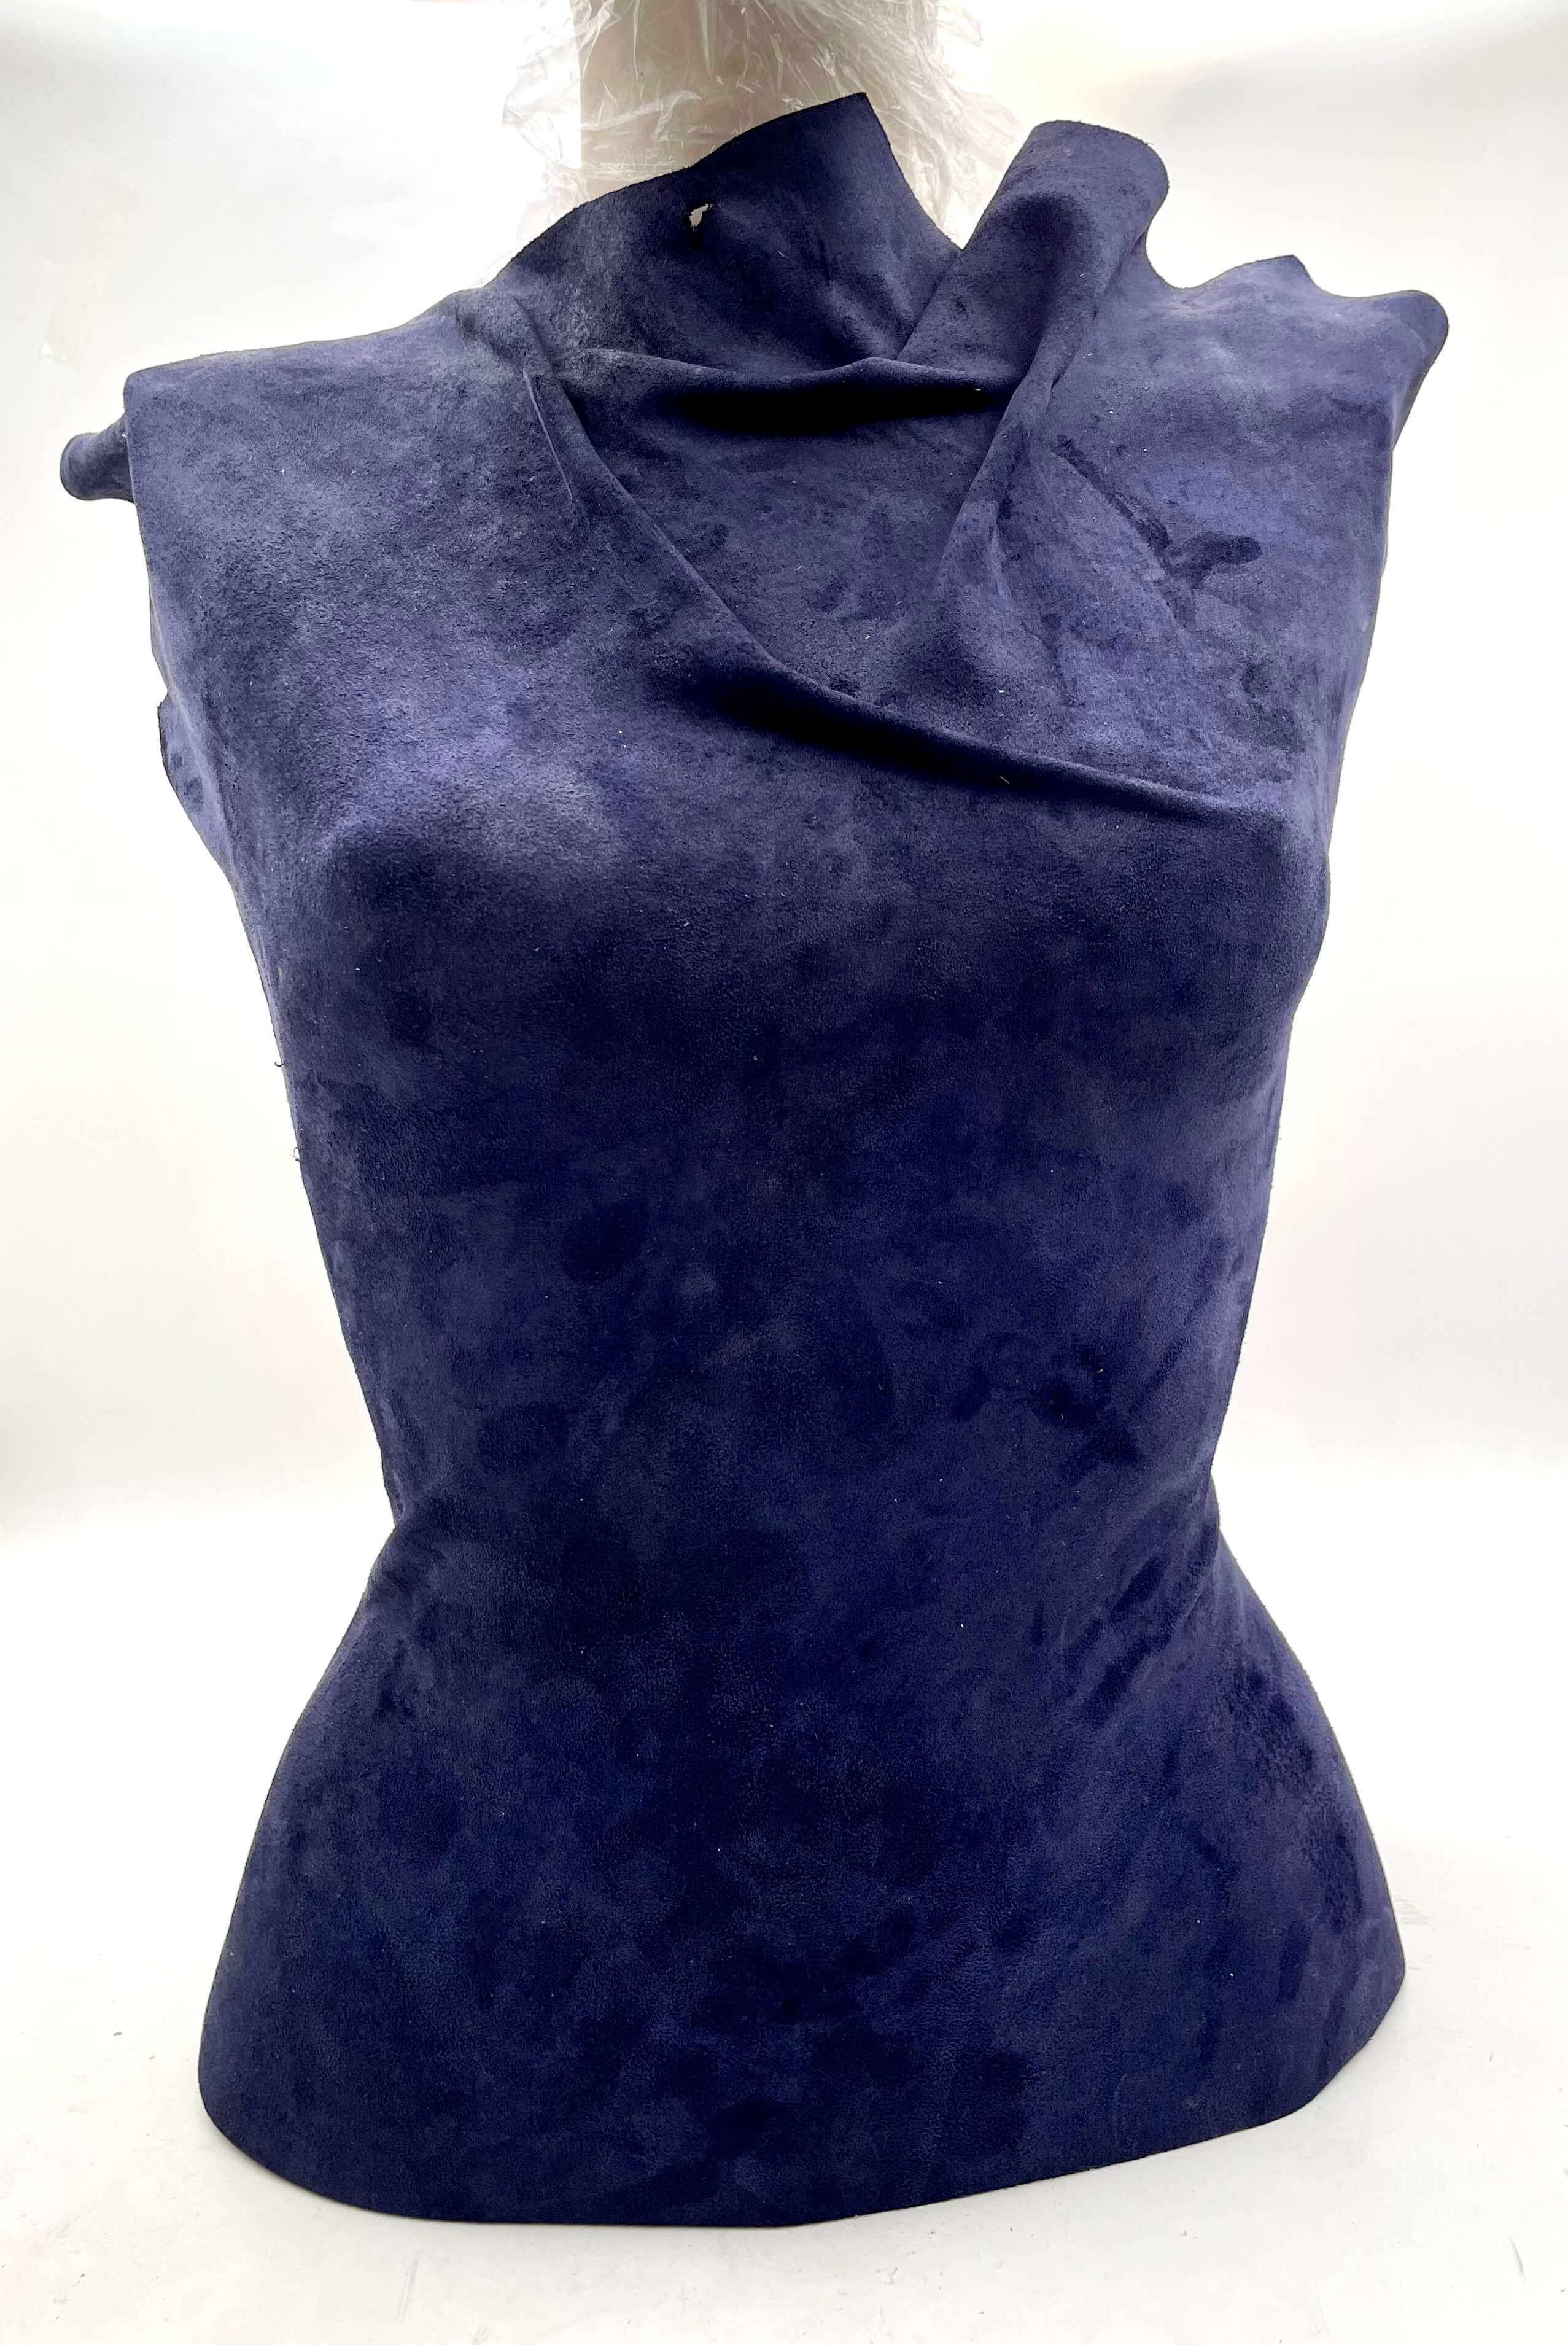
So many cool ways to mold wet leather! The process I wanted to use was to stretch the leather over a mannequin and to thermoform it in the big thermoform vaccum we have at FabLab Barcelona. Using this process, after soaking the leather and stretching it over your mold, you wrap it in plastic and put it in the thermoforming machine for up to 4 hours. Unfortunately the mannequin was too big so we had to emprovise on how to stretch and form the leather so it would hold and take shape.
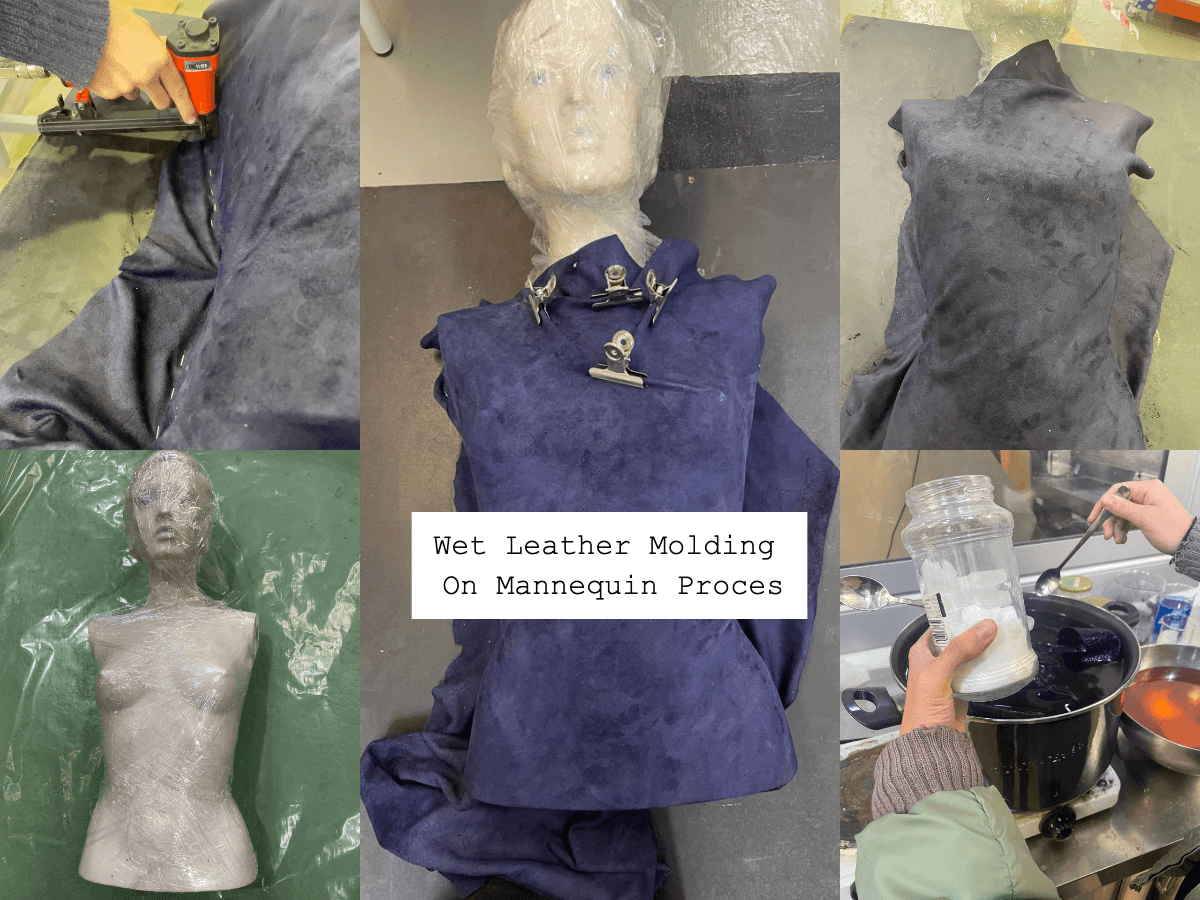
So we emprovised. I wrapped the mannequin in plastic wrap to protect it from the wet leather. Then I stretched the leather over the mannequin as tight as possible. We put the mannequin on a large scrap wood piece and while stretching the leather and holding the mannequin in place, we used a staple gun to adhere hold the leather in place. Once that part was done I folded and clipped some extra loose fabric to have a cool effect. I let it dry for about a day and then removed it from the board and the mannequin.
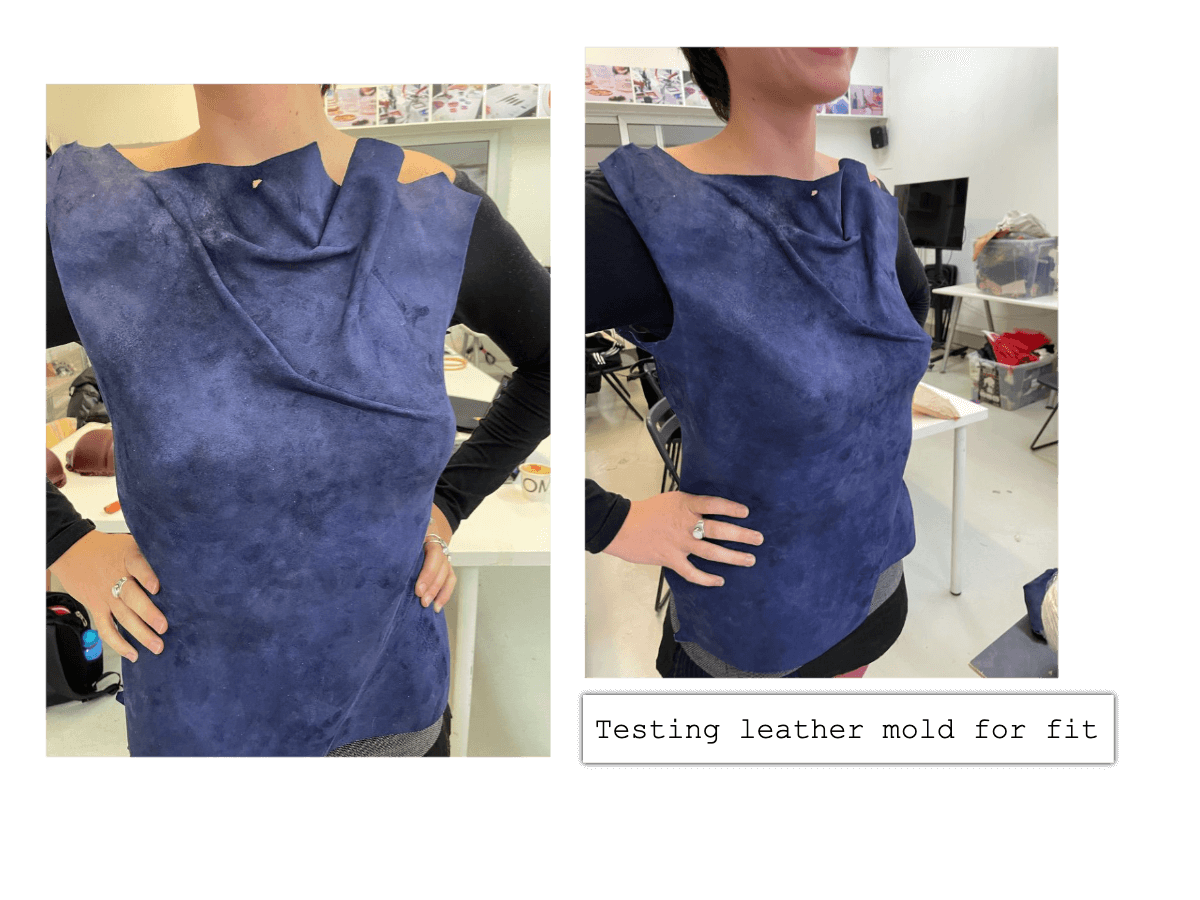
The next steps are to make this top into a corset by adding eyelets in the back and something to tie/how the top together. Once it is ready I'll upload it here.
Wet Leather Molding Steps 2:
=== "ingredients"

    * Piece of leather large enough to stretch over your mold.
    * Water, enough to full emerge your textile in.
    * Baking soda


=== "tools"

    * Large pot or clean container
    * Stove top/ electric burner
    * Wooden spoons or silicon spatuala
    * Mannequin or mold of your choice
    * Plastic cling wrap / seran wrap
    * Thermoformer Machine OR staple gun, clips, clamps, and wooden board larger than mannequin.
    * aluminum foil/or fabric and plastic sheet
    * sillicone oven mits

=== "steps"

    * Soak leather in pot of cold water, fully emersed for 1 hour.
    * Remove leather from water.
    * Heat water on stove until it gets to 80C, just before boiling.
    * While water is heating, wrap your mold in plastic cling wrap and set aside.
    * Add a couple tablespoons of backing soda and mix in.
    * Once mixed in and water remains at 80C, put leather back in pot for 2 mins.
    * Remove from water.
    * While leather is hot, stretch over mold using oven mits to protect your hands.
    * Once you get desired shape of leather on mold...
    * If using thermoforming vacuum machine: wrape in thicker plastic and tape up to ensure no water spills out. Then place in machine close and remove in 4 hours.
    * If NOT using thermoformer: place mannequin on wooden board and use a staple gun to adhere stretch and hold fabric, careful not to have too much tenstion so leather doesn't rip.
    * If you don't have a staple gun, use claps or another method to stretch and hold fabric to desired shape.
    * You can use clips to create different shapes, folds, and tectures.
    * Let leather dry on mannequing for about a day until leather has dried fully.
Molding with Mycelium
I used the mold I modeld and cut with the CNC to mold with mycelium. Here is the recipe for how to mold with mycelium.
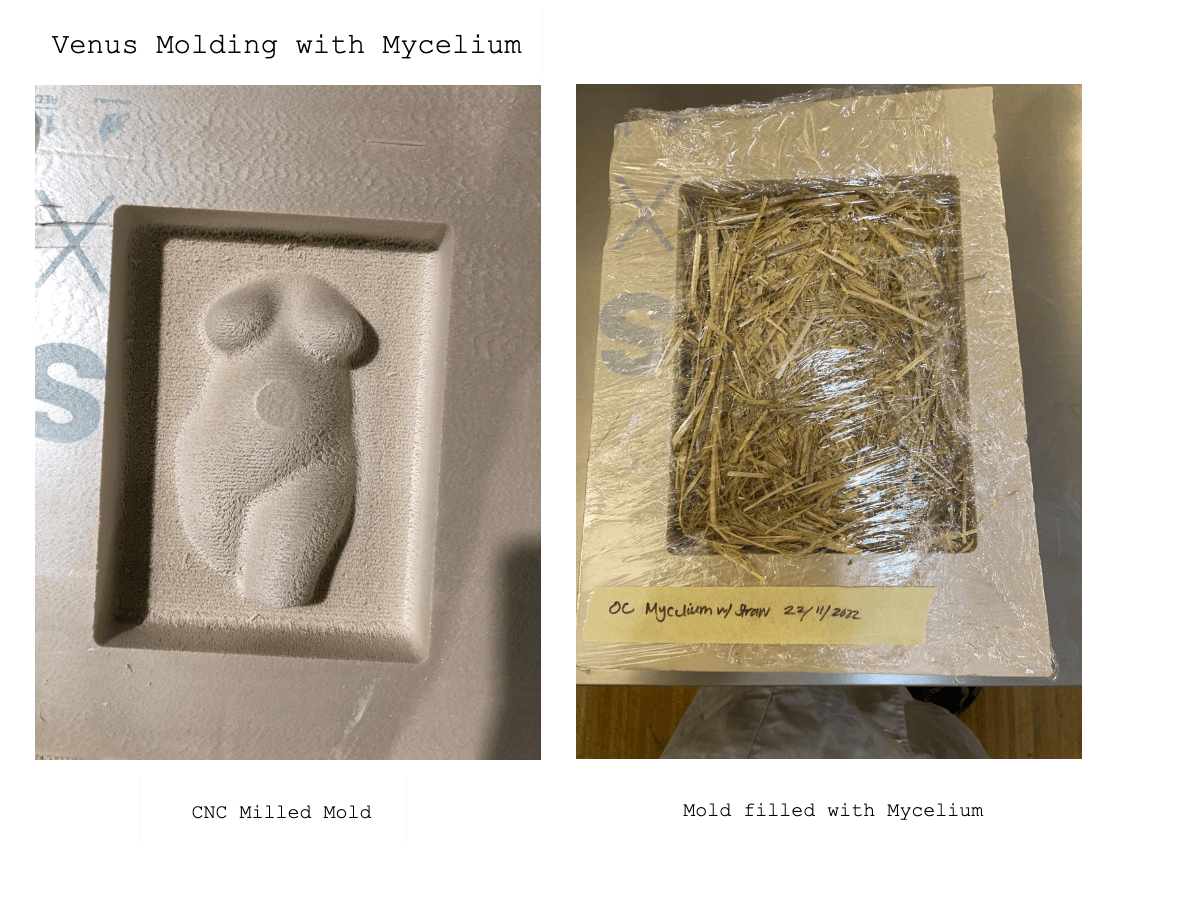
Once the mycelium has grown, I'll update here with the outcome.
Fabrication Files
1File: Venus Mold in Rhino 2File: Venus CNC Roughing [^3]File: Venus CNC Finishing [^4]File: Venus CNC Profiling