Garment Development
Draping:
Small Scale Samples
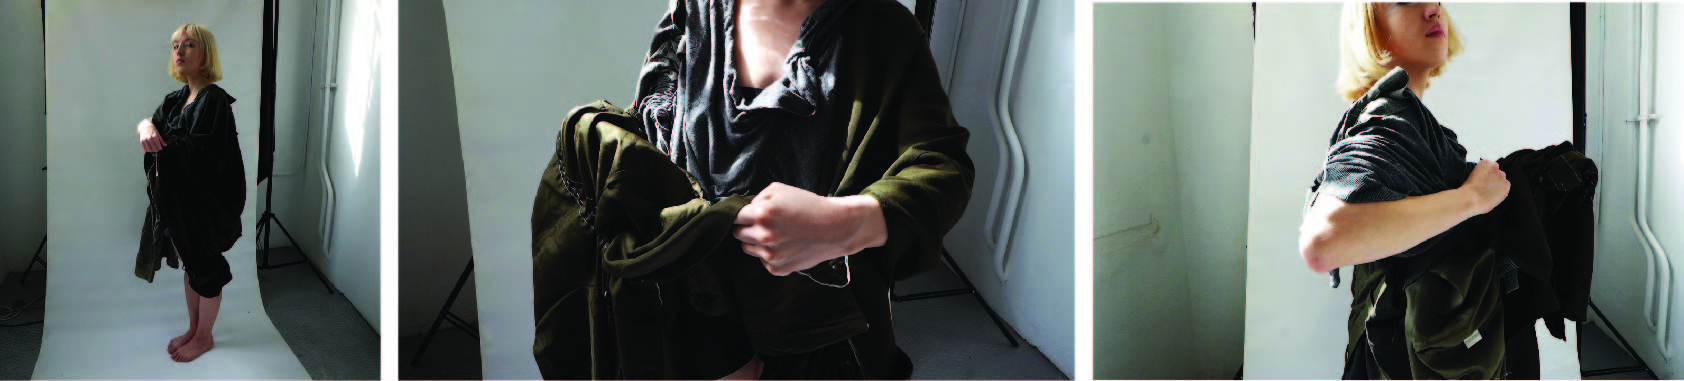
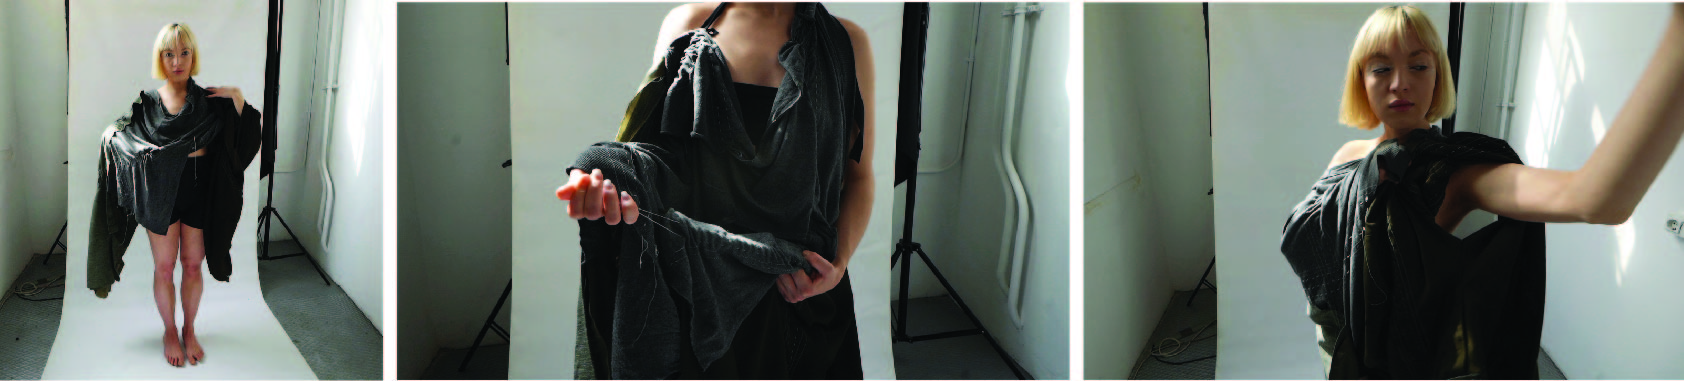
Using the samples that I had made, I did some basic draping to try to envision them as part of a full garment. As they had not been intended as full garments, the construction was more layered and busy than I was intending for the full garments to be but it was interesting to see how the shapes left by the original garment patterns could be used for shape ideas.
I liked that use of the binding as straps to hold up the garment without having to add any more trims. It could also be used alongside the stitching to add more shaping but I wouldn’t want to rely on it too heavily as this would distract from the smocking I think. I was also wary that when I scaled up to full garments, this would be a lot more work than in these samples and I’m not sure it fits with the concept and that it wouldn’t get too thick for the machine at some points.
Full Garment Tests
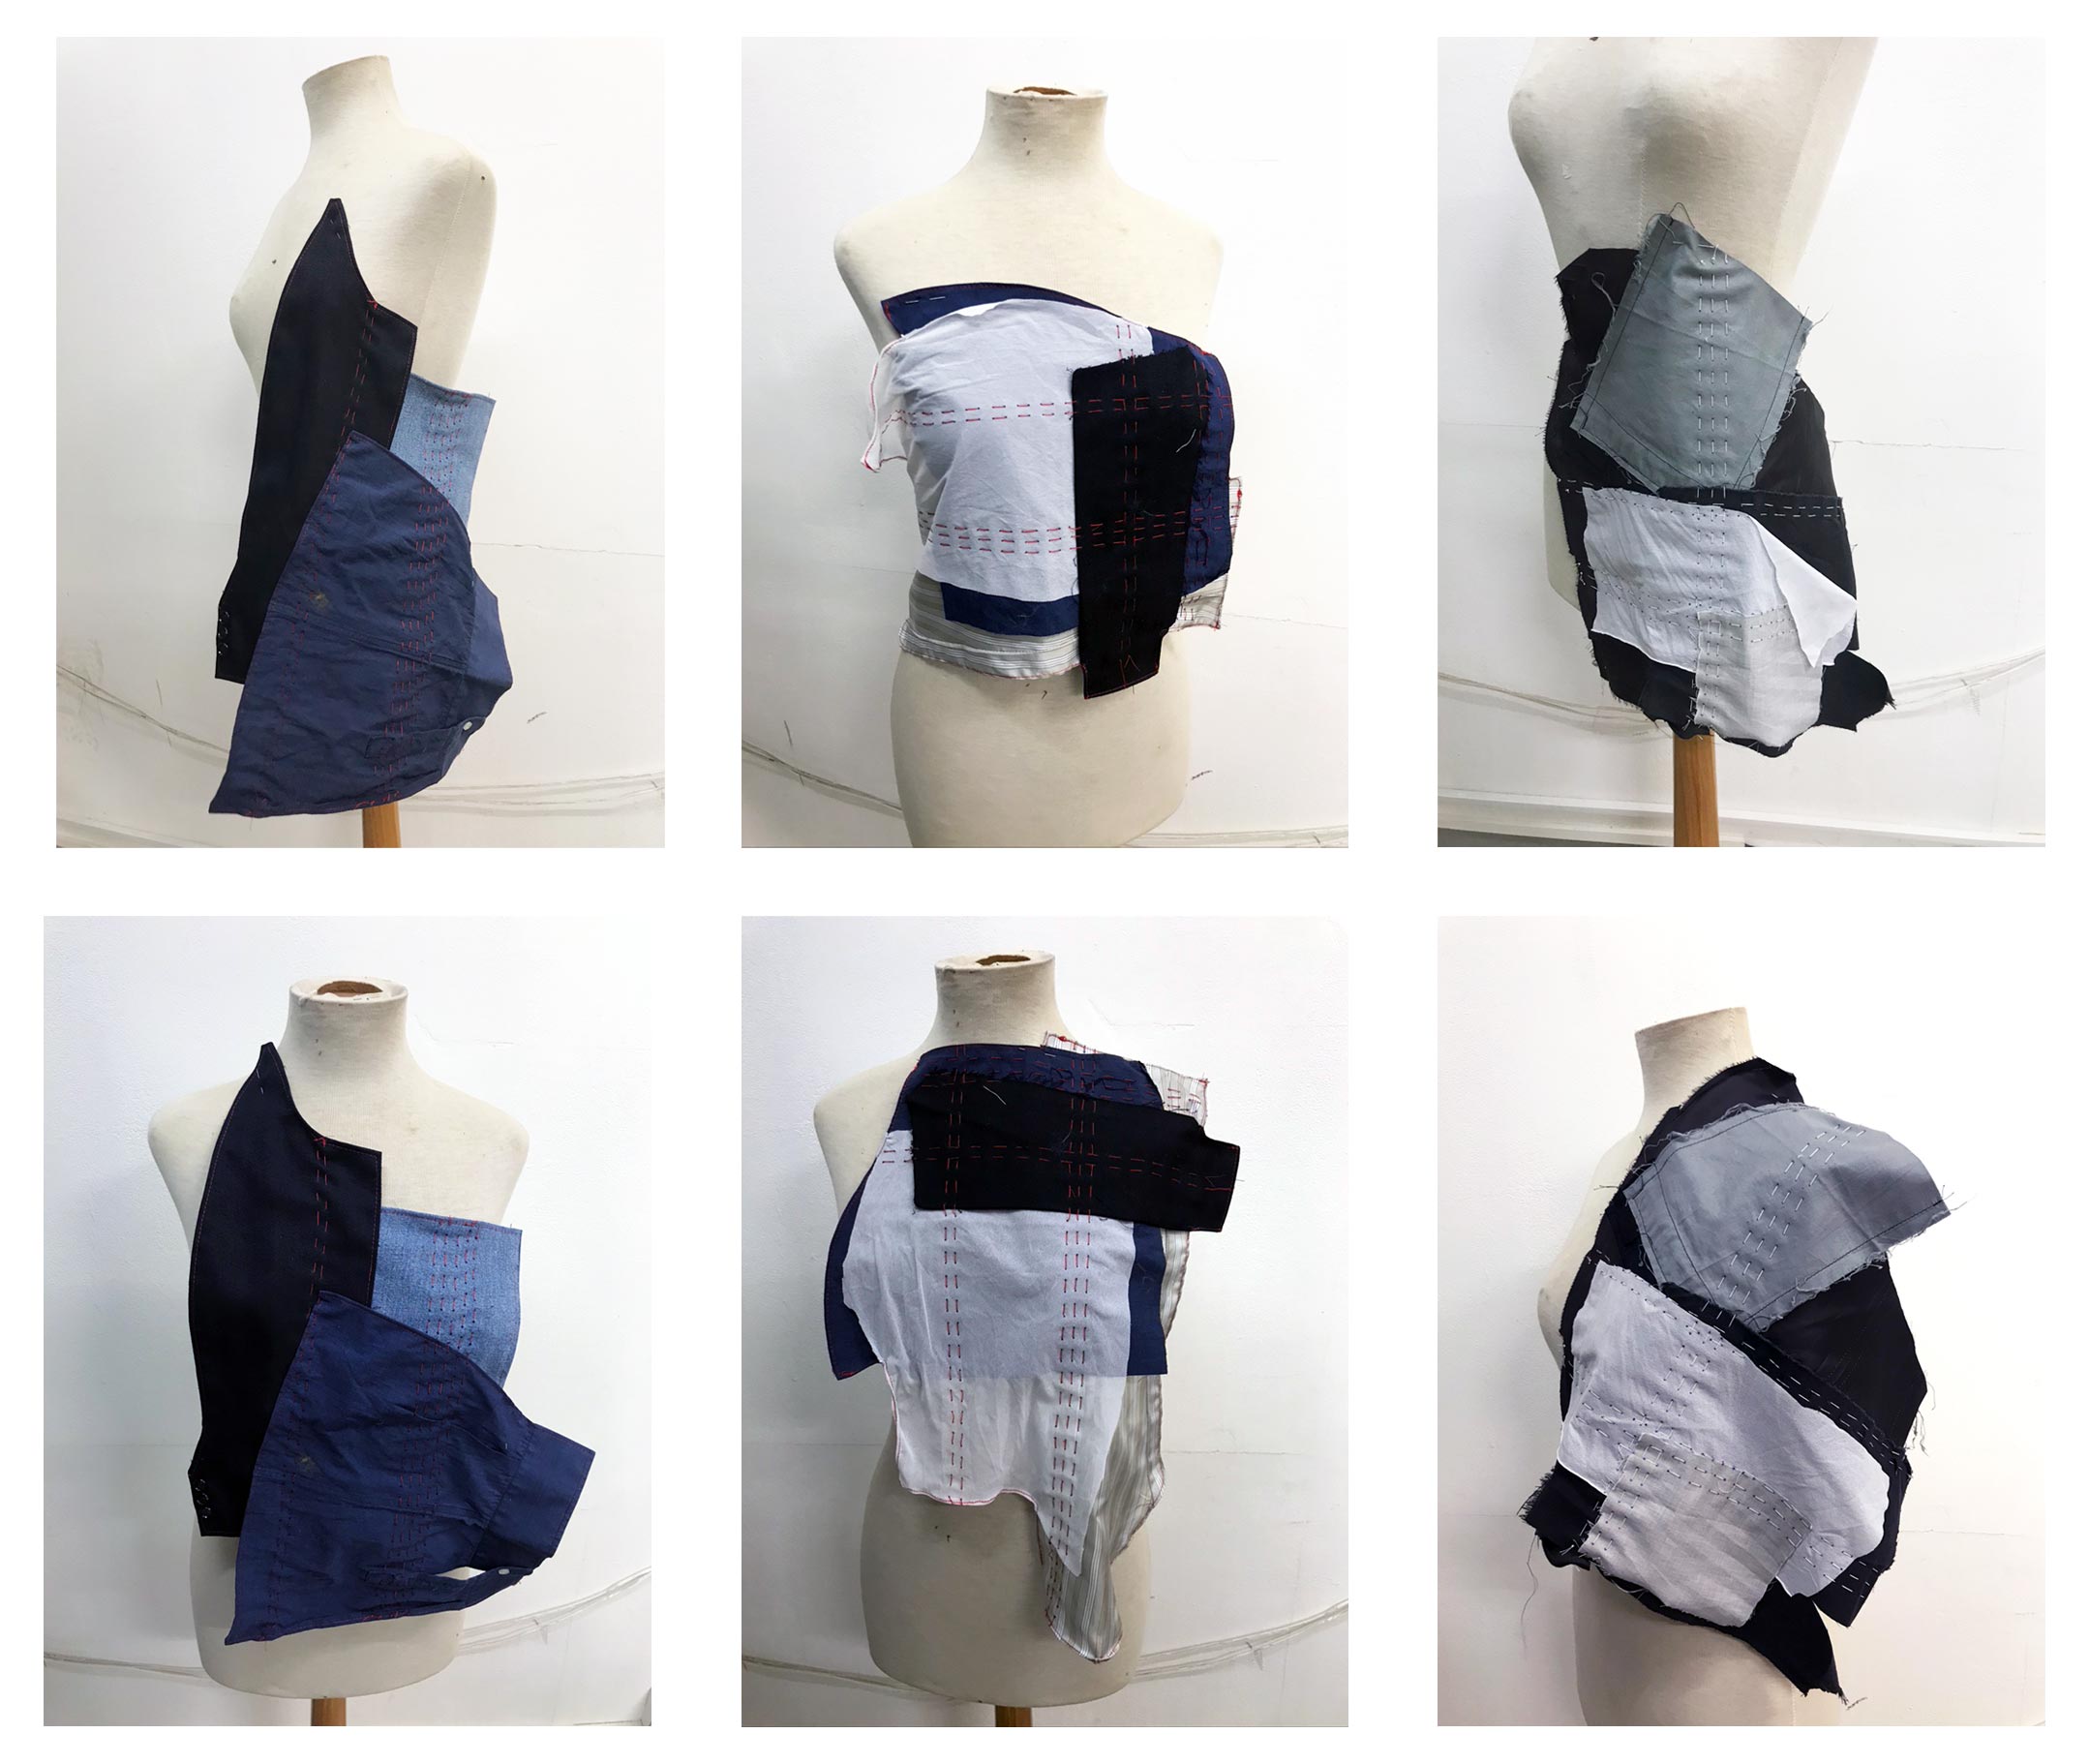
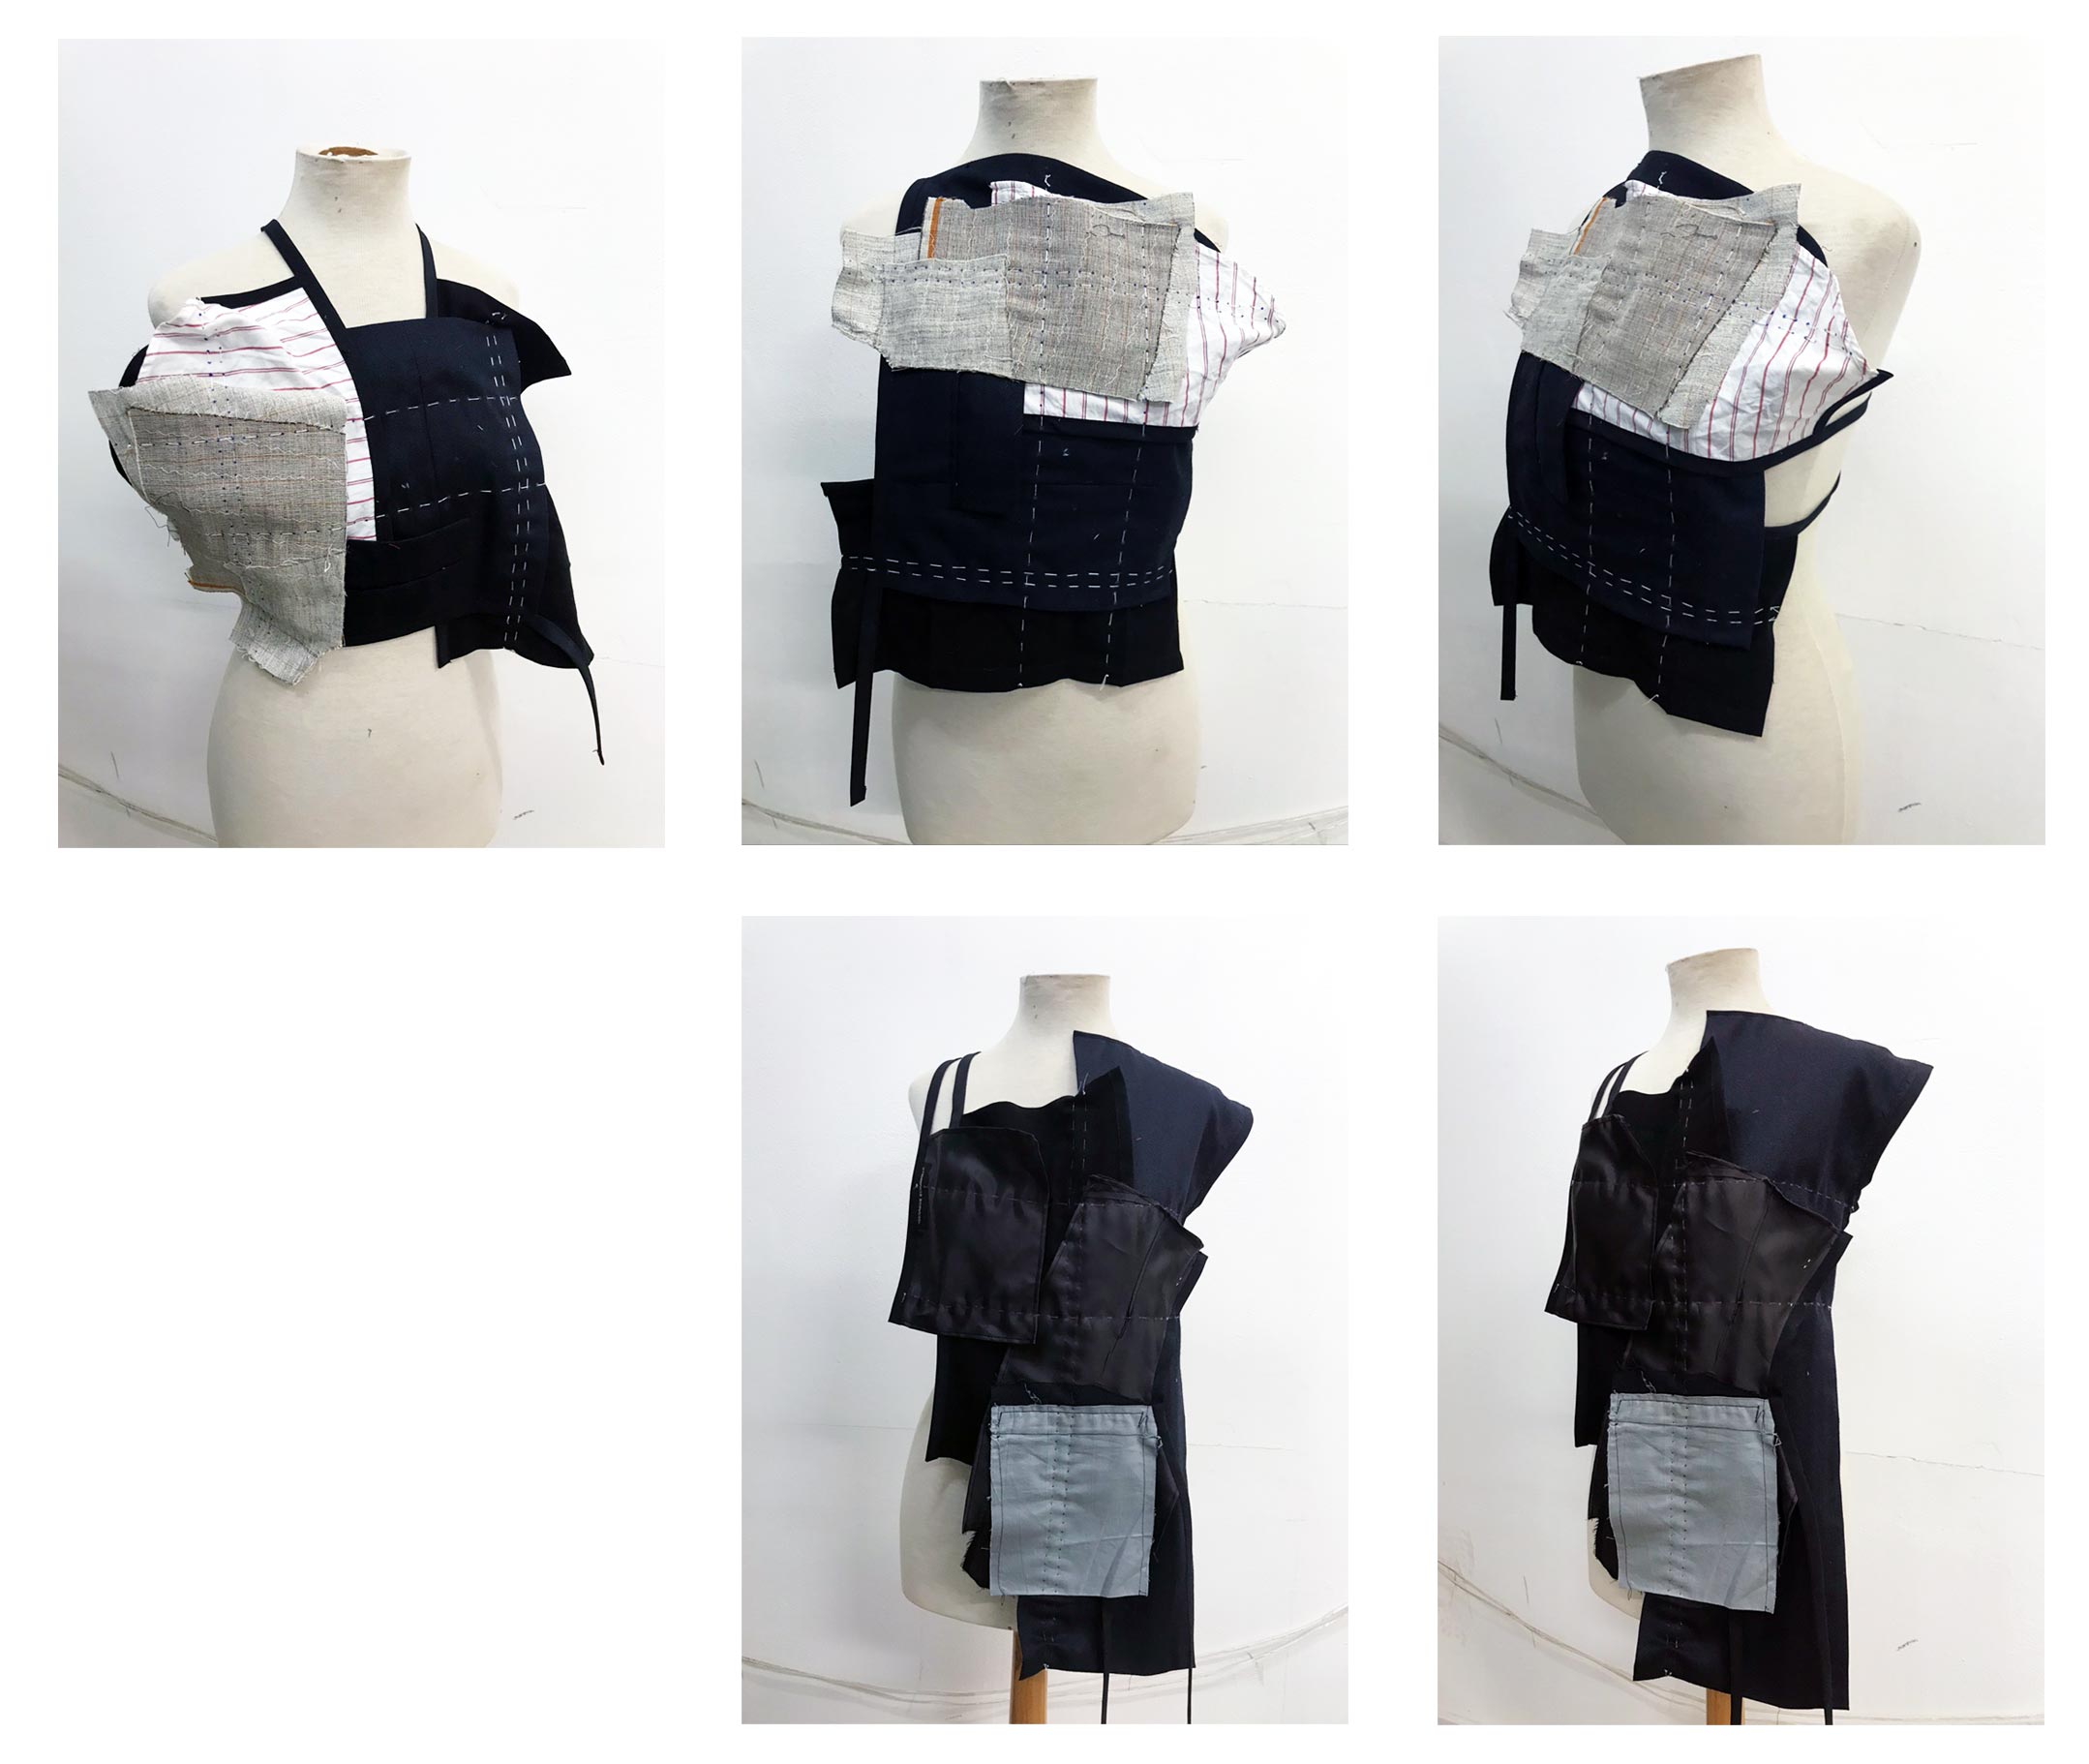
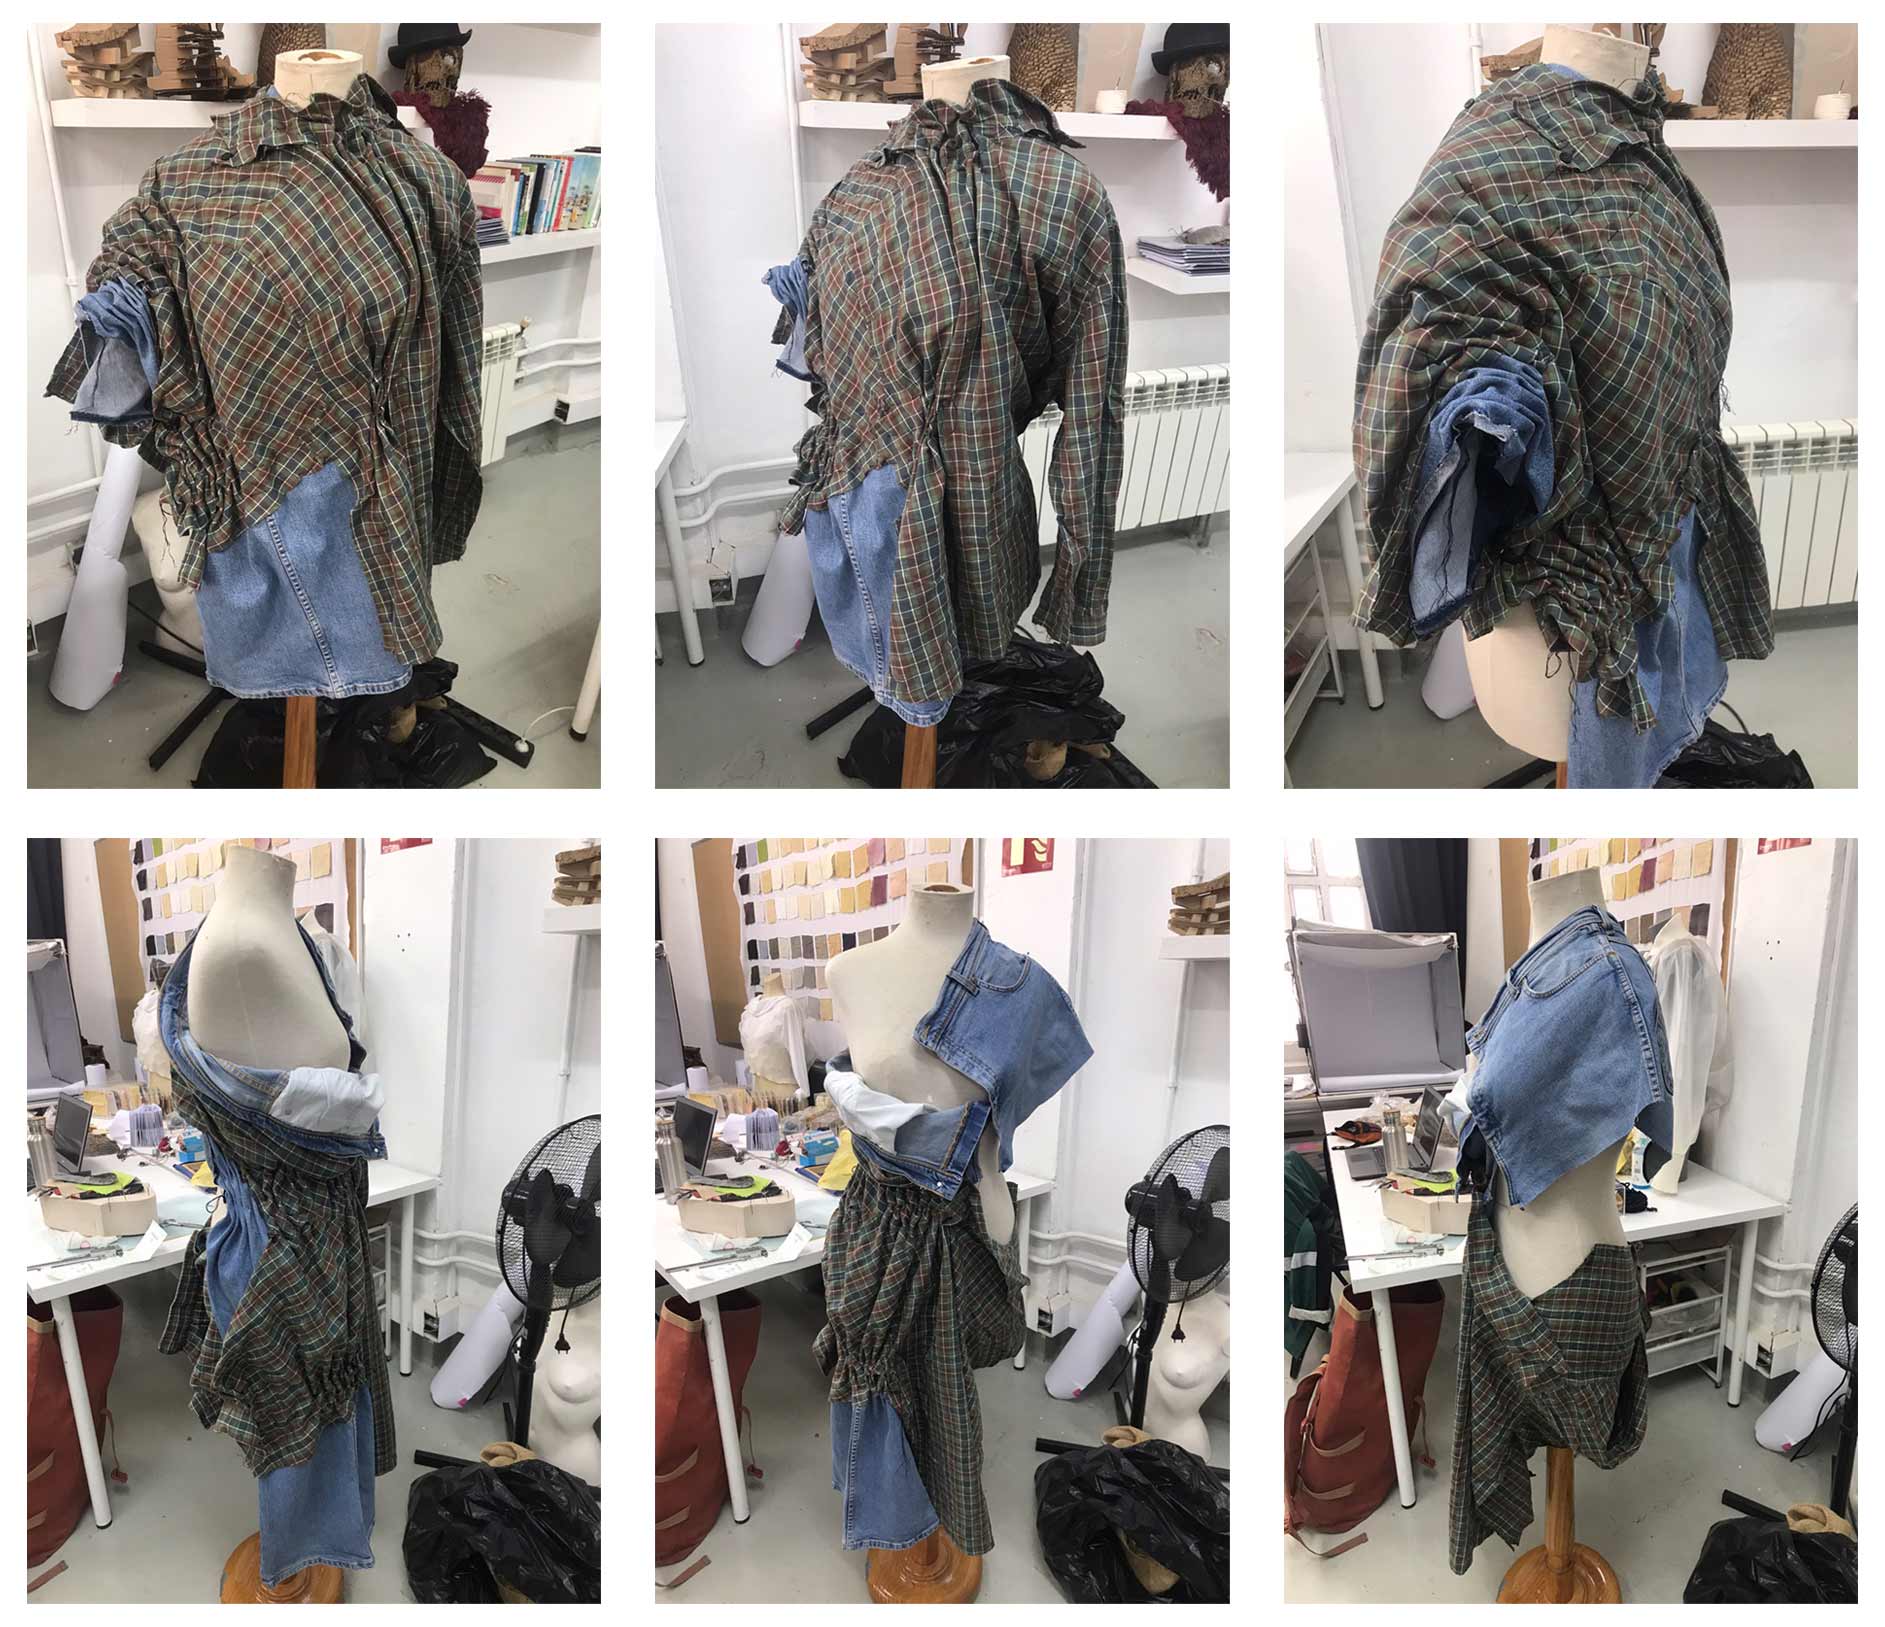
Following the small-scale samples, I did some larger samples using full garments to see how the techniques transferred to full scale. I started these by cutting up some old garments that I had in ways that I explored in the disassembly samples at the start of the project – so that they were opened up to 2d textile with as little cutting as possible – and by using up some of the bugger scraps I had left from making the other samples. For the composition of these, I tried out different levels of overlap to try to see how much I needed to make sure the textiles were strong enough to hold their own weight. Once I had a basic layout, I positioned the rows of stitching so that they went through as much of this overlap as possible so that there wouldn’t be large pieces unsecured.
I made one sample using some old jeans and a cotton shirt with 4 separate sections of stitching (between 3 and 4 rows thick). These textiles were very different weights, which I would try to avoid to this extent in future to help make the garment more seamless and allow similar gathering all over. Additionally, I liked how visible the waistband and trims of the jeans were but I would maybe try to use them more intentionally.
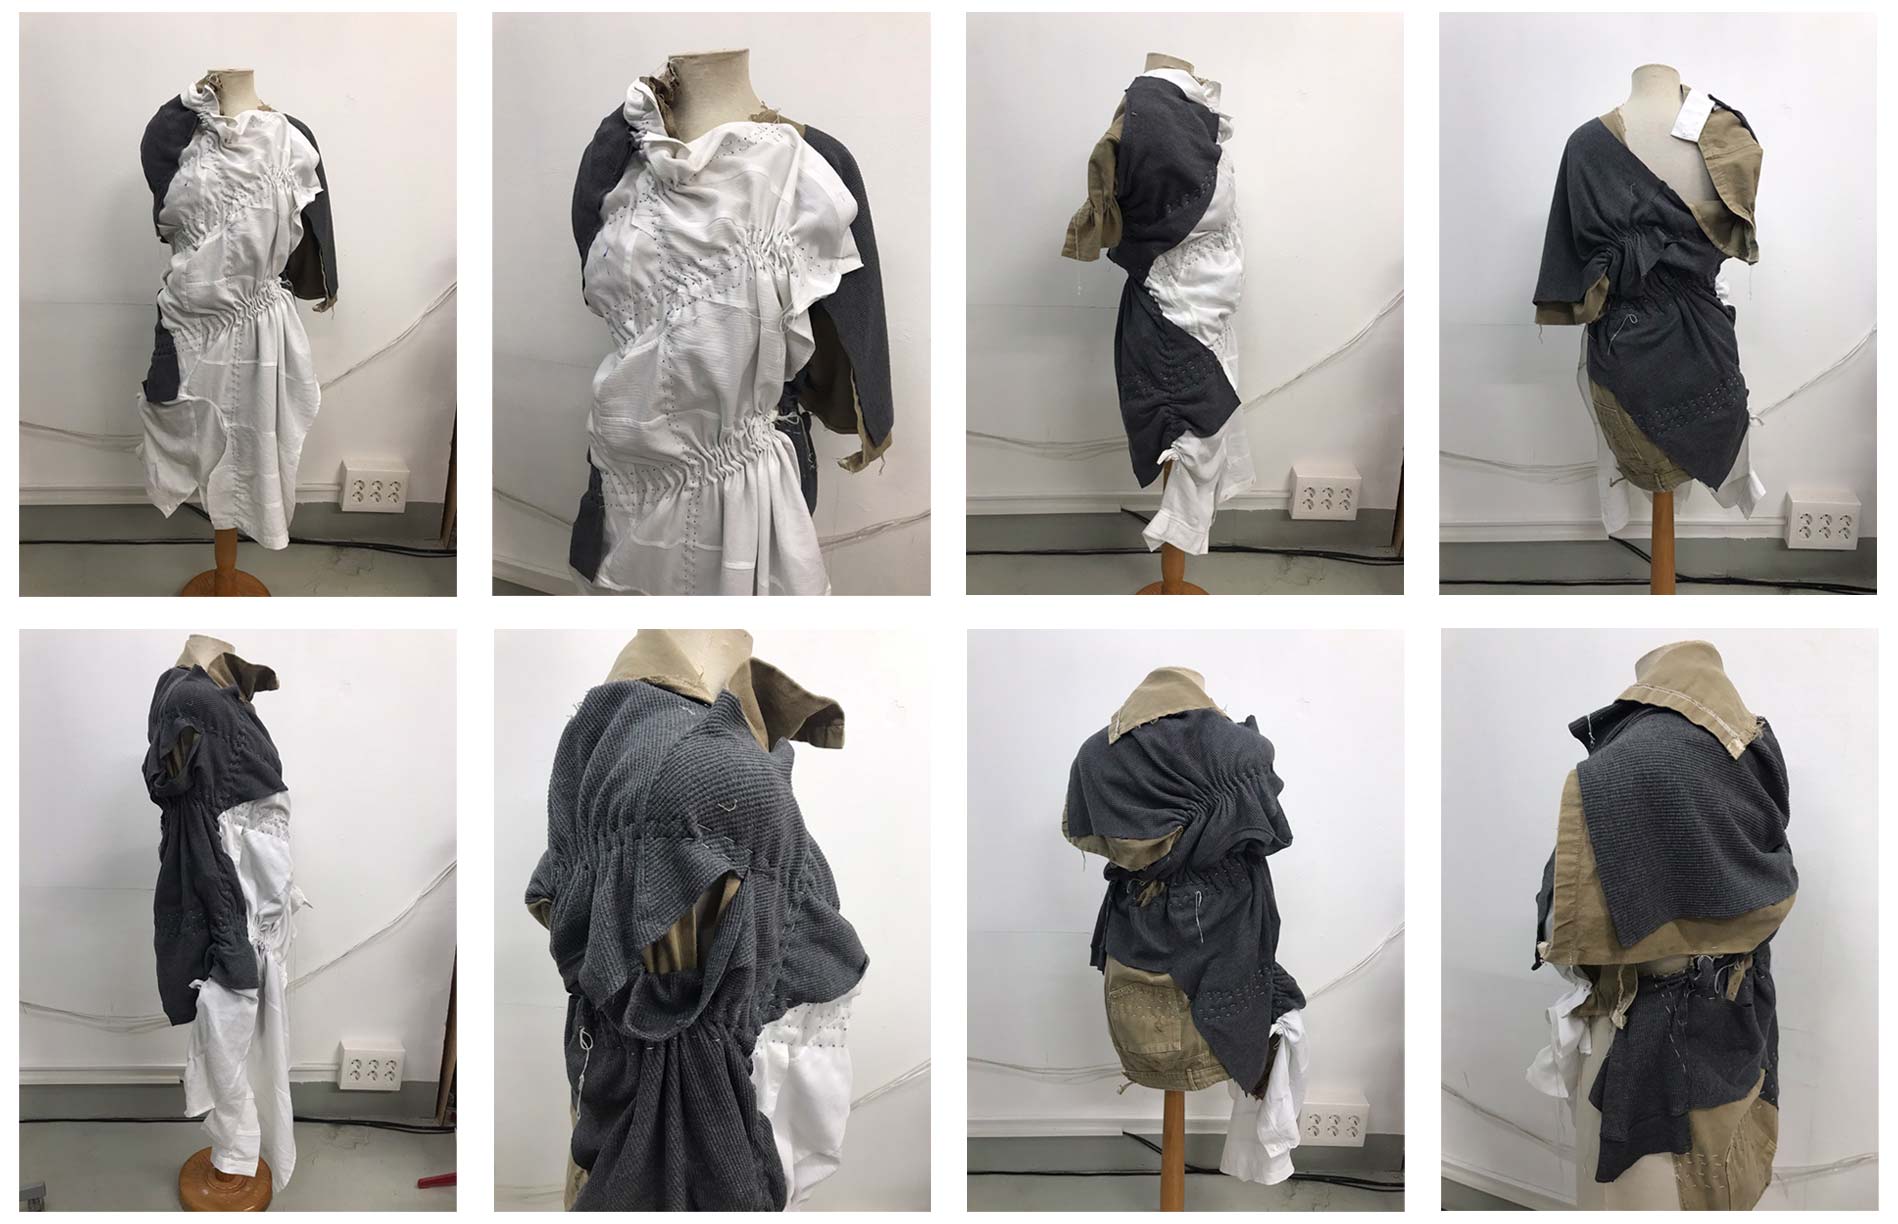
The next sample I made used a pair of cream trousers and ribbed knit jumper and a white shirt. This one was bigger and therefore there were more draping options for a full garment. Again, there was a big mix of fabric colours and weights in this composition which I would try to limit in future. I would also need to be more intentional about the positioning of the stitching to and using the obvious part of the old garments.
Draping for Pattern
Next, I decided to do some draping with calico to try to work out some patterns for the positioning of the stitching so that I could apply this pre-decided garment options to the textile patchworks rather than trying to extract shaping from random stitching like above.
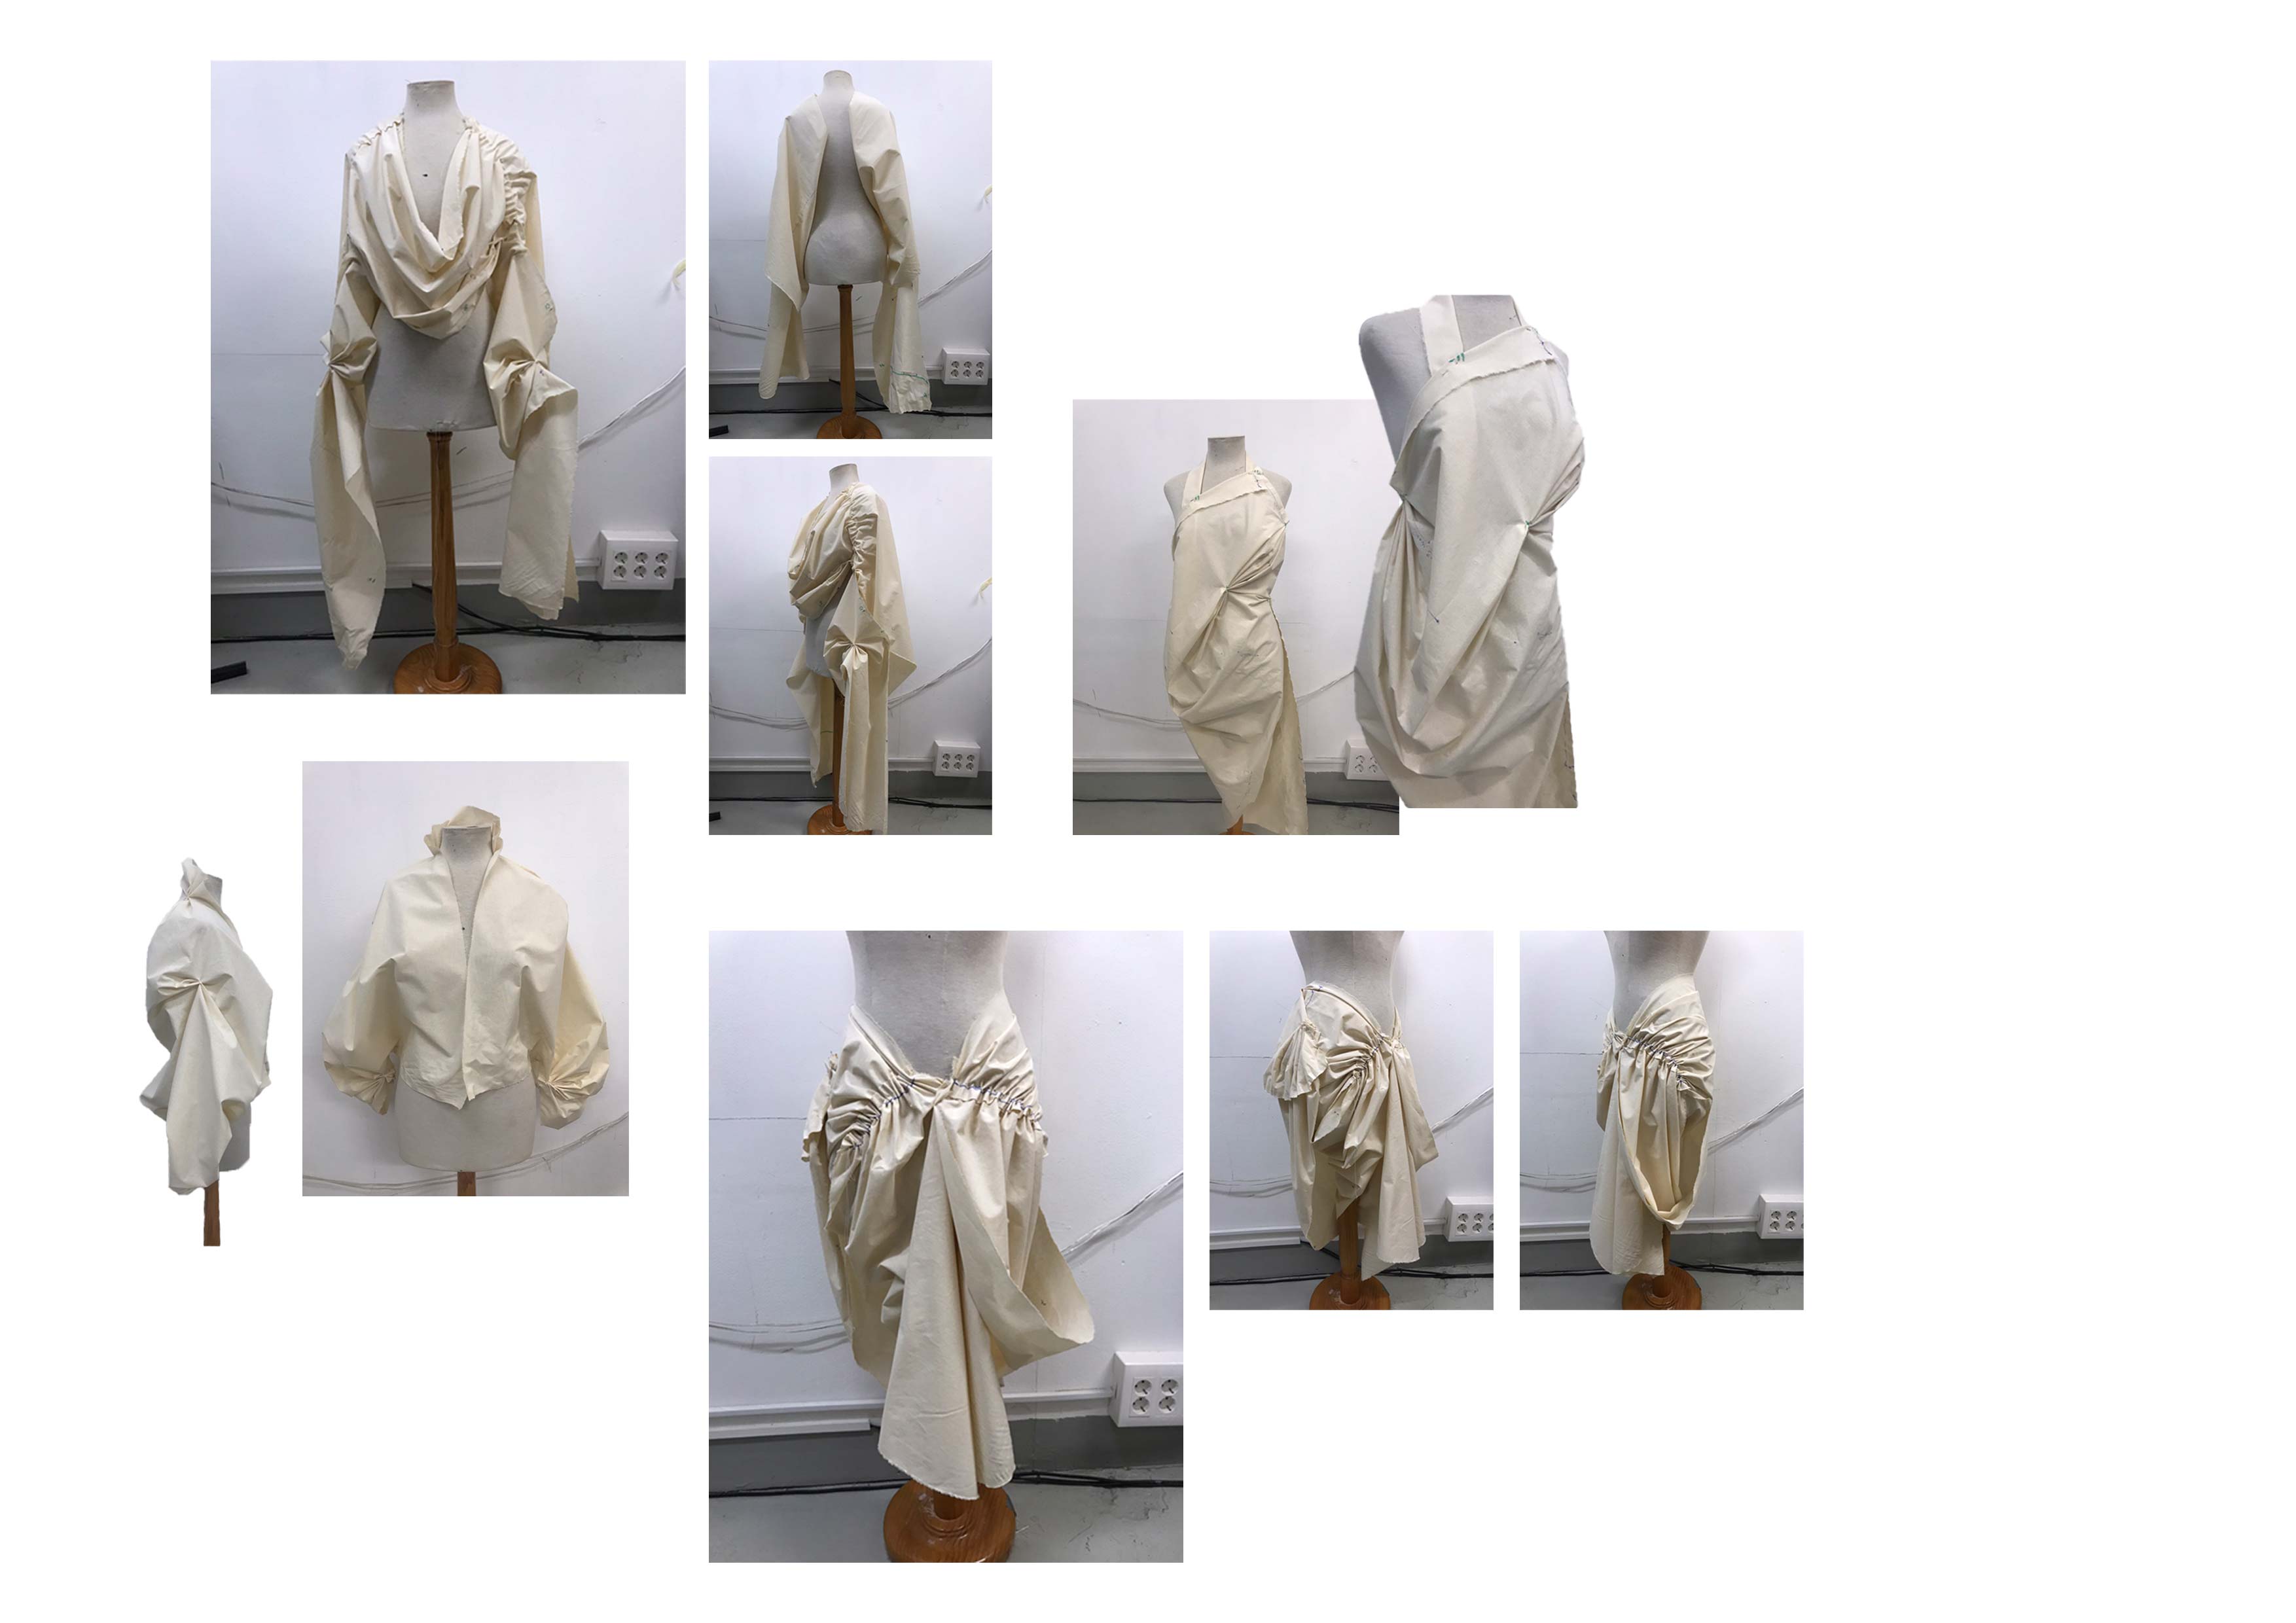
I approached this very openly and intuitively. I wanted the shapes to be quite voluminous and organic so I didn’t go in with too much of an idea about trying to make specific garment archetypes, I just wanted to see what I could make with one piece of fabric, some gathers and as few cuts as possible.

Initially, I used only a square of calico with the intention that I any pattern I could extract from this would be able to be used on a textile of any irregular shape that was roughly the same dimensions. As I am using found and patchworked textiles, they are never going to be exactly the same size as the patterns so I wanted the patterns to have a very simple base shape that could have pieces extruding or slightly missing without running the intended design.
After playing around for a while, I tried to make a few more intentional samples so that I could have a full outfit not just a selection of dresses. To help with this, I research a selection of traditional wrap garments to help understand how they approached separating the legs from each other and the arms from the torso.
After this I went back to draping to try to round out the collection a bit more. I struggled a lot with making a pair of trousers which is definitely something I would like to come back to to develop this project.

I also tried to make more specific details and spent some time trying to develop different sleeve options. These were all very draped but some had a decent amount of movement that wouldn't keep the arm too close to the body despite it being the same piece of fabric.

I was more happy with the drapes that I was happy with, I selected a few to start to move forward with for the pattern development to see if they could be easily recreated. The drapes below used 3 base textile shapes, some 4m x 0.6m, some 1.5m x 2m and some 1.5m x 1m.

Pattern development:
Pattern Research
Zero waste pattern cutting is a method of pattern making that aims to eliminate all waste from the cutting process. ‘With the predominant contemporary methods of fashion making the amount of fabric waste is approximately 15 percent of the total fabric used.’ (Rissanen, 2005). There are different ways of approaching zero waste cutting. For example, by eliminating most of the cutting so that the number of pattern pieces and the negative space in between them is minimised. Alternatively, using the negative space in between pieces to inform new pattern pieces.
Zero waste as an approach is a textile led pattern cutting method, as the textile available dictates the possible outcomes in a way that it does not in conventional pattern cutting. additionally, in this way, the creation of the garment and the pattern are much more interlinked than normal. Traditionally, a garment is designed (sketched) and then a pattern is made to suit this, in zero waste, the two processes have to happen in parallel.
According to Holly McQuillan - a designer working at the forefront of zero waste pattern cutting - ‘unlike the majority of fashion design practice – where the goal is primarily to introduce a difference (Hallnäs, 2009) – zero waste fashion design could be seen as a practice concerned with solving a problem. When engaging with the zero waste redesign of an existing garment – we know its overall desired form, but we strive to achieve something similar without making so much waste – so the design problem is the waste.’ (McQuillan, 2019).
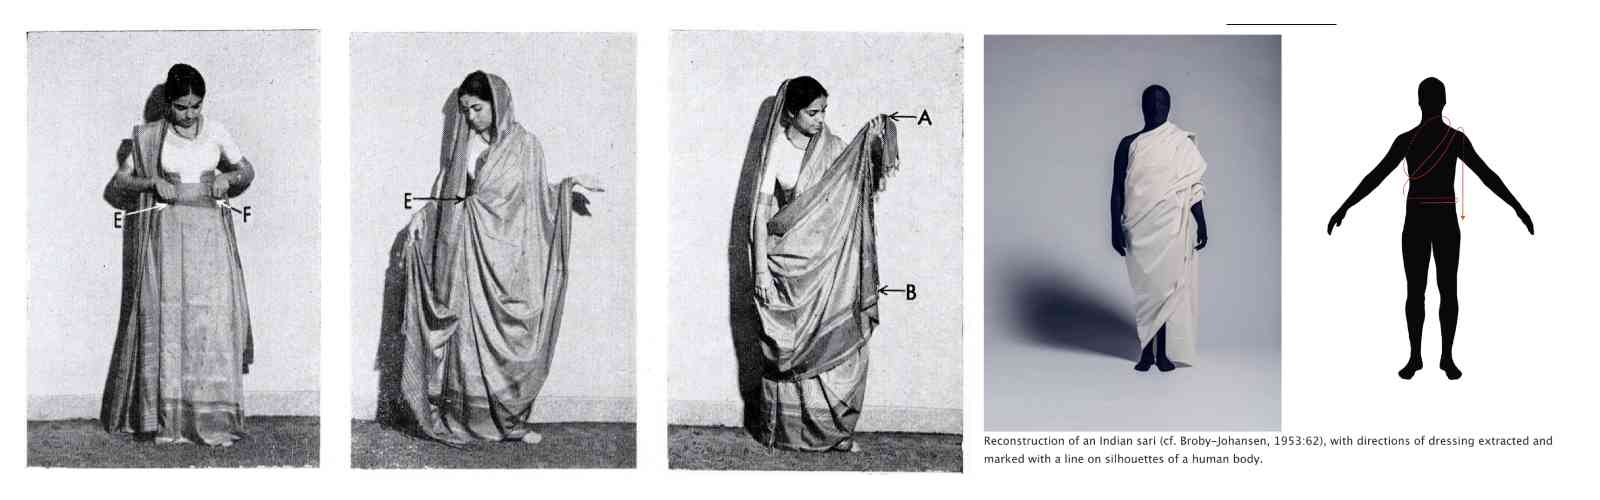
Wrap garments predate contemporary European pattern cutting by millennia and are still widely used. They are in some ways a more intuitive way of covering the body with cloth and require much less, if any, stitching a cutting. A wrap garment is at least partially constructed only through the act of actually being worn making it more easily adaptable to an individual’s body than most other garments. ‘Wrap clothing such as the Indian sari and dhoti, the Roman toga, or the Arabic hajk were rectangular woven pieces of fabric that remained undefined in shape until being worn and were recreated each time while dressing.’ (Lindqvist, 2016). As a result, the ‘pattern’ for these garments is more the process of putting them on and how the fabric should move around the body than a static shape as in more convention contemporary cutting.
This again is a textile led approach to garment construction, in which the aesthetic of the garment are the ‘pattern’ generated in conjunction with the wearers body not separately.
Kinetic pattern cutting is a type of pattern cutting developed by Rickard Lindquist to focus the movements of the 3D body more in the process of 2D pattern making. ‘The principal difference between the prevalent theory of the tailoring matrix and this human kinetic construction theory is that the latter is derived directly from how the fabric interacts with the living body instead of being derived from measurements of a static body.’ (Lindqvist, 2016). This approach focuses on the movement of the body and how the garment should be designed to enable and react to this rather than creating garments from a few specific measurements that the body will have to adapt to fit.

Subtraction cutting is a form of pattern cutting developed by Julian Roberts that creates garments through ‘the removal of fabric rather than the addition of fabric’ (Roberts, 2013). Subtraction cutting focuses on creating the space in the garment through which the body will go rather than creating a covering for the body. In this way, the result is often very organic and draped as the shape is determined through the wearing of the cloth not through design before. ‘The basic premise of Subtraction Cutting is that the patterns cut do not represent garments outward shape, but rather the negative spaces within the garment that make them hollow. Simply put, shaped holes cut from huge sheets of cloth through which the body moves.’ (Roberts, 2013)

Pattern Simplification
I selected 6 of the drapes I had done to take forward to the pattern development stage so that I had a selection in case any turned out to be too complicated.

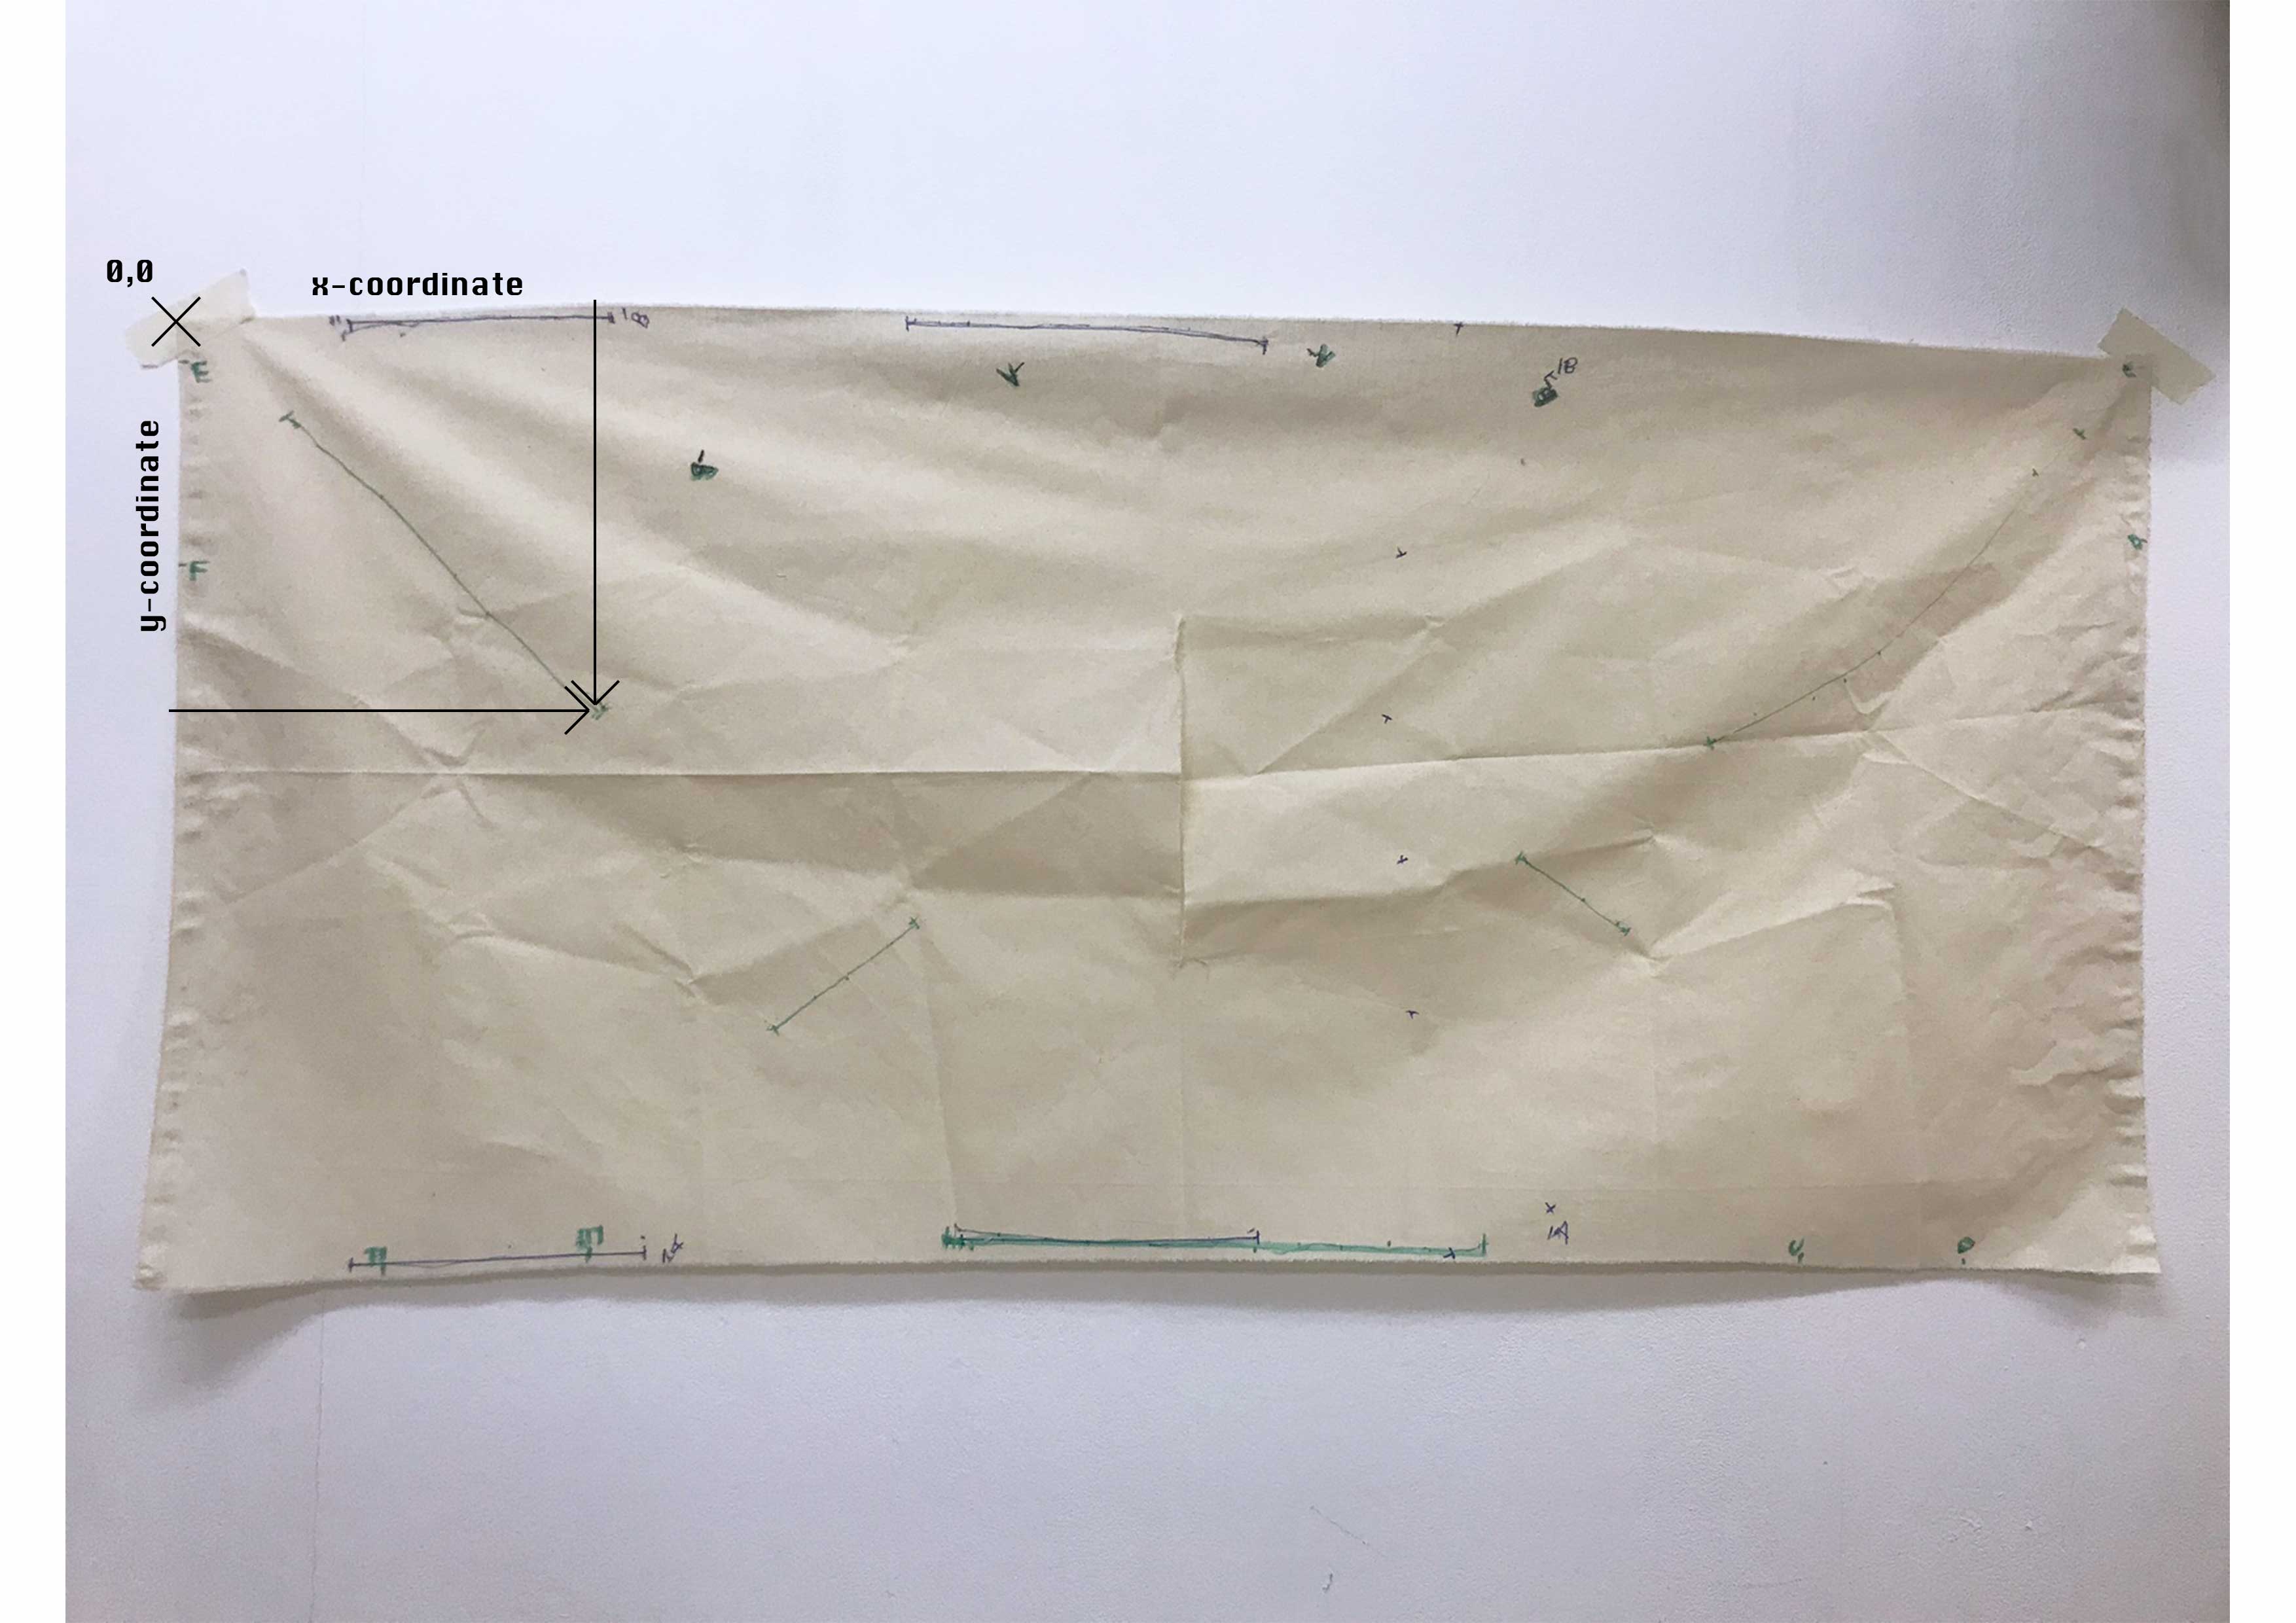
I had marked all of the join points and the lines for the gathering on the calico I draped with so I could easily extract and digitalise the patterns. I did this by measuring the distances of all the points from one corner of the calico and them inputting them into rhino like coordinates.

The patterns I ended up with:

Once I had the rough pattern, I wanted to simplify it to a point where it could easily be redrawn by someone without a good pattern kit. I measured all of the distances and angles between all the points and where I thought it would be easiest to redraw them from.
I then tried to move the points around a little bit to make the lines and distances more uniform. I wanted all of the distances you needed to measure to be ratios of each other as this would allow me to make a set of very simple rulers and stencils for creating them. I also changed some of the angles so that similar lines were fully parallel or symmetrical. Any drapes that should have been symmetrical down the middle such as the jacket, I found the average of the two corresponding points and used this to get a perfectly mirrored pattern.
This process took a few steps as I didn’t want to move the points too much as it could damage the functioning of the pattern. However, as the drapes were very loose and organic I hoped that I would have enough flexibility with the exact positioning of the gathers to move them this much and still get the same outcome or very close.
All of the patterns are available here
Example Process
The base pattern from the shift dress drape after it was initially put into rhino:
With all the measurements of the distances and angles:
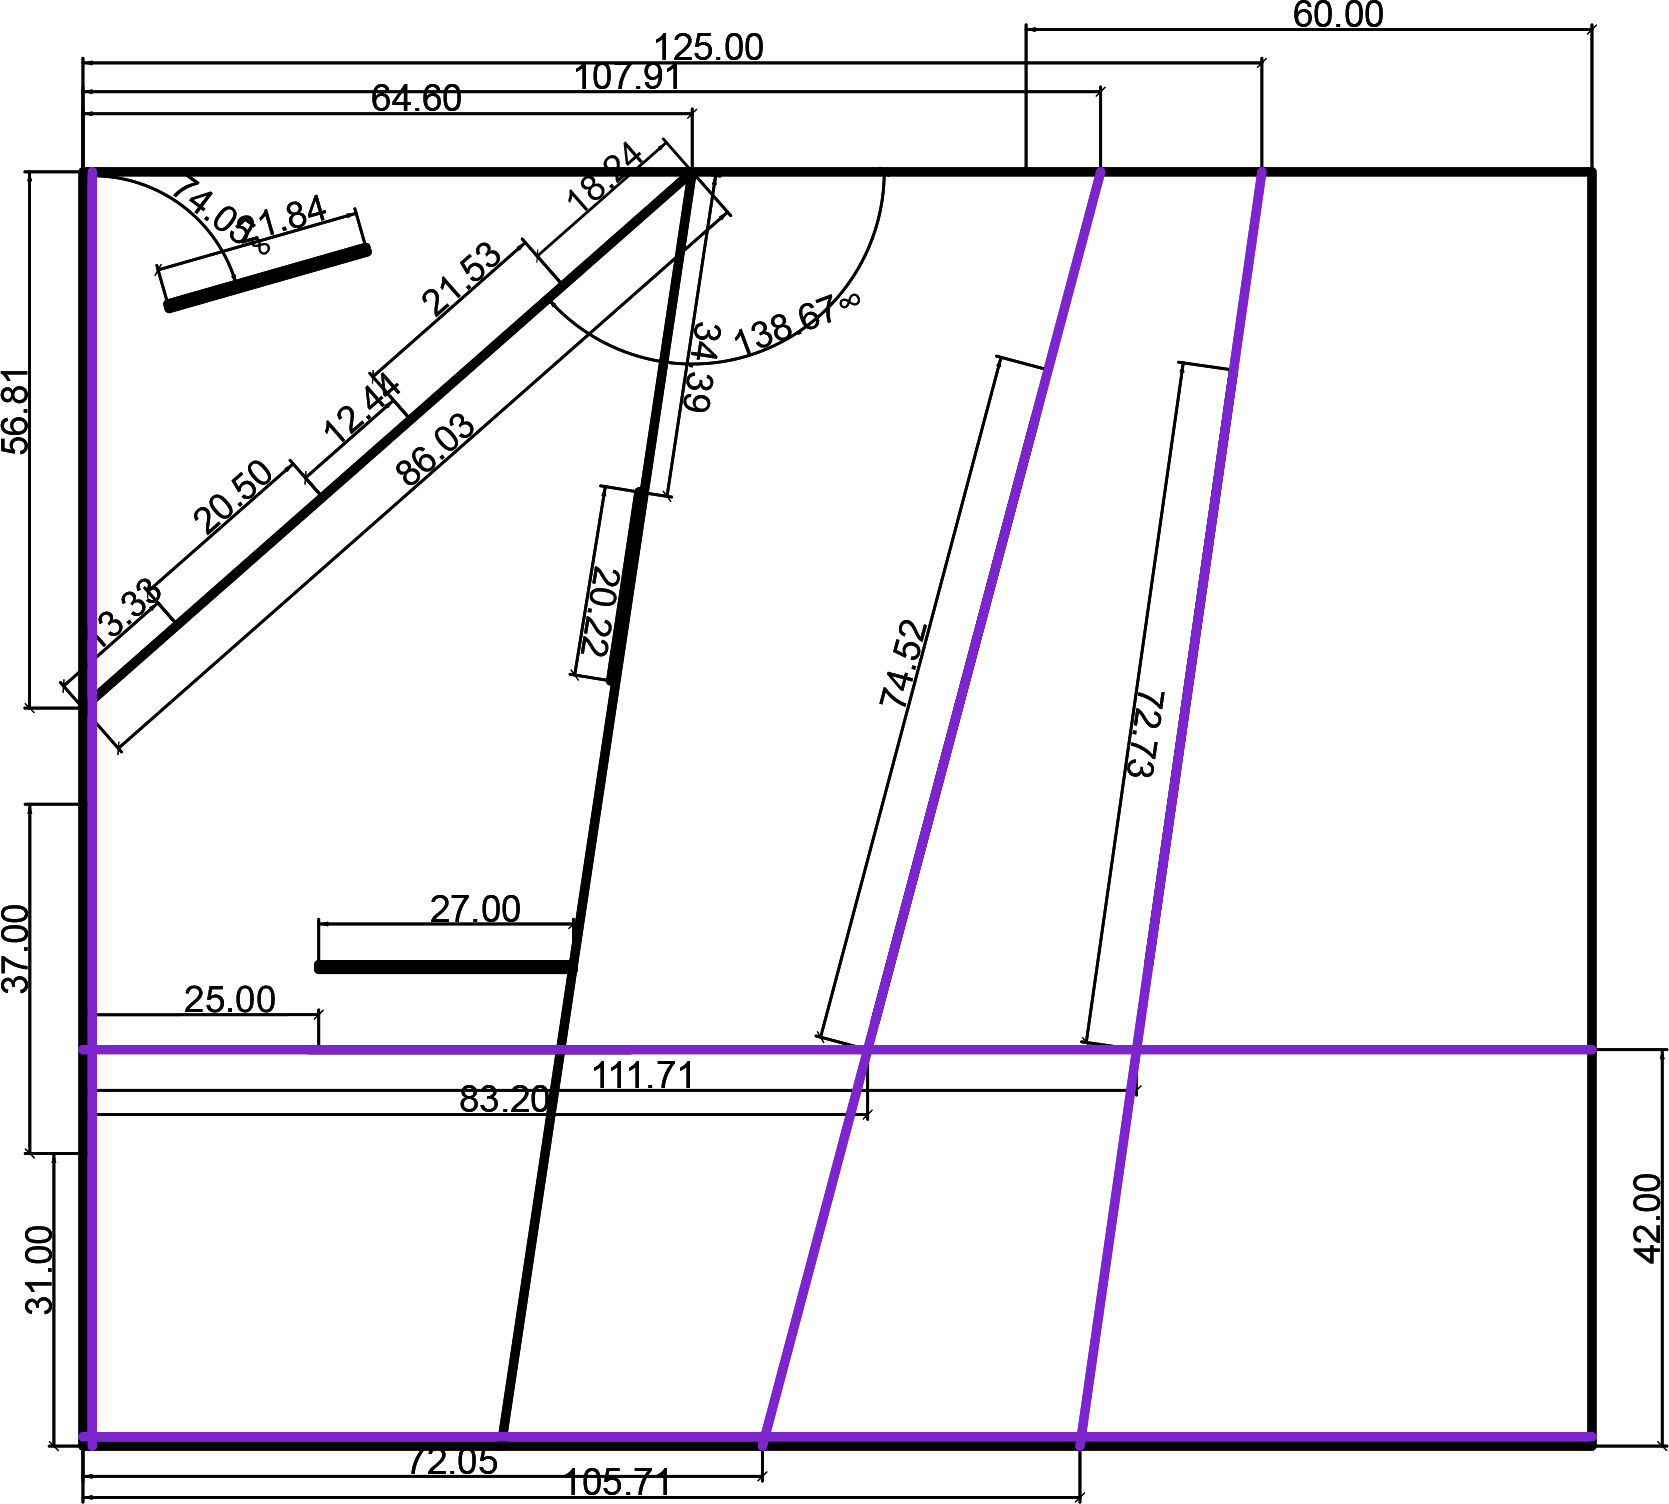
With the angles simplified to repeats of either 30 or 80 degrees and all main distances simplified to ratios of 20cm or 25cm:

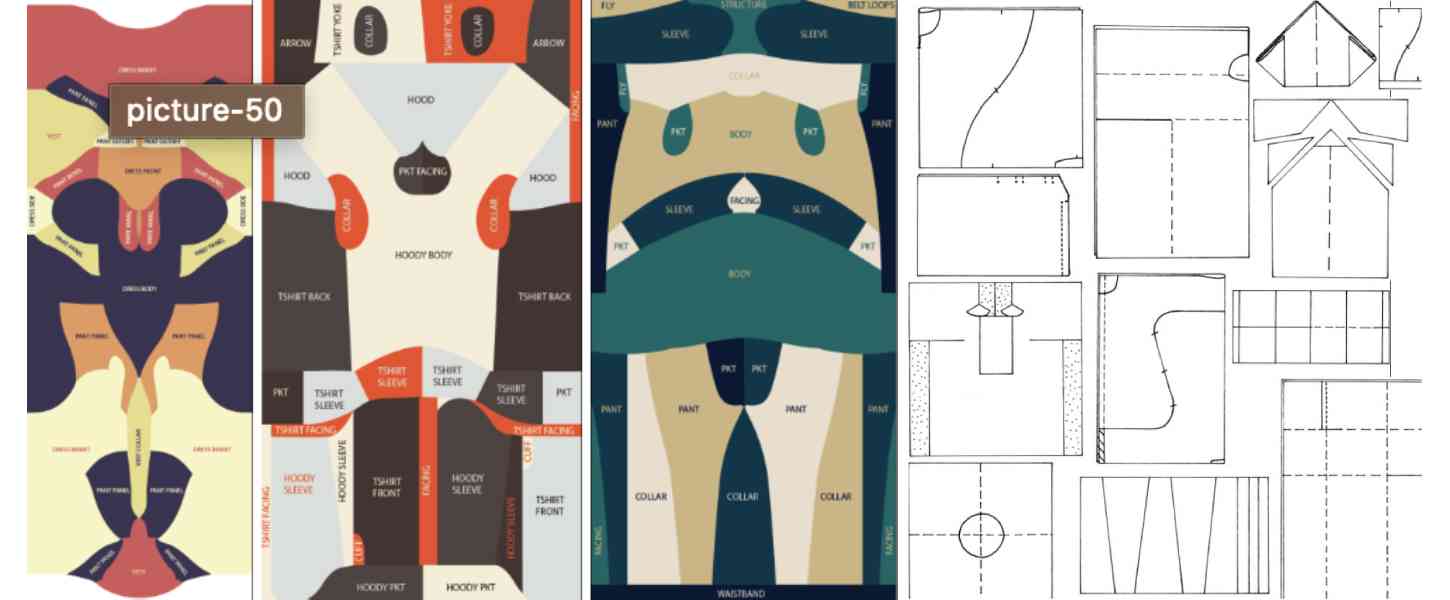
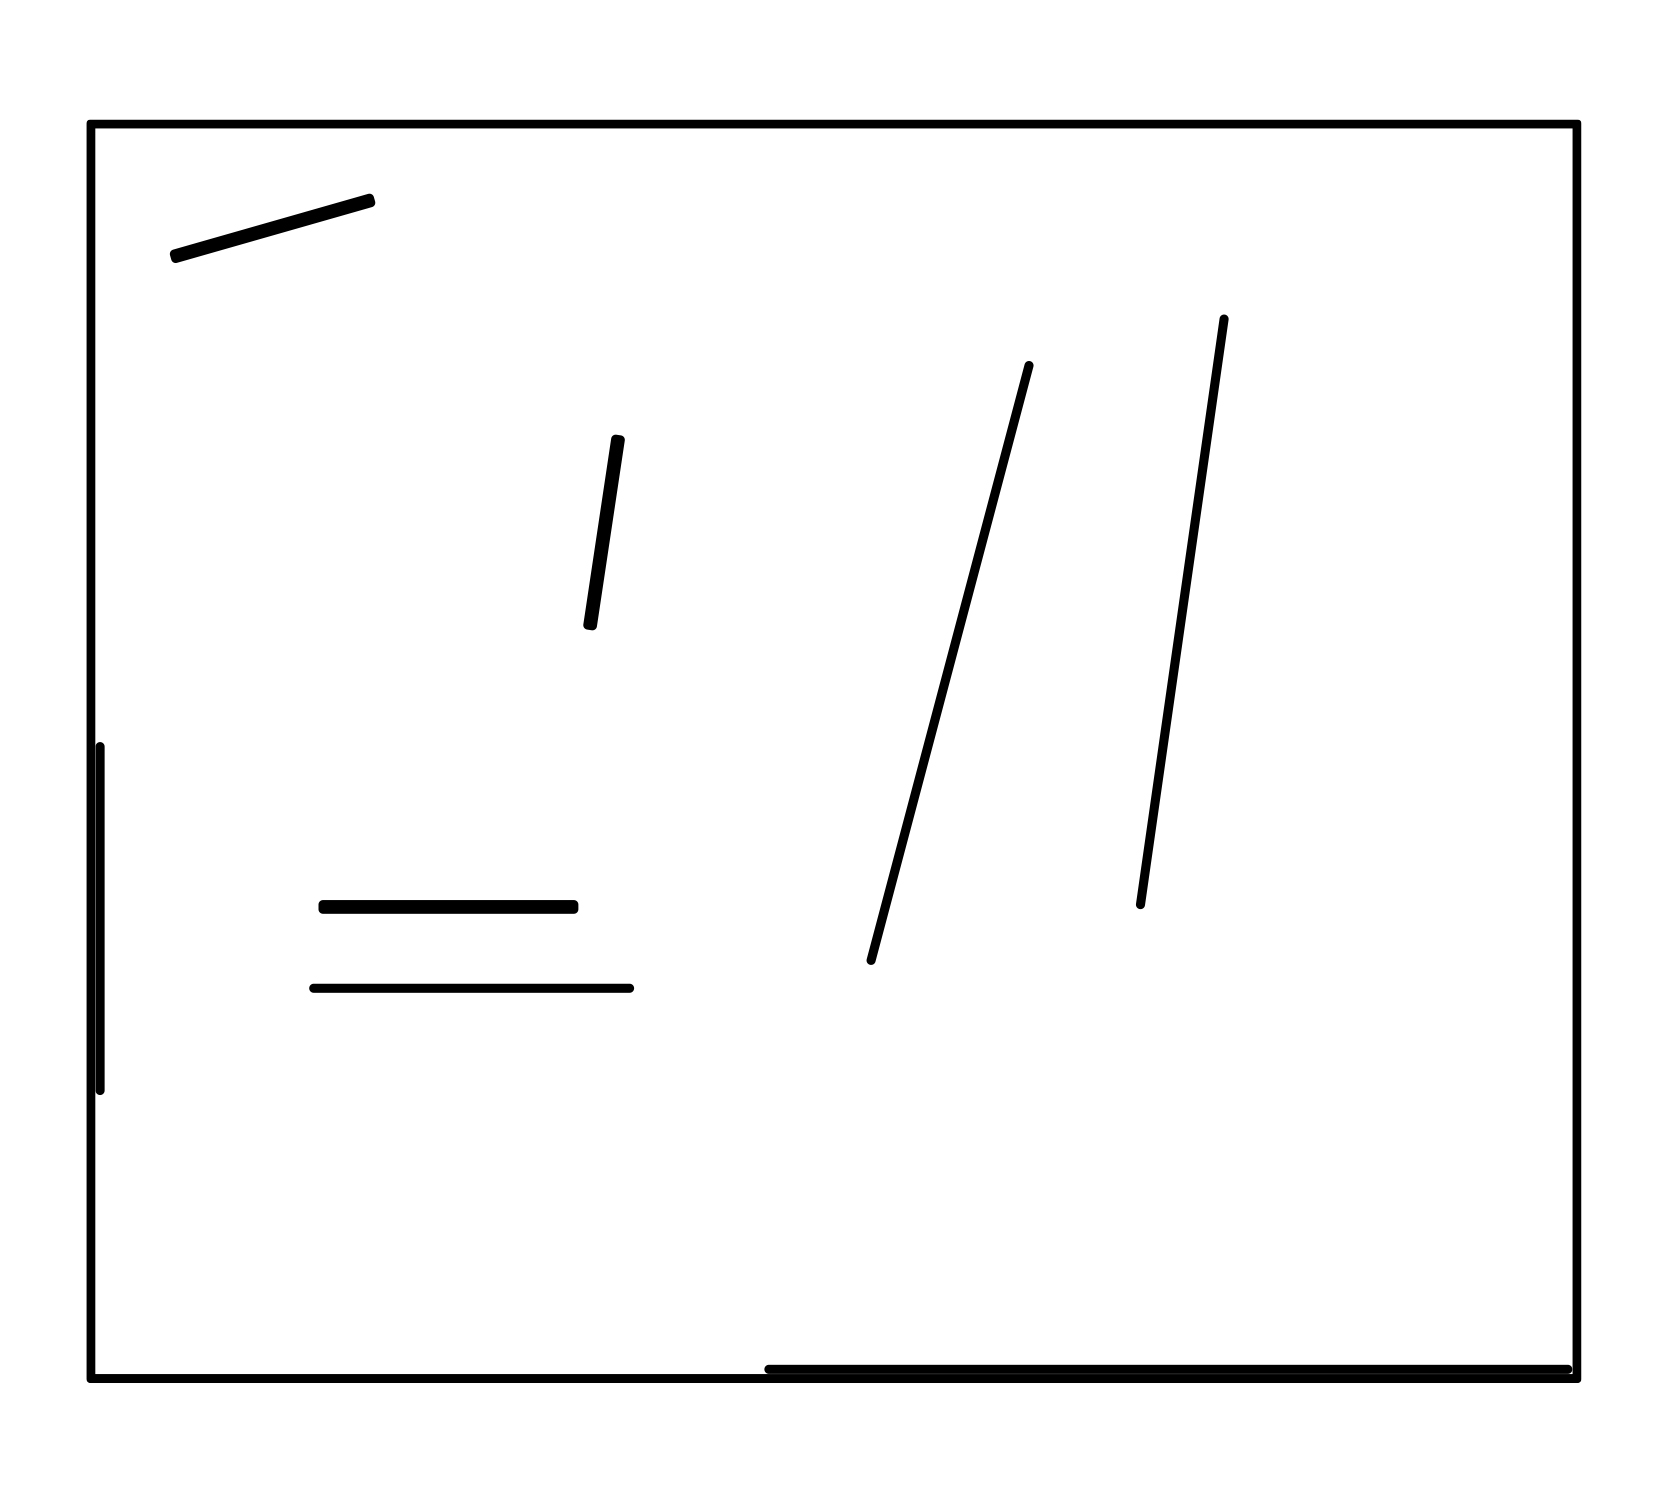
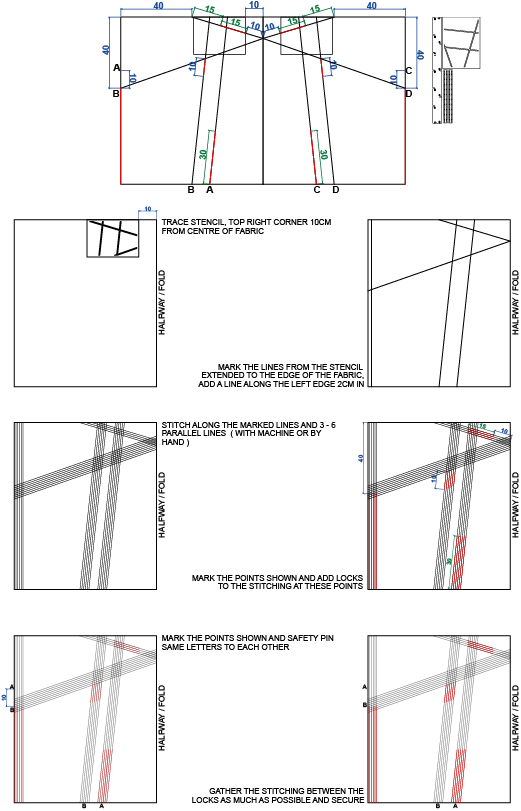
The pattern as it would be presented for use, black lines are the full stitching lines required to be able to do the red lines of gathering, blue lines are just needed for ease marking cuts and joints so should be traced in chalk, the letters mark join points and the thin rectangles are cuts:

Hardware
Rulers
As the patterns consisted only of a few straight lines, once you had the positions and angles they would be really easy to redraw. To help with this, I wanted to create a selection of stencils or rulers.
Initially, I tried making a full-scale version of one of the patterns to be laser cut or printed similar to all of the patterns you can download online and piece together yourself.

I didn’t like this attempt very much as the pattern for this garment was one long piece the was 4m x 0.6m so it would require either a large-scale printer or way too many pieces stuck together to be a practical way to convey the pattern, especially as most the this was just empty space.
Instead I decided to focus on specific parts of the pattern that held the most information and allow it to be extrapolated from there. For example, on this pattern for the jacket drape, there was a A4 size section near the top centre through which all of the lines of the pattern crossed.

This meant that I could make a stencil of only this section of the pattern and they could just be extended in a straight line to the edge of the fabric from here.
For some of the other patterns that didn’t have such convenient sections, I added sections on to the main rulers similar to a section of a protractor with the necessary angles for the line positioning. As I had to simplified the patterns to contain only one or two different angles this was just a matter or repositioning the base of the ruler in the required direction to get the position of the new line and then you could extend from the 15cm marked from using this protractor.
Additionally, as all of the distances on the pattern were multiples of each other, I decided to make a ruler with only these distances on, I thought it might help to remove as much of the work as I could from redrawing it to have everything be 1, 2 or 3 etc. on the ruler rather than say 125cm or 75cm.
Finally, I also made a ruler to help mark the points of stitching as the machine was still not working so I would have to do this by hand at this point. As I tried to make this as close to how the machine would stitch it while also keeping this time scale doable. I decided to do the stitches every 0.75cm and the lines 2cm apart.
All of these rulers could be used to mark directly onto the fabric with either chalk or heat or water removable pens. For me however it was easiest to use a line of masking tape to mark the stitching line once I had to position and to mark the stitching points on here. This meant that I could move the tape once I had done a line to the new position and didn’t have to remark 1m+ of stitch points so it saved a lot of time and left the fabric unmarked. It also helped to stabilise the patchwork so that the fabric didn’t move while I was stitching as much.
Locks and clips:
Apart from the stitching, the patterns also required some kind of clip or joint secure the wrap and a system to lock the gathering within the desired points not just along the whole line of stitching.
For this I looked on thingiverse for some toggles that I could adjust to be able to add on the stitching to hold it in place. I decided that this one would be the best fit as it was already a near the size I needed and the screw off top meant that it was well suited to adding the threads after they were sewn rather than having to feed a loose end through as with most toggles. The model can be found here.

I scaled it down slightly to try to help it catch the very thin threads that I would be using and printed a test version.
This worked very well, it screwed on and off smoothly and tightened enough to securely hold the thread where it was.
Next, I tried to print 20 of these as this would be enough for 2/3 garments. However, these did not work the same, they were very difficult to screw on and even then only screwed on halfway so the thread just passed through. I am not entirely sure why this was, I used a different colour PLA and the printed used a different path due to the increased number of parts being printed but I don’t know if it was because of either of these.
I tried using the same PLA and scaling down the top part of the screw 2% and 3% to see if this would fix this problems with the pieces fitting together. The part scaled down 3% screwed on much smoother but as it was slightly smaller, it meant that the locking system didn’t work as well and the thread could still be pulled through even when I t was fully screwed on.
I didn’t have time at this point to work on the 3D model much so I printed 20 of these and added a small amount of hot glue to the end of all of the screws to help add more friction and secure the thread. This worked very well.

As well as using these to secure the gathering position, I used them to secure the wrap by adding a few stitches in the necessary position (if there wasn’t already a line of stitching) and passing the 2 different bits of thread through the same lock.
This wasn’t an ideal join as it was super secure and it allowed for a bit of movement from the stitching but it worked for the time I had.

The fabrication files for all the hardware can be found here
Instructions
In order for these to then be reproduced by other people, I needed to find some way to explain the pattern process clearly. As the patterns, I had produced for this project were so distinct from normal patterns, I wasn’t too concerned about them being inaccessible to people without prior pattern cutting knowledge as this wouldn’t have been that much aid anyway.
1st Test:
To test if the rulers I had made above actually did help simplify the redrawing process, I wrote a basic set of instructions for Barbara from the lab to follow, gave her the rulers needed for the jacket drape and asked her to try to redraw it. I also gave her a quick sketch of the 3 main steps she needed to mark: the stitching lines, the points for the gathering locks and the points for the joining locks.

To keep it simple and focus on the pattern instructions rather than the whole process, I just used one piece of linen the exact size of the pattern rather than a patchwork as I would for the actual garments.
While Barbara did manage to redraw the pattern exactly, there were a few points throughout the process where I needed to clarify points for her, particularly where she needed to measure the points from. The main takeaways from this were that she needed a stronger visual aid and clearer explanation of where measurements she needed to make started and ended and that the ruler would be easier to use if all the measurements were on one side. She did say that it was helpful that I had visually separated the 3 steps as it meant the visual cues for each step was very simple.
Development:
From this, I returned to my patterns to create a precise step by step. I did some quick sketches of the processes to break down the 3 main information points of the patterns (4 if there was cutting as in the shift dress drape)
From these I made a virtual version of this and added in the other steps required between these points such as the actual stitching. In the end, I had 6 steps for redrawing the pattern and creating the garment.
The steps for the jacket drape, for example, were:
And the steps for the drape top:

Pattern toolkit:
I wanted to create a handbook for all of the patterns I had developed as part of the project to be downloaded similar to a sewing pattern magazine. In the end, I only had time to add two patterns to it as I wanted to have clear photos of the garment outcomes and detailed instructions and tips. I also added pages at the start about creating the textile patchwork and the garments recommended for the process as well as the stitching techniques and use of the machine.
I also made a tutorial video to use as a visual aid for the handbook. This was a detailed explanation of the redrawing, stitching, construction and deconstruction process. To help visually simplify this, it again used just a piece of linen that size of the pattern as I felt that when I tried it with a patchwork it was overwhelming and the pattern got a bit lost. Ideally, I would have like this to also include the textile creation process but I did not have time for this project.
Finally, I made the files for the rulers and stencils available from a link in the handbook so that people could download and laser cut or print the ones they needed.
Final Garments
Black Shift Dress
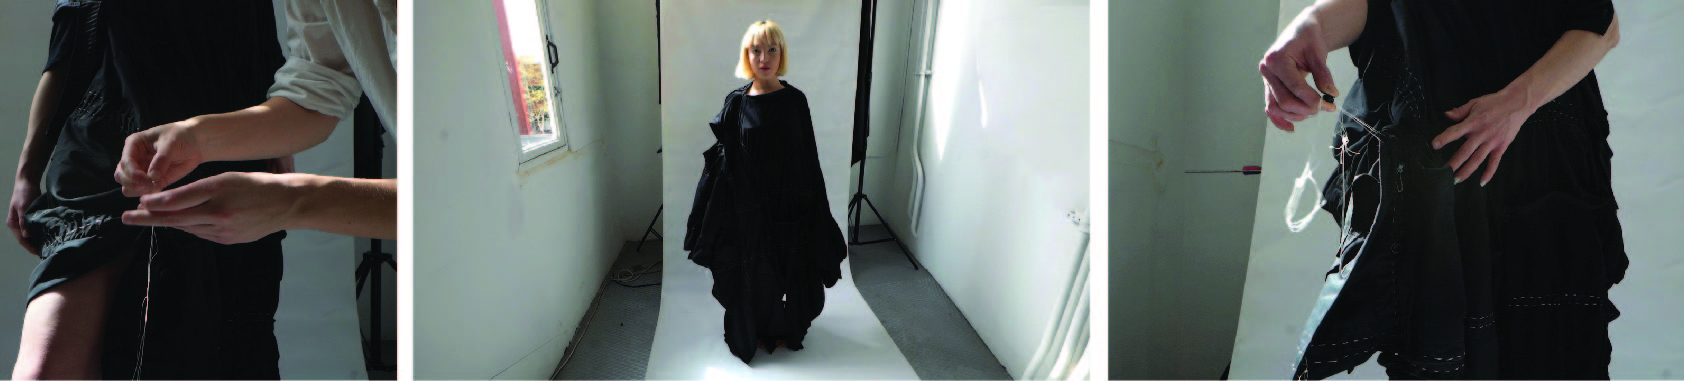
For the final video of this project I made 2 garments using the process described above. The first, a black dress used the shift dress pattern.
It was made of 4 garments: a jersey maxi dress, a pair of waterproof trousers, a ribbed top and a chiffon top. These were all of a similar colour for cohesion and to allow for more focus on the textures. All 4 garments were cut along as few seams as possible to gain as large a surface area as possible. the raw edges from these cuts was then bound in black bias tape to give a more refined finish.

As the machine was not working fully as intended at this point, this was sewn by hand and therefor took 2 days to do all of the required running stitches. Either 2 or 3 parallel lines of stitching was done for each line indicated by the pattern. In the end, the patchwork this garment was made from was very secure with few gaps visible between the pieces, this was enhanced when it was worn and gravity added some more tension between the fabrics.
This pattern was the only one that required any cutting. 3 slits are needed, 2 for the neck hole and 1 for the arm hole. To reinforce this, as especially the neck hole slits would be holding most of the weight of the rest of the dress, they were hemmed with a double layer of facing in a matching colour from some scraps at the lab. This unfortunately does add a hurdle for the disassembly process, as does the binding, making this more time consuming to take apart and then potentially repair the initial garments.

Green Drape Top
The second final garment made was a green top used the drape blouse pattern.
It was also made of 4 garments: a khaki raincoat, a light green tweed-look skirt, a grey knit sweater and a pair of khaki suit trousers. These garments had a much wider range of colours and textiles than the last set which did give the final garment a more obviously patchworked aesthetic than the other garment. All 4 garments were cut along as few seams as possible to gain as large a surface area as possible. the raw edges were hidden within the layers of the patchwork where possible but no extra finishing was done.

As the machine was not working fully as intended at this point, this was sewn by hand and therefor took 2 days to do all of the required running stitches. 2 parallel lines of running stitching was done for each line indicated by the pattern. However, for added security of the patchwork and due to time constraints, 1 or 2 parallel lines of stitching done on the machine was added either side of the running stitches. In the end, the patchwork of this garment was not very secure and there were some points between the pieces that gaped slightly with some movements. Despite this, enough stitching was done for the textile to stay together while worn, disassembly was much easier for this than the black garment.