10. Open Source Hardware - From Fibers to Fabric
weekly assignment
Check out the weekly assignment here or login to your NuEval progress and evaluation page.
get inspired!
Check out and research alumni pages to betetr understand how to document and get inspired
- Paula Franco Hernani
- Ala Janbek
- Loes Bogers TextileLab Amsterdam 2019-20_
- Pauline Gamore TextileLab Lyon
- Gabriela Lotaif
- Carolina Delgado
Open Source Hardware Notes
Research & Ideation
This week I was really inspired by the Enabling Personal Computational Handweaving with a Low-Cost Jacquard Loom project that Sara showed us in the lecture. I wanted to try to make a version of this this week.

Warp Beam The warp beam, which holds the lengthwise yarns, is located at the back of the machine and is controlled so that it releases yarns to the weaving area of the loom as needed.
Whip Roll This is guide roller which directs the warp threads on their way to the lease rods and heddles.
Lease Rods Another guiding device it is for the warp yarns. These are two sorts of wooden or glass rods set between the whip rolls and the heddles. Alternating warp threads can be kept separate by passing over and under these rods.
Heddles/Healds A heddle is a wire with a hole or eye in its center through which a warp yarn is threaded. There are as many heddles as there are warp yarns in the cloth, and the heddles are held in two or more harness.
Harness A harness is a frame to hold the heddles. The harness position, the number of harness, and the warp yarns that are controlled by each harness determine the weave pattern or interlacing.
Bobbin and Shuttle The filling thread is wound on a bobbin which sets into a shuttle or bobbin container. As the shuttle passes back and forth through the warp shed, it releases thread from the bobbin and so forms the filling cloth.
Reed This is inevitably a combination made up of steel wire rods set vertically in a frame. The spaces between the wires are known as splits or dents and are kept even and parallel. This is the first function of reed. Its second function is to feed the filling thread into position. To do this it has to move in a back and forth motion.
Breast Beam The bar his is, at the front of the loom over which the cloth passes on its way to the cloth roller.
Temples They divide at the edges of the cloth which supports to maintain fixed dimension in width.
Cloth Roller It is located at the front of the loom, hold the completed fabric.
I had a pretty good understanding of how hand looms worked as I have used them a fair amount before but I did a bit of research about how they can be used to make more complex patterns and textures to see if there was any shortcuts I could use to help with making the jacquard. Below are some examples I found of how to use the same base loom in different ways.
Next I needed to understand the mechanisms of a traditional jacquard loom so I could try to simplify or alter it for hand use. The videos below were really useful for explaining how the original looms worked and the different parts I would need for mine.
This was a nice video about how industrial digital jacquard looms work now, it wasn't super useful for this week but it was interesting to see how far the technology has come.
Open Source Examples:
My plan for this week was to try to combine elements of these different looms to make a manual, portable jacquard loom.
Process
Mechanics Sampling
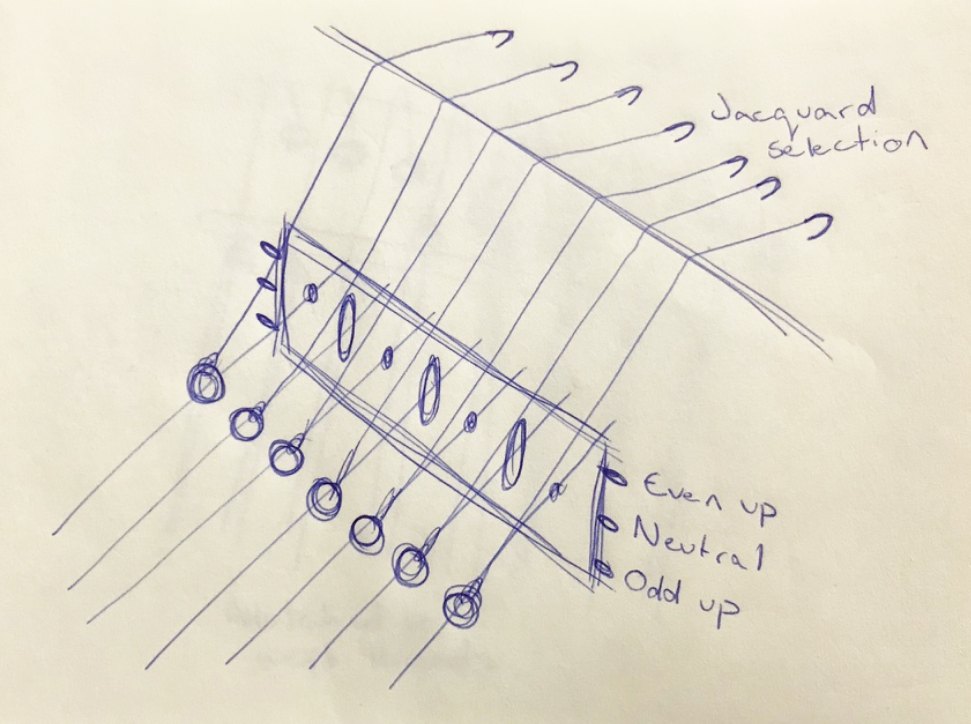
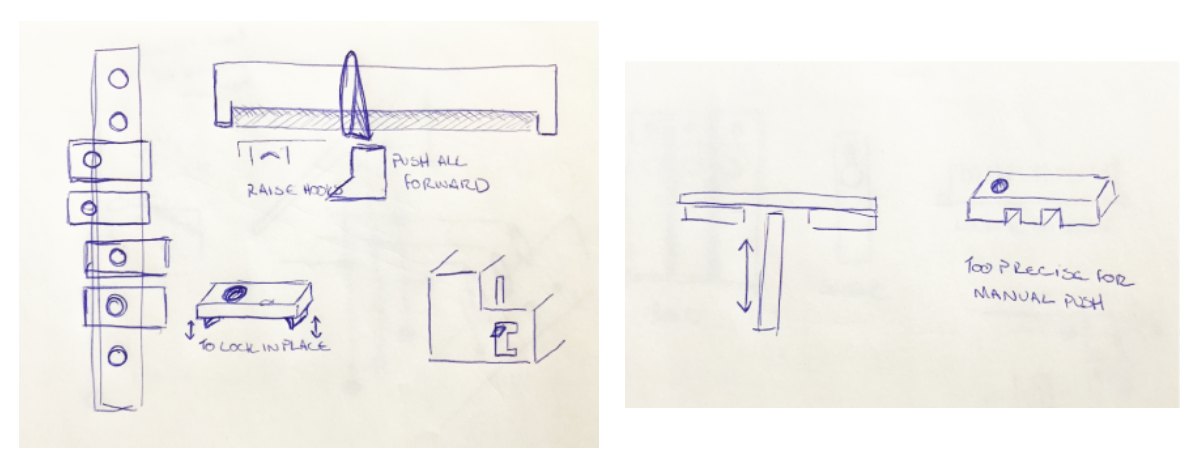
To start I did a few sketches of different ways that I could control the individual weft threads. These were based on trying to simplify either the traditional industrial looms and their punch card method and a mix of the Personal Computational Handweaving one to make it manual.

Next I made tied some yarns to the weft threads of an existing loom we had in the lab to get an understanding of how close together the mechanisms to move the yarns would need to be and how much I would need to be moving them by. I wanted to try to make the mechanism a bit thinner than the example so I could more weft threads and a smaller weave but I think that this loom was maybe too close together.

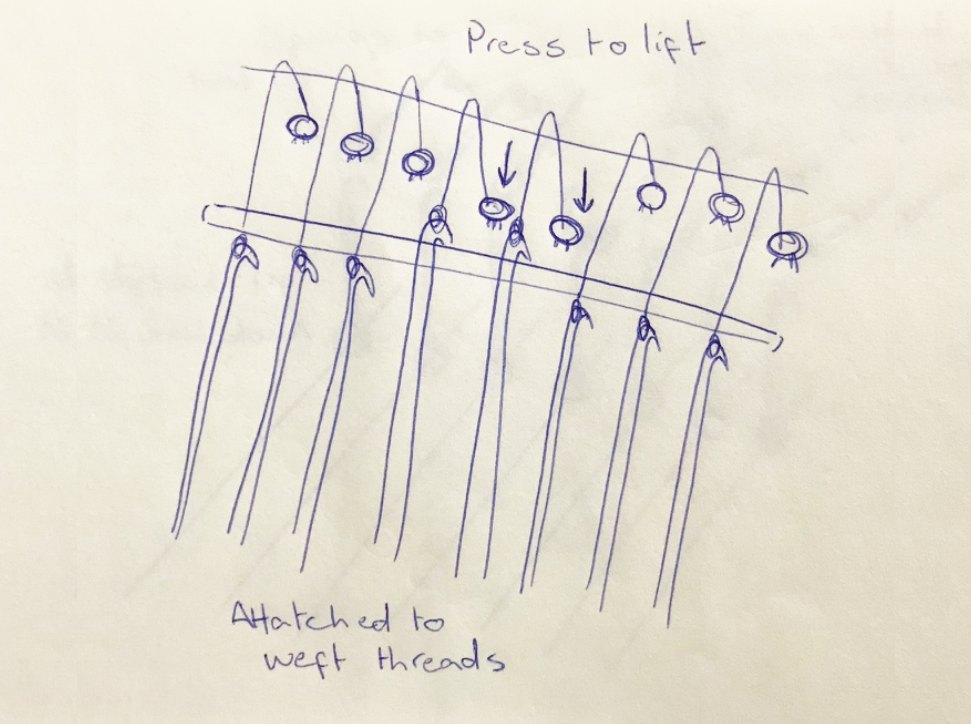
I then used a bit of laser cut scrap to make a quick visualisation one of the sketches I did before that would need a bed above the weave with holes in to allow the yarns attached to the weft threads to be held in either an up or down position through some kind of blocking mechanism.

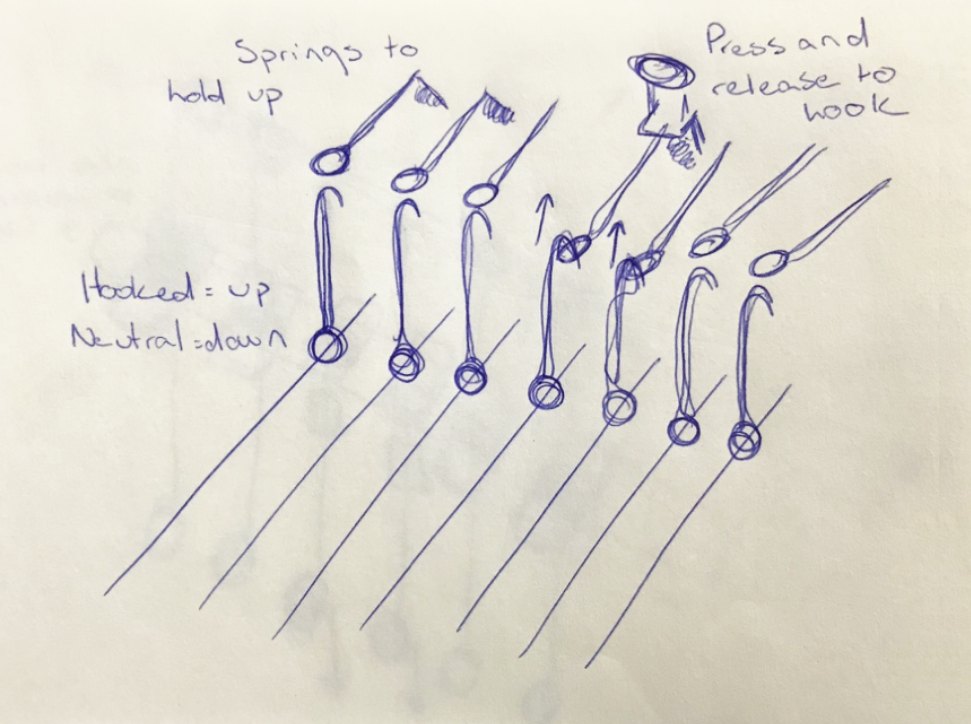
I also made a quick visualisation of another type of mechanism more based on the traditional looms. In this version, a needle is either left in upright position to be caught by a raising bar to pull the weft thread up or it is pulled back so that it misses the bar and the weft is left down. I thought that to make this a manual process I could use two rows of pegs to position the need.

1st Prototype
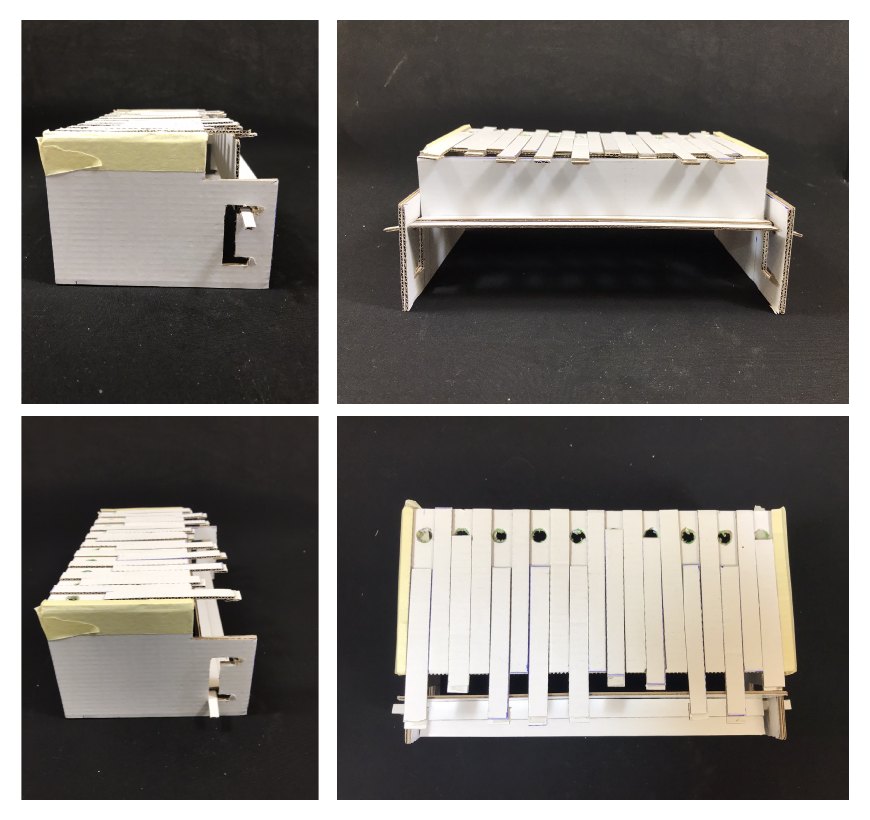
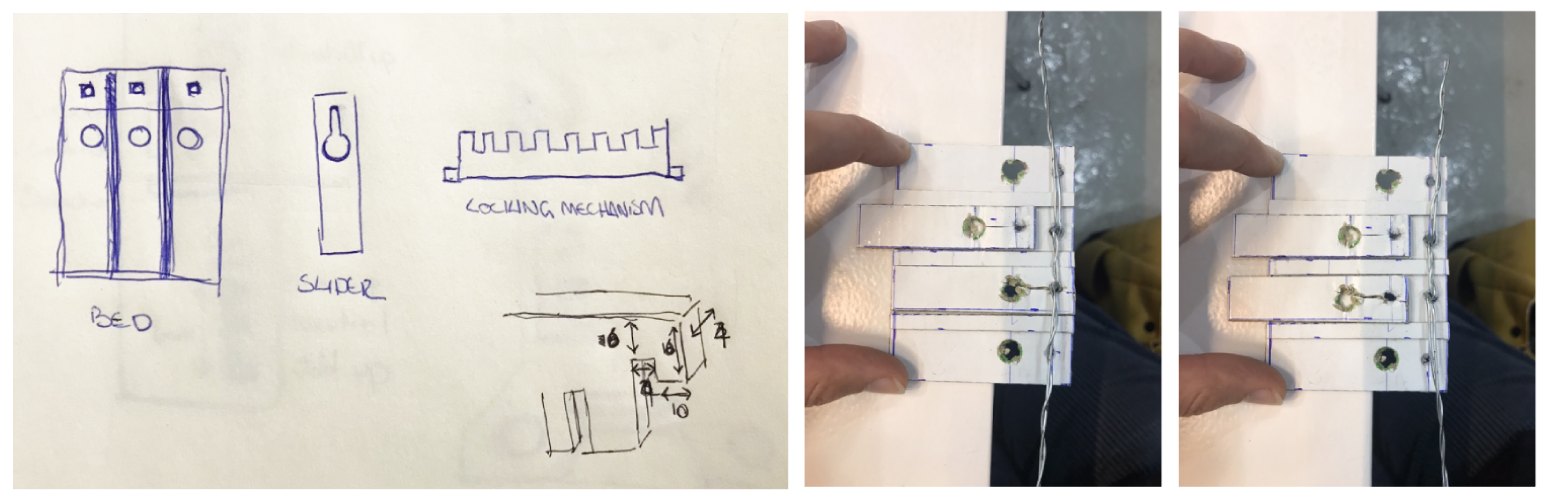
Of these two I decided to go with the first method with the bed and holes. This was most similar to the example open source one I was looking at so I thought it should be more achievable in a week on my own. I made a cardboard prototype of the bed so I could work out how the parts should move and stay in position when you were weaving.

This was my first attempt at a locking mechanism for keeping the sliders in the right position for as many rows as you needed. The proportions are obviously way off what I would actually need so it wasn’t super secure but overall it would have worked in general.
I didn’t think the sliders would be super secure with this as it was though so I wanted to try to find a method where they had less room to move around the lock. This was a bit tricky as they were going to be moved by hand so they needed to be able to be a little bit off the exact intended position and the lock to still work.
2nd Prototype
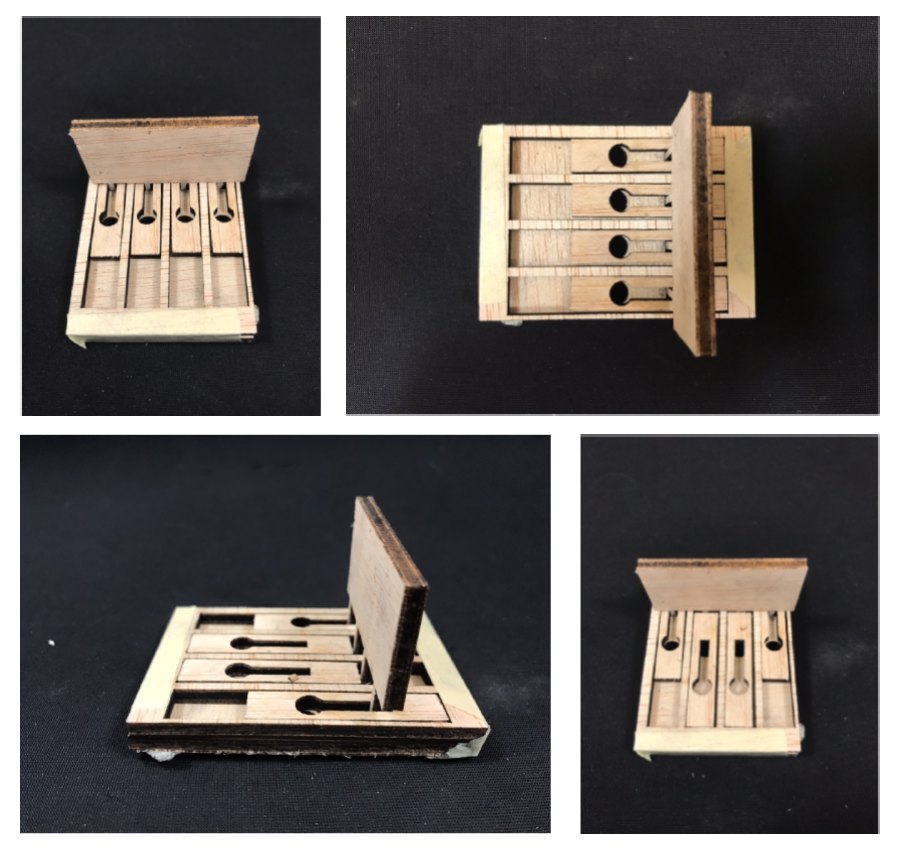
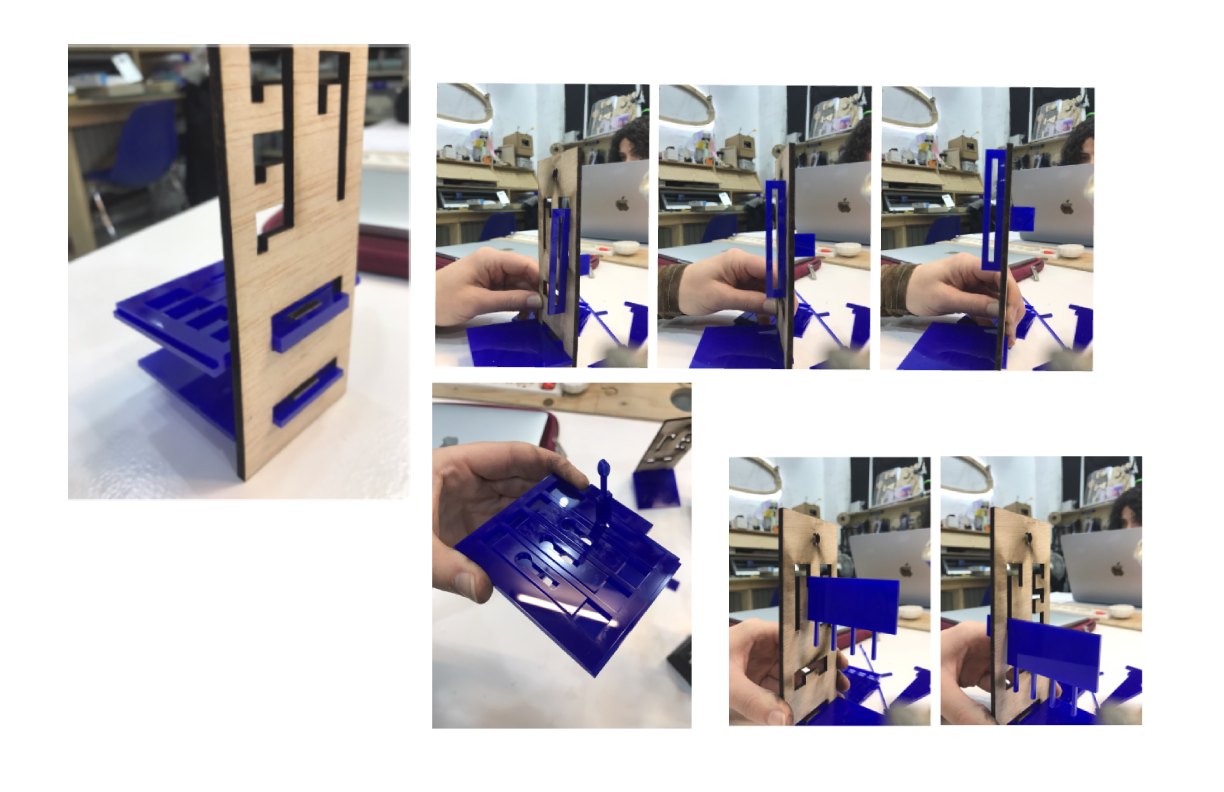
I decided that a good way to do this was to have a comb like piece for the lock that had one tooth per slider. This piece would then be raised while you positioned the sliders and lowered when they were in position so that the teeth went through a hole in just the bed when the slider was back (and the weft was therefore down) and through the bed and the slider when it was forward (and the weft up).
I drew a version of this in rhino and laser cut it to test is how easy it would be to use and that the pieces all fit together. It worked as it wanted it to but the teeth of the comb were very thin so I decided to scale it all up slightly going forward.
Construction Development
Next I had to work out how to structure the loom and how the pieces would slot in to the sides. For this I used Aslı Aydın Aksan's Open-Source Foldable 4-Shaft Weaving Loom as my starting point and added in some extra room at the top for the jacquard selection panel and to attatch the individual pins to a pole to be wound up when needed.
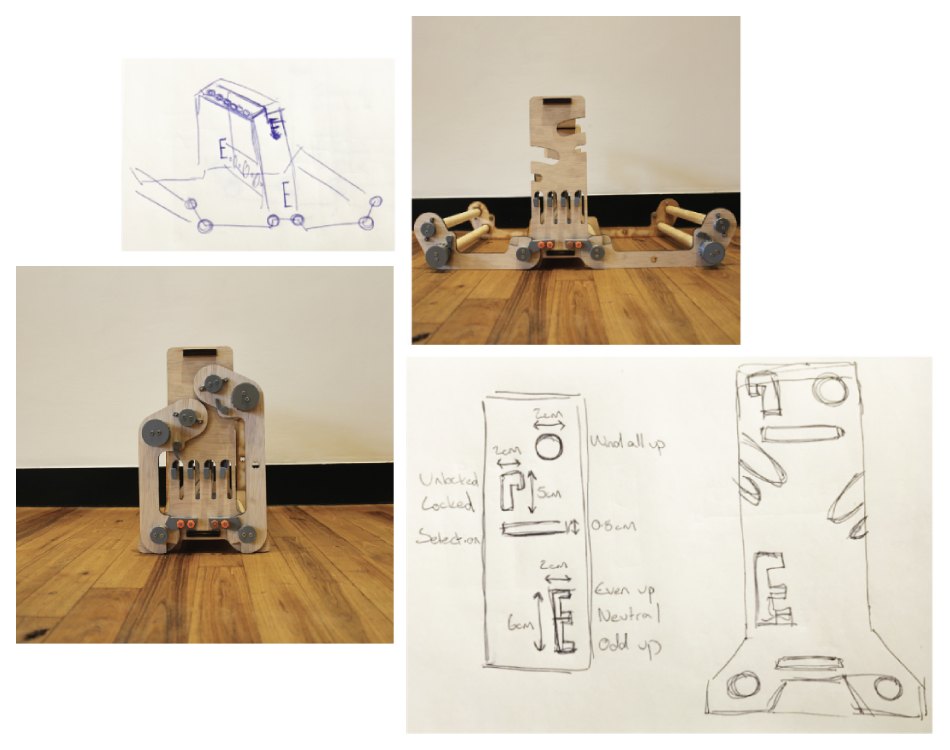
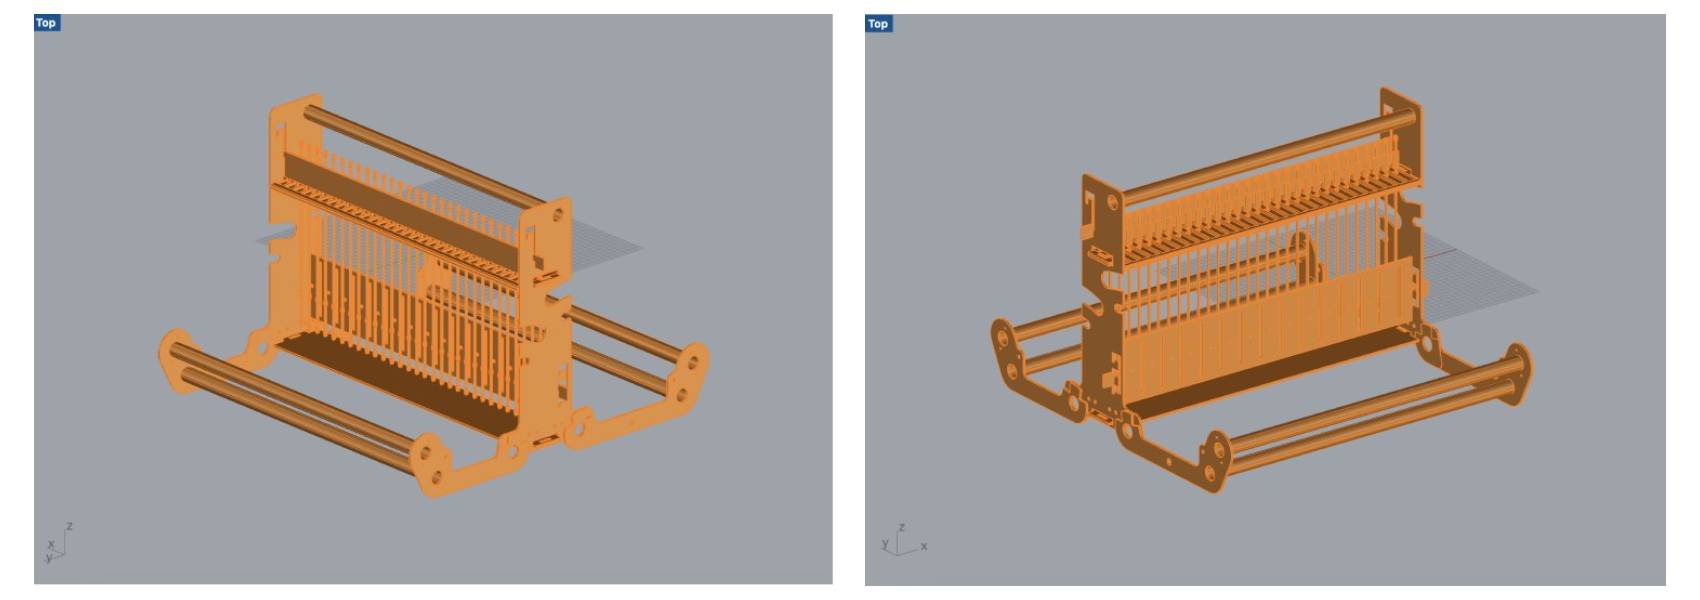
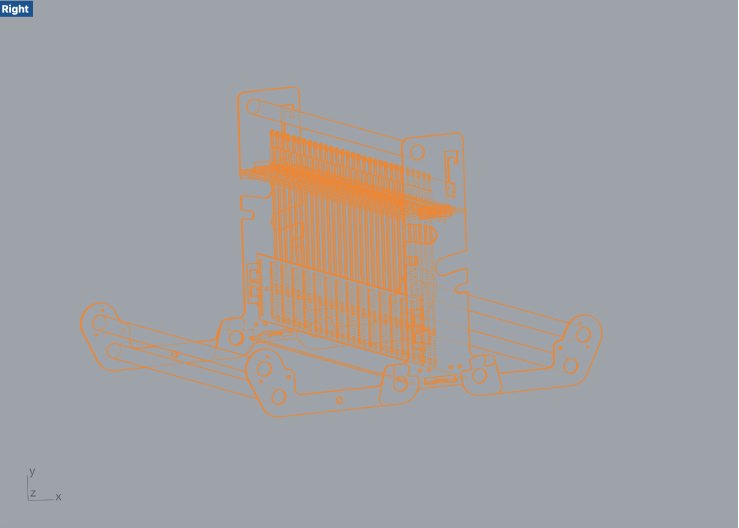
Once I had worked out the dimensions of the looms, I made it in Rhino using some of files Aslı Aydın Aksan's and the files I made for the sample above. Then I extruded all the pieces and simulated the construction in Rhino to check I all the details were correct.
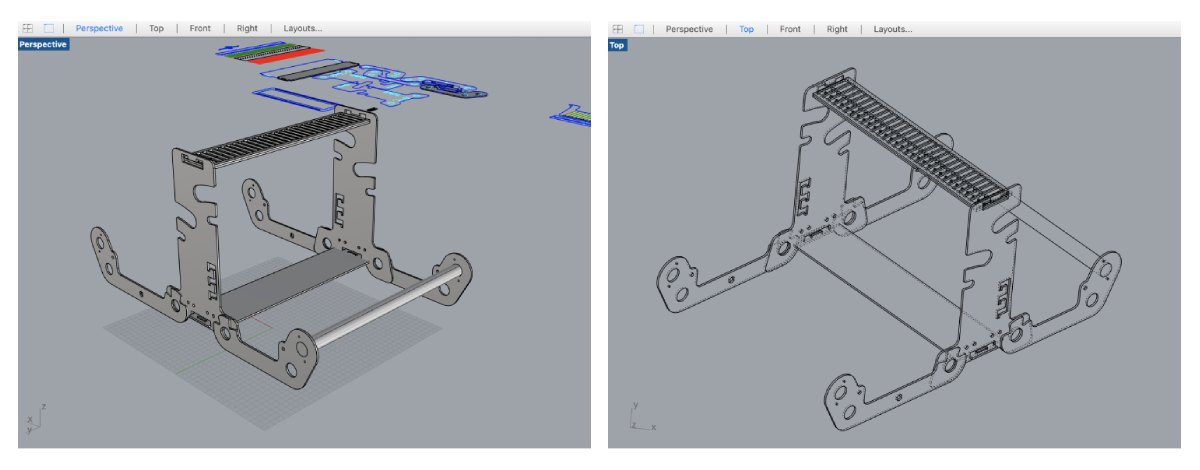
As the file was quite large, I did some more laser cutting samples of all the joints in the looms to double check that they were all secure enough and that the pieces that needed to move were easy to position correctly. I was very happy with the way they all worked so I was ready to begin constructing the final loom.
Final Loom

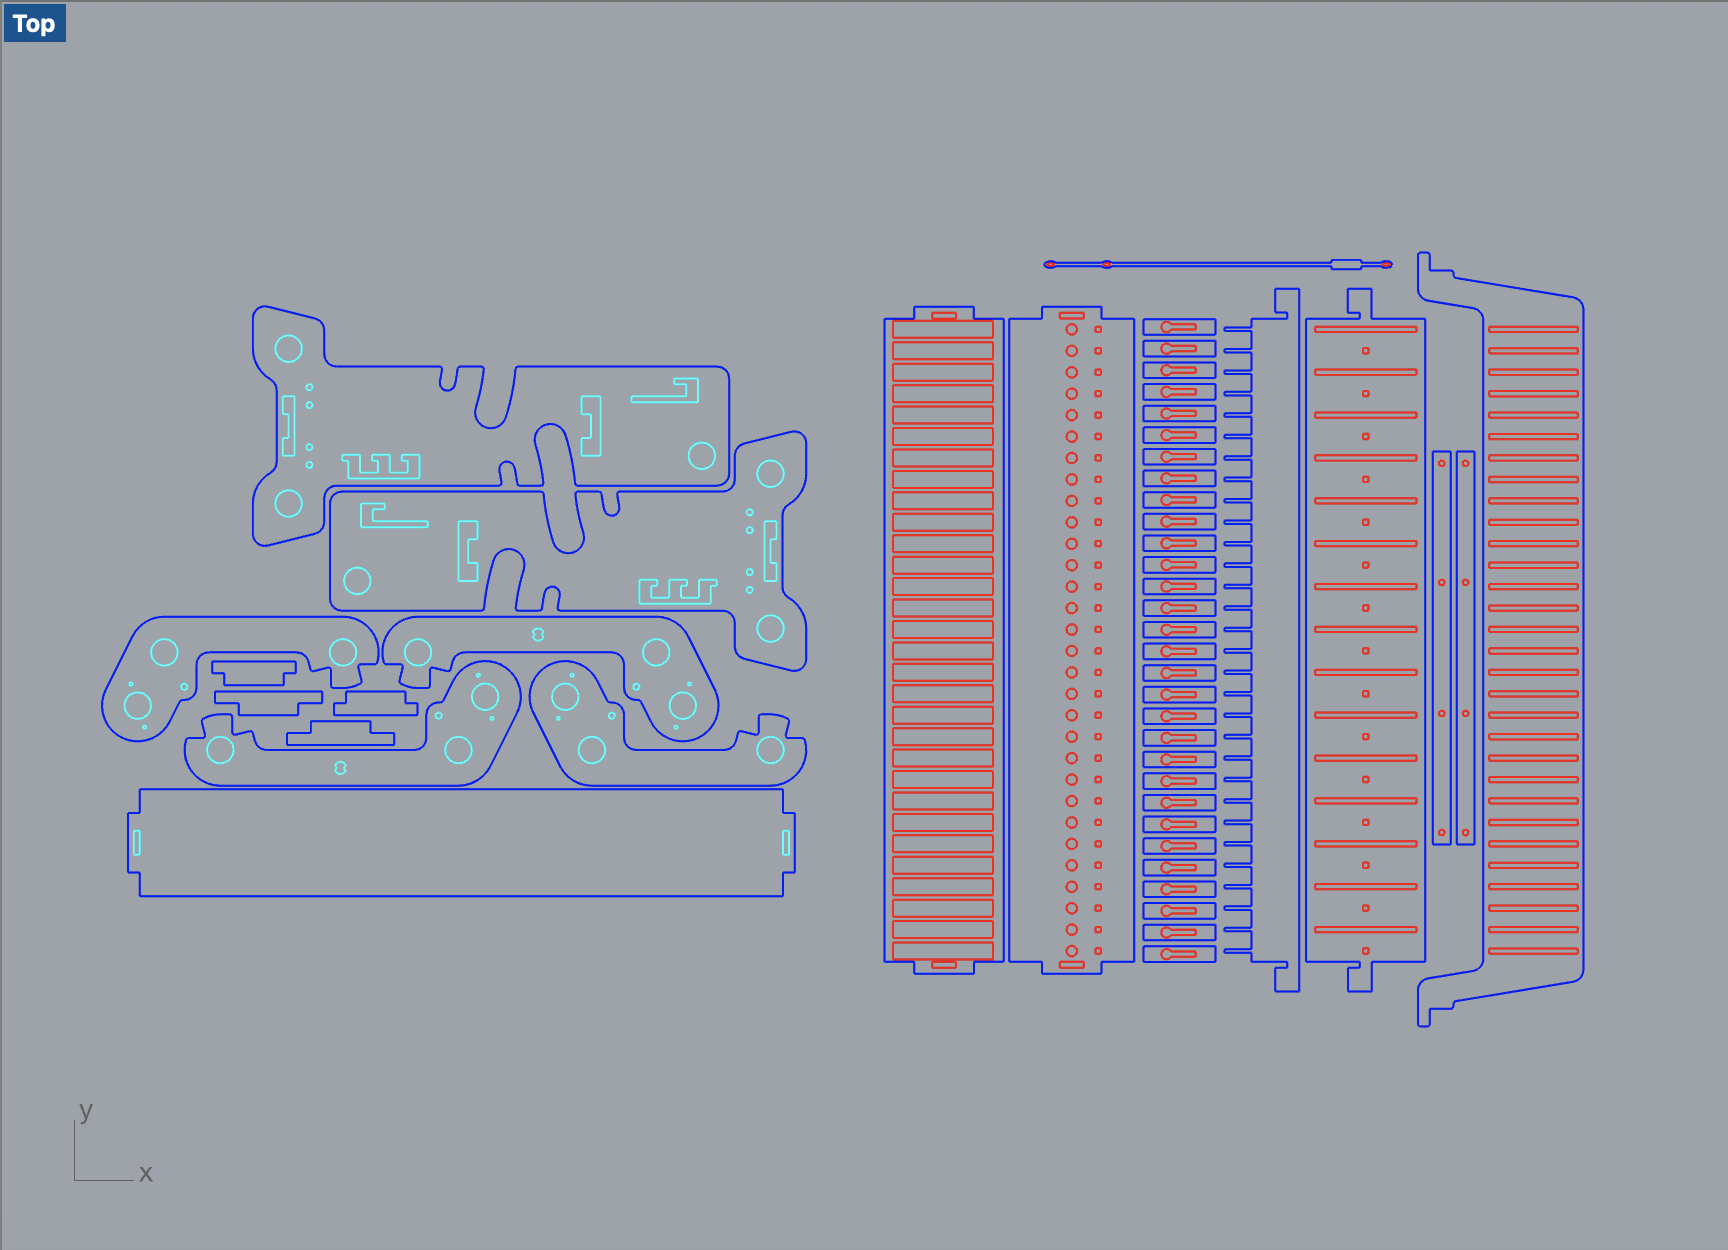
While I was making the final loom, we had some issues with the laser cutter at the lab so in the end, I cut all the parts out of 3mm acrylic insted of cutting the sides and base out of 4mm mdf as I had originally planned. Despite this it was still quite sturdy and I only needed to sheets of 600mm x 1000mm acrylic.
The settings I used for the laser cutter were
| Power | Speed | Hz |
| 90 | 0.5 | 20000 |
And the file to cut was as below.
Assembly Video
Due to time restrictions and the issues with the laser cutter, I was unable to cut all of the individual pins for the jaquard option and to 3D print the pins to secure and move the 3 poles. Despite this, I am very happy with this as a 1st full prototype.
Fabrication files
All fabrication files uploaded here: Hand Jaquard Loom Files